1
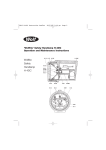
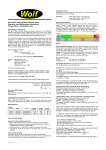
Wolf ATEX LinkEx LED Temporary Luminaire
Wolf ATEX LinkEx LED Temporary Luminaire
Parts List
Item No.
Operation and Maintenance Instructions
Please Retain – Read Before Use
Part No:
Spare Part Description
Quantity required per lamp
180o Models
360o Models
1
LX-602
Bump Ring pack of (pack of 2)
2
2
2
LX-304
Tube Seal Ring
2
2
1
1
3
LX-370
Tube
5
LX-622
Plate Seal 5mm and Tube Seal 10mm
EC Declaration of Conformity
The Wolf ATEX LX-400 LinkEx LED Temporary Luminaire meets all relevant provisions of
the 94/9/EC Explosive Atmospheres (ATEX Equipment) Directive by virtue of the issued
EC type examination certificate, demonstrating compliance with all relevant harmonised
standards and essential health and safety requirements.
4.
The Wolf ATEX LinkEx LED Temporary Luminaire is a leadlamp with a durable enclosure
construction of polycarbonate with polyurethane protective rings. Models are available
in a variety of input voltages. Approval is as Group II, Category 2 equipment for use
in zone 1 & 2 potentially explosive gases, vapours, mists and dusts where the T3
temperature class/170ºC maximum surface temperature permits.
6.
Certification/Approval Code:
(1 off of each, for one end of the lamp)
2
2
6
LX-306
Cable Entry End Cap
1
1
7
LX-312
ATX Socket Plate
1
1
8
LX-314
Stahl Socket Plate
1
1
Some variants of plugs/sockets may reduce the IP (Ingress Protection) rating.
e.g. ATX and CEAG IP66, Stahl Sockets IP54 rated.
9
LX-310
CEAG Socket Plate
1
1
EC Type examination certificate: SIRA12ATEX3177X
10
LX-385
Terminal Block Backing Plate
1
1
11
LX-316
Blank End Cap Non Link
1
1
Notified Body: Baseefa (2001) Ltd. Rockhead Business Park,
Staden Lane, Buxton, SK17 9RZ, UK
12
LL-387
Ceag Socket 110 Volt
1
1
13
LL-1080
Stahl socket 110 volt
1
1
14
LL-1092
ATX Socket 110 Volt
1
1
15
LX-684
Ex e 6 Way Weidmuller terminal block and screws M3x20, LED output
1
1
16
LX-624
Low Voltage Driver
1
1
ATEX LinkEx LED Leadlamps are certified compliant with the 2008/108/EC
EMC Directive.
17
LX-348
Strap for LV Drivers
1
1
The product is CE marked showing compliance with all relevant EC Directives.
18
LX-640
High Voltage Driver
1
1
19
LX-618
180 LED Strip Assembly and tray
1
20
LX-636
360 LED top tray assembly
1
21
LX-637
360 LED Bottom tray assembly
1
22
LL-311
Trumpet Gland
1
1
23
LX-608
Gland Nut
1
24
LX-658
Dowty Seal M6, M6x30 screws.
M5 Domenut, M5 Dowty Seal,
M5x12 Cap head, 2 of each
2
2
28
LX-672
M4x5 Pan, pack of 4
4
6
29
LX-673
M4 Nyloc nut pack of 4
4
4
31
LX-368
Driver mount brace
1
1
33
LL-1048
CEAG socket 230 volt
1
1
34
LL-1054
CEAG socket 24 volt
1
1
35
LL-1087
ATX socket 230 volt
1
1
36
LL-378
ATX socket 24 volt
1
1
37
LX-656
Wiedmuller BK6 4 way terminal block and screws M3x22, Cable input
1
1
Items not shown on the exploded diagram
LX-555
Accessory tube clamp (st/st 1 off).
2
2
LX-691
1 amp LED fuse, pack of 2
2
2
LX-382
Shoulder Strap pack of 2
2
2
LX-545/3
Pack of 3 Protective Films
1
1
LX-692
Magnet rubber coated 66mm diameter (1 off)
2
2
Saxon Road Works, Sheffield, S8 0YA, England
Tel: +44 114 255 1051
Fax: +44 114 255 7988
E-mail: [email protected] Website: www.wolf-safety.co.uk
LX-502 Issue 1
Ex emb IIC T3 Gb (-20ºC to +40ºC)
Ex t IIIC T170ºC Db IP67
Notified body number: 1180
Harmonised standards applied: EN60079-0:2009, EN60079-7:2007,
EN60079-18:2009, EN60079-31:2008
Ingress protection level IP67 to EN60529:1992
Alex Jackson – Managing Director,
Wolf Safety Lamp Company Ltd.
IECEX Scheme Certification
Certificate number: IECEx SIR 12.0070X
Certification/Approval Code:
Ex emb IIC T3 Gb (-20ºC to +40ºC)
Ex t IIIC T170ºC Db IP67
Standards applied: IEC60079-0:2007-10, IEC60079-7:2006-07,
IEC60079-18:2009, IEC60079-31:2008
WOLF SAFETY LAMP COMPANY
II 2 GD
Ingress protection level IP67 to IEC60529:1992
IMPORTANT: SPECIAL CONDITIONS OF USE (X)
1. The user/installer shall ensure that, when the Luminaire is fitted with a previously
certified plug that has associated special conditions for safe use, they shall take
into account any restrictions or conditions for safe use that are applicable to
these devices.
2. Linkable lamps fitted with Marechal sockets are certified for low impact risk use
only, do not expose to shocks greater than 4 joules.
EQUIPMENT USE
1. Read this document carefully before first use of the LinkEx LED and retain for
future reference.
2. Check the rating label to ensure the LinkEx LED leadlamp is suitable for the
supply provided, ambient temperature present and the environmental conditions.
3. Safe Operating Voltage Indicator (SOVI). The internal approval label highlights
a coloured flashing indicator LED fitted to the LED driver. When the lamp is
energised the LED will flash GREEN to indicate the supply voltage is within
certification limits. The lamp should not be used if the indicator is flashing RED,
a fast flashing RED LED indicates the supply voltage is too low, a slow flashing
RED LED indicates the supply voltage is too high. Red indication may be
due to an incorrect supply voltage or too many lamps being linked together.
If connecting a large number of lamps check the indicator on all the lamps in the
string. Guidance on lamp connection and extensions can be found on the Wolf
website:- www.wolf-safety.co.uk.
WOLF SAFETY LAMP COMPANY
Saxon Road Works, Sheffield, S8 0YA, England
Tel: +44 114 255 1051
Fax: +44 114 255 7988
E-mail: [email protected] Website: www.wolf-safety.co.uk
5.
7.
8.
9.
10.
11.
12.
13.
The LinkEx LED leadlamp enclosure is constructed from polycarbonate, the
end user must ensure suitability for the atmosphere the LinkEx LED leadlamp
will be used in.
The LinkEx LED leadlamp is class 1 earthed electrical equipment, using 3
core cable.
Ex e terminal blocks must have all terminals fully tightened down even if a
conductor is not fitted. On the six way terminal block, tighten screws to 0.6Nm,
on the 4 way terminal block tighten to 1.8Nm.
ATEX/IECEx certified cable glands must be used and be suitable for the type
of cable used.
Ensure cable is rated for the ambient temperature the LinkEx LED leadlamps
will be used in, standard SY cable is not rated for use below 0ºC.
Inspect cable at regular intervals.
Damaged equipment should be withdrawn and repaired as necessary before
being put back in to service, in accordance with EN60079-17.
Lamps must not be opened in Hazardous Areas.
When the LinkEx LED leadlamp is used in temporary installations two mounting
points must be used, see Wolf clamp rings and associated accessories.
LinkEx LED leadlamps can be carried whilst energised/illuminated.
MAINTENANCE
1. Isolate the LinkEx LED leadlamps from the power supply before carrying out any
maintenance work.
2. To replace LED strip, replace entire tray (see spares list).
3. External plastic components have an anti static coating. Use only a dilute water/
detergent mix to clean.
4. IMPORTANT. No modifications are permitted to the LinkEx LED leadlamps,
all spare parts must be purchased from the manufacturer, unauthorised
modifications or spare parts will invalidate certification.
ELECTRICAL DATA
Total circuit power is LV: 24Volt DC = 25Watt, 24Volt AC = 38Watt. Mains: 110Volt =
28Watt, 230Volt = 31Watt. Power factor correction better than 0.938. Maximum current
on a linked lamp configuration not to exceed 16A. HV insulation testing must be carried
out at voltages less than 500V DC, live and neutral cables must be shorted together
and the voltage applied between earth and this connection.
CHANGING CABLE OR SOCKETS
See attached diagrams.
Remove the two securing screws from the cable entry end plate, remove end plate.
Disconnect the input cable. To remove the enclosure tube, slide tube over the tray
assembly. With the tube removed the blank plate (non linkable Luminaire) or socket
and plate (linkable Luminaire) can be removed by removing the two internal screws;
care must be taken to retain the sealing washers fitted to the screws and dome nuts.
If required the socket plate can then be removed, if the socket is replaced ensure
correct sealing washers are used. Re-assembly is the reverse procedure.
Take care not to trap/crush wires, ensure all seals are present and in good condition.
FAULT FINDING
If a LinkEx LED leadlamp fails to function, check input cable continuity and terminations.
If satisfactory, test the output fuse to each LED strip. Only replace with Wolf
encapsulated fuse of the correct rating. If one fuse fails on the LV driver output, both
fuses must be replaced at the same time.
SPARE PARTS LIST
See attached diagram.
DISPOSAL OF WASTE MATERIAL
Disposal of packaging, LinkEx LED products, old LED trays and drivers should be
carried out in accordance with national regulations. (WEEE)
The Wolf Safety Lamp Co. Ltd has a policy of continuous product improvement.
Changes in design details may be made without prior notice.
Prices and design are subject to alteration without notice. All products sold are subject
to our conditions of sale. A copy of these instructions with any relevant revisions can be
found at www.wolf-safety.co.uk
LinkEx LED LX-400 Exploded view, High voltage
LinkEx
LED
LX-400
Exploded
Higho variants
voltage
and 360
and Low
voltage
models,
180oview,
and Low voltage models, 180o and 360o variants
37
6
37
6
22
22
5
1
5
1
23
2
5
23
2
10
5
19
19
180 Versions
o
28
11
180 Versions
o
28
11
28
28
1
1
5
2
2
28
5
31
15
24
CEAG
33
34
12
33
34
7
8
9
28
21
28
18
28
LV
15
12
28
21
24
29
9
o
28
16
29
360 Versions
28
18
HV
8
o
5
HV
7
360 Versions
28
18
5
CEAG
10
24
LV
31
HV
29
HV
29
17
17
24
18
16
29
LV
29
15
3
LV
29
31
17
29
15
17
3
13
13
ATX
ATX
20
14
35
36
14
35
36
16
31
STAHL
STAHL
16
20
24
24