1
BD MicroProbe™ Processor
Instrument User’s Manual
(For use with BD Affirm™ VPIII Microbial Identification Test)
Document No. MA0106
Revision D
250100
Becton, Dickinson and Company
7 Loveton Circle
Sparks, MD 21152 USA
Tel. 800.638.8663
www.bd.com/ds
Benex Limited
Rineanna House
Shannon Free Zone
Shannon, County Clare, Ireland
BD MicroProbe Processor Instrument User’s Manual
System Software Notice
This manual includes instructions for installing and operating the
BD MicroProbe™ Processor as it is used with the BD Affirm™
VPIII Microbial Identification Test kits. Each Affirm Microbial
Identification Test requires specific system software to be installed
in the Processor. Please refer to the test kit package insert for the
correct software version and the specific test procedures.
ii
MA0106(D)
Preface
Change History
REVISION
DATE
PAGES
REASON
New
1/99
All
New Product Release
A
4/99
All
CE Marking
B
7/99
1, 2, 50, 52
Codification
C
1003
All
CE Marking
All
Update Format, Photos
and AR Address
Change. Update ambient
operating temperature in
Section 2.2.1. Update
unpacking instructions in
Section 2.3.1.
D
2010/10
BD, BD Logo, MicroProbe and Affirm are trademarks of Becton,
Dickinson and Company.
© Copyright Becton, Dickinson and Company, 2010. All rights
reserved. No part of this publication may be reproduced,
transmitted, transcribed, stored in retrieval systems, or translated
into any language or computer language, in any form or by any
means, electronic, mechanical, magnetic, optical, chemical,
manual, or otherwise, without the prior written permission of BD, 7
Loveton Circle, Sparks, Maryland, 21152, United States of
America.
MA0106(D)
iii
BD MicroProbe Processor Instrument User’s Manual
Table of Contents
Introduction
1.1 General ....................................................................... 1-1
1.2 Intended Use of the Processor..................................... 1-1
1.3 Description and Principles of Operation ....................... 1-3
1.4 System Components ................................................... 1-4
1.4.1 BD MicroProbe Processor ..................................... 1-4
1.4.2 Program Card ....................................................... 1-4
1.4.3 Affirm Microbial Identification Test Kits .................. 1-4
1.4.4 Affirm Sample Collection Kits................................. 1-4
1.4.5 Lysis Block............................................................ 1-4
1.5 Use of this Manual....................................................... 1-4
1.6 Notes, Cautions and Warnings .................................... 1-5
1.7 Summary of Cautions and Warnings............................ 1-6
Installation
2.1 General ....................................................................... 2-1
2.2 Instrument Specifications............................................. 2-1
2.2.1 Operating Specifications........................................ 2-1
2.2.2 Calibration............................................................. 2-2
2.3 Instrument Installation.................................................. 2-2
2.3.1 Unpacking the Processor....................................... 2-2
2.3.2 Setting Up the Processor....................................... 2-5
2.3.3 Installing the Transformer...................................... 2-6
2.3.4 Installing the Program Card ................................... 2-7
2.4 Powering On and Off the Instrument ............................ 2-8
2.4.1 Power On.............................................................. 2-8
2.4.2 Power Standby...................................................... 2-9
2.4.3 Shut-down Procedure (Preparation for Storage or
Shipping)............................................................... 2-9
2.5 Repacking the Processor........................................... 2-10
iv
MA0106(D)
Preface
Operation
3.1 General ....................................................................... 3-1
3.2 Processor Components and Functions ........................ 3-1
3.2.1 Processor Base Unit.............................................. 3-1
3.2.2 Robotic Arm and PAC Arms .................................. 3-1
3.2.3 Cassette Caddy..................................................... 3-2
3.2.4 Program Card ...................................................... .3-2
3.2.5 Program Card Port ................................................ 3-2
3.2.5 User Control Panel ................................................ 3-3
3.3 User Control Panel Functions ...................................... 3-3
3.3.1
[ON/STANDBY] Key ............................................. 3-3
3.3.2 [RUN] Key............................................................. 3-3
3.3.3 [HELP] Key ........................................................... 3-3
3.3.4 Power Indicator ..................................................... 3-4
3.3.5 Display.................................................................. 3-4
3.4 User Prompts and Responses ..................................... 3-4
3.5 Setting Up and Processing Samples............................ 3-6
3.5.1 Using the Cassette Caddy ..................................... 3-6
3.5.2 Positioning the Cassettes for Processing ............... 3-6
3.5.3 Cassette Positions................................................. 3-7
3.5.4 Turning the Processor Off...................................... 3-7
Maintenance
4.1 General ....................................................................... 4-1
4.2 Cleaning and Maintenance .......................................... 4-2
4.3 General Cleaning......................................................... 4-2
4.4 Disinfection/Decontamination....................................... 4-3
4.4.1 BD MicroProbe Processor Base Unit ..................... 4-3
4.4.2 Cassette Caddy..................................................... 4-4
4.4.3 Program Card ....................................................... 4-4
MA0106(D)
v
BD MicroProbe Processor Instrument User’s Manual
Troubleshooting
5.1 General ....................................................................... 5-1
Warranty
Replacement Parts
International Contacts
List of Illustrations
Figure
1-1
2-1
2-2
2-3
2-4
2-5
3-1
3-2
Title
Page
The BD MicroProbe Processor ......................... 1-2
Unpacking the Processor.................................. 2-4
Setting Up the Processor.................................. 2-5
Installing the Transformer................................. 2-6
Installing the Program Card .............................. 2-8
Power On and Standby .................................... 2-9
User Control Panel Controls and Indicators ...... 3-4
Cassette Positions............................................ 3-7
Bibliography
Disinfecting Agents recommended in CLSI document M29-A3,
2005; Approved Guideline: Protection of Laboratory Workers from
Occupationally Acquired Infections.
vi
MA0106(D)
Introduction
1.1 General
This section provides introductory information on the BD
MicroProbe Processor. The following major topics are included:
Intended Use of the Processor ...................... Section 1.2
Description and Principles of Operation......... Section 1.3
System Components..................................... Section 1.4
Use of this Manual ........................................ Section 1.5
Notes, Cautions and Warnings...................... Section 1.6
Summary of Cautions and Warnings ............. Section 1.7
1.2 Intended Use of the Processor
The BD MicroProbe Processor is used in the Automated
Processing portion of the Affirm Microbial Identification Test
procedure. The BD MicroProbe Processor is required for ALL
Affirm tests and, together, they work as a SYSTEM. This User’s
Manual describes the installation and operation of the Processor
only. Refer to your Affirm Test kit package insert to perform the
test.
If the processor is used in a manner not specified, the protection
afforded by the processor may be impaired.
MA0106(D)
1-1
BD MicroProbe Processor Instrument User’s Manual
The BD MicroProbe Processor is pictured below. Individual
components are listed below.
6
1
5
3
4
2
7
Figure 1-1 The BD MicroProbe Processor
The BD MicroProbe Processor Components
1.
2.
3.
4.
5.
6.
7.
1-2
BD MicroProbe Processor Base Unit
Cassette Caddy
Probe Analysis Cards (PACs)
Reagent Cassettes
Robotic Arm
PAC Arms
Program Card
MA0106(D)
Introduction
1.3 Description and Principles of
Operation
The BD MicroProbe Processor is a compact, robotic unit that
automatically controls the reagent and sample mixing, and
incubation timing of the Affirm Microbial Identification Tests.
The Affirm tests use specialized beads coated with
microbe-specific DNA probes to qualitatively identify the
presence of selected target microorganisms in clinical
samples.
Each test consists of a panel of organism-specific probe
beads, plus a specificity control (negative) bead and a
procedural control (positive) bead. The beads are all located
on a single test card called a Probe Analysis Card (PAC). The
identification reaction takes place on the beads as the
processor moves the PACs through a series of incubations
with sample and reagent, resulting in a blue-colored bead if
the test is positive.
The BD MicroProbe Processor consists of a base unit with
removable tray, called the cassette caddy, which holds from
one to six reagent cassettes. The PAC arms on the robotic
arm pick up the PACs and move them through a series of
reagents in reaction wells in the reagent cassettes. The
precise timing of incubations in the reaction wells is under
software control as the PACs are automatically cycled, first
into the sample well, then through the reagent wells.
Depending on the test, the reaction is complete in
approximately 30 minutes.
The BD MicroProbe Processor is very simple to operate. Once
started, the system automatically completes the test
procedures without any further operator attention. A [HELP]
mode is available to assist new or infrequent users. The
system software is on a program card selected to match the
specific test.
MA0106(D)
1-3
BD MicroProbe Processor Instrument User’s Manual
1.4 System Components
1.4.1 BD MicroProbe Processor
BD MicroProbe Processor Base Unit
Cassette Caddy
Power Transformer (selectable for voltage)
User’s Manual
1.4.2 Program Card
The test-specific program card must be matched to the
test. Your Processor will initially arrive with a program card
included. Please confirm that you have the correct
software for the test you wish to run.
1.4.3 Affirm Microbial Identification Test Kits
Each Kit contains:
•
•
•
•
Reagent Cassettes
PACs (Probe Analysis Cards)
Reagent Bottles
Miscellaneous sample collection and processing
supplies for the particular assay
1.4.4 Affirm Sample Collection Kits
Specimen collection materials, such as swabs or
aspiration tubes, are packaged for user convenience in
the test kits or in separate sample collection kits.
1.4.5 Lysis Block
A heating block (Lysis Block) with thermometer is supplied.
1.5 Use of this Manual
This user’s manual is designed as a reference tool for
technologists, supervisors and other personnel who operate
and maintain the BD MicroProbe Processor on a regular basis.
1-4
MA0106(D)
Introduction
Every attempt has been made to include information which
would be required during normal use and maintenance of the
instrument. Should a question arise which is not answered in
this manual, please contact the following parties (USA):
For assistance in North America:
Technical Services 1-800-638-8663
International contacts are listed in Appendix C, or contact your
local BD representative.
1.6 Notes, Cautions and Warnings
Throughout this manual, important information is presented in
boxes offset from the regular text, and is labeled as either a
NOTE, CAUTION or WARNING. These messages are
formatted as shown below and bear the following significance:
NOTE
Important information about instrument use worthy of special
attention is presented as a NOTE.
CAUTION
Information on an activity which potentially could cause
damage to the instrument is presented as a CAUTION.
WARNING
INFORMATION ON AN ACTIVITY WHICH POTENTIALLY
COULD CAUSE INJURY TO THE USER IS PRESENTED AS A
WARNING.
MA0106(D)
1-5
BD MicroProbe Processor Instrument User’s Manual
1.7 Summary of Cautions and
Warnings
1-6
•
Do not use the robotic arm as a handle to lift or move the
processor. Always lift from the bottom of the base unit.
•
To raise the robotic arm, grasp it near the PAC arms and
move it upward using even but firm pressure. Do not use
the PAC arms to raise the robotic arm.
•
The power plug on the transformer must be connected to
a grounded power source. Do NOT use an adapter to
connect the power plug to an outlet for which it is not
designed.
•
Position the instrument in a place where the program card
port on the front of the instrument is protected from dirt or
liquids. If spillage occurs, contact your Technical Services
representative before using the processor or installing the
program card.
•
Handle the program cards carefully to prevent damage.
Store the card in the plastic case when not installed in the
instrument.
•
The robotic arm automatically rises when the power is
turned ON and drops when the power is set to STANDBY.
Keep hands and other objects clear of the arms when
turning power ON or setting to STANDBY.
•
Do not add or remove reagent cassettes, or attempt to
install or remove the cassette caddy when the processor
is in operation ("homing" or processing PACs).
•
The BD MicroProbe Processor contains no user
serviceable parts. All maintenance and repair other than
the procedures described in Section 4 – Maintenance
must be performed by BD qualified service personnel.
MA0106(D)
Introduction
•
Always set the Processor to STANDBY and disconnect
the power supply before performing cleaning, disinfection
or maintenance procedures.
•
Do not use organic solvents such as acetone or petroleum
based products to clean the painted plastic instrument
case. Do not use bleach on or near metal components.
•
Do not store reagents on the instrument. Wipe all reagent
spills immediately.
•
Do not immerse the BD MicroProbe Processor or power
transformer in liquid.
•
Make certain the 10 percent bleach solution does not
come into contact with the program card.
MA0106(D)
1-7
BD MicroProbe Processor Instrument User’s Manual
1-8
MA0106(D)
Installation
2.1 General
This section provides specifications for installation and setup of
the BD MicroProbe Processor. The following major topics are
included:
Instrument Specifications ............................. Section 2.2
Instrument Installation................................... Section 2.3
Powering On and Off the Instrument ............. Section 2.4
Repacking .................................................... Section 2.5
2.2 Instrument Specifications
2.2.1 Operating Specifications
Dimensions
Height:
6 in/16 cm
Width:
10 in/26 cm
Depth:
9 in/24 cm
Weight:
18 lbs/8 kg
MA0106(D)
2-1
BD MicroProbe Processor Instrument User’s Manual
Power
Voltage: Selectable by Transformer
120 VAC ± 10%; 220/240 VAC; 100 VAC ± 10%
50/60 Hz (± 10%)
Maximum Input Current: <1 A
Environmental
Indoor Use
Ambient Temperature:
22 – 28°C
Ambient Humidity:
10 – 85%
Altitude:
2000 m maximum
Installation Category II, Pollution Degree 2 as per IEC 664
Regulatory Compliance
Designed to meet UL, CSA and IEC standards.
2.2.2 Calibration
The BD MicroProbe Processor is factory calibrated. No
further calibration or alignment is required under conditions
of normal use.
2.3 Instrument Installation
2.3.1 Unpacking the Processor
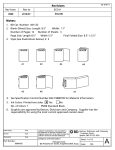
1. Place the shipping container in the upright position.
Open the top of the container and remove the product
literature and the top foam packing block.
2. Remove the accessories: The power transformer (120 V
or 220/240 V or 100 V), lysis block, thermometer,
program card and cassette caddy.
2-2
MA0106(D)
Installation
3. Carefully lift the processor in the protective bag out of
the box and place it on a level surface.
4. Remove the clear plastic bag, then remove the
protective foam insert covering the robotic arm.
CAUTION
Do not use the robotic arm as a handle to lift or move the
processor. Always lift from the bottom of the base unit.
5. Remove the power transformer, program card and
cassette caddy and make certain the program card
matches the Affirm test you intend to use.
NOTE
Retain the BD MicroProbe Processor shipping container and all
packing materials for later transport or shipment.
6. To complete the installation, verify that all parts are
present (see steps 1 – 5 above and Figure 2-1) and
inspect for any damage.
If any parts are missing or damaged contact BD:
Technical Services 1-800-638-8663
or your local BD representative.
MA0106(D)
2-3
BD MicroProbe Processor Instrument User’s Manual
Figure 2-1 Unpacking the Processor
NOTE
The plastic bag that covers the instrument is not pictured here.
2-4
MA0106(D)
Installation
2.3.2 Setting Up the Processor
CAUTION
To raise the robotic arm, grasp it near the PAC arms and
move it upward using even but firm pressure. Do not use
the PAC arms to raise the robotic arm.
1. Place the processor on a clean, level surface away from
liquids or mechanical equipment that may interfere with
the operation of the instrument.
2. Gently raise the robotic arm to install the cassette
caddy.=Rest the caddy on the locator pins on each side
of the instrument, level with the surface of the base unit.
Locator Pins
Figure 2-2 Setting up the Processor
MA0106(D)
2-5
BD MicroProbe Processor Instrument User’s Manual
2.3.3 Installing the Transformer
WARNING
THE POWER PLUG ON THE TRANSFORMER MUST BE
CONNECTED TO A GROUNDED POWER SOURCE. DO NOT
USE AN ADAPTER TO CONNECT THE POWER PLUG TO AN
OUTLET FOR WHICH IT IS NOT DESIGNED.
DO NOT, UNDER ANY CIRCUMSTANCES, OPERATE THE
SYSTEM UNTIL AN ELECTRICAL GROUND IS PROVIDED,
AND THE POWER CORD IS PROPERLY CONNECTED TO
GROUND.
Insert the transformer pin connector into the keyed port on
the back of the processor, aligning the notch on the
connector to the key at the top of the port. Then insert the
end of the power cord into an outlet of appropriate voltage.
Transformer
pin in keyed
port
Transformer
Figure 2-3 Installing the Transformer (Rear View of the Processor)
2-6
MA0106(D)
Installation
Installing the Program Card
CAUTION
Position the instrument in a place where the program card
port on the front of the instrument is protected from dirt
or liquids. If spillage occurs, contact your Technical
Services representative before using the processor or
installing the program card.
CAUTION
Handle the program cards carefully to prevent damage.
Store the card in the plastic case when not installed in the
instrument.
The program card contains the specific processor operating
software for a particular Affirm test. Confirm that the
description on the card matches that on the Affirm test kit
package insert.
1. Make sure the system is set to STANDBY (the green
LED is NOT lit). If ON, press the [ON/STANDBY] key to
set the Processor to STANDBY.
NOTE
Do not insert or remove the program card while the processor is
turned ON or in operation.
2. With the label up, insert the card in the direction of the
arrows into the program card port on the lower right front
of the instrument. You will feel the card seat firmly in
the port when it is properly installed.
MA0106(D)
2-7
BD MicroProbe Processor Instrument User’s Manual
Figure 2-4 Installing the Program Card
2.4 Powering On and Off the
Instrument
WARNING
THE ROBOTIC ARM AUTOMATICALLY RISES WHEN THE
POWER IS TURNED ON AND DROPS WHEN THE POWER IS
SET TO STANDBY. KEEP HANDS AND OTHER OBJECTS
CLEAR OF THE ARMS WHEN TURNING POWER ON OR
SETTING TO STANDBY.
2.4.1 Power On
When the unit is connected to the transformer and the
power outlet, press the red [ON/STANDBY] key on the front
left side of the control panel. The green LED on the panel
will light and will remain lit whenever the power to the
system is ON. When a program card is installed, the user
prompts will appear on the display. A program card must be
in place to light the display.
2-8
MA0106(D)
Installation
2.4.2 Power Standby
The processor may be set to STANDBY by pressing the red
[ON/STANDBY] key on the control panel. The green LED is
not illuminated when the power is set to STANDBY. It is
recommended that the instrument be set to STANDBY if it
will be idle for more than 24 hours.
NOTE
The robotic arm will drop when the power is set to STANDBY.
Lift the robotic arm to install or remove the cassette caddy when
the power is set to STANDBY.
[ON/STANDBY] key
(Red)
Power indicator
(Green LED)
Processor
display
Figure 2-5 Powering Up the Processor
2.4.3 Shut-down Procedure (Preparation for
Storage or Shipping)
1. Remove any reagent cassettes or PACs from the
instrument. Remove the caddy and store it in the original
shipping box.
2. Make sure the system is in the "home" position with the
PAC arms to the rear. The processor will go to the
"home" position when the instrument is first turned ON
and prepared to run a test, or when the [RUN] key is
pressed at the end of an assay.
MA0106(D)
2-9
BD MicroProbe Processor Instrument User’s Manual
3. Press the [ON/STANDBY] key on the control panel. The
green LED will go out, and the display will become dark.
Disconnect the electrical plug from the power outlet and
the transformer pin connector from the processor.
4. Carefully remove the program card from the port on the
front of the instrument and place it in the plastic storage
box.
5. The system may be stored covered or repacked for
shipment.
6. Prior to shipping, use the disinfecting procedure in
Section 4.4.
2.5 Repacking the Processor
1. Check that you have completed the shut-down procedure
before repacking the processor.
2. Retrieve the original shipping box and packing material.
This is very important as the custom packaging foam
supports the Processor components in the proper position
during shipment.
3. Place the shipping box on a level surface with only the
bottom packing foam in place. All other pieces of foam
must be removed.
4. With the instrument in the "home" position (PAC arms to
the rear), carefully position the protective foam insert to
cover the robotic arm.
5. Place the processor into the protective plastic bag and
carefully lower it into the foam support in the box,
supporting the unit at the bottom, if necessary. DO NOT
use the robotic arm as a handle.
2-10
MA0106(D)
Installation
6. Place all accessories into the shipping box. Cover with top
foam piece. See Figure 2-1 for placement of packing
materials.
7. Close the box and seal with shipping tape.
MA0106(D)
2-11
BD MicroProbe Processor Instrument User’s Manual
2-12
MA0106(D)
Operation
3.1 General
This section describes the routine operation of the MicroProbe
Processor. The following major topics are discussed:
Processor Components and Functions.......... Section 3.2
User Control Panel Functions ....................... Section 3.3
User Prompts and Responses ...................... Section 3.4
Setting Up and Processing Samples ............. Section 3.5
3.2 Processor Components and
Functions
3.2.1 Processor Base Unit
The base unit houses the mechanical and electronic
components, positions the cassette caddy, and provides a
port for inserting the system software (program card).
3.2.2 Robotic Arm and PAC Arms
The only moving parts on the processor, the robotic arm and
the PAC arms, work together to pick up the PACs (Probe
Analysis Cards, supplied in the Affirm VPIII test kits) at the
start of the run and move them through the reagent wells,
MA0106(D)
3-1
BD MicroProbe Processor Instrument User’s Manual
presenting them to the operator when processing is
completed.
The robotic arm supports and positions the PAC arms, and
controls the up and down motion of the PACs in the reagent
cassettes. When the power is ON, the robotic arm is always
raised up, and drops when the power is set to STANDBY.
This arm should not be used to lift the processor, but it can
be raised gently to install the caddy when the power is set to
STANDBY.
The PAC Arms (right and left) move forward and back,
carrying the PACs through the cassette wells. The PAC
arms are carefully aligned to the reagent cassette wells.
Care must be taken not to bump or manipulate these arms
in a way that may cause them to become misaligned.
3.2.3 Cassette Caddy
The cassette caddy is the tray that holds the reagent
cassettes during processing. The caddy is easily removed
for set-up and transport of multiple reagent cassettes. When
the caddy is installed, it rests in the caddy bay on the locator
pins at each side, level with the surface of the base unit.
CAUTION
Do not add or remove reagent cassettes, or attempt to
install or remove the cassette caddy when the processor is
in operation ("homing" or processing PACs).
3.2.4 Program Card
The Affirm program card functions in a manner similar to a
computer floppy disc, supplying the operating software for a
particular application. Program cards are assay specific.
3.2.5 Program Card Port
The program card is inserted into this specialized port,
which is the horizontal slot located on the lower right front of
3-2
MA0106(D)
Operation
the instrument. The instrument must be set to STANDBY
(green LED NOT lit) when the card is inserted or removed to
avoid damage to the program card.
3.2.5 User Control Panel
Includes the [ON/STANDBY], [RUN] and [HELP] keys;
20-character vacuum fluorescent display; and LED power
indicator.
3.3 User Control Panel Functions
3.3.1 [ON/STANDBY] Key
Pressing the red [ON/STANDBY] key allows the system to
be powered up (ON) or set to STANDBY from the control
panel. The green LED is illuminated only when the system is
ON. Always install the program card before turning the
instrument power to ON. If the green LED is lighted and a
card is not installed, set the system to STANDBY before
installing the card.
3.3.2 [RUN] Key
Pressing the green [RUN] key causes the system display to
prompt the user to complete the next step in the test
sequence and also starts the automatic processing cycle.
The [RUN] key is used to exit the [HELP] mode when the
operator is ready to continue. The blinking double arrow (>>)
on the display always prompts the operator to press [RUN]
to continue.
3.3.3 [HELP] Key
Pressing the blue [HELP] key causes the system to display
more information about the prompt on the display. [HELP] is
available to the operator any time before the start of
automated processing. To exit the [HELP] mode, simply
press [RUN] to continue.
MA0106(D)
3-3
BD MicroProbe Processor Instrument User’s Manual
3.3.4 Power Indicator
The green light (LED) next to the [ON/STANDBY] key is
illuminated when the BD MicroProbe Processor is powered
up and ON (the transformer is connected to processor unit
and plugged into the power supply; the [ON/STANDBY] key
has been pressed to the ON position). The green LED is not
lighted when the system is set to STANDBY.
3.3.5 Display
The lighted display prompts the operator during test setup
and provides test status messages during operation.
Displaying up to 20 characters at a time, the vacuum
fluorescent display will wrap around and repeat messages
until the operator presses the [RUN] key or presses the
[HELP] key. The display is only lighted or active when the
system is ON and a program card is installed.
[RUN] Key
(Green)
[HELP] Key
(Blue)
Figure 3-1 User Control Panel: Controls and Indicators
3.4 User Prompts and Responses
The BD MicroProbe Processor is designed to be easy to use
by both new and experienced operators. A series of prompts
on the display guides the user through the various set-up
steps in the test.
3-4
MA0106(D)
Operation
A [HELP] mode is available for new or infrequent users. (See
Section 3.3.3.) The [HELP] prompts can be accessed any time
before the start of automated processing by pressing the blue
[HELP] key. Pressing the green [RUN] key will exit [HELP] and
continue to the next step. In all instances, the appearance of a
blinking double arrow (>>) on the display tells the user to
“press the [RUN] key.”
While each test uses test-specific software, all BD MicroProbe
Processor software follows the same general operating
principles. Examples are given below. Please refer to the user
instructions packaged with each test kit for the specific
prompts and procedures.
DISPLAY
OPERATOR ACTION
PLEASE WAIT…
Wait until the next prompt appears on the
display. The instrument may be moving or
“homing” during this time.
ADD SUBSTRATE >>
Add reagent as called out in the test kit
package insert. Press the [RUN] key when
the reagent addition is complete. The
[HELP]
mode
contains
additional
information. Press [RUN] to exit [HELP] and
continue with the assay steps.
ADD SAMPLE >>
Using the test kit to prepare the sample,
place the prepared sample into well 1 of the
reagent cassette.
PLACE CADDY
Replace the caddy onto the processor,
taking care not to splash the reagents or
samples. Ensure that the caddy is placed
securely on all four locator pins.
PLACE PAC >>
Open one PAC for each sample being run
and place it in Well 1 with the beads in the
solution and the microorganism names
facing forward.
TO START PRESS
[RUN] >>
Press the [RUN] button to start automated
processing.
MA0106(D)
3-5
BD MicroProbe Processor Instrument User’s Manual
The prompts will continue to direct the operator through the
assay procedure with [HELP] available at each step until
automated processing starts. When automated processing is
complete, the system will present the PACs to the operator.
NOTE
Always remove the completed PACs when they are presented,
and be sure PACs are removed before pressing the [RUN] key.
3.5 Setting Up and Processing
Samples
The following general tips are intended to help all BD
MicroProbe Processor users. Each Affirm Microbial Identification
Test has specific sample preparation requirements and
procedures. Please refer to the package insert packaged in
each test kit before processing samples.
3.5.1 Using the Cassette Caddy
The cassette caddy is designed to be a workstation for
setting up Affirm tests. It is easier to add substrate solution
and prepared samples while the caddy is off the processor.
When power is set to STANDBY, lift the robotic arm gently
and slide the caddy out. When the power is ON, the arm
remains in a raised position so the caddy can be easily
moved on and off the processor. Care should be taken not
to bump the caddy when it is being installed with open
cassettes and samples, to avoid splash-over between wells.
When replacing the caddy onto the processor, be sure that it
is securely positioned on all four locator pins.
3.5.2 Positioning the Cassettes for Processing
When less than six samples are processed, position the
reagent cassettes closest to the center first, and then
distribute evenly on each side, moving from the center
outward. The PAC arms on the processor will move each
3-6
MA0106(D)
Operation
PAC into the proper position when it is picked up. As a
double check, observe the PACs at the start of processing
to make sure they are parallel with the cassette wells and at
even height along the bottom.
7 WELL 7
1 WELL 1
5
3
1
2
4
6
Figure 3-2 Cassette Positions
3.5.3 Cassette Positions
Although the PACs should not be manipulated during
operation, small adjustments can be made if done very
carefully. If one or more PACs are significantly out of
position at the start of a run, you may stop the run and
restart as follows: support the arm while setting the power to
STANDBY. Release the PACs into well 1 and lift the robotic
arm to remove the caddy from the processor. Check that
nothing has fallen into any of the wells in the reagent
cassettes. Turn the power ON, wait for the arm to “home,”
and begin the run again.
3.5.4 Turning the Processor Off
Always remove any PACs and cassettes and press [RUN]
before turning the processor power OFF so that the PAC
arms can return to the "home" position. If the caddy will be
stored off the processor, it is easier to remove it before
setting the instrument power to STANDBY.
MA0106(D)
3-7
BD MicroProbe Processor Instrument User’s Manual
3-8
MA0106(D)
Maintenance
4.1 General
The BD MicroProbe Processor requires little cleaning and
maintenance from the user to provide reliable performance.
Procedures are described in this section:
Cleaning and Maintenance ........................... Section 4.2
General Cleaning.......................................... Section 4.3
Disinfection/Decontamination........................ Section 4.4
WARNING
THE BD MICROPROBE PROCESSOR CONTAINS NO USER
SERVICEABLE PARTS. ALL MAINTENANCE AND REPAIR,
OTHER THAN THE PROCEDURES DESCRIBED IN SECTION
4—MAINTENANCE, MUST BE PERFORMED BY BD
QUALIFIED SERVICE PERSONNEL.
WARNING
ALWAYS SET THE PROCESSOR TO STANDBY AND
DISCONNECT THE POWER SUPPLY BEFORE PERFORMING
CLEANING, DISINFECTION OR MAINTENANCE
PROCEDURES.
MA0106(D)
4-1
BD MicroProbe Processor Instrument User’s Manual
4.2 Cleaning and Maintenance
No special maintenance procedures are required other than
wiping reagent spills and periodic surface cleaning to remove
any dirt or grime. Because of the possibility of blue-colored
reagent deposits as a result of reagent reactions, spills and
splatters should be wiped up immediately to prevent staining.
Use the following cleaning procedures with the BD MicroProbe
Processor on an as-needed basis, for general cleaning or to
remove clean liquid spills. Good laboratory practice calls for
treating any specimen spill as a potential biohazard. Therefore,
use the procedure for disinfection if contamination is suspected.
CAUTION
Do not use organic solvents such as acetone or petroleum
based products to clean the painted plastic instrument
case. Do not use bleach on or near metal components.
CAUTION
Do not store reagents on the instrument. Wipe all reagent
spills immediately.
CAUTION
Do not immerse the BD MicroProbe Processor or power
transformer in liquid.
4.3 General Cleaning
The BD MicroProbe Processor base unit and reagent caddy
should be cleaned periodically with a detergent to keep the
surfaces clean. Make sure the unit is set to STANDBY and
disconnected from the power supply while cleaning.
Wipe all surfaces with a mild detergent, and then wipe with a
moist cloth to remove any residual detergent. Finally, wipe the
4-2
MA0106(D)
Maintenance
surfaces with 70% isopropyl alcohol and allow to air dry.
Cleaning monthly should be sufficient for most laboratories,
however more frequent cleaning will not harm the system.
The program card may be wiped carefully with 70% isopropyl
alcohol and allowed to air dry. Storing the card in the protective
plastic cover when not in use will prevent exposure to dirt and
spills.
4.4 Disinfection/Decontamination
4.4.1 BD MicroProbe Processor Base Unit
1. Set the unit to STANDBY and disconnect the power.
Immediately remove the spilled material by wiping with a
soft, absorbent cloth or paper and dispose in a
biohazard container.
2. Wipe down all contaminated surfaces with a germicidal
detergent* and wipe with a moist cloth to remove all
organic material.
*Germicidal detergents are listed in CLSI M29-A3, 2005; Approved Guideline:
Protection of Laboratory Workers from Occupationally Acquired Infections.
3. Wipe all surfaces with a 10 % bleach solution and allow
to air dry.
CAUTION
Make certain the 10 % bleach solution does not come into
contact with the program card.
If you suspect any liquid material has spilled onto the
program card or into the program card port, contact BD
Technical Services or an authorized distributor for
assistance. Do NOT use the system if such a spill is
suspected.
MA0106(D)
4-3
BD MicroProbe Processor Instrument User’s Manual
4. After the disinfection time is complete, wipe the
processor thoroughly with a moist cloth to remove the
residual disinfectant.
5. Finally, wipe the surfaces with 70% isopropyl alcohol
and allow to air dry.
NOTE
This procedure must be followed prior to shipping the unit back
to BD for repair.
4.4.2 Cassette Caddy
The cassette caddy may be disinfected, using the same
procedure as the processor base unit (steps 1 through 5
above).
4.4.3 Program Card
Disinfect the program card using the same procedure as the
processor base unit steps 1 through 5 above. DO NOT GET
THE ELECTRICAL CONTACTS INSIDE THE PROGRAM
CARD WET. Allow the surface of the program card to dry
thoroughly before installing the card in the base unit.
4-4
MA0106(D)
Troubleshooting
5.1 General
This troubleshooting guide describes the symptoms, possible
causes, and corrective actions that an operator should take in
case of a problem. These are listed in order from the most
simple problem to the most complex. Please follow directions
carefully, and note the result of any corrective actions which
have been attempted in case telephone assistance is required. If
none of the recommended corrective actions are successful,
contact your BD Technical Services representative or authorized
distributor for assistance.
Please have available your processor serial number and type of
software being used when calling for assistance.
SYMPTOM: NO POWER TO UNIT
Instrument does not respond to pressing the [ON/STANDBY]
key (green LED does not light).
Possible Cause:
Unit not receiving power.
Corrective Action:
Check that the transformer is connected to the instrument.
Make sure the connection is firm.
MA0106(D)
5-1
BD MicroProbe Processor Instrument User’s Manual
Check that the transformer is connected to a live wall outlet or
power strip. If a power strip is used, make sure it is ON.
Press the [ON/STANDBY] key to continue operation. If the unit
still will not operate, call for assistance.
SYMPTOM: UNIT WILL NOT OPERATE
Instrument display does not light, and the robotic arm does not
move. Green LED light indicates power is ON.
Possible Cause:
Program card not installed, or program card not seated
properly.
Corrective Action:
Set the system to STANDBY by pressing the [ON/STANDBY]
key.
Check to see that a program card is installed in the port on the
front of the unit. If not, install the card.
If program card is in place, set the power to STANDBY and
carefully reseat the program card until it “clicks” into the port.
Press the [ON/STANDBY] key to continue operation. If the unit
still will not operate, call for assistance.
SYMPTOM: UNIT WILL NOT RESPOND
The display is locked on a prompt, or the unit does not
respond to pressing the [RUN] or [HELP] key during test setup.
Possible Cause:
Power surge or interruption or a system problem. A system
reset is required.
Corrective Action:
Press the [ON/STANDBY] key to reset the system and
continue with test setup.
5-2
MA0106(D)
Troubleshooting
If resetting the system does not cause the processor to
operate correctly, contact your BD Technical Services
representative for assistance.
SYMPTOM: UNIT STOPS PROCESSING IN MID-CYCLE
Instrument stops processing PACs mid-cycle (wells 2 to 7)
and the alarm beeps.
Possible Cause:
Power surge or interruption or system problem.
Corrective Action:
If the PAC is in wells 2 to 7:
• Support the robotic transport arm to keep it from dropping
and set the system to STANDBY.
• Lift the robotic arm and carefully remove the PACs from the
PAC arms. Discard the PACs.
• Carefully retrieve ALL of the sample from each well 1 with a
disposable pipette and place the samples into well 1 of a
new reagent cassette.
• Discard the partially processed reagent cassettes and place
the new cassettes into the caddy on the instrument.
• Process the sample with new PACs after adding substrate to
well 7 of the new reagent cassettes.
SYMPTOM: UNIT STOPS PROCESSING AT START OF RUN
Instrument stops processing at the start of a run (well 1) and
the alarm beeps.
Possible Cause:
Power surge or interruption or system problem.
Corrective Action:
If the PAC is still in well 1 (sample well):
• Support the robotic arm to keep it from dropping and set the
instrument to STANDBY.
MA0106(D)
5-3
BD MicroProbe Processor Instrument User’s Manual
• Release the PACs from the clips into reagent cassette well 1.
• Lift the robotic arm and remove the caddy with the PACs in
the cassettes.
• Turn the instrument ON to reset and wait for it to "home".
• Place the caddy with PACs positioned in the reagent
cassettes on the processor.
• Move through the prompts to start automated processing.
5-4
MA0106(D)
Warranty
Limited Warranty
This warranty gives you specific legal rights. Additionally, you
may have other rights that vary from state to state and country
to country.
The BD MicroProbe Processor is warranted to be free of
defects in material and workmanship. Full responsibility is
assumed by the manufacturer for servicing any instrument or
its components, which under normal operating conditions,
prove to be defective within one year of delivery.
BD will furnish new or remanufactured components upon its
option. All replacements shall meet new part specifications.
Defective components become the property of BD.
It is understood that the equipment covered by this agreement
has been installed in accordance with the recommendations
and instructions in the BD MicroProbe Processor User’s
Manual.
Any damage to the BD MicroProbe Processor resulting from
the negligence of the owner or operator to maintain
reasonable care and precautions in the operation and
maintenance of the system will void this warranty and
terminate the obligations of the manufacturer as stated herein.
MA0106(D)
A-1
BD MicroProbe Processor Instrument User’s Manual
This warranty is in lieu of all other warranties, whether express
or implied, including but not limited to warranties of
merchantability or fitness for a particular use. In no event will
BD be liable for indirect or consequential damages.
Service
The BD MicroProbe Processor is not designed to be repaired
by the user. Any service or repair work must be done by BD
authorized service personnel only. Contact your BD Technical
Services representative or authorized distributor if you believe
your Processor requires service or repair.
A-2
MA0106(D)
Replacement
Parts
Ordering Information
To order additional accessories or replacement parts, contact
your BD Affirm VPIII Microbial Identification Test distributor
representative.
Affirm Microbial Identification Test Kits and Sample Collection
Sets may be ordered through your BD Affirm VPIII Microbial
Identification Test distributor representative:
Replacement Items
211901
Sterile Affirm thermometer
212992
Replacement kit PAC clips – individual clips x 6
441864
Replacement kit PAC clips – single bar
MA0106(D)
B-1
BD MicroProbe Processor Instrument User’s Manual
B-2
MA0106(D)
International
Contacts
Becton, Dickinson and Company
7 Loveton Circle
Sparks, MD 21152
Tel: 1-800-638-8663
www.bd.com/ds
Rineanna House
Shannon Free Zone
Shannon, County Claire, Ireland
Tel: 353-61-47-29-20
Fax: 353-61-47-29-07
2771 Bristol Circle
Oakville, Ontario
Canada L6H 6R5
Voice: (905) 855-5550
800-268-5430
30 Tuas Avenue 2
Singapore 639461
Tel: 65-8610633
Fax: 65-8601590
Rua Alexandre Dumas 1976
04717-004 Sao Paulo, S.P Brazil
Tel: 55-11 5459833
Fax: 55-11 2478644
Monte Pelvoux 111
9th Floor
Col. Lomas de Chapultepec
11000 Mexico, D.F.
Tel: 52-5 237 1200
Fax: 52-5 237 1287
Akasaka D S Bldg.
5-26 Akasaka 8-chome
Minato-ku
Tokyo, 107 Japan
Tel: 81-3-54138181
Fax: 81-3-5418144
MA0106(D)
C-1
BD MicroProbe Processor Instrument User’s Manual
C-2
MA0106(D)
BD MicroProbe™
Processor
Instrument User’s Manual
(For use with BD Affirm™ VPIII Microbial Identification Test)
Printing Specifications
DO NOT PRINT THIS PAGE
(As per Vendor Specification VS0208)
Internal Pages
Paper: 50lb White Offset, 5 ½” x 8 ½”
Black ink both sides
Front and Back Cover
Paper: 100lb White Card Stock 5 ½” x 8 ½ “
Outside surfaces to be dull coated
Artwork:
Front Cover: use artwork on Section 10 page 1
Back Cover:blank
Binding
GBC Punch Comb, 3/8” White