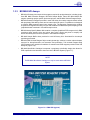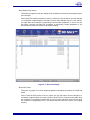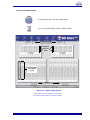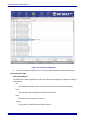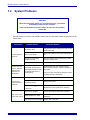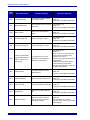
1
BD MAX™ System User's Manual (US IVD Version) (2012/09) (03) Document Number: 8086643 441938 Becton, Dickinson and Company 7 Loveton Circle Sparks, Maryland 21152 USA Tel: 800.638.8663 Benex Limited Rineanna House Shannon Free Zone Shannon, County Clare, Ireland Tel.(353)61.472920 Fax (353)61.472907 BD MAX System User’s Manual Change History Revision Date Pages Reason (2012/03) (01) All New product manual (2012/05) (02) All Updates for software version 2.7; remove Canada from Version (2012/09) (03) All Updates for software version 2.8 The BD MAX PCR cartridge is manufactured under license from Caliper Life Sciences, Inc. Alconox is a trademark of Alconox, Inc. Cy5 and Cy5.5 are registered trademarks of GE Healthcare Bio-Sciences DNA AWAY is a trademark of Molecular BioProducts FAM, HEX, and ROX are trademarks of Applera Corp. BD, BD Logo, and BD MAX are trademarks of Becton, Dickinson and Company. © Copyright Becton, Dickinson and Company, 2011-2012. All rights reserved. No part of this publication may be reproduced, transmitted, transcribed, stored in retrieval systems, or translated into any language or computer language, in any form or by any means, electronic, mechanical, magnetic, optical, chemical, manual, or otherwise, without the prior written permission of BD, 7 Loveton Circle, Sparks, Maryland, 21152, United States of America. ii 8086643(2012/09) (03) u Preface Contents 1 – Introduction 1.1 Intended Use ............................................................................................................................ 1-1 1.2 Overview .................................................................................................................................. 1-1 1.3 System Overview ..................................................................................................................... 1-5 1.3.1 1.3.2 1.3.3 BD MAX Instrument ................................................................................................... 1-5 Peripherals................................................................................................................. 1-8 BD MAX IVD Assays.................................................................................................. 1-9 1.4 Manual Structure .................................................................................................................... 1-11 1.5 Use of this Manual ................................................................................................................. 1-11 1.6 Conventions ........................................................................................................................... 1-12 1.6.1 1.6.2 1.6.3 1.7 Buttons, Displays, Fields, Messages ....................................................................... 1-12 Symbols Used on the Equipment............................................................................. 1-12 Notes, Cautions, and Warnings ............................................................................... 1-13 Precautions, Limitations, Cautions, Warnings........................................................................ 1-14 1.7.1 Summary of Cautions and Warnings ....................................................................... 1-15 2 – Installation 2.1 General .................................................................................................................................... 2-1 2.2 Instrument Specifications ......................................................................................................... 2-2 2.3 Instrument Installation .............................................................................................................. 2-4 2.3.1 2.3.2 2.3.3 2.3.4 2.4 Software Setup (Administration) .............................................................................................. 2-5 2.4.1 2.4.2 2.4.3 2.4.4 2.4.5 2.4.6 2.4.7 2.4.8 2.5 Installation Policy ....................................................................................................... 2-4 Site Location .............................................................................................................. 2-4 System Calibration..................................................................................................... 2-4 User Training ............................................................................................................. 2-4 Users Display............................................................................................................. 2-6 Date & Time Display .................................................................................................. 2-9 Language Display .................................................................................................... 2-11 Printer Display.......................................................................................................... 2-13 Assays Display......................................................................................................... 2-15 UDP Protocols Display............................................................................................. 2-19 Configuration Display............................................................................................... 2-20 External Devices Display ......................................................................................... 2-22 2.4.8.1 Pre-warm Station Window ........................................................................ 2-22 2.4.8.2 LIS Configuration Window ........................................................................ 2-22 2.4.8.3 Assurity Linc Window ............................................................................... 2-25 Instrument Startup.................................................................................................................. 2-25 8086643(2012/09) (03) iii BD MAX System User’s Manual Contents 3 – Controls and Indicators 3.1 General..................................................................................................................................... 3-1 3.2 Power Switch............................................................................................................................ 3-2 3.3 Door Handle ............................................................................................................................. 3-2 3.4 All-in-One Computer................................................................................................................. 3-3 3.5 External Connections ............................................................................................................... 3-6 4 – Operation 4.1 General..................................................................................................................................... 4-1 4.2 User Privileges ......................................................................................................................... 4-2 4.3 Using the Instrument Interface ................................................................................................. 4-2 4.4 Creating a Full Run................................................................................................................... 4-5 4.4.1 4.4.2 4.4.3 4.4.4 4.5 Logging in Samples/Tests.......................................................................................... 4-5 Preparing the Instrument.......................................................................................... 4-11 The BD MAX Run..................................................................................................... 4-13 Interleaved Runs ...................................................................................................... 4-17 Viewing, Printing, and Exporting Results................................................................................ 4-19 4.5.1 4.5.2 4.5.3 Viewing Results........................................................................................................ 4-19 4.5.1.1 Run Details .............................................................................................. 4-21 4.5.1.2 PCR Analysis ........................................................................................... 4-23 Printing Results ....................................................................................................... 4-24 Downloading (Exporting) Results ............................................................................. 4-25 4.6 Responding to Errors.............................................................................................................. 4-26 4.7 End of Day Cleanup ............................................................................................................... 4-27 4.8 Long Term Shutdown ............................................................................................................. 4-27 5 – Reference 5.1 General..................................................................................................................................... 5-1 5.2 Software Tree ........................................................................................................................... 5-2 5.3 Main Menu................................................................................................................................ 5-3 5.4 Logon / Logoff .......................................................................................................................... 5-5 5.5 Run Displays ............................................................................................................................ 5-6 5.5.1 5.5.2 5.5.3 5.5.4 iv Work List Display ....................................................................................................... 5-6 PCR Only Display .................................................................................................... 5-10 Pre-warm Display ..................................................................................................... 5-11 Test Editor Tab......................................................................................................... 5-11 8086643(2012/09) (03) u Preface Contents 5.5.5 Consumable Info Display ......................................................................................... 5-11 5.6 Status Display ........................................................................................................................ 5-14 5.7 Results Display ...................................................................................................................... 5-18 5.7.1 5.7.2 5.7.3 Reader_A/B Displays............................................................................................... 5-18 Results (List) Display ............................................................................................... 5-19 Run X Display .......................................................................................................... 5-22 5.7.3.1 Details ...................................................................................................... 5-22 5.7.3.2 PCR Analysis ........................................................................................... 5-25 5.7.3.3 Melt Analysis ............................................................................................ 5-29 5.7.3.4 Quantitative Analysis ................................................................................ 5-30 5.7.3.5 (Results) Download .................................................................................. 5-31 5.7.3.6 (Results) Print........................................................................................... 5-34 5.8 Administration ........................................................................................................................ 5-43 5.9 Maintenance Displays ............................................................................................................ 5-43 6 – Maintenance 6.1 General .................................................................................................................................... 6-1 6.2 Routine Maintenance ............................................................................................................... 6-2 6.2.1 6.2.2 6.2.3 6.2.4 End of Day Cleanup................................................................................................... 6-2 Weekly Cleaning ........................................................................................................ 6-3 “As Needed” Maintenance ......................................................................................... 6-4 6.2.3.1 System Decontamination ........................................................................... 6-4 6.2.3.2 Cleaning Spills............................................................................................ 6-5 6.2.3.3 Cleaning the Barcode Scanner Window(s) ................................................ 6-5 Maintenance Menu .................................................................................................... 6-5 6.2.4.1 System Error Summary Display ................................................................. 6-6 6.2.4.2 Version Display .......................................................................................... 6-8 6.2.4.3 Maintenance Display ................................................................................ 6-10 6.2.4.4 Event Log Display .................................................................................... 6-14 7 – Troubleshooting 7.1 General .................................................................................................................................... 7-1 7.1.1 7.1.2 Instrument Service ..................................................................................................... 7-1 Service Contact Information (USA) ............................................................................ 7-1 7.2 System Problems ..................................................................................................................... 7-2 7.3 Error List................................................................................................................................... 7-5 8086643(2012/09) (03) v BD MAX System User’s Manual Contents A – Limited Warranty B – Ordering Information C – Contact Information Service Contact Information (USA)C-1 D – Glossary and Abbreviations vi 8086643(2012/09) (03) u Preface Figures Figure Title Page Figure 1-1 Figure 1-2 Figure 1-3 Figure 1-4 Figure 1-5 Figure 1-6 Figure 1-7 Figure 1-8 BD MAX Instrument . . . . . . . . . . . . . . . . . . . . . . . . . . . . . . . . . . . . . . . . . . . . . . . 1-2 DNA Extraction (typical IVD assay). . . . . . . . . . . . . . . . . . . . . . . . . . . . . . . . . . . . 1-4 BD MAX Instrument Interior . . . . . . . . . . . . . . . . . . . . . . . . . . . . . . . . . . . . . . . . . 1-6 Main Menu . . . . . . . . . . . . . . . . . . . . . . . . . . . . . . . . . . . . . . . . . . . . . . . . . . . . . . 1-7 BD MAX System Peripherals . . . . . . . . . . . . . . . . . . . . . . . . . . . . . . . . . . . . . . . . 1-8 DNA URS (typical) . . . . . . . . . . . . . . . . . . . . . . . . . . . . . . . . . . . . . . . . . . . . . . . . 1-9 Microfluidic Cartridge . . . . . . . . . . . . . . . . . . . . . . . . . . . . . . . . . . . . . . . . . . . . . 1-10 Symbols Used on the BD MAX Instrument . . . . . . . . . . . . . . . . . . . . . . . . . . . . . 1-12 Figure 2-1 Figure 2-2 Figure 2-3 Figure 2-4 Figure 2-5 Figure 2-6 Figure 2-7 Figure 2-8 Users Display . . . . . . . . . . . . . . . . . . . . . . . . . . . . . . . . . . . . . . . . . . . . . . . . . . . . 2-7 Date & Time Display . . . . . . . . . . . . . . . . . . . . . . . . . . . . . . . . . . . . . . . . . . . . . . 2-10 Language Display . . . . . . . . . . . . . . . . . . . . . . . . . . . . . . . . . . . . . . . . . . . . . . . . 2-12 Printer Display. . . . . . . . . . . . . . . . . . . . . . . . . . . . . . . . . . . . . . . . . . . . . . . . . . . 2-14 Assays Display . . . . . . . . . . . . . . . . . . . . . . . . . . . . . . . . . . . . . . . . . . . . . . . . . . 2-16 Select Assay Window . . . . . . . . . . . . . . . . . . . . . . . . . . . . . . . . . . . . . . . . . . . . . 2-17 Configuration Display . . . . . . . . . . . . . . . . . . . . . . . . . . . . . . . . . . . . . . . . . . . . . 2-21 External Devices Display . . . . . . . . . . . . . . . . . . . . . . . . . . . . . . . . . . . . . . . . . . 2-24 Figure 3-1 Figure 3-2 Figure 3-3 Figure 3-4 Figure 3-5 BD MAX Instrument Layout. . . . . . . . . . . . . . . . . . . . . . . . . . . . . . . . . . . . . . . . . . All-in-One – Right Side . . . . . . . . . . . . . . . . . . . . . . . . . . . . . . . . . . . . . . . . . . . . . All-in-One – I/O Ports . . . . . . . . . . . . . . . . . . . . . . . . . . . . . . . . . . . . . . . . . . . . . . Monitor and Sound Controls . . . . . . . . . . . . . . . . . . . . . . . . . . . . . . . . . . . . . . . . . External Connections (I/O Panel) . . . . . . . . . . . . . . . . . . . . . . . . . . . . . . . . . . . . . 3-2 3-4 3-4 3-5 3-6 Figure 4-1 Privilege Violation Window . . . . . . . . . . . . . . . . . . . . . . . . . . . . . . . . . . . . . . . . . . 4-2 Figure 4-2 Display Regions . . . . . . . . . . . . . . . . . . . . . . . . . . . . . . . . . . . . . . . . . . . . . . . . . . 4-3 Figure 4-3 Example of Service Mode Indication. . . . . . . . . . . . . . . . . . . . . . . . . . . . . . . . . . . 4-4 Figure 4-4 Consumable Info Display . . . . . . . . . . . . . . . . . . . . . . . . . . . . . . . . . . . . . . . . . . . 4-7 Figure 4-5 URS and Reagents in Sample Rack . . . . . . . . . . . . . . . . . . . . . . . . . . . . . . . . . . . 4-8 Figure 4-6 Work List Display . . . . . . . . . . . . . . . . . . . . . . . . . . . . . . . . . . . . . . . . . . . . . . . . 4-10 Figure 4-7 Sample Racks on Instrument Deck. . . . . . . . . . . . . . . . . . . . . . . . . . . . . . . . . . . 4-12 Figure 4-8 Inserting a Microfluidic Cartridge. . . . . . . . . . . . . . . . . . . . . . . . . . . . . . . . . . . . . 4-12 Figure 4-9 Status Display with PCR in Progress . . . . . . . . . . . . . . . . . . . . . . . . . . . . . . . . . 4-14 Figure 4-10 Results List Display. . . . . . . . . . . . . . . . . . . . . . . . . . . . . . . . . . . . . . . . . . . . . . . 4-20 Figure 4-11 Details Display . . . . . . . . . . . . . . . . . . . . . . . . . . . . . . . . . . . . . . . . . . . . . . . . . . 4-22 Figure 4-12 PCR Analysis Display . . . . . . . . . . . . . . . . . . . . . . . . . . . . . . . . . . . . . . . . . . . . . 4-23 Figure 4-13 (Results) Print Display. . . . . . . . . . . . . . . . . . . . . . . . . . . . . . . . . . . . . . . . . . . . . 4-24 Figure 4-14 Results Download Display . . . . . . . . . . . . . . . . . . . . . . . . . . . . . . . . . . . . . . . . . 4-25 Figure 5-1 Figure 5-2 Figure 5-3 Figure 5-4 Figure 5-5 Figure 5-6 Figure 5-7 Figure 5-8 Figure 5-9 Main Menu . . . . . . . . . . . . . . . . . . . . . . . . . . . . . . . . . . . . . . . . . . . . . . . . . . . . . . 5-4 Logon Window . . . . . . . . . . . . . . . . . . . . . . . . . . . . . . . . . . . . . . . . . . . . . . . . . . . 5-5 Work List Display . . . . . . . . . . . . . . . . . . . . . . . . . . . . . . . . . . . . . . . . . . . . . . . . . 5-9 Consumable Info Display . . . . . . . . . . . . . . . . . . . . . . . . . . . . . . . . . . . . . . . . . . 5-12 Status Display (blank) . . . . . . . . . . . . . . . . . . . . . . . . . . . . . . . . . . . . . . . . . . . . . 5-15 Status Display with Catalog Error . . . . . . . . . . . . . . . . . . . . . . . . . . . . . . . . . . . . 5-16 Status Display with Run Complete . . . . . . . . . . . . . . . . . . . . . . . . . . . . . . . . . . . 5-17 Results (List) Display . . . . . . . . . . . . . . . . . . . . . . . . . . . . . . . . . . . . . . . . . . . . . 5-20 Details Display (left part) . . . . . . . . . . . . . . . . . . . . . . . . . . . . . . . . . . . . . . . . . . . 5-23 8086643(2012/09) (03) vii BD MAX System User’s Manual Figures Figure Title Page Figure 5-10 PCR Analysis Display. . . . . . . . . . . . . . . . . . . . . . . . . . . . . . . . . . . . . . . . . . . . . . 5-26 Figure 5-11 (Results) Download Display . . . . . . . . . . . . . . . . . . . . . . . . . . . . . . . . . . . . . . . . . 5-32 Figure 5-12 (Results) Print Display . . . . . . . . . . . . . . . . . . . . . . . . . . . . . . . . . . . . . . . . . . . . . 5-35 Figure 5-13 Results Report (page 1) . . . . . . . . . . . . . . . . . . . . . . . . . . . . . . . . . . . . . . . . . . . . 5-37 Figure 5-14 Results Report (last page) . . . . . . . . . . . . . . . . . . . . . . . . . . . . . . . . . . . . . . . . . . 5-38 Figure 5-15 Sample PCR Report. . . . . . . . . . . . . . . . . . . . . . . . . . . . . . . . . . . . . . . . . . . . . . . 5-40 Figure 6-1 Figure 6-2 Figure 6-3 Figure 6-4 Figure 6-5 viii System Error Summary Display . . . . . . . . . . . . . . . . . . . . . . . . . . . . . . . . . . . . . . . 6-7 Version Display . . . . . . . . . . . . . . . . . . . . . . . . . . . . . . . . . . . . . . . . . . . . . . . . . . . 6-9 Maintenance Display . . . . . . . . . . . . . . . . . . . . . . . . . . . . . . . . . . . . . . . . . . . . . . 6-11 Maintenance Functions Field . . . . . . . . . . . . . . . . . . . . . . . . . . . . . . . . . . . . . . . . 6-12 Event Log Display . . . . . . . . . . . . . . . . . . . . . . . . . . . . . . . . . . . . . . . . . . . . . . . . 6-15 8086643(2012/09) (03) Introduction 1.1 Intended Use The BD MAX System is intended for in vitro diagnostic (IVD) use in performing FDA cleared or approved nucleic acid testing in clinical laboratories. The BD MAX System is capable of automated extraction and purification of nucleic acids from multiple specimen types, as well as the automated amplification and detection of target nucleic acid sequences by fluorescence-based PCR. 1.2 Overview The BD MAX System for molecular diagnostics fully automates cell lysis, nucleic acid extraction, PCR set-up, target amplification and detection from a variety of specimen types. Features • Processes and analyzes up to 24 specimens per run • Individual barcode for each BD MAX Sample Buffer tube, scanned by an external barcode reader and verified against the system Work List by an internal barcode reader, ensures traceability throughout extraction and PCR • Real-time PCR with two 24-lane microfluidic PCR readers • Dedicated multi-color optics: including 475/520, 530/565, 585/630, 630/665, 680/715 • Performs IVD assays which contain all reagents required for extraction, purification, amplification and detection of a specific target analyte 8086643(2012/09) (03) 1–1 BD MAX System User’s Manual Figure 1-1 – BD MAX Instrument The BD MAX System contains all hardware and software necessary to drive and monitor operations, as well as calculate, communicate and store results. The system consists of a liquid handling head mounted on a robotic gantry and associated assemblies which allow for nucleic acid extraction and purification from various sample types. The system also performs real-time amplification and detection based on microfluidic technology for the detection of target nucleic acid sequences. 1–2 • Heater module—provides necessary thermal energy to actuate various microfluidic components on the disposable microfluidic cartridges, and thermal cycling for PCR. • Temperature sensors enable real-time monitoring of the heaters through a feedback-based mechanism, allowing for temperature control. • Fluorescence Detection—a fluorescence detection system, based on LEDs and photo-diodes with appropriate focusing and filtering components, is incorporated for monitoring fluorescence from the biochemical reactions, capable of multi-color detection. • Software—user interface allowing for: • 24 unique thermal cycling channels per system (2 onboard readers) • entering patient/sample information, either manually or by external barcode reader • monitoring operations, communication and storing of data • qualitative, quantitative and melt sample analysis • error warnings • download of results to a USB thumb drive • LIS connectivity 8086643(2012/09) (03) Introduction IVD Assay The following overview summarizes the steps, components and theory of operation associated with performance of a complete, target-specific IVD assay on the BD MAX System. • Specimens are introduced into Sample Buffer tubes according to package insert instructions. • Scanned barcode-labeled Sample Buffer tubes are placed into a sample rack. • Sample information is entered via the keyboard, or by external barcode reader. Test selection is made using the BD MAX system software. • The appropriate number of Unitized Reagent Strips (URS) needed for the run are placed in the sample rack and securely seated. Foil-sealed lyophilized extraction and PCR reagent tubes are snapped into the appropriate positions on each URS. • A 24-lane BD MAX Microfluidic Cartridge is placed into a drawer located behind each respective sample rack. • Once the run is started, verification of samples, strips, and reagents begins, followed by the extraction and purification process. • After extraction, the purified nucleic acid is mixed with master mix, including probes and primers. The instrument then transfers the PCR-ready sample into the sample injection port of the appropriate lane on the BD MAX Microfluidic Cartridge. • After all programmed samples are injected, the drawer containing the BD MAX Microfluidic Cartridge is drawn into the reader, where automated PCR amplification and detection are performed. 8086643(2012/09) (03) 1–3 BD MAX System User’s Manual DNA Extraction Sample lysis and DNA extraction take place in each URS. The steps in the lysis and extraction process are presented schematically in Figure 1-2. The red arrows represent heat that is applied to the Reaction Tube by the heater module. The gray and red box represents a bar magnet that is raised and lowered to come into close proximity to the Reaction Tube of each URS loaded within the sample rack. To start the process, the instrument transfers a fixed volume of the prepared sample to the Extraction Tube to rehydrate the extraction reagents. After rehydration, the mixture is transferred to the Reaction Tube. When applicable, heat is applied to the Reaction Tube and the cells in the sample are lysed, releasing DNA. DNA present in the sample is bound to magnetic beads which have been coated with a proprietary DNA affinity matrix. The magnetic bar is raised to immobilize the DNA bound by the magnetic beads. Supernatant is aspirated from the tube. The magnet is lowered, releasing the magnetic beads. DNA Solution A is added to the tube to remove any non-specifically bound material. The magnet is raised, immobilizing the DNA bound magnetic beads. Supernatant is removed from the tube and the magnet is lowered. DNA Solution B is added to the Reaction tube and the tube is heated to release bound nucleic acids from the magnetic beads. The magnet is raised, immobilizing the beads. The released DNA is transferred from the Extraction Tube to the Conical Tube in the URS, where it is now prepared for PCR analysis. The magnet used in the process is depicted as a red/light gray box labeled NS. Red wavy arrows represent heat being applied to the reaction tube. Figure 1-2 – DNA Extraction (typical IVD assay) 1–4 8086643(2012/09) (03) Introduction 1.3 System Overview The BD MAX System is composed of: • Instrument • Peripherals • Reagents 1.3.1 BD MAX Instrument The BD MAX Instrument is capable of: • Independent nucleic acid extraction and purification • PCR amplification using thermal cycling across 24 lanes • Real time detection of products of amplification • Identification of each Sample Buffer tube by external barcode reader • Work List verification by internal barcode reader • Fluorescence detection at up to 5 wavelengths, allowing multiplex reactions by Cycle threshold (Ct) call, or multiplex reactions by melt analysis • Qualitative, quantitative and melt sample analysis Figure 1-1 shows a BD MAX instrument (door closed). The BD MAX instrument contains the following modules: a temperature control/heating subsystem to control thermal cycling; a liquid handling head to transfer samples from Sample Buffer tubes to Unitized Reagent Strips; and onboard readers to measure the amplification reaction and report results. Several components are identified in Figure 1-3, and include: Liquid Handling Head The liquid handling head performs all sample transfers. It features a pipettor that is used to transfer fluids. The pipette head consists of 4 nozzles that move as a single unit. Each of the 4 channels can be opened or closed independently. The head also includes sensors to detect when tips have not been successfully picked up or ejected. When at rest, the robotic arm sits at the right rear of the instrument interior. The barcode reader attached to the pipette head is capable of reading linear and 2D barcodes. In a typical run, barcodes are read for the URS, PCR Master Mix tube, Extraction Reagent tube, Sample Buffer tube, and Microfluidic Cartridge. The Master Mix and Extraction disposables are either preconfigured in the URS, or are furnished as snap-in tubes. In addition to the pipettor, barcode reader, and sensors, the liquid handling head contains the x-y-z pipettor drive, pump, valve manifold, pipette interface barrels, and the pipette detection and ejection assembly. 8086643(2012/09) (03) 1–5 BD MAX System User’s Manual Liquid Handling Head Readers ^^ Sample Racks ^^ Figure 1-3 – BD MAX Instrument Interior Readers The reader unit consists of 4 major subsystems: the pressure system, the cartridge alignment system, the thermal system and the optical reader system. All the necessary thermal cycling for the run is performed by the on-board thermal system. There are 5 fluorescence channels available on each of the 2 on-board readers. Wavelength Name Dye Name 475/520 FAM 530/565 VIC 585/630 Cal Red / ROX 630/665 Cy5 680/715 Cy5.5 Each lane in the PCR amplification cartridge is read during each PCR cycle. Excitation light is directed into the PCR chamber in the cartridge and fluorescent signal is read with a detector. 1–6 8086643(2012/09) (03) Introduction Computer and Instrument Software The main computer for the BD MAX System is an All-in-One computer that contains the instrument software. Instrument software is responsible for instrument control, self-calibration, data analysis and storage, and the user interface. The user interface can be navigated with point-and-click icons (keyboard and mouse), or the All-in-One Computer’s touchscreen. Basic displays include: • Main Menu (Figure 1-4) – When instrument power-up is complete, this display appears. From here, you can access the major functions listed below. • Run – The Run module provides displays for defining a Work List (logging in samples) and creating a list of active Consumables. • Status – This display shows step-by-step run status information both as messages and as a graphic that updates dynamically, showing run progress. • Results – This display allows you to view and manage run results. • Administration – This function lets you access displays for managing Users accounts, setting Date and Time, selecting a language for displays and reports, managing printers, importing new Assays, setting up communication with a Laboratory Information System (LIS), and choosing Configuration settings. • Maintenance – This module lets you access maintenance functions and view an Error Summary and Event Log. Figure 1-4 – Main Menu 8086643(2012/09) (03) 1–7 BD MAX System User’s Manual 1.3.2 Peripherals BD MAX System includes the following peripherals: • Keyboard, mouse, handheld barcode scanner • Printer • Sample Racks (4) • Uninterruptible Power Supply (UPS) Keyboard, Mouse, and Barcode Scanner The keyboard enables you to type in text information, and the mouse enables you to navigate the displays. A handheld barcode scanner enables you to scan sample tube barcodes, accession barcodes, lot number barcodes, etc., for rapid entry of this type of data. Sample Rack Only the BD MAX sample rack will fit onto the BD MAX instrument deck. Sample racks hold up to 12 Unitized Reagent Strips (URS) and Sample Buffer Tubes. Two racks can be placed on the robot deck in the sample rack station for each run. The racks are comprised of 3 banks, each of which are composed of 4 adjacent strips and Sample Buffer Tube locations. Samples within a bank are processed simultaneously by the 4-channel pipette head that moves as a unit. Figure 1-5 – BD MAX System Peripherals Typical peripherals are shown. Actual items and quantities may vary from region to region. 1–8 8086643(2012/09) (03) Introduction 1.3.3 BD MAX IVD Assays • BD MAX IVD Assay kits contain all the reagents required for analyte detection, including lyophilized BD MAX Extraction Reagent, BD MAX Sample Buffer Tubes, BD MAX Master Mix reagent containing analyte specific probe and primers, and BD MAX Unitized Reagent Strips • BD MAX Extraction Reagent provided in each IVD Assay kit contains magnetic beads coated with proprietary DNA affinity matrix and an internal process control. Formulations are designed to optimize DNA extraction based upon sample type. The Extraction Reagent also contains enzymes and reagents necessary for lysis and extraction of DNA based upon sample type and lyophilized beads contained in foil-sealed snap-in tubes. • BD MAX Assay-Specific Master Mix contains a complete lyophilized PCR reagent mix for DNA containing assay specific probe and primer along with a probe and primer to amplify and detect an internal process control present in the Extraction Reagent. • BD MAX Sample Buffer tubes provided in each IVD Assay Kit is formulated for the sample type being processed. • BD MAX DNA Unitized Reagent Strips contain pipette tips, solutions, reaction tube and waste reservoir for deoxyribonucleic acid extraction and purification. The Unitized Reagent Strip (URS) features open positions for addition of extraction and PCR reagents provided in the IVD Assay Kit (Figure 1-6). • BD MAX Microfluidic Cartridges incorporate a proprietary microfluidic design that allows for PCR amplification and detection when used in the BD MAX System (Figure 1-7). NOTE The BD MAX Microfluidic Cartridge can only be used with the BD MAX System. Figure 1-6 – DNA URS (typical) 8086643(2012/09) (03) 1–9 BD MAX System User’s Manual Figure 1-7 – Microfluidic Cartridge 1–10 8086643(2012/09) (03) Introduction 1.4 Manual Structure This user’s manual contains the following sections: 1.5 • Section 1 – Introduction – provides an overview of the BD MAX instrument and its uses in the laboratory, its major hardware and software components. An overview of this manual’s structure and conventions is also included. • Section 2 – Installation – gives specifications for the BD MAX instrument and instructions for instrument setup. • Section 3 – Controls and Indicators – explains the use and meaning of all controls and indicators of the instrument. • Section 4 – Operation – provides instructions for routine instrument operation. • Section 5 – Reference – provides reference material on the user interface. • Section 6 – Maintenance – explains all user instrument maintenance. • Section 7 – Troubleshooting – provides a convenient guide identifying error codes and suggesting corrective actions. • The Appendices contain a warranty, list of replacement parts, a list of international contacts, and a Glossary. Use of this Manual This user’s manual is designed as a reference tool for technologists, supervisors, and other personnel who operate and maintain the BD MAX instrument on a regular basis. Every attempt has been made to include all information which would be required during normal use and maintenance of the instrument. Should a question arise which is not answered in this manual, please contact the following parties (USA): For assistance with mechanical, electrical, or software performance/operation, procedures, or reagents, in North America: Technical Services 1–800–638–8663 Other documentation required for proper instrument operation includes: Package Inserts – These documents contain important information on specimen preparation and the use, storage, performance, and limitations of reagents and assay kits. A package insert is included with each IVD assay kit, and is available upon request from BD. 8086643(2012/09) (03) 1–11 BD MAX System User’s Manual 1.6 Conventions 1.6.1 Buttons, Displays, Fields, Messages Screen buttons and icons are always identified by quotation marks, and the words “button” or “icon” (e.g., “Reset errors” button and “Unlock Door” button). Display and Field names are shown in plain text. System messages and prompts are shown within quotes (e.g., “Invalid barcode”). Field names that are variable, such as the CT values that are displayed/printed according to wavelengths, are shown in italics (e.g., CT Wavelength where the actual field name is CT 475/520, CT 530/ 565, etc.). Note that some displays and reports may appear slightly different from the ones shown in this manual. This is due to minor changes in software updates, as well as some configurable options. 1.6.2 Symbols Used on the Equipment The following symbols appear on the BD MAX instrument: SYMBOL MEANING Manufacturer Catalog Number In vitro Diagnostic Use Conformity European Biohazard Authorized Representative Waste Electrical and Electronic Equipment Directive Figure 1-8 – Symbols Used on the BD MAX Instrument 1–12 8086643(2012/09) (03) Introduction 1.6.3 Notes, Cautions, and Warnings Throughout this manual, important information is presented in boxes offset from the regular text, and is labeled as either a NOTE, CAUTION, or WARNING. These messages are formatted as shown below and bear the following significance: NOTE Important information about instrument use worthy of special attention is presented as a NOTE. CAUTION Information on an activity which potentially could cause damage to the instrument is presented as a CAUTION. WARNING INFORMATION ON AN ACTIVITY WHICH POTENTIALLY COULD CAUSE INJURY TO THE USER IS PRESENTED AS A WARNING. 8086643(2012/09) (03) 1–13 BD MAX System User’s Manual 1.7 Precautions, Limitations, Cautions, Warnings Operational Precautions, Limitations • If the BD MAX instrument malfunctions or operates unusually in any way, you may initially attempt to solve the problem by following the recommendations in this section. All other servicing attempts will terminate the responsibility of the manufacturer under the terms of the warranty. • Proper personal protective equipment, such as laboratory coats, non-powdered disposable gloves, eye protection, etc., should be worn while operating the system. • Use only non-powdered disposable gloves when programming, setting up runs or running the BD MAX System. • Before running the BD MAX System, make sure the work area is clean. Use a 1% (v/v) sodium hypochlorite solution followed by water. If amplicon contamination is suspected, use DNA AWAY wipes, followed by water. In both instances, follow with a lint-free cloth dampened with 70% alcohol. Do not spray or pour liquid directly on instrument surfaces, especially the heater. • If any tip(s) fall out of the URS, make sure the tip(s) are returned to the strip correctly. Incorrect tip placement can cause tip loading or pipetting errors. • All assays provided by BD are fixed-parameter assays. • Monitor Status display for catalog check errors to confirm the successful initiation of each run. If catalog check errors are observed, the run results for the lane are invalid. • Do not use any decontamination or cleaning agents that are not recommended by BD. Use of such agents may result in damage to the BD MAX System. • To reduce the risk of damage to the BD MAX Instrument, moving or lifting of the instrument should be under the supervision of a BD representative. • Perform only the maintenance and cleaning procedures outlined in this manual. • Do not reuse disposable supplies such as pipette tips, URS, etc. • Prior to use, verify that all reagents and consumables are undamaged and within expiry. • This product is supplied with a grounding type power plug. The system chassis and cover must be connected to an electrical ground to minimize shock hazard. The ground pin must be firmly connected to an electrical ground (safety ground) terminal at the power outlet. Any interruption of the protective (grounding) conductor or disconnection of the protective earth terminal will cause a potential shock hazard that could result in personal injury. • This device contains a user replaceable line fuse. It must be replaced with a fuse of identical rating. The fuse in this system is IEC 5 x 20 mm fast blow (F) type, rated for 10 Amps at 250 Volts. Use of any other fuse type or rating may create a potential shock or fire hazard. Do not replace fuse without first contacting BD Technical Services. Hazards Never touch any switches or outlets with wet hands. 1–14 8086643(2012/09) (03) Introduction Biological Safety Biohazard Symbol 101 – A biohazard is an organism, or substance derived from an organism, that poses a threat to (primarily) human health. • Always follow universal precautions when handling patient specimens. Wear the proper personal protective equipment such as: lab coats, non-powdered disposable gloves, safety glasses, etc. when working with the BD MAX and patient specimens. • Using new non-powdered disposable gloves will reduce the risk of cross contamination when handling patient specimens. • All specimens, controls, etc. should be treated as though they are infectious. • Dispose of unused reagents and waste in accordance with country, federal, provincial, state, and local regulations. • Cleaning of all work surfaces should be done before and after testing has taken place. • The BD MAX has been designed to work as a system. Performance characteristics have not been established for use of the system with other supplies or equipment. 1.7.1 Summary of Cautions and Warnings The following cautions and warnings appear elsewhere in this User’s Manual and are summarized here: • Protection provided by this equipment may be impaired if the equipment is used in a manner not consistent with the instructions in this manual. • IT IS MANDATORY THAT ALL SYSTEM USERS BECOME THOROUGHLY FAMILIAR WITH ALL CONTROLS AND INDICATORS BEFORE ATTEMPTING TO OPERATE THE SYSTEM. • FOR SAFETY, NEVER ATTEMPT TO DEFEAT OR OVERRIDE THE DOOR INTERLOCK SWITCH. USER INJURY CAN RESULT. DO NOT ATTEMPT TO FORCE THE DOOR OPEN WHEN IT IS LATCHED. • Be sure each URS is seated in position correctly, with the back of the URS under the back rail of the sample rack, and the front edge of URS (behind barcode tab) under the front lip. Both must be fully engaged for proper loading. • When the instrument notifies you of alerts and errors, you should immediately respond to the condition. • Do not use any decontamination or cleaning agents that could cause a hazard as a result of a reaction with parts of the equipment, or with material contained in it. Consult your local BD representative to determine the compatibility of any decontamination or cleaning agents not listed in this manual. • Do not use abrasive or corrosive cleaners on heater boards. • Do not spray or pour liquid directly on surfaces. • NEVER ATTEMPT TO OPEN THE DOOR WHILE THE “UNLOCK DOOR” BUTTON IS GRAYED OUT. • Contact your local BD representative immediately if a spill occurs in any inaccessible part of the system. • DO NOT USE alcohol, acetone, or abrasive cleaners to clean the barcode scanner window. 8086643(2012/09) (03) 1–15 BD MAX System User’s Manual 1–16 • Be sure to use the correct database backup set when you restore your database. The restore operation completely overwrites the existing database with whatever backup set is on the thumb drive. • THE BD MAX INSTRUMENT CONTAINS NO USER-SERVICEABLE PARTS. ALL MAINTENANCE AND REPAIR OTHER THAN THE PROCEDURES DESCRIBED IN SECTION 6.2 – Routine Maintenance MUST BE PERFORMED BY BD QUALIFIED SERVICE PERSONNEL. • When the instrument notifies you of alerts and errors, you should immediately respond to the condition. • If the recommended corrective actions do not solve the problem, contact BD. 8086643(2012/09) (03) Installation 2.1 General This section provides specifications for the BD MAX instrument and instructions for instrument configuration. The following major topics are included: • Instrument specifications • Instrument installation • Software setup • Instrument startup WARNING PROTECTION PROVIDED BY THIS EQUIPMENT MAY BE IMPAIRED IF THE EQUIPMENT IS USED IN A MANNER NOT CONSISTENT WITH THE INSTRUCTIONS IN THIS MANUAL. 8086643(2012/09) (03) 2–1 BD MAX System User’s Manual 2.2 Instrument Specifications Physical Dimensions Height 72.4 cm Width 94 cm Depth 75.4 cm Clearance Right Side: 7.5 cm Weight 125 kg Electrical Requirements Input Voltage 100 – 240 VAC Input Current 10 A Input Line Frequency 50 – 60 Hz Maximum Power Input 300 VA Environmental Requirements Operating Conditions Temperature 18° – 30 °C Humidity 20% – 80% R.H. (non-condensing) Locations See Section 2.3.2 – Site Location Altitude Evaluated for safety to 2,000 m Non-Operating Conditions Temperature -25 ° – 45 °C Humidity 10% – 85% R.H. (non-condensing) NOTE Ambient temperatures above 30 °C combined with relative humidity below 20% R.H. (non-condensing) may result in an increased number of Unresolved and Indeterminate results. 2–2 8086643(2012/09) (03) Installation Thermocycling Temperature Adjustment Range 50.3 ° – 110 °C Temperature Accuracy ± 0.1 °C Fluid is ± 2.0 °C; control system is ± 0.25 °C Temperature Dwell Time Range ± 1 sec. Optical Specifications Wavelength set 1 (475/520) Excitation: 464-490 nm Emission: 510-530 nm Wavelength set 2 (530/565) Excitation: 520-540 nm Emission: 559-571 nm Wavelength set 3 (585/630) Excitation: 555-598 nm Emission: 618-638 nm Wavelength set 4 (630/665) Excitation:622-636 nm Emission: 657-670 nm Wavelength set 5 (680/715) Excitation: 673-683 nm Emission: 710-790 nm 8086643(2012/09) (03) 2–3 BD MAX System User’s Manual 2.3 Instrument Installation 2.3.1 Installation Policy The BD MAX System is installed by an authorized BD service representative, who will perform all checks required on the system. Attempts should not be made to unpack, lift, move or install the system unless under the supervision of an authorized BD service representative. 2.3.2 Site Location • The BD MAX instrument should be installed in an area that is free from undue vibration, high humidity, dust, temperature extremes, and corrosive or explosive vapors or gases. • If this equipment is used for detection of potentially hazardous substances, it should be installed in an area intended for handling these substances. • System must be placed at least 3 inches (7.5 cm) from the right wall to allow access to the power cord. • Room temperature (operational) must be between 18.0° – 30.0° C. • Relative humidity (RH, operational) must be between 20% and 80% (non-condensing). • Do not place the system in direct sunlight. • Environments which exceed these limits could adversely affect the performance of the instrument components. • Use of a UPS is recommended. 2.3.3 System Calibration The system is calibrated on-site as part of the installation procedure, as well as during preventive maintenance, offered with a service contract. 2.3.4 User Training User training will be performed when the instrument is installed. Upon completion, the user will be able to, at a minimum: • Load Sample Buffer tubes and Unitized Reagent Strips onto the sample rack • Load reagents into the Unitized Reagent Strips (not required for all tests) • Load a BD MAX Microfluidic Cartridge onto the system • Program a Work List, including selecting a test • Print and download data onto a USB thumb drive Additionally, “Administrator” level users are able to: Set up user accounts and passwords Create and edit tests in the Test Editor (Test Editor is not for IVD use) 2–4 8086643(2012/09) (03) Installation 2.4 Software Setup (Administration) The instrument is shipped with all setup parameters preset to factory default values. However, before using the instrument for sample testing, you should review the setup parameters to see if they are suitable for your laboratory. These parameters include: Administration Options (tabs) Users Date & Time Language Printer Assays UDP Protocols (Not for IVD Use) Configuration External Devices You must be an Admin level user to Add/Delete Users, Add/Delete/Set Default Printers, or access Configuration settings. To Set up the Instrument Software From the Main menu, click the “Administration” button (or, from any other display, click the “Administration” button) Click the desired Tab to configure Users, Date & Time, Language, Printer, Assays, UDP Protocols (Not for IVD Use), general Configuration, or External Devices 8086643(2012/09) (03) 2–5 BD MAX System User’s Manual 2.4.1 Users Display The Users display enables you to add, modify, and delete users. You must be an Admin level user to add or delete users or set permissions. User and IT level users can change their names (Fullname) and passwords on the Users display. To modify or delete a user account, click on (highlight) the user row to select it. You can then change the desired fields or delete the user account. The ADMIN user account cannot be deleted. Initially, the ADMIN password is set to ADMIN. You should change this password immediately to a more secure one. See Figure 2-1. To Access the Users Display From the Main menu, click the “Administration” button (or, from any other display, click the “Administration” button) Users Click the Users tab To Add a User Refer to Users Display Fields for additional information on field entries. 1 Access the Users Display (see above). 2 Click the “Add” button. 3 Enter a Username, Fullname (optional), New Password, Confirm Password, and select a user Type (see Users Display Fields for additional information). 4 Click the “Apply” button to make the changes active. To Change a Name (Fullname) or Password Refer to Users Display Fields for additional information on field entries. 2–6 1 The user who wants to change his/her password must log on to the system. 2 Access the Users Display (see above). 3 To change the name (Fullname), click in the Fullname field and enter the desired name. Fullname is an optional field. 4 To change the password, in the Password field, enter the old password. In the New Password field, enter the new password. In the Confirm Password field, enter the new password again. 5 Click the “Apply” button to make the changes active. 8086643(2012/09) (03) Installation Figure 2-1 – Users Display To Delete a User 1 Access the Users Display (see above). 2 Highlight the user you want to delete by clicking on the row. 3 Click the “Delete” button. 4 Click the “Apply” button to make the changes active. Users Display Fields ID The ID number is set automatically by the system when you click the “Add” button. Each user ID number is 1 greater than the previous that was added. Once a user ID is added, even if the user is deleted, the number is reserved to preserve an audit trail. Username Enter the desired user login name. Username is case sensitive. You can enter from 5 - 20 alphanumeric characters. 8086643(2012/09) (03) 2–7 BD MAX System User’s Manual Fullname Enter the full name of the user in the Fullname text field. You can enter from 0 - 20 alphanumeric characters. This field is optional to save a user account. Password To change an existing password, enter the current password in this field. Password is case sensitive. New Password To change an existing password, or to enter a password for a new user account, enter the new password in this field. Password is case sensitive. You can enter from 5 - 20 alphanumeric characters. Confirm Password Re-enter the new password in the Confirm Password text field. Created This is a read-only field that shows when the user account was created (Day Date Time Year). Type Select the user type from the drop-down menu. The following user types are available: • ADMIN: Administrator (Full Privileges) – allows full access to all system settings • IT: IT Personnel (Setup Privilege Only) – allows user access to system network setting parameters only • USER: Normal User (Configured Privileges) – allows normal operation access for creating and initiating runs; can access Administration > Users (password change only), Date & Time, Language, Assay, and Configuration displays; cannot add/remove Printers or access Maintenance functions; default privilege level when a new user is created Users Display Buttons “Add” button Click to create a new user account. A new user text line appears in the Users list, and the user ID number automatically increments. “Delete” button Click to delete the highlighted (selected) user account. The user information is immediately deleted. The ID number of deleted users is reserved and not reused by the system. This is to maintain an audit trail. Deleted user accounts are removed from the Users window. “Apply” button Click to apply any changes you have made to the user account. 2–8 8086643(2012/09) (03) Installation 2.4.2 Date & Time Display The Date & Time display allows you to set the date and time for the BD MAX instrument. All user levels can set the date and time. See Figure 2-2. To Access the Date & Time Display From the Main menu, click the “Administration” button (or, from any other display, click the “Administration” button) Date & Time Click the Date & Time tab Date Window Date Fields Month The current month value is shown at the top left of the Date window. To select a different month, click the RIGHT arrow to increase the month value, or click the LEFT arrow to decrease the month value. Year The current year value is shown at the top right of the Date window. To select a different year, click the RIGHT arrow to increase the year value, or click the LEFT arrow to decrease the year value. Day The current day value is highlighted in the month calendar. To select a different day, click the desired day. Time Window Time Fields Current Time This read-only field shows the current time value. It is updated dynamically. Hour The current Hour value is shown in the box. To select a different hour, click the UP arrow to increase the value, or click the DOWN arrow to decrease the value. Click and hold either arrow to rapidly increase or decrease the value. You can select hours from 1 to 23. 8086643(2012/09) (03) 2–9 BD MAX System User’s Manual Figure 2-2 – Date & Time Display Minute The current Minute value is shown in the box. To select a different minute, click the UP arrow to increase the value, or click the DOWN arrow to decrease the value. Click and hold either arrow to rapidly increase or decrease the value. You can select minutes from 1 to 59. Second The current Second value is shown in the box. To select a different second, click the UP arrow to increase the value, or click the DOWN arrow to decrease the value. Click and hold either arrow to rapidly increase or decrease the value. You can select seconds from 1 to 59. Date & Time Display Buttons “Save Date & Time” button Click to save the displayed date and time. 2–10 8086643(2012/09) (03) Installation 2.4.3 Language Display The Language display enables you to select a language for displays, messages, and reports. The language choice takes effect when the system is restarted. All user levels can set the language. See Figure 2-3. To Access the Language Display From the Main menu, click the “Administration” button (or, from any other display, click the “Administration” button) Language Click the Language tab Language Field Choose Language In the Choose Language field, click on the desired language for displays, messages, and reports. You can choose from the following languages: English French German Spanish Italian Language Button “Save” button Click to save the selected language. The language choice takes effect when the system is restarted. 8086643(2012/09) (03) 2–11 BD MAX System User’s Manual Figure 2-3 – Language Display 2–12 8086643(2012/09) (03) Installation 2.4.4 Printer Display The Printer display enables you to add, remove or select default printers. You must be an Admin level user to add, modify, or delete printers. The system only accepts certain models of HP (Hewlett Packard) printers. Contact Technical Services for specific models that are compatible. See Figure 2-4. To Access the Printer Display From the Main menu, click the “Administration” button (or, from any other display, click the “Administration” button) Printer Click the Printer tab To Add a Printer to the Available Printers List 1 Plug the printer into a free USB port. 2 Wait 10 seconds to see if the printer appears in the Available Printers window. 3 If the printer does not appear, reboot the instrument (Maintenance > Maintenance > Restart). 4 The printer appears in the Available Printers window after restarting. To Remove a Printer from the Available Printers List 1 Highlight the desired printer in the Available Printers list. 2 Click the “Remove” button. 3 The printer is deleted from the list immediately. To Set a Printer as the Default Printer 1 Highlight the desired printer name in the Available Printers list. 2 Click the “Make Default Printer” button. The default printer is not flagged. Available Printers Window Printer Field This read-only field shows the currently configured printers. 8086643(2012/09) (03) 2–13 BD MAX System User’s Manual Figure 2-4 – Printer Display Printer Display Buttons “Refresh” button Click to refresh the list of available printers. “Add” button This button is not currently functional. “Remove” button Click to remove a printer from the list of available printers. “Make Default Printer” button Click to set the highlighted printer as the default printer. 2–14 8086643(2012/09) (03) Installation 2.4.5 Assays Display The Assays display enables you to import new and updated assays provided by BD and to delete existing assays. New and updated assay definitions are provided on USB thumb drives. If you rename an assay on the thumb drive, or place it in a folder, any attempt to import the assay will fail. The message, “Improper File Format” appears in the Prompt / GUI Status bar. All user levels can import assay definitions. See Figure 2-5. NOTE All assays provided by BD are fixed parameter assays that have been cleared or approved by FDA. To Access the Assays Display From the Main menu, click the “Administration” button (or, from any other display, click the “Administration” button) Assays Click the Assays tab To Add an Assay 1 Before adding a new version of an assay, first delete the old version (see procedure below). 2 Insert the thumb drive in the USB port on the left side of the instrument. Wait approximately 5-10 seconds for the drive to be recognized by the instrument. 3 Click the “Add” button. 4 The Select Assay window (Figure 2-6) appears at the bottom of the display. The Select Assay window provides the assay Name, Size (kB), Created/Attr. Changed date, and Modified date. 5 Click the desired assay, then click the “Open” button. or To close the Select Assay window without adding a new assay definition, click the “Cancel” button. 6 The message “Imported successfully!” appears in the message bar when the import is complete. 8086643(2012/09) (03) 2–15 BD MAX System User’s Manual Figure 2-5 – Assays Display To Delete an Assay Note that you cannot delete an assay definition when the Select Assay window (appears after the “Add” button is clicked) is in view. If the Select Assay window is in view, click the “Cancel” button to close the window. 1 Click the desired assay. 2 Click the “Delete” button. 3 The highlighted assay is immediately deleted. Assays Display Fields Assay Name Read-only field showing the defined assay name. 2–16 8086643(2012/09) (03) Installation Figure 2-6 – Select Assay Window NOTE All assays provided by BD are fixed parameter assays that have been cleared or approved by FDA. Version Read-only field showing the version of the assay definition. Release Date Read-only field showing the date that the assay definition was released. Date Imported Read-only field showing the date that the assay definition was imported into the instrument database. Imported By Read-only field showing the user who was logged on when the assay definition was imported. 8086643(2012/09) (03) 2–17 BD MAX System User’s Manual Assays Display Buttons “Add” button Click to open the Select Assay window to select the assay definition to add. “Delete” button Click to delete the highlighted assay definition. “Open” button Click to open and import the highlighted assay definition. “Cancel” button Click to cancel the assay definition import. 2–18 8086643(2012/09) (03) Installation 2.4.6 UDP Protocols Display The UDP Protocols display is not for IVD use. 8086643(2012/09) (03) 2–19 BD MAX System User’s Manual 2.4.7 Configuration Display The Configuration display allows you to customize settings for the instrument, Work List, and audio volume. Configuration changes take effect when the system is restarted. All user levels can change configuration settings. See Figure 2-7. To Access the Configuration Display From the Main menu, click the “Administration” button (or, from any other display, click the “Administration” button) Configuration Click the Configuration tab Configuration Display Fields Instrument # Click to set an instrument number. The default instrument number is 1. Click the UP arrow to increase the instrument number. You can select a number from 1 to 99. Click the DOWN arrow to decrease the instrument number. Description 1 Click to enter information to identify your laboratory. You can enter up to 25 characters. Description 2 Click to enter additional information to identify your laboratory. You can enter up to 25 characters. Volume Click the UP arrow to increase the volume of system beeps. Click the DOWN arrow to decrease the volume. Click and hold either arrow to rapidly increase or decrease the displayed value. Each click changes the volume by a value of 10. 0 is the lowest volume. 100 is the highest volume. The default value is 60. You can also adjust the volume with the buttons at the bottom of the monitor’s front panel. Work List: Patient ID Checkbox When checked, the Patient ID field appears on the Work List display. When unchecked, the field does not appear on the display. The default value is checked (enabled). Either Patient ID or Accession must be enabled. If both fields are disabled when the display is saved, Patient ID is enabled automatically. 2–20 8086643(2012/09) (03) Installation Figure 2-7 – Configuration Display Work List: Accession Number Checkbox When checked, the Accession field appears on the Work List display. When unchecked, the field does not appear on the display. The default value is unchecked (disabled). Either Patient ID or Accession must be enabled. If both fields are disabled when the display is saved, Patient ID is enabled automatically. Enabling LIS automatically enables the Accession Number field. Configuration Display Buttons “Save” button Click to save the settings. Configuration changes take effect when the system is restarted. 8086643(2012/09) (03) 2–21 BD MAX System User’s Manual 2.4.8 External Devices Display The External Devices display enables you to set up parameters for the Pre-warm Station (not currently available), Assurity Linc, and LIS Communications. Each of these devices is described in the sections named below: • Pre-warm Station (not currently available) • LIS Configuration (Section 2.4.8.2) • Assurity Linc (Section 2.4.8.3) See Figure 2-8. To Access the External Devices Display From the Main menu, click the “Administration” button (or, from any other display, click the “Administration” button) External Devices Click the External Devices tab 2.4.8.1 Pre-warm Station Window The Pre-warm Station is not currently available. 2.4.8.2 LIS Configuration Window The LIS Configuration window enables you to set up parameters for communications with a Laboratory Information System (LIS). Changes to any LIS parameters require the instrument to be rebooted to take effect. Enabling LIS automatically enables the Accession Number field. See Figure 2-8. LIS Fields Enable LIS checkbox To enable LIS communications, click the checkbox so that a check appears in it. To disable LIS communications, click the checkbox so that the check disappears. When enabled, the parameters discussed below become active (not grayed out). Physical window BAUD Click the drop-down arrow to select the desired baud rate. Select from 1200, 2400, 4800, 9600 (default), or 19200. 2–22 8086643(2012/09) (03) Installation PARITY Click the drop-down arrow to select the method of parity check used in serial communications with the LIS. Select from NONE (default), ODD, or EVEN. Data Bits Click the DOWN arrow to decrease or the UP arrow to increase the number of data bits used in serial communications with the LIS. Select from 7 or 8 (default). Stop Bits Click the DOWN arrow to decrease or the UP arrow to increase the number of stop bits used in serial communications with the LIS. Select from 1 (default) or 2. Logical window LIS Solicited Results checkbox Click the checkbox so that a check appears in it to enable Solicited mode. In Solicited mode (default), results are uploaded by the instrument ONLY when requested by the LIS. In Unsolicited mode (checkbox unchecked), the instrument uploads results to the LIS automatically when they are available. When Solicited mode is enabled, the 3 Upload fields immediately below are disabled. Upload Instrument Negatives checkbox Click the checkbox so that a check appears in it to enable the upload of instrument negatives. This checkbox is active only when the LIS Solicited Results checkbox is unchecked. Instrument negatives refers to negative results of BD-defined assays. Upload Instrument Positives checkbox Click the checkbox so that a check appears in it to enable the upload of instrument positives. This checkbox is active only when the LIS Solicited Results checkbox is unchecked. Instrument positives refers to positive results of BD-defined assays only. Upload Confirmed Positives checkbox Click the checkbox so that a check appears in it to enable the upload of confirmed positives. This checkbox is active only when the LIS Solicited Results checkbox is unchecked. Confirmed positives refers to user-confirmed positive results of BD-defined assays. You can confirm positive results in the Results > Run x > PCR Analysis display (Section 5.7.3.2). Packed Frames checkbox Click the checkbox so that a check appears in it to enable Packed Frames. With Packed Frames, the instrument uploads information in multiple records per frame. To disable Packed Frames, tap the checkbox so that the check disappears. When disabled, the instrument uploads one record per frame (default setting). LIS Configuration Window Button “Save” button Click to save the settings. The settings take effect when the system is restarted. 8086643(2012/09) (03) 2–23 BD MAX System User’s Manual Figure 2-8 – External Devices Display 2–24 8086643(2012/09) (03) Installation 2.4.8.3 Assurity Linc Window The Assurity Linc window enables you to set up paramaters for the Assurity Linc gateway system. The Assurity Linc gateway system is a minicomputer that collects information from a BD MAX instrument and transmits it to BD Support computers, where it can be accessed by BD Service associates. When Assurity Linc is enabled, the BD MAX system sends its log files (including the instrument database, GUI log file, back end log file, user configuration settings, and heartbeat log files) to BD Service at designated (not user configurable) times. For additional information about the Assurity Linc gateway system, refer to the separate BD Assurity Linc™Gateway System Instructions, document 8086461. Enabling Assurity Linc requires the instrument to be rebooted to take effect. See Figure 2-8. Assurity Linc Window Fields Enable Assurity Linc checkbox To enable Assurity Linc communications, click the checkbox so that a check appears in it. To disable Assurity Linc communications, click the checkbox so that the check disappears. (Status information) A general status message appears below the Enable checkbox. Typically the message states: Assurity Linc is enabled and running (pid xxxx), where pid xxxx indicates the process identification number. External IP Address Set the IP address for the Assurity Linc device. The first three octets are fixed (192.168.2.x). Select a value from 1 to 99 for the Assurity Linc IP address. If the IP Address is changed, it does not take effect until instrument power is cycled. Assurity Linc Window Button “Save” button Click to save the settings. The settings take effect when the system is restarted (IP address changes do not take effect until instrument power is cycled). 2.5 Instrument Startup Whenever power is applied to the instrument, the following operations are performed: all hardware systems are checked and initialized. Various sensors and subsystems are verified. The instrument reports any problems that require user attention through alerts. If any files are missing or corrupted which would prevent proper operation of the instrument, the startup process is aborted. If not, the user interface loads automatically. Afterwards, the instrument awaits sample login. BD recommends that the instrument and All-in-One computer be powered on at all times except during certain maintenance procedures (as recommended). 8086643(2012/09) (03) 2–25 BD MAX System User’s Manual 2–26 8086643(2012/09) (03) Controls and Indicators 3.1 General This section describes the meaning and use of the controls and indicators of the BD MAX instrument. The overall layout of the instrument cabinet is shown in Figure 3-1 BD MAX Instrument Layout. Individual components are illustrated in figures accompanying the related text. The following controls and indicators are discussed: • Power Switch • Door Handle • All-in-One Computer • USB Ports (4) WARNING IT IS MANDATORY THAT ALL SYSTEM USERS BECOME THOROUGHLY FAMILIAR WITH ALL CONTROLS AND INDICATORS BEFORE ATTEMPTING TO OPERATE THE SYSTEM. 8086643(2012/09) (03) 3–1 BD MAX System User’s Manual Power Switch All-in-One Computer Power Input Door Handle Figure 3-1 – BD MAX Instrument Layout USB ports, not shown, are located on left side of instrument at bottom. 3.2 Power Switch The main instrument power switch is located on the right side of the instrument near the top. See Figure 3-1 BD MAX Instrument Layout. When in the Off (O) position, power is removed from the instrument. When in the On (|) position, the switch illuminates green and power is applied to the instrument. Power must be turned On for sample processing and testing to occur. For normal operation, the power should remain on at all times (except during some maintenance procedures). 3.3 Door Handle The door is locked and unlocked by the instrument software. An electromagnetic latch keeps the door locked whenever a run is in progress and when the robotic arm may move. Open the door by grasping the handle, pushing down slightly, and sliding the door upward. Close the door by sliding the door downward. The door handle is shown in Figure 3-1 BD MAX Instrument Layout. 3–2 8086643(2012/09) (03) Controls and Indicators WARNING FOR SAFETY, NEVER ATTEMPT TO DEFEAT OR OVERRIDE THE DOOR INTERLOCK SWITCH. USER INJURY CAN RESULT. DO NOT ATTEMPT TO FORCE THE DOOR OPEN WHEN IT IS LATCHED. 3.4 All-in-One Computer The All-in-One computer contains the following components: • Hard disk drive that stores run data and results, the operating system, BD MAX application, and the GUI • Memory • Speakers • I/O ports • An optical drive The All-in-One computer should remain connected at all times to the USB Type B connector on the left side of the BD MAX instrument at the bottom (Figure 3-5). Two USB ports and the Power/Standby switch are located on the right side of the All-in-One. Power must be left on to create Work Lists and perform runs. I/O ports are located on the bottom panel (Figure 3-3). For BD MAX use, only the power input (from the power adapter), serial port (for LIS connection), and USB ports (for peripheral devices) are used. Monitor and sound controls are located at the bottom of the front panel (Figure 3-4). The controls are, from left to right: Volume Down, Volume Up, Brightness, Contrast, Mute/Exit, and Menu/Enter. 8086643(2012/09) (03) 3–3 BD MAX System User’s Manual Figure 3-2 – All-in-One – Right Side Figure 3-3 – All-in-One – I/O Ports Power input from power adapter is at far right; Serial Port is blue port to left of power input; USB ports are to the left of the serial port. 3–4 8086643(2012/09) (03) Controls and Indicators Figure 3-4 – Monitor and Sound Controls 8086643(2012/09) (03) 3–5 BD MAX System User’s Manual 3.5 External Connections The USB ports are located on the left side of the instrument, at the bottom. The square USB port (Type B) is located on the left side of the I/O panel. This is where you connect the All-in-One computer to the instrument. The other 3 USB ports (Type A) can be used to connect system peripherals (keyboard, mouse, and handheld barcode scanner). (Peripheral devices can be connected to USB ports on the All-in-One computer instead, if you prefer.) You can also connect a USB thumb drive for exporting results or error logs. The 3 Type A USB ports are located on the right side of the I/O panel. See Figure 3-5 External Connections (I/O Panel). Figure 3-5 – External Connections (I/O Panel) Type B USB port on left; Type A USB ports (3) on right. 3–6 8086643(2012/09) (03) Operation 4.1 General This section describes the routine operation of the BD MAX instrument. The following major topics are discussed: • User privileges (Section 4.2) • Using the instrument interface (Section 4.3) • Creating a full run (Section 4.4) • Viewing, Printing, and Exporting results (Section 4.5) • Responding to alarms and errors (Section 4.6) • End of day cleanup (Section 4.7) • Long-term shutdown (Section 4.8) 8086643(2012/09) (03) 4–1 BD MAX System User’s Manual 4.2 User Privileges When your user account is created, it is assigned one of 3 privilege levels. If you attempt to access a function or display that requires a higher privilege level, the following message appears in the middle of the display: Figure 4-1 – Privilege Violation Window Contact your lab supervisor to determine if you require a higher privilege level. 4.3 Using the Instrument Interface The monitor presents all the information needed to view instrument status and operate the instrument. The information is presented on displays that are accessed through the Main menu (see Figure 1-5 – Main Menu). Various operations are performed by clicking on buttons that appear on the displays or by touching them on the monitor’s touchscreen. See below for information on display regions. Display Regions System displays are arranged as described below and shown in Figure 4-2. • Menu bar – the main display selections • Product name – BD MAX, located at the top right • LIS indicator – if LIS communications is enabled, the letters “LIS” appear below the Product name • Tabs primary, secondary – enables navigating between different displays in a group; the primary set of tabs is located just below the Menu bar; if a display has a secondary set of tabs, they are located just above the Prompts bar • Main body of display – occupies most of the display region at the center • Prompts bar – shows prompts or GUI status information, just above the Instrument status bar • Instrument status bar – shows instrument status, located at the very bottom • Current user – shows current user at the bottom right Buttons Buttons can be found anywhere on a display, however most are located on the right side or near the bottom of the display. Buttons can be clicked with the left mouse button. They darken when clicked. 4–2 8086643(2012/09) (03) Operation –––––––––––––––––– Menu Bar –––––––––––––––––– ––– Primary Tabs ––– LIS Indicator (not shown) Product Name Instrument Number Main Display Body Secondary Tabs (not shown) Prompt/GUI Status Bar Instrument Status Bar Current User Figure 4-2 – Display Regions Drop-down fields Drop-down fields present multiple choices when you click them. Many drop-down fields allow you to use the UP or DOWN arrow keys to cycle through the available field choices when that field has focus. Fields that have focus have a blue box surrounding the field box. Service Mode When a BD representative has enabled Service Mode, display and menu backgrounds have a distinctive red pattern showing the words, “Service Mode” (see Figure 4-3). Do not attempt to use the instrument if your instrument is left in Service Mode. Contact your local BD representative for further instructions. 8086643(2012/09) (03) 4–3 BD MAX System User’s Manual Figure 4-3 – Example of Service Mode Indication All the displays, fields, and buttons are discussed in detail in Section 5 – Reference. Functions which cannot be performed (buttons or icons) are “grayed out.” 4–4 8086643(2012/09) (03) Operation 4.4 Creating a Full Run Creating a full run consists of 3 main activities: • Logging in samples/tests (Section 4.4.1) • Preparing the instrument for a run (Section 4.4.2) • The BD MAX run (Section 4.4.3) 4.4.1 Logging in Samples/Tests To log in sample tubes or tests, you must complete these steps: • Prepare the sample rack • Turn on the instrument • Logon to the system • Create lot numbers for IVD Assay or URS (as appropriate) • Log in the sample tubes/tests Prepare the Sample Rack NOTE Use only powder-free disposable gloves when setting up or running the BD MAX instrument. Specimens should be collected, transported, and prepared, according to the instructions in the appropriate BD MAX IVD Assay package insert. Refer to assay-specific package inserts for instructions on testing different specimen types. 1 Add appropriate specimen volume (varies according to specimen type) to each Sample Buffer tube and follow any additional preparation steps described in the package insert. 2 Place the tubes into a clean and dry sample rack with barcode labels (linear) facing outward (this makes scanning tubes easier during sample login). Make sure the square 2D barcode at the bottom of the label is also facing outward and that there is not a label gap facing the instrument’s mirror. Each Sample Buffer tube has a unique sequence number. The number is printed in two barcode formats, 2D and linear, which helps maintain traceability throughout operation. Turn on the BD MAX Instrument The BD MAX system should be left powered on. The door should be kept closed when not in use. 1 If power is not on already, turn on instrument power by pushing the Power switch on the righthand side (facing the system) to the On position 2 The instrument takes about 1 minute to initialize. 3 If the All-in-One computer is not on, push its Power switch to the On position. 4 When instrument start-up is complete, the Main Menu appears. 8086643(2012/09) (03) 4–5 BD MAX System User’s Manual Logon to the System All user levels can set up a Work List for a run. 1 From the Main Menu, click the Logon button. 2 The Logon window appears. 3 Enter your Username and Password. The username and password are case sensitive. 4 Click the “OK” button. 5 You are successfully logged on if your username appears at the bottom right of the display. Create Lot Numbers 1 From the Main Menu, click the “Run” button. 2 Click the “Consumable Info” tab. The Consumable Info display appears (see Figure 4-4). 3 For each lot of URS being used, scan the barcode on the reagent kit. The barcode number appears in the Enter New Consumable Barcode field at the bottom of the display. 4 Click the “Info” button to populate the fields with information for that reagent lot. 5 Click the “Save” button to save the lot information. The barcode number appears in the Barcode list. A “Y” in the Active field indicates that this lot is active. 4–6 8086643(2012/09) (03) Operation Figure 4-4 – Consumable Info Display 6 If you have to use a second lot in a rack, note the location (Position) of the lot change to log the information into the Work List. 7 To deactivate a reagent lot, click the desired lot number and then click the “Disable” button at the right of the display. The lot remains in the list, but “N” appears in the Active field, indicating that the reagent is Not active. 8086643(2012/09) (03) 4–7 BD MAX System User’s Manual Load URS 1 Place the appropriate type of URS in a clean and dry sample rack for each sample tube from this lot. (See Figure 4-5.) Place each URS into position with the pipette tip toward the front of sample rack and the reaction tube nearest the Sample Buffer tubes. CAUTION Be sure each URS is seated in position correctly, with the back of the URS under the back rail of the sample rack, and the front edge of URS (behind barcode tab) under the front lip. Both must be fully engaged for proper loading. 2 Make sure all Unitized Reagent Strips are aligned and pulled forward. If a URS is not aligned correctly, gently pull the URS down and forward to reseat it. 3 If they are not already in place, place the appropriate foil-sealed extraction reagents into each URS (refer to the package insert) by snapping each tube into place. Extraction reagent foil seals are color coded in white to match the white stripe (with which they align) on the sample rack. Place the appropriate foil-sealed PCR master mix tubes into each URS (refer to the package insert) by snapping each tube into Position 2. The foil seal is color coded to match the colored stripe on the sample rack (see Figure 4-5). Make sure tubes are snapped into place securely. Figure 4-5 – URS and Reagents in Sample Rack 4–8 8086643(2012/09) (03) Operation Log in the Sample Tubes 1 Click the “Work List” tab. The Work List display appears (see Figure 4-6). 2 Click the Assay field in Row A1 and select the assay/ type by clicking it in the drop-down list. Only predefined assays appear in this list. The selected assay populates the selected row and the rest of the rows in the first rack. 3 Click on the first row to highlight the row. An arrow appears below the “n” of the Position field name. To complete the Work List row by row, click the arrow so that it points rightward (→). To complete the Work List column by column, click the arrow so that it points downward (↓). 4 Click in the Sample Tube ID field and scan or type in the Sample Buffer tube linear barcode for the first sample. 5 Click in the Patient ID field and scan or type in the identification linear barcode for the first sample. This information is optional (provided Accession is enabled). If this field is enabled, you must enter data in it. The Patient ID or Accession field is enabled in the Administration > Configuration display. 6 Click in the Accession field and enter the accession number by scanning or typing it in the Accession field. This information is optional (provided Patient ID is enabled). If this field is enabled, you must enter data in it. The Accession field is enabled in the Administration > Configuration display. 7 If the sample is an External Control, click the cursor in this field and select Positive or Negative in the drop-down list to designate the type of control. This field is informational only. 8 Select the lot number for the URS (only) by clicking in the Lot Number field and selecting the lot number in the drop-down list. Lot numbers must be defined in the Consumable Info display before they can be selected here. This information is optional but strongly recommended to assist in potential troubleshooting efforts. Lot information appears in reports when it is entered on the Work List. The lot number selected populates the selected row and all rows below it. 8086643(2012/09) (03) 4–9 BD MAX System User’s Manual Figure 4-6 – Work List Display 9 The Concentration and Units fields are not for IVD use. 10 When you reach row B1, select the assay for the second (right) rack by clicking the desired test in the Assay drop-down list. The selected test populates the selected row and the rest of the rows in the second rack. 11 Repeat Steps 3 – 10 for the rest of the samples. For the second and all additional samples, the cursor advances automatically if you scan barcodes to enter data in the fields. To Clear the Information for (and below) a Selected Line 1 Click the desired row once. An “X” appears at the far right of the Position field. 2 Click the “X” button twice. The information in that row is cleared. In addition, the Assay and Lot Number fields below that row are cleared. 3 Re-select the assay and lot numbers if you log in additional samples. To Clear the Work List Display 4–10 1 To clear all logged in samples, tap the “Clear Work List” button. 2 The button text changes to a countdown of approximately 3 seconds (Confirm: Clear Work List 3s). Click the button again while the countdown is progressing to clear the Work List. If you do not click the button a second time while the countdown is progressing, the Work List is not cleared. 8086643(2012/09) (03) Operation 4.4.2 Preparing the Instrument After sample tubes are logged in, prepare the BD MAX instrument for sample testing by performing the activities listed below in Procedure. Required Materials • Powder-free, disposable gloves • Microfluidic cartridges • Sample racks loaded with sample tubes, reagents, and URS for the run Procedure 1 After the work list is completed, and all Sample Buffer tubes, and URS with reagents are positioned in the sample rack, place the sample rack(s) into the system as shown in Figure 4-7. (Sample rack A is positioned on the left side of the BD MAX instrument and sample rack B is on the right.) 2 The sample rack has pegs to guide and secure the rack in place. Lower the handle towards the back of the sample rack once the sample rack is in position to lock the rack in place. Repeat for the second sample rack. 3 Place an unused or partially used (one previous run) microfluidic cartridge into the cartridge drawer (see Figure 4-8). Position the chamfered edge of the BD MAX Microfluidic Cartridge into the upper left corner of the drawer. NOTE The BD MAX Microfluidic Cartridge can be used for a maximum of 2 full process runs. BD recommends leaving the cartridge in the instrument for 2 consecutive runs. 4 Make sure the microfluidic cartridge is positioned correctly, and lies snugly on the reader drawer. NOTE Do not manually close the Microfluidic Cartridge drawer; it closes automatically. 8086643(2012/09) (03) 4–11 BD MAX System User’s Manual Microfluidic Cartridges ^^ Sample Rack A ^^ Sample Rack B Figure 4-7 – Sample Racks on Instrument Deck Figure 4-8 – Inserting a Microfluidic Cartridge 4–12 8086643(2012/09) (03) Operation 4.4.3 The BD MAX Run Initiating a Run 1 To begin a run, close the door of the BD MAX instrument. Click the “Start Run” button. The instrument initializes and homes the motors to their ready positions. Next the instrument performs a catalog check by reading the barcodes on the URS, reagents, Sample Buffer tubes, and Microfluidic Cartridges to verify the Work List. Cartridges are scanned a second time, right before they are loaded into the readers. 2 3 The Status display appears automatically as the run begins. If there are any errors or mismatches in the catalog check, the instrument issues an alert. You can view the status of the catalog check in the following locations: • On the Work List display, a Caution symbol () appears to the right of the Position field for the sample that caused the error • On the Status display, the specific consumable that caused the error is filled in red; move the cursor over the red area to view the problem (see Figure 5-10); a yellow snap-in indicates an unknown reagent and a yellow box on the microfluidic cartridge indicates that it is partially used; neither of these yellow statuses stops the run • The failure could be caused by a missing consumable, swapped extraction and PCR reagents, etc. NOTE Monitor Status display for catalog check errors to confirm the successful initiation of each run. For catalog check errors, the run stops. The catalog error must be corrected before the run can proceed or a new Work List can be created. If there is a problem with the cartridge when the second cartridge check occurs, a message appears advising you to correct the problem. Click the “Unlock Door” button on the Work List display to access the sample tray and microfluidic drawers. Correct the source of the error. Close the door and click the “Start Run” button. The catalog check resumes. 4 When the catalog check completes successfully, sample preparation or PCR begins depending upon the selected test. 8086643(2012/09) (03) 4–13 BD MAX System User’s Manual Viewing Run Status 1 In the menu bar, click the Status button. 2 The Status display appears. 3 The Status display updates dynamically as operations progress on the instrument. As consumables complete their portion of the run, they are filled in green. Status messages also appear in the Instrument Status bar. Figure 4-9 shows a run after sample preparation is complete and the PCR process has started. Figure 4-9 – Status Display with PCR in Progress 4–14 8086643(2012/09) (03) Operation Unlocking the Door The “Unlock Door” button appears on the Work List display. This button unlocks the instrument door. You may need to unlock the door for the following reasons: • to correct catalog check errors that stop run progress until they are corrected • a run is complete • sample preparation is complete (PCR is running) and you want to add new sample racks • if you abort sample preparation and need to remove reagents To Unlock the Door 1 On the Work List display, click the “Unlock Door” button. 2 When you click the button, the text changes to a countdown of approximately 14 seconds (“Unlock Door in 14.”). After 14 seconds, the button text returns to its original wording. 3 Open the instrument door while the countdown is progressing. The door relocks after 14 seconds if you have not opened it. If you miss the 14 second window, simply click the button again to unlock the door again. WARNING NEVER ATTEMPT TO OPEN THE DOOR WHILE THE “UNLOCK DOOR” BUTTON IS GRAYED OUT. Removing Sample Racks When the BD MAX instrument has completed a run, or when the first batch of samples has reached the point where the last sample is being cycled within the instrument, the status of the robot is Idle, and the Reader(s) Status is listed as Running PCR, the “Unlock Door” button becomes enabled on the Work List display. To remove sample racks: 1 Unlock the door as described above. 2 Remove the rack(s) containing the disposable material from the run. 3 If another run can be performed on the current microfluidic cartridges, load the new sample racks on the instrument deck. If there are no more runs available for the current microfluidic cartridges, you can remove the sample racks and dispose of the consumables in accordance with all applicable regulations. 8086643(2012/09) (03) 4–15 BD MAX System User’s Manual To Abort the Catalog Check The “Abort Catalog” button is located at the top right of the Work List display. It is active while the catalog check is in progress. 1 To abort the catalog check phase of a run, click the “Abort Catalog” button. 2 The text changes to a countdown of approximately 3 seconds (“Confirm: Abort Catalog 3s”). Click the button again while the countdown is progressing to abort the catalog check. If you do not click the button a second time while the countdown is progressing, the catalog check is not aborted and the button text returns to its original wording. 3 The system immediately stops the current operation. 4 The display returns to the normal Work List. You can restart the run after clicking the “Unlock Door” button. To Abort Sample Prep The “Abort Sample Prep” button is located at the top right of the Work List display. It is active once a run has started, and stays active until sample preparation is completed. NOTE The Abort Sample Prep function causes the loss of the entire run. If the problem affects only a few specimens, it may be possible to complete the run and repeat the affected specimens. 4–16 1 To abort the sample preparation phase of a run, click the “Abort Sample Prep” button. 2 The text changes to a countdown of approximately 3 seconds (“Confirm: Abort Sample Prep 3s”). Click the button again while the countdown is progressing to abort sample preparation. If you do not click the button a second time while the countdown is progressing, sample preparation is not aborted and the button text returns to its original wording. 3 The system immediately stops the current operation. The liquid handling head dispenses any liquid in the pipette tips into the waste vessel, returns the pipette tips and moves to its home position. 4 The “Unlock Door” button is enabled so that you can remove the sample racks. 8086643(2012/09) (03) Operation 5 If needed, set up the Work List, reagents, specimens and BD MAX Microfluidic Cartridges for a new run. 6 Close the door to begin the new run. To Abort PCR The “Abort PCR” button allows you to abort the PCR process if it is determined there is a problem. It is located at the top right of the Work List display. This button is active only when sample preparation is completed. NOTE The Abort PCR function causes the loss of the entire run. If the problem affects only a few specimens, it may be preferable to complete the run and repeat the affected specimens. 1 To abort PCR phase of a run, click the “Abort PCR” button. 2 The text changes to a countdown of approximately 3 seconds (“Confirm: Abort PCR 3s”). Click the button again while the countdown is progressing to abort PCR. If you do not click the button a second time while the countdown is progressing, PCR is not aborted and the button text returns to its original wording. 3 The PCR process on both BD MAX Microfluidic Cartridges stops immediately. 4 The “Unlock Door” button is enabled to provide access to the inside of the instrument. 4.4.4 Interleaved Runs Interleaving enables you to maximize the use of your BD MAX instrument by keeping sample preparation and PCR operations as fully utilized as possible. While the first run is in PCR cycling, the second run can begin sample prep. Once the first batch of samples has been verified by the instrument and sample prep has started, you can start the off-instrument preparation of the second batch of samples. You can enter information into the Work List for the second batch of samples at any time during the first batch sample prep, i.e., when Running Sample Prep is listed as Status on the instrument. CAUTION Exposure of lyophilized reagents to elevated humidity outside of their protective packaging and/or adding samples to the Sample Preparation Buffer too far in advance of the instrument preparation can cause unsatisfactory results. Refer to the appropriate package insert for more information regarding individual tests. Specimen stability studies must be conducted by the user for user generated protocols. Once the first batch of samples has progressed to a point where the last sample is being cycled within 8086643(2012/09) (03) 4–17 BD MAX System User’s Manual the instrument, the status of the robot is Idle, and the Reader(s) Status is listed as Running PCR, the “Unlock Door” button becomes enabled on the Work List display. To Start the Second Run 1 Open the instrument door by clicking the “Unlock Door” button on the Work List display. 2 Remove the rack(s) containing the disposable material from the first run. 3 Enter the information for the second run into the Work List, if not already entered. 4 Load the racks containing the samples and reagent strips for the second run into the instrument. 5 Close the instrument door and click the “Start Run” button. The instrument begins processing the second run up to the point of loading the PCR cartridges. 6 If a new cartridge is used for the first run, the bottom row of the cartridge is available for the second run. If the cartridge has been used previously (i.e., when interleaving more than 2 runs), the drawers containing the PCR cartridges move to the out position. At the bottom of the Status display, the message Waiting for New Cartridge... is displayed, and the “Unlock Door” button is enabled. 7 Click the “Unlock Door” button and open the door. 8 Remove the used cartridges from the instrument, place in a sealable bag, and dispose of in accordance with all federal, state, regional, and institutional guidelines. Do not remove the racks at this time. 9 Place new cartridges into the reader drawers. 10 Close the instrument door to complete cartridge loading of the second run. NOTE Before loading the new cartridges, the instrument verifies all barcodes from the second run, including the new cartridges. Be sure to monitor the Status display for door and run status, and for prompts to load the next disposables. Some messages include timers that may vary among different assays/tests. 4–18 8086643(2012/09) (03) Operation NOTE When a timer appears, typically you can replace the microfluidic cartridges and restart the run. However, a timer may also appear when there is a conflict in the instrument’s ability to finish Sample Prep and/ or PCR due to the timing constraints of the selected test/ assay. You should carefully review the timer and evaluate each situation to see if the issue can be resolved. If you are unable to decide the best course of action, contact your local BD representative for additional recommendations. If a cartridge needs to be replaced but cannot because of the current instrument operation, a “mute” button appears in the Status Bar at the bottom of the display. Tap the “mute audible alarm” button to silence any audible alarm. The “audible alarm is muted” icon indicates that a silenced alarm is still active. “mute audible alarm” button “audible alarm is muted” icon You can view results from the first run while the second run samples are undergoing sample preparation. Data from the first run continues to be available in the Results > RunX displays, for viewing, downloading, or printing. 4.5 Viewing, Printing, and Exporting Results When a run is complete, you can view, print, and download the results to a thumb drive in the Results displays. You can perform the following operations: • View run results • Print reports • Download (export) results to a USB thumb drive 4.5.1 Viewing Results 1 From the Main Menu, click the “Results” button. 8086643(2012/09) (03) 4–19 BD MAX System User’s Manual 2 Click the “Results” tab. The Results list display appears (Figure 4-10). 3 Double-click the desired run on the list display. A new tab appears, labeled “Run X” (where “X” is the Run number. 4 Click the “Run X” tab to open the Run Details display. Figure 4-10 – Results List Display 4–20 8086643(2012/09) (03) Operation 4.5.1.1 Run Details When the run is complete, a detailed table of results can be viewed in the Results > Run X > Details tab. See Figure 4-11. The table shows the following information (not all columns mentioned below appear for all run types): • Date and time of the run • Run number • Assay/Test name • Position • Cartridge position • Patient ID • Accession • Result • Lot number • Status of Sample Preparation (SP) and/or PCR • Concentration (Not for IVD Use) • Recalc Conc (Not for IVD Use) • Conc Units (Not for IVD Use) • Sample Tube Barcode • CT Wavelength (Not for IVD Use) • Melt Wavelength (Not for IVD Use) Additional information on this display is provided in Section 5.7.3.1 Details. 8086643(2012/09) (03) 4–21 BD MAX System User’s Manual Figure 4-11 – Details Display 4–22 8086643(2012/09) (03) Operation 4.5.1.2 PCR Analysis The PCR Analysis display enables you to view PCR curves for past runs. To access the PCR Analysis display, from the Results > Run X Details display, click the “PCR Analysis” tab. Figure 4-12 shows a sample PCR Analysis display. By default, only the channels used in the test are shown and all Positions are shown. Use the Plot? checkboxes and the Display Rack A/B checkboxes to view and hide specific Positions (samples). For IVD assays, you can confirm the positive status of a sample for upload to the LIS by checking the Confirm Positive checkbox. Only samples with a status of Positive can be confirmed positive. Click the “Save Confirm Positive” button to upload the updated status according to your LIS communication configuration. Figure 4-12 – PCR Analysis Display 8086643(2012/09) (03) 4–23 BD MAX System User’s Manual 4.5.2 Printing Results 1 From the Main Menu, click the “Results” button. 2 Click the “Results” tab. The Results list display appears (Figure 4-10). 3 Double-click the desired run on the list display. A new tab appears, labeled “Run X” (where “X” is the Run number. 4 Click the “Run X” tab to open the Run Details display. 5 Click the “Print” tab. The Print window appears (Figure 4-13). 6 Click the checkbox next to the report(s) you want to print. 7 Click the “Create Report” button to preview the report(s) in the Preview window. 8 To print the report to the default printer, click the “Print Report” button. Figure 4-13 – (Results) Print Display 4–24 8086643(2012/09) (03) Operation 4.5.3 Downloading (Exporting) Results The Download (export) operation exports results to a Comma Separated Value (.csv) file and copies a PDF file of the current report. Refer to Section 5.7.3.5 (Results) Download for additional information on what data is exported. 1 From the Main menu, click the Results button. 2 Click the “Results” tab. The Results list display appears (Figure 4-10). 3 Insert a formatted, unpartitioned thumb drive into an available USB port (left side of the instrument). 4 Double-click the desired run to open the Run Details display for that run. 5 Click the “Download” tab to access the Download display (Figure 4-14). 6 If the thumb drive does not appear on the list, click the “Detect USB Disks” button. 7 Click the desired USB drive. Figure 4-14 – Results Download Display As it appears after results are exported successfully. 8086643(2012/09) (03) 4–25 BD MAX System User’s Manual 8 Click the “Export” button. The information is downloaded to the selected drive, and a confirmation message appears in the window. 9 Remove the thumb drive when the operation is complete. 4.6 Responding to Errors As you perform activities at the BD MAX instrument, and as testing progresses, alerts and errors may occur. See Section 7.2 System Problems and 7.3 Error List for the different types of errors. CAUTION When the instrument notifies you of alerts and errors, you should immediately respond to the condition. Unresolved errors are reported in the System Errors Summary. These errors represent instrument errors that may stop the progress of testing. To Review System Errors: 1 From the Main menu, click the Maintenance button. 2 Click the “System Error Summary” tab. 3 Review the error listing. For catalog check errors, the instrument stops until the error is corrected. Correct the error, then click the “Acknowledge Errors” button to resume testing. NOTE Monitor Status display for catalog check errors to confirm the successful initiation of each run. For catalog check errors, the run stops. The catalog error must be corrected before the run can proceed or a new Work List can be created. 4 4–26 For other errors, consult the error listings in Section 7.3 Error List. 8086643(2012/09) (03) Operation 4.7 End of Day Cleanup CAUTION Do not use any decontamination or cleaning agents that could cause a hazard as a result of a reaction with parts of the equipment, or with material contained in it. Consult your local BD representative to determine the compatibility of any decontamination or cleaning agents not listed in this manual. Do not use abrasive or corrosive cleaners on heater boards. Do not spray or pour liquid directly on surfaces. At the end of each day, perform the following cleaning procedure: 1 Wipe down the following items and areas with 1% (v/v) sodium hypochlorite in water, 3% hydrogen peroxide solution, DNA AWAY, or commercially available disinfecting wipes containing 1% sodium hypochlorite. Dampen a lint-free cloth for the cleaning process. • sample racks • laboratory work surfaces • ancillary items such as hand pipettors, vortex, tube racks, etc. • all external and internal work surfaces of the BD MAX instrument, except the monitor screen, the clear part of the instrument door, and the glass surface of the cartridge drawer (it is recommended that you clean external BD MAX surfaces before internal surfaces) 2 Using a unidirectional motion, thoroughly wipe off all system parts that came into contact with sodium hypochlorite (a known PCR inhibitor) with a lint-free cloth dampened with deionized (DI) water, then with 70% alcohol. 3 Use a new, dampened lint-free cloth for each solution. 4 Dry the system with a lint-free cloth. Sample racks should be cleaned between each run. Refer to the assay-specific package insert for additional instructions on cleaning. 4.8 Long Term Shutdown 1 Remove all microfluidic cartridges from the instrument. 2 Turn instrument power off. 3 Disconnect the power cord from the wall outlet/UPS and the instrument. 4 Clean the system as described in Section 4.7. 5 Close the door to minimize intrusion of dust into the interior. 8086643(2012/09) (03) 4–27 BD MAX System User’s Manual 4–28 8086643(2012/09) (03) Reference 5.1 General This section presents reference material on the BD MAX instrument user interface. The following information is presented: • Software tree (Section 5.2) • Main menu (Section 5.3) • Logon/Logoff (Section 5.4) • Run displays (Section 5.5) • Status display (Section 5.6) • Results display (Section 5.7) • Administration displays (Section 5.8) • Maintenance displays (Section 5.9) 8086643(2012/09) (03) 5–1 BD MAX System User’s Manual 5.2 Software Tree The following is a hierarchical list of all displays/functions in the instrument. The sections where these activities are discussed in detail are noted in parentheses. Main Menu (Section 5.3) Logon/Logoff (Section 5.4) Run (Section 5.5) Work List (Section 5.5.1) PCR Only (Section 5.5.2) (Not for IVD Use) Pre-warm (Section 5.5.3) (Not currently available) Test Editor (Section 5.5.4) (Not for IVD Use) Consumable Info (Section 5.5.5) Status (Section 5.6) Results (Section 5.7) Reader_A/B (Section 5.7.1) Results (Section 5.7.2) Run X (Section 5.7.3) Details (Section 5.7.3.1) PCR Analysis (Section 5.7.3.2) Melt Analysis (Section 5.7.3.3) (Not for IVD Use) Quantitative Analysis (Section 5.7.3.4) (Not for IVD Use) Download (Section 5.7.3.5) Print (Section 5.7.3.6) Administration (Section 2.4) Users (Section 2.4.1) Date & Time (Section 2.4.2) Language (Section 2.4.3) Printer (Section 2.4.4) Assays (Section 2.4.5) UDP Protocols (Section 2.4.6) (Not for IVD Use) Configuration (Section 2.4.7) External Devices (Section 2.4.8) Maintenance (Section 6.2.4) System Error Summary (Section 6.2.4.1) Version (Section 6.2.4.2) Maintenance (Section 6.2.4.3) Event Log (Section 6.2.4.4) 5–2 8086643(2012/09) (03) Reference 5.3 Main Menu The Main menu (Figure 5-1) is the default display that appears immediately after instrument bootup. This menu presents buttons for the major software functions (see below). To access a function, first log on to the system (Section 5.4), then click the desired function. The following major functions are available: • Logon/Logoff • Run • Status • Results • Administration • Maintenance The product name appears at the top left of the display. If a user is logged on, the Username appears at the bottom right of the display. The instrument number appears at the bottom right of the display. If LIS communications is enabled, the letters LIS appear to the left of the instrument number. The letters are red if LIS is enabled but not communicating. The letters are white if LIS is enabled and communicating. Main Menu Icons and Buttons 8086643(2012/09) (03) “Logon” / “Logoff” button “Results” button “Run” button “Administration” button “Status” button “Maintenance” button 5–3 BD MAX System User’s Manual Figure 5-1 – Main Menu Shown with user ADMIN logged on and LIS enabled. 5–4 8086643(2012/09) (03) Reference 5.4 Logon / Logoff The Logon / Logoff function enables you to log onto or off of the BD MAX user interface. Logon/logoff is accessed from the Main menu. You must be logged on with a defined Username/Password to perform any functions at the instrument, such as logging in samples, viewing results, etc. When a user is logged on, the Username appears at the bottom right of the display and the button is named “Logoff.” Clicking the “Logoff” button enables the logged in user to log off of the system. When no one is logged in, the button is named “Logon” and clicking it accesses the logon window (Figure 5-2). For information on adding, modifying, and deleting User accounts, refer to Section 2.4.1. NOTE The first time you log on, you must use the ADMIN Username and Password. Be sure to change the password for security reasons. To access Logon / Logoff From the Main menu, click the “Logon” / “Logoff” button From any other display, click the “Logon” / “Logoff” button in the Menu bar To Logon: In the Username field, enter your user name (case sensitive) In the Password field, enter your password (case sensitive) Click the “OK” button to log on, or click the “Cancel” button to cancel the logon To Logoff: From the Main Menu, click the “Logon” / “Logoff” button again Figure 5-2 – Logon Window 8086643(2012/09) (03) 5–5 BD MAX System User’s Manual 5.5 Run Displays Run displays allow you to access displays to create a Work List to set up and initiate a full assay run and to enter consumable information to be used in testing. 5.5.1 Work List Display The Work List display is where you log in samples for testing. You define the Work List by entering information for each sample, including Assay, sample barcode, patient and accession (if configured), lot number, concentration, and optional external control. Work Lists cannot be saved; the Work List you define is specific to the current run. All user levels can set up Work Lists. See Figure 5-3. To Access the Work List Display From the Main menu, click the “Run” button (or, from any other display, click the “Run” button) Work List Click the “Work List” tab To Create a Work List Refer to Section 4.4.1 – Logging in Samples/Tests for step-by-step instructions on creating a Work List. Work List Display Fields Load Cartridge Top Row Checkbox This field appears only when it is enabled by a BD representative. Check this box if this is the first run using the current microfluidic cartridge. Load Cartridge Bottom Row Checkbox This field appears only when it is enabled by a BD representative. Check this box if this is the second run using the current microfluidic cartridge. A maximum of 2 runs with 2 full sample racks can be run on a pair of microfluidic cartridges. 5–6 8086643(2012/09) (03) Reference Position Read-only field showing the sample’s rack position. Positions go from 1 to 12 for both racks A and B. Error Indicator (Unlabeled column) Caution symbol () to the right of the sample’s Position indicates a catalog check error. You must correct the error, then clear the error(s) (see Section 6.2.4.1 – System Error Summary Display) before proceeding with the current run or creating a new Work List. Assay Click to select an assay from the drop-down list box. When you select an assay, all rows in that rack (A or B) below the current row are populated with that assay. To complete the field for both racks, select the assay/test at Position A1 and B1. You must select an assay to initiate a run. Sample Tube ID Enter the Sample Buffer tube’s barcode number by scanning the linear barcode or typing in the human readable characters. If the barcode is entered incorrectly, or an improper barcode is scanned, the words, “Invalid Barcode” appear in the field and the instrument beeps 4 times. If the tube has passed its expiration date, the words “Expired Barcode” appear in the field, and the instrument beeps 4 times. You must enter Sample Tube IDs to initiate a run. Patient ID This field is enabled in the Administration > Configuration display (Section 2.4.7). Enter the sample’s patient identification. You can enter up to 20 alphanumeric characters. This field is optional (provided Accession is enabled). If the field is enabled, you must enter data for it. Accession This field is enabled in the Administration > Configuration display (Section 2.4.7). Enter the sample’s accession by scanning the linear barcode or typing in the human readable characters. You can enter up to 20 alphanumeric characters. This field is optional (provided Patient ID is enabled). If the field is enabled, you must enter data for it. External Control If the sample is an external control, click to select either Positive or Negative to designate the type of control. This field is optional, and is informational only. Lot Number Click to select from a predefined lot number. When you select a lot number, all rows below the current row are populated with that lot number. Lot numbers to be used in a run must be defined in the Run > Consumable Info display (Section 5.5.5) before you create a Work List. You cannot type in or scan a lot number that has not been predefined in Consumable Info. You must select lot numbers for all samples to initiate a run. Concentration This field is not for IVD use. 8086643(2012/09) (03) 5–7 BD MAX System User’s Manual Units This field is not for IVD use. Work List Display Buttons “→” (right arrow) button When you click (highlight) a row that is populated with entries, an arrow button appears at the center right of the Position column. The right arrow causes the cursor to advance across the row as you press the “Tab” key on the keyboard or scan barcodes. Alternatively, you can complete the Work List by columns by clicking the → to change it to ↓. “↓” (down arrow) button When you click (highlight) a row that is populated with entries, an arrow button appears at the center right of the Position column. The down arrow causes the cursor to advance down the column as you press the “Tab” key on the keyboard or scan barcodes. Alternatively, you can complete the Work List by rows by clicking the ↓ to change it to →. “X” button When you click (highlight) a row that is populated with entries, an “X” appears at the far right of the Position column. Click the “X” button once to create a larger “X” button; click the larger “X” button to clear all the rows below the highlighted row (inclusive of that row). “Start Run” button Click to start the run. This button is disabled if the door is not closed. “Unlock Door” button Click to unlock the door. When you click the button, the text changes to a countdown of approximately 14 seconds (“Unlock Door in 14.”). After 14 seconds, the button text returns to its original wording. You may need to unlock the door for the following reasons: • to correct catalog check errors that stop run progress until they are corrected • a run is complete • sample preparation is complete (PCR is running) and you want to add new sample racks • if you abort sample preparation and need to remove reagents “Clear Work List” button Click to clear all entries from the currently displayed Work List. When you click the button, the text changes to a countdown of approximately 3 seconds (“Confirm: Clear Work List 3s”). Click the button again while the countdown is progressing to clear the Work List. If you do not click the button a second time while the countdown is progressing, the Work List is not cleared and the button text returns to its original wording. “Abort Catalog” button This button is grayed out until the catalog check has begun. Click to abort the catalog check portion of the run. When you click the button, the text changes to a countdown of approximately 3 seconds (“Confirm: Abort Catalog 3s”). Click the button again while the countdown is progressing to abort the catalog check. If you do not click the button a second time while the countdown is progressing, the catalog check is not aborted and the button text returns to its original wording. 5–8 8086643(2012/09) (03) Reference “Abort Sample Prep” button This button is grayed out until the catalog check completes successfully and sample preparation has begun. Click to abort the sample prep portion of the run. When you click the button, the text changes to a countdown of approximately 3 seconds (“Confirm: Abort Sample Prep 3s”). Click the button again while the countdown is progressing to abort sample preparation. If you do not click the button a second time while the countdown is progressing, sample preparation is not aborted and the button text returns to its original wording. Figure 5-3 – Work List Display “Abort PCR” button This button is grayed out until the sample preparation completes successfully and PCR has begun. Click to abort the PCR portion of the run. When you click the button, the text changes to a countdown of approximately 3 seconds (“Confirm: Abort PCR 3s”). Click the button again while the countdown is progressing to abort PCR. If you do not click the button a second time while the countdown is progressing, PCR is not aborted and the button text returns to its original wording. 8086643(2012/09) (03) 5–9 BD MAX System User’s Manual 5.5.2 PCR Only Display The PCR Only Display is not for IVD use. 5–10 8086643(2012/09) (03) Reference 5.5.3 Pre-warm Display Pre-warm functionality is not currently available. 5.5.4 Test Editor Tab The Test Editor tab is not for IVD use. Assay parameters for all FDA cleared or approved IVD tests are predefined by BD. Users cannot modify, edit, or copy these assays. 5.5.5 Consumable Info Display The Consumable Info display enables you to create, enable, and disable consumable lots to use when creating Work Lists. Only defined consumable lots can be used when creating a Work List. See Figure 5-4. To Access the Consumable Info Display From the Main menu, click the “Run” button (or, from any other display, click the “Run” button) Consumable Info Click the “Consumable Info” tab To Add Consumable Info Refer to Section 4.4.1 – Logging in Samples/Tests for step-by-step instructions on adding consumable information. Consumable Info Display Fields Enter new consumable barcode Scan or type in the barcode for the consumable (assay lot number). You can use the barcode on the box or on the consumable pouch. Type Read-only field showing the type of consumable (e.g., General Purpose Strip, Sample Prep Vial, etc.; if type cannot be determined, the value “Unknown” appears). This information is embedded in the lot barcode. Mfg Date Read-only field showing the lot’s date of manufacture (YYYY-MM-DD; if the date cannot be determined, the value “n/a” appears). This information is embedded in the lot barcode. 8086643(2012/09) (03) 5–11 BD MAX System User’s Manual Expires Read-only field showing the lot’s expiration date (YYYY-MM-DD; if the date cannot be determined, the value “n/a” appears). This information is embedded in the lot barcode. If the lot has expired, the word “EXPIRED” appears after the date, and both are in red text. Serial Num Read-only field showing the lot’s serial number (typically a 4-digit number; if the serial number cannot be determined, the value “n/a” appears). This information is embedded in the consumable barcode. Figure 5-4 – Consumable Info Display Used Read-only field showing whether the lot is USED or New (if the used value cannot be determined, the value “n/a” appears). Consumable Info Display Buttons “Disable”/”Enable” button Click to enable or disable the highlighted consumable. Enabled consumable lots show “Y” in the Active field in the main part of the display, and they appear in the Lot Number drop-down field on the Work List display. Disabled lots show “N” in the Active field. 5–12 8086643(2012/09) (03) Reference “Clear” button Click to clear the entry from the Enter new consumable barcode field. “Info” button Click to populate the fields for the current consumable lot. The type, manufacturing date, expiration date, and serial number are read from the barcode. “Save” button Click to save the lot information. 8086643(2012/09) (03) 5–13 BD MAX System User’s Manual 5.6 Status Display The Status display shows run status in a dynamic graphic format. Timers appear at the top of the display, and status messages appear in the Instrument Status bar. Any errors or problems are flagged graphically (red/yellow fill) on the display in the place that the problem occurs. Catalog Checks As each item successfully passes the catalog check, that consumable turns green on the display. If all items pass the catalog check, the message, Catalog Scan Complete appears in the Instrument Status bar. If an item fails the catalog check, that consumable turns red on the display, and the Status changes to Catalog Error. Move the cursor over the red area to view the problem. For the Sample Buffer tube, the barcode, Patient ID and Accession (if applicable) appear in a flyover window. Catalog errors must be corrected before the run can proceed or a new Work List can be created. A yellow snap-in indicates an unknown reagent and a yellow box on the microfluidic cartridge indicates that it is partially used; neither of these yellow statuses stops the run NOTE Monitor Status display for catalog check errors to confirm the successful initiation of each run. For information on clearing errors, refer to Section 6.2.4.1 – System Error Summary Display. As the run progresses, timers at the top of the display for Sample Prep, Load Cartridge, and PCR show time remaining for that operation. In addition, messages in the Instrument Status bar are updated. The status of each bank (A/B1-A/B4, A/B5-A/B8, and A/B9-A/B12) of each rack is updated dynamically at the bottom of the display with the following status: Idle, Waiting, Lysis, Wash, Release, Mix with Master Mix, Sample Prep Complete. The URS graphic fills in green as the sample preparation progresses, and the microfluidic cartridges also reflect status changes as PCR progresses. You can use to mouse pointer to hover over barcoded items (Sample Buffer Tubes, URS) to see the barcode number. You can also hover over red (error) areas to see the specific error condition and in the bottom status bar (e.g., Missing). Figure 5-5 shows a blank Status display, and indicates the locations of progress bars. Both sample preparation and PCR feature progress bars for completion of those phases of the run. The sample prep progress bar is bounded by the outline of the URS. The PCR progress bar is the PCR well of the microfluidic cartridge. Figure 5-6 shows a Status display with a catalog check error. Figure 5-7 shows a Status display with the run complete. 5–14 8086643(2012/09) (03) Reference To Access the Status Display From the Main menu, click the “Status” button (or, from any other display, click the “Status” button) Time remaining Progress bars for PCR Progress bars for sample prep Status Figure 5-5 – Status Display (blank) Progress bars are for each URS and each PCR well. Timers at top indicate remaining time for the operation. 8086643(2012/09) (03) 5–15 BD MAX System User’s Manual Figure 5-6 – Status Display with Catalog Error 5–16 8086643(2012/09) (03) Reference Figure 5-7 – Status Display with Run Complete 8086643(2012/09) (03) 5–17 BD MAX System User’s Manual 5.7 Results Display 5.7.1 Reader_A/B Displays The Reader_A/B displays are not for IVD use. 5–18 8086643(2012/09) (03) Reference 5.7.2 Results (List) Display The Results (List) display presents a list of all run results currently in the instrument’s database. This display provides basic information about the run, including: an ID number for the run, User who was logged on when the run occurred, the date and time of the run, the number of tests in the run, and any Notes you want to enter about the run. A window at the bottom of the Results list display allows you to search for a particular run based on the following criteria: Patient ID, Accession, Assay/Test type, Result, and Date Range. See Figure 5-8. To Access the Results Display From the Main menu, click the “Results” button (or, from any other display, click the “Results” button) Results Click the “Results” tab To Search for a Run 1 Enter the information on which you want to search in the appropriate field(s) at the bottom of the display. Note the following constraints for searching: • Patient ID – The field is case sensitive. You cannot do a partial search, however you can enter wildcards for searching. For example, if you want to find a Patient ID that begins with PET but has additional characters about which you are unsure, enter PET* in the Patient ID field. If you enter just PET, the search fails. If you enter pet*, the search fails. • Accession – Same notations as Patient ID. • Assay – Select the desired assay or test by clicking the drop-down arrow at the right of the field, then clicking the test in the drop-down box. • Result – Select the desired result by clicking the drop-down arrow at the right of the field, then clicking the test in the drop-down box. • From this Date – Enter the starting date for the search in the form, mm/dd/yyyy, where mm is the numeric month. • To this Date – Enter the ending date for the search in the form, mm/dd/yyyy, where mm is the numeric month. You can enter multiple criteria, however if your search repeatedly fails, you might have better success entering fewer criteria on which to search, then gradually adding information to narrow down the search. 2 Click the “Search” button. Only the runs that meet the criteria you entered are shown in the Select Runs window. 8086643(2012/09) (03) 5–19 BD MAX System User’s Manual Figure 5-8 – Results (List) Display 3 To clear the criteria and display all runs in the Select Runs window, click the “Reset” button. Results Display Fields Select Runs Window The Select Runs window appears at the top of the Results list display and is where the listing of runs appears. ID The identification number of the run. Each successive run is numbered sequentially. User The Username that was logged on when the run occurred. Date The date and time that the run occurred. # Tests The number of samples that were tested in the run. 5–20 8086643(2012/09) (03) Reference Notes Enter up to 34 characters to describe the run. These notes are printed on reports under the report title. Search Criteria Window The Search Criteria window appears at the bottom of the Results list display and is you enter information on which to search for specific runs. Patient ID Enter the Patient ID for which to search. The field is case sensitive and accepts wildcards. Accession Enter the Accession for which to search. The field is case sensitive and accepts wildcards. Assay Select the desired assay or test by clicking the drop-down arrow at the right of the field, then clicking the test in the drop-down box. Result Select the desired result by clicking the drop-down arrow at the right of the field, then clicking the test in the drop-down box. From this Date Enter the starting date for the search in the form, mm/dd/yyyy, where mm is the numeric month. To this Date Enter the ending date for the search in the form, mm/dd/yyyy, where mm is the numeric month. Results Display Buttons “Search” button Click to perform a search on the criteria you entered. Only the runs that meet the criteria you entered are shown in the Select Runs window. “Reset” button Click to clear the criteria you entered and show all runs in the Select Runs window. 8086643(2012/09) (03) 5–21 BD MAX System User’s Manual 5.7.3 Run X Display The Run X display (where X is a number) appears when you double-click a run in the Results list display. When the Run X display is first accessed, the Details display appears (Figure 5-9). The Run X Details display presents information about the run and results in a table-like format. You can access other graphs and functions related to run results by clicking tabs at the bottom of the display. These additional graphs and functions are described in Sections 5.7.3.1 – 5.7.3.6. 5.7.3.1 Details The Run X Details display presents read-only information about the run and results in a table format. The display is shown in Figure 5-9. The fields that are displayed vary with the type of run that is performed. Not all columns mentioned below appear for all run types. To Access the Run X Details Display From the Main menu, click the “Results” button (or, from any other display, click the “Results” button) Results Click the “Results” tab Double-click the run in the Results List display Run X Details Display Fields Date The date and time that the run occurred. Run The ID number of the run. Test The assay or test name. Position The position of the Sample Buffer tube on the sample rack. Cartridge Position The position of the sample on the microfluidic cartridge. Patient The patient ID entered on the Work List/PCR Only display. 5–22 8086643(2012/09) (03) Reference Figure 5-9 – Details Display (left part) Accession The accession entered on the Work List/PCR Only display. Result For assays, the final result of testing. See Package Insert for specific information relevant to the assay. • ABORT – indicates the run was aborted or an Empty Fill Check failure occurred • IND – indicates the sample was indeterminate or had a Liquid Level Sense error (nonPositive sample) • NA – indicates the sample is not an assay • NEG – indicates the sample was negative • POS – indicates the sample was positive • UNR – indicates unresolved: neither the internal control nor the target displayed amplification Lot The Lot number entered on the Work List/PCR Only display. 8086643(2012/09) (03) 5–23 BD MAX System User’s Manual Status Indicates status for Sample Preparation (SP) and PCR (PCR). Success process was successfully completed Error process was not successfully completed (where Error is the actual error that occurred) Incomplete process did not start Not Applicable does not apply Script Aborted process was aborted SP Barcode The barcode number of the Sample Buffer tube entered on the Work List/PCR Only display. Concentration This field is not for IVD use. Conc Units This field is not for IVD use. Recalc Conc This field is not for IVD use. CT Wavelength (where Wavelength is the actual wavelength) This field is not for IVD use. Melt Wavelength This field is not for IVD use. 5–24 8086643(2012/09) (03) Reference 5.7.3.2 PCR Analysis The PCR Analysis display enables you to view PCR readings for samples read by the BD MAX instrument’s readers. Readings are plotted in line graphs for each wavelength on the left side of the display. You select which sample positions to view from a listing of tested positions on the right side of the display. Each sample is plotted in a unique color to help you distinguish different samples. By default, wavelengths that are not used in a given test are not displayed. See Figure 5-10 for a sample PCR Analysis display. To Access the PCR Analysis Display From the Main menu, click the “Results” button (or, from any other display, click the “Results” button) PCR Analysis Double-click the run in the Results List display Click the “PCR Analysis” tab PCR Analysis Display Fields Wavelength graphs Each wavelength that is used in the run appears on the left side of the display. The x-axis represents cycles and the y-axis represents fluorescence. A legend of Identifier (either Position, Accession, or Patient ID) and line graph colors appears below the graph. This legend can be moved. Place the cursor over any edge of the legend and hover, until the cursor changes to a hand. Grab the legend and move it to the desired location. The graph automatically scales vertically and horizontally to accommodate readings. The overall size of a given graph can be increased by deselecting wavelengths with the “Wavelength” checkboxes. When only one wavelength is selected, it fills the left half of the display. 8086643(2012/09) (03) 5–25 BD MAX System User’s Manual Figure 5-10 – PCR Analysis Display 5–26 8086643(2012/09) (03) Reference Curve selection box The Curve selection box enables you to select Raw curves or Background curves. Background curves are displayed with the same starting point. Raw curves are displayed with their unadjusted starting point.The default setting is Background curves. When Raw is selected, the Threshold cannot be recalculated. Legend selection box The Legend selection box enables you to select whether the legend in the graph area displays Position, Accession, or Patient ID to identify each trace. It also controls whether Patient ID or Accession is displayed in the data table. The default value is Accession. Wavelength checkboxes (where Wavelength is the actual wavelength) Each wavelength that the instrument is capable of testing has a corresponding checkbox at the top right of the display. Check the checkbox to enable a graph for that wavelength on the left side of the display containing readings. Uncheck the checkbox to remove that wavelength from the graphs on the left side. The default setting is for only the wavelengths used in the run to be shown. Position field The Position field shows the Positions used in the run. Patient ID or Accession The Patient ID or Accession for the sample is shown. The default is Accession, unless that field is disabled in Administration > Configuration. Plot? checkbox Click to select an individual Position to show/hide in the graph. Checked Positions are shown, unchecked Positions are hidden. Confirm Positive checkbox Only samples with a final call of POS are enabled for selection with this checkbox. Check to mark the specimen as a user-confirmed positive for upload to the LIS system. This field is only used for filtering results uploaded to the LIS. Results are not confirmed until the “Save Confirm Positive” button is clicked. Result Read-only field showing the final result for predefined BD assays. These are the same values shown in the Results > Run x > Details display (Section 5.7.3.1). 8086643(2012/09) (03) 5–27 BD MAX System User’s Manual Display Rack A/B checkboxes Click to select all the positions in Rack A or B (or both) to show/hide in the graph. When checked, all positions in that rack are shown; when unchecked, all positions in that rack are hidden. Test Click the arrow to drop down a list of all tests or assays used in the run. To select a test or assay to display, click that test/assay in the list. When you select a test/assay, only the applicable positions are displayed; other tests/assays are hidden. PCR Analysis Display Buttons “Save Confirm Positive” button Click to save the Confirm Positives status. After the status is saved, the Confirm Positive specimens are uploaded according to LIS upload parameters (immediately or when solicited by the LIS). 5–28 8086643(2012/09) (03) Reference 5.7.3.3 Melt Analysis The Melt Analysis display is not for IVD use. 8086643(2012/09) (03) 5–29 BD MAX System User’s Manual 5.7.3.4 Quantitative Analysis The Quantitative Analysis display is not for IVD use. 5–30 8086643(2012/09) (03) Reference 5.7.3.5 (Results) Download The Download display enables you to download results from a run to a USB thumb drive. Results are exported to a Comma Separated Value (.csv) file. See Section 4.5.3 for a step-by-step procedure on downloading results. Figure 5-11 shows a Download display. To Access the (Results) Download Display From the Main menu, click the “Results” button (or, from any other display, click the “Results” button) Download Double-click the run in the Results List display Click the “Download” tab (Results) Download Display Fields Choose USB disk field This window shows any USB disks that have been inserted into the USB ports on the left side of the instrument (at the bottom rear). It takes approximately 10 seconds for a disk to be mounted for use after it is inserted in the USB port. Status window This window shows status messages related to the export process. (Results) Download Display Buttons “Detect USB Disks” button Click to populate the Choose USB disk field with any USB thumb drives currently inserted in the USB ports. “Export” button Click to begin the export process. 8086643(2012/09) (03) 5–31 BD MAX System User’s Manual CAUTION Do not remove the USB thumb drive until its light stops flashing and the message, “It is now safe to remove the usb disk” appears in the Status window. Figure 5-11 – (Results) Download Display Content of CSV File The CSV file contains the following information: 5–32 • General – Instrument Serial Number, Date exported, Run ID, Date, User, PCR Only (yes/ no) • Run Summary – StripPosition, CartridgePosition, Patient ID, Accession Number, Sample Tube ID, Test, Ct 585/630, Ct 630/665, Ct 475/520, Ct 680/715, Ct 530/565, Result, Strip, Extraction, PCR, Cartridge, TestID, VersionID, Prep Status, PCR Status, ErrorCode, Melt 585/630, Melt 630/665, Melt 475/520, Melt 680/715, Melt 530/565, Recalc 585/630, Recalc 630/665, Recalc 475/520, Recalc 680/715, Recalc 530/565, Lot Barcode 8086643(2012/09) (03) Reference • PCR Detector Settings – Position, Color, Gain(Percent), Exposure(ms) • PCR Data – Cycle (1-50), Pos#0/Col#0, Pos#1/Col#0, Pos#2/Col#0 ... Pos#23/Col#5 • PCR Crosstalk Corrected Data – Cycle (1-50), Pos#0/Col#0, Pos#1/Col#0, Pos#2/Col#0 ... Pos#23/Col#5 • PCR Background Data – Cycle (1-50), Pos#0/Col#0, Pos#1/Col#0, Pos#2/Col#0 ... Pos#23/Col#5 • Raw PCR Data – Cycle (1-50), Pos#0/Col#0, Pos#1/Col#0, Pos#2/Col#0 ... Pos#23/Col#5 • PCR Normalization Data – Cycle (1-50), Pos#0/Col#0, Pos#1/Col#0, Pos#2/Col#0 ... Pos#23/Col#5 • Melt Detector Settings – Position (0-23), Color (0-5), Gain (Percent), Exposure (ms) • Version – Collected date and time, Software Version Number; Board Set ID, Board type, Board version, Board script version, Board name • Optics Normalization Parameters – Date and time, Comment, Status for each board, LED attenuation factors (00-11) for each board, LED alignment factors (00-11) for each board, LED alignment LED gains (00-11) for each board, Serial (currently (N/A), Operator name (current N/A), 8086643(2012/09) (03) 5–33 BD MAX System User’s Manual 5.7.3.6 (Results) Print The Print display allows you to generate report(s) of results. You can generate the following reports: • Results – shows comprehensive data about the run • Protocol Details – report is grayed out for BD defined assays • PCR – shows PCR analysis curves • Quantitative – report is blank for IVD assays • Melt – report is blank for IVD assays See Section 4.5.2 for a step-by-step procedure on printing results. Figure 5-12 shows a Print display. To Access the Print Display From the Main menu, click the “Results” button (or, from any other display, click the “Results” button) Double-click the run in the Results List display Print Click the “Print” tab at the bottom of the display Print Display Fields Report selection drop-down field At the top right of the Choose Report window at the left of the display, the top field enables you to select the report to be generated. Currently, only “Default” can be selected. Report preview window The preview window shows a preview of the report selected in the Choose Report window at the left of the display. Reports checkboxes The Results, Protocol Details, PCR, Melt, and Quantitative checkboxes enable you to select which report(s) you want to generate (note that Standards, Quantitative, and Melt reports are not applicable to IVD assays). Several of these reports can only be generated after the appropriate analyses are performed. Refer to the sections below that are specific to each report for additional information. The Show Recalc Concentration checkbox is not applicable to IVD assays. You can select multiple reports to be generated as a batch. 5–34 8086643(2012/09) (03) Reference Figure 5-12 – (Results) Print Display Print Display Buttons “Create Report” button Click to create the specified report and display it in the Report preview window. “Print Report” button Click to print the previewed report(s) to the selected printer. 8086643(2012/09) (03) 5–35 BD MAX System User’s Manual Results Report The Results Report shows comprehensive data about a run. This report prints in landscape mode (wide orientation). See Figures 5-13 and 5-14 for a sample Results Report. The Results Report contains the following information: • Report Header (Run Date/Time, User Name, Report Title, Notes, Descriptions (from Administration > Configuration), Instrument (Number and Serial Number), Software Version • Report Data First Row ○ Pos(ition) ○ Test Name ○ Sample Tube Barcode ○ Patient ID ○ Result Positive results are highlighted with a red background; negative results are highlighted with a green background ○ CT Wavelength (not for IVD use) ○ Concentration (not for IVD use) Second Row • 5–36 ○ SP (Sample Preparation) Status ○ PCR Status ○ Accession ○ Melt [temperature] Wavelength (not for IVD use) ○ Conc. Units (not for IVD use) ○ Lot Barcode Report Footer (Performed By signature line with Date, Reviewed By signature line with Date, Current Date/Time, Page x of y), IVD Assay statement* * BD MAX System cleared or approved by FDA only when used with BD MAX IVD Assays which have been cleared or approved by FDA. 8086643(2012/09) (03) Reference ( %# % '$%)* '$%)* '$%)* '$%)* % % '$%)* '$%)* '$%)* '$%)* '$%)* + + + + + + + + + + + + + + + + + + + + + + + + + + + + + + + + + + + + + + + + + + + + + + + + + + + + + + + + + + + + + + + + + + + + + + + + + + + + + + + + + + + + + + + + + + + + + + + + + + + + + + + + + + + + + + '$%)* %# %## + + %# + + %, + + %" + + '$%)* ! "! ! " # $ $ $ $ $ ! "! ! " # + + % % &' % %! '$%)* ()(*)+*),-../ !!" #$%& % &%&&&"# !!" #$' Figure 5-13 – Results Report (page 1) 8086643(2012/09) (03) 5–37 BD MAX System User’s Manual ( # '$%)* '$%)* '$%)* '$%)* '$%)* '$%)* '$%)* '$%)* '$%)* # + + + + + + + + + + + + + + + + + + + + + + + + + + + + + + + + + + + + + + + + + + + + + + + + + + + + + + + + + + + + + + + + + + + + + + + + + + + + + + + + + + + + + + + + + + + + + + + + + + + + + + + + + + + + + + '$%)* ## + + # + + , + + " + + '$%)* ! "! ! " # $ $ $ $ $ ! "! ! " # + + &' % ! '$%)* ()(*)+*),-../ ( !!" #$%& % &%&&&"# !!" #$' Figure 5-14 – Results Report (last page) 5–38 8086643(2012/09) (03) Reference Protocol Details Report The Protocol Details Report is unavailable (grayed out) for IVD assays. 8086643(2012/09) (03) 5–39 BD MAX System User’s Manual PCR Report The PCR Report shows graphs corresponding to PCR Analysis. This report prints in landscape mode (wide orientation). You should generate the PCR Report immediately after performing PCR analysis. If you have a row highlighted in the PCR Analysis display when you print the PCR report, the report shows the selected curve highlighted in the report. See Figure 5-15 for a sample PCR Report. The PCR Report contains the following information: • Report Header (Run Date/Time, User Name, Report Title, Notes, Descriptions (from Administration > Configuration), Instrument (Number and Serial Number), Software Version • Report Data ○ • PCR Analysis graphs for wavelengths selected in PCR Analysis display Report Footer (Performed By signature line with Date, Reviewed By signature line with Date, Current Date/Time, Page x of y), IVD Assay statement* * BD MAX System cleared or approved by FDA only when used with BD MAX IVD Assays which have been cleared or approved by FDA. *- 1 000000000000000000000000000000 000000000000000000000000000000 2"% 000000000000000000000000000000 000000000000000000000000000000 ()(*)+*),-../ !!" #$%& % &%&&&"# !!" #$' Figure 5-15 – Sample PCR Report 5–40 8086643(2012/09) (03) Reference Melt Report The Melt Report is not for IVD use. 8086643(2012/09) (03) 5–41 BD MAX System User’s Manual Quantitative Report The Quantitative Report is not for IVD use. 5–42 8086643(2012/09) (03) Reference 5.8 Administration The Administration displays are discussed in detail in Section 2.4 – Software Setup (Administration). 5.9 Maintenance Displays The Maintenance displays are discussed in detail in Section 6.2.4 – Maintenance Menu. 8086643(2012/09) (03) 5–43 BD MAX System User’s Manual 5–44 8086643(2012/09) (03) Maintenance 6.1 General The BD MAX instrument requires little maintenance from the user to provide reliable performance. The only routine scheduled maintenance is a weekly cleaning. All other procedures are on an “as needed” basis. WARNING THE BD MAX INSTRUMENT CONTAINS NO USER-SERVICEABLE PARTS. ALL MAINTENANCE AND REPAIR OTHER THAN THE PROCEDURES DESCRIBED IN SECTION 6.2 – Routine Maintenance MUST BE PERFORMED BY BD QUALIFIED SERVICE PERSONNEL. 8086643(2012/09) (03) 6–1 BD MAX System User’s Manual 6.2 Routine Maintenance 6.2.1 End of Day Cleanup CAUTION Do not use any decontamination or cleaning agents that could cause a hazard as a result of a reaction with parts of the equipment, or with material contained in it. Consult your local BD representative to determine the compatibility of any decontamination or cleaning agents not listed in this manual. Do not use abrasive or corrosive cleaners on heater boards. Do not spray or pour liquid directly on surfaces. At the end of each day, perform the following cleaning procedure: 1 Wipe down the following items and areas with 1% (v/v) sodium hypochlorite in water, 3% hydrogen peroxide solution, DNA AWAY, or commercially available disinfecting wipes containing 1% sodium hypochlorite. Dampen a lint-free cloth for the cleaning process. • sample racks • laboratory work surfaces • ancillary items such as hand pipettors, vortex, tube racks, etc. • all external and internal work surfaces of the BD MAX instrument, except the monitor screen, the clear part of the instrument door, and the glass surface of the cartridge drawer (it is recommended that you clean external BD MAX surfaces before internal surfaces) 2 Using a unidirectional motion, thoroughly wipe off all system parts that came into contact with sodium hypochlorite (a known PCR inhibitor) with a lint-free cloth dampened with deionized (DI) water, then with 70% alcohol. 3 Use a new, dampened lint-free cloth for each solution. 4 Dry the system with a lint-free cloth. Sample racks should be cleaned between each run. Refer to the assay-specific package insert for additional instructions on cleaning. 6–2 8086643(2012/09) (03) Maintenance 6.2.2 Weekly Cleaning CAUTION Do not use any decontamination or cleaning agents that could cause a hazard as a result of a reaction with parts of the equipment, or with material contained in it. Consult your local BD representative to determine the compatibility of any decontamination or cleaning agents not listed in this manual. Do not use abrasive or corrosive cleaners on heater boards. Do not spray or pour liquid directly on surfaces. 1 Turn off the BD MAX instrument using the On/Off switch. 2 Unplug the BD MAX instrument from the Uninterruptible Power Supply (UPS) when performing cleaning and maintenance. 3 Use proper personal protective equipment and follow safety guidelines. 4 Do not spray or pour liquid directly on surfaces. Wipe down the following items and areas with 1% (v/v) sodium hypochlorite in water, 3% hydrogen peroxide solution, DNA AWAY, or commercially available disinfecting wipes containing 1% sodium hypochlorite. Dampen a lint-free cloth for the cleaning process. • sample racks • laboratory work surfaces • ancillary items such as hand pipettors, vortex, tube racks, etc. • all external and internal work surfaces of the BD MAX instrument, except the monitor screen, the clear part of the instrument door, and the glass surface of the cartridge drawer (it is recommended that you clean external BD MAX surfaces before internal surfaces) 5 Using a unidirectional motion, thoroughly wipe off all system parts that came into contact with sodium hypochlorite (a known PCR inhibitor) with a lint-free cloth dampened with deionized (DI) water, then with 70% alcohol. 6 Inspect the cartridge drawer for foreign objects, dirt, or dust. If any are discovered in the tray, remove and clean the surface with a 70% alcohol solution on a lint-free cloth. 7 Wipe the monitor screen with an alcohol wipe, then dry the screen with a soft cloth. 8 Use either an alcohol wipe or glass cleaner to clean both the transparent cover of the system and the mirror inside the instrument, using a lint-free cloth to dry. 9 Plug the system back into the UPS and turn on. 10 Put on a clean pair of non-powdered disposable gloves before beginning BD MAX instrument operation. 8086643(2012/09) (03) 6–3 BD MAX System User’s Manual NOTE A preventative maintenance (PM) visit by an authorized BD representative will be scheduled twice a year with a service contract. 6.2.3 “As Needed” Maintenance 6.2.3.1 System Decontamination The following decontamination protocol is to be followed before transporting the system out of the laboratory for servicing. CAUTION Do not use any decontamination or cleaning agents that could cause a hazard as a result of a reaction with parts of the equipment, or with material contained in it. Consult your local BD representative to determine the compatibility of any decontamination or cleaning agents not listed in this manual. Do not use abrasive or corrosive cleaners on heater boards. Do not spray or pour liquid directly on surfaces. 6–4 1 Wear proper personal protective equipment including non-powdered disposable gloves, lab coat and eye protection when conducting decontamination. 2 Disconnect power supply of the system. 3 Open the door of the system using two hands, and remove any sample racks or BD MAX Microfluidic Cartridges. 4 Power off the system. 5 Use a lint-free cloth dampened with 1% (v/v) sodium hypochlorite, 3% hydrogen peroxide solution, DNA AWAY, or commercially available disinfectant wipes containing sodium hypochlorite to wipe all external parts of the system thoroughly (including back plate and feet). 6 With another lint-free cloth dampened with 1% (v/v) sodium hypochlorite, 3% hydrogen peroxide solution, or DNA AWAY, thoroughly wipe the interior compartment. 7 Wipe off all system parts that came into contact with 1% (v/v) sodium hypochlorite, 3% hydrogen peroxide solution, or DNA AWAY with a lint-free cloth dampened with DI water. Wipe several times to ensure that as much sodium hypochlorite as possible is removed from the system parts. 8 Wipe the system with a lint-free cloth dampened with 70% alcohol to remove any residue. 9 An authorized BD representative will package the system for shipment. 8086643(2012/09) (03) Maintenance 6.2.3.2 Cleaning Spills Clean all spills immediately using proper personal protective equipment. CAUTION Contact your local BD representative immediately if a spill occurs in any inaccessible part of the system. 1 Wipe the work surface with a lint free cloth, followed by 1% (v/v) sodium hypochlorite in water, 3% hydrogen peroxide solution, or DNA AWAY. Wipe off all system parts that came into contact with sodium hypochlorite (a known PCR inhibitor) with a lint-free cloth dampened with DI water, then wipe with 70% alcohol. 2 Allow work surface to dry. 6.2.3.3 Cleaning the Barcode Scanner Window(s) The handheld barcode scanner has a clear window through which the scanner beam passes. If the scanner is giving read errors when attempting to scan, you can try cleaning the scanner window. To clean the window, use a lint-free, non-abrasive cloth dampened with water. CAUTION DO NOT USE alcohol, acetone, or abrasive cleaners to clean the barcode scanner window. Dry the window with a dry lint-free non-abrasive cloth. 6.2.4 Maintenance Menu The Maintenance menu provides several utilities for viewing instrument events and errors and for maintaining data. The following functions are provided: • System Error Summary • Version • Maintenance functions • • Restart • Update • Shutdown • Backup Database • Restore Database Event Log You must be an Admin level user to access the Maintenance menu. 8086643(2012/09) (03) 6–5 BD MAX System User’s Manual 6.2.4.1 System Error Summary Display The System Error Summary display provides a listing of the most recent System Errors. The following information is provided: Date, Position, Error Code, Run ID, Mux ID, Reason. A button allows you to acknowledge or clear the display of errors that can prevent a new work list from being created. System errors are described in Section 7 – Error List. See Figure 6-1. To Access the System Error Summary Display From the Main menu, click the “Maintenance” button (or, from any other display, click the “Maintenance” button) System Error Summary Click the System Error Summary tab To Clear the Display 1 Access the System Error Summary Display (see above). 2 Click the “Clear All Errors” button. System Error Summary Display Fields ACK Read-only field showing whether the error has been acknowledged. Yes indicates that a user has clicked the “Acknowledge Errors” button after this error occurred. No indicates that the error has not been acknowledged. DATE Read-only field showing the date and time that the error occurred. POSITION Read-only field showing the position of the error. ERROR CODE Read-only field showing the error code of the error. RUN ID Read-only field showing the ID of the run of the error. 6–6 8086643(2012/09) (03) Maintenance Figure 6-1 – System Error Summary Display MUX ID Read-only field showing the ID of the mux. REASON Read-only field showing a text description of the error. System Error Summary Display Buttons: “Acknowledge Errors” button Click to acknowledge all the displayed errors. Acknowledged errors remain on the System Error Summary display, with Yes in the ACK field. Errors that are flagged with a Caution symbol () on the Work List (to the right of the sample’s Position) prevent the creation of a new Work List until they are acknowledged or cleared. “Clear All Errors” button Click to clear the display of errors. Errors that are flagged with a Caution symbol () on the Work List (to the right of the sample’s Position) prevent the creation of a new Work List until they are acknowledged or cleared. 8086643(2012/09) (03) 6–7 BD MAX System User’s Manual 6.2.4.2 Version Display The Version display is a read-only display that shows the instrument software version and serial number. See Figure 6-2. To Access the Version Display From the Main menu, click the “Maintenance” button (or, from any other display, click the “Maintenance” button) Version Click the Version tab Version Display Fields Version: Read-only field showing the version of the instrument software. Serial Number Read-only field showing the instrument serial number. 6–8 8086643(2012/09) (03) Maintenance Figure 6-2 – Version Display 8086643(2012/09) (03) 6–9 BD MAX System User’s Manual 6.2.4.3 Maintenance Display The Maintenance display enables you to perform several instrument functions, including Restart, Update, Shutdown, Backup and Restore Database, Log Snapshot, Backup All Logs to Thumb Drive, and to override certain types of instrument errors. See Figure 6-3. To Access the Maintenance Display From the Main menu, click the “Maintenance” button (or, from any other display, click the “Maintenance” button) Maintenance Click the Maintenance tab Maintenance Display Fields and Buttons Maintenance Functions Field Click the UP/DOWN arrows to drop down the Maintenance functions field. See Figure 6-4. To perform any function, click the name of the function in the drop-down field, then click the “Execute” button to the right. You can perform the following functions: • Restart – Restarts the GUI to accept configuration changes. To perform a restart, close the instrument door, if it is open. Select Restart from the drop-down list box, then click the “Execute” button. • Update – Updates the instrument software. To perform an update, insert the software update thumb drive in a USB port. Click Update, then click the “Execute” button. The software is updated and informs you when the update is complete. Remove the thumb drive, then use the Restart function to restart the GUI. If one or more of the following messages appear: HUEY contained # extra files that were backed-up then deleted. DEWEY contained # extra files that were backed-up then deleted. LOUIE contained # extra files that were backed-up then deleted. Contact your local BD representative for further instructions. Check the Software Release Notes for additional information on the specific software update. • 6–10 Shutdown – Shuts down the GUI. This function should only be performed under BD direction. To shut down the GUI, click Shutdown, then click the “Execute” button. The GUI terminates. 8086643(2012/09) (03) Maintenance Figure 6-3 – Maintenance Display • Backup Database – Backs up the instrument database to a thumb drive. You should perform a database backup at least monthly, and also before any software update is initiated. To backup the database, insert an unpartitioned thumb drive into a USB port. Click Backup Database, then click the “Execute” button. The GUI shuts down as the backup is performed. The database is then copied to a file named “Database” on the thumb drive. When the backup is complete, the GUI restarts. Remove the thumb drive and store it in a secure location. Note that the data in this file is stored in a root folder and is readable only by the BD MAX instrument. Do not change the name of the file. • Restore Database – Restores a database backup to the instrument. This function should only be performed under BD direction. To restore the database, verify that the desired backup is in the root folder of the thumb drive. Insert the thumb drive into a USB port. 8086643(2012/09) (03) 6–11 BD MAX System User’s Manual CAUTION Be sure to use the correct database backup set when you restore your database. The restore operation completely overwrites the existing database with whatever backup set is on the thumb drive. Click Restore Database, then click the “Execute” button. The instrument’s database is overwritten with the database on the thumb drive. • Set Serial # – Enables you to set the instrument serial number. When you click the “Execute” button, a dialogue box launches, prompting you to input the instrument's Serial Number. Enter the Serial Number and press Enter. The instrument software restarts automatically. Figure 6-4 – Maintenance Functions Field Environment Variables Window NO_EXTRAPOLATE_QUANT checkbox (Not for IVD use.) This field instructs the instrument to show recalculated concentrations on the Quantitative Analysis display that fall outside the standard curve range (min/max values). When this checkbox is unchecked, these values are shown in the Calc Conc field at their actual recalculated value. When checked, values are shown as greater than the maximum (>x) or less than the minimum (<y) concentration value in the curve. OVERRIDE_UDP_SNAPINS checkbox (Not for IVD use.) This field instructs the instrument to ignore Catalog Check errors for Snap-in disposables for UDP tests. By default, the checkbox is unchecked (Catalog Check errors are flagged). OVERRIDE__UDP_SBT checkbox (Not for IVD use.) This field instructs the instrument to ignore Catalog Check errors for Sample Buffer Tubes for UDP tests. By default, the checkbox is unchecked (Catalog Check errors are flagged). OVERRIDE_UDP_STRIPS checkbox (Not for IVD use.) This field instructs the instrument to ignore Catalog Check errors for URS for UDP tests. By default, the checkbox is unchecked (Catalog Check errors are flagged). 6–12 8086643(2012/09) (03) Maintenance The 3 buttons below are disabled when a run is in progress. “Execute” button Click to perform any function selected in the Maintenance functions field. When the button is clicked, the text changes to a countdown of approximately 3 seconds (“Confirm: Execute 3s.”). After 3 seconds, the button text returns to its original wording. Click the button again while the countdown is progressing to execute the selected function. “Backup All Logs to USB” button This function is for use under BD direction only. Insert an empty thumb drive in the USB port. Click to copy all instrument logs and databases to the thumb drive. Depending on the amount of data, this operation can take more than 20 minutes to complete. You cannot perform any other operations while this one is in progress. ROOT Password field / “Unlock” button This function is for BD use only. 8086643(2012/09) (03) 6–13 BD MAX System User’s Manual 6.2.4.4 Event Log Display The Event Log is a read-only display that shows a list of events and activities (not errors) for which the instrument maintains a log. Such events and activities include users logging on and off, door open and close activities, run status activities. The list is presented with the oldest events at the top of the display, and the newest events at the bottom of the display. For each event that is logged, the date and time, type of event, and description (specific activity) is presented. This information is typically used by BD representatives to help with system troubleshooting. See Figure 6-5. To Access the Event Log Display From the Main menu, click the “Maintenance” button (or, from any other display, click the “Maintenance” button) Event Log Click the Event Log tab Event Log Display Fields Time Read-only field showing the day, date, and time of the event. Event Read-only field showing the general type of event that occurred. Types include, for example, Startup, Door Event, Logon, etc. Description Read-only field showing the specific event that occurred. Examples include the Username that logged on or off, whether a door opened or closed, optics calibration status, etc. 6–14 8086643(2012/09) (03) Maintenance Figure 6-5 – Event Log Display 8086643(2012/09) (03) 6–15 BD MAX System User’s Manual 6–16 8086643(2012/09) (03) Troubleshooting 7.1 General 7.1.1 Instrument Service If your BD MAX instrument malfunctions or operates unusually in any way, you may initially attempt to solve the problem by following the recommendations in this section. All other servicing attempts will terminate the responsibility of the manufacturer under the terms of the warranty. If you cannot correct an instrument malfunction, contact your local BD representative. 7.1.2 Service Contact Information (USA) Customer service is available Monday through Friday from 8 a.m. to 5 p.m. Eastern Time and can be reached by calling 800-638-8656 and entering “3.” Product inquiries and purchase orders may be placed by mail, telephone or fax to BD as follows: Customer Service Information Telephone Number: 800-638-8656, select option #3 Email Address: [email protected] Fax Number: 410-316-4723 Address: 7 Loveton Circle Sparks, MD 21152 USA The Technical Services team is responsible for installation, service, and ongoing system and assay support. Technical Services is available Monday through Friday from 8:30 a.m. to 8:00 p.m. Eastern Time and can be reached by calling 800-638-8663. Technical Service Information Telephone Number: 800-638-8663 Fax Number: 410-316-4269 Email Address: [email protected] 8086643(2012/09) (03) 7–1 BD MAX System User’s Manual 7.2 System Problems CAUTION When the instrument notifies you of alerts and errors, you should immediately respond to the condition. If the recommended corrective actions do not solve the problem, contact BD. Several problem scenarios, with possible causes and recommended actions are described in the tables below: Description System does not power on System does not turn on. Indicator light in power switch is not illuminated. Cannot enter information into Work List Run will not start when door is shut 7–2 Possible Causes Corrective Actions No power to UPS Plug in power cord to working outlet and connect other end to UPS. UPS is not turned on Hold power button for 3 seconds until unit turns on. Jumpers are not properly configured in UPS Remove stickers covering openings and insert jumpers until they click. No power to system Connect cord from system to UPS. This device contains a user replaceable line-fuse. It must be replaced with a fuse of identical rating. Replace blown fuse with new fuse (IEC 5 x 20mm fast blow (F) type, rated for 10 Amps at 250 Volts). Use of any other fuse type or rating may create a potential shock or fire hazard. Cursor is not in entry field Click on entry field. More than allowed or duplicate information entered Delete extra entries. Caution Symbol () appears in Work List Clear System Error Summary under Maintenance. See “System Error Summary.” Work List not complete Ensure all necessary information is in place. Sample Racks not in place Insert sample rack until present indicator is displayed. Door closed sensor not tripped Ensure door is fully shut. 8086643(2012/09) (03) Troubleshooting Description Run does not complete Run completes and target amplifies, but BD internal control does not amplify Run completes but target and internal control do not amplify Possible Causes Corrective Actions Liquid Handling Head failure Contact your local BD representative. Pipette tip pickup failure Contact your local BD representative. Pipette tip drop failure Remove pipette tips by hand and restart run with new samples and reagents. Sample Heater failure Contact your local BD representative. Drawer failure Contact your local BD representative. Optics failure Contact your local BD representative. PCR heater failure Contact your local BD representative. Target out competed internal control for resources during reaction Verify sample has early amplification. PCR inhibited by exogenous or endogenous substances Repeat sample testing. Liquid handling problem Check URS and Microfluidic Cartridge to determine where liquid handling problem occurred and re-run sample. If problem persists, contact your local BD representative. Make sure the door is unlocked. Turn off system using the On/Off switch. Liquid Handling Head stops in place; unable to release pipette tips Manually raise Liquid Handling Head. Pipette tip stripper motor failure Physically remove pipette tips. Turn on system using the On/Off switch. System will initialize. Restart run using new samples and reagents. Sample Buffer tube did not contain enough liquid If liquid or bubbles are visible above filter on pipette tips, contact your local BD representative. If not, repeat sample testing. Verify that sample in Sample Buffer tube is visible in window. System liquid handling failure Check URS and microfluidic cartridge(s) and check for appropriate volume transfers from reaction and reagent tubes, as well as to the cartridge. Contact your local BD representative. Calibration issue Contact your local BD representative. Microfluidic Cartridge: partial fill, no fill, bubbles 8086643(2012/09) (03) 7–3 BD MAX System User’s Manual Description Possible Causes Sample Buffer tube did not contain enough liquid If liquid or bubbles are visible above filter on pipette tips, contact your local BD representative. If not, repeat sample testing. Verify that sample in Sample Buffer tube is visible in window. System liquid handling failure Contact your local BD representative. Check URS to determine where liquid handling failure occurred. Power surge Verify that system is connected to the UPS. Optics error Contact your local BD representative. Microfluidic Cartridge valves did not seal; partial fill of lanes in cartridge Check URS and Microfluidic Cartridge(s) and check for appropriate volume transfers from reaction and reagent tubes, as well as to the cartridge. Contact your local BD representative. Sample Preparation Reagent tube did not contain enough liquid If liquid or bubbles are visible above filter on pipette tips, contact your local BD representative. If not, repeat sample testing. Verify that sample in Sample Buffer tube is visible in window. System liquid handling failure Check URS and microfluidic cartridge(s) and check for appropriate volume transfers from reaction and reagent tubes, as well as to the cartridge. Calibration issue Contact your local BD representative. Sample Preparation Reagent tube did not contain enough liquid If liquid or bubbles are visible above filter on pipette tips, contact your local BD representative. If not, repeat sample testing. Verify that sample in Sample Buffer tube is visible in window. System liquid handling failure Contact your local BD representative. Check URS to determine where liquid handling failure occurred. Cannot import assay definition file: message “Improper File Format” appears The assay definition file was renamed on the USB thumb drive, or was placed within a folder on the thumb drive Do not rename assay definition files or place them in folders on the USB thumb drive. Instrument cannot read the 2D barcode of the Sample Buffer Tube Wrong positioning of the tube in the sample rack Make sure the square 2D barcode at the bottom of the label is facing outward and that there is not a label gap facing the instrument’s mirror. Unitized Reagent Strip: Bubbles throughout PCR Issue: Spike in all amplification curves at same point PCR Issue: Very low fluorescence across all samples, including internal control Microfluidic Cartridge: partial fill, no fill, bubbles Unitized Reagent Strip: Bubbles throughout 7–4 Corrective Actions 8086643(2012/09) (03) Troubleshooting 7.3 Error List System errors generally indicate fault conditions that occur in the instrument. System errors appear in the System Error Summary Display, which is described in 6 – System Error Summary Display. System events are tracked in the Event Log, and generally indicate status messages. See 6 – Event Log Display, for more information. The table below presents System Errors, the possible causes of the errors, and suggested Corrective Actions. If the suggested corrective actions do not correct the error, or if the error recurs, contact your local BD representative. In the Corrective Action column, at the top of each row are 2 conditions: Acknowledge and Fatal. Acknowledge indicates that you must view and acknowledge the error on the System Error Summary display before you can continue instrument operations. Fatal indicates that the error causes the current run to fail and halts robot and reader operations. This necessitates repeating the tests that were in progress when the error occurred. Error Code Error Description Possible Cause(s) Corrective Action(s) 0X0 Success Script ran to successful completion. Message is informational. Acknowledge: NA Fatal: NA No corrective action needed. 0X1 Exit Failure General failure, not otherwise classified. Acknowledge: Yes Fatal: Yes Contact your local BD representative. 0X2 Exit Assert Assertion failure. Acknowledge: Yes Fatal: Yes Contact your local BD representative. 0X3 Script killed Script was killed by the OS. Acknowledge: Yes Fatal: Yes Contact your local BD representative. 0X4 Script not Found Script not found. The GUI tried to launch a script that was not on the mux. Acknowledge: Yes Fatal: Yes Contact your local BD representative. 0X5 Bad Magic Number Checksum error. Acknowledge: Yes Fatal: Yes Contact your local BD representative. 0X6 Script Aborted User aborted a run. Message is informational. Acknowledge: No Fatal: Yes 0X7 Robot Calibration Table Failure Failure in the robot calibration table. Acknowledge: Yes Fatal: Yes Contact your local BD representative. 0X8 No Parameters Specified No parameters were specified in script. Acknowledge: Yes Fatal: Yes Contact your local BD representative. 8086643(2012/09) (03) 7–5 BD MAX System User’s Manual Error Code Error Description Possible Cause(s) Corrective Action(s) 0X9 Invalid Parameters Parameter string didn't match to any in table in script. Acknowledge: Yes Fatal: Yes Contact your local BD representative. 0XA Mixed Parameters DNA and RNA were mixed on the same bank. Acknowledge: Yes Fatal: Yes Contact your local BD representative. 0XB Motor Failure Robot motor communication failure. Acknowledge: Yes Fatal: Yes Contact your local BD representative. 0XC Could not Drop Tip Failed to drop tips in 2 tries Acknowledge: Yes Fatal: Yes Contact your local BD representative. 0XD Could not Pickup Tip Failed to pickup tips in 3 tries Acknowledge: Yes Fatal: Yes Contact your local BD representative. 0X10 Heater Timeout Warning. Heater timeout on bank X, lane Y! Temperature=Z Lysis heater does not reach temperature in specified time. Message is informational. Acknowledge: No Fatal: No Error can occur on a per-lane basis. Assay results of positive remain positive if error occurs. All other assay results are reported as Indeterminate. OSR tests are reported as Heater Timeout Warning for SP Status. If error recurs frequently, contact your local BD representative. 0X11 Optics Failure Normalizer detection for LED failed (timeout). Acknowledge: Yes Fatal: Yes Contact your local BD representative. 0X12 Optics Restarted Optics restart exceeded 10 tries Acknowledge: Yes Fatal: Yes Contact your local BD representative. 0X13 File not Found Failed to find XML parameter file. Acknowledge: Yes Fatal: Yes Contact your local BD representative. 0X14 Syntax Error Syntax error in XML parameter file. Acknowledge: Yes Fatal: Yes Contact your local BD representative. Motion Timeout Timeout on motor movement. May be caused by a jammed microfluidic cartridge. Acknowledge: Yes Fatal: Yes See if cartridge can be easily removed. If not, contact your local BD representative. 0X15 7–6 8086643(2012/09) (03) Troubleshooting Error Code Error Description Possible Cause(s) Corrective Action(s) 0X16 Limit Hit Robot reached limit switch on axis. Acknowledge: Yes Fatal: Yes Contact your local BD representative. 0X17 Offset: Normalizer detection for LED X failed! Failed to adjust position for offset 2 times. Acknowledge: Yes Fatal: Yes Contact your local BD representative. Cap Detected Instrument detected cap on Sample Buffer Tube. Acknowledge: Yes Fatal: Yes Always remove caps from Sample Buffer Tubes before initiating a run. PCR Valve failure. Valve heater failure. Microfluidic cartridge seal failed. Acknowledge: Yes Fatal: No Error can occur on a per-lane basis. Contact your local BD representative. 0X18 0X19 PCR Heater Warning Heater zone S1/S2/S3/ V1/V2 of cartridge lane X exceeded the minimum/maximum temperature and was killed. (a) Acknowledge: No Fatal: No Error can occur on a per-lane basis. For error (a), assay results are changed to Indeterminate. SP Status is reported as PCR Heater Warning. or 0X1A Heater zone S1/S2/S3/ V1/V2 of cartridge lane X exceeded the setpoint limit. (b) PCR heater failure. or Heater zone S1/S2/S3/ V1/V2 of cartridge lane X exceeded the outliers percent limit. (c) For errors (b) and (c), assay results of Positive or Negative retain their status; unresolved samples are changed to Indeterminate. OSR test results >0 retain their value. OSR test results <=0 are reported as PCR Heater Warning. Contact your local BD representative. 0X1B PCR Detector Motor failure. Detect motor position exceeded encoder tolerance! Detect motor position exceeded encoder tolerance. Acknowledge: Yes Fatal: No Contact your local BD representative. 0X1C CORE/USER Mismatch Core system ID and timestamp mismatch. Acknowledge: Yes Fatal: Yes Contact your local BD representative. 8086643(2012/09) (03) 7–7 BD MAX System User’s Manual Error Code 0X1D 0X1E 0x1F 0x20 7–8 Error Description Possible Cause(s) Corrective Action(s) Detected liquid level error in the tip. Acknowledge: Yes Fatal: Fatal on first bank when all 4 tips fail. Otherwise, occurs on a perlane basis. Assay results of Positive remain positive if error occurs. All other assay results are changed to Indeterminate. Not reported for OSR tests. Error in Full Fill Check Cartridge fill check reading was under threshold. Could be caused by a bent tip, faulty cartridge, etc. Acknowledge: No Fatal: No Occurs on a per-lane basis. Assay results of Positive remain positive if error occurs. All other assay results are changed to Indeterminate. Error in Empty Fill Check Cartridge fill check reading was under threshold. The instrument detected fluid in the cartridge when it should be empty. Acknowledge: No Fatal: Yes Saturated readings; readings are out of the reader’s limits; amplification too high Acknowledge: Yes Fatal: No Results stand, but Status - PCR is reported as Warning Reader Saturation. Contact BD if this error recurs. Liquid Level Sense Error PCR Reader Saturation 8086643(2012/09) (03) f Limited Warranty This warranty gives you specific legal rights. Additionally, you may have other rights that vary from region to region. The BD MAX system is warranted to the original purchaser to be free from defects in materials and workmanship for a period of one year following installation. BD’s sole responsibility under this warranty shall be to repair or replace any instrument or its components (except for expendable supplies) which under normal operating conditions, prove to be defective within one year of delivery. BD will furnish new or remanufactured components upon its option. All replacements shall meet new part specifications and shall be warranted as above for the remainder of the one year period. Replaced components become the property of BD. It is understood that the equipment covered by this Agreement has been installed in accordance with the recommendations and instructions in the BD MAX™ System User’s Manual. Any damage to a BD MAX™ system resulting from the insertion or removal of cables that connect this instrument to systems other than those approved or supplied by BD or the failure of the owner to maintain reasonable care and precautions in the operation and maintenance of the system will void this warranty and terminate the obligations of the manufacturer as stated herein. This warranty is in lieu of all other warranties, whether expressed or implied, including but not limited to, warranties of merchantability, or fitness for a particular use. In no event will BD be liable for indirect, incidental, special or consequential damages regardless of whether BD has been advised of such. 8086643(2012/09) (03) A–1 BD MAX System User’s Manual A–2 8086643(2012/09) (03) g Ordering Information Name Catalog Number Disposables Sample Buffer Tube N/A (furnished in BD MAX kit) Unitized Reagent Strips (URS) N/A (furnished in BD MAX kit) BD MAX Microfluidic Cartridges 437519 System Peripherals Sample Rack (ea.) 435218 Printer (ea.) 435121 Barcode Reader (ea.) 435117 Keyboard (ea.) 435119 Mouse (ea.) 435120 User’s Manual 441938 8086643(2012/09) (03) B–1 BD MAX System User’s Manual B–2 8086643(2012/09) (03) h Contact Information Service Contact Information (USA) Customer service is available Monday through Friday from 8 a.m. to 5 p.m. Eastern Time and can be reached by calling 800-638-8656 and entering “3.” Product inquiries and purchase orders may be placed by mail, telephone or fax to BD as follows: Customer Service Information Telephone Number: 800-638-8656, select option #3 Email Address: [email protected] Fax Number: 410-316-4723 Address: 7 Loveton Circle Sparks, MD 21152 USA The Technical Services team is responsible for installation, service, and ongoing system and assay support. Technical Services is available Monday through Friday from 8:30 a.m. to 8:00 p.m. Eastern Time and can be reached by calling 800-638-8663. Technical Service Information 8086643(2012/09) (03) Telephone Number: 800-638-8663 Fax Number: 410-316-4269 Email Address: [email protected] C–1 BD MAX System User’s Manual C–2 8086643(2012/09) (03) i Glossary and Abbreviations Term Meaning accession number Identification number used for identifying a specific sample. audit trail Each user logon is written to the Event Log. The Event Log tracks system activities. Each user account that is created has a unique ID so that system activities can be traced to a unique user ID that was logged on when a specific system activity occurs. Cartridge A plastic disposable that contains microfluidic channels and a PCR chamber where the PCR takes place. The cartridge fits into the reader drawer. case sensitive The system knows the difference between UPPER and lower case letters. If your username or password has mixed UPPER and lower case characters, you must type the correct case. catalog check When a new run is initiated, the barcode scanners check all disposables for validity. Any errors are flagged with a Caution symbol in the Work List, and must be corrected before the run can proceed or a new Work List can be defined. Cy 5™ Cyanine derivative with excitation and emission maxima of 649 and 670 nm, respectively. Cy 5.5™ Cyanine derivative with excitation and emission maxima of 675 and 694 nm, respectively. 8086643(2012/09) (03) D–1 BD MAX System User’s Manual Term Meaning Extraction Method to separate, capture and elute DNA or RNA, or to extract DNA or RNA from a patient sample FAM™ Fluorescein derivative with excitation and emission maxima of 494 and 522 nm, respectively. A commonly used fluorescent dye; various derivatives of fluorescein are often used in conjugate form for molecular analyses. focus A display field has focus when it is the active field for input. It is typically indicated by a blue box surrounding the field. GUI Graphical User Interface, or the displays the allow you to login samples, view results, set up the instrument, etc. HEX™ A chlorinated fluorescein derivative with excitation and emission maxima of 535 and 556 nm, respectively. I/O Input / Output kB Kilobytes LED Light Emitting Diode - A solid-state light emitting semiconductor device. Mux Multiplexer, a device that selects one of many input signals and forwards the selected input into a single line Patient ID Identification number used to identify a specific patient or sample per patient. PCR Polymerase Chain Reaction Prepared Samples Specimens that have been prepared for testing. This usually means transferring material from a collection device to a Sample Buffer tube. Sample preparation happens before the specimen goes onto the rack. Processed Samples Specimens that have been lysed and extracted and are ready to be mixed with Master Mix for PCR testing. Sample processing are the steps that happen on the instrument. Rack A removable rack that holds up to 12 URS and 12 SBT and is loaded onto the BD MAX instrument. ROX™ Sulphorhodamine derivative with excitation and emission maxima of 575 and 602 nm, respectively. A commonly used fluorescent dye. Various derivatives of sulforhodamine are often used in conjugate form for molecular analyses. Sample A specimen that has been prepared for diagnostic testing Sample ID An identification number affixed to a sample container D–2 8086643(2012/09) (03) i Glossary and Abbreviations Term Meaning Sample Preparation Sample preparation includes the steps involved in preparing the sample for processing. It is also referred to as pre-analytical preparation. These steps are assay dependent. Typical steps might include uncapping a SBT containing diluent, inserting and breaking the collection swab, capping the SBT with a penetrable and re-sealable cap, and vortexing if required. Sample Processing Sample preparation includes the steps for lysis, extraction/purification that lead up to a solution that is ready to be mixed with Master mix for PCR testing. These steps are performed automatically on the instrument. SBT Sample Buffer Tube – a 4.5 mL NUNC tube that is used to contain the specimen. SBTs are loaded onto the rack and the robot samples the specimen to initiate the automated sample preparation process. Specimen Biological material obtained from a patient for the purposes of a diagnostic test Specimen ID An identification number affixed to a specimen container or assigned to a specific sample thumb drive USB flash media used for importing assay definitions and exporting results, error logs, etc. USB Universal Serial Bus UPS Uninterruptible Power Supply URS Unitized Reagent Strip. This is the consumable that contains assayspecific dried and liquid reagents, pipette tips, and vessels for mixing and waste. 8086643(2012/09) (03) D–3 BD MAX System User’s Manual D–4 8086643(2012/09) (03)