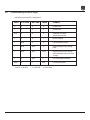
1
User’s Manual
for
Eagle Series
COPYRIGHT NOTICE
This manual is a publication of Renu Electronics Pvt. Ltd. and is provided for use by its customers only.
The contents of the manual are copyrighted by Renu Electronics; reproduction in whole or in part, for use other than in
support of Renu Electronics equipment, is prohibited without the specific written permission of Renu Electronics.
SERVICE
If service is required then pack the unit in its original packaging container or, if unavailable, any suitable rigid container.
If a substitute container is used, surround the unit with shock absorbing material; damage in shipment is not covered
by the warranty. Include a letter with the unit describing the difficulty and Hardware Revision and Software Version.
Send to the following address:
Renu Electronics Pvt. Ltd.
Survey No. 2/6,
Baner Road,
Pune-411045
All returns will be tested to verify customer claims of noncompliance with the product warranty. Improper return
packaging, which makes verification impossible, will void the warranty. If noncompliance is verified and is not due to
customer abuse or the other exceptions described with product warranty, Renu Electronics will, at its option, repair or
replace the Product returned to it, freight prepaid, which fail to comply with the foregoing warranty, provided REPL is
notified of such noncompliance within the one-year warranty period.
ASSISTANCE
This manual is designed to provide the necessary information for trouble-free installation and operation of your Eagle
Series. However, if you need assistance, please call Renu Electronics Pvt. Ltd. at 91-20-27292840 or visit our web site
at www.renuelectronics.com
MANUAL REVISION
If you contact us in reference to this manual, please include the following document number
Name
:
User Manual Eagle Series
Part Number
:
URML450
Document
:
UMAN\EGL\0507
Revision
:
1.00
Revision Number
Document Number
Date
Description
Rev 1.00
UMAN\EGL\0507
29-05-2007
Cable diagrams are added.
Warranty Certificate
For New product: This product is warranted against defects in materials and workmanship for a period of 12 months
from the date of shipment to Buyer.
For Rectified Products: Any product that will be replaced will have Warranty for 6 months or upto Original Product
Warranty period whichever is greater.
The warranty is limited to repair or replacement of the defective unit at the option of the manufacturer. This warranty is
void if the product has been altered, misused, dismantled, or otherwise abused.
ALL OTHER WARRANTIES, EXPRESSED OR IMPLIED, ARE EXCLUDED, INCLUDING BUT NOT LIMITED TO THE
IMPLIED WARRANTIES OF MERCHANTABILITY AND FITNESS FOR A PARTICULAR PURPOSE.
MAINTENANCE & SERVICE : There are no parts that can be serviced by the user. Service should be performed on a
unit substitution basis only. Do not attempt to remove, replace or service any printed circuit board, components or any
hardware/software related with display product. If problem within the display product occurs, contact the factory for
service information or repair.
NOTE : Renu Electronics Pvt. Ltd. is dedicated to providing complete customer service and customer satisfaction. If you
have any comments or criticisms about how to improve the product features/reliability, please make a note of the
problem/improvement and notify us. We are always open to new ideas and improvements. So please let us know your
ideas and comments.
IMPORTANT
Eagle Series Products are intended to be operator interfaces, to work with PLCs
which actually take control actions. It is assumed that the user is well acquainted with the
PLC system being used. Never use Eagle units to perform emergency STOP applications. It is advised that separate switches be used outside the PLC for ANY emergency
Stops.
Any Mechanical or Electrical Modification to this Unit will
void all Warranties.
Contents
Introduction
1.1
Purpose of this Manual
1.2
Introduction to Eagle
1.3
Eagle Configuration
1.4
Eagle Applications
1.5
Eagle Specifications
1.6
General Specifications
Hardware
2.1
Dimensional Details
2.2
Power Requirements
Getting Started
3.1
Eagle Operation - Configuration and Communication
How to Order
4.0
How to Order
4.1
PLC’s Supported and suitable cables
Installation and Wiring
5.0
Hardware Installation
5.1
Communication Port Details
Modbus Configuration
6.0
Modbus RTU Slave Eagle
CABLE DIAGRAMS
7.0
IBM Cable Diagrams
7.1
PC to Eagle PLC Port Cable Diagrams
7.2
Prizm to Eagle IBM Port Cable Diagrams
7.3
Prizm to Eagle PLC Port Cable Diagrams
7.4
Non-Modbus Communication Cable Diagrams
7.4.1
7.4.2
7.4.3
7.4.4
7.4.5
7.4.6
7.4.7
7.4.8
7.4.9
7.4.10
7.4.11
7.4.12
7.4.13
7.4.14
7.4.15
7.4.16
7.4.17
MICROLOGIX PLC (MINIDIN) to Eagle 0404 / 0800 (SC-E-027A-00):
ALLEN BRADELY DH485 to Eagle 0404 / 0800 (SC-E-007-00):
AROMAT FP0/FPM to Eagle 0404 / 0800 (SC-E-015A-00):
AROMAT FP1 to Eagle 0404 / 0800 (SC-E-015B-00):
DELTA DVP PLC to Eagle 0404 / 0800 (SC-E-044-00):
FUJI FLEX to Eagle 0404 / 0800 (SC-E-028-00):
GE 90 SERIES PLC to Eagle 0404 / 0800 (SC-E-002-00):
GE VERSAMAX PLC to Eagle 0404 / 0800 (SC-E-002A-00):
GE VERSAMAX PLC to Eagle 0404 / 0800 (SC-E-002B-00):
IDEC MICRO3 PLC to Eagle 0404 / 0800 (SC-E-025A-00):
IDEC MICROSMART PLC to Eagle 0404 / 0800 (SC-E-025B-00):
KEYENCE KV PLC to Eagle 0404 / 0800 (SC-E-018-00):
LG MASTER-K SERIES PLC to Eagle 0404 / 0800 (SC-E-037-00):
MITSUBISHI FX0 PLC to Eagle 0404 / 0800 (SC-E-008A-00):
OMRON CQM1 PLC to Eagle 0404 / 0800 (SC-E-006B-00):
OMRON HOSTLINK to Eagle 0404 / 0800 (SC-E-006C-00):
SIEMENS STEP-7 MICRO (S7-200) PLC to Eagle 0404 / 0800 (SC-E-029-00):
1
2
2
2
3
4
4
5
6
7
8
9
16
17
17
18
19
22
23
24
26
27
28
30
31
37
37
38
39
40
41
42
43
44
45
46
47
48
49
50
51
52
53
7.4.18 TELEMECHANIQUE TSX-07/TSX-37 PLC to Eagle 0404 / 0800 (SC-E-026A-00):
7.4.19 TOSHIBA T1 PLC to Eagle 0404 / 0800 (SC-E-019A-00):
7.4.20 TOSHIBA T2 PLC to Eagle 0404 / 0800 (SC-E-019B-00):
FAQs
8.0
Frequently asked questions for Eagle
Troubleshooting
9.0
Troubleshooting Guide for Eagle
54
55
56
57
58
61
62
Introduction
In this chapter. . .
• Purpose of this Manual
• Introduction to Eagle
• Eagle Configuration
• Eagle Applications
• Eagle Specifications
1
1.1
Purpose of this Manual
The intention of this Operation Manual is to provide a guide for Safe installation, Configuration and Operation of Eagle. This
manual is applicable for general purpose Eagle (Part Eagle-XXXX) units. Functionality of all the Eagle models is same.
Read this operation manual thoroughly before installing and operating Eagle.
This document is based on information available at the time of its publication. While efforts have been made to be accurate,
the information in this document may not cover all the details or variations in hardware or software. Features described herein
may not be present in all hardwares. Renu Electronics reserves the right to update information in this publication without prior
notice.
1.2
Introduction to Eagle
Eagle is an Industrial Analog I / O series. It accepts Universal Analog Inputs (e.g. Thermocouples, RTDs, mA, mV) and
provides Analog Outputs (4 to 20 mA or 0 to 10 V DC). Eagle can be connected to the programming port of PLC and SCADA
Applications.
1.3
Eagle Configuration
Each Eagle has to be configured using Windows based configuration Software before connecting it to the PLC.
Analog outputs
(4-20 mA or 0-10VDC)
EAGLE-0404
PLC
Analog I/O Module
Example: Eagle-0404-U
by Renu Electronics
Analog inputs
(mA, mV, RTD, Thermocouple)
Multiple Eagle units (Modbus Slaves) connected to one PLC
EAGLE-0404
PLC
Node 1
~
~
Modbus Master
EAGLE-0800
2
Node n
1.4
Eagle Applications
Our users have used Eagle units in various different applications across many industries. The typical configurations include
the followings:
1. Add analog I/Os to your PLC.
Analog outputs
(4-20 mA or 0-10VDC)
PLC
Analog I/O Module
Example: Eagle-0404-U
by Renu Electronics
EAGLE-0404
Analog inputs
(mA, mV, RTD, Thermocouple)
2. Prizm Operator Interface on Pass-through port.
Analog in
(mA, mV, RTD,
Thermocouple)
Pump Motor is ON now
Speed is 1450 RPM
Temp:
-550 C.
Press F5 to STOP
EAGLE-0800
PLC
1
2
3
4
5
6
7
8
9
ESC
0
+/-
ENT
Analog I/O Module
Example: Eagle-0800-U
by Renu Electronics
3. Multiple Eagle units (Modbus Slaves) connected to one PLC
EAGLE-0404
PLC
Node 1
~
~
Modbus Master
EAGLE-0800
Node n
4. Data Aquisition Application
A
S
T
R
A
EAGLE-0404
Node 1
EAGLE-0800
Node 2
EAGLE-0404
Node n
50
RPM
(x10)
0
100
.
.
.
.
Modbus
RS485
~
~
Converter
Example: CNV-01
by Renu Electronics
SCADA Software
Example: ASTRA
by Renu Electronics
3
1.5
Eagle Specifications
For Voltage inputs:
Uses 0-100 mV input range resolved in 12 bit.
For higher input ranges, use externally calibrated shunt.
Total error: + 0.1% of scale + 1 bit.
For Current inputs:
Uses 0-20mA input range with 5Ω precision shunt resolved in 12 bit. Total error: + 0.1% of scale + 1 bit.
For RTD input:
Uses 3 wire compensation technique. Current sense is 0.5mA.
Power dissipated in RTD is 0.025mV @ 100Ω.
Range supported: -200 to 850oC.
For Thermocouple Input:
Uses 0-100mV input range resolved in to 12 bits for positive input and resolved in 11 bits for negative inputs.
Cold junction error is 1o maximum and 0.5o typical.
Total error: + 0.5% of scale + 1 bit + CJC error
Input Type
J
K
E
R
S
B
N
T
Temperature
Range
-210 to 770oC
-200 to 1373oC
-200 to 1000oC
-50 to 1769oC
-50 to 1769oC
0 to 1820oC
-200 to 1300oC
-200 to 400oC
1 Bit
Corresponds to
0.43oC
0.61oC
0.32oC
2.04oC
2.31oC
3.21oC
0.7oC
0.47oC
For outputs:
(Supported outputs are mA and Volts)
mA range: 4-20mA resolved in 12 bits.
Max load impedence: upto 500 Ω
Voltage Range:0-10VDC resolved in 12 bits
Min load impedence: 400 Ω
1.6
General Specifications
Power
Operating Temperature
Storage Temperature
Humidity
: +24 V DC +5%, 3.5 W maximum
: 0o to 50oC
: -20o to 80oC
: 10% to 90% (Non condensing)
Mounting
Dimensions
Eagle-0404, Eagle-0800
Eagle-0201
Immunity to ESD
Transient Immunity
Radiated Immunity
Emissions
Isolation
: DIN rail or back panel mounting
:
: 155mm X 102mm X 48mm
: 94mm X 42mm X 47mm
: 8 kV air, 6kV contact as per IEC 61000-4-2
: 2kV as per IEC 61000-4-4
: 10V/meter as per IEC 61000-4-3
: EN55011 CISPR A
: Analog section from digital.
: No isolation between channels.
: Connects to PC for application download or operator interface for Pass-through.
: Connects to PLC.
: Depends on driver. Typical 100 mSec / Channel
IBM Port
PLC Port
Response time
4
Hardware
In this chapter. . .
• Dimensional Details
• Power Requirements
5
Dimensional Details
All dimensions are in mm.
For Eagle-0800 and Eagle-0404
155
Top View
35
48
102
Side View
53.4
47
Eagle-0201
Front View
94
42
2.1
Top View
6
2.2
Power Requirements
Eagle units operate on 24V DC external supply. Power should be applied to the PCB Terminal block on the Eagle unit. Power
rating is +24VDC ± 5%, 125mA max. Please follow the instructions given below while making power supply connections:
Follow the sticker wiring diagram on the unit which shows terminals for the positive
DC, negative DC and EARTH.
To make a connection strip about 1/4" (6mm) of insulation of the wire and turn the
connector screw counter-clock wise until the gap is wide open. Insert the wire all
the way in and turn the screw clockwise until it is tight.
Wire lengths should be minimum. Wires should run in pairs with a neutral or
common paired with a live or signal wire.
Eagle products are housed in a molded ABS plastic case which eliminates any
electrical shock hazard. Hence safety ground is not required to be connected to the
chassis of the unit.
!
The DC ground is not directly coupled to Earth ground internally. The unit is
designed to operate properly whether the DC ground is connected to the
Earth ground or not. We do recommend, however, that if the DC ground has to be
connected to the Earth ground, the Earth connection should be made to a central
star point as poor site earths can introduce noise into a system.
!
Do not power Eagle and inductive loads with the same power supply even though
there is enough immunity in the Eagle to withstand the transients present on
these lines. Avoid using power supplies with large capacitive outputs, which may
cause problems if power is cycled within a short time period. If wiring is to be
exposed to lightening or surges, use appropriate surge suppression devices.
Keep AC, high energy and rapidly switching DC wiring separate from signal wires.
Connecting high voltages or AC power mains to the DC input will make Eagle
unusable and may create an electrical shock hazard to personnel. Such a failure or
shock could result in serious personal injury, loss of life and/or equipment damage.
DC voltage sources should provide proper isolation from main AC power and similar
hazards.
7
Getting Started
In this chapter. . .
• Eagle Operation - Configuration and Communication
8
3.1
Eagle Operation - Configuration and Communication
Install the Eagle Setup Software from the installable device (CD).
It will add the icon in your program manager as Eagle.
Quick start for setup for Eagle & input parameters alongwith downloading ranges, LED indications & status word meanings
are as mentioned below:
Select Project | New... from the Eagle Setup Software
Select the Eagle Model:
EAGLE-0800: 8 Universal Inputs ,no Outputs.
EAGLE-0404: 4 Universal Inputs, 4 Analog Outputs.
EAGLE-0201: 2 Universal Inputs, 1 Analog Output.
Select the PLC and PLC Model: Select the PLC Model for which Eagle Unit is to be connected.
9
Select Edit | Channel Info... to configure the channels.
10
EAGLE-0800:
In case of 8 analog inputs:
Select the Channel No. ( 1 to 8 ) from the Channel number list.
Select the Channel Type from the Type list:
Default for the channel is Not configured.
Input types and sub-types supported are:
Thermocouples:
Thermocouple B type,
Thermocouple R type,
Thermocouple S type,
Thermocouple E type,
Thermocouple J type,
Thermocouple K type,
Thermocouple N type,
Thermocouple T type.
* Eagle will download degree centigrade multiplied by 10 according to NBS polynomials for thermocouples in the PLC / Host
device.
RTD:PT-100 (3 wires supported):
Temperature Coefficient 1 ( 0.00385 ),
Temperature Coefficient 2 ( 0.00392 ).
* Eagle will download degree centigrade multiplied by 10 according to NBS polynomials for RTD in the PLC / Host device.
mA (milli Ampere):
0 - 20 mA ( Linear and 16 point Non-Linear ),
4 - 20 mA ( Linear and 16 point Non-Linear ).
* Internal shunt of 5 ohm is assembled.
* Eagle will download the 12 bit count in case of linear input & engineering value in case of nonlinear input.
mV (milli Volts ):
0 - 100 mV ( Linear and 16 point Non-Linear ),
0- 50 mV ( Linear and 16 point Non-Linear ).
* Eagle will download the 12 bit count in case of linear input & engineering value in case of nonlinear input.
When you select, Non-linear, you must enter atleast 3 sets of input (Minimum, intermediate and maximum) and engineering
values. The input range is dependant on the mA or mV type and the engineering value is from -3276.0 to 3276.0.
Once you have configured the channels, Press Accept Changes button.
11
EAGLE-0404:
In case of 4 analog inputs, 4 analog outputs:
Select the Channel No. ( 1 to 4 i/p or 1 to 4 o/p ) from Channel number list.
Select the Channel Type from the Type list:
Default for the channel is Not configured.
Input types and sub-types supported are:
Thermocouples:
Thermocouple B type,
Thermocouple R type,
Thermocouple S type,
Thermocouple E type,
Thermocouple J type,
Thermocouple K type,
Thermocouple N type,
Thermocouple T type.
* Eagle will download degree centigrade multiplied by 10 according to NBS polynomials for thermocouples in the PLC / Host
device.
RTD:PT-100 (3 wires supported):
Temperature Coefficient 1 ( 0.00385 ),
Temperature Coefficient 2 ( 0.00392 ).
* Eagle will download degree centigrade multiplied by 10 according to NBS polynomials for RTD in the PLC / Host device.
mA (milli Ampere):
0 - 20 mA ( Linear and 16 point Non-Linear ),
4 - 20 mA ( Linear and 16 point Non-Linear ).
* Internal shunt of 5 ohm is assembled.
* Eagle will download the 12 bit count in case of linear input & engineering value in case of nonlinear input.
mV (milli Volts):
0 - 100 mV ( Linear and 16 point Non-Linear ),
0- 50 mV ( Linear and 16 point Non-Linear ).
* Eagle will download the 12 bit count in case of linear input & engineering value in case of nonlinear input.
When you select, Non-linear, you must enter atleast 3 sets of input (Minimum, intermediate and maximum) and engineering
values. The input range is dependant on the mA or mV type and the engineering value is from -3276.0 to 3276.0.
Outputs:
4 - 20 mA: Sourcing current output @ 500 ohm max. load impedance
0 to 10 V DC ( Linear output): Minimum load impedance 400 ohm.
Once you have configured the channels, Press Accept Changes button.
12
EAGLE-0201#:
In case of 2 analog Inputs, 1 analog Output:
Select the Channel No. ( 1 to 2 Input or Single Output ) from Channel number list.
Select the Channel Type from the Type list:
Default for the channel is Not configured.
Inputs types and sub-types supported:
Thermocouples:
Thermocouple B type,
Thermocouple R type,
Thermocouple S type,
Thermocouple E type,
Thermocouple J type,
Thermocouple K type,
Thermocouple N type,
Thermocouple T type.
* Eagle will download degree centigrade multiplied by 10 according to NBS polynomials for thermocouples in the PLC / Host
device.
RTD:PT-100 (3 wires supported):
Temperature Coefficient 1 ( 0.00385 ),
Temperature Coefficient 2 ( 0.00392 ).
* Eagle will download degree centigrade multiplied by 10 according to NBS polynomials for RTD in the PLC / Host device.
mA (milli Ampere):
0 - 20 mA ( Linear and 16 point Non-Linear ),
4 - 20 mA ( Linear and 16 point Non-Linear ).
* Internal shunt of 5 ohm is assembled.
* Eagle will download the 12 bit count in case of linear input & engineering value in case of nonlinear input.
mV (milli Volts):
0 - 100 mV ( Linear and 16 point Non-Linear ),
0- 50 mV ( Linear and 16 point Non-Linear ).
* Eagle will download the 12 bit count in case of linear input & engineering value in case of nonlinear input.
When you select, Non-linear, you must enter atleast 3 sets of input (Minimum, intermediate and maximum) and engineering
values. The input range is dependant on the mA or mV type and the engineering value is from -3276.0 to 3276.0.
Outputs:
4 - 20 mA: Sourcing current output @ 500 ohm max. load impedance
Once you have configured the channels, Press Accept Changes button.
13
Select Edit Setup for configuration of PLC registers.
ADC Register- I/P:
This is the register where the information for the first input channel will be stored in the PLC. The following seven registers will
have the data for the other seven channels.
ADC Register- O/P:
For Eagle 0404 and Eagle 0201, this is the register where the information for the first O/P channel will be stored in the PLC.
The following three registers will have the data for the other three O/P channels.
Note:
For Modbus RTU Slave and RENU Special Eagle Driver; the ADC register input and ADC register output fields are don’t care.
14
Eagle Data:
After Clicking this button you will see the following window. This is applicable for certain PLC’s only. (e.g. MODBUS RTU)
Station ID: In case of multiple units connected on the same network, this field defines unit address for the specific unit.
Level/Baud: There are four combinations for this field according to communication protocol (RS232 / RS485) and communication baud rate.
Select Project | Save... to save the project.
After making project file on setup, connect 24V DC@ 3 W regulated power supply to unit connect IBM Cable on the IBM port
of Eagle and the PLC cable on PLC port of Eagle.
Select Communicate | Downloaded to Unit and the saved project will be downloaded in to the Eagle.
Eagle will start communicating with the PLC.
15
How to Order
In this chapter. . .
• How to Order
• PLC’s Supported by Eagle
16
4.0
How to Order
Model
Analog Inputs Analog Outputs
Digital Input Digital Output
Part Number
Listing
Eagle 0201#
2 Universal
1(4-20 mA)
3
2
Eagle-0201-0302-U
CE/CSA
Eagle 0404
4 Universal
4 (4-20 mA / 0-10 V DC)
0
0
Eagle-0404-U
CE/CSA
Eagle 0800
8 Universal
0
0
0
Eagle-0800-U
CE/CSA
More models are being added. We also make custom models . #Supports only Modbus RTU (Needs Eagle software ver.
Eagle0201_SP)
4.1
PLC’s Supported and suitable cables
PLC
COM Port
Cable part number
(Eagle0404, Eagle0800)
Pass-through
Support
AB Micrologix
RS232
SC-E-027A-00
AB SLC 500 (DF1 and DH485)
RS422
SC-E-007-00
Aromat FP0 Series
RS232
SC-E-015A-00
Aromat FP1
RS485
SC-E-015B-00
Delta DVP Series
RS232
SC-E-044-00
Fuji NB0
RS485
SC-E-028-00
GE Series 90-30 (SNP)
RS485
SC-E-002-00
GE VersaMax, RJ45
RS232
SC-E-002A-00
GE VersaMax, DB9
RS232
SC-E-002B-00
IDEC Micro3
RS422
SC-E-025A-00
IDEC MicroSmart
RS232
SC-E-025B-00
Keyence KV Series
RS232
SC-E-018-00
Koyo DL205
RS232
SC-E-005-00
X
LG-Master K Series
RS232
SC-E-037-00
X
Mitsubishi FX0
RS485
SC-E-008A-00
Modbus Slave
RS232/RS485* User Supplied
Omron (Host Link) - 9 pin
RS232
SC-E-006B-00
Omron (Host Link) - 25 pin
RS232
SC-E-006C-00
Siemens S7-200 / Micro
RS485
SC-E-029-00
Telemecanique TSX07/37
RS422
SC-E-026A-00
Telemecanique TSX17
RS485
SC-E-017A-00
Toshiba T1
RS232
SC-E-019A-00
Toshiba T2
RS232
SC-E-019B-00
Network
X
Multidropping
Network
X
* Software selectable. New PLC drivers are constantly added. Please contact factory for more information. We welcome an
opportunity to develop new , custom drivers and customized units.
17
Installation and Wiring
In this chapter. . .
• Hardware Installation
• Communication Port Details
18
5.0
!
Hardware Installation
Use separate 24V DC, 3.5Watt regulated power supply for Eagle unit. Using common supply for the unit as well
as i/p sensors (if any) may damage the i/p channel of the unit.
Before connecting 24V DC supply, check the positive and negative polarity as shown on the unit.
DC+
DC-
1
2
Earth
3
Power ON the unit. ‘READY’ LED will be ON . Refer Troubleshooting Guide for different LED Indications. Connect PLC cable
between PLC PORT of Eagle and the PLC. This is dedicated cable for particular PLC and is supplied along with the unit.
Refer Cable Part number list for more details. (Section No.7.0).
Power ON the PLC. If the driver for respective PLC is already downloaded in the unit, then Eagle will start communicating
with the PLC. Then download the channel configuration as per the application through Eagle setup s/w.(PLC driver will be
downloaded alongwith the channel configuration) (Refer Section No.3.1 for unit configuration)
Make connections to the required Input and/or Output channels as per the configuration downloaded in the unit.
Connections for different types of I / Ps are shown on the unit and are as followsFor Voltage Input (0-50mV or 0-100mV):
1
1
2
+
3
mV
19
-
4
For Current Input (0-20mA or 4-20 mA)
O / P Stage of external
Current Source (0-20mA or 4-20 mA)
.
Eagle I / P Stage
VDD
1
.
IO+
+
2
4.7E
-
IO-
3
GND1
GND
For RTD Input
1
2
.
4
3
4
RTD
20
+
-
.
For Thermocouple Input
1
2
3
+
4
-
T/C
Output Connections:
Current Output (4-20 mA): Maximum load variation for stable current output is 0-500 ohm.
V+
I+
I-
V-
1
2
3
4
RL < 500Ω
Voltage Output (0-10 V DC): Minimum load requirement for voltage o/p is 400 ohm.
V+
I+
I-
V-
1
2
3
4
RL > 400Ω
21
5.1
Communication Port Details
For Eagle 0404 / Eagle 0800;
PLC Port
1
6
7
8
9
2
3
4
5
DB9 Male
IBM Port
5
9
8
7
6
4
3
2
1
DB9 Female
PIN #
1
2
3
4
5
6
7
8
9
Signal Name
TX+
RX+
TXD
NC
GND
TXRXRXD
NC
Signal Description
RS-485 transmit positive
RS-485 receive positive
RS-232 transmit line
NC
GND
RS-485 transmit negative
RS-485 receive negative
RS-232 receive line
NC
PIN #
1
2
3
4
5
6
7
8
9
Signal Name
NC
TXD
RXD
NC
GND
NC
NC
NC
GND
Signal Description
NC
RS-232 Transmit
RS-232 Receive
NC
GND
NC
NC
NC
GND
PIN #
1
2
3
4
5
6
7
8
9
Signal Name
TX+
TXD
RXD
RX+
GND
NC
PLC-CMOS
TXRX-
Signal Description
RS-485 transmit positive
RS-232 Transmit
RS-232 Receive
RS-485 receive positive
GND
NC
CMOS
RS-485 transmit negative
RS-485 receive negative
PIN #
1
2
3
4
5
6
7
8
9
Signal Name
NC
TXD
RXD
NC
GND
NC
NC
NC
NC
Signal Description
NC
RS-232 Transmit
RS-232 Receive
NC
GND
NC
NC
NC
NC
For Eagle 0201#:
PLC Port
5
9
8
7
6
4
3
2
1
DB9 Female
IBM Port
5
9
8
7
6
4
3
2
1
DB9 Female
22
Modbus Configuration
In this chapter. . .
• Eagle as Modbus RTU Slave
23
6.0
Modbus RTU Slave Eagle
In the MODBUS SLAVE configuration, Eagle supports following commands.
“03”
READ HOLDING REGISTERS
Command and response format for this command is as follows.
Command from Master:
Field
Example ( Hex )
Slave address
01
Function
03
Start address (High)
00
Start address (Low)
64
No.of words (High)
00
No.of words (Low)
01
CRC (Low)
XX
CRC (High)
XX
Response from Slave (EAGLE)
Field
Example ( Hex )
Slave address
01
Function
03
Byte Count
02
Data for channel (1)(High)
XX
Data for channel (1)(Low)
XX
CRC (Low)
CRC (High)
** Master can send this command with the address 000A Hex to read the continuous channel data e.g. if the Master
sends 03 command with starting address 000A Hex and No.of words 08H, Eagle will send data of all eight input channels
to the Master.
“06”
Preset Single Holding Resisters
Command and response format for this command is as follows.
Command from Master:
Field
Example ( Hex )
Slave address
01
Function
06
Register address (High) 00
Register address (Low) 64
Preset Data (High)
00
Preset Data (low)
01
CRC (Low)
XX
CRC (High)
XX
Response from Eagle (Slave)
Field
Slave address
Function
Register address (High)
Register address (Low)
Preset Data (High)
Preset Data (Low)
CRC (Low)
CRC (High)
24
Example ( Hex )
01
06
00
64
00
01
XX
XX
“16 (10 Hex)”
Preset Multiple Holding Registers (For RENU Special Modbus Driver)
Command from Master
Field
Slave address
Function
Start address (High)
Start address (Low)
No.of words (High)
No.of words (Low)
Byte Count
Data for channel 1(High)
Data for channel 1(Low)
Data for channel 2(High)
Data for channel 2(Low)
CRC Hi
CRC Lo
Example ( Hex )
01
10
07
D1
00
02
04
xx
xx
xx
xx
xx
xx
Response from Eagle (Slave):
Field
Example ( Hex )
Slave address
01
Function
10
Start address (High)
07
Start address (Low)
D1
No.of words (High)
00
No. of words (Low)
02
CRC
(Low)
XX
CRC
(High)
XX
For Modbus RTU Slave Driver, following are the tag addresses:
For Single register length:
I/P Channel No.
1
2
3
4
5
6
7
8
Holding Regsister
400101
400301
400501
400701
400901
401101
401301
401501
O/P Channel No.
1
2
3
4
Holding Register
402001
402003
402005
402007
For Multiple register length:
I/P Channel No.
1
2
3
4
5
6
7
8
Holding Regsister
400011
400012
400013
400014
400015
400016
400017
400018
Note: Multiple register length is not supported for output channels in Modbus RTU slave driver.
For “RENU Special Driver” following are the tag addresses for both the ‘single’ and ‘multiple’ register length:
I/P Channel No.
1
2
3
4
5
6
7
8
Holding Regsister
400011
400012
400013
400014
400015
400016
400017
400018
O/P Channel No.
1
2
3
4
25
Holding Regsister
402002
402003
402004
402005
CABLE DIAGRAMS
In this chapter. . .
• Communication Cable Diagrams for Eagle
26
7.0
IBM Cable Diagrams
PC TO EAGLE IBM PORT CABLE:
For Eagle 0404 / 0800 and for Eagle 0201#
PC SIDE
EAGLE SIDE(IBM Port)
2 mtr.
IBM
UNIT
DB9 FEMALE
(RS232)
DB9 MALE
(RS232)
Shield Wire
Pin #
Pin #
1
1
RXD
2
2
TXD
TXD
3
3
RXD
4
4
5
5
6
6
7
7
8
8
9
9
SIGNALS
SG
Shield Wire
DB9 FEMALE
PINOUTS
5
SG
DB9 MALE
PINOUTS
1
1
9
SIGNALS
5
6
6
27
9
7.1
PC to Eagle PLC Port Cable Diagrams
For Eagle 0404 / 0800:
PC SIDE
EAGLE SIDE (PLC Port)
2 mtr.
IBM
UNIT
DB9 FEMALE
(RS232)
DB9 FEMALE
(RS232)
Shield Wire
Pin #
Pin #
1
1
RXD
2
2
TXD
3
3
4
4
5
5
6
6
7
7
8
8
9
9
SIGNALS
SG
Shield Wire
DB9 FEMALE
PINOUTS
5
1
9
28
6
SIGNALS
TXD
SG
RXD
PC to Eagle PLC Port Cable Diagrams
For Eagle 0201#
PC SIDE
EAGLE SIDE (PLC Port)
2 mtr.
IBM
UNIT
DB9 FEMALE
(RS232)
DB9 MALE
(RS232)
Shield Wire
Pin #
Pin #
1
1
RXD
2
2
TXD
TXD
3
3
RXD
4
4
5
5
6
6
7
7
8
8
9
9
SIGNALS
SG
SIGNALS
SG
Shield Wire
DB9 FEMALE
PINOUTS
5
DB9 MALE
PINOUTS
1
1
9
6
6
29
5
9
7.2
Prizm to Eagle IBM Port Cable Diagrams
For Eagle 0404 / 0800 and for Eagle 0201#
PRIZM SIDE
EAGLE SIDE (IBM Port)
UNIT
PRIZM
2 mtr.
DB9 MALE
(RS232)
DB9 MALE
(RS232)
Shield Wire
Pin #
Pin #
1
1
TXD
2
2
TXD
RXD
3
3
RXD
4
4
5
5
6
6
7
7
8
8
9
9
SIGNALS
SG
Shield Wire
DB9 MALE
PINOUTS
1
5
6
Note: For HMI, short pin 5 and pin 9 at the HMI communication port.
30
9
SIGNALS
SG
7.3
Prizm to Eagle PLC Port Cable Diagrams
RS232 Cable For Eagle 0404 / 0800
PRIZM SIDE
EAGLE SIDE (PLC Port)
UNIT
PRIZM
2 mtr.
DB9 MALE
(RS232)
DB9 FEMALE
(RS232)
Shield Wire
Pin #
Pin #
1
1
TXD
2
2
RXD
3
3
4
4
5
5
6
6
7
7
8
8
9
9
SIGNALS
SG
Shield Wire
DB9 MALE
PINOUTS
1
TXD
SG
RXD
DB9 FEMALE
PINOUTS
5
5
6
SIGNALS
9
1
9
31
6
Prizm to Eagle PLC Port Cable Diagrams
RS232 Cable for Eagle 0201#
PRIZM SIDE
EAGLE SIDE (PLC Port)
UNIT
PRIZM
2 mtr.
DB9 MALE
(RS232)
DB9 FEMALE
(RS232)
Shield Wire
Pin #
Pin #
1
1
TXD
2
2
TXD
RXD
3
3
RXD
4
4
5
5
6
6
7
7
8
8
9
9
SIGNALS
SG
Shield Wire
DB9 MALE
PINOUTS
1
5
6
32
9
SIGNALS
SG
2 Wire RS485 Cable For Eagle 0404 / 0800
PRIZM SIDE
EAGLE SIDE (PLC Port)
UNIT
PRIZM
2 mtr.
DB9 MALE
(RS422)
DB9 FEMALE
(RS422)
Shield Wire
SIGNALS
Pin #
TX+
1
Pin #
SIGNALS
1
TX+
2
2
RX+
3
3
RX+
4
4
SG
5
5
SG
6
TX-
7
RX-
A
A
6
B
7
TX-
8
RX-
9
8
B
9
Shield Wire
DB9 MALE
PINOUTS
1
5
5
6
DB9 FEMALE
PINOUTS
9
1
9
33
6
2 Wire RS485 Cable For Eagle 0201#
PRIZM SIDE
EAGLE SIDE (PLC Port)
UNIT
PRIZM
2 mtr.
DB9 MALE
(RS422)
DB9 MALE
(RS422)
Shield Wire
SIGNALS
Pin #
Pin #
SIGNALS
TX+
1
1
TX+
2
A
A
2
3
3
RX+
4
4
RX+
SG
5
5
SG
6
6
7
7
TX-
8
RX-
9
B
B
Shield Wire
DB9 MALE
PINOUTS
1
5
6
34
9
8
TX-
9
RX-
4 Wire RS485 Cable For Eagle 0404 / 0800
PRIZM SIDE
EAGLE SIDE (PLC Port)
UNIT
PRIZM
2 mtr.
DB9 MALE
(RS485)
DB9 FEMALE
(RS485)
Shield Wire
SIGNALS
Pin #
Pin #
SIGNALS
TX+
1
1
TX+
2
2
RX+
3
3
RX+
4
4
SG
5
5
SG
6
6
TX-
7
7
RX-
TX-
8
8
RX-
9
9
Shield Wire
DB9 MALE
PINOUTS
1
5
5
6
DB9 FEMALE
PINOUTS
9
1
9
35
6
4 Wire RS485 Cable For Eagle 0201#
PRIZM SIDE
EAGLE SIDE (PLC Port)
UNIT
PRIZM
2 mtr.
DB9 MALE
(RS422)
DB9 MALE
(RS422)
Shield Wire
SIGNALS
Pin #
Pin #
SIGNALS
TX+
1
1
TX+
2
2
3
3
RX+
4
4
RX+
SG
5
5
SG
6
6
7
7
TX-
8
8
TX-
RX-
9
9
RX-
Shield Wire
DB9 MALE
PINOUTS
1
5
6
36
9
7.4
Non-Modbus Communication Cable Diagrams
Note: In case of non-modbus communication cable drawings; for Eagle 0201# product; contact factory.
7.4.1
MICROLOGIX PLC (MINIDIN) to Eagle 0404 / 0800 (SC-E-027A-00):
MICROLOGIX SIDE
EAGLE SIDE (PLC Port)
2 mtr.
UNIT
8 PIN MINIDIN
(RS232)
SIGNALS
GND
RXD
TXD
DB9 FEMALE
(RS232)
Shield Wire
Pin #
Pin #
1
1
2
2
3
3
4
4
5
5
6
6
7
7
8
8
SIGNALS
TXD
SG
RXD
9
Shield Wire
8 PIN MINIDIN CONNECTOR PINOUTS
6
8
7
5
3
4
1
DB9 FEMALE
PINOUTS
5
1
9
2
37
6
7.4.2
ALLEN BRADELY DH485 to Eagle 0404 / 0800 (SC-E-007-00):
ALLEN BRADELY
DH485 SIDE
EAGLE SIDE (PLC Port)
2 mtr.
UNIT
8 PIN MODULAR
CONNECTOR
(RS422)
DB9 FEMALE
(RS422)
Shield Wire
SIGNALS
Pin #
Pin #
SIGNALS
A
1
1
TX+
B
2
2
RX+
3
3
4
4
5
5
SG
6
6
TX-
7
7
RX-
8
8
SG
9
8 PIN MODULAR CONNECTOR PINOUTS
Shield Wire
R.H.S. VIEW
FRONT VIEW
Pin 1
(Left side)
Pin 8
(Right side)
DB9 FEMALE
PINOUTS
5
1
9
Cable insert end
Cable insert end
38
6
7.4.3
AROMAT FP0/FPM to Eagle 0404 / 0800 (SC-E-015A-00):
AROMAT FP0 SIDE
EAGLE SIDE (PLC Port)
2 mtr.
UNIT
5 PIN MINIDIN
(RS232)
DB9 FEMALE
(RS232)
Shield Wire
SIGNALS
Pin #
Pin #
SG
1
1
TXD
2
2
RXD
3
3
4
4
5
5
SIGNALS
TXD
SG
6
7
RXD
8
9
Shield Wire
5 PIN MINIDIN CONNECTOR PINOUTS
4
2
5
DB9 FEMALE
PINOUTS
5
3
1
9
1
39
6
7.4.4
AROMAT FP1 to Eagle 0404 / 0800 (SC-E-015B-00):
AROMAT FP1 SIDE
EAGLE SIDE (PLC Port)
2 mtr.
UNIT
DIN CONNECTOR
MALE (RS485)
DB9 FEMALE
(RS485)
Shield Wire
SIGNALS
Pin #
Pin #
SIGNALS
SG
1
1
TX+
TX-
2
2
RX+
RX-
3
3
4
4
TX+
5
5
SG
RX+
6
6
TX-
7
7
RX-
8
8
9
Shield Wire
DIN CONNECTOR PINOUTS
4
2
5
1
3
DB9 FEMALE
PINOUTS
5
1
9
6
7
8
40
6
7.4.5
DELTA DVP PLC to Eagle 0404 / 0800 (SC-E-044-00):
DELTA DVP SIDE
EAGLE SIDE (PLC Port)
2 mtr.
UNIT
8 PIN MINIDIN
(RS232)
DB9 FEMALE
(RS232)
Shield Wire
Pin #
Pin #
1
1
2
2
3
3
RXD
4
4
TXD
5
5
6
6
7
7
8
8
SIGNALS
SG
SIGNALS
TXD
SG
RXD
9
Shield Wire
8 PIN MINIDIN CONNECTOR PINOUTS
6
8
7
5
3
4
1
DB9 FEMALE
PINOUTS
5
1
9
2
41
6
7.4.6
FUJI FLEX to Eagle 0404 / 0800 (SC-E-028-00):
FUJI FLEX SIDE
EAGLE SIDE (PLC Port)
2 mtr.
UNIT
8 PIN MODULAR
CONNECTOR
(RS485)
DB9 FEMALE
(RS485)
Shield Wire
Pin #
Pin #
SIGNALS
1
1
TX+
2
2
RX+
TX+
3
3
TX-
4
4
RX+
5
5
SG
RX-
6
6
TX-
7
7
RX-
8
8
SIGNALS
SG
9
8 PIN MODULAR CONNECTOR PINOUTS
Shield Wire
R.H.S. VIEW
DB9 FEMALE
PINOUTS
FRONT VIEW
Pin 1
(Left side)
Cable insert end
Pin 8
(Right side)
5
1
9
Cable insert end
42
6
GE 90 SERIES PLC to Eagle 0404 / 0800 (SC-E-002-00):
GE90 SERIES SIDE
EAGLE SIDE (PLC Port)
2 mtr.
UNIT
ATTACH PLC
7.4.7
DB15 MALE
(RS485)
DB9 FEMALE
(RS485)
Shield Wire
SIGNALS
Pin #
Pin #
SIGNALS
EARTH
1
1
TX+
2
RX+
2
3
4
3
5
4
6
7
SG
8
9
5
SG
6
TX-
7
RX-
RX-
10
RX+
11
8
TX-
12
9
TX+
13
Shield Wire
14
DB9 FEMALE
PINOUTS
15
DB15 MALE CONNECTOR PINOUTS
5
1
9
8
1
9
15
43
6
7.4.8
GE VERSAMAX PLC to Eagle 0404 / 0800 (SC-E-002A-00):
GE VERSAMAX SIDE
EAGLE SIDE (PLC Port)
2 mtr.
UNIT
8 PIN MODULAR
CONNECTOR
(RS232)
DB9 FEMALE
(RS232)
Shield Wire
SIGNALS
Pin #
Pin #
SG
1
1
2
2
3
3
4
4
TXD
5
5
RXD
6
6
7
7
8
8
SIGNALS
TXD
SG
RXD
9
8 PIN MODULAR CONNECTOR PINOUTS
Shield Wire
DB9 FEMALE
PINOUTS
R.H.S. VIEW
FRONT VIEW
Pin 1
(Left side)
Pin 8
(Right side)
5
1
9
Cable insert end
Cable insert end
44
6
GE VERSAMAX PLC to Eagle 0404 / 0800 (SC-E-002B-00):
GE VERSAMAX SIDE
EAGLE SIDE (PLC Port)
2 mtr.
UNIT
PLC
7.4.9
DB9 MALE
(RS232)
DB9 FEMALE
(RS232)
Shield Wire
Pin #
Pin #
1
1
TXD
2
2
RXD
3
3
4
4
5
5
6
6
7
7
8
8
9
9
SIGNALS
SG
Shield Wire
DB9 MALE
PINOUTS
1
5
6
SIGNALS
TXD
SG
RXD
DB9 FEMALE
PINOUTS
5
9
1
9
45
6
7.4.10 IDEC MICRO3 PLC to Eagle 0404 / 0800 (SC-E-025A-00):
IDEC MICRO3 SIDE
EAGLE SIDE (PLC Port)
2 mtr.
UNIT
8 PIN MINIDIN
(RS422)
DB9 FEMALE
(PLC Port)
(RS422)
Shield Wire
SIGNALS
Pin #
A
1
B
Pin #
SIGNALS
1
TX+
2
2
RX+
3
3
4
4
5
5
SG
6
TX-
7
7
RX-
8
8
A
6
SG
B
9
Shield Wire
8 PIN MINIDIN CONNECTOR PINOUTS
6
8
7
5
3
4
1
DB9 FEMALE
PINOUTS
5
1
9
2
46
6
7.4.11 IDEC MICROSMART PLC to Eagle 0404 / 0800 (SC-E-025B-00):
IDEC MICROSMART
SIDE
EAGLE SIDE (PLC Port)
2 mtr.
UNIT
8 PIN MINIDIN
(RS232)
DB9 FEMALE
(PLC Port)
(RS232)
Shield Wire
Pin #
Pin #
1
1
2
2
TXD
3
3
RXD
4
4
5
5
SG
6
6
SG
7
7
8
8
SIGNALS
SIGNALS
TXD
SG
RXD
9
Shield Wire
8 PIN MINIDIN CONNECTOR PINOUTS
6
8
7
5
3
4
1
DB9 FEMALE
PINOUTS
5
1
9
2
47
6
7.4.12 KEYENCE KV PLC to Eagle 0404 / 0800 (SC-E-018-00):
EAGLE SIDE (PLC Port)
KEYENCE KV
PLC SIDE
2 mtr.
UNIT
6X4 MODULAR
CONNECTOR
(RS232)
DB9 FEMALE
(RS232)
Shield Wire
SIGNALS
Pin #
Pin #
TXD
1
1
SG
2
2
RXD
3
3
4
4
SIGNALS
TXD
SG
5
6
7
RXD
8
9
6X4 MODULAR CONNECTOR PINOUTS
Shield Wire
DB9 FEMALE
PINOUTS
R.H.S. VIEW
FRONT VIEW
Pin 1
(Left side)
Pin 4
(Right side)
5
1
9
Cable insert end
Cable insert end
48
6
7.4.13 LG MASTER-K SERIES PLC to Eagle 0404 / 0800 (SC-E-037-00):
LG MASTER
PLC SIDE
EAGLE SIDE (PLC Port)
2 mtr.
PLC
UNIT
DB9 MALE
(RS232)
DB9 FEMALE
(RS232)
Shield Wire
Pin #
Pin #
1
1
RXD
2
2
TXD
3
3
4
4
5
5
6
6
7
7
8
8
9
9
SIGNALS
SG
Shield Wire
DB9 MALE
PINOUTS
1
5
6
SIGNALS
TXD
SG
RXD
DB9 FEMALE
PINOUTS
5
9
1
9
49
6
7.4.14 MITSUBISHI FX0 PLC to Eagle 0404 / 0800 (SC-E-008A-00):
MITSUBISHI FX0 SIDE
EAGLE SIDE (PLC Port)
2 mtr.
UNIT
8 PIN MINIDIN
(RS485)
DB9 FEMALE
(PLC Port)
(RS485)
Shield Wire
SIGNALS
Pin #
Pin #
SIGNALS
RX-
1
1
TX+
RX+
2
2
RX+
SG
3
3
TX-
4
4
5
5
SG
6
6
TX-
7
7
RX-
8
8
TX+
9
Shield Wire
8 PIN MINIDIN CONNECTOR PINOUTS
6
8
7
5
3
4
1
DB9 FEMALE
PINOUTS
5
1
9
2
50
6
7.4.15 OMRON CQM1 PLC to Eagle 0404 / 0800 (SC-E-006B-00):
OMRON CQM1
PLC SIDE
EAGLE SIDE (PLC Port)
2 mtr.
PLC
UNIT
DB9 MALE
(RS232)
DB9 FEMALE
(RS232)
Shield Wire
SIGNALS
Pin #
Pin #
EARTH
1
1
TXD
2
2
RXD
3
3
4
4
5
5
6
6
7
7
8
8
9
9
SG
Shield Wire
DB9 MALE
PINOUTS
1
5
6
SIGNALS
TXD
SG
RXD
DB9 FEMALE
PINOUTS
5
9
1
9
51
6
7.4.16 OMRON HOSTLINK to Eagle 0404 / 0800 (SC-E-006C-00):
OMRON HOSTLINK
PLC SIDE
EAGLE SIDE (PLC Port)
UNIT
ATTACH PLC
2 mtr.
DB25 MALE
(RS232)
DB9 FEMALE
(RS232)
Shield Wire
SIGNALS
Pin #
Pin #
FRAME GND
TXD
RXD
RS
CS
1
2
3
4
5
6
7
8
9
10
11
12
13
14
15
16
17
18
19
20
21
22
23
24
25
1
GND
2
4
SG
5
6
7
RXD
8
9
Shield Wire
DB9 FEMALE
PINOUTS
5
1
9
12
14
TXD
3
DB25 MALE
PINOUTS
1
SIGNALS
25
52
6
7.4.17 SIEMENS STEP-7 MICRO (S7-200) PLC to Eagle 0404 / 0800 (SC-E-029-00):
EAGLE SIDE (PLC Port)
SIEMENS S7-200
PLC SIDE
2 mtr.
PLC
UNIT
DB9 MALE
(RS422)
SIGNALS
DB9 FEMALE
(RS422)
Shield Wire
Pin #
Pin #
SIGNALS
1
1
TX+
2
2
RX+
3
3
4
4
5
5
SG
6
6
TX-
7
7
RX-
8
8
9
9
A
SG
B
Shield Wire
DB9 MALE
PINOUTS
1
5
6
DB9 FEMALE
PINOUTS
5
9
1
9
Note: These details are also applicable for Siemens S7-300.
53
6
7.4.18 TELEMECHANIQUE TSX-07/TSX-37 PLC to Eagle 0404 / 0800 (SC-E-026A-00):
TELEMECHANIQUE
TSX-07/TSX-37 SIDE
EAGLE SIDE (PLC Port)
2 mtr.
UNIT
8 PIN MINIDIN
(RS422)
DB9 FEMALE
(RS422)
Shield Wire
SIGNALS
Pin #
A
1
B
Pin #
SIGNALS
1
TX+
2
2
RX+
3
3
4
4
5
5
SG
6
TX-
7
7
RX-
8
8
A
6
GND
B
9
Shield Wire
8 PIN MINIDIN CONNECTOR PINOUTS
6
8
7
5
3
4
1
DB9 FEMALE
PINOUTS
5
1
9
2
54
6
7.4.19 TOSHIBA T1 PLC to Eagle 0404 / 0800 (SC-E-019A-00):
TOSHIBA T1 SIDE
EAGLE SIDE (PLC Port)
2 mtr.
UNIT
8 PIN MINIDIN
(RS232)
DB9 FEMALE
(RS232)
Shield Wire
Pin #
Pin #
1
1
2
2
3
3
4
4
SG
5
5
TXD
6
6
7
7
8
8
SIGNALS
RXD
SIGNALS
TXD
SG
RXD
9
Shield Wire
8 PIN MINIDIN CONNECTOR PINOUTS
6
8
7
5
3
4
1
DB9 FEMALE
PINOUTS
5
1
9
2
55
6
7.4.20 TOSHIBA T2 PLC to Eagle 0404 / 0800 (SC-E-019B-00):
EAGLE SIDE (PLC Port)
TOSHIBA T2
PLC SIDE
2 mtr.
PLC
UNIT
DB9 MALE
(RS232)
DB9 FEMALE
(RS232)
Shield Wire
Pin #
Pin #
1
1
RXD
2
2
TXD
3
3
4
4
5
5
6
6
7
7
8
8
9
9
SIGNALS
SG
Shield Wire
DB9 MALE
PINOUTS
1
5
6
SIGNALS
TXD
SG
RXD
DB9 FEMALE
PINOUTS
5
9
1
9
56
6
FAQs
In this chapter. . .
• Frequently asked Questions for Eagle
57
8.0
Frequently asked questions for Eagle
Q. What are the different types of Analog inputs and outputs Eagle series supports?
Ans. Eagle series supports four types of Analog inputs and two types of Analog outputs.
They are:
Analog input types:
Current Inputs:
a) 0 to 20 mA (linear and non-linear)
b) 4 to 20 mA (linear and non-linear)
Voltage Inputs:
a) 0 to 50 mV (linear and non-linear)
b) 0 to 100 mV (linear and non-linear)
RTD Input:
a) RTD’s (Alpha 1, Alpha 2)
Thermocouple:
a) Types: J, K, E, R, S, B, N and T
Analog output types:
Current Output:
a) 4 to 20 mA
Voltage Output:
a) 0 to 10 VDC
Q. How Analog input / output channels are mapped with the PLC Register?
Ans. For Input Channels, one of the PLC Data Registers should be assigned as Input ADC Register where the information for
the first channel will be stored in the PLC. The following registers will have the data for the other input channels. Similar
concept is used for output register also.
Q. What are the ranges for digital values downloaded in the PLC input ADC Register?
Ans. Different ranges based on the Analog inputs are as mentioned below:
a) Milli Volts (0-100mV or 0-50 mV): 0 to 4095 decimal
b) Milli Amperes (0-20mA or 4-20 mA): 0 to 4095 decimal
c) Thermocouples & RTD’s: Actual field values in degree centigrade multiplied by 10 is used for Thermocouple and RTD type
inputs.
In case of non-linear inputs, Eagle will download the engineering value entered by user multiplied by 10 into the PLC.
Q. Can I have combinations of different types of inputs?
Ans. Yes, you can. All the input channels of Eagle are user configurable and any combination of input types is possible. You
can define different channels to Analog inputs like RTD, Thermocouple, mA and mV. All these inputs can be connected to
Eagle at a time.
Q. Can I connect multiple Eagles to HMI Software / SCADA?
Ans. Yes, you can. Up to 32 Eagle units can be connected on RS 485 Modbus network. Define Eagle units as Modbus RTU
Slaves. Each Eagle unit will have unique slave ID. HMI Software / SCADA will be Modbus Master. In such applications Eagle
units are connected on RS 485 multidrop mode for fast response.
Q. Can I connect Eagle on RS 485 Modbus network with other field devices?
Ans. Yes, You can. Eagles will be connected in the RS 485 network as Modbus slaves with other field devices such as
Energy Meters, Temp. Controllers, Operator Panels etc.
Q. Can I connect multiple Eagles to Devices or PLC’s that do not support Modbus? How?
Ans. Yes, you can.
In such applications REPL make Gateway (Protocol Converter) unit is used. Gateway has 2 communication ports that
support RS 232 or RS 485. Gateway will convert PLCs’ protocol to Modbus. One port of Gateway will be connected to PLC
or non-Modbus device and other port will be Modbus Master. Multiple Eagles can be connected to Modbus Master port as
Modbus slaves.
58
Q. Is it possible to connect two devices, Eagle and Prizm Operator Panel on the same port of the PLC?
Ans. Yes, it is possible. Connect Eagle to the programming port of the PLC and Operator Interface to the IBM port of Eagle
(Slave Port). You can read / write / edit all the PLC registers and coils including Eagle channels by Prizm Operator Interface
using Eagle pass through port.
Q. Can I connect two different models of Eagles in the same network?
Ans. Yes, you can.
Q. What is the default Modbus ADC addresses when Eagle is defined as Modbus Slave?
Ans. Modbus addresses for Input Channels are:
For Modbus RTU Slave Driver, following are the tag addresses:
For Single register length:
I/P Channel No.
1
2
3
4
5
6
7
8
Holding Regsister
400101
400301
400501
400701
400901
401101
401301
401501
O/P Channel No.
1
2
3
4
Holding Register
402001
402003
402005
402007
For Multiple register length:
I/P Channel No.
1
2
3
4
5
6
7
8
Holding Regsister
400011
400012
400013
400014
400015
400016
400017
400018
Note: Multiple register length is not supported for output channels in Modbus RTU slave driver.
For “RENU Special Driver” following are the tag addresses for both the ‘single’ and ‘multiple’ register length:
I/P Channel No.
1
2
3
4
5
6
7
8
Holding Regsister
400011
400012
400013
400014
400015
400016
400017
400018
O/P Channel No.
1
2
3
4
59
Holding Regsister
402002
402003
402004
402005
Q. Can I set the Baud rate and RS232 / RS485 communication levels in the Eagle setup software when defining
Eagle as Modbus slave? How?
Ans. Yes, you can.
Select Eagle data button in the EDIT/ Setup menu. Set Level / baud between range of 0 to 3, where:
0 means RS232 Level and 9600-baud rate
1 means RS485 Level and 9600-baud rate
2 means RS232 Level and 19200 baud rate
3 means RS485 Level and 19200 baud rate
Q. What is the response time of Eagle?
Ans. response time of Eagle is typically 100 mSec. However, the overall response time depends on the level of communication and protocol used.
Q. How Eagle unit is calibrated?
Ans. Eagle unit is factory Calibrated. Special Calibration software and universal Calibrator is used to calibrate Eagle unit.
Universal Calibrator is certified and traceable to the Standard Calibration Organization.
Q. What are the different applications where Eagle units can be used?
Ans. Eagle units can be used for:
Process Automation.
Data Acquisition and Data Logging applications
Building Automation
Pharmaceutical machines
Test labs
Turbines
Q. Can I set the Baud Rate of Eagle above 19.2K?
Ans. Yes, you can. RENU Electronics Special Eagle Driver communicates Eagle with Modbus master at fixed baud rate of
57.6K. Its tag definitions explained in Chapter 6 (Modbus Configuration).
60
Troubleshooting
In this chapter. . .
• Troubleshooting guide for Eagle
61
9.0
Troubleshooting Guide for Eagle
* Indications of various LED configurations:
READY
PLC COMM
IBM COMM
0
0
0
0
POWER OFF
1
0
0
0
POWER ON
blink
X
X
X
Calibration corrupted,
default values loaded
1
0
0
1
Driver corrupted
1
blink
0
0
Communication with plc
1
blink
blink
0
Eagle working in Pass Through
mode
1
blink
blink
blink
Eagle working in Pass Through
mode indicating channel input out
of range
1
0
blink
0
Communicating on IBM port
Blink
0
0
blink
Firmware Corrupted
* Note: 0 = LED OFF,
1 = LED ON,
ERROR
X = Don’t care
62
COMMENT