1
Guided Tour (Version 3.3)
By Steven Castellucci as Modified by Brandon Haworth
This document was inspired by the Guided Tour written by Professor H. Roumani. His version of the tour can
be accessed at the following URL: http://www.cse.yorku.ca/~roumani/jbaYork/GuidedTour.pdf.
The Desktop
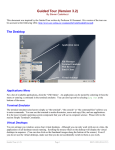
Application menu
Terminal window
Firefox and Thunderbird
Virtual desktops
Applications Menu
For a list of available applications, click the “CSE Menu”. An application can be started by selecting it from the
menu. In addition to Firefox and Thunderbird, other applications include Eclipse (an environment in which to
write and run programs), Acrobat Reader (to view and print PDF files), and OpenOffice (to create, edit, and
print Office documents). You can also log-out by selecting Log Out at the bottom of the menu.
Terminal
The terminal (also known as the console or the command-line) allows you to enter commands. You can use the
terminal to make directories, move and copy files, run applications, and submit your programs. It is the most
versatile operating system component that you will use in computer science.
Starting Firefox and Thunderbird
The Firefox Internet browser and the Thunderbird email client can be started with a single click. Firefox is
configured with department-specific bookmarks, while Thunderbird is configured to access your CSE mail
account. To receive your CSE mail elsewhere, please refer to the section Mail Forwarding.
Guided Tour (v.3)
Page 1
CSE 1020 M (2012-13 W)
Virtual Desktops
The operating system’s desktop is where you can arrange your application windows. You can arrange you
windows across four (by default) virtual desktops. Although you can only work with one at a time, the
applications on all desktops remain running.
To switch between desktops, you can click on the thumbnail images. Alternatively, you can scroll the mouse
wheel on an empty portion of the desktop. Even if you do not use the virtual desktops, make sure that you do
not accidentally switch to them as you work.
Configuring eCheck
Every chapter in the textbook ends with lab assignments, called “eChecks” – programs that are checked
electronically. You will learn more about eChecks in the textbook. However, you must first configure the
eCheck program that checks your code. Enter the command java Options at a terminal.
Uncheck “Work Offline”. Enter your username, password, and the following URL:
http://www.cse.yorku.ca/~roumani/type/ec/ec.cgi
Double-check that you entered the URL correctly. When you are finished, click Apply.
Configuring Eclipse
Open a terminal and enter the command mkdir ~/cse1020 to make a directory called “cse1020”. (The
squiggly character is a tilde. It represents your home directory and appears above the TAB key on the keyboard.)
This directory will be used to organize your 1020 programs. Next, start Eclipse by entering eclipse & .
Guided Tour (v.3)
Page 2
CSE 1020 M (2012-13 W)
When Eclipse starts, it asks where it should store your programs. Click Browse..., select the “cse1020”
directory you just created and click OK. Enable “Use this as the default and do not ask again”, and click OK.
Close the Welcome tab in Eclipse. Open the Windows menu and select “Preferences”. In the left pane, expand
“Java”, “Code Style”, select “Formatter”, and click Edit... .
Enter “York” as the profile name and select the “Braces” tab. For each option, select “Next line”. Click OK.
Guided Tour (v.3)
Page 3
CSE 1020 M (2012-13 W)
To allow eCheck to check your eCheck exercises, it needs to be configured as an external tool. Open the Run
menu, and then select “External Tools” and “External Tools Configurations...”. From the left pane, select
“Program”, then click the new icon (sheet with a plus sign). Fill-in the center pane as follows:
Name:
eCheck
Location:
/cse/local/bin/java
Working Directory:
${workspace_loc:${project_name}/src}
Arguments:
eCheck ${selected_resource_name}
Click Apply and then Close. Eclipse is now configured to write, run, and test programs for CSE 1020.
Guided Tour (v.3)
Page 4
CSE 1020 M (2012-13 W)
Create Your First Java Program Using jEdit & Linux Command Line
Open a terminal and enter the command mkdir ~/cse1020 to make a directory called “cse1020”. Enter the
command jedit & to launch jEdit. The & symbol will cause the program to 'detach' and run in the background,
allowing you to continue using the command line.
In jEdit, type the following code:
public class First
{
public static void main(String[] args)
{
System.out.println(“My name is ???”);
}
}
Save your code by selecting “Save” from the File menu (save the file as First.java in your newly created
~/cse1020 directory). In your open linux command terminal, enter the command cd ~/cse1020 to change to
your newly created directory. Now enter the command javac First.java to compile your java program into
bytecode. If everything went well your ~/cse1020 directory should now contain two files: First.java and
First.class. You can see this by entering the command ls -l in the terminal. Now enter the command java First
to run your newly compiled java program.
Running eCheck From The Linux Command Line
Complete the first eCheck exercise for Chapter 1 of the textbook. Create a class called “Check01A”. Read the
requirements for eCheck01A and write the necessary code. The result is similar to First.java. Save your
code by selecting “Save” from the File menu in jEdit.
To eCheck your code, open a terminal and enter the command cd ~/cse1020 to change to your 1020 directory.
Now enter the command java eCheck Check01A to eCheck your code.
Guided Tour (v.3)
Page 5
CSE 1020 M (2012-13 W)
The eCheck tool will compare the output of your program with the expected, correct output. If there is a
discrepancy, it outlines the difference. In the example below (see Running eCheck in Eclipse for example run),
the output is missing a colon before the account name. Make the necessary changes to correct your code and
eCheck it again. Repeat this process until eCheck reports that your code “Successfully passed all tests”.
Note that eCheck can only check “eCheck” exercises.
Creating Your First Java Program Using Eclipse
Open the File menu and select “New”, and then “Project...”.
Select “Java Project” and click Next.
Enter “Test” as the project name and click Finish.
Right-click the project name in the left pane and select “New”, and then “Class”.
Guided Tour (v.3)
Page 6
CSE 1020 M (2012-13 W)
Enter “First” as the name of the class. Enable “public static void main(String[] args)”, and click Finish.
If Eclipse asks you to “Open Associated Perspective?”, enable “Remember my decision”, and click Yes. In the
tabbed pane titled “First.java”, type the following code (replace “???” with your name):
public class First
{
public static void main(String[] args)
{
System.out.println(“My name is ???”);
}
}
Save your code by selecting “Save” from the File menu. Next, click on the triangle next to the run button
(circled below), and then select “Run As”, then “Java Application”. This only has to be done once per program.
Subsequent times, you can click the “Run” button (green circle with a white triangle). The output appears in the
bottom pane in Eclipse.
Guided Tour (v.3)
Page 7
CSE 1020 M (2012-13 W)
Congratulations! You have just written your first program in 1020 this term.
Running eCheck in Eclipse
Complete the first eCheck exercise for Chapter 1 of the textbook. Create a class called “Check01A” in the
“Test” project. Read the requirements for eCheck01A and write the necessary code. The result is similar to
First.java. Save your code by selecting “Save” from the File menu.
To eCheck your code, open the Run menu, and then select “External Tools” and “External Tools
Configurations...”. From the left pane, select “eCheck”, and then click Run. After doing this once, “eCheck”
becomes directly accessible from the “External Tools” submenu.
The eCheck tool will compare the output of your program with the expected, correct output. If there is a
discrepancy, it outlines the difference. In the example below, the output is missing a colon before the account
name. Make the necessary changes to correct your code and eCheck it again. Repeat this process until eCheck
reports that your code “Successfully passed all tests”.
Note that eCheck can only check “eCheck” exercises.
Guided Tour (v.3)
Page 8
CSE 1020 M (2012-13 W)
Submitting Assignments
In computer science courses, you will be required to submit assignments and lab tests. To do so, you will use
the submit command, which has the following structure:
submit course assignmentName yourFile1 yourFile2 ... yourFileN
For example:
submit 1020 LEx0 First.java
However, Eclipse saves all your programs in its workspace. Before submitting your work, you will need to
navigate to the correct directory. As an example, let us submit First.java from the Test project as your
solution to “LEx0”. It is located in the src directory of the Test project in the workspace directory. Open a
terminal (or use an existing one) and enter cd ~/cse1020/Test/src to navigate to the directory
containing First.java. Enter the command ls –l (“el” not “one”) to list the contents of directory. Using
“-l” also displays the modification date/time. Sometimes, students accidentally submit the wrong file. Check
the modification time of First.java to make sure that it is the correct version of the file that you want to
submit (i.e., the latest one). Then, enter the submit command provided to you in the test, assignment, or
exercise. For LEx0, it is the following: submit 1020 LEx0 First.java .
It is recommended that you submit your files early and often. Newer files overwrite those with the same name.
For more information, enter the command man submit at a terminal.
Printing Files
Included in your course fee is a print quota of 500 pages. To display the number of pages remaining in your
quota, enter the command pquota at a terminal.
Typically, you can print an open file by selecting Print from the File menu. After you send the file to be
printed, go to any print station in room CSEB 1002, 1004, or 1006. Touch the screen to activate it. Enter your
username and password using the attached keyboard. Ensure that the files you want printed are selected, and
press the print icon in the bottom-left corner. To exit without printing, press the exit icon. If you experience any
printing problems, contact the lab monitor.
Guided Tour (v.3)
Page 9
CSE 1020 M (2012-13 W)
Mail Forwarding
You can have your CSE mail automatically forwarded to the email account of your choice (e.g., yorku.ca,
gmail.com, hotmail.com, etc.). To do so, open a web browser and go to mail.cse.yorku.ca . Log-in using
your CSE username and password. From the left pane, select Options, then Mail. From the center pane,
select Filters, Edit your filter rules, then Forward. Enter the your other email address(es) and
click Save. To test the forwarding, send an email to your CSE address (e.g., [email protected]) and
check your other email address(es).
Simple Terminal Commands
Command: pwd
Example: pwd
Description: Displays the current directory (a.k.a. working directory). The same output can be seen a terminal
window’s title bar.
Command: man command
Example: man submit
Description: Displays the user manual for the passed command. The user manual details the type and number
of arguments required by the command, and lists all the available command options. To scroll through the user
manual, press the spacebar. To exit the user manual, simply press the Q-key.
Command: mkdir dirName Example: mkdir eChecks
Description: Creates a subdirectory with the passed name in the current directory. The example creates a
subdirectory called “eChecks”.
Command: cd dirName
Example 1: cd Example 2: cd ..
Example 3: cd mail
Description: Without any argument (Example 1), this command changes the working directory to your home
directory (equivalent to the “My Documents” folder in Windows). With the argument “..” (Example 2), this
command changes the working directory to the parent directory. If you provide the name of a subdirectory as an
argument (Example 3), this command changes the working directory to be that subdirectory (e.g., the
subdirectory called “mail”).
Command: ls dirName
Example 1: ls Example 2: ls mail Example 3: ls *.txt
Description: Lists the contents of the directory specified by the argument. Without any arguments (Example 1),
this command lists the visible contents of the working directory. If the argument is a directory name
Guided Tour (v.3)
Page 10
CSE 1020 M (2012-13 W)
(Example 2), this command lists the visible contents of that directory (e.g., the subdirectory called “mail”).
Example 3 lists all files in the current directory that have a “.txt” extension. You can use the “*” wildcard to
search for files that match a pattern. There are many options for this command, such as “-a” to show hidden
files and “-l” to show file and directory details. Enter the command man ls for further details.
Command: rm fileOrDir Example 1: rm First.java
Example 2: rm –r eChecks
Description: Removes the file or directory indicated by the argument. The first example deletes the file
“First.java”. The second example (note the “-r” option) removes directory called “eChecks” and all of its
contents. Use this command with caution!
Command: cp orgnl cpy Example: cp First.java First_backup.java
Description: Copies the file orgnl to the location cpy. The example creates a copy of “First.java”, called
“First_backup.java”.
Command: mv old new
Example: mv First.java Second.java
Description: Moves the file old to the location new. This command can also be used to rename files. The
example renames “First.java” to “Second.java”.
Command: script log
Example: script A1_log.txt
Description: Records the commands and output generated at the terminal until exit is entered. The record is
written to a file, whose name is passed as an argument.
Auto-Completion and Command History
You do not have to type entire filenames or directory paths. Type the first couple of characters, followed by the
TAB key. The operating system will complete the rest of the name or path. If there are multiple matches, the
operating system will complete only the common portion. You will have to type additional characters to
identify the desired file or directory. To repeat a command at a terminal, you can use the up- and down-arrow
keys to cycle through commands you previously entered.
Guided Tour (v.3)
Page 11
CSE 1020 M (2012-13 W)