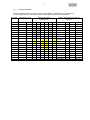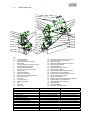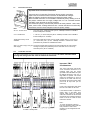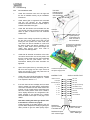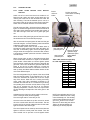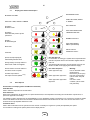
1
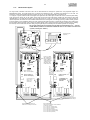
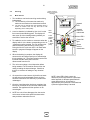
These instructions contain operating information and should be left with the unit.
Gas fired Humidifier
Units type B and C
Commissioning & User Manual
(Edition 2.1)
(For use with Software version 9.0 and subsequent issues)
WARNING: If the information in this manual is not
followed exactly, a fire or explosion may result causing
property damage, personal injury or loss of life
_ Do not store or use gasoline or other flammable vapours and liquids
in the vicinity of this or any other appliance.
_WHAT TO DO IF YOU SMELL GAS
• Do not try to light any appliance
• Do not touch any electrical switch; do not use any phone.
Follow the gas supplier’s instructions.
• If you cannot reach your gas supplier, call the fire department.
_ Installation and service must be performed by a qualified installer,
service agency or gas supplier.
Installation in countries covered by EC Directives:
This product will meet the requirements of the Low Voltage Safety Directive 73 / 23 EEC and the EMC
Directive 89 / 336 EEC when installed in accordance with the instructions contained in this manual.
Failure to comply with these instructions may invalidate the manufacturer's warranty or any
certificate/declaration of conformance requested to be supplied with the unit.
2
Contents
1.1
Positioning the Vapac ............................................................................................................. 4
1.2
Technical information ............................................................................................................. 5
1.3
General layout of unit ............................................................................................................. 7
1.5
Plumbing Considerations........................................................................................................ 8
1.5.1
Cold water supply. .............................................................................................................. 8
1.5.2
Drain connection. ................................................................................................................ 8
1.6
Electrical Connections ............................................................................................................ 9
1.6.1
Termination onto unit .......................................................................................................... 9
1.6.2
Power Supply Connection................................................................................................. 10
1.6.3
Remote indication ............................................................................................................. 10
1.6.4
Cable Entry Provision........................................................................................................ 10
1.6.5
Vapac Control Circuit Transformer.................................................................................... 10
1.6.6
RDU Connection ............................................................................................................... 10
1.7
Control Circuit Connections .................................................................................................. 11
1.7.1
Control Circuit Wiring ........................................................................................................ 11
1.7.2
Proportional Control .......................................................................................................... 11
1.7.3
Control Signal Selection.................................................................................................... 11
1.7.4
On/Off Control................................................................................................................... 11
1.7.6
Security Circuit / E.P.O. Shutdown.................................................................................... 12
1.7.7
Load Shed Option ............................................................................................................. 12
1.7.8
Master/Tandem System .................................................................................................... 13
2.0 Commissioning....................................................................................................................... 14
2.0.1
Pre commission check ...................................................................................................... 14
2.0.1.2 Master slave set up ......................................................................................................... 16
2.0.2.1
STAND ALONE MASTER UNITS WITHOUT DISPLAYS.............................................. 17
2.0.2.2
STAND ALONE MASTER UNITS WITH DISPLAYS ..................................................... 18
2.0.2.3
Start/Restart .................................................................................................................. 18
2.1
OPERATION NOTES ........................................................................................................... 18
3.0
User LED.............................................................................................................................. 19
3.1
Display panel label and description ...................................................................................... 20
3.2
Other Options ....................................................................................................................... 20
4.0
Servicing............................................................................................................................... 21
4.1
Minor Service ....................................................................................................................... 21
4.2
Major Service ....................................................................................................................... 22
4.3
Major Overhaul ..................................................................................................................... 23
4.4
REBUILDING ....................................................................................................................... 25
3.0
Wiring diagrams.................................................................................................................... 27
Tables
TABLE 1
TABLE 2
TABLE 3
TABLE 4
TABLE 5
Gas fired humidifier gas types ……..…………………………………………….………. 4
Technical DATA ……………………………………………………………………………. 5
Connection details …………………………………………………………………………. 6
Water type setting and default drain (DD) times ………………………………………. 8
Set maximum output duty to % CO2 adjustment setting………………………………. .8
Vapac Humidity Control Limited reserve the right to change the design or
Specification of the equipment described in this manual without prior notice.
Made in England by:
Vapac Humidity Control Ltd.
0410210 Nov. 2005.
Printed in Great Britain.
3
Important Installation Points
Read the instruction and recommendation in manual carefully to ensure proper installation, and
keep this manual in a safe place.
The unit must be installed to comply with national regulations and/or codes of practice. A qualified
electrician must carry this out.
Ensure at least 1000 mm clear front access to the electrical panel and burner of the cabinet.
Do not locate the cabinet where the ambient temperature around the unit could exceed 45 oC; or
fall below 5 oC e.g., an unventilated roof mounted enclosure – see minimum space / ventilation
requirements page 4.
Do not locate the cabinet where a ladder is required for service access as this could make
servicing the heat exchanger or its removal hazardous.
Make sure steam line(s) have adequate slope (min 12%) for condensate drainage and use
condensate separators if the pipe is lower than the unit. (see page 13)
Provide adequate support to prevent sags developing in flexible steam lines, which can fill with
water and create a "trap".
Important Electrical Connection Items
Before commissioning the unit, check that all electrical (power) connections - including those at
the terminals and contactor are tight.
The Vapac transformer must not be used to power other equipment.
To comply with EMC aspects see recommendations on page 16.
Use a high-limit humidistat connected to control terminals 9 & 10 to ensure positive interruption of
unit operation when over-humidification is detected.
It is important that the control signal connected to terminals 5 & 6 must be referenced to ground at
the control PCB – this can be done by linking either terminal 5 0r 6 to terminal 7.
NB if the controller output is referenced to ground, it is important that the “leg” which is
connected to ground at the controller is also connected to ground at the Vapac unit. Grounding
the opposite “leg” will cause damage to the controller and/or the Vapac control PCB.
Important Maintenance Items
Only a qualified electricians and CORGI registered engineers should work on this unit.
The boiler contains hot water, and must be drained before any maintenance is carried out on the
steam section. This should be done prior to isolating the power, and removing the front access
panel
EDS SENSITIVE DEVICES USED ON PCB. ENSURE ANTI-STATIC PRECAUTIONS ARE TAKEN
WHEN REMOVING OR REPLACING PCB’s
4
Don’ts
Installation.
1.1
Positioning the Vapac
Do’s
Do Read the instructions and recommendations in the
manual carefully to ensure proper installation.
Do keep this manual in a safe place. You may need it for
your own reference or the service engineer may need to
consult it during installation or servicing in the future.
Do mount the unit on the floor as close to the steam
distribution pipe(s) as possible.
Do ensure adequate front access to the electrical and gas
burner. (min 1000 mm).
Do ensure adequate ventilation for combustion and to unit
for control panel max. temperature of operation 45 °C
Do Check with code of practice and qualified engineer the
standard of installation require for location of heat
exchanger i.e. type B for ventilated plant room or type C
for most other areas.
Do ensure if unit is a type B and take air from the space
there is adequate ventilation within the space to feed
unit, in accordance to building regulations codes of
practice.
Do check the appliance data plate and technical information
tables conforms to the water supply, mains electrical
and the type of gas supply to your building.
Don’t mount the unit close to sources of strong electromagnetic emissions e.g. variable speed lift motor drives,
kVa transformers etc.
Don’t mount the unit in an unventilated enclosure.
Don’t mount in a position requiring ladder access to the
unit.
Don’t mount the unit behind a false ceiling, wall or other
situation where an unusual malfunction (e.g. water leak)
would cause damage.
Don’t install this appliance a damp environment or close to
equipment which spray water or other liquid.
Don’t mount the unit in an area which will be hosed down.
Don’t install the unit where the ambient temperature can
exceed 45oC; or fall below 5oC and freeze the heat
exchanger.
Don’t mount the unit inside a cold-room or other place
where temperature and humidity conditions can cause
condensation on electrical components.
Don’t mount the unit where the sound of a contactor
opening/closing and water flow in a pipe would be
unacceptable e.g. libraries, private apartments, etc.
Don’t place objects on the appliance, block or obstruct the
air inlet to the appliance.
Don’t place combustible materials, gasoline or other
flammable vapours and liquids around the area the unit
is located.
Warning
IF YOU SMELL GAS IN THE ROOM, DO NOT TURN ON LIGHT SWITCHES OR POWER POINTS,
USE THE TELEPHONE OR ANY OTHER OBJECT WHICH MIGHT CAUSE SPARK.
Open doors and windows immediately to ventilate the room! Shut the gas main tap on the meter or
the gas cylinder and call your Gas supplier or service immediately.
Always disconnect the appliance from the mains either by switching off at mains switch and if
possible, unplugging it from the mains, before cleaning the appliance or carrying out maintenance
on the unit.
Never block the ventilation inlets or outlets of the of the appliance.
Never place combustible materials, gasoline or other flammable vapors and liquids around the area
the unit is
Should overheating occur, or the gas supply fail to shut off, shut off the manual gas valve (item 19 on
the general layout diagram 1.3) to the appliance before shutting off the electrical supply
Do not use this appliance if any part has been under water. Immediately call a qualified service
technician to inspect the appliance and to replace any part of the control system and any gas
control which has been under water.
5
1.2
Technical information
Table 1 Gas fired humidifier gas types. The gas fired humidifier is supplied pre-set for two bands of
European gases E and LL the calorific values for these gases is given in the following table.
Gas Type
G21
G24
G20
G222
G23
G26
G25
G231
G27
G221
G271
CALORIFIC VALUE
GROSS HS
NET HI
45.28
41.01
37.78
31.86
34.95
36.91
32.49
34.02
28.53
31.46
33.36
29.25
32.11
30.98
28.91
27.89
Second family gases
Category index
E
H
L
LL
Es
Country gas category type and gas
pressure
Ei
Country
Austria
Belgium
Denmark
G20 G20
G20
Germany
G222 G222
G222
Finland
G23
France
G26 G26 G26 G26
Greece
G25 G25
G25
United
Kingdom
G231
G231
Iceland
G27
Ireland
Italy
G271
Luxembourg
Netherlands
Norway
Portugal
Spain
Sweden
Switzerland
G21 G21
G21
Code CAT
AT
BE
DK
DE
FI
FR
GR
GB
IS
IE
IT
LU
NL
NO
PT
ES
SE
CH
mbar
I2H
I2E(S)B
I2H
I2ELL
I2H
I2Esi
I2H
I2H
H - 20
E - 20/25
H - 20
ELL - 20
H - 20
E - 20/25
H - 20
H - 20
I2H
I2H
I2E
I2L
H - 20
H - 20
E - 20
L - 25
I2H
I2H
I2H
I2H
H - 20
H - 20
H - 20
H - 20
6
Calorific value for G20
Gas Steam Burner
Fired output input
power
Unit
GROSS
model
Gas
Kg/hr Hs kW
TABLE 2 Technical DATA
NET = 34.02 Mj/Kg
Calorific value for G25 GROSS = 32.94 Mj/Kg NET = 29.25 Mj/Kg
Start fan speed Minimum fan Maximum fan
CO2 setting at
CO2 setting at
Efficiency Efficiency Average
minimum speed
maximum speed
RPM
speed RPM
speed RPM
maximum maximum water
speed consump
RPM / CO2
RPM / CO2
speed
NET
tion
NET
GROSS
Hi kW E on G20 LL onG25
E
LL
E
LL
E
LL
E
LL
E
LL
%
%
l/min
GROSS = 37.78 Mj/Kg
Burner Maximum GAS
input
rate m3/hr
power
type
GF6
GF10
GF10P
GF20
GF20P
GF30
GF30P
GF40
GF40P
GF50
GF50P
GF60
GF60P
GF70
GF70P
GF85
GF85P
6
10
6 - 10
20
6 - 20
30
6 - 30
40
17 - 40
50
17 - 50
60
17 - 60
70
17 - 70
85
17 - 85
5.01
8.14
8.14
15.96
15.96
23.79
23.79
32.05
32.05
39.96
39.96
47.86
47.86
55.77
55.77
67.62
67.62
4.51
7.33
7.33
14.37
14.37
21.42
21.42
28.86
28.86
35.98
35.98
43.1
43.1
50.22
50.22
60.89
60.89
Gas Fired Unit MODEL
0.48
0.78
0.78
1.52
1.52
2.27
2.27
3.05
3.05
3.81
3.81
4.56
4.56
5.31
5.31
6.44
6.44
0.55
0.89
0.89
1.74
1.74
2.6
2.6
3.5
3.5
4.37
4.37
5.23
5.23
6.1
6.1
7.39
7.39
Operating Gas
pressure rang
mbar
Minimum Maximum
GF6 - GF30 &
GF6P - GF30P
GF40 - GF 85 &
GF40 - GF85P
1930
1930
1930
1930
1930
1930
1930
1820
1820
1820
1820
1820
1820
1820
1820
1820
1820
2100
2100
2100
2100
2100
2100
2100
2100
2100
2100
2100
2100
2100
2100
2100
2100
2100
1320
1320
1320
1320
1320
1320
1320
1430
1430
1430
1430
1430
1430
1430
1430
1430
1430
1485
1485
1485
1485
1485
1485
1485
2100
2100
2100
2100
2100
2100
2100
2100
2100
2100
1485
2145
2145
3410
3410
4730
4730
2750
2750
3410
3410
4125
4125
4785
4785
5775
5775
1485
2145
2145
3410
3410
4730
4730
2750
2750
3410
3410
4125
4125
4785
4785
5775
5775
1320 / 8.7
1320 / 8.7
1320 / 8.7
1320 / 8.7
1320 / 8.7
1320 / 8.7
1320 / 8.7
1480 / 8.7
1480 / 8.7
1480 / 8.7
1480 / 8.7
1480 / 8.7
1480 / 8.7
1480 / 8.7
1480 / 8.7
1480 / 8.7
1480 / 8.7
GENERAL DATA
Water Minimum Maximum
water
flow
water
pressure
rate
pressure
ppm
l/min
Bar
Bar
36
5
1.5
10
CO at
CO at
NOx at NOx at
minimum maximu minimum maximu
speed m speed speed m speed
15
27
ppm
3
ppm
22
ppm
15
15
27
3
22
15
36
5
1.5
10
1485 / 9.0
1485 / 9.0
1485 / 9.0
1485 / 9.0
1485 / 9.0
1485 / 9.0
1485 / 9.0
2100 / 9.0
2100 / 9.0
2100 / 9.0
2100 / 9.0
2100 / 9.0
2100 / 9.0
2100 / 9.0
2100 / 9.0
2100 / 9.0
2100 / 9.0
Water
content
l
22
36
5430 / 9.3
5430 / 9.3
5430 / 9.3
5430 / 9.3
5430 / 9.3
5430 / 9.3
5430 / 9.3
5665 / 9.3
5665 / 9.3
5665 / 9.3
5665 / 9.3
5665 / 9.3
5665 / 9.3
5665 / 9.3
5665 / 9.3
5665 / 9.3
5665 / 9.3
5430 / 9.7
5430 / 9.7
5430 / 9.7
5430 / 9.7
5430 / 9.7
5430 / 9.7
5430 / 9.7
5665 / 9.7
5665 / 9.7
5665 / 9.7
5665 / 9.7
5665 / 9.7
5665 / 9.7
5665 / 9.7
5665 / 9.7
5665 / 9.7
5665 / 9.7
86.7
86.5
86.5
86.5
86.5
86.3
86.3
86
86
85.6
85.6
85.4
85.4
85.3
85.3
85.2
85.2
95.6
95.4
95.4
95.4
95.4
95.1
95.1
94.8
94.8
94.4
94.4
94.2
94.2
94
94
93.9
93.9
0.11
0.18
0.18
0.37
0.37
0.55
0.55
0.73
0.73
0.92
0.92
1.1
1.1
1.28
1.28
1.56
1.56
Electrical Weight IP rating
Discharge steam
power empty (no
pressure
absorbed water)
Pa
Minimum Maximum
watts
Kg
-2000
2000
70
125
20
-2000
All units are supplied to run on 220 – 240 volts 50 – 60 Hz. single phase and Natural plus EARTH or two phase, plus EARTH
Unit configuration for g20 type “E” gas Digital Input 7 open circuit, to configure for G25 type “LL” gas Digital Input 7 closed circuit or linked.
2000
90
142.5
20
7
1.3
General layout of unit
1a
1b
3
4
5
6
7
8
9
24
25
26
2
31
33
10
11
15
16
17
18
19
20
22
21
22
23
36
11
12
13
14
15
32
18
36
19
20
Key:1a
1b
2
3
4
5
6
7
8
9
10
11
12
13
14
15
16
17
18
Flue outlet Option 1
Air intake Option 1
Coaxial flue connection Option 2
Steam outlet
Heat exchanger top inspection cover lid
Optional display and keypad
Microprocessor display LED
Auto run / off / drain rocker switch.
Mains on lamp.
Lockout reset button
Electrical control panel.
Burner fan motor supply transformer.
Control transformer
Gas valve
Air intake venture
Gas valve controller
Fan
Fan motor
Drain pump
TABLE 3 Connection details
1a Flue outlet OPTION 1
1b Air intake pipe OTION 1
2 Coaxial flue system OPTION 2
3 Steam outlet
16 Gas supply
17 Electrical connections
Mains feed
Run & fault remote indication.
Remote control input signal or sensor
Network link connections
Remote fan start will humidifier signal
18 Drain connection
30 Water feed connection
27
28
29
30
31
32
33
34
35
19
20
21
22
23
24
25
26
27
28
29
30
31
32
33
34
35
36
37
Gas supply isolator valve and connection
Electrical connection terminal box.
Drain connection.
Water feed isolation valve and connection
Drain discharge tundish.
Water feed tundish
Water feed twin solenoid valve.
Float switches chamber.
Heat exchanger high temperature cutout.
Top inspection cover lid fasteners.
Heat exchanger chamber inspection cover
Burner flame inspection glass.
Burner mat assembly.
Bottom inspection and cleaning cover fasteners
Heat exchanger manual drain cock.
Heat exchanger base enclosure.
Plinth side legs
Casing lid fasteners
Enclosure cover (not shown).
GF 6 – 30 (P)
1 x 80mm Outside diameter pipe
1 x 80mm Outside diameter pipe
1 x 80 /125 mm diameters coaxial
1 x 54mm outside diameter pipe
1 x ½” BSP female into valve
GF40-85 (P)
1 x 80mm Outside diameter pipe
1 x 80mm Outside diameter pipe
1 x 80 /125 mm diameters coaxial
2 x 54mm outside diameter pipe
1 x ¾” BSP female into valve
Live neutral & earth into 2.5 mm2 screw clamp terminal
6 x 1.5 spring clip terminals COM, N.O. & N.C. one for each condition
12 x 1.5 spring clip terminal see wiring diagram and connection details
3 x plug connection terminals
Live neutral & earth into 2.5 mm2 screw clamp terminal
1 ½” BSP for 35mm pipe drain connection from tundish to waste gully.
½” BSP female into valve
½” BSP female into valve
8
1.5
Plumbing Considerations.
1.5.1
Cold water supply.
1.5.2
Drain connection.
General
Condensate connection to the unit should be via the
1” BSP male elbow connected to the Tundish
provided with the unit at the front.
General
The Gas fired Humidifier range of units is capable of
operating with a range of water quality raw mains or
de-mineralised/de-ionised. The water supply should
be within the following limits: -
Conductivity 0 – 1000µS
PH
7.3 – 8.0
Silica
0
Pressure of between 1.5 - 8 bar.
Maximum chlorine level 170 ppm
If the chlorine level within the supply water to the
humidifier is above 70 PPM then set periodic drain
so as the water within the cylinder i.e. measured
from drain water out of cylinder is below 250 ppm.
For water flow rates and consumption, please
refer to section 1.2 technical information.
Water connection to the unit should be via the ½”
BSP female isolation valve provided with the unit at
the front, the valve has a blue handle.
Do's
Do ensure metal drain and supply water pipework is
grounded electrically close to the unit (a
ground/earth stud is positioned on the underside
of the cabinet.
Drain capacity per cylinder
= pump discharge rate of max 16.8 l/min at 50 Hz.
Power supply
17.2 l/min at 60 Hz.
Do periodically check and clean condensate tundish
by removing and flushing through with water.
Note:- the unit must be set for the correct water
type to prevent scaling or foaming as per table 3.
Do’s
Gas pipe work must be installed, connected and
tested in accordance with the CORGI code of
practice and by a CORGI qualified engineer.
Gas supply pipe to
be connected into
¾” BSP female gas
isolation valve
supplied as part of
Gas Fired
Humidifier
Water supply pipe to be
connected into ½” BSP female
water isolation valve supplied as
part of the Gas Fired Humidifier.
Condensate drain connection
onto 1” BSP male elbow from
external tundish. Elbow and
tundish supplied with Gas Fired
Humidifier.
Condensate pipe from tundish to
run to gully or drain point with a
full greater than 7%.
Electrical connection
terminal box for all mains
supply and control cables
for the Gas Fired
Humidifier unit.
Table 4 Water type setting and default drain (DD) times
Water Type
Conductivity
Chlorine
level ppm
range µS
Run Interval
between DD
DD period
DD period
6–30Kg/hr
6–30Kg/hr
units
units
De-mineralised water
<10
0
48 hours
36 sec
60 sec
De-Ironies
< 50
0
24 hours
36 sec
60 sec
Softened
< 100
0
30 min
36 sec
60 sec
Pot. Low conductivity
50 – 300
20 – 100
2 hours
36 sec
60 sec
Pot. Medium conductivity
50 – 500
20 – 150
1 hour
36 sec
60 sec
Pot. High conductivity
> 500
> 150
20 min
36 sec
60 sec
The above table gives the factory setting for default drain times with each setting of water types. The water type
must be set in accordance to the conductivity and chlorine measured or obtained from the water provider.
9
1.6
Electrical Connections
.
Important Power Connection Information
Vapac 24V and 9 V secondary Transformer Primary supply connections:
Vapac units can be wired to allow connection to alternative site Voltages.
Make the following simple checks before connecting the power supply: Move the RED connection on the VAPANET transformer primary winding circuit to
the position marked with the supply Voltage that is to be connected between
VAPANET power terminals A1 and the neutral N.
The transformer primary circuit terminal positions are clearly marked: - 200V, 230V,
380V, 415V & 440V. If voltage other than 220 – 240 are used the 24 volt secondary
transformer 150 VA must be changed to mach the primary voltage.
Note:
24 V a.c. Control circuit
-
3.15 A 20 mm (F - Quick blow) fuse (Pt. No. 1080096) mounted on VAPANET
Echelon PCB (Pt.No.1150630).
9 V a.c. PCB Circuit
-
1 A 20 mm (F - Quick blow) fuse (Pt No. 1080054) mounted on the VAPANET
Echelon PCB (Pt, No. 1150630).
Transformer Primary Circuit And RDU.
Two fuses protect the control circuit on Single cylinder units F1 3.15 A 20 mm
(F - Quick blow) fuse (Pt. No. 1080096) mounted in fuse-terminal holder
protects Primary transformer and RDU unit if fitted.
230V ac Drain Pump and gas The pump and gas valve are fed from the main transformer via a 230 volt auto
winding. The pumps are protected by fuse F1 main fuse at 3.15 A 20 mm (F valve supply.
Quick blow) fuse (Pt. No. 1080096)
1.6.1
Termination onto unit
The Gas Fired Humidifier unit has an external terminal box for site connection. No cables should be drilled
through the casing as this will cause air leaks to the sealed unit
Important E.M.C.
Considerations
The control load shed and security
circuit connections should be run in
screened cable with the screen
grounded at the VAPANET end (onto
the EARTH terminal) if long runs or
large EMF are present. The screen
should be maintained as close as
possible to the cable ends and any
tail between the screen and the earth
point must be kept short (50 mm
maximum).
Control Shutdown OR
Load Shed
If short runs in electrically clean areas
then two core cables can be used.
F1 main 3.15 amp fuse
If the network COM’s is required for
master slave or site BMS. Then
network cable should be screened
cable and connected to the terminals
provide and only screened connection
made on end of the cable the other
end screen cut back.
Note :11 and 12 are interlock control for
time clock and airflow when used with
frost protection or with no frost
protection can be configured as load
shed option.
10
1.6.2
Power Supply Connection
The wiring to the Vapac should be done by a
qualified electrician. The external overcurrent
protection and wiring should comply with the
appropriate Regulations and Codes of Practice.
Note: for computerized building management
systems, using the keypad, the “flashing” signal can
be changed to continuous to avoid unwarranted
print-outs.
1.6.4
Cable Entry Provision
Important: Make sure the connection to the primary
Voltage winding of the Vapac transformer matches
the supply Voltage which is to be connected
between Vapac terminals L & N.
Cable glands must be used to ensure cables are
held securely at the entry position. Gas fired units
are supplied with terminal connection box that has
knock out for cable entry, for cable gland.
A switched fuse isolator or switch fused spur outlet
must be sized to suit the total maximum phase/line
current of the unit and should be located adjacent to
the Vapac cabinet or within easy reach and readily
accessible.
1.6.5
In Vapac VAPANET units terminals 1, 2 and 3 are
for the power supply connections as indicated in the
diagrams below.
1.6.3
Remote indication
Remote indication of “unit-on” or on line signal and a
fault warning are available as standard. Both the
“unit-on” indication and the fault warning can be
wired for either normally-open or normally-closed
Volt-free contacts (Max. Rating 240 Volts 3
Amperes). On healthy or fault condition.
If the run signal is wired across 545 and 547 the
contacts will be open circuit when on stand by and
closed circuit when running on line.
If the fault signal is wired across 542 and 544 the
contacts will be open circuit on no fault and close on
fault condition.
The VAPANET provides the fault warning as either:
a) a continuous signal
b) an immediate “flashing” signal for
“Stop” condition.
Vapac Control Circuit Transformer
The internal control circuit of the Vapac unit
operates at 24Vac - the transformer secondary is
set at 24V.
As standard the Vapac VAPANET includes a
transformer with alternative primary winding options
200V, 230V, 380V, 415V, and 440V and requires on
site adjustment to match it to the Voltage connected
to Vapac terminals A1 and A2.
The transformer also has a 9V secondary tapping
which provides power to the VAPANET 1150630
PCB.
Important: The Vapac transformer must NOT be
used to power other equipment or the warranty will
be invalidated.
1.6.6
RDU Connection
Units up to 30 kg/h can be connected to a remote
mounted Room Distribution Unit. Terminals 25 & N
provide a 230 V supply for the fan motors in the
R.D.U.
Notes:1.
2.
3.
All units must have a PE earth connection connected to the units terminal.
Unit with N.A. in the following tables means NOT AVAILABLE there is not a unit available to run at the voltage
and phases shown. Please check that the correct model reference is ordered and installed, for the low or high
voltage required, and at the desired steam output.
Standard design is for 50 Hz. Supplies. Design for 60 Hz. Also available - 60 Hz. Supply must be specified with
order as the standard pump is only 50Hz.
FOR FULL ELECTRO-MAGNETIC COMPATIBILITY A NEUTRAL CONNECTION IS REQUIRED FOR ALL
PROPORTIONAL UNITS AS INDICATED IN THE CONNECTION DIAGRAMS ON THE FOLLOWING PAGES.
RDU Connection
The three types of RDU are for various voltages and phase without neutrals connections that can be made to the VAPANET
unit. Please refer to the VAPANET connection diagram on the following three pages as to which type of unit is required. On
twin cylinder units two fan circuits as shown below one for each cylinder will be in the RDU unit.
200 – 250 V 1Ph. N + earth
200 – 250 V 2Ph. + earth
380 – 440 V 2Ph. + earth
TRANSFORMER
PRIMARY
380 – 440 V
SECONDARY
210 – 250 V
11
16
Use a dedicated, earthed metal conduit for both the
control signal cable and the security circuit cables,
sharing the same conduit if practicable.
8
1
CR2
CR2
F1
Control Circuit Wiring
F2
1.7.1
CR1
Control Circuit Connections
1
1.7
1
CR4
UCP
configuration
resistor
Use screened cable for all control and security circuit
connections to minimise risk of electrical interference.
The screen should be grounded at the VAPANET end
only. See detail on page 7. NB. The control signal
should be connected to ground at the PCB by
connecting either terminal 5 or 6 to terminal 7 –
Important note if the controller output is
referenced to ground, then the “leg” which is
ground must be the one linked to terminal 7.
16
J3
1
CR3
J2
J1
J6
CR7
Net
J5
10
CR5
CR6
6
6
1
16
1
1.7.2
Jumper J1
should be
fitted if
control
signal is
4 – 20 mA
J4
Vapac PART No. 1150630
Proportional Control
The VAPANET Electrode Boiler (LExxP) models can
all be operated by either a potentiometric signal, a
lonworks network signal or by one of 6 standard
proprietary DC analogue signals.
Input signal:
Potentiometric control
0-5V
0-10V
0-20V (Actually 0-18V – not phase cut)
2-10V
1-18V
4-20mA (Ensure jumper J1 is in place)
Network (Slave unit – demand generated by
Master)
Response:
8-100%
POTENTIOMETRIC
CONTROL
min.
135 Ohms
Max. 10,000 Ohms
NOTE :- FOR CURRENT INPUT ONLY JUMPER J1 ON THE
1150630 CONTROL BOARD MUST BE LINKED.
Control Signal Selection
Selection of the control signals is done a part of the
initial set-up procedure using the keypad display. For
confirmation that the signal has been selected, view
the information window. If the unit has not got a
keypad then this is done on the configuration board
1150634 mounted on the main control board 1150630
using the jumpers provided. The appropriate right
hand link should be made to select the site feed water
type and the appropriate left hand link representing
the actual site control signal should be linked using
the jumper plugs provided.
Vapac part no. 1150634
Electro
boiler
Network
or slave
Full o/p
pot
UCP1
4-20mA
Pot high
Pot medium
0-20v
Pot low
1-18v
Softened
2-10v
De-iron
0-10v
0-5v
De-min
J1
J2
CR2
12
11
9
10
8
7
6
5
Vapanet models can be operated by a single
step humidistat which has Volt-free contacts –
select control option Pot.
4
On/Off Control
2
1.7.4
4 – 20 Ma
CURRENT
CONTROL
1
1.7.3
DC 0 - 20
VOLTAGE
CONTROL
HYGROSTAT WITH VOLT FREE CONTACTS (max.
RESISTANCE OF EXTERNAL CONNECTION 100
Ohms.
12
12
11
9
10
8
7
5
6
RH Output
4
0 Volt Ref.
Thermistor
If “Frost Protection” is required do not connect
the thermistor input from the sensing head to
control terminals 1 & 2, which should be used to
connect the “frost protection thermistor” (part
number 1220275) instead. Frost protection is
selected via the display – Set the frost demand
above the minimum cylinder demand (LE units
>20%; LE(P) & LE(C) units >8%)
+9 Volt
1
The units are designed to operate using a sensing
head, supplied by Vapac Humidity Control Ltd. which
should be connected as shown below. Other
propriety sensing heads which give a DC signal
may also be used, providing the control signal is
connected to control terminals 5 & 6, and the
sensing head is powered externally from the unit.
2
Sensing Head
Thermistor
1.7.5
Vapac
HUMIDITY
SENSOR
9 VOLT
POWER SUPPLY
TEMPERATURE
AND
HUMIDITY
SENSOR
Note:
Use of the 24V supply of the VAPANET unit
to power other items of equipment will
invalidate the Vapac warranty.
NB breaking terminals 9 & 10 will prevent any unit
operation including frost protection.
12
11
9
10
8
7
6
5
4
2
Load Shed Operation
1
12
11
9
E.P.O.
Fire Stop
10
8
7
6
5
4
2
As standard units are shipped such that terminals 9 &
10 are provided for connection of an E.P.O.
(Emergency Power Off) switch or fire shutdown
facility. Other control interlocks, such as high limit
humidistat, airflow switch and/or fan interlock and time
switches etc. should be connected to terminals 11 &
12. Please note that if a display is connected to
the unit “DI1 Control Option” must be set to
“Shutdown”.
E.P.O.
Fire Stop
Fan
Interlock
Fan
Interlock
Air Flow
Switch
Air Flow
Switch
High Limit
Hygrostat
High Limit
Hygrostat
Load Shed Option
This can only be evoked via a display, either “hard
wired” or hand held. When this option is selected,
making the connection between terminals 11 & 12 will
activate the “load shed” software routine, which will
inhibit the operation of either the unit or in the case of
nd
twin cylinder units unit or just the 2 cylinder. This will
limit the power used during peak supply periods. If
this option is selected, the fan interlock, airflow switch
and/or high limit hygrostat should be wired into
terminals 9 & 10 with the EPO switch if fitted (as per
the drawing on the far right). It should be noted that
selection of this option will mean that frost protection
cannot be utilized.
Please note that if a display is connected to the
unit “DI1 Control Option” must be set to the
following:
Single cylinder units: “Load shed”.
Twin cylinder units: either “Load Shed Cyl 2” or
“Load Shed Both”.
Load Shed
1.7.7
Standard Operation
Security Circuit / E.P.O. Shutdown
1
1.7.6
Vapac’s accessory kit part numbers for sensors are
Remote Room mounted sensing head FVKIT-107
And
Remote Duct mounted sensing head FVKIT-108
13
1.7.8
Master/Tandem System
For larger duties, VAPANET “Gas fired” units can be interconnected and arranged to operate from one proportional signal as a
Master/tandem system. The system allows up to 10 cylinders to be linked in this way. The tandem units will all be “on / off” units. The
master unit, to which the proportional signal is connected, can be “on / off” but will preferably be a “proportional” unit.
To “configure” a system, ensure that the control signal is zero [disconnect the control signal, or switch the units off at the front panel switch].
Press and hold the service pin on the master control PCB, until the user LED’s flash amber, release and check that the LEDs flash
red/amber/green, if not repeat the procedure. Then press the service pin on each of the tandem control PCB’s in the order that they are
required to operate, the tandem user LED1 will flash Green/amber until it is configured, once the light goes out [or flashes red/off], proceed
to the next tandem. If units of different capacity are used, ensure that the master is equal to or greater than the capacity of the tandems, and
that the largest capacity tandems come on before the smaller capacity units]. Once this process is complete, confirm the fact by pressing
the service pin on the master PCB until user LED2 goes green [this step is not necessary if all nine tandem cylinders are configured].
NB. The total cable length of the network (using the cable recommended by V.H.C.L. – Our part
number 8040251) is 500 m and it should be assumed that there is 1 m of cable in each unit of the
“system” (including the “master”).
Net
J1
Vapac
CR1
V
0V
Vapac part no 1150631
Esc
40K 48K
9V ac Supply
Display & Keypad
(Optional)
xxxxxx
xxxxxx
xxxxxxxxxxxxxxxxxxxxxxxxx
xxxxxxxxxxxxxxxxxxxxxxxxx
xxxxxxxxxxxxxxxxxxxxxxxxx
CR2
Õ × Ø Ö
J2
J2
Network Coms,
Indicator
Config.
button
UCP1
configuration
resistor
PCB for "Slave 1" to
"Slave 9" units.
PCB for tandem 1 to
tandem 9
J1
J3
1
CR3
J1 see section 1.9.1
Not required for
slave unit.
J2
J4
16
Network Expansion to
slave units 2 to 9 or
other network
components.
CR2
CR2
1
CR4
1
CR3
J1 see section 1.9.1
Link if control
signal is mA
current only.
J3
16
PCB for master or
tandem with display
J4
8
1
CR2
PCB for "Master" or
"Slave" unit with display.
F1
1
CR2
UCP1
configuration
resistor
F2
F1
F2
1
CR4
16
1
CR1
16
1
CR1
8
If unit is not fitted
with a display then
UCP1 configuration
resistor is fitted on
configuration board
1150634 which is
plugged into CR4
on the master unit.
J2
J1
J6
CR7
CR7
J6
Net
Net
J5
J5
10
10
AB
AB
CR5
CR6
CR5
CR6
6
6
6
6
1
16
1
1
16
1
Vapac PART No. 1150630
Vapac PART No. 1150630
Alternative Network Expansion
(to additional Network compon
Customers terminals within unit
located on low voltage terminal rail
Remote Indications
CR6 gives the following remote indications
as Volt-free contacts:
Pin 1 - Unit Run (normally open)
Pin 2 - Unit Run (normally closed)
Pin 3 - Unit Run (Common)
Pin 4 - Unit Alarm (normally open)
Pin 5 - Unit Alarm (normally closed)
Pin 6 - Unit Alarm (Common)
14
2.0
Commissioning
2.0.1
Pre commission check
1.
Check flue connection onto unit is air tight and
the flue is installed correctly as per installation
instructions
2.
Check steam pipe is supported and connected
onto the unit correctly as per installation
instructions and that there are no steam traps or
isolation valves fitted onto pipe.
3.
Check that the electrics are terminated into the
unit correctly and that a fused two-pole isolator
switch is within 3 meters of the unit. Switched
isolator OFF.
4.
Remove outer casing top section by pulling up
the two clips on the lower front of the unit and
turning the four quarter turn screw locks anticlock wise. Use the two handles on cover to lift
the back of casing top section vertically up, as
casing is lifted, check control panel drops into
cradle. Then remove cover, once cover is
removed, See detail opposite.
5.
Check that all electrical connections to the main
connection terminal box are correctly made, and
that the control signal type has been terminated
correctly to the unit, (see section 1.9.1. for
terminations details) and check terminals are
tightened.
6.
Open control panel door by unscrewing the two
M6 nuts and hinging the door open check all
relays are securely in their relay base and all
cables are terminated tightly.
7.
Check main control board terminals are plugged
in firmly to board. Also check jumpers J1 – J6 are
in as required in section 1.9.1.
8.
If the unit does not have a display and is a stand
alone or master unit check that the configuration
UCP board 1150634 has been fitted and the two
jumpers, one for control and the other water type
are in the correct position. If the unit is a slave or
has a display fitted then the configuration UCP
board 1150634 is not required but a resistor
should be fitted across input 8. See page 13 for
details.
Note when setting the water type please refer
to the table 4 in section 1.5.2 page 8.
Check the quality of the water supply to the unit
by ether taken samples and testing or getting the
water provider to give the water quality report.
Use 8mmtriangle key and
turn catches 90°
anti-clockwise to
open
Electrical
terminal box
Lift bottom of clip
up then pull top
of clip away from
hook, so cover is
free to be lifted.
1150630 Control
board.
1150634 UCP configuration
board fitted to master units
without display only.
1150632 Fan speed control
and power supply board.
CONTROL TYPE
SUPPLY WATER TYPE
Network or slave
Not used
Full output
Not used
Potentiometer pot
Not used
4 – 20 mA
Pot High Conductivity.
0 – 20v
Pot Medium Cond.
1 – 18 v
Pot Low Conductivity.
2 – 10 v
Softened
0 – 10 v
De-ionized
0–5v
De-mineralized
Resistance
Input 5 remote
Thermistor temp.
Resistance Input 8
UCP 1 Unit size
Resistance Input 6
UCP 3 Control type.
Resistance Input 7
UCP 1 Water type
15
9.
Check voltage tapping on transformer primary is
correct for supply voltage. Factory set 230 volt for
supply range 220 – 240 volts. See section 1.6.
10.
Check which gas type group, gas supply is i.e.
type “E” or type “LL”. If “E” check DI 7 is open
circuit. If “LL” link DI 7 to Dig. Common’s.
11.
Check all silicon hose connections at back and
front of unit are securely fitted.
12.
Pressure check gas main for leaks, with the
appliance isolation valves open in accordance to
gas regulations. Check installer has certified pipe
work before trying to start unit Check that the gas
supply has been purged or purge out gas pipe
work in accordance to gas regulations. THIS
CAN ONLY BE PEFORMED BY A QUALIFIED
ENGINEER.
13.
Pressure check water supply for leaks with the
appliance isolation valve open, then purge water
supply.
14.
Once 11 and 12 have been checked and certified
open isolation valves gas and water to unit.
15.
With the top casing removed and the control
switch on the control panel switched to OFF mid.
position of the rocker switch. Switch electrical
power on to unit.
16.
If the unit has a display panel fitted and is going
to be the master unit in a multi unit configuration
or the unit is a stand alone control master unit,
then use the display to configured unit by running
the set-up programme see also the alphanumeric
display manual for the gas-fired unit. If unit is a
slave move to 16
A
From the display press set-up
select language required
B
From the display press attach to
unit, when prompted press
network button on main control
board through front door of
control panel see section 2.1
C
From the display press set up,
confirm that you want to set the
unit up,
Then select the control signal
required,
The water type,
The units for display imperial or
S. I.
16.
If the unit is to be part of a master slave system
then repeat 1 to 14 for all other units on system.
Gas purging is important; as the
starting gas quantity is a low flow rate
the unit will continually lock out on
starting until the mains gas line is
purged through.
Note:If when unit is powered up the User
LED’s flash red at 2 second intervals
then the unit UCP 1 is not connected
properly into input 8 See page 13 for
location of UCP 1.
Before the unit goes into configuration
the User LED’s should be flashing red
green if the unit has not been
configured.
When the unit is in configuration the
user LED 1 should be flashing red
green amber.
16
2.0.1.2
17.
A.
B.
Master slave set up
Once all units have been checked from 1 to 11
above then the master slave configuration can be
set up. This is done by switching of all control
switches to the unit and turning power supply on,
selecting the master unit which will have either a
display or an 1150634-unit configuration plug
board fitted.
Press the network button on the main control
board for about 5 to 8 seconds until the User
LED 1 & 2 flashes amber then release button.
(Note: if the button is held for to long 25 to 30
seconds the LED change from flashing amber to
flashing red this will now indicate that the
configuration set up has been cleared and will
require action 15 to be repeated).
Network
LED
User LED
1
Three
position
switch
1. ON
2. OFF
When the button is released the user LED’s will 3. Drain
stop flashing amber and start flashing red, green, pump only
amber this will indicate that it is in a configuration
state
C.
The slave gas fired units must be attached to the
master in the order of capacities with the master
having the largest capacity then the first slave
must be equal or less than the master the second
slave must be equal or less than the first slave,
etc.
D.
Attach the first slave unit to the master by press
the network button on the main control board of
the first slave for 1 second wait for the User 1
LED light to stop flashing red green amber on the
first slave unit. Once this has stopped and the
User 1 LED flashes red, move to the next slave
unit.
E.
Press the network button of the second slave unit
for 1 second wait for the User 1 LED light to stop
flashing red green amber on the second slave
unit. Once this has stopped and the User 1 LED
flashes red, move to the next slave unit.
F.
Repeat E for the remainder of the slave units to
be added to the system.
G.
Once the master has seen ten gas fired burner
units on the system it will automatically after the
tenth one is attached come out of configuration
mode and the User 1 LED will flash red no other
units can be attached to the system.
OR
If the number of slave gas fired units on the
system is less than 10. Once the last slave unit
has attached to the system as in E above has
finished, then press the network button of the
master unit for 1 second the User 1 LED should
then flash red only. The network is now complete.
Note:The master unit must be configured
first before the slaves are added as
when the slaves are attach the water
type and other properties are down
loaded to the slave units so they do
not need to be set up or have a
configuration UCP board 1150634
fitted.
Network
button for
main board
User LED 2
Power ON
light
Burner
lockout
reset button
17
2.0.2
STARTING THE UNIT
2.0.2.1 STAND ALONE
DISPLAYS
MASTER
UNITS
WITHOUT
Switch unit off on control and check unit isolator is off.
Remove outer casing and open control panel door via
undoing the to M6 nuts on the left-hand side under the
door overhang. Then set the demand input to 100 % or
set control jumper to full output. Close control panel door.
Switch unit on at isolator and then on at control switch.
Burner
orifice air
intake
Full fire gas output
control screw for setting
burner CO2
The left hand user LED 1 will change from a flashing red
light to a constant red light then the unit should start to fill
with water check visual flow from tundish pipe at back of
unit. Wait until right hand user LED 2 green light goes
out.
When the user LED green light goes off then the burner
fan will start and run for 40 seconds pre-purge.
After 40 seconds the spark igniter will start and the gas
valve will energise, once the ionisation probe has sensed
a flame the spark igniter will switch off.
If the ionisation probe does not see a flame within 5
seconds the spark igniter and gas valve will switch off,
then wait 10 seconds try again. That is the spark igniter
and gas valve will energise for 5 seconds if after a further
5 seconds the ionisation probe has not seen a flame the
unit will lockout.
When the gas valve is open or energised the gas fired
PCB control board receives a run signal. If the ionisation
probe senses a flame within a 5-second ignition period
then the burner control box will continue to energise the
gas valve. This in turn will allow the gas fired PCB control
board to run the fan at start speed for a further 90
seconds after the burner has lit. This allows a cold unit to
heat up slowly and allows stable condition before the fan
runs at the demand output.
The Unit Configuration Plug on input 8 of the control PCB
sets the required output of the gas-fired unit. This will
control the maximum fan speed and hence the output
duty of the burner. When the unit is running at full duty
check water feed valve periodically energises to fill
humidifier and switches off on a continuous cycle during
the operating time. Once the unit has been running at full
duty for 10 minutes the unit will be at its optimum
operating temperature, check the flue CO2 output within
the flue discharge corresponds to the value given in the
table x.
Adjustment to the flue’s CO2 can be made on the screw
on the control gas valve (shown opposite).
Then check gas rate for correct duty of unit.
Once the burner has been set up the unit can be turned
off at the control switch then the main isolator. The two
jumpers-one for the control voltage the other for the water
type-can be set to the correct type.
The control panel can be closed up and the two M6 nuts
tighten to seal the control panel door closed. Then the
outer coverlid can be put back on and clipped closed.
Gas output test
pressure point
Gas input test
pressure point
Factory set valve
operation range
differential control
setting. Don’t
adjust.
Table 5 Set maximum output duty
to % CO2 adjustment setting.
kg/hr
5
7.5
10
12.5
15
17.5
20
22.5
25
27.5
30
32.5
35
%CO2
8.5
8.6
8.7
8.8
8.9
9.0
9.1
9.2
9.3
9.4
9.6
9.6
9.6
NOTE: when adjusting the CO2. The
procedure is different for the 0-30kg
unit and the 80kg unit. The 40-80kg
unit gas valve needs to be set up to
give a CO2 value of 9.7% at 100%
demand. For the 0-30kg unit refer to
Table A for the percentage CO2
depending on the duty required
18
2.0.2.2 STAND ALONE MASTER UNITS WITH DISPLAYS
Switch main supply to unit on then select set up from the
display window please refer to the gas fired unit display
manual set the control signal type, the water type and the
units required for display. Then Logon at Service
engineer level select Service then Unit, Constant output
and set for 100% press OK then select duration set at 60
minuets press OK. Then Initiate press and press yes.
Then follow procedure in 2.0.2.1 paragraph two onwards.
Once the unit has been set up to revert back to auto
control set the duration to 0. Press OK and the unit will
return to Auto.
Note to check minimum duty on a P control unit set the
constant output to 10%.
For adjustment to units that do not
have displays, this can be done by a
Vapac engineer using a remote hand
held display to set the unit perimeters.
Check
connections are
secure and
ceramic is
undamaged
2.0.2.3 Start/Restart
If the unit reaches a lock out state when it tries to start up
this could be due to a number of reasons.
1. The gas pipework may not be purged properly
2. There may be no gas reaching the burner e.g. there
maybe a valve turned of still somewhere
3. One of the leads to the burner plate may have come
off or could be damaged. Check the burner leads, the
spark, earth, and the ionization probe leads for
damage or bad connection to the burner plate and
control box.
4. The ceramic insulation around the burner probes
may be damaged and causing the ignition probe to
arc onto the wrong point and not igniting the gas.
5. The burner ignition and earth probes may be in the
wrong position causing the spark to be too far away
or too close to the bed where the optimum gas
concentration for ignition is situated.
6. ANY OF THE ABOVE PROBLEMS MUST BE
ATTENDED TO BY A QUALIFIED GAS
ENGINEER, FAILURE TO DO SO COULD
RESULT IN AN UNSAFE AND POSSIBLY
FATAL SYSTEM
2.1
OPERATION NOTES
When unit is running check for foaming. If unit
starts to foam, decrease the periodic drain interval
time until the unit stops foaming between drains.
Using a display and login at Engineers level is the
only way to adjust the periodic drain time.
After the unit has run for some time check the
condensate drain from front tundish water
conductivity is not above 2000 µS. If it is then
decrease the period drain interval time. Also check
the drain condensate water is < 300 ppm chlorine.
If it is higher than 300 ppm then decrease the
periodic drain interval time. If the conductivity after
48 hrs of running is less than 1200 µS, the unit is not
foaming and the chlorine level is low, then the periodic
drain interval can be increased if required.
Check
connections are
secure and
control box is
securely in place
Dimensions for Ignition
Probes (mm)
E = Earth Probe
S = Starter Probe
I = Ionization Probe
19
3.0
1.
2.
User LED
User LED's provide an indication of the condition of the humidifier.
During the initialisation process the User LEDs can be in one of the following states,
User LED State
RED Flashing
2 second period
RED/AMBER Flashing
2 second period
RED/GREEN Flashing
2 second period
Description
Unit initialising. If remains in this state, then unit does not a valid UCP1 fitted.
UCP1 valid.
For units fitted with a configuration board, the UCP2 and/or UCP3 are not being
detected.
UCP1 valid.
For units fitted with a display, the unit requires site set-up.
This state does not occur if the unit is fitted with a configuration board.
User LED 1 RED/AMBER/GREEN
User LED 2 – OFF
User LED 1 & LED 2 RED/AMBER/GREEN
3.
Invalid configuration (UCP2)
Prior to the start of the initialisation process, the LEDs will flash Green, Red, Amber repeatedly for 10 seconds to check that
the LEDs are operation correctly. Once this has completed User LED 1 refers to cylinder 1, while User LED 2 refers to
Cylinder 2. For combinations of LED 1 and LED 2 being off, RED or RED Flashing refer to following table.
User LED 1
OFF
User LED 2
OFF
OFF
RED Flashing
1 second
period
OFF
RED
Flashing
Variable
Period or
RED
4.
Unit in configuration set-up mode, as instructed from the attached display node.
Description
Cylinder 1 in shutdown.
Or
Cylinder 1 in standby.
Cylinder 1 in standby
Cylinder 1 Online.
The variable period is determined by the demand signal for cylinder 1 as follows,
Cylinder 1 demand
<12.5%
<25%
<37.5%
<50%
<62.5%
<75%
<87.5%
>=87.5%
LED ON RED
LED OFF
0.5 seconds
3.5 seconds
1.0 seconds
3.0 seconds
1.5 seconds
2.5 seconds
2.0 seconds
2.0 seconds
2.5 seconds
1.5 seconds
3.0 seconds
1.0 seconds
3.5 seconds
0.5 seconds
ON RED Continually
Once initialization has completed User LED 1 provides details of the mode of operation, while User LED 2 provides an
indication of fault conditions
User LED 1 State
OFF
RED
RED Flashing 1 second period
AMBER
AMBER Flashing 1 second period
GREEN Flashing 1 second period
GREEN Flashing 2 second period
User LED 2 State
OFF
OFF
OFF
OFF
OFF
OFF
OFF
GREEN
RED/AMBER 1 second period
OFF
OFF
RED or RED 1 sec flashing or OFF
OFF
OFF
OFF
AMBER
RED
GREEN
GREEN/AMBER 1
sec period
OFF
Green/Amber 1 sec period
Description
Cylinder is in shutdown mode. Due to No 24VAC or Load shed input active.
Cylinder on-line. Demand signal present and cylinder operational.
Standby. No demand signal
Drain Fault
Feed Fault
Service Interval expired OR Conductivity Sensor Fault
Service Routine/Periodic Flush/Periodic Drain/Manual Drain/Auto Flush in
progress
Service Routine/Periodic Drain/Periodic Flush/Manual Drain completed.
Constant Output Active/Full Output via UCP3 (Master cylinder only)
High Temperature
Burner Lockout
Water Level below Lower Float Switch
Safety Relay Fault
Float Switch Error
20
3.1
Display panel label and description
NETWORK LED RED
NETWORK BUTTON
USER LED 1 RED, GREEN or AMBER
USER LED 2 RED, GREEN
or AMBER
NOT USED OFF
Humidifier –
Shutdown mode
HEAT EXCHANGER HIGH
TEMPERATURE TRIP
Humidifier –
Online Demand present cylinder
operational
BURNER LOCKOUT
Standby –
No Demand Signal
HEAT EXCHANGER
EMPTY (NO WATER)
Drain Fault
SAFETY RELAY
INTERLOCK FAULT
Feed Fault
Service Interval Expired OR
Conductivity Sensor Fault
Service Routine / Periodic / Manual /
Use with LRO unit.
For information on setting up a system with a Vapanet Reverse
Osmosis unit please see the documentation supplied with the
LRO unit.
Auto Flush / Drain In Progress
The following light sequences may also appear on the LR unit
fascia if an LRO unit is supplying the feed water supply:-
Service Routine / Periodic / Manual /
Auto Flush / Drain Complete
User LED 1 Sequence:
Amber (off) Green (off):
Constant Output Active /
Full Output via UCP3 (Master Only)
Amber (off) Amber (off) Green
3.2
Other Options
Amber (off) Amber (off) Amber
(off) Green
Meaning:
LRO in “Shutdown” Mode
(Switched off or
EPO/security circuit open)
LRO unit not responding.
(LR unit “Fault” relay will
make).
LRO unit in “Fault”
condition. (LR unit “Fault”
relay will make).
All selectable via a display (either Hard Wired or Hand held)
Feed With Drain
Used to lower the temperature of the drain water.
Frost Protectiion
When this is activated the unit will operate, at a preset demand level, if the temperature surrounding the unit falls below a preset level, to
prevent the pipework from freezing.
It is enabled by setting “frost demand” (via keypad/display) to >0 (it I disabled by setting “frost demand” to 0). However the unit will not operate
unless “frost demand” is set above the unit minimum demand level. Minimum demand level for LE units is 21% and for LEP units it is 10%.
Frost demand is fully adjustable between 0 & 50%.
Timed Drain down.
Used to drain all the water from the cylinder if the unit remains on standby for longer than a preset (but adjustable) time period.
For information on setting these options please see the display manual.
21
4.0
Servicing
4.1
Minor Service
Display (showing
Service in Progress
Message)
1. Two conditions can lead to servicing routines being
implemented.
A. The conductivity of the water has reached a
maximum and needs to be drained and re-filled
B.
2. A service situation is indicated by User Led 2 on the
front control panel flashing green. The display will
also come up with a message asking whether you
would like to service the unit now.
3.
Network
LED
The unit has an internal timer that specifies when a
service is needed. This can vary from site to site
depending on the water quality.
User
LED 1
Three
position
switch
To enable the service routine to commence when the 1. ON
display calls for it, the button corresponding to the “ok 2. OFF
3. Drain
“ statement must be pressed. The unit will then shut
pump
down and draining will commence via the pump.
During the Service cycle user LED 1 will flash and a
service in progress message will appear on the
display
Network
button for
main board
User LED 2
Power ON
light
Burner
lockout
reset button
4. When the draining is complete, the display will
announce this and will prompts you to acknowledge
this by pressing “ok”. The power switch must then be
turned off and the mains power must be
disconnected from the unit
5. The unit must undergo a visual inspection before
being restarted. The lid must be removed from the
casing revealing the heat exchanger. Check that
there is no evidence of leakage or any electrical
faults.
6. Go around the unit and ensure all the silicone hoses
are still secure and undamaged. Ensure all of the
electrical connections’ are still firmly in position and
undamaged.
7. Once the visual inspection has been completed, the
lid may be re-fitted to the unit and then mains power
restored. The appliance will then perform run as
normal again.
8. NOTE: the unit will not disengage from the service
environment unless mains power has been taken
away and then restored to the unit.
NOTE: when LED’s flash, ensure the
difference can be seen between a slow flash
and a fast flash. A different speed flash will
mean different things. A fast flash is
approximately every second; a slow flash has
a period of approximately 2 seconds
22
4.2
Major Service
1. The unit will display the normal service prompt on the
screen.
Cut-away View
for Clarity
2. When the service is initiated the unit will drain as in
the minor service routine
3. Once the unit has drained, a ‘Thermal Shock Wash’
will be performed. The Thermal Shock Wash enables
the unit to rid itself of build up with the heat
exchanger pipework by firing the burner for 10
seconds, the pipework will expand and the limescale
build up will crack off.
Heat
Projected
on to S/S
4. The unit will then be filled to the top and drained
again to release all of the sediment
5. The unit is then filled again once more, this is held for
twenty minutes then drained.
6. The service routine has now been finished. All that is
needed now is for the unit to be disconnected from
the mains and visually inspected as in the minor
servicing routine
7. Once the unit has been inspected and the casing lid
replaced the unit can then be turned on again and
normal operation can be resumed
NOTE: if you choose not to service the unit immediately.
Escape from the “Service Start” screen to let the unit
continue running. The User Led 2 will continue to flash
green letting the user know that the unit is due for
another service but the “Service Start” screen will not
appear again until another 24 hours of unit running time.
Sediment build
up on the inside
of the tubes
High heat of thermal shock
causes sediment to crack
off tubes walls. Sediment is
washed away during fill and
drain procedure
23
4.3
Major Overhaul
When the unit requires a major overhaul, the heat
exchanger needs to be completely removed form the
casing to be checked over
• Firstly the Flue (A), Air Inlet (B), and Steam (C) must
be safely detached. The casing lid must now be
G
removed as was described earlier in the manual
C
• All of the electrical connections (F) leading to and
away from the electrical control box need to be
unplugged so that is can be removed form its cradle
in preparation for removing the heat exchanger from
the casing. The electrical connections include the
Fan (K) and Burner Control Box (L)
• Remove the flue and steam blanking plate by
unscrewing the M6 blots that fix the plate (G) to the
casing base. Once unscrewed the plate may be
removed
• Two more fittings must be disconnected. The gas
and water. The gas is a union (D) on the front
bulkhead of the base. The water has two fittings that
need to be disconnected, one being the feed (E) the
other the drain (H). The feed (E) is a screw fitting
from a braided hose to the solenoid fee valve
• The heat exchanger is now ready for removal. There
are four M6 bolts fixing the heat exchanger to the
base. These must be removed, to safely remove the
heat exchanger ensure all loose leads and
connections need to cleared so that they do not get
F
caught on extraction of the heat exchanger
• The heat exchanger must be completely drained of
water using the ball valve on the front of the unit
(next to the drain pump) to manually drain the unit.
Side of the casing base
Once the unit has completely finished draining it is
removed in diagram for
possible to remove the appliance
improved clarity
• To remove the appliance there are two handles (J)
on the front and the back of the unit; two people are
needed to remove the unit. the usual rules for lifting
anything heavy apply
• The unit must now be completely stripped down to its
bare metal form. All of the Rockwool insulation needs Side
to be completely removed from the appliance.
Panel
• Once all the insulation has been removed, the burner
and the flue need to removed and inspected for
damage. The gaskets need to be replaced for new
items.
• The side panels must be removed by unscrewing to 6 Heat Exchanger
x M6 bolts. The panels are sealed in place using
Fixing Bolts
silicone, a knife may be needed to cut the silicone so
that the panel can be completely separated form the
L
main body of the appliance. The silicone sealant
D
must be completely removed for the appliance and
the doors
B
A
F
E
Lid Clips
F
K
Manual
Drain
24
Check the internals of the unit and if the fibre board
insulation is damaged or showings signs of degradation
remove this also
• Unclip and remove the base and lid, there maybe a
little residual water in the base so be careful when
removing the base
• Now that the unit is completely stripped down all
parts must be cleaned and stripped right down to
clean metal
• Inspect the interior workings of the heat
exchanger, check for any deformation,
discoloration, or cracking of welds.
• Most importantly, inspect the copper coiled
stainless tubes. Check for any separation of the
copper coil from the tube.
• Inspect the primary bare steal tubes through the
front cavity. Check the tubes for any warp or
buckling also any discoloration or degradation of
the tubes.
• Ensure there is no oxidation around any point on
the heat exchanger.
• Move to the casing base and check for any
oxidation
J
• Check all of the flying electrical leads around the
casing base, check for any splits or cuts in the
insulation that show bare wire. Also, inspect the
wires for heat degradation. If there is any damage
to the wire/s, they must be replaced.
J
H
Copper
Finned
tubes
Base
Clips
25
4.4
REBUILDING
Place the unit upside down on a bench. Ensure the
bottom of the unit is clean and free of grease and dirt.
Distribute a thin and even bead of Loctite Gasket Sealant
(9130047) around the base of the unit (Fig 17).
Place the rubber gasket (GFH-40-4) over the top of the
base of the unit (Fig 18).
Again, distribute a bead of gasket sealant on the gasket
as shown in Fig 21 using the same method as before.
The final product before fitting the base.
Fit the base of the unit into place making sure the pump
connection is facing to the front of the unit and clip into
place.
Place the unit upright and perform the same procedure
for fitting the lid of the unit in place (Fig 24)
Fig 19
Fig 20
Fig 21
Fig 22
Fig 23
Fig 24
If the internal insulation has been removed the cut the
internal insulation to size from the Fibre board as per
drawings GFH-80-## and GFH-80-##
Clean the internals of the unit making sure there is no
grease or foreign matter inside the unit.
To fit the internal insulation High Temperature Red
silicone (9130048) is used to fix the Superwool insulation
to the walls, securing clips are then bent up to secure the
board into place.
Distribute and even bead on the back of the insulation
and place in its correct position. Refer to Fig 28a for the
correct position of each part.
Fig 28a uses a cutaway view for improved clarity
Fig 25
Fig 26
Insulation must also be placed on the openings where the
doors are. This insulation is held in by clips and needs to
be trimmed so that it wedges into place as shown in Fig
29 and Fig 30a
To fit the inspection doors; the same procedure is used
for each side as described below
Distribute a thin and even bead of High Temperature
Silicone around the inspection door (Fig 30), this ensures
an airtight fit. Place the door on to the side of the unit
and screw into place as shown to the right using M6
screws (4100381), M6 Spring Washers (4120106), and
M6 Flat Washers (4120076) (Fig 30b).
Fig 28a
Fig 27
Fig 28
26
The insulation that surrounds the unit must now be fitted.
The foil backed Rockwool insulation must be cut to size
using the templates provided. The template number and
its corresponding position are shown via the legend, and
a key number.
The Legend provides the position and orientation of each
piece of insulation on the diagram provided
The insulation itself is fixed to the unit using Bostick
Adhesive. Follow the instructions on the tin. Any joins
between panels are covered with foil tape.
At the corners, join the neighboring insulation part using
pig tail screws for a more secure structure
Template No.
No
GFH-80-27-1
GFH-80-27-2
GFH-80-27-3
GFH-80-27-4
GFH-80-27-5
GFH-80-27-6
GFH-80-27-7
GFH-80-27-8
GFH-80-27-9
GFH-80-27-10
GFH-80-27-11
GFH-80-27-12
GFH-80-27-13
GFH-80-27-14
1
2
3
4
5
6
7
8
9
10
11
12
13
14
Fig 32
11
2
1
3
4
5
12
13
7
10
9
3 and 4 are on the front
of the unit and cannot
be clearly shown
27
3.0
Wiring diagrams
28
29
30
31