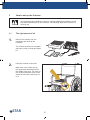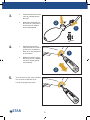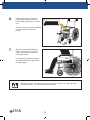
1
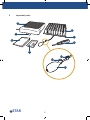
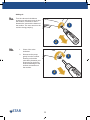
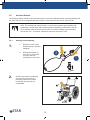
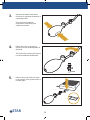
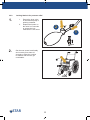
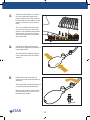
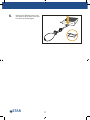
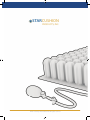
EN
User manual
STARLOCK
“Careways International - Innovation
Quality
Performance”
Content
About this manual...................................................................................................................... 3
The Starlock cushion..................................................................................................................
4
1
Warnings....................................................................................................................
5
2
Important parts...........................................................................................................
6
3
Use.............................................................................................................................
8
The right amount of air.........................................................................................
8
Activate Starlock mechanism..............................................................................
13
13
3.1
3.2
3.2.1 3.2.2
3.3
4
Locking Starlock for Stability......................................................................
Locking Starlock for locallised pressure relief..........................................
15
Cleaning instructions...........................................................................................
18
Warranty......................................................................................................................
19
STAR
2
About this manual
This manual contains information on the operation and maintenance of your Starlock cushion, you must
fully read these instructions before use .
Star Cushion Products Inc and Careways International BV are not responsible any negative results if
the instructions are not followed
If you have additional questions, please contact Careways or your nearest local supplier of rehabilitation
products.
Careways International B.V
Angstelkade 2A 3.1
3631 NA Nieuwersluis
Nederland
Tel: +31 (0) 294 458 400
Fax:+31 (0) 294 458 410
STAR
3
The StarLock cushion
Air cushions are proven to offer the most effective relief from pressure.
The Starlock is available in 4 heights; 2”/5cm, 3”/7.5cm,4”/ 10cm and 5”/13cm.
The Starlock is a unique patented product, it is the only cushion available that can lock individual or
groups of cells to create a pressure free zone. Reducing direct pressure is vital in the management of
risk areas. Reducing pressure is proven to improve blood flow, improving the skin function to reduce risk
and assist the healing process.
As a consequence of the design and quality of the material used in the construction of the Starlock, it
does not deflate. Once set, the Starlock maintains it pressure relief, eliminating costly and time consuming maintenance.
The control of shearing forces is vital in the management of pressure care. The Starlock can be tailored
to optimize the seating position of the user, minimalizing the impact of shear
Posture is also vital in the management of pressure. Incorrect posture can lead to unequal pressure distribution increasing the possibility of tissue damage. The Starlock actively manages position by putting
the user in control of their posture.
StarLock:
-
-
-
-
-
Excellent pressure distribution
Ability to create “pressure free” zones
No air loss
Very stable so reducing shear forces
Dynamic and unique positioning capability
* It is important to recheck your cushion at least once every 2 weeks to ensure it is correctly maintaining
support.
STAR
4
1
Good practice guideline
Always check your cushion daily, if it is set correctly and
operating properly.
Remove any sharp objects in your pockets. We strongly recommend that you keep all pets away from your cushion.
Avoid extreme heat and keep away from heat sources.
Always use the valve, bulb and pump as supplied with your
Starlock cushion.
Do not let the surface of the cushion come into contact with
lanolin or oil based creams/lotions.
The cushion should not be used as a toy or a buoyance aid.
Should the cushion lose air or cannot be set correctly, please contact Careways International B.V. or the
nearest local supplier of rehabilitation products.
STAR
5
2
Important parts
E
A
F
G
C
Handleiding
B
H
D2
D3
D1
STAR
6
A Air cells: each individual cells of the cushion are made of latex free neopreen. Each air cell is
connected to each other and will allow air to be distributed evenly across the whole cushion.
B Star-Pump: This is used to inflate the cushion by blowing air into each cell through the valve
(see C).
C Valve: The valve supports the flow of air into each cell. Note: you can only insert air when the
Starlock mechanism is deactivated. (D1-D3).
D1 Using the pump, activates the inflation and setting of the cushion to suit the individual user.
Until the Starlock lock mechanism is activated, the air and shaping of the cushion will be only
temporary.
D2 The Starlock block valve: The Starlock block valve controls setting the lock mechanism and
only once it has been a quarter turn, will a fixed position be achieved and maintained.
D3 To deactivate the Starlock, depress the button on the vent of the bulb, thereby allowing free
flow of air between the cells.
E The cover of the cushion is made from a breathable, multi-directional stretch fabric which supports the bodies dynamic shape.
F Pocket; There is a pocket at the back of the cover where the pump can be stored when not
required. This reduces the risk of interference with the setting as well as easy storage when
required.
G Each Starlock cushion comes complete with a user manual. This includes details on how to
set up, warranty and contact details for any further support.
H
Repair kit: Minor punctures to your cushion can be easily repaired with the repair kit.
STAR
7
3
How to set up the Cushion
It is important that the Starlock cushion is correctly inflated and checked to avoid
any risks of deterioration of skin condition. The following steps are to ensure it is
correctly set.
3.1
The right amount of air
1.
Remove the cushion from the
packaging and check all the
contents.
The cushion should come complete
with valve, pump, manual and repair
kit.
2.
Handleiding
Place the cushion on the seat.
Make sure it is the right side up,
fully supported underneath and in
the middle of the seat. The valve on
the cushion should be at the corner
where the left knee is when you sit
on it.
STAR
8
3.
1. Check that the lever in the
valve is pointing back to
the seat.
2
2.Hold down the button on
the valve for 5 seconds to
ensure the lock mechanism is deactivated.
5
1
Open
4.
1. Attach the pump to the
valve and turn the valve a
quarter turn clockwise to
allow air to be pumped in
to the cushion.
1
2.Inflate the cushion using
the pump until it is slightly
convex in shape (gently
over inflated).
2
5.
Turn the lever on the valve a quarter
turn to close off the flow of air.
Leave the pump at the valve.
STAR
9
6.
Check again that the cushion is
positioned centrally on the seat
before allowing the user to sit down
on it.
The user needs to sit down carefully
on the cushion and take their
posture.
7.
Slide your hand underneath the
user to ensure there is a 2cm/1”
depth of immersion between the
user and the seat.
It is important, particularly around
the ischial tuberosity’s that there is
enough support..
2cm
Warning: If there is more than 2cm/1” you will need to remove air ( step 8) if there
is less than 2cm/1” you will need to add air (step 9).
STAR
10
Remove air
8a.
1. Disconnect the pump
gently from the cushion.
Ensure you hold the
valve firmly between your
fingers as you do this to
avoid any damage to the
surface connections on
the cushion.
2
2.Turn the valve anti
clockwise a quarter turn
and gently let air out of
the cushion.
8b.
1
Check again under the user until
there is 2cm/1” space between the
user and the bottom of the seat.
Make sure the area around the
ischial tuberosity’s is checked.
STAR
11
Adding air
9a.
Turn the valve anti clockwise a
quarter turn and pump more air into
the cushion, until there is 2cm/1”
between the user and the bottom of
the cushion. The user can sit on the
cushion during pumping.
1
2
9b.
1. Close of the valve
clockwise.
1
2.Disconnect the pump
gently from the cushion.
Ensure you hold the
valve firmly between your
fingers as you do this to
avoid and damage to the
surface connections on
the cushion.
2
STAR
12
3.2
Activate Starlock
The Starlock system should not be activated until the user and cushion has been correctly positioned in
the chair and you have completed the above steps to ensure there is the correct amount of air.
Note: The cushion has a dual function- it can be set to achieve good stability and
positioning in conjunction with excellent pressure distribution; alternative it can be
set to achieve areas of pressure free zones. To achieve stability and positioning
see section 3.2.1 To achieve a pressure free zone see section 3.2.2.
3.2.1
1.
Stability and Positioning
1. Ensure the valve of the
Starlock pump is pointing
outwards.
2
2.Depress the button on
the valve for 5 seconds
to ensure the lock
mechanism is not active.
5
1
Open
2.
Get the user seated comfortably
and correctly for at least 10
seconds, to allow the cushion
to stabilize and the user get
comfortable.
STAR
10
13
3.
Squeeze the bulb several times
until there is significant resistance to
squeezing further.
This ensures the Starlock
mechanism is effectively and
sufficiently activate.
4.
Rotate the lever on the valve a
quarter once the desired position is
achieved.
This locks off the setting and cannot
now be accidentally deactivated.
Closed
5.
Remove the pump, bulb and store
in the cushion cover pocket until it is
needed again.
STAR
14
3.2.2
Locking Starlock for pressure refief
1.
1. Ensure the lever valve
of the Starlock pump is
pointing outwards.
2.Depress the button on
the valve for 5 seconds
to ensure the lock
mechanism is not active.
2
5
1
Open
2.
Get the user seated comfortably
and correctly for at least 10
seconds, to allow the cushion
to stabilize and the user get
comfortable.
STAR
10
15
3.
Select the cells where no contact
is to be created and push down
firmly with the hand. This needs to
be done with the user sitting on the
product to ensure it is the correct
area.
Tip: If it is a diffuse area to reach,
you can fold a towel or other soft
object in the desired area and then
get the user to sit on the cushion.
This ensures the cells are pushed
away firmly flat.
4.
Squeeze the bulb several times
until there is significant resistance to
squeezing further.
This ensures the Starlock mechanism is effectively and sufficiently
activate.
5.
Rotate the lever on the valve a
quarter once the desired position is
achieved.
This locks off the setting and cannot
now be accidentally deactivated.
Remove your hand or object used
and check that the zone is free of
pressure and contact.
Closed
STAR
16
6.
Remove the Starlock pump, bulb
and store in the cushion cover pocket until it is needed again.
STAR
17
3.3
Cleaning the Star cushion
Note: Cleaning and disinfect are two separate operations. Cleaning must be done
for disinfect.
Clean the Star Cushion:
Cleaning in washing machine:
Gently remove the cover, ensuring the valve is not pulled where it connects to the cushion.
Deactivate the Starlock system and allow the cushion to deflate. Close the corner and Starlock valve.
Both the cushion and the cover should be placed in a laundry bag before putting into the washing machine. Do not put the pump in the washing machine. Only wash for a maximum of 10 minutes and no
higher that 60 degrees. The cushion and cover should be left to air dry. Do not use bleach.
Hand wash:
Gently remove the cover, ensuring the valve is not pulled where it connects to the cushion.
Deactivate the Starlock system and allow the cushion to deflate. Close the corner and Starlock valve
and put the cushion in a basin. Use a soft plastic or bristle brush, sponge or wash cloth to clean each
cell and space between. Do not use bleach.
Cleaning the cover:
Only wash for a maximum of 10 minutes and no higher that 60 degrees. The cover should be left to air
dry. Do not use bleach.
Repairs:
Protect your Starlock cushion against needles and other sharp objects as well as keeping away from
open flame, heat source or cigarettes. If there is a small air leak, you can simply repair with the free
repair kit included. Once the plaster has been applied over the hole, check to ensure is a good adhesion
between the surfaces so no air can escape.
STAR
18
4Warranty
What is warranty?
Star guarantee this cushion against material and manufacturing errors.
How long?
24 months from the original date of purchase, regardless of any change in ownership.
What will be done?
Any damage as a result of misuse or accidental are not included in this guarantee.
STAR
19
STARCUSHION
PRODUCTS, INC.
© 2011 Careways International B.V. All rights reserved