1
Data Collection and Analysis Modules
User Manual
Data Collection and Analysis Modules (DCAM)
DCAM User Manual
Author:
Vendor:
Jon Mika
Mika Consulting, Inc.
Version:
1.01
Creation Date:
4/25/2008
Last Updated:
5/27/2011 12:24 PM
5/27/2011
Page 1 of 76
DCAM User Manual_v1.02_FINAL_20110527.docx
Version 1.02
Mika Consulting, Inc.
Data Collection and Analysis Modules
User Manual
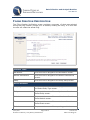
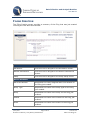
DOCUMENT CONTROL
CHANGE RECORD
Date
Author
Version
Change Reference
04/25/2008
Jon Mika
1.00 (Draft)
Initial draft
04/29/2008
Jon Mika
1.01 (Draft)
Continued updates
06/27/2008
Jon Mika
1.02 (Draft)
Continued updates
7/20/2008
Jon Mika
1.03 (Draft)
Updates based on OIR feedback
7/25/2008
Jon Mika
1.00
Initial release
8/19/2008
Jon Mika
1.01
Updates based on OIR feedback
5/10/2011
Ashley Grant
1.02
Added survey component
5/27/2011
Jon Mika
1.02
Updated screen shots
5/27/2011
Page 2 of 76
DCAM User Manual_v1.02_FINAL_20110527.docx
Version 1.02
Mika Consulting, Inc.
Data Collection and Analysis Modules
User Manual
TABLE OF CONTENTS
DOCUMENT CONTROL .................................................................................................................... 2
Change Record ............................................................................................. 2
TABLE OF CONTENTS ....................................................................................................................... 3
ABOUT THIS DOCUMENT ............................................................................................................... 5
Who Should Use This Document? .................................................................... 5
How to Use This Document ............................................................................ 5
Topics ...................................................................................................... 5
Conventions .............................................................................................. 5
High Level Process Flow ................................................................................. 7
INDUSTRY PORTAL MAIN MENU ................................................................................................. 8
To Select the DCAM System ........................................................................... 8
LOGON.................................................................................................................................................. 9
To Logon into the System .............................................................................. 9
ENTITY SETUP................................................................................................................................... 11
To Delete a Company .................................................................................. 12
To Delete an Other Required Filer ................................................................. 12
CONTACT INFORMATION ............................................................................................................ 14
To Add/Update DCAM Contact Information ..................................................... 15
To Add/Update Filing Contact Information ...................................................... 17
COMPANY SEARCH ......................................................................................................................... 19
COMPANY SEARCH RESULTS ...................................................................................................... 20
ADD COMPANY................................................................................................................................ 22
To Add a Company ...................................................................................... 23
ADD OTHER REQUIRED FILER..................................................................................................... 24
To Add an Other Required Filer ..................................................................... 26
WORKBENCH .................................................................................................................................... 28
To Sort the Filing List .................................................................................. 29
To View the Next Set of Filings ..................................................................... 29
To Export the Filing List ............................................................................... 30
DELETE FILINGS............................................................................................................................... 31
To Delete a Filing ........................................................................................ 32
REVIEW SUBMISSIONS .................................................................................................................. 33
To Sort the Filing List .................................................................................. 34
To View the Next Set of Filings ..................................................................... 34
5/27/2011
Page 3 of 76
DCAM User Manual_v1.02_FINAL_20110527.docx
Version 1.02
Mika Consulting, Inc.
Data Collection and Analysis Modules
User Manual
To Export the Filing List ............................................................................... 35
FILING COMPONENT LIST ............................................................................................................ 36
To Show/Hide the Extension Request Information ........................................... 38
FILING COMPONENT...................................................................................................................... 40
To Delete an Uploaded File ........................................................................... 41
To Restore Offline Files ................................................................................ 41
ADD/UPLOAD FILE .......................................................................................................................... 43
To Add/Upload a File ................................................................................... 44
VIEW PAST FILING SUBMISSIONS.............................................................................................. 46
FILING SURVEY COMPONENT ..................................................................................................... 49
Text Type Question ..................................................................................... 50
Number Type Question ................................................................................ 51
Date Type Question..................................................................................... 51
Yes/No Type Question ................................................................................. 52
Choice Type Question .................................................................................. 52
Rating Type Question .................................................................................. 52
FILING SUBMISSION ...................................................................................................................... 53
To Submit a Filing ....................................................................................... 53
CREATE NEW FILING ...................................................................................................................... 55
SELECT ENTITY TYPE ...................................................................................................................... 56
To Select an Entity Type .............................................................................. 56
SELECT ENTITY ................................................................................................................................ 58
To Select an Entity ...................................................................................... 59
SELECT MODULE ............................................................................................................................. 60
To Select a Module ...................................................................................... 61
SELECT EVENT .................................................................................................................................. 62
To Select an Event ...................................................................................... 63
SELECT PERIOD ................................................................................................................................ 64
To Select a Reporting Period ........................................................................ 65
SELECT PURPOSE ............................................................................................................................. 66
To Select a Purpose..................................................................................... 67
To Request an Extension.............................................................................. 68
FILING CREATION VERIFICATION ............................................................................................. 70
To Create a Filing........................................................................................ 71
FILING CREATION ........................................................................................................................... 73
APPLICATION AVAILABILITY...................................................................................................... 75
SESSION TIMEOUT .......................................................................................................................... 76
5/27/2011
Page 4 of 76
DCAM User Manual_v1.02_FINAL_20110527.docx
Version 1.02
Mika Consulting, Inc.
Data Collection and Analysis Modules
User Manual
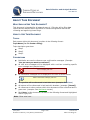
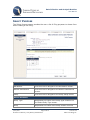
ABOUT THIS DOCUMENT
WHO SHOULD USE THIS DOCUMENT?
This document is intended for all external users in I-File who will be filing data
reports and all analysts within the Office of Insurance Regulation that will be
reviewing and approving these filings.
HOW TO USE THIS DOCUMENT
TOPICS
Each screen within this document is written in the following format:
Topic Name (i.e. To Create a Filing)
Topic description goes here:
Step 1
Step 2
Step 3
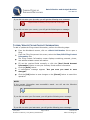
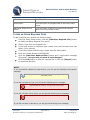
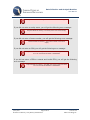
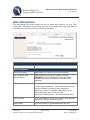
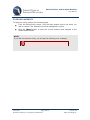
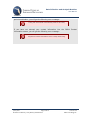
CONVENTIONS
Bold italics are used to reference user confirmation messages. (Example:
“Are you sure you want to continue?”)
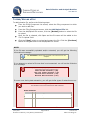
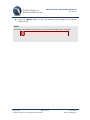
All user error messages will be displayed with a red box containing specific
error message text (sample below):
Error message goes here.
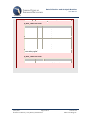
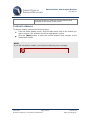
All information messages will be displayed to the user as shown below:
NOTE: Information message goes here.
All hyperlinks will be referenced in bold blue text. (example: Start Over)
All buttons will be referenced in bold and with brackets. (example: [Cancel])
All references to other sections within this document will be underlined and in
green text. (example: See Workbench screen)
Each Note: in this document is written in the following format and highlighted
within a grey box:
Note: Enter note here…
5/27/2011
Page 5 of 76
DCAM User Manual_v1.02_FINAL_20110527.docx
Version 1.02
Mika Consulting, Inc.
Data Collection and Analysis Modules
User Manual
<this page intentionally left blank>
5/27/2011
Page 6 of 76
DCAM User Manual_v1.02_FINAL_20110527.docx
Version 1.02
Mika Consulting, Inc.
Data Collection and Analysis Modules
User Manual
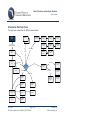
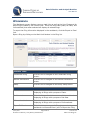
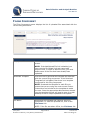
HIGH LEVEL PROCESS FLOW
The high level process flow for DCAM is shown below:
I-File
Main Menu
Screen
Create Filing Main
Screen
Help Files
Select Entity Type
Screen
Select Entity
Screen
Select Module
Screen
Select Purpose
Screen
Select Period
Screen
Select Event
Screen
Filing Creation
Verification
Screen
Filing Created
Screen
Help Files
Data Collection and
Analysis Modules (DCAM)
Create New Filing
Logon
Screen
Help
Logout
Workbench
Screen
Add Company
Workbench
Company Search
Screen
Setup
Setup Main
Screen
Common Task
Selection
Delete Filings
Screen
Add Other
Required Filer
Review Submissions
Company Results
Screen
Contact Information
Review Filing
Submissions
Screen
Add Other
Required Filer
Screen
Filing Contact
Information
Screen
DCAM Contact
Information
Screen
Filing / Filing
Component List
Screen
Filing Component
Screen
Add/Upload File
Screen
Filing Submitted
Screen
Past Filing
Submissions
Screen
5/27/2011
Page 7 of 76
DCAM User Manual_v1.02_FINAL_20110527.docx
Add Company
Screen
Version 1.02
Mika Consulting, Inc.
Data Collection and Analysis Modules
User Manual
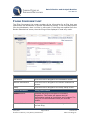
INDUSTRY PORTAL MAIN MENU
The Industry Portal (I-Portal) main menu screen allows for access into the various
systems with the Office of Insurance Regulation Industry Portal. One of these
systems is the Data Collection and Analysis Modules (DCAM).
TO SELECT THE DCAM SYSTEM
To select the DCAM application, perform the following steps:
Select the Data Collection and Analysis Modules (DCAM) link.
The DCAM Logon screen appears
5/27/2011
Page 8 of 76
DCAM User Manual_v1.02_FINAL_20110527.docx
Version 1.02
Mika Consulting, Inc.
Data Collection and Analysis Modules
User Manual
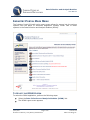
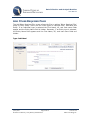
LOGON
The Logon screen allows for access into the DCAM system. You will use your Industry
Portal account name (i.e. email address) and password to authenticate into DCAM.
Common Tasks
Help
Click this link to navigate to the Help files.
Create Account
Click this link to navigate to the Industry Portal Account
Creation screen.
Retrieve Password
Click this link to navigate to the Industry Portal Retrieve
Password screen.
Screen Elements
User Name
Enter your Industry Portal user name (email address)
into this field.
Password
Enter your password into this field.
Logon button
Click this button to authenticate the user and navigate to
the Workbench screen.
TO LOGON INTO THE SYSTEM
To logon to the application, perform the following steps:
5/27/2011
Page 9 of 76
DCAM User Manual_v1.02_FINAL_20110527.docx
Version 1.02
Mika Consulting, Inc.
Data Collection and Analysis Modules
User Manual
Enter your Industry Portal user name.
Enter your password.
Click the [Logon] button.
NOTE:
If you did not enter a user name, you will get the following error message:
Required fields are missing...A user name must be provided.
If you did not enter a password, you will get the following error message:
Required fields are missing...A password must be provided.
If either the user name or password is invalid, you will get the following error
message:
The user name entered is unknown, please try again. To create a
new user account, select the Create Account link in the Common
Tasks section.
If you created your I-Portal account but did not activate it, you will get the following
error message:
The user account is not active. To activate your account, select the
activate link that was included in the confirmation email sent to you
when you first created the account.
5/27/2011
Page 10 of 76
DCAM User Manual_v1.02_FINAL_20110527.docx
Version 1.02
Mika Consulting, Inc.
Data Collection and Analysis Modules
User Manual
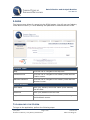
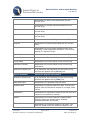
ENTITY SETUP
The Entity Setup screen allows the filer the ability to manage entities such as
companies and other required filers. This screen will also access the filer‟s contact
information.
Common Tasks
Workbench
Click this link to navigate to the Workbench screen.
Contact Information
Click this link to navigate to the Contact Information
screen.
Screen Elements
Companies
Company Name
The name of the company.
FEIN
The federal employer identification number of the
company.
FL Co Code
The Florida company code of the company.
NAIC Co Code
The NAIC company code of the company.
NAIC Grp Code
The NAIC group code of the company.
Status
The authority status of the company.
Add Company button
Click this button to add a company by displaying the
5/27/2011
Page 11 of 76
DCAM User Manual_v1.02_FINAL_20110527.docx
Version 1.02
Mika Consulting, Inc.
Data Collection and Analysis Modules
User Manual
screen.
Delete button
Click this button to delete a company. (See to Delete a
Company)
Screen Elements
Other Required Filers
Entity Name
The name of the other required filer.
License Number
The license number of the other required filer.
Type
The other required filer type (Individual or Entity)
Add Other Required Filer
button
Click this button to add a required filer by displaying
the screen.
Delete button
Click this button to delete a required filer. (See To
Delete an Other Required Filer)
Done button
Click this button to navigate back to the Workbench
screen.
TO DELETE A COMPANY
To delete a company, perform the following steps:
From the Workbench screen, select the Setup link.
The Entity Setup screen displays and the list of companies appear in the
Companies table.
Select a company to delete. The selected row will be highlighted in yellow.
Click the [Delete] button.
A confirmation message appears “Are you sure you want to delete the
selected record?”
Click the [OK] button to delete the record or the [Cancel] button to cancel
the operation.
NOTE:
If you did not select a company, you will get the following error message:
An entity must be selected from the list.
TO DELETE AN OTHER REQUIRED FILER
To delete a required filer, perform the following steps:
From the Workbench screen, select the Setup link.
5/27/2011
Page 12 of 76
DCAM User Manual_v1.02_FINAL_20110527.docx
Version 1.02
Mika Consulting, Inc.
Data Collection and Analysis Modules
User Manual
The Entity Setup screen displays and the list of other required filers appear in
the Other Required Filers table.
Select a required filer to delete. The selected row will be highlighted in yellow.
Click the [Delete] button.
A confirmation message appears “Are you sure you want to delete the
selected record?”
Click the [OK] button to delete the record or the [Cancel] button to cancel
the operation.
NOTE:
If you did not select a company, you will get the following error message:
An entity must be selected from the list.
5/27/2011
Page 13 of 76
DCAM User Manual_v1.02_FINAL_20110527.docx
Version 1.02
Mika Consulting, Inc.
Data Collection and Analysis Modules
User Manual
CONTACT INFORMATION
The Contact Information screen allows the filer to manage their contact information.
This contact information can be either DCAM or Filing.
The DCAM Contact Information screen contains the main contact information and is
accessible within the Entity Setup screen. The DCAM contact information is copied to
the filing when a filing is created.
The Filing Contact information is specific to the filing and can be modified after a
filing is created by opening up the filing from your workbench, and selecting
View/Edit Filing Contact Information link.
Common Tasks
Workbench
Click this link to navigate to the Workbench screen.
Setup
Click this link to navigate to the Entity Setup screen.
Screen Elements
Personal
First Name
Represents the first name of the contact.
MI
Represents the middle initial of the contact.
5/27/2011
Page 14 of 76
DCAM User Manual_v1.02_FINAL_20110527.docx
Version 1.02
Mika Consulting, Inc.
Data Collection and Analysis Modules
User Manual
Last Name
Represents the last name of the contact.
Entity Name
Represents the entity name of the contact.
Email Address
Represents the email address of the contact.
Screen Elements
Phone
Phone Number
Represents the phone number of the contact.
Phone Extension
Represents the phone number extension of the
contact.
Fax Number
Represents the fax number of the contact.
Screen Elements
Address
Street
Represents the street address of the contact.
Optional Street
Represents the optional street address of the contact.
City
Represents the city of the contact.
State
Represents the state of the contact.
ZIP/Postal Code
Represents the zip/postal code of the contact.
Country
Represents the country of the contact.
Done button
Click this button to navigate to the Entity Setup
screen.
Use I-Portal Account
Information button
Click this button to use your Industry Portal account
information.
Save button
Click this button to save your contact information.
TO ADD/UPDATE DCAM CONTACT INFORMATION
To add or update DCAM contact information, perform the following steps:
From the Entity Setup screen, select the Contact Information link.
The DCAM Contact Information screen displays containing personal, phone,
and address related contact information.
Fill out the required fields manually or click the [Use I-Portal Account
Information] button to use your Industry Portal account information.
Click the [Save] button.
A confirmation message appears “Are you sure you want to save
changes?”
Click the [OK] button to save changes or the [Cancel] button to cancel the
operation.
5/27/2011
Page 15 of 76
DCAM User Manual_v1.02_FINAL_20110527.docx
Version 1.02
Mika Consulting, Inc.
Data Collection and Analysis Modules
User Manual
NOTE:
If the contact information was successfully saved, you will get the following
informational message:
The contact information was successfully saved.
If you did not enter your first name, you will get the following error message:
Required fields are missing…The first name must not be empty.
If you did not enter your last name, you will get the following error message:
Required fields are missing…The last name must not be empty.
If you did not enter your email address, you will get the following error message:
Required fields are missing…The email address must not be empty.
If you did not enter your phone number, you will get the following error message:
Required fields are missing…The phone number must not be empty.
If you did not enter your street address, you will get the following error message:
Required fields are missing…The address must not be empty.
If you did not enter your city, you will get the following error message:
Required fields are missing…The city must not be empty.
If you did not enter your state, you will get the following error message:
Required fields are missing…The state must not be empty.
5/27/2011
Page 16 of 76
DCAM User Manual_v1.02_FINAL_20110527.docx
Version 1.02
Mika Consulting, Inc.
Data Collection and Analysis Modules
User Manual
If you did not enter your zip code, you will get the following error message:
Required fields are missing…The zip code must not be empty.
If you did not enter your country, you will get the following error message:
Required fields are missing…The country must not be empty.
TO ADD/UPDATE FILING CONTACT INFORMATION
To add or update the filing contact information, perform the following steps:
From the Workbench screen, click on a Work Unit Number link to open a
filing.
From the Filing Component List screen, select the View/Edit Filing Contact
Information link.
The Filing Contact Information screen displays containing personal, phone,
and address related contact information.
Fill out the required fields manually or click the [Use I-Portal Account
Information] button to use your Industry Portal account information.
Click the [Save] button.
A confirmation message appears “Are you sure you want to save
changes?”
Click the [OK] button to save changes or the [Cancel] button to cancel the
operation.
NOTE:
If the contact information was successfully saved, you will get the following
informational message:
The contact information was successfully saved.
If you did not enter your first name, you will get the following error message:
Required fields are missing…The first name must not be empty.
If you did not enter your last name, you will get the following error message:
5/27/2011
Page 17 of 76
DCAM User Manual_v1.02_FINAL_20110527.docx
Version 1.02
Mika Consulting, Inc.
Data Collection and Analysis Modules
User Manual
Required fields are missing…The last name must not be empty.
If you did not enter your email address, you will get the following error message:
Required fields are missing…The email address must not be empty.
If you did not enter your phone number, you will get the following error message:
Required fields are missing…The phone number must not be empty.
If you did not enter your street address, you will get the following error message:
Required fields are missing…The address must not be empty.
If you did not enter your city, you will get the following error message:
Required fields are missing…The city must not be empty.
If you did not enter your state, you will get the following error message:
Required fields are missing…The state must not be empty.
If you did not enter your zip code, you will get the following error message:
Required fields are missing…The zip code must not be empty.
If you did not enter your country, you will get the following error message:
Required fields are missing…The country must not be empty.
5/27/2011
Page 18 of 76
DCAM User Manual_v1.02_FINAL_20110527.docx
Version 1.02
Mika Consulting, Inc.
Data Collection and Analysis Modules
User Manual
COMPANY SEARCH
The Company Search screen allows the filer to search for a company using various
search criteria.
Common Tasks
Workbench
Click this link to navigate to the Workbench screen.
Contact Information
Click this link to navigate to the Contact Information
screen.
Setup
Click this link to navigate to the Entity Setup screen.
Screen Elements
Search
Search Type
Anywhere, Starts With, Exact Match
Company Name
Represents the company name search field.
NAIC Company Code
Represents the NAIC company code search field.
NAIC Group Code
Represents the NAIC group code search field.
FEIN
Represents the FEIN search field.
Florida Company Code
Represents the Florida company code search field.
Cancel button
Click this button cancel the Add Company operation
and return to the Entity Setup screen.
Clear button
Click this button to clear all search fields above.
Search button
Click this button to perform a search based on the
criteria entered and navigate to the Company Search
Results screen.
5/27/2011
Page 19 of 76
DCAM User Manual_v1.02_FINAL_20110527.docx
Version 1.02
Mika Consulting, Inc.
Data Collection and Analysis Modules
User Manual
COMPANY SEARCH RESULTS
The Company Search Results screen displays the results of the criteria selected on
the Company Search screen.
Common Tasks
Workbench
Click this link to navigate to the Workbench screen.
Contact Information
Click this link to navigate to the Contact Information
screen.
Setup
Click this link to navigate to the Entity Setup screen.
Screen Elements
<Previous 50
Click this link to display the previous set of 50
companies.
Next 50>
Click this link to display the next set of 50 companies.
5/27/2011
Page 20 of 76
DCAM User Manual_v1.02_FINAL_20110527.docx
Version 1.02
Mika Consulting, Inc.
Data Collection and Analysis Modules
User Manual
Company Name
Represents the name of the company. Click this link to
add the company by navigating to the Add Company
screen.
FEIN
Represents the federal employer identification number
of the company.
NAIC Company Code
Represents the NAIC company code of the company.
NAIC Group Code
Represents the NAIC group code of the company.
Florida Company Code
Represents the Florida company code of the company.
Cancel button
Click this button cancel the Add Company operation
and return to the Entity Setup screen.
Search Again button
Click this button to return to the Company Search
screen.
5/27/2011
Page 21 of 76
DCAM User Manual_v1.02_FINAL_20110527.docx
Version 1.02
Mika Consulting, Inc.
Data Collection and Analysis Modules
User Manual
ADD COMPANY
The Add Company screen displays the company information for the company that
was selected in the Company Search Results screen.
Common Tasks
Workbench
Click this link to navigate to the Workbench screen.
Contact Information
Click this link to navigate to the Contact Information
screen.
Setup
Click this link to navigate to the Entity Setup screen.
Screen Elements
Company Name
Represents the name of the company.
Company FEIN
Represents the federal employer identification number
of the company.
NAIC Company Code
Represents the NAIC company code of the company.
NAIC Group Code
Represents the NAIC group code of the company.
Florida Company Code
Represents the Florida company code of the company.
Cancel button
Click this button to cancel the add company operation
and return to the Entity Setup screen.
Back button
Click this button to navigate back to the Company
Search screen.
Add Company button
Click this button to add the company and navigate
back to the Entity Setup screen.
5/27/2011
Page 22 of 76
DCAM User Manual_v1.02_FINAL_20110527.docx
Version 1.02
Mika Consulting, Inc.
Data Collection and Analysis Modules
User Manual
TO ADD A COMPANY
To add a company, perform the following steps:
From the Entity Setup screen, click the [Add Company] button.
The Company Search screen displays.
Enter search criteria in the fields provided.
Click the [Search] button and the Company Search Results screen is
displayed containing a list of companies matching your search criteria.
NOTE:
If you did not enter at least one search parameter, you will get the following error
message:
Please provide at least one search parameter to do a search.
Select the company you wish to add by clicking on the Company Name link.
The Add Company screen will appear displaying the selected company
information.
Click the [Add Company] button to add the company. A confirmation
window is displayed “Are you sure you want to add this entity?”
Click the [OK] button to add the entity or click the [Cancel] button to cancel
the operation.
NOTE:
If you have already added this entity to your setup, you will get the following error
message:
The company you are tying to add already exists in your Entity
Setup.
5/27/2011
Page 23 of 76
DCAM User Manual_v1.02_FINAL_20110527.docx
Version 1.02
Mika Consulting, Inc.
Data Collection and Analysis Modules
User Manual
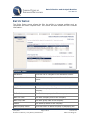
ADD OTHER REQUIRED FILER
The Add Other Required Filer screen allows the filer to add an „Other Required Filer‟
entity to their Setup. There are two main types of required filers, Individual and
Entity. If an Individual type is selected the First Name, MI, and Last name fields
appear and the Entity Name field is hidden. Reversely, if an Entity type is selected,
the Entity Name field appears and the First Name, MI, and Last name fields are
hidden.
Type: Individual
5/27/2011
Page 24 of 76
DCAM User Manual_v1.02_FINAL_20110527.docx
Version 1.02
Mika Consulting, Inc.
Data Collection and Analysis Modules
User Manual
Type: Entity
Common Tasks
Workbench
Click this link to navigate to the Workbench screen.
Contact Information
Click this link to navigate to the Contact Information
screen.
Setup
Click this link to navigate to the Entity Setup screen.
Screen Elements
Type
Represents a dropdown list containing the other
required filer types:
Individual (PLCR Only)
Entity (PLCR Only)
Individual (GEAR Only)
Entity (GEAR Only)
First Name
The first name of the other required filer. (Individual
types only)
MI
The middle initial of the other required filer. (Individual
types only)
Last Name
The last name of the other required filer. (Individual
types only)
Entity Name
The entity name of the other required filer. (Entity
types only)
License Number
The license number of the other required filer. (All
types)
5/27/2011
Page 25 of 76
DCAM User Manual_v1.02_FINAL_20110527.docx
Version 1.02
Mika Consulting, Inc.
Data Collection and Analysis Modules
User Manual
FEIN/SSN
The FEIN/SSN of the other required filer. (All types)
Done button
Click this button to navigate back to the Entity Setup
screen.
Add Other Required Filer
button
Click this button to add the company and navigate
back to the Entity Setup screen.
TO ADD AN OTHER REQUIRED FILER
To add a required filer, perform the following steps:
From the Entity Setup screen, click the [Add Other Required Filer] button
to display the Other Required Filer screen.
Select a Type from the dropdown list.
If you have chosen an Individual type, please enter the First Name and Last
Name. (MI is optional)
If you have chosen an Entity type, please enter the Entity Name.
Enter the License Number and FEIN/SSN.
Click the [Add Other Required Filer] button and a confirmation message
will appear: “Are you sure you want to save changes?”
Click the [OK] button to save the required filer or click the [Cancel] button
to cancel the operation.
NOTE:
If you successfully added the required filer, you will get the following informational
message:
The required filer [First Name Last Name or Entity Name] was
successfully saved.
If you did not select a Type, you will get the following error message:
Required fields are missing...The type must not be empty.
If you did not enter a first name, you will get the following error message:
Required fields are missing...The first name must not be empty.
If you did not enter a last name, you will get the following error message:
5/27/2011
Page 26 of 76
DCAM User Manual_v1.02_FINAL_20110527.docx
Version 1.02
Mika Consulting, Inc.
Data Collection and Analysis Modules
User Manual
Required fields are missing...The last name must not be empty.
If you did not enter an entity name, you will get the following error message:
Required fields are missing...The entity name must not be empty.
If you did not enter a license number, you will get the following error message:
Required fields are missing...The license number must not be
empty.
If you did not enter an SSN, you will get the following error message:
Required fields are missing... The SSN must not be empty and must
be in the format 999-99-9999 or 999999999.
If you did not enter a FEIN or entered and invalid FEIN, you will get the following
error message:
Required fields are missing...The FEIN must not be empty and must
be in the format 99-9999999 or 999999999.
5/27/2011
Page 27 of 76
DCAM User Manual_v1.02_FINAL_20110527.docx
Version 1.02
Mika Consulting, Inc.
Data Collection and Analysis Modules
User Manual
WORKBENCH
The Workbench screen displays common task links as well as the list of Data and No
Data filings created by the current user. There are three tabs (Data, No Data, and
Informational) that when selected will display all related filings.
To export the filing information displayed in the workbench, click the Export to Excel
link.
Open a filing by clicking on the Work Unit Number in the filing list.
Common Tasks
Create New Filing
Click this link to navigate to the Create New Filing
screen.
Review Submissions
Click this link to navigate to the Review Submissions
screen
Setup
Click this link to navigate to the Entity Setup screen.
Screen Elements
Data tab
Click this link to refresh the contents of the workbench
displaying all filings with a purpose of Data.
No Data tab
Click this link to refresh the contents of the workbench
displaying all filings with a purpose of No Data.
Informational tab
Click this link to refresh the contents of the workbench
displaying all filings with a purpose of Informational.
Export To Excel
Click this button to export all filing data seen in the
workbench to Microsoft Excel. (see To Export the Filing
5/27/2011
Page 28 of 76
DCAM User Manual_v1.02_FINAL_20110527.docx
Version 1.02
Mika Consulting, Inc.
Data Collection and Analysis Modules
User Manual
List)
Delete Filings button
Click this button to navigate to the Delete Filings
screen.
Filing List
Work Unit Num/
File Log Num
The work unit number assigned to the filing. If the filing
has been received by the Office, it will also have a File
Log Number. Clicking on the Work Unit Number link will
display the Filing Component List screen.
Entity Name
Represents the name of the entity associated with the
filing.
Module
Represents the name of the module associated with the
filing.
Event
Represents the name of the event associated with the
filing.
Period
Represents the name of the period associated with the
filing.
Due Date
Represents the date the filing is due to the Office.
TO SORT THE FILING LIST
You can sort the list of filings on your workbench based on each column. By clicking
on the column you will toggle between sorting in ascending and descending order.
To sort the list of filings, perform the following steps:
From the Workbench screen, click the respective column header link in which
to sort (Work Unit Num, Entity Name, Module, Event, Period or Create
Date).
The filing list is refreshed based on the column selected. To sort the same
column but in the opposite sort order, simply click the same column header
again.
TO VIEW THE NEXT SET OF FILINGS
The workbench is configured to display only 20 filings at a time. If there are more
than 20 filings at any point, then you will need to page through the set of filings.
To view the next set of filings, perform the following steps:
From the Workbench screen, there will be a list of page number links at the
bottom of the request list (1 2 3).
Click the desired page number to view the corresponding set of filings.
5/27/2011
Page 29 of 76
DCAM User Manual_v1.02_FINAL_20110527.docx
Version 1.02
Mika Consulting, Inc.
Data Collection and Analysis Modules
User Manual
TO EXPORT THE FILING LIST
To export the filing information to Microsoft Excel, please perform the following
steps:
From the Workbench screen, click the Data, No Data, or Informational tab for
the list of filings you would like to export.
Click the Export To Excel link and a window displays prompting you to Open
or Save the Excel document.
5/27/2011
Page 30 of 76
DCAM User Manual_v1.02_FINAL_20110527.docx
Version 1.02
Mika Consulting, Inc.
Data Collection and Analysis Modules
User Manual
DELETE FILINGS
The Delete Filings screen displays common task links as well as the list of Data and
No Data filings that can be deleted. Only original filings that have not been submitted
can be deleted from the workbench.
Common Tasks
Workbench
Click this link to navigate to the Workbench screen.
Create New Filing
Click this link to navigate to the Create New Filing
screen.
Review Submissions
Click this link to navigate to the Review Submissions
screen.
Setup
Click this link to navigate to the Entity Setup screen.
Screen Elements
Delete checkbox
Represents the checkbox that when checked will delete
the filing after the [Delete] button is clicked.
Work Unit Num
Represents the work unit number associated with the
filing.
Entity Name
Represents the name of the entity associated with the
filing.
Purpose
Represents the name of the purpose associated with the
filing.
Module
Represents the name of the module associated with the
filing.
Create Date
Represents the creation date of the filing.
5/27/2011
Page 31 of 76
DCAM User Manual_v1.02_FINAL_20110527.docx
Version 1.02
Mika Consulting, Inc.
Data Collection and Analysis Modules
User Manual
Cancel button
Click this button to cancel the operation and navigate
back to the Workbench screen.
Delete button
Click this button to delete the selected filings from the
list. (See To Delete a Filing)
TO DELETE A FILING
To delete one or more filings from your workbench, please perform the following
steps:
From the Workbench screen, click the [Delete Filings] button.
The Delete Filings screen will display containing a list of filings you are
allowed to delete. Only original filings you created that have not been
submitted can be deleted from your workbench.
Select one or more filings to delete by checking the box in the first column of
the list.
Click the [Delete] button. A confirmation message appears to the user: “Are
you sure you want to delete the selected filings?”
Click the [OK] button to delete the selected filings or click the [Cancel]
button to cancel the operation.
NOTE:
If the filings were successfully deleted, you will get the following message:
The selected filings were successfully deleted.
If you did not select any filings to delete, you will get the following error message:
Please select one or more filings from the list below.
5/27/2011
Page 32 of 76
DCAM User Manual_v1.02_FINAL_20110527.docx
Version 1.02
Mika Consulting, Inc.
Data Collection and Analysis Modules
User Manual
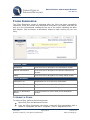
REVIEW SUBMISSIONS
The Review Submissions screen displays common task links as well as the list of
Data and No Data filings that have been created and submitted for all entities
defined in the current user‟s entity setup. This means that if a filing was created and
submitted by a different user (other than the current user) having the same entity in
their setup, it will appear in the Review Submissions list. However, that filing will be
highlighted in pink as shown below.
Common Tasks
Workbench
Click this link to navigate to the Workbench screen.
Create New Filing
Click this link to navigate to the Create New Filing
screen.
Setup
Click this link to navigate to the Entity Setup screen.
Screen Elements
Data tab
Click this link to refresh the contents of the review
submissions list displaying all filings with a purpose of
Data.
No Data tab
Click this link to refresh the contents of the review
5/27/2011
Page 33 of 76
DCAM User Manual_v1.02_FINAL_20110527.docx
Version 1.02
Mika Consulting, Inc.
Data Collection and Analysis Modules
User Manual
submissions list displaying all filings with a purpose of
No Data.
Informational tab
Click this link to refresh the contents of the review
submissions list displaying all filings with a purpose of
Informational.
Export To Excel
Click this button to export all filing data seen in the
workbench to Microsoft Excel. (See To Export the Filing
List)
Work Unit Num
Represents the work unit number assigned to the filing.
Clicking on the Work Unit Number link will display the
Filing Component List screen in read-only mode.
Entity Name
Represents the name of the entity associated with the
filing.
Module
Represents the name of the module associated with the
filing.
Status
Represents the current status of the submitted filing.
Possible valued are: Under Review or final action status
displayed in all caps (i.e. ACCEPTED)
Status as of
Represents the date of the Status above.
File Log Num
Represents the File Log Number assigned by the Office
used to identify the filing during review.
TO SORT THE FILING LIST
You can sort the filings in your review submissions list based on each column. By
clicking on the column you will toggle between sorting in ascending and descending
order.
To sort the list of filings, perform the following steps:
From the Review Submissions screen, click the respective column header link
in which to sort (Work Unit Number, Entity Name, Module, Status,
Status as of or File Log Num).
The filing list is refreshed based on the column selected. To sort the same
column but in the opposite sort order, simply click the same column header
again.
TO VIEW THE NEXT SET OF FILINGS
The review submissions list is configured to display only 20 filings at a time. If there
are more than 20 filings at any point, then you will need to page through the set of
filings.
To view the next set of filings, perform the following steps:
5/27/2011
Page 34 of 76
DCAM User Manual_v1.02_FINAL_20110527.docx
Version 1.02
Mika Consulting, Inc.
Data Collection and Analysis Modules
User Manual
From the Review Submissions screen, there will be a list of page number links
at the bottom of the request list (1 2 3).
Click the desired page number to view the corresponding set of filings.
TO EXPORT THE FILING LIST
To export the filing information to Microsoft Excel, please perform the following
steps:
From the Review Submissions screen, click the Data/No Data tab for the list
of filings you would like to export.
Click the Export To Excel link and a window displays prompting you to Open
or Save the Excel document.
5/27/2011
Page 35 of 76
DCAM User Manual_v1.02_FINAL_20110527.docx
Version 1.02
Mika Consulting, Inc.
Data Collection and Analysis Modules
User Manual
FILING COMPONENT LIST
The Filing Component List screen contains all the information for a filing that was
opened from the Workbench or Review Submissions screens. If the filing was opened
from the Workbench, then it will be in edit mode. If the filing was opened from the
Review Submissions screen, then the filing will be displayed in read-only mode.
Common Tasks
Workbench
Click this link to navigate to the Workbench screen.
Review Submissions
Click this link to navigate to the Review Submissions
screen.
Setup
Click this link to navigate to the Entity Setup screen.
Screen Elements
Filing Information
Submit Button
Submits the filing to the Office of Insurance
Regulation. This button will appear when all
components marked as Incomplete are Complete. The
filing will not be submitted unless you click this
button.
Work Unit Number
Represents the work unit number assigned to the
current filing.
5/27/2011
Page 36 of 76
DCAM User Manual_v1.02_FINAL_20110527.docx
Version 1.02
Mika Consulting, Inc.
Data Collection and Analysis Modules
User Manual
Entity Name
Represents the entity name associated with the
current filing.
Module
Represents the module name associated with the
current filing.
Event
Represents the event name associated with the
current filing.
Period
Represents the period name associated with the
current filing.
Due Date
Represents the date the filing is due to the Office.
Purpose
Represents the purpose associated with the current
filing.
Filing Number
Represents the filing number assigned to the filing
indicating it was received by the Office. This will only
appear for response filings.
Create Date
Represents the creation date of the current filing.
Created By
Represents the filer who created the current filing.
Filing Status
Represents the current status of the current filing.
Submission Status
Represents the current status of the current filing
submission.
Extension Request link
If an extension was requested for the current filing,
this field will appear with a [Show] link.
Screen Elements
Extension Request Information
Extension Request link
If an extension was requested for the current filing,
this field will appear with a [Hide] link.
Requested Date
Represents the requested extension date.
Granted Date
Represents the granted extension date. This field will
appear when the extension request is no longer under
review.
Explanation
Represents the explanation made by the filer as to the
reason for the extension request.
Status
Represents the current extension request status.
Possible values are Under Review, Granted,
Granted/Amended, and Denied.
Status Comments
Represents the comments made by the Office. This
field will appear when the extension request is no
5/27/2011
Page 37 of 76
DCAM User Manual_v1.02_FINAL_20110527.docx
Version 1.02
Mika Consulting, Inc.
Data Collection and Analysis Modules
User Manual
longer under review.
View/Edit Filing Contact
Information link
Clicking this link will display the Contact Information
screen (See To View/Edit DCAM Contact Information.
NOTE: If the filing was opened from the Review
Submissions screen, the link will be labeled View
Filing Contact Information.
Screen Elements
Component List
Component Name
Represents the name of the filing component. Beneath
the filing component name link is the component
description. Click the Component Name link to
display the Component screen.
Last Updated Date
Represents the date that the component was last
updated.
Status
Represents the current status of the filing component.
Possible values are:
Incomplete – The required filing component is
incomplete and a file or files must be uploaded to
complete the filing component.
Complete – A file or files were successfully uploaded
for the required filing component.
---------- - The optional required filing component is
incomplete and a file or files must be uploaded to
change the status to Included.
Included - A file or files were successfully uploaded
for the optional filing component.
View Previous
Submissions link
Clicking this link will display the View Past Filing
Submissions screen.
Return To Workbench or
Return To Submissions
button
Click the Return To Workbench button to navigate
back to the Workbench screen if the filing is not
submitted. If this is a submitted filing, click the Return
To Submissions button to navigate back to the Review
Submissions screen.
TO SHOW/HIDE THE EXTENSION REQUEST INFORMATION
To show the extension request information, perform the following steps:
Open a filing from either the Workbench screen or the Review Submissions
screen.
If an extension was requested for the filing, there will be a Extension Request
field displaying the current status as well as a [Show] link
5/27/2011
Page 38 of 76
DCAM User Manual_v1.02_FINAL_20110527.docx
Version 1.02
Mika Consulting, Inc.
Data Collection and Analysis Modules
User Manual
Click the [Show] link and the extension request information table will appear
below.
To hide the extension request information, simply click the [Hide] link within
the Extension Request Information table.
5/27/2011
Page 39 of 76
DCAM User Manual_v1.02_FINAL_20110527.docx
Version 1.02
Mika Consulting, Inc.
Data Collection and Analysis Modules
User Manual
FILING COMPONENT
The Filing Component screen displays the list of uploaded files associated with the
current filing submission.
Common Tasks
Add/Upload File
Click this link to navigate to the Add/Upload File
screen.
NOTE: If the Add/Upload File link is disabled, you
have met the file upload limit and cannot add
anymore files. In order to add more files, you must
delete some of the files that have already been
uploaded.
Download Template
Click this link to download the template file associate
with the current filing component. If the Download
Template link is disabled, then there is no template
configured for this filing component.
NOTE: Download the template for each filing to
ensure that you are using the most current version.
Instructions are included on the templates to assist
the user. Once the appropriate data has been entered
into the template the user will need to save it to their
desktop so that it maybe uploaded to the system.
Screen Elements
File Name
Represents the uploaded file name for the filing
component. To view the uploaded file, click on the
File Name link.
NOTE: If the file was taken offline, the File Name link
5/27/2011
Page 40 of 76
DCAM User Manual_v1.02_FINAL_20110527.docx
Version 1.02
Mika Consulting, Inc.
Data Collection and Analysis Modules
User Manual
will be disabled and will read:
[FILE OFFLINE]: filename.pdf
Size (in KB)
Represents the size of the uploaded file. The size is
displayed in kilobytes.
Date Uploaded
Represents the date the file was uploaded.
Action
Represents the Delete action link. Click the Delete
link to delete an uploaded file.
NOTE: If the current filing was already submitted,
then the Delete link will be disabled.
Restore button
Click this button to restore the files that are OFFLINE
for the filing component.
Back button
Click this button to navigate back to the Filing
Component List screen.
TO DELETE AN UPLOADED FILE
To delete an uploaded file, perform the following steps:
Open filing from the Workbench screen.
From the Filing Component List screen, select the filing component containing
the uploaded file you wish to delete.
From the Filing Component screen, click the Delete link next to the file to
delete.
A confirmation message appears to the user: “Are you sure you want to
delete this uploaded file?”
Click the [OK] button to delete the file or click the [Cancel] button to cancel
the operation.
TO RESTORE OFFLINE FILES
Over time, files uploaded to our server will need to be purged to free up disk space.
To accomplish this, the files associated with processed filings will be archived after a
period of time.
So, if you are reviewing old filings and need to view a specific file, odds are that file
is offline and will need to be restored. To restore offline files, perform the following
steps:
Open filing from the Review Submissions screen.
From the Filing Component List screen, select the filing component containing
the uploaded files you wish to restore.
From the Filing Component screen, click the [Restore] button.
A confirmation message appears to the user: “Are you sure you want to
restore the offline files?”
5/27/2011
Page 41 of 76
DCAM User Manual_v1.02_FINAL_20110527.docx
Version 1.02
Mika Consulting, Inc.
Data Collection and Analysis Modules
User Manual
Click the [OK] button to queue the files for restoration or click the [Cancel]
button to cancel the operation.
NOTE:
If the files were successfully queued for restoration, you will get the following
informational message:
The files were successfully queued for restoration. You will receive
an email when the file(s) are restored.
5/27/2011
Page 42 of 76
DCAM User Manual_v1.02_FINAL_20110527.docx
Version 1.02
Mika Consulting, Inc.
Data Collection and Analysis Modules
User Manual
ADD/UPLOAD FILE
The Add/Upload File screen allows the filer to select and upload a file to a filing
component. Depending on the filing and the filing component, data may also be
extracted from the file at the time it is being uploaded.
Common Tasks
None
Screen Elements
Component Name
Represents the name of the filing component.
File To Upload field
Browse button
Represents the file name to upload. Click the
[Browse] button to display the File Open dialog
window. File name will display in field after file is
selected.
File Upload Information
Represents information about the file upload:
The file types supported – lists the different file types
you are allowed to upload for this component.
Maximum number of uploads – Depending on the
filing component this number will vary.
Maximum upload file size – file cannot exceed 5MB.
Cancel button
Click this button to cancel the operation and navigate
back to the Filing Component screen.
Save button
Click this button to upload and extract the file.
5/27/2011
Page 43 of 76
DCAM User Manual_v1.02_FINAL_20110527.docx
Version 1.02
Mika Consulting, Inc.
Data Collection and Analysis Modules
User Manual
TO ADD/UPLOAD A FILE
To add/upload a file, perform the following steps:
From the Filing Component List screen, select the filing component to which
you wish to add files.
From the Filing Component screen, click the Add/Upload File link.
From the Add/Upload File screen, click the [Browse] button to select the file
to upload.
Once the file is selected, click Open and the file name will be added to the
„File To Upload‟ field.
Click the [Save] button to upload and extract the file. Click the [Continue]
button to navigate back to the Add/Upload File screen.
NOTE:
If the file was successfully uploaded and/or extracted, you will get the following
informational message:
File {File Name} upload was successful. This component is now
complete.
If you attempt to upload a file type that is not supported, you will get the following
error message:
The file type you are attempting to upload is incorrect, the file types
supported for this filing component are:
Adobe Acrobat document (*.pdf)
Rich Text Format document (*.rtf)
Microsoft Excel document (*.xls)
Microsoft Word document (*.doc)
If errors occur during data extraction, you will get similar types of extraction errors:
File DataExtractionTest_2.xls upload was unsuccessful.
The following errors were found during data extraction:
Global Validations
5/27/2011
Worksheet
Cell Error Message
SECTION A
K2
B4 must equal B5
SECTION A
L8
C10 must equal C11
SECTION A
K14 B16 must equal B17
SECTION A
I41
SECTION A
D41 Cell cannot be null.
SECTION B
F5
Cell cannot be null.
Sum of column Number 3 must be greater than 250000
Page 44 of 76
DCAM User Manual_v1.02_FINAL_20110527.docx
Version 1.02
Mika Consulting, Inc.
Data Collection and Analysis Modules
User Manual
SECTION B
F25 Sum of column Number 4 must be greater than 500000
U_DATA_TEST1 Data Table
Worksheet
Cell
Error Message
SECTION A
H4
Value must be greater than 1000
SECTION A
H5
Value must be greater than 1000
SECTION A
H6
Value must be greater than 1000
SECTION A
H7
Value must be greater than 1000
SECTION A
H8
Value must be greater than 1000
SECTION A
H9
Value must be greater than 1000
SECTION A
H10
Value must be greater than 1000
SECTION A
H11
Value must be greater than 1000
SECTION A
H12
Value must be greater than 1000
SECTION A
H13
Value must be greater than 1000
Too many errors (10) reached for this data table. Please fix current
errors and try again.
U_DATA_TEST2 Data Table
5/27/2011
Worksheet
Cell
SECTION A
No match of columns for range (B28:K28)
Error Message
Page 45 of 76
DCAM User Manual_v1.02_FINAL_20110527.docx
Version 1.02
Mika Consulting, Inc.
Data Collection and Analysis Modules
User Manual
VIEW PAST FILING SUBMISSIONS
The View Past Filing Submissions screen allows the filer to review all past
submissions for the current filing. This includes submission information and all files
that were uploaded to the filing components for the original filing as well as all the
response filings.
The submissions will appear with the most recent listed first.
5/27/2011
Page 46 of 76
DCAM User Manual_v1.02_FINAL_20110527.docx
Version 1.02
Mika Consulting, Inc.
Data Collection and Analysis Modules
User Manual
Common Tasks
None
Screen Elements
Submission Information
Submission ID
Represents the Submission ID.
5/27/2011
Page 47 of 76
DCAM User Manual_v1.02_FINAL_20110527.docx
Version 1.02
Mika Consulting, Inc.
Data Collection and Analysis Modules
User Manual
Submission Date
Represents the Submission Date.
Submission Type
Represents the Submission Type. (Original or
Response)
Submission Status
Represents the Submission Status. (Not Submitted,
Submitted or Received)
Analyst Comments
Represents the comments supplied by the analyst
during a response filing. If the field is empty then no
comments were entered for this submission.
Screen Elements
Submission Information
Component Name
Represents the name of the filing component. Beneath
the filing component name link is the component
description. Click the Component Name link to
display the Filing Component screen.
Last Updated Date
Represents the date that the component was last
updated.
Status
Represents the current status of the filing component.
Back button
Click this button to navigate to the Filing Component
List screen.
5/27/2011
Page 48 of 76
DCAM User Manual_v1.02_FINAL_20110527.docx
Version 1.02
Mika Consulting, Inc.
Data Collection and Analysis Modules
User Manual
FILING SURVEY COMPONENT
The Filing Survey Component screen displays the list of survey questions associated
with the current filing survey component.
Common Tasks
Workbench
Click this link to navigate to the Workbench.
Filing Component List
Click this link to navigate to the Filing Component List.
Screen Elements
Red Asterisk (*)
Displayed if an answer is required for a question.
Question Number (1., 2.,
etc)
Represents the question to be answered.
Text Box
Displayed for text type, number type, and date type
questions. Enter appropriate survey answer here.
Yes/No Radio Buttons
Displayed for yes/no type questions. Enter
appropriate survey answer here.
Drop Down List
May be displayed for choice type questions. Select
appropriate survey answer here.
5/27/2011
Page 49 of 76
DCAM User Manual_v1.02_FINAL_20110527.docx
Version 1.02
Mika Consulting, Inc.
Data Collection and Analysis Modules
User Manual
Radio Button List
May be displayed for choice type questions. Select
appropriate survey answer here.
Rating Matrix
Displayed for rating type questions. Select
appropriate survey rating here.
Return Button
Clicking this button will return to the Filing Component
List without saving the survey component.
Save and Return Button
Clicking this button will save the survey component.
If the save is successful, the user will be returned to
the Filing Component List.
Save Button
Clicking this button will save the survey component
and return the user to the survey component.
NOTE:
If the survey is saved successfully when clicking the Save Button, you will get one
of the two following informational messages, depending on if the survey is
complete. A survey is considered completed when all required questions are
completed successfully:
Incomplete survey saved successfully.
Completed survey saved successfully. Please click 'Filing Component
List' to the left to return to the Filing Component List.
TEXT TYPE QUESTION
Text type questions may be single or multiple lines. Each question will have a
maximum number of characters that may be entered. If the maximum number of
characters is exceeded, an error message like the one below will be displayed.
5/27/2011
Page 50 of 76
DCAM User Manual_v1.02_FINAL_20110527.docx
Version 1.02
Mika Consulting, Inc.
Data Collection and Analysis Modules
User Manual
NUMBER TYPE QUESTION
Number type questions may be percentage, currency, or normal number. There
may be a maximum and/or minimum amount allowed for the response. If the
response is not within the required range, an error message like the one below will
be displayed.
There may be a maximum number of decimal places allowed for the response. If the
response has too many digits after the decimal place, an error message like the one
below will be displayed.
DATE TYPE QUESTION
Date type questions must be answered with a response in the format of
MM/DD/YYYY. If the response entered is not in this format, an error message like
the one below will be displayed.
There may be a minimum and/or maximum date allowed for the response. If the
response is not within this date range, an error message like the one below will be
displayed.
5/27/2011
Page 51 of 76
DCAM User Manual_v1.02_FINAL_20110527.docx
Version 1.02
Mika Consulting, Inc.
Data Collection and Analysis Modules
User Manual
YES/NO TYPE QUESTION
Yes/No type questions are answered by selecting the proper radio button.
may or may not be a “N/A” option.
There
CHOICE TYPE QUESTION
Choice type questions may be displayed as a radio button list or a drop down
selection box. They are answered by selecting the proper response.
RATING TYPE QUESTION
Rating type questions are displayed as a radio button list with descriptions of the
various rating options. They are answered by selecting the proper response.
5/27/2011
Page 52 of 76
DCAM User Manual_v1.02_FINAL_20110527.docx
Version 1.02
Mika Consulting, Inc.
Data Collection and Analysis Modules
User Manual
FILING SUBMISSION
The Filing Submission screen is displayed after the filing has been successfully
submitted. It lists the current filing submission information (ID, status, and date) as
well as in the informational message at the top of the screen indicating the Work
Unit Number. Click the Return to Workbench button to begin working on your new
filing.
Common Tasks
Workbench
Click this link to navigate to the Workbench screen.
Review Submissions
Click this link to navigate to the Review Submissions
screen.
Setup
Click this link to navigate to the Entity Setup screen.
Screen Elements
Submission ID
Represents the ID of the filing submission.
Submission Status
Represents the status ID of the filing submission.
Submission Date
Represents the date of the filing submission.
Return To Workbench
button
Click this button to return back to the Workbench
screen.
TO SUBMIT A FILING
To submit a filing, perform the following steps:
Open filing from the Workbench screen.
From the Filing Component List screen, ensure all filing components with a
status of „Incomplete‟ are set to „Complete‟. (See To Add/Upload a File)
5/27/2011
Page 53 of 76
DCAM User Manual_v1.02_FINAL_20110527.docx
Version 1.02
Mika Consulting, Inc.
Data Collection and Analysis Modules
User Manual
Verify the Filing Contact Information is correct (See To Add/Update Filing
Contact Information)
Click the [Submit Filing] button.
A confirmation message appears to the user: “Are you sure you want to
submit this filing?”
Click the [OK] button to submit the filing or click the [Cancel] button to
cancel the operation.
NOTE:
If the filing was successfully submitted, you will get the following informational
message:
Filing [Work Unit Number] was submitted successfully.
5/27/2011
Page 54 of 76
DCAM User Manual_v1.02_FINAL_20110527.docx
Version 1.02
Mika Consulting, Inc.
Data Collection and Analysis Modules
User Manual
CREATE NEW FILING
The Create New Filing screen begins the process of creating a new filing.
Common Tasks
Workbench
Click this link to navigate to the Workbench screen.
Review Submissions
Click this link to navigate to the Review Submissions
screen.
Setup
Click this link to navigate to the Entity Setup screen.
Screen Elements
Next button
5/27/2011
Click this button to navigate to the Select Entity Type
screen.
Page 55 of 76
DCAM User Manual_v1.02_FINAL_20110527.docx
Version 1.02
Mika Consulting, Inc.
Data Collection and Analysis Modules
User Manual
SELECT ENTITY TYPE
The Select Entity Type screen provides the user a list of entity types to choose from
when creating a new filing.
Common Tasks
Workbench
Click this link to navigate to the Workbench screen.
Review Submissions
Click this link to navigate to the Review Submissions
screen.
Setup
Click this link to navigate to the Entity Setup screen.
Screen Elements
Select radio button
Represents the button to select the entity type. When
an entity type is selected, the entire row will be
highlighted in yellow.
Name
Represents the name of the entity type.
Description
Represents the description of the entity type.
Cancel button
Click this button to cancel the current operation and
return to the Workbench screen.
Back button
Click this button to go back to the Create New Filing
screen.
Next button
Click this button to save the current selection and
navigate to the Select Entity screen.
TO SELECT AN ENTITY TYPE
To select an entity type, perform the following steps:
From the Select Entity Type screen, click the radio button next to the entity
type you wish to choose. The selected row will be highlighted in yellow.
5/27/2011
Page 56 of 76
DCAM User Manual_v1.02_FINAL_20110527.docx
Version 1.02
Mika Consulting, Inc.
Data Collection and Analysis Modules
User Manual
Click the [Next] button to save the selection and navigate to the Select
Entity screen.
NOTE:
If you did not select an entity type, you will get the following error message:
An entity type must be selected from the list.
5/27/2011
Page 57 of 76
DCAM User Manual_v1.02_FINAL_20110527.docx
Version 1.02
Mika Consulting, Inc.
Data Collection and Analysis Modules
User Manual
SELECT ENTITY
The Select Entity screen provides the user a list of entities to choose from when
creating a new filing. The entities that appear are the list of entities the user added
within their Setup.
The screen below shows a sample of the Select Company screen:
Common Tasks
Workbench
Click this link to navigate to the Workbench screen.
Review Submissions
Click this link to navigate to the Review Submissions
screen.
Setup
Click this link to navigate to the Entity Setup screen.
Screen Elements
Entity Type
Represents the name of the entity type chosen from
the Select Entity Type screen.
Select radio button
Represents the button to select the entity. When an
entity is selected, the entire row will be highlighted in
yellow.
Name
This column represents the name of the entity.
Description
This column represents the description of the entity.
Cancel button
Click this button to cancel the current operation and
return to the Workbench screen.
Back button
Click this button to go back to the Select Entity Type
screen.
Next button
Click this button to save the current selection and
navigate to the Select Module screen.
5/27/2011
Page 58 of 76
DCAM User Manual_v1.02_FINAL_20110527.docx
Version 1.02
Mika Consulting, Inc.
Data Collection and Analysis Modules
User Manual
TO SELECT AN ENTITY
To select an entity, perform the following steps:
From the Select Entity screen, click the radio button next to the entity you
wish to choose. The selected row will be highlighted in yellow.
Click the [Next] button to save the current selection and navigate to the
Select Module screen.
NOTE:
If you did not select an entity, you will get the following error message:
An entity must be selected from the list.
5/27/2011
Page 59 of 76
DCAM User Manual_v1.02_FINAL_20110527.docx
Version 1.02
Mika Consulting, Inc.
Data Collection and Analysis Modules
User Manual
SELECT MODULE
The Select Module screen provides the user a list of modules to choose from when
creating a new filing.
Common Tasks
Workbench
Click this link to navigate to the Workbench screen.
Review Submissions
Click this link to navigate to the Review Submissions
screen.
Setup
Click this link to navigate to the Entity Setup screen.
Screen Elements
Entity Type
Represents the name of the entity type chosen from
the Select Entity Type screen.
Entity
Represents the name of the entity chosen from the
Select Entity screen.
Select radio button
Represents the button to select the module. When a
module is selected, the entire row will be highlighted
in yellow.
Name
This column represents the name of the module.
Description
This column represents the description of the module.
Cancel button
Click this button to cancel the current operation and
return to the Workbench screen.
Back button
Click this button to go back to the Select Entity Type
screen.
5/27/2011
Page 60 of 76
DCAM User Manual_v1.02_FINAL_20110527.docx
Version 1.02
Mika Consulting, Inc.
Data Collection and Analysis Modules
User Manual
Next button
Click this button to save the current selection and
navigate to the Select Event screen.
TO SELECT A MODULE
To select a module, perform the following steps:
From the Select Module screen, click the radio button next to the module you
wish to choose. The selected row will be highlighted in yellow.
Click the [Next] button to save the current selection and navigate to the
Select Event screen.
NOTE:
If you did not select a module, you will get the following error message:
A module must be selected from the list.
5/27/2011
Page 61 of 76
DCAM User Manual_v1.02_FINAL_20110527.docx
Version 1.02
Mika Consulting, Inc.
Data Collection and Analysis Modules
User Manual
SELECT EVENT
The Select Event screen provides the user a list of events to choose from when
creating a new filing.
Common Tasks
Workbench
Click this link to navigate to the Workbench screen.
Review Submissions
Click this link to navigate to the Review Submissions
screen.
Setup
Click this link to navigate to the Entity Setup screen.
Screen Elements
Entity Type
Represents the name of the entity type chosen from
the Select Entity Type screen.
Entity
Represents the name of the entity chosen from the
Select Entity screen.
Module
Represents the name of the module chosen from the
Select Module screen.
Select radio button
Represents the button to select the event. When an
event is selected, the entire row will be highlighted in
yellow.
Name
This column represents the name of the event.
Description
This column represents the description of the event.
Cancel button
Click this button to cancel the current operation and
return to the Workbench screen.
Back button
Click this button to go back to the Select Module
5/27/2011
Page 62 of 76
DCAM User Manual_v1.02_FINAL_20110527.docx
Version 1.02
Mika Consulting, Inc.
Data Collection and Analysis Modules
User Manual
screen.
Next button
Click this button to save the current selection and
navigate to the Select Period screen.
TO SELECT AN EVENT
To select an event, perform the following steps:
From the Select Event screen, click the radio button next to the event you
wish to choose. The selected row will be highlighted in yellow.
Click the [Next] button to save the current selection and navigate to the
Select Period screen.
NOTE:
If you did not select an event, you will get the following error message:
An event must be selected from the list.
5/27/2011
Page 63 of 76
DCAM User Manual_v1.02_FINAL_20110527.docx
Version 1.02
Mika Consulting, Inc.
Data Collection and Analysis Modules
User Manual
SELECT PERIOD
The Select Period screen provides the user a list of reporting periods to choose from
when creating a new filing.
Common Tasks
Workbench
Click this link to navigate to the Workbench screen.
Review Submissions
Click this link to navigate to the Review Submissions
screen.
Setup
Click this link to navigate to the Entity Setup screen.
Screen Elements
Entity Type
Represents the name of the entity type chosen from
the Select Entity Type screen.
Entity
Represents the name of the entity chosen from the
Select Entity screen.
Module
Represents the name of the module chosen from the
Select Module screen.
Event
Represents the name of the event chosen from the
Select Event screen.
Select radio button
Represents the button to select the period. When a
period is selected, the entire row will be highlighted in
yellow.
Name
This column represents the name of the period.
Description
This column represents the description of the period.
5/27/2011
Page 64 of 76
DCAM User Manual_v1.02_FINAL_20110527.docx
Version 1.02
Mika Consulting, Inc.
Data Collection and Analysis Modules
User Manual
Due Date
This column represents the due date of the filing if
created with this reporting period.
Cancel button
Click this button to cancel the current operation and
return to the Workbench screen.
Back button
Click this button to go back to the Select Event
screen.
Next button
Click this button to save the current selection and
navigate to the Select Purpose screen.
TO SELECT A REPORTING PERIOD
To select a reporting period, perform the following steps:
From the Select Period screen, click the radio button next to the period you
wish to choose. The selected row will be highlighted in yellow.
Click the [Next] button navigate to save the current selection and navigate
to the Select Purpose screen.
NOTE:
If you did not select a reporting period, you will get the following error message:
A period must be selected from the list.
5/27/2011
Page 65 of 76
DCAM User Manual_v1.02_FINAL_20110527.docx
Version 1.02
Mika Consulting, Inc.
Data Collection and Analysis Modules
User Manual
SELECT PURPOSE
The Select Purpose screen provides the user a list of filing purposes to choose from
when creating a new filing.
Common Tasks
Workbench
Click this link to navigate to the Workbench screen.
Review Submissions
Click this link to navigate to the Review Submissions
screen.
Setup
Click this link to navigate to the Entity Setup screen.
Screen Elements
Entity Type
Represents the name of the entity type chosen from
the Select Entity Type screen.
Entity
Represents the name of the entity chosen from the
5/27/2011
Page 66 of 76
DCAM User Manual_v1.02_FINAL_20110527.docx
Version 1.02
Mika Consulting, Inc.
Data Collection and Analysis Modules
User Manual
Select Entity screen.
Module
Represents the name of the module chosen from the
Select Module screen.
Event
Represents the name of the event chosen from the
Select Event screen.
Period
Represents the name of the reporting period chosen
from the Select Period screen.
Submission Due Date
Represents the due date of the filing.
Select radio button
Represents the button to select the purpose. When a
purpose is selected, the entire row will be highlighted
in yellow.
Name
This column represents the name of the purpose.
Description
This column represents the description of the purpose.
Extension Request
checkbox
If this checkbox is enabled and checked, the extension
Date and Explanation fields will become visible.
Date
Represents the extension date being requested. The
date must be entered in the format MM/DD/YYYY.
Date Picker Button
Clicking this button will display a calendar screen in
which the user can select a date. When the date is
selected, it will appear in the Date field.
Explanation
Represents a text box that contains the explanation
for the extension request. This field is limited to 1000
characters.
Cancel button
Click this button to cancel the current operation and
return to the Workbench screen.
Back button
Click this button to go back to the Select Period
screen.
Next button
Click this button to save the current selection and
extension request information and navigate to the
Filing Creation Verification screen.
TO SELECT A PURPOSE
To select a purpose, perform the following steps:
From the Select Purpose screen, click the radio button next to the purpose
you wish to choose. The selected row will be highlighted in yellow.
Click the [Next] button to save the current selection and navigate to the
Filing Creation Verification screen.
5/27/2011
Page 67 of 76
DCAM User Manual_v1.02_FINAL_20110527.docx
Version 1.02
Mika Consulting, Inc.
Data Collection and Analysis Modules
User Manual
NOTE:
If you did not select a purpose, you will get the following error message:
A purpose must be selected from the list.
TO REQUEST AN EXTENSION
To request an extension, perform the following steps:
From the Select Purpose screen, click the radio button next to the purpose
you wish to choose. The selected row will be highlighted in yellow.
If the selected purpose is configured to allow extension requests, the
Extension Request checkbox will become enabled.
Check the Extension Request checkbox and the Date and Explanation fields
will appear.
Enter a valid date (format mm/dd/yyyy) or select the date from the date
picker button located next to the Date field.
Enter an explanation as to why you are requesting the extension.
Click the [Next] button to save the extension request date and explanation
and navigate to the Filing Creation Verification screen.
NOTE:
If you did not enter an extension date, you will get the following error message:
Required fields are missing…The Extension Date must not be empty.
If you did not enter an explanation, you will get the following error message:
Required fields are missing…The Extension Explanation must not be
empty.
If you did not enter an extension date that was within X calendar days, you will get
the following error message:
The extension date must be within X calendar day(s) from today's
date.
5/27/2011
Page 68 of 76
DCAM User Manual_v1.02_FINAL_20110527.docx
Version 1.02
Mika Consulting, Inc.
Data Collection and Analysis Modules
User Manual
If you enter an invalid extension date, you will get the following error message:
The Extension Date is invalid, please enter a date in the format
mm/dd/yyyy.
5/27/2011
Page 69 of 76
DCAM User Manual_v1.02_FINAL_20110527.docx
Version 1.02
Mika Consulting, Inc.
Data Collection and Analysis Modules
User Manual
FILING CREATION VERIFICATION
The Filing Creation Verification screen provides a summary of what was selected
during the filing creation process prior to actually creating the filing. It is here that
the user will create the actual filing.
Common Tasks
Workbench
Click this link to navigate to the Workbench screen.
Review Submissions
Click this link to navigate to the Review Submissions
screen.
Setup
Click this link to navigate to the Entity Setup screen.
Screen Elements
Entity Type
Represents the name of the entity type chosen from
the Select Entity Type screen.
Entity
Represents the name of the entity chosen from the
Select Entity screen.
Module
Represents the name of the module chosen from the
Select Module screen.
Event
Represents the name of the event chosen from the
Select Event screen.
Period
Represents the name of the reporting period chosen
5/27/2011
Page 70 of 76
DCAM User Manual_v1.02_FINAL_20110527.docx
Version 1.02
Mika Consulting, Inc.
Data Collection and Analysis Modules
User Manual
from the Select Period screen.
Submission Due Date
Represents the due date of the filing.
Purpose
Represents the name of the filing purpose chosen
from the Select Purpose screen.
Extension Request Date
Represents the date that was entered from the Select
Purpose screen.
Extension Request
Explanation
Represents the explanation that was entered from the
Select Purpose screen.
Cancel button
Click this button to cancel the current operation and
return to the Workbench screen.
Back button
Click this button to go back to the Select Purpose
screen.
Create Filing button
Click this button to create the filing and navigate to
the Filing Creation screen.
TO CREATE A FILING
To create a filing, perform the following steps:
From the Workbench screen, select the Create New Filing link.
From the Create New Filing screen, click the [Next] button to navigate to the
Select Entity Type screen.
Select an entity type. (See To Select an Entity Type)
Select an entity. (See To Select and Entity)
Select a module. (See To Select a Module)
Select an event. (See To Select an Event)
Select a reporting period. (See To Select a Reporting Period)
Request an extension (This is optional. Only request an extension if
necessary) (See To Request an Extension)
Select a purpose. (See To Select a Purpose)
From the Filing Verification screen, click the [Create Filing] button. A
confirmation window appears to the user “Are you sure you want to
create this filing?”
Click the [OK] button to create the filing and navigate to the Filing Creation
screen or click the [Cancel] button to cancel the operation.
NOTE:
If a filing has already been created for the entity with the same module, event, and
5/27/2011
Page 71 of 76
DCAM User Manual_v1.02_FINAL_20110527.docx
Version 1.02
Mika Consulting, Inc.
Data Collection and Analysis Modules
User Manual
period combination, you will get the following error message:
A filing with the selected criteria already exists for this entity.
If you have not entered your contact information into the DCAM Contact
Information screen, you will get the following error message:
There is no contact information created for this account. Please
complete the Contact Information screen in Setup before filing.
5/27/2011
Page 72 of 76
DCAM User Manual_v1.02_FINAL_20110527.docx
Version 1.02
Mika Consulting, Inc.
Data Collection and Analysis Modules
User Manual
FILING CREATION
The Filing Creation screen provides a summary of the filing that was just created
including the new Work Unit Number.
Common Tasks
Workbench
Click this link to navigate to the Workbench screen.
Review Submissions
Click this link to navigate to the Review Submissions
screen.
Setup
Click this link to navigate to the Entity Setup screen.
Screen Elements
Work Unit Number
Represents the newly assigned Work Unit Number for
the filing just created.
Entity Type
Represents the name of the entity type for the filing
just created.
Entity
Represents the name of the entity for the filing just
created.
Module
Represents the name of the module for the filing just
created.
Event
Represents the name of the event for the filing just
created.
5/27/2011
Page 73 of 76
DCAM User Manual_v1.02_FINAL_20110527.docx
Version 1.02
Mika Consulting, Inc.
Data Collection and Analysis Modules
User Manual
Period
Represents the name of the reporting period for the
filing just created.
Submission Due Date
Represents the date the filing is due to the Office.
Purpose
Represents the name of the filing purpose for the
filing just created.
Return to Workbench
button
Click this button to navigate back to the Workbench
screen.
5/27/2011
Page 74 of 76
DCAM User Manual_v1.02_FINAL_20110527.docx
Version 1.02
Mika Consulting, Inc.
Data Collection and Analysis Modules
User Manual
APPLICATION AVAILABILITY
The application availability screen will appear when there is either scheduled or
unscheduled maintenance being performed on the application. In either case, the
application will be unavailable to all users.
Common Tasks
None
NOTE:
If the application is down for scheduled maintenance, the following error message
will appear:
DCAM is currently unavailable due to scheduled maintenance.
If the application is down for unscheduled maintenance, the following error
message will appear:
DCAM is currently unavailable due to unscheduled maintenance.
5/27/2011
Page 75 of 76
DCAM User Manual_v1.02_FINAL_20110527.docx
Version 1.02
Mika Consulting, Inc.
Data Collection and Analysis Modules
User Manual
SESSION TIMEOUT
The session timeout screen will appear there is no activity for a period of time.
When the session does timeout, the following screen will appear.
Common Tasks
Logon
5/27/2011
Click this link to navigate you to the Logon screen.
Page 76 of 76
DCAM User Manual_v1.02_FINAL_20110527.docx
Version 1.02
Mika Consulting, Inc.