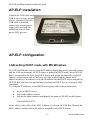
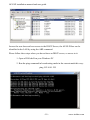
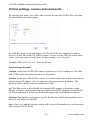
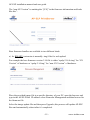
1
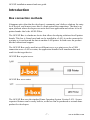
AP-ELP ELP Appliance Installation and User Guide Version 8.8.18 AP-ELP installation manual and user guide NOTE The information contained in this document is subject to change without prior notice This document contains proprietary information, which is protected by copyright. All rights reserved. This document cannot be photocopied, reproduced or translated without prior written approval by Oberon Service and stethos GmbH. Microsoft®, Microsoft WindowsTM are US trademarks of Microsoft Corporation. Adobe and Acrobat are US trademarks of Adobe System Incorporated. All other Companies and/or product names are trademarks or registered trademarks of their respective company. Oberon Service and stethos GmbH 2007. All rights reserved. -2- www.stethos.com AP-ELP installation manual and user guide SOFTWARE LICENSE AGREEMENT and Copyright IMPORTANT: Please read this License carefully before using the Software / Firmware contained in the AP-ELP Box, hereinafter referred to as "SOFTWARE". The right to use this Software is granted only if the Customer agrees with the terms of this License. If you do not agree with the terms of this License, you may return the unused Software product for a refund. HOWEVER, THE USE OF THIS SOFTWARE INDICATES YOUR ACCEPTANCE OF THESE TERMS AND CONDITIONS. This Software is copyrighted and all rights are reserved by Oberon Service srl and stethos GmbH, hereinafter referred to as "Oberon" and “stethos”. Oberon is responsible for the AP-ELP Box firmware, stethos for the ELP part of the product. In return for the payment of a one-time license fee, which was included in the purchase price of the AP-ELP Box product, Oberon and stethos grant you a nonexclusive right to use the Software, subject to the following terms and conditions. No title or ownership of the Software is conferred with the License. 1. The Software may be used without time limit. 2. The Software may not be duplicated or copied. 3. The Software may not be duplicated, transmitted, transcribed, disassembled, decompiled, decrypted or reverse engineered unless Oberon's and stethos’s prior written consent is either obtained or required by law. Upon request, the user will provide Oberon and stethos with reasonably detailed information regarding any disassembly, de-compilation and decryption or reverse engineering. 4. Any third party supplier of the Software may protect its rights in the Software against violation of this License. 5. Oberon and stethos reserve the rights to terminate this License upon breach. In the event of a termination, all copies of the Software shall be returned to Oberon or, -3- www.stethos.com AP-ELP installation manual and user guide with Oberon’s and stethos’s prior written consent, a certificate of destruction of all copies may be provided to Oberon. Any use of the Software in violation of the copyright laws constitutes termination of this agreement and prosecution will begin. 6. This License and the Software product may be transferred to a third party provided the third party agrees to all the terms of this License and that no copies of the Software are retained by the transferring party. 7. Intellectual property; limited license to users The software product is protected by copyright, trademark, patent, and/or other intellectual property laws, and any unauthorized use of this licence may violate such laws and the Terms of Use. Except as expressly provided herein, Oberon and its suppliers do not grant any express or implied rights to use this software. You agree not to copy, republish, frame, download, transmit, modify, assign, distribute, license, sublicense, reverse engineer, or create derivative works based on this software, except as expressly authorized herein. 8. If the software is licensed for use by the U.S. Government, the user agrees that the Software has been developed entirely at private expense and is delivered as "Commercial Computer Software" (as defined in DFARS 252.227-7013) or as "Restricted Computer Software" (as defined in FAR 52.227-19). -4- www.stethos.com AP-ELP installation manual and user guide LIMITED WARRANTY To the original purchaser, Oberon and stethos warrant the hardware on which the Software is stored, to be free of defects in materials and faulty workmanship for a period of ninety (90) days from the date the software is delivered. If during this period a defect in this hardware should occur, you may return the hardware with a copy of your receipt or other proof of payment to Oberon or to an authorized Oberon or stethos distributor, and Oberon or stethos will replace the hardware without charge. Your sole and exclusive remedy in the event of a defect is expressly limited to replacement of the hardware as provided above. Oberon and stethos do not warrant that the functions contained in this Software will meet your requirements or that the Software operation will be uninterrupted or error free. Information contained in the user manual is subject to change without notice and does not represent a commitment on the part of Oberon or stethos. IN NO EVENT WILL Oberon OR ANYONE ELSE WHO HAS BEEN INVOLVED IN THE CREATION, PRODUCTION OR DELIVERY OF THIS SOFTWARE BE LIABLE TO YOU FOR ANY DAMAGES, INCLUDING ANY LOST PROFITS, LOST SAVINGS OR OTHER INCIDENTAL OR CONSEQUENTIAL DAMAGES ARISING OUT OF THE USE OR INABILITY TO USE THIS PROGRAM, OR FOR ANY CLAIM BY ANY OTHER PARTY. THE ENTIRE RISK AS TO THE RESULTS AND PERFORMANCE OF THE PROGRAM AND MANUAL IS ASSUMED BY YOU. This agreement shall be construed, interpreted and governed by the Italian laws for the AP-ELP Box Firmware and for ELP Software for German laws. You agree that this is the complete and exclusive statement of this agreement, which supersedes any prior agreement or other communication between us on this subject. Microsoft®, Microsoft Windows™, Windows 95™, MS Windows and MS are registered Trademarks of Microsoft Corporation. All named company names and/or products are trade names or registered trade names of the named companies. -5- www.stethos.com AP-ELP installation manual and user guide Table of contents SOFTWARE LICENSE AGREEMENT and Copyright................................................3 LIMITED WARRANTY ...............................................................................................5 Table of contents ............................................................................................................6 Introduction ....................................................................................................................7 Box connection methods .......................................................................................7 Features .................................................................................................................8 AP-ELP installation........................................................................................................9 AP-ELP configuration....................................................................................................9 LAN setting DHCP mode with MS Windows.......................................................9 LAN setting DHCP mode with Linux .................................................................11 IP Address setting with arp command .................................................................12 The WebGUI .......................................................................................................13 Network communication setting, set IP address ..................................................15 Printer settings, receive and send ports................................................................16 A quick functional test.........................................................................................17 Base firmware upgrade........................................................................................18 System Log..........................................................................................................21 LED function .......................................................................................................21 Restore Factory Default.......................................................................................22 Hardware specification ........................................................................................23 Hardware support ................................................................................................23 ELP installation ............................................................................................................24 ELP configuration ........................................................................................................24 The WebGUI .......................................................................................................25 Firmware upgrade................................................................................................26 Installation and configuration of the Windows W-ELP software........................27 Download the rules and forms to AP-ELP ..........................................................28 Declarations of conformity...........................................................................................29 Support .........................................................................................................................30 Product numbers and options .......................................................................................33 -6- www.stethos.com AP-ELP installation manual and user guide Introduction Box connection methods It happens quite often that the developer’s community can’t deliver solutions for entrylevel devices, and in most cases this is a limit against the competitors. The idea is an open platform where developers can write their own application and release it for all printer brands: that’s the AP-ELP Box. The AP-ELP Box is a hardware device that allows developing solutions for all printer brands. This box is Linux based and can be installed in a LAN; it can be connected to a printer or it can forward the data to another LAN printer. In both cases the product has the bidirectional support. The AP-ELP Box can be used in two different ways: as a print server for a USB connection or as a LAN re-router; the application installed will transform data and send it to the target device. AP-ELP Box as print server AP-ELP Box as re-router The AP-ELP Box uses the standard Linux Operating System Version 2.4.31. So new requested features can be easily built in, or the box can be purchased as a stand alone product for developers. -7- www.stethos.com AP-ELP installation manual and user guide Features This is the integration of the base hardware AP-ELP Box with the software ELP developed by stethos GmbH, Germany, www.stethos.com/ap-elp stethos Enhanced Laser Printing System (ELP) is an intelligent, modular, scalable and very efficient Output Management System. ELP offers different possibilities to enhance and modify the printer data stream without interfering in existing processes. ELP is a high level scalable product including rule based printing and AP-ELP Box supports the complete Linux supported features. ELP does provide printer emulation, data conversion, forms and printer capabilities management. Here a list of the major functionalities, supported in the J-ELP implementation: • • • • • • • • • • • Search and replace (or delete or add) function offers a simple manipulation of the print data stream (PCL5, but PCL6 and Postscript as well). This allows the selective usage of forms and the correction of inappropriate print commands in the source data stream. Rule based printing. All functions can be activated or deactivated setting a theoretical indefinite amount of rules, based upon the printer data stream Soft flash: automatic use of static electronic forms as overlays for usage within PCL 5x macro escape commands. Print management with stapling, forms overlays, Watermarks, in/out tray definitions, simplex, duplex, stapling and much more. Definable for each page or a set of pages, like form – to or left and right handed pages, Tray mapping allows the remapping of paper trays using existing tray pull commands. Variable management: ELP controlled print e.g. date and time stamp or user name/document name on the printout. Additional values such as invoice numbers can be found using the 'search' capability and then stored for logging purposes. Barcode for all well known one dimensional and two dimensional codes (PCL5 and PostScript) Support for OMR codes for mail inserter from Stielow, Hefter, Neopost and PFE. Simplex or duplex prints from different input trays with pre-printed or prepunched paper. Report line generator which prints reading lines (like formerly seen on zfold continuous paper used on dot-matrix printers) PCL raster compression mode 8 (fax group 4) Emulations like Prescribe, PPDS, Epson, PGL, VGL, etc. -8- www.stethos.com AP-ELP installation manual and user guide AP-ELP installation Connect the LAN cable (and USB in case of usage as print server). Once the LAN and USB cable is installed, connect the external power supply delivered with the product and check if the power LED goes on. AP-ELP configuration LAN setting DHCP mode with MS Windows AP-ELP has different ways to setup the IP address depending on the operating system and the LAN environment. AP-ELP comes as default in DHCP mode: when AP-ELP Box is connected to the LAN, the DHCP Server will assign automatically a valid IP address; on the bottom side of the box you’ll find a label with the unique MAC address of the box. In order to verify the IP address that the DHCP Server assigned to AP-ELP Box you have two possibilities: checking on DHCP Server or using an ARP command. To verify the IP addresses at the DHCP server please follow these instructions: • • • log in on DHCP Server look in the Address Leases look on the right windows and identify the name of AP-ELP in this format J-Box-00408c010772 where J-Box is the suffix of the MAC Address of relevant AP-ELP Box. Identify the MAC address and the relative IP address assigned by the DHCP Server. -9- www.stethos.com AP-ELP installation manual and user guide In case the user does not have access to the DHCP Server, the AP-ELP Box can be identified in the LAN by using the ARP command. Please follow these steps when you do not have an DHCP server, or access to it: 1. Open a DOS shell on your Windows PC 2. Run the ping command in broadcasting mode in the current mask this way: ping 192.168.1.255 - 10 - www.stethos.com AP-ELP installation manual and user guide 3. Now examine the ARP table using the command arp –a 4. Find the AP-ELP Box MAC address (reported on the label on the bottom side of box) and the relative IP address assigned by DHCP Server. LAN setting DHCP mode with Linux In case of Linux environment the commands to run are the following: • • • • Open a terminal session ping 255.255.255.255 –c 2 –b Now examine the ARP table using the command arp –a Find the AP-ELP Box MAC address (reported on the label on the bottom side of box) and the relative IP address assigned by DHCP Server. - 11 - www.stethos.com AP-ELP installation manual and user guide IP Address setting with arp command In case the DHCP Server is not running or the LAN is not linked to it, the user can set the AP-ELP IP Address using the arp command. Please note the manual arp setting should be executed by an expert user, as the duplication of an IP address on the LAN can cause a LAN crash. Open a DOS shell on the Windows PC (or a terminal session on Linux PC) and run the command in this way: arp –s 192.168.1.56 00-aa-00-62-c6-09 Where 192.168.1.56 is the IP address which is assigned to the AP-ELP Box 00-aa-00-62-c6-09 is the unique AP-ELP Box MAC address; please identify it on the label on the bottom side of the box. Ping now the AP-ELP Box 192.168.1.56 to check for any response. Follow the instructions on page 13 to fix network parameters as Manual and adding IP, MASK, GATEWAY and BROADCAST. - 12 - www.stethos.com AP-ELP installation manual and user guide The WebGUI Once the IP address is settled by DHCP Server or by arp command the user can configure all of the other settings by using the AP-ELP Box graphical user interface (GUI). Open a web browser type in the AP-ELP Box IP address on the address bar First time after the AP-ELP Box web is started, you can provide any username and any password of your choice. This username and password will be kept until a restore factory default (either with the hardware reset button or the webGUI) is performed. - 13 - www.stethos.com AP-ELP installation manual and user guide After a successful login this page will be showed: The menu allows the user to setup: • Network settings • Printer Settings • Storage Management • Firmware Management • Log file • Restore Factory Default • Restart PrintServer • Logout • AP-ELP Management - 14 - www.stethos.com AP-ELP installation manual and user guide Network communication setting, set IP address Select the Network Setting link from the home screen, the following page will show up: Host name: Name of the host assigned within the IP table. IP lookup method DHCP: Select DHCP and the Server will automatically assign the IP address at next power reboot. If no DHCP server was found, the IP address will automatically fall back after 240 seconds to 192.0.0.192 Manual: select manual to assign the APELP Box IP address and all of the other network parameters as subnet mask, gateway and broadcast address. Network Time Protocol: Select NTP to enable the automatic synchronization with a NTP server using port 123 as a default. LAN Speed: Select AUTO or the correct LAN speed according to your LAN environment. Save: Press Save and the LAN setting will be saved; please note the AP-ELP Box will automatically reboot once this button is pressed. You need to reboot the box, after a change of the IP setting. It takes approximately tow minutes, until the box is up and running again. Don’t forget to change the address you are referring to in your web browser. - 15 - www.stethos.com AP-ELP installation manual and user guide Printer settings, receive and send ports By selecting this menu, you will be able to select the how the AP-ELP Box will send the spool data to the target printer. AP-ELP Box receiver daemon listens on IP Port 9100 for raw transmission and on Port 515 from LPR clients (eg. BSD systems). In case of using LPR, the queue name can be set to any value of your choice (in this example <raw> is used): Example: LPR -S192.168.1.27 –Praw myfile.prn Print manager daemon: lan2usb: in this case AP-ELP Box runs as a print server. If you connect a LAN cable and a USB printer the printer becomes a LAN printer. lan2lan: In this case AP-ELP Box runs as a re-router and the data will be forwarded to another printer IP address. Select it and type in the target printer IP address. The protocol must be RAW format (normally port 9100). pjl: This flag can be used to disable the outbound PJL support to the printer when lan2lan is choose. Some printers that not support the full PJL language set and the APELP Box might block. In this case disable the support by un-checking this option. Software log: Enables to generate a log file; the file size will be automatically erased once the size achieved is 40 KB. Save: Press save and the software setting will be saved. Remember to go at home page end restart the AP-ELP Box. - 16 - www.stethos.com AP-ELP installation manual and user guide A quick functional test Independent which way AP-ELP receives the print data we recommend to send a test file first. By selecting the menu AP-ELP Management this screen will popup: Download the AP-ELP test pintfile and unzip it into a proper directory. You can send the file ELPstatusPage.pcl to the AP-ELP Box either using IP port 9100 (also known as raw mode) or port 515 (also known as LPR/LPD mode). Test using the LPD in the AP-ELP Box (port 515): lpr –S<IP Address of the AP-ELP Box> –Praw ELPstatusPage.pcl When your connected printer does start printing barcodes, the installation is verified and working ok. - 17 - www.stethos.com AP-ELP installation manual and user guide Base firmware upgrade This section is aimed for base firmware upgrades of the Linux Kernel of the AP-ELP box. The base firmware upgrade will not touch at all the ELP part of the box. Base firmware upgrades are always separate of ELP code upgrades. There are two hardware versions of the AP-ELP box available: • Old version (non-LX) • New version (LX) First you have to identify which version you want to upgrade. There are two ways to identify which hardware version the box has: a) There is a label on the bottom of the AP-ELP box which tells you the MAC Address and additional written information like “LX Version”. If that line is not present you can be sure, that the box is the “non-LX” Version. b) The initial screen of web interface tells you the current base firmware version and the hardware version. The “LX Version” reports a “[LX]” in the firmware looks like this”: - 18 - www.stethos.com AP-ELP installation manual and user guide The “non-LX Version” is omitting the “[LX]” in the firmware information and looks like this”: Base firmware bundles are available in two different kinds: a) As BINARY (extension is normally .img) files for web upload. For example the base firmware version 2.14 file is either “apelp-2.14-lx.img” for “LX Version” of hardware or “apelp-2.14.img” for “non-LX Version” of hardware. Place the provided image file in a specific directory of your PC, open the browser and type in the AP-ELP Box IP address select Firmware Management and then browse for the firmware file. Select the image update file and then press Upgrade; this process will update AP-ELP Box and automatically reboot after it’s completed. - 19 - www.stethos.com AP-ELP installation manual and user guide b) As RFU (remote firmware update) file for direct copy For example the base firmware version 2.14 file is either “apelp-2.14-lx.rfu” for “LX Version” of hardware or “apelp-2.14.rfu” for “non-LX Version” of hardware. You can either send the new firmware to the box via port 9100 or via port 515. An example how to send the firmware via port 515 can be like the following: lpr –S<IP Address of the AP-ELP Box> –Praw NewFirmware.rfu This process will update AP-ELP Box and automatically reboot after it’s completed. Important information: After base firmware upgrade you must re-login the web interface and invoke a “Restore Factory Default” (AP-ELP Box configuration will be lost, but the ELP content will remain untouched). - 20 - www.stethos.com AP-ELP installation manual and user guide System Log If the Log dialog box on Software Setting Menu is selected, AP-ELP Box will generate a log file. In case the user needs support, the log file can be saved to a target txt file and sent to your supplier of the AP-ELP Box. LED function The AP-ELP Box is equipped with 3 LED’s: Green, yellow and red. These LED’s do help to check the status of the AP-ELP appliance. Green: Power ON of the box is correctly receiving power through the power supply. Yellow: Network/LAN Activity Normally is blinking when connected and configured correctly in the LAN. Red: Printer Activity Normally this LED is OFF when AP-ELP is not sending data to the printer. During normal send operations it is blinking fast and when an error occurs with the printer (USB / LAN) it remains ON until the Printer error is cleared. - 21 - www.stethos.com AP-ELP installation manual and user guide Restore Factory Default This section gives you the capability to reset the AP-ELP Box to its factory default configuration. This procedure will: • erase the WEB interface User and Password • set network configuration to DHCP mode (cleaning previous configured address) • set printer configuration to LAN2USB The AP-ELP Box will reboot automatically when this option is selected. It is possible to perform a “Restore Factory Default” using the front button located at the right of green LED. Follow these steps: • Power off the AP-ELP Box • While pressing the button, apply power to AP-ELP Box keeping the button pressed all the time • After a while the red LED will be on • Keep the button pressed until the red LED turns off, then the button can be released - 22 - www.stethos.com AP-ELP installation manual and user guide Hardware specification AP-ELP box is designed around a RISC 32Bit Axis processor and runs at 100 MHz. The ELP code storage is on a USB stick up to 2GB (by default the box is shipped with 32MB, 64MB or 128MB USB stick (depending on the date of purchase of the box). The log of the AP-ELP Box will tell you the size of the USB stick when it’s mounted to the operating system of the box. The operative RAM size is 16MB. AP-ELP Box needs an external power supply with a 5 to 7.5 voltage range. Hardware support For any support request please use the following contact information: Oberon Service srl Via Meda 28 I-20141 Milan Italy Phone: + 39 02 84800612 Fax: + 30 02 84800538 e-mail: [email protected] [email protected] - 23 - www.stethos.com AP-ELP installation manual and user guide ELP installation There is nothing to do here. AP-ELP comes fully preconfigured with the ELP code pre-installed in the box. ELP configuration PCL Bar-coding: No configuration is needed. By default ELP fully emulates the industry standard for Laser printer barcode printing, but with some nice extensions, which are listed in the manual. Postscript Bar-coding: This is an extension to the standard printing, and can be configured using the Windows configuration tool. All other functionalities need to be configured in 3 steps: • • • Use the Windows PPADMIN tool to setup the required rules Test the rules Download the configuration files to the AP-ELP or put the proper ELP command into the data stream. - 24 - www.stethos.com AP-ELP installation manual and user guide The WebGUI Once the IP address is settled by DHCP Server or by arp command the user can configure all of the other settings by using the AP-ELP GUI. Open a browser on Windows or Linux PC and type in the AP-ELP IP address, perform a login and select the AP-ELP Management. We recommend using this page to check if there is a newer version of the AP-ELP firmware code available (internet connection required). - 25 - www.stethos.com AP-ELP installation manual and user guide Firmware upgrade This section is aimed for ELP firmware upgrades of the AP-ELP box. The ELP firmware upgrade will not touch at all the base firmware of the box. ELP firmware upgrades are always separate of base firmware code upgrades. ELP firmware upgrades are released as RFU (remote firmware update) file for direct copy lpr –S<IP Address of the AP-ELP Box> –Praw NewFirmware.rfu There is no reboot needed after it’s completed. The upgrade is instantly active. The EPL firmware is displayed on the WebGUI of the box after you login and hit the icon “AP-ELP Management”. - 26 - www.stethos.com AP-ELP installation manual and user guide Installation and configuration of the Windows W-ELP software Download the configuration software from www.stethos.com/e_welp.htm (English) or www.stethos.com/d_welp.htm (German) Install it, and run the PPAdmin Control Centre. In the first step, you need to set the software into the AP-ELP Emulation mode, as the pure Windows part does support more functionality. This is to prevent you to define rules, which may not apply in the APELP version. 1. Mark the DIMM version option 2. Apply the new setting 3. Exit the PPAdmin software 4. Restart the software to activate the changes. Now the DIMM / AP-ELP Emulation mode is active. For first steps please click on the top right question mark and implement your rules. - 27 - www.stethos.com AP-ELP installation manual and user guide Download the rules and forms to AP-ELP Once the settings are made and everything is working you need to download the configuration to the AP-ELP Box. Normally there are 2 types of files downloaded form the WELP\forms directory: convert.ini Your rules configuration file. Other linked ini files: In rare cases, additional ruled ini-files may be needed, using the ini-file key iniFile=…. In the convert.ini file: Before downloading the convert.ini in this case, you need to change the iniFile= statements from the Windows based path to the AP-ELP Box based path: c:\programme\welp\forms\xxxx.ini to /mnt/usbdisk/runs/xxxx.ini Forms files *.mac. Please download only the mac files you have created. IMPORTANT: ALL FILENAMES ON THE AP-ELP BOX NEED TO BE STORED IN lower case! In order to download the files please open your Browser and type in the TCP/IP address of your box and browse to the runs folder: Select each file you want to transfer normally out of the c:\programme\welp\forms and transfer it to the AP-ELP box. The next job arriving will be treated according the defined rules. - 28 - www.stethos.com AP-ELP installation manual and user guide Declarations of conformity We, stethos GmbH Weimarer Str. 48 71065 Sindelfingen Germany Phone: +49 7031 860910 Fax: +49 7031 871444 e-mail: [email protected] [email protected] declare under our sole responsibility that the product AP-ELP, ELP Appliance to which this declaration relates, are in conformity with the following standards and/or other normative documents. We hereby declare that the above named product is in conformity with the essential requirements and other relevant provisions of Telecommunication directive (Dz. U.2000, nr 73 pos. 852). The technical documentation relevant to the above equipment will be held at stethos GmbH Weimarer Str. 48 71065 Sindelfingen Germany Stefan Schmidt (Name) (Signature) Marketing Manager (Title) March 6th, 2006 (Date) - 29 - www.stethos.com AP-ELP installation manual and user guide Support If you encounter any problems with the box, please follow the steps described below: - Make sure that the log of the box is activated (in the printer settings): - Restart the print server. - Download the current convert.ini to your local machine: o o o - Go to storage management Click on “runs” Click on the file an select “download” Add the following commands to your downloaded convert.ini: Log_Mode=101 Debug_OutData=ON Debug_InData=ON - 30 - www.stethos.com AP-ELP installation manual and user guide - Mark the old ini-file: - And then press the delete-button at the bottom of the page: - Upload the convert.ini to your runs-folder (storage management) and store it like this: Go to Storage Management / runs. Select the file to download (to the box) by pressing the search-button (in German: “Durchsuchen”). - 31 - www.stethos.com AP-ELP installation manual and user guide Now choose the new convert.ini within the file dialog of your operating system and click on open. And then hit the store button. - Process a print job. - Download (to your local machine) and send us the following files: convert.ini, in_data.prn, out_data.prn, log_file.txt, your print job and all your used macro files from storage management/runs For any support request please use the following contact information Please open the PPAdmin software -> License Tab -> about to find your local distributor or contact: stethos GmbH Weimarer Str. 48 71065 Sindelfingen Germany Phone: + 49 7031 860910 Fax: + 49 7031 871444 e-mail: [email protected] [email protected] - 32 - www.stethos.com AP-ELP installation manual and user guide Product numbers and options AP-ELP can be ordered through your local distributor. If you need help to find a reseller just let stethos know. Product No Description ELPAP001 ELPAP002 ELPAP003 AP-ELP appliance for 1 printer (either networked or USB) USB Cable from AP-ELP Box (Type-A) to printer (Type-B) Cable from AP-ELP Box (USB Type-A) to printer (Centronics) Gender changer from Centronics (female) to mini Centronics 1 year maintenance* 2 years maintenance* 3 years maintenance * 4 years maintenance * 5 years maintenance * ELPAP004 ELPAP011 ELPAP012 ELPAP013 ELPAP014 ELPAP015 *Check your supplier for terms and conditions of the maintenance option - 33 - www.stethos.com