1
Océ
PRISMAprepare
Perfection made
easy
o
User manual
Application guide
Copyright
© 2009 Océ
All rights reserved. No part of this work may be reproduced, copied, adapted, or transmitted
in any form or by any means without written permission from Océ.
Océ makes no representation or warranties with respect to the contents hereof and specifically disclaims any implied warranties of merchantability or fitness for any particular purpose.
Further, Océ reserves the right to revise this publication and to make changes from time
to time in the content hereof without obligation to notify any person of such revision or
changes.
Edition: 4.2.1
Trademarks
Trademarks
Adobe®, Acrobat®, Reader® and Distiller® are registered trademarks of Adobe® Systems
Incorporated.
PostScript® 3™ is a registered trademark of Adobe® Systems Incorporated.
Microsoft®, Windows® , Windows NT®, Windows 98®, Windows 2000®, Windows
XP®, Windows Server 2003® are either registered trademarks or trademarks of Microsoft®
Corporation in the United States and/or other countries.
Products in this publication are referred to by their general trade names. In most, if not
all cases, these designations are claimed as trademarks or registered trademarks of their
respective companies.
3
Contents
Contents
Chapter 1
Introduction.........................................................................................................7
Introduction.................................................................................................8
Chapter 2
Start using the application................................................................................9
Open and close a document....................................................................10
Save a document......................................................................................12
Open the last saved version of the document.......................................13
Close the application................................................................................14
Undo and redo commands......................................................................15
Start an external application...................................................................16
Define the application options................................................................17
Define the document properties.............................................................19
Shortcut keys............................................................................................20
Icons..........................................................................................................29
List of concepts.........................................................................................33
Chapter 3
The Pages workspace.......................................................................................39
Introduction...............................................................................................40
The button bar..........................................................................................42
The Structure view...................................................................................44
The Preview view.....................................................................................46
Configure sections...................................................................................49
Collect pages.............................................................................................51
Introduction.........................................................................................51
Insert pages.........................................................................................52
Replace pages.....................................................................................54
Delete pages.......................................................................................56
Move pages.........................................................................................57
Clean-up scanned pages..........................................................................58
Introduction.........................................................................................58
Rasterize a page..................................................................................59
Despeckle the scanned page content...............................................62
Deskew the scanned page content...................................................64
Erase parts of the scanned page content.........................................66
Align the scanned page content........................................................67
Correct pages............................................................................................69
Introduction.........................................................................................69
4
Contents
Change the page size.........................................................................70
Shift the page content........................................................................72
Scale the page content.......................................................................74
Mask parts of the page content.........................................................76
Split the page......................................................................................77
Rotate the page...................................................................................78
Mark or unmark a page......................................................................79
Mark color pages with custom settings............................................81
Chapter 4
The Document workspace...............................................................................83
Introduction...............................................................................................84
The button bar..........................................................................................86
The Structure view...................................................................................88
The Preview view.....................................................................................90
Configure sections...................................................................................95
Allocate pages..........................................................................................97
Introduction.........................................................................................97
Insert blank sheets..............................................................................98
Insert pages.......................................................................................100
Replace pages...................................................................................102
Delete pages.....................................................................................104
Move pages.......................................................................................105
Set a page to 1-sided........................................................................106
Set a page to 2-sided........................................................................107
Force a page to the front side of a sheet........................................108
Force a page to the back side of a sheet........................................109
Do not force a page to any side of the sheet.................................110
Define your document...........................................................................111
Introduction.......................................................................................111
Define the document type...............................................................112
Assign media to pages.....................................................................116
Specify the binding margin.............................................................118
Rotate the page.................................................................................119
Mark or unmark a page....................................................................120
Define the staple settings................................................................122
Define the punch settings................................................................124
Define the fold settings....................................................................125
Set to default.....................................................................................130
Enhance your document........................................................................131
Introduction.......................................................................................131
Create and edit the 'Tab captions'..................................................132
Create and edit the 'Spine caption'.................................................134
Create and edit the 'Page numbers'................................................135
5
Contents
Chapter 5
The Print dialog...............................................................................................137
Introduction.............................................................................................138
Buttons....................................................................................................139
Select a printer.......................................................................................140
Select a printer..................................................................................140
Split and merge................................................................................141
Optimize the printed document............................................................142
Define the extended print settings..................................................142
Define the Media settings................................................................143
Define the Imposition settings........................................................144
Define the Finishing settings...........................................................147
Define the Image settings................................................................149
Page programmed settings vs. printer capabilities.............................150
Introduction.......................................................................................150
Map media types..............................................................................151
Change / map assigned trays in tray-based printers.....................152
Change / map assigned media definitions in media-based printers......................................................................................................153
Define the print settings...................................................................154
Chapter 6
Manage the media catalog............................................................................155
Configure the media catalog.................................................................156
Export the media catalog.......................................................................159
Load the media catalog.........................................................................161
6
Chapter 1
Introduction
Introduction
Introduction
This application provides an easy way to prepare and print your document.
The workflow of this application contains the following steps:
■ Collect all pages from analog or digital sources, do a Scan clean-up on the scanned
pages, and Correct minor imperfections.
You use the'Pages' workspace for this.
■ Allocate pages onto sheets, Define media and binding settings, and Enhance your
document.
You use the'Document' workspace for this.
■ Route your job to a printer (and finisher) and Optimize the job for that route.
For this, you use the 'Print' dialog.
8
Chapter 1 - Introduction
Chapter 2
Start using the application
Open and close a document
Open and close a document
Introduction
This application can handle documents with format PDF v1.8 and older.
When you open a 'read-only' document a warning message will appear. If you continue,
you will not be able to save the changes that you make in your document.
The 'Open', 'Open recent' and 'Close' options are not available when this application is
opened via another application.
For example, a job management application offers the possibility to add page program
settings to a document. You open this application via the job management application
to modify the document. You can only modify the current document.
Missing fonts
In case of missing fonts in the PDF file, the tab caption, the spine caption or the page
numbers, an error message will appear. The 'Missing fonts' message indicates that required
fonts are:
■ Not embedded in the PDF document.
■ Not installed on your computer.
■ Installed on your computer, but the Adobe® Acrobat® setting called 'Local font' is
deselected.
When you open the document, the missing fonts will be substituted according to the
Adobe® Acrobat® settings.
Document cannot be opened
If the PDF document cannot be opened due to PDF security restrictions, an error message
appears.
Open a document
1. Click 'File' - 'Open...'.
A 'Browse' dialog will appear.
2. Browse to the location of the PDF file.
3. Select the PDF file and click 'Open'.
10
Chapter 2 - Start using the application
Open and close a document
Note:
If you opened a document that did not contain any settings for the application, the default
settings will be added to the document. A default media size is assigned and any pdf
bookmarks are converted into sections in the document. Thus, even if you did not
modify the document, a message will appear which asks you to save the document including the specific settings for this application.
Open a recently used document
1. Click 'File' - 'Open recent'.
The documents recently used will appear.
2. Select the document that you want to open.
Note:
The application options on page 17 dialog allows you to specify the number of recently
used documents that are listed. In this dialog you can also clear the list of recent documents with the 'Clear List' button.
Close a document
1. Click 'File' - 'Close'.
If you changed the document, you are asked to save the changes.
Note:
If you opened a document that did not contain any settings for the application, the default
settings will be added to the document. A default media size is assigned and any pdf
bookmarks are converted into sections in the document. Thus, even if you did not
modify the document, a message will appear which asks you to save the document including the specific settings for this application.
Chapter 2 - Start using the application
11
Save a document
Save a document
Introduction
You can save your document. When you save a document, the current file name will be
used.
The 'Save as' command allows you to save your document using a new file name and/or
another folder.
The option 'Save as' is not available when this application is opened via another application.
For example, a job management application offers the possibility to add page program
settings to a document. You open this application via the job management application
to modify the document. You can only modify the current document and save the changes.
Save a document
1. Click 'File' - 'Save'.
Note:
If there are no changes since the last save command, the 'Save' command is disabled.
Save a document using a new file name
1. Click 'File' - 'Save as'.
2. Specify the new file name and/or folder and click 'Save'.
12
Chapter 2 - Start using the application
Open the last saved version of the document
Open the last saved version of the document
Introduction
You can discard the changes to a document and return to the last saved version.
The option 'Revert to last saved' is not available when this application is opened via another application.
For example, a job management application offers the possibility to add page program
settings to a document. You open this application via the job management application
to modify the document. You can only modify the current document and save the changes.
Revert to last saved
1. Click 'File' - 'Revert to last saved'.
A dialog will appear that allows you to discard the changes.
2. Click 'Yes'
The last saved version of the document will be opened.
Chapter 2 - Start using the application
13
Close the application
Close the application
Introduction
Use the 'Exit' command to close the application.
Close the application
1. Click 'File' - 'Exit'.
or
2. Click the close button ('X') in the right top-corner.
14
Chapter 2 - Start using the application
Undo and redo commands
Undo and redo commands
Introduction
Every command in this application can be undone or redone until you save the document.
Undo a command
1. Click 'Edit' - 'Undo'.
The previous command is undone.
2. Repeat step 1 until you have undone the desired command.
Note:
You can undo commands since the last moment you have saved the document.
Redo a command
1. Click 'Edit' - 'Redo'.
The previous undone command is redone.
2. Repeat step 1 until you have redone the desired command.
Note:
You can redo commands until there are no more commands to redo, or until you save
the document.
Chapter 2 - Start using the application
15
Start an external application
Start an external application
Introduction
Use the 'Tools' menu to start one of the configured external applications. You can modify the selected pages in this external application. When you close the external application,
you import the updated pages into your document.
An external application can be configured to accept only 1 PDF page. When you select
multiple pages, the concerning external application is not available to you.
Note:
The administrator defines which external applications are available in the 'Tools' menu.
Start an external application
1. Select the pages that you want to use in the external application.
2. Click 'Tools' and select the required external application.
The selected pages will be exported to the external application.
3. Use the external application to modify the selected pages.
4. Close and save the external application.
5. Click 'Import' to import the selected pages into the application.
6. Click 'Cancel' to discard the changes that you made in the external application.
16
Chapter 2 - Start using the application
Define the application options
Define the application options
Introduction
Click 'Tools' - 'Options' to define the application options.
Define the application options
The application options#
Option
Description
'Default media
system'
This setting defines the default media size and the media weight
unit that is used in this application.
■ 'Metric'
Default media size 'A4' and media weight unit [g/m2] is used.
■ 'Imperial'
Default media size 'Letter' and media weight unit [g/m2 (lb
bond)] is used.
'Assign pick
list media for
folded sheets'
This setting defines how the media assignment from the ‘’ on page
156 is done if the 'Document type' is 'Booklet':
■ 'To page(s)'
The media will be assigned to the selected page(s) only.
■ 'To whole sheet(s)'
The media will be assigned to the sheet(s) of the selected pages.
This means that the media is also assigned to the pages that are
located in the other half of the booklet.
'Recent files'
Use this option to specify the number of files that should appear in
the 'Open recent' list in the 'File' menu.
'Clear List'
Click this button to remove the files from the 'Open recent' list in
the 'File' menu.
Open 'Save as' Enable this option to open the 'Save as' dialogue for converted
documents that are saved for the first time.
dialogue for
converted doc- Documents are converted by the application because the original
document is:
uments
■ A non-page programmed PDF
■ A PDF with an ODW 3.6.x page programme.
You can use the 'Save as' functionality to keep the original pdf
document.
By default, the 'Save' dialogue is offered to the user.
Chapter 2 - Start using the application
17
Define the application options
Option
Description
'Enable overprint preview'
With option 'Enable overprint preview' you can simulate overprints
in the application.
This option allows you to gain an estimation of how overprint behaviour appears in the printed document.
Note:
Option 'Enable overprint preview' is overruled by option
'Overprint simulation' in the 'Print' dialogue.
Set the measurement settings
This application uses the measurement settings defined by Microsoft Windows.
To change your measurement settings (in Windows XP):
1. Click 'Start' - 'Settings' - 'Control Panel' - 'Regional and Language Options'.
2. Click 'Customize...'. button.
3. Set 'Measurement System' option to 'Metric' [mm] or 'U.S.' [inch].
Note:
Standard media sizes are always shown in their own measurement units regardless of the
value of option 'Measurement System'. The size of A4 media is always defined in [mm],
the size of Letter media is always defined in [inch].
18
Chapter 2 - Start using the application
Define the document properties
Define the document properties
Introduction
The Document properties are initialized based on the corresponding PDF document
properties. Once you change the Document properties within this application, these
properties will not be overruled by the PDF properties in the future.
Click 'Document' - 'Properties' to specify the document properties.
Document properties
Document properties#
Setting
Description
Title
Enter the document title here.
Owner
Enter the document owner here.
Account
Enter your account here.
Addressee
Enter your address here,
Banner message
Specify the message that should appear on the banner page.
Special instruction
Specify the special instruction message.
Creation date
Specify the creation date here.
Chapter 2 - Start using the application
19
Shortcut keys
Shortcut keys
Introduction
This application supports keyboard shortcut keys.
General shortcut keys
General shortcut keys#
20
Function
Key(s)
Precondition
Close the active window
ALT + F4
Focus on application
Display the application help
F1
Focus on application
Activate the selection tool
ESC
Focus on preview view
Reset the cut pages
ESC
Focus on structure view
Undo the last action.
CTRL + Z
Focus on application
Redo the last action
CTRL + Y
Focus on application
Cut
CTRL + X
Focus on application
Paste
CTRL + V
Focus on application
Open the Print dialog
CTRL + P
Focus on application
Open the Open dialog
CTRL + O
Focus on application
Select all
CTRL + A
Focus on application
Save
CTRL + S
Focus on application
Save as
CTRL +
SHIFT + S
Focus on application
Delete the selected item
DELETE
Focus on application
Select the page with focus
SPACEBAR
Focus on preview view/structure
view
Add/remove the current page
to/from selection
CTRL +
SPACEBAR
Focus on structure view
Zoom in
CTRL + +
Focus on preview view/structure
view
Zoom out
CTRL + -
Focus on preview view/structure
view
Fit the page to the window
CTRL + 0
Focus on preview view/structure
view
Chapter 2 - Start using the application
Shortcut keys
Function
Key(s)
Precondition
Zoom 100%
CTRL + 1
Focus on preview view/structure
view
Zoom 200%
CTRL + 2
Focus on preview view/structure
view
Activate the zoom out tool
CTRL + W
Focus on preview view
Activate the zoom in tool
CTRL + Q
Focus on preview view
Activate the selection tool
CTRL + E
Focus on preview view
Activate the drag tool
CTRL + H
Focus on preview view
Activate the rectangle selection
tool
CTRL + R
Focus on preview view
Activate the area selection tool
CTRL + T
Focus on preview view
Activate zoom out tool (temporary)
SHIFT + W
(hold)
Focus on preview view
Activate the zoom in tool (temporary)
SHIFT + Q
(hold)
Focus on preview view
Activate the drag tool (temporary)
SHIFT + H
(hold)
Focus on preview view
Select the inverse of a rectangle
SHIFT (hold)
+ draw an area
with the rectangle selection
tool
Focus on preview view
Select the inverse of a selected
area
SHIFT (hold)
+ select an area
between guidelines
Focus on preview view
Show/hide columns
CTRL + G
Focus on preview view
Show/hide contents outside of
the page
CTRL + J
Focus on preview view
Invert a selected area
CTRL + I
Focus on preview view
Chapter 2 - Start using the application
21
Shortcut keys
Navigation in main menu and context menus
Every menu item is accessible with access keys. Access keys are keys used in combination
with the ALT key to activate a control. Access keys appear as underlined letters on a
menu.
Navigation in main menu and context menus#
Function
Key(s)
Precondition
Activate the menu bar and enter
the menu mode
ALT
Focus on application
Activate the menu bar and enter
the menu mode
F10
Focus on application
Execute the corresponding command
ALT + access
key
Focus on application
Display the context menu for the
selected item
Context menu
button
Focus on Structure view/Preview
view
Display the context menu for the
selected item
SHIFT + F10
Focus on Structure view/Preview
view
Open the menu item, move to
the item below, or move to the
top of the menu if the focus is
located in the bottom of the
menu.
DOWN ARROW
Focus on menu
Move to the menu item above,
or move to the bottom of the
menu if the focus is located at
the top of the menu.
UP ARROW
Focus on menu
Open the next menu to the
right, or open a submenu
RIGHT ARROW
Focus on menu
Open the next menu to the left,
or close a submenu.
LEFT ARROW
Focus on menu
Execute the selected command
ENTER
Focus on menu
Function
Key(s)
Precondition
Move the focus forward through
the controls inside the view
TAB
Focus on main window
Navigation in main window
Navigation in main window#
22
Chapter 2 - Start using the application
Shortcut keys
Function
Key(s)
Precondition
Move the focus backward
through the controls inside the
view
SHIFT + TAB
Focus on main window
Move the focus to the next view
CTRL + TAB
Focus on main window
Move the focus to the next view
F6
Focus on main window
Move the focus to the previous
view
CTRL +
SHIFT + TAB
Focus on main window
Move the focus to the previous
view
SHIFT + F6
Focus on main window
Navigation in secondary windows
The OK and Cancel buttons have no access keys. They are operated with the ENTER
and ESC keys.
Navigation in secondary windows#
Function
Key(s)
Precondition
Move forward through the controls
TAB
Focus on secondary window
Move backward through the
controls
SHIFT + TAB
Focus on secondary window
Move focus to the next tab
CTRL + TAB
Focus on secondary window
Move focus to the previous tab
CTRL +
SHIFT + TAB
Focus on secondary window
Select the corresponding command
ALT + access
key
Focus on secondary window
Move the focus or selection in a
group of controls or items
ARROW keys
Focus on secondary window
Cancel
ESC
Focus on secondary window
OK
ENTER
Focus on secondary window
Execute the control with the focus
SPACEBAR
Focus on secondary window
Chapter 2 - Start using the application
23
Shortcut keys
Keyboard selection in lists and list boxes
It is possible to select multiple items in a list with the keyboard. Besides focus, an anchor
is used. The item that has the focus also has the anchor.
Keyboard selection in lists and list boxes#
24
Function
Key(s)
Precondition
Select previous item. Deselect all
other items
UP ARROW
Focus on list
Select next item. Deselect all
other items
DOWN ARROW
Focus on list
Move to previous item. Keep the
selection of all other items.
CTRL + UP
ARROW
Focus on list
Move to next item. Keep the selection of all other items.
CTRL +
DOWN ARROW
Focus on list
Select all items from the anchor
to the previous item(s). Deselect
all other items
SHIFT + UP
ARROW
Focus on list
Select all items from the anchor
to the next item(s). Deselect all
other items
SHIFT +
DOWN ARROW
Focus on list
Select the item with focus. Deselect all other items.
SPACEBAR
Focus on list
Toggle the selection state of an
item with focus.
CTRL +
SPACEBAR
Focus on list
Select all items from the anchor
to the focus. Deselect all other
items
SHIFT +
SPACEBAR
Focus on list
Select the first item of the list.
Deselect all other items
HOME
Focus on list
Select the last item of the list.
Deselect all other items
END
Focus on list
Move to the fist item of the list.
Keep the selection of all other
items.
CTRL +
HOME
Focus on list
Chapter 2 - Start using the application
Shortcut keys
Function
Key(s)
Precondition
Move to the last item of the list.
Keep the selection of all other
items.
CTRL + END
Focus on list
Select all items from the anchor
to the first item of the list. Deselect all other items
SHIFT +
HOME
Focus on list
Select all items from the anchor
to the last item of the list. Deselect all other items
SHIFT +
END
Focus on list
Select the item with the same
first letter/number
Any printable
key
Focus on list
Function
Key(s)
Precondition
Move the cursor to the beginning of the line
HOME
Focus on edit box
Move the cursor to the end of
the line
END
Focus on edit box
Move the cursor to the beginning of the previous word
CTRL +
LEFT ARROW
Focus on edit box
Move the cursor to the beginning of the next word
CTRL +
RIGHT ARROW
Focus on edit box
Move the cursor to the beginning of the previous line
CTRL + UP
ARROW
Focus on edit box
Move the cursor to the beginning of the next line
CTRL +
DOWN ARROW
Focus on edit box
Move the cursor to the beginning of the text
CTRL +
HOME
Focus on edit box
Move the cursor to the end of
the text
CTRL + END
Focus on edit box
Edit boxes
Edit boxes#
Chapter 2 - Start using the application
25
Shortcut keys
Function
Key(s)
Precondition
Select or extend the selection
SHIFT + cursor movement
(ARROW,
HOME,
END)
Focus on edit box
Select or extend the selection
with complete words
SHIFT +
CTRL + cursor movement
(ARROW,
HOME,
END)
Focus on edit box
Function
Key(s)
Precondition
Select the current item
ENTER
Focus on drop-down box
Move the selection to the previous item
LEFT ARROW
Focus on drop-down box
Move the selection to the previous item
UP ARROW
Focus on drop-down box
Move the selection to the next
item
RIGHT ARROW
Focus on drop-down box
Move the selection to the next
item
DOWN ARROW
Focus on drop-down box
Display or hide the list
F4
Focus on drop-down box
Display the list
ALT +
DOWN ARROW
Focus on drop-down box
Hide the list
ALT + UPPER ARROW
Focus on drop-down box
Move the selection to the next
item with the same first letter/number
Any printable
key
Focus on drop-down box
Drop-down boxes
Drop-down boxes#
26
Chapter 2 - Start using the application
Shortcut keys
Check box
Check box#
Function
Key(s)
Precondition
Toggle the check box
SPACEBAR
Focus on check box
Set the value to true
+
Focus on check box
Set the value to false
-
Focus on check box
Function
Key(s)
Precondition
Select the previous value
LEFT ARROW
Focus on radio button group
Select the previous value
UP ARROW
Focus on radio button group
Select the next value
RIGHT ARROW
Focus on radio button group
Select the next value
DOWN ARROW
Focus on radio button group
Select the value with focus
SPACEBAR
Focus on radio button group
Function
Key(s)
Precondition
Set the slider to the previous
value
LEFT ARROW
Focus on slider
Set the slider to the previous
value
UP ARROW
Focus on slider
Set the slider to the next value
RIGHT ARROW
Focus on slider
Set the slider to the next value
DOWN ARROW
Focus on slider
Radio buttons
Radio buttons#
Slider
Slider#
Chapter 2 - Start using the application
27
Shortcut keys
Date/time
Date/time#
28
Function
Key(s)
Precondition
Display the calendar
F4
Focus on date/time
Display the calendar
ALT +
DOWN ARROW
Focus on date/time
Hide the calendar
ALT + UP
ARROW
Focus on date/time
Move to the previous month in
the calendar
PAGE UP
Focus on date/time
Move to the next month in the
calendar
PAGE
DOWN
Focus on date/time
Move to the previous year in the
calendar
CTRL +
PAGE UP
Focus on date/time
Move to the next year in the calendar
CTRL +
PAGE
DOWN
Focus on date/time
Move up/right/down/left in the
calendar
ARROW keys
Focus on date/time
Chapter 2 - Start using the application
Icons
Icons
Introduction
The 'Structure' view uses the following icons to display the sheets and to give feedback
about the page settings.
Icons
Icons#
Icons
Description
Page column
The page icon refers to a single page.
This icon appears when you move a page.
This icon refers to a disabled page.
It appears when a page cannot be selected.
If the page is a scanned page, this icon is displayed on top of the
page icon.
Note:
This icon is only visible in the 'Pages' workspace.
This icon is displayed on top of the page icon if the page is currently
selected in the 'Preview' view.
Note:
This icon is only visible in the 'Pages' workspace.
This icon is displayed on top of the page icon if the page is marked
in the 'Preview' view.
The icon refers to a blank page.
Chapter 2 - Start using the application
29
Icons
Icons
Description
This icon appears when you move a blank page.
This icon refers to a disabled blank page.
It appears if a blank page cannot be selected.
The icon refers to a group of pages.
This icon appears when you move a group of pages.
This icon refers to a group of pages.
It appears when a group of pages consists completely of pages that
cannot be selected.
With these icons, you can expand or collapse a group of pages.
Page size column
This icon refers to portrait pages of A4-like size.
This icon refers to landscape pages of A4-like size.
This icon refers to portrait pages of A3-like size.
This icon refers to landscape pages of A3-like size.
30
Chapter 2 - Start using the application
Icons
Icons
Description
These icons refer to pages with fold settings.
Media column
This icon refers to portrait pages of A4-like size.
This icon refers to landscape pages of A3-like size.
This icon refers to punched media.
This icon refers to Tab media.
This icons refers to inserts of A4-like size.
This icon refers to inserts of A3-like size.
Section column
This icon refers to a section.
This icon refers to one or more collapsed sections.
Output group column
Chapter 2 - Start using the application
31
Icons
Icons
Description
This icon appears when the finishing setting for this page is set to
one staple.
This icon appears when the finishing setting for this page is set to
two or more staples.
This icon appears when the finishing setting for this page is set to
'Other binding'.
Hole punch column
This icon appears when a page contains hole punch settings.
32
Chapter 2 - Start using the application
List of concepts
List of concepts
Blank sheet
A blank sheet is a sheet for which each sheet side contains a blank page.
A blank page is a new page created by this application and inserted in the PDF file. A
blank page has no content but can have a tab caption or a page number. Blank pages are
always created in pairs. One for the front side and one for the back side of a blank sheet.
Page
This application presents the pages of a document to you. You can apply page program
settings to the pages of your document.
Sheet
One sheet contains one or more pages.
You map the pages of your document to physical sheets.
For example, one A3 sheet can contains four A4 pages.
Normal
The document consists of separate sheets. You can add finishing on a sheet level.
Panel
A panel is an area on a sheet which is delimited by:
■ - The edge of the sheet and a fold line.
■ - Two fold lines.
Chapter 2 - Start using the application
33
List of concepts
Booklet
In a 'Booklet' there are multiple sheets folded in 4 panels with one fold in the centre.
Each panel is a separate PDF page. The sheets are folded inside each other.
This application puts the pages correctly on the sheets. For example, the pages 1 and 8
are printed on one side of the sheet. The pages 2 and 7 are printed on the other side of
the sheet.
'Booklet' is applied to all pages in the document.
Perfect binding
'Perfect Binding' is a form of adhesive binding and gives a result similar to paperback
books.
The document sheets are aligned to form a perfect stack. The sheets are then glued together
at the spine and a cover is glued to the sheets.
'Perfect Binding' is applied to all pages in the document.
Tri-Fold In
In a 'Tri-Fold In' there is one sheet folded in 6 panels with two parallel folds. Each side
of a sheet is a PDF page.
The right panel folds inward and the left panel folds over the right panel. To allow the
panels to nest inside each other properly, the folded in right panel is usually slightly
smaller than the other panels.
34
Chapter 2 - Start using the application
List of concepts
A variation is the 'Multi Tri-Fold In'. Multiple sheets are folded in 6 panels with two
parallel folds. Each side of a sheet is a PDF page. The sheets are folded inside each other.
'Tri-Fold In' and 'Multi Tri-Fold In' are applied to all pages in the document.
Note:
'Tri-Fold In' and 'Multi Tri-Fold In' documents can be folded on different finishers.
Therefore, the fold lines of these two document types can differ from each other.
Tri-Fold Out
In a 'Tri-Fold Out' there is one sheet folded in 6 panels. The two parallel folds go in
opposite directions. Each side of a sheet is a PDF page.
This is a simple zig-zag fold where each panel is about the same size.
'Tri-Fold Out' is applied to all pages in the document.
Z-fold
The 'Z-Fold' is a variation of the 'Tri-Fold Out'. In an 'Z-Fold' one panel is twice the
size of the other two.
'Z-Fold' is applied to one sheet in the document.
Chapter 2 - Start using the application
35
List of concepts
Parallel Fold
In a 'Parallel Fold' there is one sheet folded in 8 panels. The sheet is folded in half and
then folded in half again with a fold parallel to the first fold. Each side of a sheet is a PDF
page.
To allow the panels to nest inside each other properly, the two inside folded panels are
slightly smaller than the two outer panels.
'Parallel Fold' is applied to all pages in the document.
Gate Fold
In a 'Gate Fold' there is one sheet folded in 8 panels. The left and right edges fold inward
with parallel folds and meet in the middle of the sheet without overlapping. The sheet is
then folded again along a fold in the middle of the sheet. Each side of a sheet is a PDF
page.
To allow the panels to nest inside each other properly, the outer panels are usually
slightly smaller than the inner panels. The outer panels fold in to the middle and cover
the inner panels.
A variation is the 'Simple Gate Fold'. One sheet folded in 8 panels. The left and right
edges fold inward with parallel folds and meet in the middle of the sheet without overlapping. Each side of a sheet is a PDF page.
'Gate Fold' and 'Simple Gate Fold' are applied to all pages in the document.
36
Chapter 2 - Start using the application
List of concepts
Half Fold
In a 'Half Fold' there is one sheet folded in 4 panels. The sheet is folded along a fold at
the centre, parallel to the short-edge of the page. Each side of a sheet is a PDF page.
A variation is the 'Long Fold', where the fold is parallel to the long-edge of the page.
A variation is the 'Multi Half Fold'. Multiple sheets are folded in 4 panels along a fold
at the centre. Each side of a sheet is a PDF page. The sheets are folded inside each other.
'Half Fold', 'Long Fold' and 'Multi Half Fold' are applied to all pages in the document.
Chapter 2 - Start using the application
37
List of concepts
38
Chapter 2 - Start using the application
Chapter 3
The Pages workspace
Introduction
Introduction
Introduction
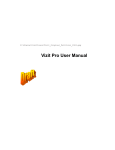
The 'Pages' workspace offers the tools to collect the pages for your document and adjust
the content of the pages. You use the 'Pages' workspace during the 'Collect pages', 'Cleanup scanned pages' and 'Correct pages' phase.
1
2
4
3
5
6
The 'Pages' workspace contains the following elements:
1. The menu bar
Use the menu bar to select an action and open the Help file.
2. The button bar
Use the button bar for quick access to the actions most often used.
3. The 'Structure' view
The 'Structure' view offers an overview of the structure of your document. You can navigate
within your document and select pages.
4. The 'Preview' view
The 'Pages' workspace offers a WYSIWYG preview that shows the pages one by one or stacked
(on top of each other).
5. The navigation bar
Use this navigation bar to switch between the 'Pages' workspace and the 'Document' workspace.
6. The footer
Use this footer to specify the zoom factor and to select the required tools.
40
Chapter 3 - The Pages workspace
Introduction
Open the 'Pages' workspace
Click the 'Pages' button, or
Click 'View' - 'Pages workspace'.
The context menu
You can access the context menu when you right-click on a page(s). This allows quick
access to the actions most often used.
Chapter 3 - The Pages workspace
41
The button bar
The button bar
Introduction
The 'Pages' workspace contains a button bar that allows quick access to the actions most
often used.
The button bar
The button bar#
Button
Description
Print
Print the job.
Delete
Delete page(s)
Clean-up
Clean-up scanned image(s)
This button is only enabled for scanned pages
Size
Modify page size
Shift
Shift page content
Scale
Scale page content
Mask
Mask a specific area
Split
Split page(s)
Rotate
- Rotate the page(s) 90 degrees clockwise
- Rotate the page(s) 90 degrees counter-clockwise
- Rotate the page(s) 180 degrees
42
Chapter 3 - The Pages workspace
The button bar
Button
Description
Mark
Add mark to page(s)
Remove mark from page(s)
- Add mark to all color page(s)
- Add mark to all color page(s). Define custom settings for the color
detection.
Chapter 3 - The Pages workspace
43
The Structure view
The Structure view
Introduction
The 'Structure' view provides easy navigation and selection of pages in the document. It
also gives an overview of the page programmed settings that are used in your document.
You can drag and drop pages in the 'Structure' view.
Horizontally, the 'Structure' view displays columns. These columns describe properties
on which you can group pages. These groups allow you to easily select a range of pages
that have the same properties.
Vertically, the document is shown in pages and groups of pages. For every (sub)section
of pages, a bar is created. With these bars you can easily manage your (sub)sections.
Right-click anywhere in a column to get a context menu. The context menu depends on
the position where you right-click.
The available columns
You can group pages based on the following criteria:
■ The 'Page' column shows the pages and blank sheets of your document. The 'Page'
column contains the logical page index.
■ 'Section'
You can group sequential pages that belong together (for example chapters) in a section.
You can divide a section into subsections. Up to 5 levels are possible here. The names
of each 'Section' level are displayed.
■ 'Page size'
The sequential pages with the same page size and orientation. This column also shows
any fold settings.
Every column has icons and labels:
■ The icon section displays icons that give feedback about the properties of the (group
of) pages.
■ The label section displays in text the properties of the (group of) pages.
You can show or hide the label when you double click on the column's header.
You can adjust the columns:
■ Show or hide columns
Click 'View' - 'Show columns' to specify whether or not a column should be visible.
You can right-click the column header and use its context menu.
■ Column order
44
Chapter 3 - The Pages workspace
The Structure view
■
To change the order of the columns you can drag the column headers to a new position.
The active column is the first column behind the 'Page' column. You can use this active
column to expand or collapse a group of pages.
Column width
You can drag the separators in the column header to change the width of a column.
Feedback icons
Feedback ‘Icons’ on page 29 are displayed in the columns.
Footer
Click the 'Expand all groups' button to expand all groups of the active column.
This option is also available via 'View' - 'Expand all groups'.
Click the 'Collapse all groups' button to collapse all groups of the active column.
This option is also available via 'View' - 'Collapse all groups'.
Note:
The active column is the first column behind the 'Page' column.
Enter page numbers or page ranges in the 'Pages' field to select pages. The character n is
used to define the last page. Character * defines all pages. For example: 1,5,9-n.
Note that disabled pages and blank sheets cannot be selected via the pages field.
Chapter 3 - The Pages workspace
45
The Preview view
The Preview view
Introduction
The 'Preview' view displays the current page ('Single page view') or the selected pages on
top of each other in see-through mode ('Stacked view').
The footer contains tools that you can use in the 'Preview' view.
Fold lines
When a sheet fold setting is applied to the current page, the fold lines are displayed in
the 'Preview' view.
You can 'Shift' the image on the page according to the fold lines.
Hole punch
When a 'Hole punch' setting is applied to the current page, the punch holes are displayed
in the 'Preview' view.
Rulers & guidelines
Rulers are displayed at the top and left of the 'Preview' view. The units displayed in the
rulers depend on the 'Region' setting (inches/mm).
Guidelines can be placed in the 'Preview' view by dragging them from the rulers
■ Horizontal ruler: horizontal guideline
■ Vertical ruler: vertical guideline
■ Intersection of horizontal and vertical ruler: horizontal and vertical guidelines.
Guidelines can also be numerically positioned.
Double-click the rulers or right-click in the 'Preview' view. Then click 'View' - 'Add
guideline...' for the menu to add a guideline.
Right-click on an existing guideline to edit, center, or delete it.
Show or hide guidelines:
■ Option 'Show guidelines' in menu 'View' is automatically enabled when you add a
guideline.
■ Click 'View' - 'Remove all guidelines' to delete all guidelines from the 'Preview' view.
Footer
The footer contains tools that you can use in the 'Preview' view.
46
Chapter 3 - The Pages workspace
The Preview view
Tools and icons in the footer#
Tool
Description
Zoom selection
Use this to specify the zoom factor.
Or click 'View' - 'Zoom'.
Use these tools to zoom in or zoom out.
Or click 'Tools' - 'Zoom out'.
Click 'Tools' - 'Zoom in'.
Select page
Or click 'Tools' - 'Select pages'.
Drag tool
Use this tool to drag the page in the 'Preview' view.
Or click 'Tools' - 'Drag'.
Rectangle selection tool
You can draw a selection rectangle using your mouse. The selected
area is visible by a dotted line around the selected area.
To reset a selection, click your mouse inside the 'Preview' view.
Or click 'Tools' - 'Select area with rectangle'.
Note:
Push 'Shift' on the keyboard and select with the mouse to
select and invert an area with one action.
Area selection tool
You can select an area that is marked by guidelines and page-borders
by clicking inside this area. The selected area is visible by a dotted
line around the selected area.
To reset a selection, click your mouse inside the 'Preview' view.
Or click 'Tools' - 'Select area inside guidelines'.
Invert selected area
Click the 'Invert selected area' button to select the page content
outside the initially selected area.
For example, you select a Company logo. Then you click the 'Invert
selected area' button. Now, the page content without the Company
logo is selected.
Previous page
Current page
Shows the current page number.
Chapter 3 - The Pages workspace
47
The Preview view
Tool
Description
Next page
Single page view
Or click 'View' - 'Single page view'.
Stacked view
In a stacked view the selected pages are displayed on top of each
other in see-through mode (transparent background). The current
page is displayed in a green color to make it stand out in the stacked
view.
Or click 'View' - 'Stacked view'.
Mirrored stacked view
In a stacked view the selected pages are displayed on top of each
other in see-through mode (transparent background). The current
page is displayed in a green color to make it stand out in the stacked
view.
All selected pages are stacked with the even pages shown in a mirrored way. In the 'Mirrored stacked view' you can check the margins
on all sides of the pages.
Or click 'View' - 'Mirrored stacked view'.
Show content outside of page
Select this option if you want to show the content outside of the
page.
In this view the bleed margin is indicated by a dotted line around
the page.
Or click 'View' - 'Show content outside of page'.
48
Chapter 3 - The Pages workspace
Configure sections
Configure sections
Introduction
You can group sequential pages that belong together (for example chapters) in a section.
You can divide a section into subsections. Up to 5 levels are possible here. A section is
indicated by the section icon on page 29 in the 'Structure' view. You can expand or collapse
the section by clicking the '+' or '-' of the section icon.
Sections can be used for quick document preparation. For example: insert a tab before
each chapter, set an appendix to '1-sided', or force each first page of a section to the front
side of a sheet.
When a document is opened any PDF bookmarks are converted into sections in the
document.
Create a section
1. Select the pages that you want to include in the section.
2. Click 'Pages' - 'Section' - 'Create...'.
The 'Create section' dialog appears.
3. Enter the section name and click 'OK'.
The selected pages are grouped in a section.
Note:
You can add only complete subsections to a section.
Create a subsection
1. Select the pages within a section that you want to include in the subsection.
2. Click 'Pages' - 'Section' - 'Level x' - 'Create...'.
The 'Create section' dialog appears.
3. Enter the subsection name and click 'OK'.
The selected pages are grouped in a subsection within the section.
Note:
A subsection can only be a part of a single section.
Replace a section
1. Select the (sub)sections and pages that you want to replace.
Chapter 3 - The Pages workspace
49
Configure sections
Now you can:
■ Rename this (sub)section if you have selected only one (sub)section.
■ Merge the selected (sub)sections and pages into a single new section.
■ Split a partially selected (sub)section.
2. Click 'Pages' - 'Section' - 'Level x' - 'Replace...'.
The 'Replace section' dialog box appears.
3. Enter the new section name and click 'OK'.
Delete a (sub)section
Note:
When you delete a (sub)section, the pages within that (sub)section are not deleted.
1. Select the section that you want to delete.
2. Click 'Pages' - 'Section' - 'Level x' - 'Delete'.
The (sub)section is deleted.
Show section levels
1. Click 'View' - 'Show section levels'.
2. Define how many section levels you want to show in the 'Structure' view.
Note:
You can create a (sub)section at a level that is currently not shown. This will cause all
section levels to be shown. When you create a (sub)section at a section level that is currently shown, all hidden section levels remain hidden.
50
Chapter 3 - The Pages workspace
Introduction
Collect pages
Introduction
Introduction
During the 'Collect pages' phase, you collect all pages for your document.
At the end of this phase your document contains all pages in the correct order.
Collect pages
During the 'Collect pages' phase, you can:
■ Insert the pages of a PDF file within your document.
You can only insert all pages of the external PDF file. It is not possible to insert a
subset from an external PDF file.
■ Replace pages within your document with the pages of an external document.
■ Move pages within your document.
■ Delete pages from your document.
■ Create sections or subsections of sequential pages that belong together (for example
chapters).
Chapter 3 - The Pages workspace
51
Insert pages
Insert pages
Introduction
Use the 'Insert pages...' command to insert one or more external PDF file(s) into your
document.
Example scenarios:
- You want to combine multiple documents into one document. Open the first document
and insert every other document into this document.
- You want to add new chapters to a document which already has page programmed settings, like page numbering. The new chapters are provided as separate documents. Open
the document and insert each new chapter at the right insertion point.
Note:
It is only possible to insert whole PDF file(s). The insert of only a part of a PDF file is
not supported.
This option is available via:
■ The menu: click 'Pages' - 'Insert pages...'.
■ The context menu: right-click the selected page(s) and select option 'Insert pages...'.
Insert pages
1. Select the location where you want to insert the PDF file(s).
2. Click 'Pages' - 'Insert pages...'.
The 'Insert pages' dialog box appears.
3. Use the 'Add file(s)' button to select the PDF file(s) that you want to insert.
4. Use the 'Move file(s) up' and 'Move file(s) down' buttons to set the order of the PDF
files. The PDF files are added to your document in this order.
Note:
You can use the 'Delete file(s)' button to remove a selected PDF file from the list.
5. Use the 'Position' setting to insert the PDF file(s) before or after the selected pages.
6. For 'Create section' setting:
■ Select the 'As new section' option to create a new section for the PDF file(s) in your
document.
■ Select the 'In current section' option to create a subsection in the current active section
for the PDF file(s).
52
Chapter 3 - The Pages workspace
Insert pages
Note:
Option 'In current section' is available only if your document contains sections.
7. Different options for setting 'Use page properties of' can be available:
#
Option
Description
'Inserted file(s)'
The inserted PDF file(s) keep their own page properties.
This option is always available.
'Selected page'
The inserted PDF file(s) receive the page properties of the
selected page.
This option is available when you select one page as the
location to insert the pages.
'First selected page'
The inserted PDF file(s) receive the page properties of the
first page of the selected pages.
This option is available when:
■ You select multiple pages as the location to insert the
pages and
■ You select option 'Before selection' for setting 'Position'.
'Last selected page'
The inserted PDF file(s) receive the page properties of the
last page of the selected pages.
This option is available when:
■ You select multiple pages as the location to insert the
pages and
■ You select option 'After selection' for setting 'Position'.
Note:
A page programmed PDF file can have a document type on page 112 that is incompatible
with the current document. Option 'Inserted file(s)' is then disabled. The pages receive
the page programd settings of the current document.
8. Click 'OK' to insert the PDF file(s).
Chapter 3 - The Pages workspace
53
Replace pages
Replace pages
Introduction
Use the 'Replace pages...' command to replace a set of consecutive pages from your document by an external PDF file.
Note:
It is only possible to replace pages with a complete PDF file. The replacement of pages
with only a part of a PDF file is not supported.
This option is available via:
■ The menu: click 'Pages' - 'Replace pages...'.
■ The context menu: right-click the selected page(s) and select option 'Replace pages...'.
Replace pages
1. Select the set of consecutive pages that you want to replace.
2. Click 'Pages' - 'Replace pages...'.
The 'Replace pages' dialog will appear.
3. Use the 'Browse...' button to select the external PDF file that you want to use.
4. Different options for setting 'Use page properties of' can be available:
#
Option
Description
'Inserted file'
The pages in the PDF file keep their own page properties
when they replace the selected pages.
This option is always available.
Note:
Additional pages in the PDF file are inserted in the
document.
'Selected page'
Each page of the PDF file receives the page properties of
the selected page.
This option is available when you select to replace one page.
Note:
Additional pages in the PDF file are inserted with
the page properties of the selected page.
54
Chapter 3 - The Pages workspace
Replace pages
Option
Description
'Selected pages'
Each page of the PDF file receives the page properties of
the corresponding page in the page selection.
This option is available when you select to replace multiple
pages.
Note:
Additional pages in the PDF file are inserted with
the page properties of the last page of the page selection.
Note:
A page programmed PDF file can have a document type on page 112 that is incompatible
with the current document. Option 'Inserted file' is then disabled. The pages receive the
page programd settings of the current document.
5. Click 'OK' to replace the pages.
Chapter 3 - The Pages workspace
55
Delete pages
Delete pages
Introduction
Use the 'Delete' command to delete pages from your document.
This option is available via:
■ The button bar: click the drop-down button 'Delete'.
■ The menu: click 'Pages' - 'Delete pages'.
■ The context menu: right-click the selected page(s) and select option 'Delete pages'.
Delete pages
1. Select the page(s) that you want to delete from your document.
Note:
You can also delete blank sheet(s).
2. Click 'Pages' - 'Delete pages'.
The selected page(s) will be deleted.
56
Chapter 3 - The Pages workspace
Move pages
Move pages
Introduction
You can change the order of the pages within your document. Use the 'Cut pages' and
'Paste pages' commands to move pages within your document.
These options are available via:
■ The menu: click 'Pages' - 'Cut pages'.
■ The menu: click 'Pages' - 'Paste pages'.
■ The context menu: right-click the selected page(s) and select option 'Cut pages'.
■ The context menu: right-click the selected page(s) and select option 'Paste pages'.
Move pages
1.
2.
3.
4.
5.
Select the page(s) that you want to move.
click 'Pages' - 'Cut pages'.
Navigate within your document and select the page where you want to insert the page(s).
click 'Pages' - 'Paste pages'.
Specify whether you want to paste the page(s) 'before' or 'after' the selected page.
Chapter 3 - The Pages workspace
57
Introduction
Clean-up scanned pages
Introduction
Introduction
You can clean-up scanned pages. Click the 'Clean-up' button to have these operations
available.
Fold lines and punches are not displayed in the 'Clean-up''Preview' view.
Some pages are not recognized as scanned pages. How can I clean-up these pages?
1. You must rasterize the pages on page 59 which are not recognized as scanned pages.
You can clean-up the rasterized pages.
Note:
Any mask that you apply on page content disappears when you click the 'Clean-up'
button. After you close the 'Clean-up' dialog, the mask appears again. For example, you
have masked some page content. Then you click the 'Clean-up' button. This causes the
mask to disappear. In the 'Clean-up' dialog you align the content of the page. Then you
close the 'Clean-up' dialog and the mask appears again. Now, the mask might cover
some of the aligned page content. Therefore, always do a clean-up before you mask any
content.
Clean-up scanned pages
The scan 'Clean-up' button provides you with five operations:
■ Rasterize a page.
■ Remove all speckles.
■ Put scanned content straight on a page.
■ Erase areas of the scanned content.
■ Align the scanned content.
58
Chapter 3 - The Pages workspace
Rasterize a page
Rasterize a page
Introduction
Use the 'Rasterize' option for scanned pages that are not detected as scanned pages by
the application.
This option is available via:
■ The button bar: click the button 'Clean-up'.
■ The menu: click 'Pages' - 'Rasterize'.
■ The menu: click 'Pages' - 'Clean-up'.
■ The context menu: right-click the selected page(s) and select option 'Rasterize'.
■ The context menu: right-click the selected page(s) and select option 'Clean-up'.
Note:
Vector graphics, text documents, et cetera are converted into bitmaps when you rasterize
a page.
Note:
When an image is rasterized, the quality of the image decreases.
Note:
Select the rasterize mode which best describes the pages that you want to rasterize. The
best matching mode generates an optimal rasterize result and preview view.
Questions and answers
1. Question: Why is the preview view of a rasterized page so poor?
Answer: When you rasterize an image you convert the image into a bitmap.
For example, you convert a grayscale vector image. The created bitmap can only contain
black and white pixels. The different shades of gray must be converted using black and
white pixels. Dark gray is represented with more black pixels in a certain area. Light gray
is represented with less black pixels in a certain area.
The bitmap in the preview view must be resized to fit the preview window. Usually the
bitmap is decreased and this results in the 'leaving out of pixels' in the preview view. This
results in the poor review quality.
2. Question: Is the print result of a rasterized page of the same poor quality as the preview
view?
Answer: No. The print result is almost the same as a pdf page, as long as you select the
correct rasterize mode for the concerning page(s).
Chapter 3 - The Pages workspace
59
Rasterize a page
Rasterize one or more pages via the clean-up button
1. Click the 'Clean-up' button.
The 'Clean-up' dialog box appears.
2. Select option:
■ 'Continue scan clean-up with the scanned pages'
One or more of the selected pages are not detected as scanned pages.
Select this option to clean-up only the detected scanned pages.
■ 'Rasterize'
One or more of the selected pages are not detected as scanned pages.
Select this option if the selected pages are scanned pages, but some are not detected
as scanned pages.
#
'Mode'
Select the rasterize mode which best describes the pages that you
want to rasterize:
■ Black and white
Use this mode for text pages.
■ 'Grayscale'
Use this mode for text pages that contain grayscale images.
■ 'Color'
Use this mode for color pages.
Note:
The different modes are designed to rasterize a specific type
of data, such as grayscale pages.
'Resolution'
Select the resolution that is used by your printer.
Note:
The application becomes slower when you select a high
resolution.
Rasterize one or more pages via option 'Rasterize'
1. Click 'Pages' - 'Rasterize'.
The 'Rasterize' dialog box appears.
2. Select which pages you want to rasterize.
60
Chapter 3 - The Pages workspace
Rasterize a page
Note:
When an image is rasterized, the quality of the image decreases.
3. Define the following options:
#
'Mode'
Select the rasterize mode which best describes the pages that you
want to rasterize:
■ Black and white
Use this mode for text pages.
■ 'Grayscale'
Use this mode for text pages that contain grayscale images.
■ 'Color'
Use this mode for color pages.
Note:
The different modes are designed to rasterize a specific type
of data, such as grayscale pages.
'Resolution'
Select the resolution that is used by your printer.
Note:
The application becomes slower when you select a high
resolution.
Chapter 3 - The Pages workspace
61
Despeckle the scanned page content
Despeckle the scanned page content
Introduction
You can despeckle the page content of scanned pages.
The settings for option 'Despeckle'
1. You can define the following settings for the 'Despeckle' option:
Despeckle#
Setting
Description
'Pages'
Specify whether you want to despeckle the scanned page content
for:
■ All pages
■ Selected pages
■ Current page
'Area'
Specify whether you want to despeckle:
■ 'Complete page'
Use this option if your scanned page contains text only.
■ 'Selected area'
Use this option if your scanned page contains both images and
text.
Use any of the selection tools to select the area containing text.
Note:
Do not despeckle images.
'Remove'
Select to remove:
■ 'Noise'
Speckles are removed automatically by this application.
■ 'Objects smaller than:' a defined number of pixels.
You can define the number of pixel of a speckle manually. You
can also drag a box around an object to measure its size with the
measurement tool.
Note:
Light gray areas can be considered as noise.
The 'Objects smaller than:' option can only be applied on black and white pages.
62
Chapter 3 - The Pages workspace
Despeckle the scanned page content
The 'Noise' option can be performed on:
■ black and white pages,
■ grayscale pages,
■ color pages.
Option 'Noise' can be applied multiple times for a better despeckle result.
Note:
Every time you apply option 'Noise' gray images can become whiter and lines can become
thinner. Use you own judgment to determine when option 'Noise' does not improve
the despeckle result anymore. You can always 'Undo' option 'Noise'.
Despeckle the scanned page content
1.
2.
3.
4.
5.
6.
Select the scanned pages that you want to despeckle.
Click the 'Clean-up' button.
Optionally: ‘Rasterize one or more pages via the clean-up button’ on page 60.
Click the 'Despeckle' button.
Set the 'Despeckle' settings.
Click 'Apply' to despeckle the scanned page content.
Chapter 3 - The Pages workspace
63
Deskew the scanned page content
Deskew the scanned page content
Introduction
You can deskew the page content of scanned pages.
Why does 'Automatic' deskew not deskew the page?
1. The page cannot be deskewed automatically when the deskew angle is greater than 20 degrees.
First do a manual deskew and then an automatic deskew.
2. There is too little information or too many graphics on the page to deskew automatically.
Deskew manually.
3. Due to the skew algorithm, texts that use non-Latin fonts (e.g. Chinese and Japanese) do not
deskew automatically. Deskew manually.
Why is content lost after a deskew at a large angle?
1. The content is rotated during the deskew. Content that is rotated beyond the page boundaries
is lost permanently.
Click 'Undo' to recover the lost content.
The settings for option 'Deskew'
1. You can define the following settings for option 'Deskew':
Deskew#
64
Setting
Description
'Pages'
Specify whether you want to deskew the scanned page content for:
■ All pages
■ Selected pages
■ Current page
'Deskew'
Select to deskew:
■ 'Automatic'
Deskewing is performed automatically by the application.
■ 'Manual'
You can define the deskew angle manually.
You can use the mouse to measure the angle in the preview view
with the angle tool. You can adjust the angle with the handles
on each side of the line.
Chapter 3 - The Pages workspace
Deskew the scanned page content
Deskew the scanned page content
1.
2.
3.
4.
5.
6.
Select the scanned pages that you want to deskew.
Click the 'Clean-up' button.
Optionally: ‘Rasterize one or more pages via the clean-up button’ on page 60.
Click the 'Deskew' button.
Set the 'Deskew' settings.
Click 'Apply' to deskew the scanned page content.
Chapter 3 - The Pages workspace
65
Erase parts of the scanned page content
Erase parts of the scanned page content
Introduction
You can erase parts of the page content of scanned pages.
For example, the scanned page contains punch holes or black strips at the border.
The settings for option 'Erase'
1. You can define the following settings for the 'Erase' option:
Erase#
Setting
Description
'Pages'
Specify whether you want to erase parts of the scanned page content
for:
■ All pages
■ Selected pages
■ Current page
Erase parts of the scanned page content
1.
2.
3.
4.
5.
6.
66
Select the scanned pages for which you want to erase a part of the page content.
Click the 'Clean-up' button.
Optionally: ‘Rasterize one or more pages via the clean-up button’ on page 60.
Click the 'Erase' button.
Use any of the selection tools to select the area that you want to erase.
Click 'Apply' to permanently erase the selected area.
Chapter 3 - The Pages workspace
Align the scanned page content
Align the scanned page content
Introduction
You can align the page content of scanned pages.
The purpose of this action is to set the margin of each page at the same location.
Why is the content on some pages not aligned?
1. The content of the selected pages is aligned to the selected object on the current page. If the
object is not found on one or more pages, than the content of the concerning pages is not
aligned.
Tip: select 'Stacked view' and make sure you see a green object in the selected area.
The settings for option 'Align'
1. You can define the following settings for the 'Align' option:
Align#
Setting
Description
'Pages'
Specify whether you want to align the scanned page content for:
■ All pages
■ Selected pages
■ Current page
'Alignment'
■
■
'Align object'
You select an object - for example the company logo - with the
selection tool. The object is then aligned to the same position
for all selected pages. Be aware that the entire page content moves
with the selected object.
'Align content to:'
The content of the page is aligned to a certain location on the
page. You define the location with the available guidelines.
Note:
If you align an object, make sure the object is within the
selected area on ALL pages. Otherwise, the object will not
be aligned.
Note:
Page content is lost when it is shifted from the page. In this
case, 'Undo' the alignment operation.
Chapter 3 - The Pages workspace
67
Align the scanned page content
Align the scanned page content
1.
2.
3.
4.
5.
6.
68
Select the scanned pages that you want to align.
Click the 'Clean-up' button.
Optionally: ‘Rasterize one or more pages via the clean-up button’ on page 60.
Click the 'Align' button.
Set the 'Align' settings.
Click 'Apply' to align the scanned page content.
Chapter 3 - The Pages workspace
Introduction
Correct pages
Introduction
Introduction
During the 'Correct pages' phase, you determine the layout of your document.
The content and layout of the pages within your document are correct at the end of this
phase.
Correct pages
During the 'Correct pages' phase, you can:
■ Change the page size
■ Shift the page content
■ Scale the page content
■ Mask the page content
■ Split the page
■ Rotate the page content
■ Mark pages to separate special pages (like pages with color) from other pages.
Note:
In the 'Preview' view you can monitor the correction actions.
Chapter 3 - The Pages workspace
69
Change the page size
Change the page size
Introduction
The 'Size' button allows you to change the page size and the page content size simultaneously. Or, you can change the page size without changing the page content size.
For example, you receive a document with pages of size 'Letter'. You want to print the
document on 'A4'. So you must set the page size to 'A4' and also scale the page content.
Note:
You cannot change the page size of tab sheets and pages with sheet folds.
This option is available via:
■ The button bar: click the button 'Size'.
■ The menu: click 'Pages' - 'Size'.
■ The context menu: right-click the selected page(s) and select option 'Size'.
Size#
Setting
Description
'Pages'
Specify whether you want to change the page size for:
■ All pages
■ Selected pages
■ Current page
'Resize'
Specify whether you want to change the 'Page and content' size or
just the 'Page' size.
'Size'
Select a predefined page size from the drop-down list. The width
and length of the selected page size is shown.
Set the page orientation for the predefined page sizes with the 'portrait' and 'landscape' buttons.
You can also define a 'Custom' page size yourself.
Note:
You can drag the page borders with your mouse to set a
page size.
70
Chapter 3 - The Pages workspace
Change the page size
Setting
Description
'Position'
Select option 'Center page' to keep the page content always in the
centre of the page.
Select the 'Page shift' option to shift the page independently from
the page content:
■ 'Right'
Select a positive value for a horizontal shift to the right.
■ 'Left'
Select a negative value for a horizontal shift to the left.
■ 'Bottom'
Select a positive value for a vertical shift downward.
■ 'Top'
Select a negative value for a vertical shift upward.
Note:
When the 'Page shift' option is selected, you can move the
page with your mouse within the 'Preview' view.
Change the page size
1. Select the pages for which you want to change the page size.
2. Click the 'Size' button.
The 'Size' dialog box appears.
3. Specify the 'Size' settings:
4. Click 'Apply' to confirm the changes.
Note:
You cannot change the page size of tab sheets and pages with sheet folds.
Reset your settings
1. Click the reset button to reset your settings in this dialog.
The reset button is placed just below the 'X' of the dialog.
Chapter 3 - The Pages workspace
71
Shift the page content
Shift the page content
Introduction
The 'Shift' button allows you to shift the content of the page. The whole content of the
page shifts with this action.
For example, you need to adjust the margins of the pages.
These options are available via:
■ The button bar: click the button 'Shift'.
■ The menu: click 'Pages' - 'Shift'.
■ The context menu: right-click the selected page(s) and select option 'Shift'.
Shift#
Setting
Description
'Pages'
Specify whether you want to shift the page content for:
■ All pages
■ Selected pages
■ Current page
'Shift'
Allows you to shift the content of the page to the:
■ Right
Select a positive value for a horizontal shift to the right.
■ Left
Select a negative value for a horizontal shift to the left.
■ Bottom
Select a positive value for a vertical shift downward.
■ Top
Select a negative value for a vertical shift upward.
Use any of the selection tools to select an area of the content. Click
the option 'Center selected area'. Now, the selected area is centered
on the page.
Note:
You can also drag the content of the page with your mouse
in the 'Preview' view.
Shift the page content
1. Select the pages for which you want to shift the page content.
2. Click the 'Shift' button.
72
Chapter 3 - The Pages workspace
Shift the page content
The 'Shift' dialog box appears.
3. Specify the 'Shift' settings:
4. Click 'Apply' to confirm the changes.
Reset your settings
1. Click the reset button to reset your settings in this dialog.
The reset button is placed just below the 'X' of the dialog.
Chapter 3 - The Pages workspace
73
Scale the page content
Scale the page content
Introduction
The 'Scale' button allows you to scale the content of the page. Scaling starts from the
center of the page.
Note:
Page content that falls outside the page size after scaling will not be printed.
These options are available via:
■ The button bar: click the button 'Scale'.
■ The menu: click 'Pages' - 'Scale'.
■ The context menu: right-click the selected page(s) and select option 'Scale'.
Scale#
Setting
Description
'Pages'
Specify whether you want to scale the content of the page for:
■ All pages
■ Selected pages
■ Current page
'Scale'
Specify the percentage by which you want to increase or decrease
the content of the page.
Note:
You can also scale the page content with your mouse in the
'Preview' view.
Scale the page content
1. Select the pages for which you want to scale the page content.
2. Click the 'Scale' button.
The 'Scale' dialog box appears.
3. Specify the 'Scale' settings:
4. Click 'Apply' to confirm the changes.
Reset your settings
1. Click the reset button to reset your settings in this dialog.
74
Chapter 3 - The Pages workspace
Scale the page content
The reset button is placed just below the 'X' of the dialog.
Chapter 3 - The Pages workspace
75
Mask parts of the page content
Mask parts of the page content
Introduction
Use the 'Mask' button to mask those parts of the page content that you do not want to
print.
For example, you want to remove a company logo from a document.
Note:
Applied masks will be scaled, rotated, and shifted along with the content of the pages.
This option is available via:
■ The button bar: click the button 'Mask'.
■ The menu: click 'Pages' - 'Mask'.
■ The context menu: right-click the selected page(s) and select option 'Mask'.
Mask#
Setting
Description
'Pages'
Specify whether you want to mask the page content for:
■ All pages
■ Selected pages
■ Current page
Note:
Any mask that you apply on page content disappears when you click the 'Clean-up'
button. After you close the 'Clean-up' dialog, the mask appears again. For example, you
have masked some page content. Then you click the 'Clean-up' button. This causes the
mask to disappear. In the 'Clean-up' dialog you align the content of the page. Then you
close the 'Clean-up' dialog and the mask appears again. Now, the mask might cover
some of the aligned page content. Therefore, always do a clean-up before you mask any
content.
Mask parts of the page content
1. Select the pages for which you want to mask a part of the page content.
2. Click the 'Mask' button.
The 'Mask' dialog box appears.
3. Use any of the selection tools to select the area that you want to mask.
4. Specify the 'Mask' settings:
5. Click 'Apply' to confirm the changes.
76
Chapter 3 - The Pages workspace
Split the page
Split the page
Introduction
Use the 'Split' button to split the page.
For example, you have received a booklet document with 'A3' pages. You want to split
all pages to 'A4' page size.
Note:
You cannot split blank sheets.
This option is available via:
■ The button bar: click the button 'Split'.
■ The menu: click 'Pages' - 'Split'.
■ The context menu: right-click the selected page(s) and select option 'Split'.
Mask#
Setting
Description
'Pages'
Specify whether you want to split the page for:
■ All pages
■ Selected pages
■ Current page
'Split'
■
■
Select the 'In half' option to split the page at the longest page
side.
Select the 'At guideline' option. Then drag a horizontal or vertical
guideline onto the page. The page is split at the position of the
guideline.
Split the page
1. Select the pages that you want to split.
2. Click the 'Split' button.
The 'Split' dialog box appears.
3. Select your 'Split' option.
4. Click 'OK' to split the pages.
Note:
You cannot split blank sheets.
Chapter 3 - The Pages workspace
77
Rotate the page
Rotate the page
Introduction
The 'Rotate pages' option allows you rotate the page(s).
The following options are available:
■ 'Rotate right'
Rotate the page(s) 90 degrees to the right.
■ 'Rotate left'
Rotate the page(s) 90 degrees to the left.
■ 'Rotate 180 degrees'
Rotate the page(s) 180 degrees.
All pages of the document are rotated:
- If the selected pages are part of a 'Booklet', or
- If a fold setting is applied to the whole document.
Note:
If the selected pages have 'Tab' media or have pages with sheet folds, you can only rotate
the pages 180 degrees.
This option is available via:
■ The button bar: click the drop-down button 'Rotate pages'.
■ The menu: click 'Pages' - 'Rotate'.
■ The context menu: right-click the selected page(s) and select option 'Rotate'.
Rotate a page
1. Select the page(s) that you want to rotate.
2. Click the 'Rotate pages' drop-down button.
3. Select the rotation that you want to apply.
The selected pages are rotated.
Note:
If the selected pages have 'Tab' media or have pages with sheet folds, you can only rotate
the pages 180 degrees.
78
Chapter 3 - The Pages workspace
Mark or unmark a page
Mark or unmark a page
Introduction
You can mark or unmark pages. This allows you to:
■ Define pages as special pages.
■ Define pages as color pages.
You can process the marked pages separately from other pages of the document, for example:
■ Print only the marked pages, or do not print the marked pages.
■ Use inserts for the marked pages when you print your document.
■ Use a different tray for the marked pages when you print your document.
Note:
The option 'Mark color' allows you to automatically mark all color pages. You can then
print only the color marked sheets on a color machine.
These options are available via:
■ The button bar: click the drop-down button 'Mark pages'.
■ The menu: click 'Pages' - 'Mark'.
■ The context menu: right-click the selected page(s) and select option 'Mark'.
Mark a page
1. Select the page(s) to mark.
2. Click the 'Mark pages' drop-down button.
3. Click 'Mark on'.
The page(s) are marked.
Mark pages as color page
1. Click the 'Mark pages' drop-down button.
2. Click 'Mark color'.
3. The automatic color detection marks all pages that contain color.
Note:
If you want to unmark pages that were marked by the automatic color detection, use
option 'Mark off'.
Chapter 3 - The Pages workspace
79
Mark or unmark a page
Mark pages as color pages with custom settings
1. See procedure ‘Mark color pages with custom settings’ on page 81.
Note:
This option is only available in the 'Pages' workspace.
Unmark a page
1. Select the page(s) to unmark.
2. Click the 'Mark pages' drop-down button.
3. Click 'Mark off'.
The mark is removed from all selected page(s).
80
Chapter 3 - The Pages workspace
Mark color pages with custom settings
Mark color pages with custom settings
Introduction
Option 'Mark color advanced' allows you to define custom settings for the color detection.
The custom settings define when a page is marked as a color page.
Note:
This option is only available in the 'Pages' workspace.
You can process the marked pages separately from other pages of the document, for example:
■ Print only the marked pages, or do not print the marked pages.
■ Print only the color marked sheets on a color machine.
■ Use inserts for the marked pages when you print your document.
■ Use a different tray for the marked pages when you print your document.
Define the minimum percentage of color on a page:
You can define a 'Threshold' for the color detection. The threshold defines the percentage
of color pixels that must be detected on a page to mark that page as a color page.
The threshold can range from 0% to 20%.
Exclude grayscale images from the color detection:
Pages with grayscale images can be marked as color pages by the color detection process.
Increase the value of option 'Grayscale tolerance' to exclude grayscale values from the
color detection.
Grayscale images have an RGB value of R = G = B.
The tolerance can range from 0% to 20% of the RGB value of the grayscale values.
The preview view
The preview view shows the current page. The preview view displays the areas that are
considered as color according to the current settings. When the settings are changed, the
preview view is updated accordingly.
You can find the detected percentage of color on the current page below option
'Threshold'.
This option is available via:
■ The button bar: click the drop-down button 'Mark pages'.
■ The menu: click 'Pages' - 'Mark'.
■ The context menu: right-click the selected page(s) and select option 'Mark'.
Chapter 3 - The Pages workspace
81
Mark color pages with custom settings
Mark pages as color pages with custom settings
1. Click 'Pages' - 'Mark color advanced'.
2. Define if the color detection is valid for:
■ 'All' pages
■ 'Selected' page(s)
3. Define if the color detection is valid for:
■ 'Complete page'
■ 'Selected area'
Use the 'Rectangle selection tool' to select the area for the color detection.
You can select the area in the preview view of the current page.
4. Define the 'Threshold' for the color detection.
A page is marked as a color page when the percentage of color on the page is larger than
the threshold.
■ 'Threshold' = 0%:
The page is marked as a color page when one color pixel is detected.
■ 'Threshold' = 20%:
All pages with a color percentage of 20%, or larger, are marked as color pages.
5. You can exclude grayscale values from the color detection with option 'grayscale tolerance'.
■ Define the tolerance in the textbox, or
■ Define the tolerance with the slider.
6. Click 'OK'.
Note:
All existing marks are removed prior to the new color detection. The marks are removed
when you click the 'OK' button.
Reset your settings
1. Click the reset button to reset your settings in this dialog.
The reset button is placed just below the 'X' of the dialog.
Unmark a page
1. Select the page(s) to unmark.
2. Click the 'Mark pages' drop-down button.
3. Click 'Mark off'.
The mark is removed from all selected page(s).
82
Chapter 3 - The Pages workspace
Chapter 4
The Document workspace
Introduction
Introduction
Introduction
The 'Document' workspace offers the tools to transform pages into a fully prepared print
job. You use the 'Document' workspace during the 'Allocate pages', 'Define your document' and 'Enhance your document' phase.
1
2
3
4
5
6
The 'Document' workspace contains the following elements:
1. The menu bar
Use the menu bar to select an action and open the Help file.
2. The button bar
Use the button bar for quick access to the actions most often used.
3. The 'Structure' view
The 'Structure' view offers an overview of the structure of your document. You can navigate
within your document and select pages.
4. The 'Preview' view
The 'Document' workspace offers a WYSIWYG preview that shows how your document
looks when all production steps are completed.
All settings that affect the appearance of your document are shown, for example staples, tab
captions, page numbers, and so on.
The pages of your document can be shown in different views on page 90.
5. The navigation bar
Use this navigation bar to switch between the 'Document' workspace and the 'Pages' workspace.
6. The footer
Use this footer to specify the zoom factor and to select the required tools and views.
84
Chapter 4 - The Document workspace
Introduction
Open the 'Document' workspace
Click the 'Document' button, or
Click 'View' - 'Document workspace'.
The context menu
You can access the context menu when you right-click on a page(s). This allows quick
access to actions, for example create sections, insert pages, assign media, and so on.
Chapter 4 - The Document workspace
85
The button bar
The button bar
Introduction
The 'Document' workspace contains a button bar that allows quick access to the actions
most often used.
The button bar
[83] The button bar
The button bar#
Button
Description
Print
Print the job.
Insert sheet
- Insert sheet before selection
- Insert sheet after selection
Delete
Delete page(s)
Media
Assign media from the 'Media catalog' to page(s)
1-sided/2-sided
- Set page(s) to 1-sided
- Set page(s) to 2-sided
Force to
- Force the page(s) to the front side of the sheet
- Force the page(s) to the back side of the sheet
- Do not force the page(s) to any side of the sheet
86
Chapter 4 - The Document workspace
The button bar
Button
Description
Binding margin
Shift the binding margin
Rotate
- Rotate the page(s) 90 degrees to the right
- Rotate the page(s) 90 degrees to the left
- Rotate the page(s) 180 degrees
Staple settings
Punch settings
Fold settings
Mark
Add mark to page(s)
Remove mark from page(s)
- Add mark to all color page(s)
Tab captions
Define tab captions
Document type
Set 'Binding edge' and 'Booklet' for the whole document
Chapter 4 - The Document workspace
87
The Structure view
The Structure view
Introduction
The 'Structure' view provides easy navigation and selection of pages in the document. It
also gives an overview of the page programmed settings that are used in your document.
You can drag and drop pages in the 'Structure' view.
Horizontally, the 'Structure' view displays columns. These columns describe properties
on which you can group pages. These groups allow you to easily select a range of pages
that have the same properties.
Vertically, the document is shown in pages and groups of pages. For every (sub)section
of pages, a bar is created. With these bars you can easily manage your (sub)sections.
Right-click anywhere in a column to get a context menu. The context menu depends on
the position where you right-click.
The available columns
You can group pages based on the following criteria:
■ The 'Page' column shows the pages and blank sheets of your document. The 'Page'
column contains the logical page index.
■ 'Section'
You can group sequential pages that belong together (for example chapters) in a section.
You can divide a section into subsections. Up to 5 levels are possible here. The names
of each 'Section' level are displayed.
■ 'Media'
The sequential pages that have the same media are grouped within a 'Media' group.
If media is present in your document but it was removed from the 'Media Catalog',
this media is shown in grey.
■ 'Output group'
The sequential pages that are stapled or folded together are grouped within a 'Output
group' group. This column also shows the document type.
■ 'Page size'
The sequential pages with the same page size, orientation and sheet fold.
■ 'Hole punch'
The sequential pages that have the same punch pattern are grouped within a 'Hole
punch' group.
Every column has icons and labels:
■ The icon section displays icons that give feedback about the properties of the (group
of) pages.
88
Chapter 4 - The Document workspace
The Structure view
■
The label section displays in text the properties of the (group of) pages.
You can show or hide the label when you double click on the column's header.
You can adjust the columns:
■ Show or hide columns
Click 'View' - 'Show columns' to specify whether or not a column should be visible.
You can right-click the column header and use its context menu.
■ Column order
To change the order of the columns you can drag the column headers to a new position.
The active column is the first column behind the 'Page' column. You can use this active
column to expand or collapse a group of pages.
■ Column width
You can drag the separators in the column header to change the width of a column.
Feedback icons
Feedback ‘Icons’ on page 29 are displayed in the columns.
Footer
Click the 'Expand all groups' button to expand all groups of the active column.
This option is also available via 'View' - 'Expand all groups'.
Click the 'Collapse all groups' button to collapse all groups of the active column.
This option is also available via 'View' - 'Collapse all groups'.
Note:
The active column is the first column behind the 'Page' column.
Enter page numbers or page ranges in the 'Pages' field to select pages. The character n is
used to define the last page. Character * defines all pages. For example: 1,5,9-n.
Note that disabled pages and blank sheets cannot be selected via the pages field.
Chapter 4 - The Document workspace
89
The Preview view
The Preview view
Introduction
The 'Preview' view shows how your document is prepared for print. Each page is displayed
within a box representing the page size, orientation, and the content of that page.
The 'Document type', 'Staple', 'Fold', 'Hole punch' and 'Binding edge' settings are also
visible in the 'Preview' view.
The pages of your document can be shown in different modes:
■ 'Facing pages view'
■ 'Continuous pages view'
This view is available when your 'Document type' is set to 'Normal' or to 'Perfect
Binding'. This view is also available when a document fold is chosen that applies to
all pages in the document.
■ 'Folded pages view'
When a document contains pages with sheet folds the view can be toggled between a
folded and unfolded view. All pages with sheet folds are then shown folded or unfolded
respectively. 'Z-Fold' is an example for a sheet fold.
■ 'Unfolded pages view'
Empty sheet sides
An empty sheet side is a side of a sheet to which no page has been allocated. The side remains empty. This may be caused by:
■ 1-sided media
In the 'Media Catalog' you can specify media to be '1-sided'. The media must only
be printed on one side (for example transparent sheets).
This application allocates only one page to this sheet, leaving the other sheet side
empty. The empty sheet side is indicated by the following icon:
■ 1-sided page
You can specify a page to be '1-sided'. This application will make sure that only this
page is allocated to the sheet, leaving the other sheet side empty. The empty sheet side
is indicated with the following icon:
■ Other
When pages have different media sizes, page sizes, or fold, staple, or punch settings,
they cannot be allocated to the same sheet. If necessary, this application automatically
assigns such pages to sheets with one empty sheet side. An automatically created
empty sheet side is not indicated by an icon, but with a specific pattern. This pattern
will not be printed.
Important differences between an empty sheet side and a blank sheet:
90
Chapter 4 - The Document workspace
The Preview view
■
■
■
■
An automatically created empty sheet side can appear and disappear, depending on
the page allocation.
A blank sheet is defined by the user.
You cannot select an empty sheet side because you cannot perform any operation on
it.
However, you can select a blank sheet and perform operations on it.
Empty sheet sides cannot contain any content. Empty sheet sides cannot, for example,
contain a page number or a tab caption. If you need content on an empty sheet side,
you have to turn it into a blank sheet.
An empty sheet side is not shown in the 'Structure' view.
A blank sheet is always shown in the 'Structure' view.
[107] Empty sheet side
Page Ids
The consecutive pages of your document are numbered in the 'Preview' view.
Empty sheet sides and blank sheets are not numbered.
Page numbers
Next to the 'Preview' view numbering of the pages, you can add page numbers (including
pre- and postfixes) to the content of the pages. The 'Preview' view shows you how the
page numbers are printed on the pages.
Folded and unfolded view
When a fold setting is applied, the fold lines are displayed in the 'Preview' view.
Chapter 4 - The Document workspace
91
The Preview view
■
■
For all fold types which are applied on document level, animations are available to see
how the page(s) are folded. See procedure ‘Folded and unfolded view in animations’ on
page 126.
If a document contains sheets with 'Z-Fold', these sheets can be viewed folded or unfolded.
Move your mouse over the outermost fold pane of such a sheet. An arrow becomes
available. With this arrow, you can toggle between the folded and unfolded view. In
the 'Continuous pages view' these sheets are always shown unfolded.
You can also select the desired fold view from the footer or via option 'View' in the
menu.
Hole punch
When a 'Hole punch' setting is applied to the current page, the punch holes are displayed
in the 'Preview' view.
Media properties
The following media properties are visible in the 'Preview' view.
■ Media color
The media color of a page is shown.
If the media color is unknown, the media color is shown as gray.
■ Media description
The media properties are displayed in a tool tip when you move your mouse over a
page border.
Tabs
■
■
92
Tabs and tab captions
Tabs and tab captions are displayed in the 'Preview' view. The tabs that are located
before the left-hand page in the spread view are displayed ‘behind’ this page. If these
tabs contain a tab caption at the back side of the sheet, this tab caption is displayed.
The tabs that are located after the right-hand page in the spread view are displayed
‘behind’ this page. If these tabs contain a tab caption on the front side of the sheet,
this tab caption is displayed.
Multiple tab sets
If your document contains multiple tab sets, only the tab set to which the page belongs
will be displayed behind this page. The tab set of the first page in the spread can differ
from the tab set of the second page. Tabs of a page with a different page size than the
page in the current spread view are not displayed.
Chapter 4 - The Document workspace
The Preview view
If you move your mouse over the tab caption, a ToolTip displays the tab caption. You
can also use tab captions for navigation purposes. You can double-click the tab caption
to open the 'Tab captions' window.
Spine caption
The 'Spine caption' (only possible in case of 'Booklet') is displayed in the 'Preview' view
at the left or at the top of the first page.
The 'Spine caption' field appears in the background color of the media. The width of the
'Spine caption' field depends on the number of pages within your document. The 'Spine
caption' is displayed according to the location and format that you have specified. When
you double-click the 'Spine caption' field the 'Spine caption' editor will appear.
Feedback icons
When you use the 'Force page' setting or the 'Mark pages' setting, this is indicated in the
'Preview' view by icons.
Selection and focus
When you select a page, this is displayed in the 'Preview' view by a selection border around
the page. The focus of a page is displayed in the 'Preview' view by a dashed box around
the page.
Footer
The footer contains tools that you can use in the 'Preview' view.
The state (inactive or active) is displayed by the icon.
Tools and icons in the footer#
Tool
Description
Zoom selection
Use this to specify the zoom factor.
Or click 'View' - 'Zoom'.
'Facing pages view'
The pages are displayed as they appear in a book. You can fold or
unfold pages that have a sheet fold.
Or click 'View' - 'Facing pages view'.
Chapter 4 - The Document workspace
93
The Preview view
Tool
Description
'Continuous pages view'
The pages are displayed underneath each other. The pages are always
shown unfolded.
Or click 'View' - 'Continuous pages view'.
'Folded pages view'
The pages with sheet fold settings are displayed folded. All pages
are displayed as in the 'Facing pages view' view.
Or click 'View' - 'Folded pages view'.
'Unfolded pages view'
The pages with sheet fold settings are displayed unfolded. All pages
are displayed as in the 'Facing pages view' view.
Or click 'View' - 'Unfolded pages view'.
Select page
Or click 'Tools' - 'Select pages'.
Drag tool
Use this tool to drag the page within the view when the page is not
completely visible.
Or click 'Tools' - 'Drag'.
94
Chapter 4 - The Document workspace
Configure sections
Configure sections
Introduction
You can group sequential pages that belong together (for example chapters) in a section.
You can divide a section into subsections. Up to 5 levels are possible here. A section is
indicated by the section icon on page 29 in the 'Structure' view. You can expand or collapse
the section by clicking the '+' or '-' of the section icon.
Sections can be used for quick document preparation. For example: insert a tab before
each chapter, set an appendix to '1-sided', or force each first page of a section to the front
side of a sheet.
When a document is opened any PDF bookmarks are converted into sections in the
document.
Create a section
1. Select the pages that you want to include in the section.
2. Click 'Pages' - 'Section' - 'Create...'.
The 'Create section' dialog appears.
3. Enter the section name and click 'OK'.
The selected pages are grouped in a section.
Note:
You can add only complete subsections to a section.
Create a subsection
1. Select the pages within a section that you want to include in the subsection.
2. Click 'Pages' - 'Section' - 'Level x' - 'Create...'.
The 'Create section' dialog appears.
3. Enter the subsection name and click 'OK'.
The selected pages are grouped in a subsection within the section.
Note:
A subsection can only be a part of a single section.
Replace a section
1. Select the (sub)sections and pages that you want to replace.
Chapter 4 - The Document workspace
95
Configure sections
Now you can:
■ Rename this (sub)section if you have selected only one (sub)section.
■ Merge the selected (sub)sections and pages into a single new section.
■ Split a partially selected (sub)section.
2. Click 'Pages' - 'Section' - 'Level x' - 'Replace...'.
The 'Replace section' dialog box appears.
3. Enter the new section name and click 'OK'.
Delete a (sub)section
Note:
When you delete a (sub)section, the pages within that (sub)section are not deleted.
1. Select the section that you want to delete.
2. Click 'Pages' - 'Section' - 'Level x' - 'Delete'.
The (sub)section is deleted.
Show section levels
1. Click 'View' - 'Show section levels'.
2. Define how many section levels you want to show in the 'Structure' view.
Note:
You can create a (sub)section at a level that is currently not shown. This will cause all
section levels to be shown. When you create a (sub)section at a section level that is currently shown, all hidden section levels remain hidden.
96
Chapter 4 - The Document workspace
Introduction
Allocate pages
Introduction
Introduction
During the 'Allocate pages' phase, you allocate pages to sheets. You can also insert sheets
to your document.
At the end of this phase all pages are allocated to sheets within your document.
Allocate pages
During the 'Allocate pages' phase, you can:
■ Set a page to '1-sided'. This means that the back side of the sheet stays empty.
■ Set a page to '2-sided'. This means that the back side of the sheet is allowed to get
content.
■ Use the 'Force to front' command to set pages to the front side of a sheet. For example,
to start a new chapter on the front side of a sheet.
■ Use the 'Force to back' command to set pages to the back side of a sheet.
■ Insert blank sheets into your document. A blank sheet is a sheet with two blank pages.
■ Insert sheets into your document. You can also delete or replace existing sheets of your
document.
■ You can 'Replace pages' in the document with pages from an external PDF file.
■ You can 'Delete' pages from your document.
Note:
You cannot set a page to '1-sided' when that page is set to 'Force to back'.
Chapter 4 - The Document workspace
97
Insert blank sheets
Insert blank sheets
Introduction
You can insert blank sheets into your document. A blank sheet is shown as two blank
pages in the 'Preview' view.
Note:
It is not possible on page 128 to have different media sizes for a 'Document type' other
than 'Normal'. If you add a blank sheet with a different media size to a booklet, a
warning appears. You are asked if you want to convert all pages of the document to the
media size of the blank sheet.
These options are available via:
■ The button bar: click the drop-down button 'Insert sheet'.
■ The menu: click 'Pages' - 'Insert sheet before'.
■ The menu: click 'Pages' - 'Insert sheet after'.
■ The context menu: right-click the selected page(s) and select option 'Insert sheet before'
or 'Insert sheet after'.
The first time you use the drop-down button, the blank sheet receives the media of the
first selected page. From then on, the application uses the media, which was last inserted
via the menu, for the blank sheet.
When you want to define the media for the blank sheet yourself, you must use the menu.
Insert a blank sheet
1. Select the page where you want to insert a blank sheet.
2. Click 'Pages' - 'Insert sheet before'.
Note:
Use the 'Insert sheet after' option to insert the blank sheet after the selected page.
3. Select the media for the blank sheet.
Insert multiple blank sheets
1. Select the pages where you want to insert blank sheets.
2. Click 'Pages' - 'Insert sheet before'.
98
Chapter 4 - The Document workspace
Insert blank sheets
Note:
Use the 'Insert sheet after' option to insert the blank sheets after the selected pages.
3. Select the media for the blank sheets.
Chapter 4 - The Document workspace
99
Insert pages
Insert pages
Introduction
Use the 'Insert pages...' command to insert one or more external PDF file(s) into your
document.
Example scenarios:
- You want to combine multiple documents into one document. Open the first document
and insert every other document into this document.
- You want to add new chapters to a document which already has page programmed settings, like page numbering. The new chapters are provided as separate documents. Open
the document and insert each new chapter at the right insertion point.
Note:
It is only possible to insert whole PDF file(s). The insert of only a part of a PDF file is
not supported.
This option is available via:
■ The menu: click 'Pages' - 'Insert pages...'.
■ The context menu: right-click the selected page(s) and select option 'Insert pages...'.
Insert pages
1. Select the location where you want to insert the PDF file(s).
2. Click 'Pages' - 'Insert pages...'.
The 'Insert pages' dialog box appears.
3. Use the 'Add file(s)' button to select the PDF file(s) that you want to insert.
4. Use the 'Move file(s) up' and 'Move file(s) down' buttons to set the order of the PDF
files. The PDF files are added to your document in this order.
Note:
You can use the 'Delete file(s)' button to remove a selected PDF file from the list.
5. Use the 'Position' setting to insert the PDF file(s) before or after the selected pages.
6. For 'Create section' setting:
■ Select the 'As new section' option to create a new section for the PDF file(s) in your
document.
■ Select the 'In current section' option to create a subsection in the current active section
for the PDF file(s).
100
Chapter 4 - The Document workspace
Insert pages
Note:
Option 'In current section' is available only if your document contains sections.
7. Different options for setting 'Use page properties of' can be available:
#
Option
Description
'Inserted file(s)'
The inserted PDF file(s) keep their own page properties.
This option is always available.
'Selected page'
The inserted PDF file(s) receive the page properties of the
selected page.
This option is available when you select one page as the
location to insert the pages.
'First selected page'
The inserted PDF file(s) receive the page properties of the
first page of the selected pages.
This option is available when:
■ You select multiple pages as the location to insert the
pages and
■ You select option 'Before selection' for setting 'Position'.
'Last selected page'
The inserted PDF file(s) receive the page properties of the
last page of the selected pages.
This option is available when:
■ You select multiple pages as the location to insert the
pages and
■ You select option 'After selection' for setting 'Position'.
Note:
A page programmed PDF file can have a document type on page 112 that is incompatible
with the current document. Option 'Inserted file(s)' is then disabled. The pages receive
the page programd settings of the current document.
8. Click 'OK' to insert the PDF file(s).
Chapter 4 - The Document workspace
101
Replace pages
Replace pages
Introduction
Use the 'Replace pages...' command to replace a set of consecutive pages from your document by an external PDF file.
Note:
It is only possible to replace pages with a complete PDF file. The replacement of pages
with only a part of a PDF file is not supported.
This option is available via:
■ The menu: click 'Pages' - 'Replace pages...'.
■ The context menu: right-click the selected page(s) and select option 'Replace pages...'.
Replace pages
1. Select the set of consecutive pages that you want to replace.
2. Click 'Pages' - 'Replace pages...'.
The 'Replace pages' dialog will appear.
3. Use the 'Browse...' button to select the external PDF file that you want to use.
4. Different options for setting 'Use page properties of' can be available:
#
Option
Description
'Inserted file'
The pages in the PDF file keep their own page properties
when they replace the selected pages.
This option is always available.
Note:
Additional pages in the PDF file are inserted in the
document.
'Selected page'
Each page of the PDF file receives the page properties of
the selected page.
This option is available when you select to replace one page.
Note:
Additional pages in the PDF file are inserted with
the page properties of the selected page.
102
Chapter 4 - The Document workspace
Replace pages
Option
Description
'Selected pages'
Each page of the PDF file receives the page properties of
the corresponding page in the page selection.
This option is available when you select to replace multiple
pages.
Note:
Additional pages in the PDF file are inserted with
the page properties of the last page of the page selection.
Note:
A page programmed PDF file can have a document type on page 112 that is incompatible
with the current document. Option 'Inserted file' is then disabled. The pages receive the
page programd settings of the current document.
5. Click 'OK' to replace the pages.
Chapter 4 - The Document workspace
103
Delete pages
Delete pages
Introduction
Use the 'Delete' command to delete pages from your document.
This option is available via:
■ The button bar: click the drop-down button 'Delete'.
■ The menu: click 'Pages' - 'Delete pages'.
■ The context menu: right-click the selected page(s) and select option 'Delete pages'.
Delete pages
1. Select the page(s) that you want to delete from your document.
Note:
You can also delete blank sheet(s).
2. Click 'Pages' - 'Delete pages'.
The selected page(s) will be deleted.
104
Chapter 4 - The Document workspace
Move pages
Move pages
Introduction
You can change the order of the pages within your document. Use the 'Cut pages' and
'Paste pages' commands to move pages within your document.
These options are available via:
■ The menu: click 'Pages' - 'Cut pages'.
■ The menu: click 'Pages' - 'Paste pages'.
■ The context menu: right-click the selected page(s) and select option 'Cut pages'.
■ The context menu: right-click the selected page(s) and select option 'Paste pages'.
Move pages
1.
2.
3.
4.
5.
Select the page(s) that you want to move.
click 'Pages' - 'Cut pages'.
Navigate within your document and select the page where you want to insert the page(s).
click 'Pages' - 'Paste pages'.
Specify whether you want to paste the page(s) 'before' or 'after' the selected page.
Chapter 4 - The Document workspace
105
Set a page to 1-sided
Set a page to 1-sided
Introduction
Use '1-sided' pages if the back side of the sheet must be empty.
This option is available via:
■ The button bar: click the drop-down button '1-sided'.
■ The menu: click 'Pages' - '1-sided'.
■ The context menu: right-click the selected page(s) and select option '1-sided'.
Set a page to 1-sided
1. Select the page that must be on a '1-sided' sheet.
2. Select '1-sided' from the 'Pages' menu.
Note:
You cannot set a page to '1-sided' when that page is set to 'Force to back'.
106
Chapter 4 - The Document workspace
Set a page to 2-sided
Set a page to 2-sided
Introduction
Use '2-sided' pages if the back side of the sheet is allowed to get content.
This option is available via:
■ The button bar: click the drop-down button '2-sided'.
■ The menu: click 'Pages' - '2-sided'.
■ The context menu: right-click the selected page(s) and select option '2-sided'.
Set a page to 2-sided
1. Select the page that must be on a '2-sided' sheet.
2. Select '2-sided' from the 'Pages' menu.
Chapter 4 - The Document workspace
107
Force a page to the front side of a sheet
Force a page to the front side of a sheet
Introduction
The 'Force to front' command sets pages to the front side of a sheet.
You can also use the 'Force to front' command if your 'Document type' is 'Booklet'.
For example, you can use the 'Force to front' command to begin a new chapter on the
front side of a sheet.
Force a page to the front side of a sheet
1. Select the page(s) you want to force to the front side of a sheet.
2. Click the 'Force page' drop-down button.
3. Select the 'Force to front' option.
Or
Select 'Pages' - 'Force to' - 'Front'.
Note:
The 'Preview' section displays the page with an icon that indicates the page is forced to
front.
108
Chapter 4 - The Document workspace
Force a page to the back side of a sheet
Force a page to the back side of a sheet
Introduction
The 'Force to back' command sets pages to the back side of a sheet.
You can also use the 'Force to back' command if your 'Document type' is 'Booklet'.
Force a page to the back side of a sheet
1. Select the page(s) you want to force to the back side of a sheet.
2. Click the 'Force page' drop-down button.
3. Select the 'Force to back' option.
Or
4. Select 'Pages' - 'Force to' - 'Back'.
Note:
The 'Preview' section displays the page with an icon that indicates the page is forced to
back.
Chapter 4 - The Document workspace
109
Do not force a page to any side of the sheet
Do not force a page to any side of the sheet
Introduction
The 'Force to none' command lets you remove the 'Force to front' or 'Force to back'
settings of the selected pages.
Do not force a page to any side of the sheet
1. Select the page(s) that are set 'Force to front' or 'Force to back'.
2. Click the 'Force page' drop-down button.
3. Select the 'Force to none' option.
Or
4. Select 'Pages' - 'Force to' - 'None'.
Note:
The side of the sheet on which the page(s) is/are printed depends on the settings of the
previous pages.
110
Chapter 4 - The Document workspace
Introduction
Define your document
Introduction
Introduction
During the 'Define your document' phase you define how your document should look
like.
At the end of this phase the layout of your document is correct.
Define your document
During the 'Define your document' phase, you can:
■ ‘Define the document properties’ on page 19 like title, owner and account.
■ ‘Define the document type’ on page 112.
■ ‘Assign media to pages’ on page 116.
■ Rotate pages on page 119.
■ Mark pages on page 120 to separate special pages (like pages with color) from other
pages.
■ ‘Specify the binding margin’ on page 118.
■ ‘Define the staple settings’ on page 122.
■ ‘Define the fold settings’ on page 125.
■ ‘Define the punch settings’ on page 124.
Chapter 4 - The Document workspace
111
Define the document type
Define the document type
Introduction
You can define the 'Document type' for your document. The 'Document type' is assigned
to the entire document.
This chapter describes the possible document types, their constrains and their settings.
This application offers additional settings for some document types. For example, a spine
caption is only possible for option 'Booklet' and option 'Perfect Binding'.
When you change the document type, the staple, fold and punch settings are set to 'None'.
Select a new staple setting for the changed document type.
Note:
There are constraints on page 128 for the document type.
This option is available via:
■ The button bar: click the button 'Document type'.
■ The menu: click 'Document' - 'Document type'.
Define the document type
1. Click the 'Document type' button in the button bar.
2. Select the document type on page 33.
3. Define the required settings for the document type, see ‘Settings for the document types’
on page 113.
The required settings can differ between the available document types.
4. Click the 'OK' button.
112
Chapter 4 - The Document workspace
Define the document type
Settings for the document types
#
Setting
Value
'Finisher'
Select the intended finisher for this document. By selecting the
intended finisher you can improve the preview of your document. In the 'Print' dialog, you decide to which finisher you
send your document.
Note:
The administrator configures which finishers are available.
'Binding edge'
The position of the binding edge determines how the pages are
printed on the paper. You can select the following options:
■ 'Left'
The document will be printed so that the pages of the produced document will turn over the left side of the paper.
■ 'Top'
The job will be printed so that the pages of the produced
document will turn over the top side of the paper.
'Staple'
You can select the following options:
■ 'None'
■ Staple pattern
Select a staple pattern that matches the capabilities of your
finisher.
■ 'Staple sections'
You can create stapled output groups for one or more sections. All pages of the concerning sections must be selected.
■ 'Other binding'
Select 'Other binding' to create output groups for off-line
finishing. For example, a group of pages must be glued.
Select 'Other binding' to enable jogging of unstapled pages
in the 'Print' dialog.
Note:
The option 'Staple sections' overrules any previously
assigned staples.
Chapter 4 - The Document workspace
113
Define the document type
Setting
Value
'Page size'
Define the 'Page size':
■ Use 'Keep page size' to keep the current page size for all
pages with the booklet layout. This means that if your current page size is A4, each page within your booklet layout
will be A4. In this case A3 sheet is used when you print the
booklet document.
■ Use 'Reduce page size' to resize the pages. This means that
if your current page size is A4, each page within your booklet
layout will become A5. In this case A4 sheets are used when
you print the booklet document.
'Cover'
You can select the following options:
■ 'Included in current document'
The cover is defined in the current document.
■ 'Not included in current document'
The cover is not defined in the current document. The
cover is added to the document in the Perfect Binding finisher.
Note:
When you enable option 'Not included in current
document', the 'Browse' button is enabled. You can
browse to a file which contains a cover.
114
Chapter 4 - The Document workspace
Define the document type
Setting
Value
'Create cover'
You can select the following options:
■ 'The cover has already been created'
You have defined which pages are used as a cover. The document is produced according to your page programmed
settings.
Note:
If you have enabled option 'Not included in current document' and you have browsed for a file:
The first page of the browsed file is used as outside cover.
The second page is used as inside cover, if this page has the
same media size as the first page.
■ 'The cover must be created'
The application defines a cover for you from the first two
pages and the last two pages of the document.
Note:
If you have enabled option 'Not included in current document' and you have browsed for a file:
The first two pages and the last two pages of the browsed
file are used as cover.
Chapter 4 - The Document workspace
115
Assign media to pages
Assign media to pages
Introduction
You can use one of the following methods to assign media to pages:
■ Select media from the Pick list on page 156. This is the quickest way.
■ Select media from the 'Document media' list.
■ Select media from the complete 'Media Catalog'.
The 'Media' button is used to assign media to the selected pages.
Note:
You can assign only one type of media to the selected page(s).
Messages
If you select media, several messages may be displayed:
■ You will not be able to assign 'Tab', 'Punched', 'Single sided', 'Cyclic' media:
- If your 'Document type' is 'Booklet', or
- If a fold setting on page 125 is applied to the whole document.
■ If your document has top binding, you will not be able to assign 'Tab' media to a page
with portrait orientation.
■ If your document has left binding, you will not be able to assign 'Tab' media to a page
with landscape orientation.
If the media size does not match the selected page(s) size, a separate dialog will appear:
■ If media size is larger than the current page size:
- 'Keep page size'. Use this option when you want to print the page on a larger media
size and cut it afterwards.
- 'Change page size' and do not 'Scale pages'
- 'Change page size' and 'Scale pages' (scale to fit to the new page size)
■ If the media size is smaller than the current page size:
- 'Change page size' and remove all page content along the border of the page.
- 'Change page size' and 'Scale pages' (scale to fit the page size to the new media size)
Note:
Due to certain constraints on page 128, it is not always possible to have different media
sizes in your document. If you change the media size of a page, a warning can appear.
You are asked if you want to convert all pages of the document to the new media size.
116
Chapter 4 - The Document workspace
Assign media to pages
Assign media using the Pick list
1. Select the page(s).
2. Click 'Pages' - 'Assign media'.
The media that you have added to the Pick list on page 156 will appear.
3. Select the media from the Pick list on page 156.
Note:
The 'Assign pick list media for folded sheets' setting in the application options on page
17 determines whether the pages or the selected sheets are affected.
Assign media using the Document media list
Note:
The 'Document media' list contains an overview of all media that is currently used in
your document. It is located above the Pick list on page 156 menu items. If the document
contains a media which is not defined in the media catalog, than this media is shown in
gray. This can occur when you have imported a document.
1. Select the page(s).
2. Click 'Pages' - 'Assign media'.
3. Select the media from the 'Document media' list.
Assign media using the Media catalog
1. Select the page(s).
2. Click 'Pages' - 'Assign media'.
3. Click 'From Media catalog...'
The 'Media Catalog' dialog will appear.
4. Select the media from the 'Media Catalog' and click 'Assign'.
Note:
You can select option 'Assign to whole sheet(s)' in the 'Media Catalog'. The selected
media is then assigned to all pages that are positioned to the same sheet(s) as the selected
page(s).
Chapter 4 - The Document workspace
117
Specify the binding margin
Specify the binding margin
Introduction
You can specify the binding margin that is used for your document.
Use this option to create additional white space along the binding edge.
Specify the binding margin
1. Select the pages for which you want to specify the binding margin.
2. Click the 'Margin' button.
Or
3. Click 'Pages' - 'Binding margin...'.
118
Chapter 4 - The Document workspace
Rotate the page
Rotate the page
Introduction
The 'Rotate pages' option allows you rotate the page(s).
The following options are available:
■ 'Rotate right'
Rotate the page(s) 90 degrees to the right.
■ 'Rotate left'
Rotate the page(s) 90 degrees to the left.
■ 'Rotate 180 degrees'
Rotate the page(s) 180 degrees.
All pages of the document are rotated:
- If the selected pages are part of a 'Booklet', or
- If a fold setting is applied to the whole document.
Note:
If the selected pages have 'Tab' media or have pages with sheet folds, you can only rotate
the pages 180 degrees.
This option is available via:
■ The button bar: click the drop-down button 'Rotate pages'.
■ The menu: click 'Pages' - 'Rotate'.
■ The context menu: right-click the selected page(s) and select option 'Rotate'.
Rotate a page
1. Select the page(s) that you want to rotate.
2. Click the 'Rotate pages' drop-down button.
3. Select the rotation that you want to apply.
The selected pages are rotated.
Note:
If the selected pages have 'Tab' media or have pages with sheet folds, you can only rotate
the pages 180 degrees.
Chapter 4 - The Document workspace
119
Mark or unmark a page
Mark or unmark a page
Introduction
You can mark or unmark pages. This allows you to:
■ Define pages as special pages.
■ Define pages as color pages.
You can process the marked pages separately from other pages of the document, for example:
■ Print only the marked pages, or do not print the marked pages.
■ Use inserts for the marked pages when you print your document.
■ Use a different tray for the marked pages when you print your document.
Note:
The option 'Mark color' allows you to automatically mark all color pages. You can then
print only the color marked sheets on a color machine.
These options are available via:
■ The button bar: click the drop-down button 'Mark pages'.
■ The menu: click 'Pages' - 'Mark'.
■ The context menu: right-click the selected page(s) and select option 'Mark'.
Mark a page
1. Select the page(s) to mark.
2. Click the 'Mark pages' drop-down button.
3. Click 'Mark on'.
The page(s) are marked.
Mark pages as color page
1. Click the 'Mark pages' drop-down button.
2. Click 'Mark color'.
3. The automatic color detection marks all pages that contain color.
Note:
If you want to unmark pages that were marked by the automatic color detection, use
option 'Mark off'.
120
Chapter 4 - The Document workspace
Mark or unmark a page
Mark pages as color pages with custom settings
1. See procedure ‘Mark color pages with custom settings’ on page 81.
Note:
This option is only available in the 'Pages' workspace.
Unmark a page
1. Select the page(s) to unmark.
2. Click the 'Mark pages' drop-down button.
3. Click 'Mark off'.
The mark is removed from all selected page(s).
Chapter 4 - The Document workspace
121
Define the staple settings
Define the staple settings
Introduction
The 'Staple' option allows you to define the staple settings for one or more pages.
Note:
There are constraints on page 128 for the staple settings.
These options are available via:
■ The button bar: click the drop-down button 'Staple'.
■ The menu: click 'Pages' - 'Staple'.
■ The context menu: right-click the selected page(s) and select option 'Staple'.
Define the staple settings
1. Select the page(s) for which you want to define a staple setting.
2. Click the drop-down button 'Staple' in the button bar.
3. Define the staple setting.
If possible, select a staple setting which matches the capabilities of your finisher. For example: 2 Edge staples left-edge (<your finisher>).
■ 'None'
■ Staple pattern
Select a staple pattern that matches the capabilities of your finisher.
■ 'Staple sections'
You can create stapled output groups for one or more sections. All pages of the concerning sections must be selected.
In the 'Staple sections' dialog you can define from which section level you want to
apply the staples.
The staples are applied to the selected level and deeper.
■ 'Other binding'
Select 'Other binding' to create output groups for off-line finishing. For example, a
group of pages must be glued.
Note:
The option 'Staple sections' overrules any previously assigned staples.
122
Chapter 4 - The Document workspace
Define the staple settings
Change the staple settings
1. Select any page or any part of an output group.
2. Define the new staple setting.
Note:
A partly selected output group is split.
Change the staple settings for output groups
1. Select the output groups where you want to apply staples.
2. Select a staple setting.
The 'Staple' dialog box appears.
3. Select option 'Merge current output groups' to create one output group from the selected
output groups. The new output group gets the defined staple setting.
Select the 'Keep current output groups' option if you want to keep the existing output
groups. All selected output groups get the defined staple setting.
Note:
Partly selected output groups are automatically split.
Chapter 4 - The Document workspace
123
Define the punch settings
Define the punch settings
Introduction
The 'Hole punch' option allows you to define the punch type for one or more pages.
Note:
There are constraints on page 128 for the punch settings.
These options are available via:
■ The button bar: click the drop-down button 'Punch'.
■ The menu: click 'Pages' - 'Hole punch'.
■ The context menu: right-click the selected page(s) and select option 'Hole punch'.
Define the punch settings
1. Select the page(s) for which you want to define a punch type.
2. Click the drop-down button 'Punch' in the button bar.
3. Define the punch type.
If possible, select a punch type which matches the capabilities of your finisher. For example:
2 Hole punch (<your finisher>).
Note:
A punch type, which is shown in gray, is in use in the document, but is not configured
in this application.
124
Chapter 4 - The Document workspace
Define the fold settings
Define the fold settings
Introduction
The 'Fold' option allows you to define the fold settings for one or more pages.
All fold types are applied on document level, except the 'Z-Fold'. The 'Z-Fold' is applied
on sheet level.
Note:
There are constraints for the fold types on page 128.
These options are available via:
■ The button bar: click the drop-down button 'Fold'.
■ The menu: click 'Pages' - 'Fold'.
■ The context menu: right-click the selected page(s) and select option 'Fold'.
Define the fold settings on sheet level
1. Select the page for which you want to define a fold type.
2. Right-click the selected page.
3. Define the desired sheet fold.
Note:
The 'Z-Fold' is the only fold type which is applied on sheet level.
Define the fold settings on document level
1. Click the drop-down button 'Fold' in the button bar.
2. Select a fold type on page 33.
Option 'No fold' removes all folds from the document. Each set of folded sheet(s) becomes
an output group.
Note:
All fold types are applied on document level, except the 'Z-Fold'. The 'Z-Fold' is applied
on sheet level.
3. Define the required settings for the fold type, see ‘Settings for the fold types’ on page 126.
The required settings can differ between the available fold types.
4. Click the 'OK' button.
Chapter 4 - The Document workspace
125
Define the fold settings
Folded and unfolded view in animations
1. Click 'View' - 'Folded view' in the menu bar.
Or move your mouse over the top or bottom of the page in the 'Preview' view. An arrow
becomes available. Click this arrow.
The 'Fold preview' dialog box appears.
2. Click button 'Fold' to view an animation of how the page(s) are folded in the finisher.
Click button 'Unfold' to unfold the page(s).
You can select the following options:
■ 'Outside of folded sheet'
The first page is visible for the reader when a single sheet is folded.
■ 'Inside of folded sheet'
The first page is visible for the reader when a single is unfolded.
Settings for the fold types
#
Setting
Value
'Finisher'
Select the intended finisher for this document. By selecting the
intended finisher you can improve the preview of your document. In the 'Print' dialog, you decide to which finisher you
send your document.
Note:
The administrator configures which finishers are available.
'Pages'
126
All fold types are applied on document level, except the 'ZFold'. The 'Z-Fold' is applied on sheet level.
Chapter 4 - The Document workspace
Define the fold settings
Setting
Value
'Print first page on' You can select the following options:
■ 'Outside of folded sheet'
The first page is visible for the reader when a single sheet is
folded.
■ 'Inside of folded sheet'
The first page is visible for the reader when a single is unfolded.
Note:
Both settings apply to every odd page in an output
group.
'Create output
groups'
You can select the following options for a multi fold setting:
■ 'Single output group'
The document is defined as one output group. This output
group is folded in its entirety.
■ 'pages per output group'
You define the number of pages per output group. Each
output group is folded separately.
Note:
No warning is reported when the total number of pages
in a document is not an integer multiple of the output
group size. In case of a mismatch, the last output group
contains fewer pages.
Chapter 4 - The Document workspace
127
Define the fold settings
Setting
Value
'Staple'
You can select the following options:
■ 'None'
■ Staple pattern
Select a staple pattern that matches the capabilities of your
finisher.
■ 'Staple sections'
You can create stapled output groups for one or more sections. All pages of the concerning sections must be selected.
■ 'Other binding'
Select 'Other binding' to create output groups for off-line
finishing. For example, a group of pages must be glued.
Note:
The option 'Staple sections' overrules any previously
assigned staples.
Constraints
1. There are constraints for certain settings to the document:
2. Example 1:
You have chosen the fold setting 'Tri-Fold In' for your document.
You want to add a 'Spine caption'.
Now, you must change the 'Document type' to 'Booklet'.
3. Example 2:
You have chosen the fold setting 'Multi Tri-Fold In' for your document. Your media size
is A4.
128
Chapter 4 - The Document workspace
Define the fold settings
You want to add two A3 sheets to your document, but you want to keep the same fold
setting.
Now, you must change the 'Document type' to 'Tri-Fold In'.
4. Example 3:
You have defined hole punch settings to a number of pages of your document.
You want to create a 'Booklet'.
The hole punch settings are removed.
Chapter 4 - The Document workspace
129
Set to default
Set to default
Introduction
The set to default command applies the default properties to the selected page(s). Document settings are not changed with this command.
Set to default
1. Click 'Pages' - 'Set to default'.
The following default properties are applied to the selected page(s):
#
Setting
Set to
When
Fold settings
'None'
All situations
'Hole punch' settings
'None'
All situations
'Force to front'
'Force to back'
'Force to none'
All situations
'Mark pages'
Off
All situations
'Binding margin'
0
All situations
'Media'
Default media based on
the page size of the selected page(s)
All situations
'1-sided'
'2-sided'
'2-sided'
All situations
'Page numbers'
Removed
All situations
'Staple' settings
'None'
■
■
'Document type'
130
'Normal'
Chapter 4 - The Document workspace
'Document type' = 'Normal'.
'Document type' = 'Multi
Half Fold' and all pages in
the output group are selected.
All pages are selected
Introduction
Enhance your document
Introduction
Introduction
During the 'Enhance your document' phase you enhance your document.
At the end of this phase you can print your document.
Enhance your document
During the 'Enhance your document' phase, you can:
■ Create and edit the Tab captions.
■ Create and edit the Spine caption.
■ Create and edit the page numbering.
Chapter 4 - The Document workspace
131
Create and edit the 'Tab captions'
Create and edit the 'Tab captions'
Introduction
Use the 'Tab captions' dialog to define the text on the tabs of the tab sheets in your document. The 'Preview' view shows how the tab captions are printed on the tabs.
You must create a group of tab captions for each different tab media that you use in your
document. You can define a maximum of 4 different tab groups.
Every tab media has a 'Cycle length'. The number of tabs shown at one time in the
'Preview' view is equal to the 'Cycle length' for this tab media.
The 'Cycle length' is defined in the 'Media Catalog' for every tab media.
For a correct position of the tab caption text you must define the 'Top / bottom indent'
in the 'Media Catalog'. The 'Top / bottom indent' is the distance between the top of the
tab media and the top of its first tab.
You can define all tab captions before you add the tab sheets to your document.
This option is available via:
■ The button bar: click the button 'Tab captions'.
■ The menu: click 'Document' - 'Tab captions'.
■ The preview view: double-click a tab in the 'Preview' view.
The tab caption dialog
The button bar of the tab caption dialog allows you to do the following:
■ 'Start set' or 'Continue set'
Use the 'Start set' button to start with a new set of tab sheets. The tab of the first tab
sheet is at the upper right corner in the case of portrait orientation. For landscape
orientation the first tab is at the bottom right corner.
For example, the tab set contains five tab sheets. Select the fourth tab caption. Click
the 'Start set' button. Then the selected tab caption becomes the first tab caption of
a new set of tab sheets. The unused tab sheets of the previous set - in this example the
tab sheets four and five - are discarded. Now, the tab captions continue on a new set
of tab sheets. The 'Start set' button changes into 'Continue set' for the first tab of the
new set of tab sheets. Push the 'Continue set' button to undo this action.
■ 'Delete'
Use this button to delete the selected tab caption.
The tab page in your document will not be removed.
■ 'Up' / 'Down'
Use these buttons to move the selected tab caption up or down.
■ 'Insert'
132
Chapter 4 - The Document workspace
Create and edit the 'Tab captions'
■
■
Use this button to insert a new tab caption before the selected tab caption.
'New group'
Use this button to create a new group of tab captions (if different tab media are used
within your document).
You can define a maximum of 4 groups.
'Delete group'
Use this button to delete the selected group of tab captions.
Create the tab captions
1. Click the 'Tab captions' button in the button bar.
The 'Tab captions' dialog box appears.
2. Select a row and enter the tab caption.
Note:
A tab caption can contain up to three lines of text.
3. Repeat step 2 to enter the text for the rest of the tab captions.
Configure the tab captions
1. Use the 'Media' drop-down list to select the media that you want to use for the tab
sheet(s). Push the 'New...' button to define new tab media (see ‘Configure the media catalog’
on page 156).
Note:
You can only select 'Tab' media here.
2. Use the 'Horizontal' and 'Vertical' options to align the tab captions.
3. Use the associated 'Margin' option to set the top distance and side distance of the caption
on the tab. The same value is used for the front side and the back side of the tab sheet.
4. Define the 'Orientation' of the tab caption.
Use the 'Print caption' option to specify whether the captions must also be printed on
the back side of the tab.
Use the 'Rotate 180 degrees' option to define the orientation of the caption on the back
side of the tab.
5. Click 'Font...' to select the font that must be used for the tab caption.
6. Click 'Color...' to select the color that should be used for the tab caption.
Chapter 4 - The Document workspace
133
Create and edit the 'Spine caption'
Create and edit the 'Spine caption'
Introduction
Use the 'Spine caption' dialog to define the text on the spine of your document.
Note:
You can create a spine caption only when your 'Document type' is 'Booklet'.
The spine caption is displayed in the 'Preview' view at the left or at the top of the first
page. This spine caption position depends on the binding of the document (see ‘Define
the document type’ on page 112).
The width of the spine caption depends on the number of pages in your document.
Create and edit the Spine caption
Click 'Document' - 'Spine caption' or double-click the spine caption in the 'Preview'
view.
The 'Spine caption' dialog box appears.
Spine caption settings#
134
Setting
Description
'Spine caption'
Defines the text for the spine caption. The spine caption can contain
up to three lines of text.
'Font...'
Click 'Font...' to select the font that must be used for the spine
caption.
'Color...'
Click 'Color...' to select the color that must be used for the spine
caption.
'Alignment'
Defines the alignment of the spine caption.
'Margin'
Use the 'Margin' option to set the distance of the spine caption from
the edge. The manual distance is relative to the defined 'Alignment'.
'Orientation'
Define the 'Orientation' of the spine caption.
Chapter 4 - The Document workspace
Create and edit the 'Page numbers'
Create and edit the 'Page numbers'
Introduction
You can add page numbering (including pre- and postfixes) to the pages. The 'Preview'
view shows you how the page numbers are printed on the pages.
This option is available via:
■ The menu: click 'Pages' - 'Page numbers'.
■ The preview view: double-click the page number area in the 'Preview' view.
Create and edit the page numbering
Page number settings#
Setting
Description
'Apply settings
to'
Specify whether the page numbers are added to the 'Whole document' or just to the 'Selected pages'.
'Page numbers'
Select:
■ 'None' if you want to disable page numbering.
■ 'Start at' to define the first page number to use for the page
numbering.
■ 'Continue from previous' page number.
'Numbering
method'
Specify whether you want to include page numbers on the 'Front
and back side' or on the 'Front side only'.
'Alignment'
'Front side'
Use your mouse to specify the location of the page number on the
front side of the sheet.
'Back side'
Use your mouse to specify the location of the page number on the
back side of the sheet.
'Margins'
Specify the horizontal and the vertical margins of the page number.
'Format'
'Number style'
Select the style that you want to use for the page numbers.
'Prefix'
Use this option to add a prefix to the page number, for example
'Page '.
'Suffix'
Use this option to add a suffix to the page number, for example '
of pages.'.
'Font...'
Click this button to select the font of the page numbers.
'Color...'
Click this button to select the color of the page numbers.
Chapter 4 - The Document workspace
135
Create and edit the 'Page numbers'
Setting
Description
'Preview'
The 'Preview' view shows you how the page numbers are printed
on the pages.
Delete the page numbers
You can delete all page numbers of your document in one action:
Click 'Pages' - 'Delete page numbers'.
136
Chapter 4 - The Document workspace
Chapter 5
The Print dialog
Introduction
Introduction
Introduction
During the 'Print' phase you route your document and optimize it for the printing process.
First you select the printer that you will use for the printing process. In case of color split,
you specify the 'Split and merge' settings. You define your job name and you can add an
operator note. The end result of this phase is a print job that is submitted to the selected
printer.
Note:
For some printers you must set the programmed settings to the capabilities of the selected
printer on page 150.
Optimize
You can optimize the printing process by specifying the extended print settings:
■ 'Media'
- Print one media at a time.
- Rename media for easy recognition of job partitions.
■ 'Imposition'
- Select how many of the same images you want to print on one side of the sheet.
- With a 'Bleed area' you can print to the edge of the paper.
- Add trim and fold marks.
■ 'Finishing'
- Optimize the output stack for subsequent finishing.
- Define the output stack options for off-line finishing.
- Select a specific printer output location.
■ 'Image'
- Specify the printer resolution.
- Select color conversion for black & white mapping.
138
Chapter 5 - The Print dialog
Buttons
Buttons
Introduction
The 'Print' dialog contains buttons that allow you to restore the default settings, restore
the settings last used, save the settings and submit or cancel your print job.
Buttons
Buttons#
Button
Description
'Defaults'
Click this button to restore the default print settings.
'Last used'
Click this button to restore the print settings last used.
'Save'
Click this button to save the specified print settings.
Note:
If your document has not been saved before you print, this
setting is disabled.
'Print'
Click this button to print the job.
The 'Print' dialog is then closed.
'Test print'
Click this button to make one test print of the job.
The 'Print' dialog remains open.
'Cancel'
Click this button to cancel printing and close the 'Print' dialog.
Chapter 5 - The Print dialog
139
Select a printer
Select a printer
Select a printer
Introduction
This topic shows you how to select the printer and configure the printer related settings.
Select a printer
1. Click 'File' - 'Print' to open the 'Print' dialog, or
Click the 'Print' button in the button bar.
2. Select the 'Printer' that you want to send your document to.
3. For a color document, you can change the printing preferences of the printer driver.
Click the 'Printing preferences' button behind the selected printer.
Define the color and image settings for the color printer.
Note:
The administrator configures if this button is available.
4. Specify the 'Job name'.
Note:
By default, the PDF file name is used.
5. Specify the 'Number of sets'.
6. With the 'Destination' setting you can send the document to a printer queue.
The job is printed immediately if no queues are configured.
Note:
The 'Destination' setting can be fixed. It is then always used for this printer.
7. Specify the 'Operator note'.
Note:
The 'Operator note' is displayed on the operator panel, if your printer supports this
functionality.
8. Select the 'Print range'.
140
Chapter 5 - The Print dialog
Split and merge
Split and merge
Introduction
This topic shows you how to specify the split and merge settings for your job.
Note:
When you select option 'Split', the document is printed without any finishing settings.
Split and merge
■
■
■
'None'
The document is printed on one printer.
'Split'
This setting will only print the marked (color) sheets.
If one side of a sheet is a color page, then the complete sheet is printed on a color
printer.
'Merge'
This setting will print your document and insert the marked (color) sheets at the right
place in the document.
When you select the 'Split' or 'Merge' option, you can select:
■ 'Use separate paper trays'
Select this option to allocate a separate paper tray for each type of insert sheet.
So, if you have five different insert sheets in your document, you need at least six paper
trays. One paper tray for the normal paper and five paper trays for the insert pages.
If you do not select this option, the different insert sheets must be put in one paper
tray.
So, if you have two different insert sheets, then put the insert sheets cyclic (1-2, 1-2,
...) in one paper tray.
Chapter 5 - The Print dialog
141
Define the extended print settings
Optimize the printed document
Define the extended print settings
Introduction
Click 'File' - 'Print...' to open the 'Print' dialog. The 'Print' dialog contains a section for
basic print settings and a section for extended print settings. This topic gives you an
overview of the extended print settings
Define the extended print settings
The extended print settings section contains the following tabs:
■ Media on page 143
■ Imposition on page 144
■ Finishing on page 147
■ Image on page 149
142
Chapter 5 - The Print dialog
Define the Media settings
Define the Media settings
Introduction
This topic describes the 'Media' settings.
Define the 'Media' settings
'Media'#
Setting
Description
'Media'
All media that is used within your document is displayed here.
Use the selection-box to specify the media that you want to print.
This allows you to print your job in multiple batches and combine
the job afterwards.
Note:
The media name is displayed on the operator panel, if your
printer supports this functionality.
Chapter 5 - The Print dialog
143
Define the Imposition settings
Define the Imposition settings
Introduction
This topic describes the 'Imposition' settings.
The 'Imposition' tab allows the user to modify the position of the page content on a
sheet.
Define the 'Imposition' settings
'Imposition'#
Setting
Description
'Sheet size'
■
■
'Sheet size':
You can change the 'Sheet size' of your document here. This
sheet size is applied to the whole document.
'Custom':
Select 'Custom' if you want to create a custom sized sheet size
with the 'Width' and 'Height' settings.
The 'Portrait' and 'Landscape' settings allow you to specify the sheet
orientation.
Note:
The 'Sheet size' option is disabled if your document contains
different media sizes.
144
Chapter 5 - The Print dialog
Define the Imposition settings
Setting
Description
'Same-up'
Select how many images you want to print on one side of the sheet.
■ '1':
One image.
■ 'Maximum':
The application calculates the maximum number of images that
fit on one side of the sheet. For example, two A4 images on one
A3 sheet.
The calculation takes several settings into account. For example,
only one A4 image on one A3 sheet if a bleed area is needed.
■ 'Custom':
Define the number of images yourself with the 'Horizontal' and
'Vertical' settings.
Enable option 'Binding edge outside' to rotate the image on the
sheet 180 degrees.
For example, use this option when prepunched paper is used with
the punched holes on both ends of the paper.
Note:
You can only select option 'Binding edge outside' if 'Sameup' is ' 2'.
'Gutter'
■
■
'Horizontal
position'
Define the distance between the images on the sheet with the
'Horizontal' and 'Vertical' settings.
With a 'Bleed area' you can print to the edge of the paper. Use
this option if your job has a colored background.
The 'Bleed area' refers to the area that is trimmed off when your
job is printed and cut to the finished size. This bleed area should
not contain text or other important information. The bleed area
is 3 mm.
Use this setting to move the image(s) horizontally to one side of the
sheet.
Note:
If you want to shift the cover of a 'Booklet' to the right, you
need a negative horizontal shift. This is because a cover is
actually the back side of a sheet.
'Vertical position'
Use this setting to move the image(s) vertically to one side of the
sheet.
Chapter 5 - The Print dialog
145
Define the Imposition settings
Setting
Description
Trim and fold
marks
Use this setting to add trim and fold marks to your document. These
marks indicate where to trim and/or fold the printed sheets.
'Creep compensation'
Use 'Creep compensation' to make sure that the margins on all pages
are equal after the booklet is folded and trimmed.
'Creep compensation' also compensates for the change of distance
between the page content and the spine of the booklet.
The 'Creep compensation' factor is calculated from the 'Thickness'
of the paper (see ‘Configure the media catalog’ on page 156).
For example:
You have 30 sheets, which you fold to make a booklet. The sheets
in the middle of the booklet stick out compared with the cover of
the booklet. When you trim the sheets that stick out, the distance
between the page content and the sheet edges is changed.
This means that the page content creeps towards the edge of the
sheets due to the trim action.
Note:
The 'Thickness' of the used media must be defined when
you enable option 'Creep compensation'.
'Gain':
146
With the 'Gain' option you can increase or decrease the calculated
'Creep compensation' factor.
Chapter 5 - The Print dialog
Define the Finishing settings
Define the Finishing settings
Introduction
This topic describes the 'Finishing' settings.
Define the 'Finishing' settings
'Finishing'#
Setting
Description
'Finishing'
You can overrule the defined finishing settings in the document,
without loosing the original finishing settings.
■ 'As in document'
Print the document with the original finishing settings.
■ 'No finishing'
Print the document without any finishing settings.
■ '1 staple'
Print the document with 1 staple, but without any fold and
punch settings.
■ '2 staples'
Print the document with 2 staples, but without any fold and
punch settings.
For example, you make a test print with option '1 staple'. The document is printed with 1 staple, but without any fold and punch
settings.
Then you select option 'As in document' and print again. The
document is printed with the original finishing settings as defined
in the application.
'Sort'
You can specify the sorting method:
■ 'By set'
The pages of a job will be sorted in the order 123, 123, 123.
■ 'By page'
The pages of a job will be sorted in the order 111, 222, 333.
Chapter 5 - The Print dialog
147
Define the Finishing settings
Setting
Description
'Offset stacking'
You can select:
■ 'Off'
The job is stacked in the 'Output location' as one straight stack.
■ 'By set'
The job is stacked in the 'Output location' with a small offset
between each set.
■ 'By Finishing group'
The job is stacked in the 'Output location' with a small offset
between each finishing group. You have defined these finishing
groups in the 'Document' workspace.
'Output location'
Depending on the configured output locations and the selected
printer, you can select an available 'Output location'.
'Output location for unused cyclic media'
Any unused cyclic media, such as tab media, is deposited in an
'Output location'.
Depending on the configured output locations and the selected
printer, you can select an available 'Output location'.
'Rotate 180
degrees'
The 'Output location' of a job can be an 'External finisher'. Some
external finishers require a 180 degree rotation of the jobs before
the jobs go into the external finisher. The documentation of the
external finisher describes how a job must go into the external finisher.
If a 180 degree rotation is required, you select this setting.
'Reverse order'
By default, the first sheet of the job is delivered first.
When you select the 'Reverse order' setting, the last sheet of the job
is delivered first.
Example
Normal order: 1-2 3-4 5-6 7-8 9-10
'Reverse order': 10-9-8-7-6-5-4-3-2-1
'Swap pages'
Use this setting to turn the pages in the 'Output location'.
Example
Normal order: 1-2 3-4 5-6 7-8 9-10
'Swap pages': 2-1 4-3 6-5 8-7 10-9
Note:
'Swap pages' & 'Reverse order': 9-10-7-8-5-6-3-4-1-2
'First sheet to
end'
148
Select this setting if you want to move the first sheet to the end of
the job. You can use this setting, for example, if the first A3 sheet
is used as a cover sheet for the rest of the A4 job.
Chapter 5 - The Print dialog
Define the Image settings
Define the Image settings
Introduction
This topic describes the 'Image' settings.
Define the 'Image' settings
Image#
Setting
Description
'Resolution'
Select the resolution that is used by your printer.
Note:
The print quality that you can select depends on the printer.
'Color management'
You can select whether the color to grayscales conversion is done
by the printer or by the application.
'Overprint
simulation'
Adobe Acrobat handles the overprint simulation when you enable
the 'Overprint simulation' setting.
Note:
Use this setting for color printers.
Chapter 5 - The Print dialog
149
Introduction
Page programmed settings vs. printer
capabilities
Introduction
Introduction
You can send documents with page programmed settings to any printer. However, some
printers cannot process all programmed settings. In such a case a printer window appears.
With the printer window you can set the programmed settings to the capabilities of the
selected printer.
Note:
Certain page programmed settings can be lost when the printer does not have the capabilities to process these programmed settings.
Match the programmed settings to the printer capabilities
1. Map the media types on page 151
2. ‘Define the print settings’ on page 154
150
Chapter 5 - The Print dialog
Map media types
Map media types
Introduction
This application supports tray-oriented and media-type-oriented printers.
In the map media area of the printer window, the media types used in the document can
be mapped on trays or media types which are supported by the printer.
The map media area
The map media area contains 2 columns:
Map media columns#
Column
Description
Media in document
Displays the media used in the document.
Use this
Displays the media or tray that is assigned.
A marked sheet is defined as a separate media type. When various marked sheets have
the same media properties, then these sheets are defined as the same media type.
For example, there are five marked sheets. Three marked sheets have paper size A4 and
the paper color is red. These three sheets are defined as the same media type. The other
two marked sheets have paper size A3 and A5. Each of these sheets is defined as a separate
media type.
In the column Media in document, icons give feedback about warnings and errors which
are related to media types. The following icons are used:
Feedback icons#
Icon
Description
Media property cannot be processed by the printer.
Media property is not completely recognized by the printer.
Chapter 5 - The Print dialog
151
Change / map assigned trays in tray-based printers
Change / map assigned trays in tray-based printers
Introduction
This procedure shows you how to change the assigned trays in the tray-based printers.
You can select the trays in the use this column in the map media area.
Change / map assigned trays in the tray-based printers
1. Click the 'Print job' button.
The Print dialog appears.
2. Select a tray-based printer.
3. Click the 'Print' button.
The printer window opens.
4. Select a tray in the 'Use this' column for each media type.
5. Click the 'OK' button.
152
Chapter 5 - The Print dialog
Change / map assigned media definitions in media-based printers
Change / map assigned media definitions in media-based
printers
Introduction
This procedure shows you how to change the assigned media definitions for media-based
printers.
You can change the assigned media definitions in the use this column in the map media
area.
When you select 'Other' as the media type, the 'media type' window opens.
Change / map assigned media definitions in media-based printers
1. Click the 'Print job' button.
The Print dialog appears.
2. Select a media-based printer.
3. Click the 'Print' button.
The printer window opens.
4. Select 'Other...' in the 'Use this' column.
The 'media type' window opens.
5. Define the settings of the media type.
Click the 'OK' button.
Chapter 5 - The Print dialog
153
Define the print settings
Define the print settings
Introduction
You can define the Print settings of the document.
Define the printer driver settings
1. Click 'Properties' in the 'Print settings' area of the printer module.
The printer driver opens.
2. You can change the print options in the printer driver. For example, the number of copies.
Note:
The settings in the printer driver that interfere with the page program settings can result
in unpredictable print results.
154
Chapter 5 - The Print dialog
Chapter 6
Manage the media catalog
Configure the media catalog
Configure the media catalog
Introduction
This application offers a default 'Media Catalog' which contains the most used media
types. You can assign the media to selected pages.
This topic shows you how to add, edit and delete media within the 'Media Catalog'.
You can add media to the Pick list on page 158. The 'Pick list' is a subset of the 'Media
Catalog'. It allows quick assignment of media to selected pages without having to open
the 'Media Catalog'.
Click on a column header to sort the 'Media Catalog'. You can sort ascending and descending.
Drag the separators to change the width of the columns.
Add media to the Media catalog
1. Click 'Tools' - 'Media catalog...'.
The 'Media Catalog' dialogue will appear.
2. Click 'New'.
The 'New media' dialogue will appear.
3. Enter the media 'Name'.
4. Specify the media 'Size'.
The media sizes like 'A4' and 'Letter' are available here. If you select one of the default
sizes the 'Width' and 'Height' are displayed automatically.
To create a 'Custom' media size, change the 'Width' and 'Height'. In that case, the media
size will indicate 'Custom'.
Note:
Due to tolerances of the paper size, some custom sizes will be mapped on standard media
sizes. See the preview view at the bottom of the dialog.
5. Select 'Insert' if the media is used for an insert.
6. Select 'Tab' if the media is used for a tab.
Use the 'Top / bottom indent' setting to specify the distance of the tab from the top of
the sheet.
7. Select 'Cyclic' if the media is part of a set (for example a set of tabs).
Use the 'Cycle length' setting to specify the number of media within the set.
8. Specify the media 'Weight'.
For example '80 g/m2' for A4 and '16 lb bond' for Letter.
156
Chapter 6 - Manage the media catalog
Configure the media catalog
9. Select the media 'Type'.
For example 'Plain', 'Glossy', or 'Transparent'.
10. Select the media 'Color'.
For example 'White', 'Green' or 'Orange'.
11. Select 'Punched' if the media is punched media.
Use the 'Punch pattern' setting to define the number, the shape and the size of holes in
the punched media.
Select the correct punch pattern for pre-punched media to improve the preview of your
document.
12. Select 'Single sided' if this media can only be used on one side.
13. Select 'Preprinted' to indicate that the media is pre-printed (for example with a company
logo).
14. Specify the media 'Thickness'.
This media thickness is used to determine the default 'Creep compensation' in case of
Booklets.
Note:
The 'Preview' section gives you a rough overview of the specified media.
15. Click 'OK' to add the media to the 'Media Catalog'.
Note:
It is not mandatory to specify the name, weight, type, and color.
If the specified media already exists in the 'Media Catalog' you will not be able to add
it again.
Edit media within the Media catalog
1. Click 'Tools' - 'Media catalog...'.
The 'Media catalog' dialog will appear.
2. Select the media that you want to edit.
3. Edit the media properties and click 'OK' to save the changes.
Note:
If the specified media already exists in the 'Media catalog' you will not be able to add it
again.
If you edit the media properties in the 'Media catalog', it will not change the properties
of that media in case it is already used in your document.
Chapter 6 - Manage the media catalog
157
Configure the media catalog
Delete media from the Media catalog
1. Click 'Tools' - 'Media catalog...'.
The 'Media catalog' dialog will appear.
2. Select the media that you want to delete.
3. Click 'Delete' to delete the media from the 'Media catalog'.
Note:
If you delete media from the 'Media catalog', it will not delete that media from your
document (in case it is used in your document.)
Add temporary media to the 'Pick list'
1. Click 'Tools' - 'Media catalog...'.
The 'Media catalog' dialog will appear.
2. Select the check-box in front of the media to add the media to the 'Pick list'.
158
Chapter 6 - Manage the media catalog
Export the media catalog
Export the media catalog
Introduction
You can export the media catalogue directly to a printer or to an XML file.
A message is shown when a printer does not support the export, or merge, of a media
catalogue file.
You cannot export an empty media catalog.
Export the media catalogue to the printer(s)
1. Click 'Tools' - 'Export media catalog'.
The 'Export media catalog' dialog box appears.
2. Select the 'Export to printers' option.
3. Select the printer(s).
These printer(s) receive the media catalog of this application.
Note:
The administrator configures which printers are available to you. The administrator also
configures which printers can import the media catalog.
4. You can select the following options:
■ 'Merge with the existing media catalog'
Merge the media catalog of the printer with the media catalog of this application.
■ 'Replace the existing media catalog'
Replace the media catalog of the printer with the media catalog of this application.
Note:
The administrator configures which printers support this functionality.
5. Select the media for the 'Banner page'.
6. Select the 'Default front cover'.
With this option you define the default front cover in the media catalog of the printer.
7. Select the 'Default back cover'.
With this option you define the default back cover in the media catalog of the printer.
8. Click the 'Export' button.
Note:
The controller of the printer must be switched on during the export of the media catalog.
Chapter 6 - Manage the media catalog
159
Export the media catalog
Export the media catalog to an XML file
1. Click 'Tools' - 'Export media catalog'.
The 'Export media catalog' dialog box appears.
2. Select the 'Export to file' option.
3. For option 'Format' you can select the following values:
■ 'Application file'
A copy is made of the XML file which contains the media catalog of this application.
Use this format when you want to configure other installations of this application.
■ 'Printer file'
An XML file is created that contains the media catalog of this application.
Note:
It is recommended to use option 'Export to printers' instead of creating an XML file with
format 'Printer file'.
Note:
Use the 'Settings Editor' to import an XML file with format 'Printer file' into the printer.
You cannot use the XML file with format 'Printer file' in the load the media catalog on
page 161 scenario.
4. Select the 'Default front cover'.
With this option you define the default front cover in the media catalog file.
5. Select the 'Default back cover'.
With this option you define the default back cover in the media catalog file.
6. Click the 'Export' button.
160
Chapter 6 - Manage the media catalog
Load the media catalog
Load the media catalog
Introduction
You can load the media catalog file.
The media catalog file must be created with the ‘Export the media catalog to an XML file’
on page 160 scenario.
Note:
The XML file must have format 'Application file', see ‘Export the media catalog to an
XML file’ on page 160.
Load the media catalog
1. Click 'Tools' - 'Load media catalog'.
The 'Load media catalogue' dialog appears.
2. Click the 'Browse...' button.
3. Browse to the media catalog file.
The media catalog file is an XML file.
4. Click 'OK'.
Chapter 6 - Manage the media catalog
161
Index
Index
1-sided
1-sided ...................................................86, 106
2-sided
2-sided ...................................................86, 107
A
Account
Account ..........................................................19
Addressee
Addressee ........................................................19
After
After ......................................................57, 105
Align
Align ...............................................................67
Alignment
Alignment ..................................132, 134, 135
Allocate pages
Allocate pages .................................................97
Application options
Application options ........................................17
Area selection
Area selection ..................................................76
Area selection tools
Area selection tools .........................................76
Assign media
Assign media ..........................................86, 116
Assigned media
change ..........................................................153
map ..............................................................153
Assigned trays
change ..........................................................152
map ..............................................................152
B
Back
Back .............................................................109
Back side
Back side ......................................................135
Banner message
Banner message ..............................................19
Before
Before ....................................................57, 105
Binding edge
162
Binding edge ..................................................86
Left ..............................................................112
Top ..............................................................112
Binding margin
Binding margin ......................................86, 118
Blank after
Blank after ......................................................98
Blank before
Blank before ...................................................98
Blank sheet
Blank sheet .....................................................98
Booklet
Booklet ..................................................86, 134
Button bar
Button bar ......................................................86
Buttons
Buttons ........................................................139
C
Clean-up
Clean-up ........................................................40
Clean-up a scanned page
Clean-up a scanned page .................................58
Clear list
Clear list .........................................................17
Close
Close ..............................................................10
Collapse all groups
Collapse all groups ...................................44, 88
Collect
Collect ............................................................51
Collect pages
Collect pages ...................................................51
Color
Color ...................................................132, 135
Color sheets
Color sheets ..................................................141
Column headers
Hole punch ....................................................88
Media .............................................................88
Output group .................................................88
Page size ...................................................44, 88
Section .....................................................44, 88
Continue from previous
Continue from previous ...............................135
Continuous pages view
Continuous pages view ...................................93
Preview view ...................................................91
Correct
Index
Correct ...........................................................69
Correct pages
Correct pages ..................................................69
Cover
Document type ............................................112
Create output groups
Pages per output groups ...............................125
Single output groups ....................................125
Creation date
Creation date ..................................................19
Cut
Cut ........................................................57, 105
Cut pages
Cut pages ...............................................57, 105
Cyclic media
Cyclic media .................................................156
D
Default back cover
Default back cover ........................................159
Default front cover
Default front cover .......................................159
Default media size
Default media size ..........................................17
Defaults
Defaults ........................................................139
Define
Print settings ................................................154
Define your document
Define your document .................................111
Delete
Delete .............................................56, 86, 104
Delete blank sheets
Delete blank sheets ................................56, 104
Delete caption
Delete caption ..............................................132
Delete page numbers
Delete page numbers ....................................136
Delete pages
Delete pages ...........................................56, 104
Deskew
Deskew ...........................................................64
Despeckle
Despeckle .......................................................62
Destination
Destination ..................................................140
Document media list
Document media list ....................................116
Document properties
Document properties ......................................19
Document type
Document type ...............................................86
Booklet ...........................................................34
Normal ...........................................................33
Perfect binding ...............................................34
Document types
Settings ........................................................113
Drag
Drag ...............................................................93
Drag and drop pages
Drag and drop pages .......................................88
E
Enhance your document
Enhance your document ...............................131
Erase
Erase ...............................................................66
Exit
Exit .................................................................14
Expand all groups
Expand all groups ....................................44, 88
Extended print settings
Extended print settings .................................142
External application
External application ........................................16
External PDF file
External PDF file ...................................52, 100
F
Facing pages view
Facing pages view ...........................................93
Finishing
Finishing ........................................................86
Fold type
Gate Fold .......................................................36
Half Fold ........................................................37
Long Fold .......................................................37
Multi Half Fold ..............................................37
Multi Tri-Fold In ...........................................34
Parallel Fold ....................................................36
Simple Gate Fold ............................................36
Tri-Fold In .....................................................34
Tri-Fold Out ..................................................35
Z-Fold ............................................................35
Fold types
Constraints ...................................................128
Settings ........................................................126
163
Index
Folded pages view
Folded pages view ...........................................93
Folded view
Folded view ..................................................125
Font
Font ...........................................132, 134, 135
Font color
Font color ....................................................134
Force to
Force to ..........................................................86
Force to back
Force to back ................................................109
Force to front
Force to front ........................................86, 108
Force to none
Force to none .........................................86, 110
Force to rear
Force to rear ...................................................86
Front
Front ............................................................108
Front side
Front side .....................................................135
G
general shortcut keys
general shortcut keys .......................................20
Job queue
Job queue .....................................................140
K
Keyboard selection in check boxes
Keyboard selection in check boxes ..................27
Keyboard selection in date/time
Keyboard selection in date/time ......................28
Keyboard selection in drop-down boxes
Keyboard selection in drop-down boxes ..........26
Keyboard selection in edit boxes
Keyboard selection in edit boxes .....................25
Keyboard selection in lists
Keyboard selection in lists ...............................24
Keyboard selection in radio buttons
Keyboard selection in radio buttons ................27
Keyboard selection in slider
Keyboard selection in slider ............................27
keyboard shortcut keys
keyboard shortcut keys ...................................20
Keyboard shortcuts in main window
Keyboard shortcuts in main window ...............22
Keyboard shortcuts in main/context menus
Keyboard shortcuts in main/context menus .....22
Keyboard shortcuts in secondary windows
Keyboard shortcuts in secondary windows ......23
I
L
Icons
Icons ...............................................................29
Feedback ..................................................44, 88
Import
Import ............................................................16
Insert
Insert .....................................................52, 100
Insert blank sheet(s)
Insert blank sheet(s) ........................................98
Insert location
Insert location ........................................52, 100
Insert pages
Insert pages ............................................52, 100
Insert sheet
Insert sheet .....................................................86
Last saved version
Last saved version ...........................................13
Last used
Last used ......................................................139
J
Job name
Job name ......................................................140
164
M
Map
media types ..................................................151
Margin
Margin .......................................118, 132, 134
Mark
Mark ..............................................................86
Mark pages
Mark pages ......................................79, 81, 120
Color .....................................................79, 120
Color advanced ...............................79, 81, 120
Mask
Mask ........................................................40, 76
Mask disappears during clean-up
Index
Mask disappears during clean-up ....................58
Measurement settings (mm or inch)
Measurement settings (mm or inch) ...............18
Media
Delete ...........................................................156
Edit ..............................................................156
New .............................................................156
Media catalog
Media catalog ......................................116, 156
Application file .............................................159
Export ..........................................................159
Load .............................................................161
Printer file ....................................................159
Media color
Media color ..................................................156
Media definitions
Media definitions .........................................153
Media weight
Media weight ...............................................156
Media-based printers
Media-based printers ....................................153
Merge
Merge ...........................................................141
Messages
Messages .......................................................116
Missing fonts
Missing fonts ..................................................10
Move
Move .....................................................57, 105
Move pages
Move pages ............................................57, 105
N
None
None ............................................................110
Number of sets
Number of sets .............................................140
Number style
Number style ................................................135
Numbering method
Numbering method ......................................135
O
Open
Open ..............................................................10
Open recent
Open recent ....................................................10
Operator note
Operator note ...............................................140
Options
Options ..........................................................17
Orientation
Orientation .........................................132, 134
Owner
Owner ............................................................19
P
Page numbers
Add ..............................................................135
Delete ...........................................................135
Page properties
Current document .................................54, 102
Inserted file(s) ........................................54, 102
Page selection
Page selection ...........................................44, 88
Page size
Page size .........................................................70
Keep page size ..............................................112
Reduce page size ...........................................112
Pages workspace
Pages workspace ..............................................40
Paper trays
Paper trays ....................................................141
Paste
Paste ......................................................57, 105
Paste pages
Paste pages .............................................57, 105
PDF
PDF ...............................................................10
Pick list
Pick list .........................................17, 116, 156
Pre-printed
Pre-printed ...................................................156
Prefix
Prefix ............................................................135
Preview
Preview .........................................70, 132, 135
Preview view
Area selection tool ..........................................46
Blank sheet .....................................................90
Drag tool ........................................................46
Empty sheet side .............................................90
Feedback icons ...............................................90
Fold lines ........................................................46
Folded and unfolded view ...............................90
Footer .............................................................90
Hole punch ....................................................46
165
Index
Invert selected area ..........................................46
Mirrored stacked view ....................................46
Next page .......................................................46
Page Ids ..........................................................90
Page numbers .................................................90
Previous page ..................................................46
Punches ..........................................................90
Rectangle selection tool ..................................46
Rulers and guidelines ......................................46
Select page ......................................................46
Show content outside of page .........................46
Single page view ..............................................46
Spine caption ..................................................90
Stacked view ...................................................46
Tabs ...............................................................90
Zoom .............................................................46
Print
Print .............................................86, 139, 140
Print caption
Print caption ................................................132
Print dialog
Print dialog ..................................................138
Print first page on
Inside of folded sheet ....................................125
Outside of folded sheet .................................125
Print range
Print range ...................................................140
Printer capabilities
Printer capabilities ........................................150
Printing preferences
Printing preferences ......................................140
Punched
Punch pattern ...............................................156
R
Rasterize
Rasterize .........................................................59
Recent files
Recent files .....................................................17
Recently used file list
Recently used file list ......................................17
Redo
Redo ...............................................................15
Remove
noise ...............................................................62
objects ............................................................62
Replace
Replace ..................................................54, 102
Replace pages
166
Replace pages .........................................54, 102
Revert to last saved
Revert to last saved .........................................13
Rotate
Rotate ......................................................40, 86
Rotate 180 degrees
Rotate 180 degrees ........................78, 119, 132
Rotate left
Rotate left ..............................................78, 119
Rotate page
Rotate page ............................................78, 119
Rotate right
Rotate right ...........................................78, 119
S
Save
Save .......................................................12, 139
Save as
Save as ............................................................12
Scale
Scale .........................................................40, 74
Scale page content
Scale page content ..........................................74
Scanned page
Scanned page ..............................62, 64, 66, 67
Sections
Sections ....................................................49, 95
Select pages
Select pages .....................................................93
Set to default
Set to default ................................................130
Shift
Shift .........................................................40, 72
Shift margin
Shift margin .................................................118
Shift page
Shift page .......................................................70
Shift page content
Shift page content ...........................................72
shortcut keys
shortcut keys ...................................................20
Show section levels
Show section levels ...................................50, 96
Single sided
Transparent ..................................................156
Size
Size ..........................................................40, 70
Special instruction
Special instruction ..........................................19
Index
Spine caption
Spine caption ...............................................134
Split
Split ................................................40, 77, 141
Split page
Split page ........................................................77
Staple
Document type ............................................112
Fold ..............................................................125
Staple settings
Staple settings ...............................................122
Start at
Start at .........................................................135
Structure view
Document workspace .....................................88
Pages workspace ..............................................44
Subsections
Subsections ..............................................49, 95
Suffix
Suffix ............................................................135
Supported printers
Supported printers ........................................138
Unmark pages
Unmark pages .................................79, 81, 120
Use separate paper trays
Use separate paper trays ................................141
Z
Zoom
Zoom .............................................................93
T
Tab
Top / bottom indent ....................................156
Tab captions
Tab captions ..........................................86, 132
Tab captions style
Tab captions style .........................................132
Tab group
Tab group ....................................................132
Tab set
Tab set .........................................................132
Test print
Test print .....................................................139
Title
Title ...............................................................19
Tools
Tools ..............................................................16
Tray-based printers
Tray-based printers .......................................152
U
Undo
Undo ..............................................................15
Unfolded pages view
Unfolded pages view .......................................93
167
Beyond the Ordinary
o
Printing for
Professionals
Océ helps the people who make our world. Companies
everywhere use Océ technical documentation systems in
manufacturing, architecture, engineering and construction. High speed Océ printing systems produce millions
of transaction documents each week, such as bank
statements and utility bills. And in offices around the
world, people use Océ professional document systems
to keep the wheels of business and government turning.
Océ is also at work in publishing on demand, newspaper
production and wide format colour for spectacular display graphics.
More information
Visit us at www.oce.com