1
1COUV 23690216-5.fm Page 1 Mardi, 11. décembre 2001 3:46 15
7(/(&20
3KRQHI#[70 606
####
User’s manual
2COUV 23690216-5.fm Page 2 Mardi, 11. décembre 2001 3:47 15
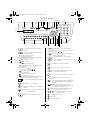
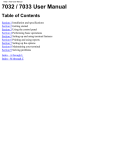
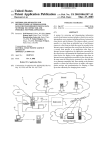
2YHUYLHZ
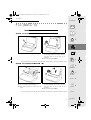
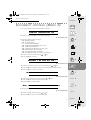
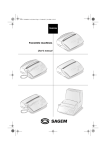
3KRQHID[606##
Access door to paper and
document feeders
or
3KRQHI#[606##
Handset
Paper tray
Document feeder
Handset
Rear cover
Rear cover
Control panel
Control panel
Front cover
Front cover
Handset connector
Telephone line connector
3KRQHI#[606##
or
DECT kit module
connector
3KRQHI#[606##
DECT kit module
connector
Légende 23690216-5.fm Page 3 Mardi, 11. décembre 2001 3:47 15
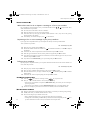
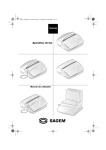
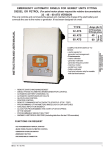
&RQWUROSDQHO
1
2
4
6 3
5
12
8 9 10 11
7
SMS
26
@
25
22
24
23
16
1
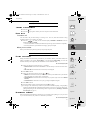
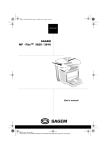
: key to print received documents from the
14
: key to play back messages received on the
6
answering machine
• flashing: new messages received
• on: message stored in memory
LCD screen made of 2 lines of 16 characters and 10 icons
Choice of fax transmission resolution
•
(Fine): fine icon
•
(Photo): photo icon
Line icon
:
• on: fax communication in progress
• flashing: for communication or phone communication
being established
Memory status (0 to 4 )
7
Choice of reception mode (
3
4
5
•
):
icon (TEL): telephone in use
Flashing icon: mute ring
•
8
icon (FAX): automatic fax reception
icon (TAD): TAD in service
Flashing icon: answering machine greeting message not
recorded or answering machine memory full.
SMS key: to send an SMS (text-message) to a mobile
15
(DIRECTORY) key: access to directory
10
key: insertion of a dialling break (/), or flash feature
16
17
11
13
(START) key: fax transmission, or local copy
(STOP) key: stop of the operation in progress, or
(LOUDSPEAKER) key: hands-free mode
key: move up in menus or to the left in an entry
key: confirmation of the displayed selection
19
(MENU) key: access to the various functions
20
key: move down in menus or to the right in an
entry field - Volume down
21
22
23
25
Numeric keypad
(INTERNET) key: enter an e-mail address,
18
(REDIAL) key:automatic call-back of one of the last
10 called numbers
12
13
field - Volume up
24
(PABX)
@
14
18
17
activation of the secret mode
phone.
9
19
transmission via the Internet or access the Web site directory
or
.
with the following keys
memory
2
15
20
21
26
key: return to previous displayed message or clearing of
the last character entered in an entry field
Qwerty keypad
key: used in conjunction with any letter on the keypad to
access the symbols shown above the alphabetic
characters
key: used alone to insert a space. Used in
conjunction with the Ctrl key to enter the @
character in an Internet address
(shift) key:used in conjunction with any letter on the
keypad to enter a capital letter
keys: preprogrammed keys to access the
following functions:
: list of callers (Service Class)
: night mode
: access to the print menu
Guide Menu.fm Page 1 Mardi, 11. décembre 2001 3:48 15
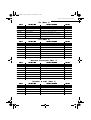
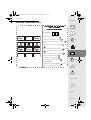
Quick reference guide, menu guide
48,&.5()(5(1&(*8,'(0(18 *8,'(
',5(&725<0(18 3UHVV
)XQFWLRQFDOOHG
)XQFWLRQGHVFULSWLRQ
6HHSDJH
M 11 OK
ADD
Add a record to the directory
9
M 12 OK
MODIFY
Modify a record in the directory
10
M 13 OK
CANCEL
Delete a record from the directory
11
M 14 OK
PRINT
Print the directory
11
6(77,1*60(18
3UHVV
)XQFWLRQFDOOHG
)XQFWLRQGHVFULSWLRQ
6HHSDJH
M 21 OK
DATE/TIME
M 22 OK
NUMBER/NAME
Enter your number and name
13
M 23 OK
MELODIES/BEEPS
Choose the ring melody and key tones
13
Enter the date and time
M 231 OK
MELODY
Choose the ring melody
M 232 OK
BEEPS
Choose the key tones
M 233 OK
ALARM
M 24 OK
M 241 OK
M 242 OK
NETWORK
NETWORK TYPE
PREFIX
13
Switch alarm On/Off
Set network parameters
14
Select network type
Activate the prefix
M 25 OK
NIGHT MODE
Night mode control
14
M 26 OK
NB OF RINGS
Set the number of rings
15
M 27 OK
CORDLESS
Cordless phone (depending on model)
15
M 271 OK
HANDSET REGIS
Register handset (depending on model)
M 272 OK
HANDSET ERASE
Erase handset (depending on model)
M 273 OK
HANDSET CODE
Radio encryption code (depending on model)
M 28 OK
SECURITY
Protected access
M 281 OK
MEM ACCESS
Lock fax and voice messages
M 282 OK
REMOTE CODE
Remote access code
M 29 OK
LANGUAGE/NETWORK
Choice of language and network
15
16
Guide Menu.fm Page 2 Mardi, 11. décembre 2001 3:48 15
Quick reference guide, menu guide
)$;0(18 3UHVV )XQFWLRQFDOOHG
)XQFWLRQGHVFULSWLRQ
6HHSDJH
M 31 OK
FCT TRANSM
Delayed transmission and broadcasting
M 32 OK
POLLING ACTV
Perform an active polling
21
M 33 OK
POLLING PASS
Perform a passive polling
21
M 34 OK
SEND REPORT
19
M 35 OK
TX FROM MEM
M 36 OK
RX TO MEM
Print choice of transmission reports
Transmission from the memory or document
feeder
Document reception into memory or on paper
18
19
20
7$'0(18 3UHVV )XQFWLRQFDOOHG
)XQFWLRQGHVFULSWLRQ
6HHSDJH
M 41 OK
OGM RECORD
Record the outgoing greeting message
23
M 42 OK
OGM PLAYING
Play the outgoing greeting message
23
M 43 OK
MEMO
Record a message (memo)
24
M 44 OK
DELETE MSG
Delete the voice messages
25
M 45 OK
TYPE
Select the type of TAD
24
M 46 OK
FILTERING
Select the call filtering feature
26
M 47 OK
PRIVIL ACCES
Select the privileged access mode
26
M 48 OK
PRIVIL CODE
Select the privileged access code
26
35,17,1*/2&$/&23<0(18 3UHVV )XQFWLRQFDOOHG
)XQFWLRQGHVFULSWLRQ
6HHSDJH
M 51 OK
GUIDE
Print the menus
29
M 52 OK
LOGS
Print the Tx and Rx logs
29
M 53 OK
DIRECTORY
Print the directory
29
M 54 OK
SETTINGS
Print the setting list
29
M 55 OK
SEND REPORT
Print the last communication report
29
M 56 OK
LOCAL COPY
Choose the number of copies
29
M 57 OK
RIBBON GAUGE
Display the ribbon gauge status
30
M 58 OK
INTERNET SERVICE
Print the Web site directory
30
'2&80(17&21752/0(18 3UHVV )XQFWLRQFDOOHG
)XQFWLRQGHVFULSWLRQ
6HHSDJH
M 61 OK
PERFORM
Perform a pending command
31
M 62 OK
MODIFY
Modify a pending command
31
M 63 OK
CANCEL
Cancel a pending command
31
M 64 OK
PRINTING DOC
Print a pending document
31
M 65 OK
PRINT LIST
Print the command list
32
Guide Menu.fm Page 3 Mardi, 11. décembre 2001 3:48 15
Quick reference guide, menu guide
$'9$1&(')81&7,2160(18 3UHVV M 71 OK
)XQFWLRQFDOOHG
MAILBOX
)XQFWLRQGHVFULSWLRQ
6HHSDJH
Mailbox functions
M 711 OK
CREATE
Create a mailbox
33
M 712 OK
CANCEL
Cancel mailboxes
33
M 713 OK
TX MAILBOX
Transmission to a mailbox
34
M 714 OK
MBX POLLING
Poll a mailbox
34
M 79 OK
TECHNICAL
Modification of the technical parameters
35
6(59,&(60(18 3UHVV M 81 OK
)XQFWLRQFDOOHG
WEB TO PRINT
)XQFWLRQGHVFULSWLRQ
6HHSDJH
Print Web pages
M 811 OK
MY LOG
Select Web sites for my log
40
M 812 OK
UPDATE
Automatic update of the WEB directory
40
M 813 OK
ADD
Add a record into the directory
41
M 814 OK
MODIFY
Modify a name in the WEB directory
41
M 815 OK
CANCEL
Delete a name from the WEB directory
41
M 816 OK
PRINT
Print the WEB directory
40
M 84 OK
SMS SERVICE
Settings for sending a text-message
37
M 841 OK
SENDER
Choose whether or not to present the sender of the
37
M 842 OK
SETTINGS
Technical service for the SMS service
text-message
,17(51(70(18 3UHVV M 91 OK
)XQFWLRQFDOOHG
)XQFWLRQGHVFULSWLRQ
6HHSDJH
PROVIDER
Choose the access provider
44
M 92 OK
IMMED ACCESS
Immediate connection to the Internet access
provider
45
M 93 OK
SEND E-MAIL
Send a e-mail from the keypad
45
M 94 OK
SEND V-MAIL
Send a voice mail
46
M 95 OK
SETTINGS
M 951 OK
CONNECTION
Choose the type of connection
47
M 952 OK
TRANSMISSION
Print the Internet parameters
47
M 953 OK
SERVERS
Internet server addresses
48
M 954 OK
PRINT
Choose the type of transmission
Sort the received mails: choose the type of
reception
M 96 OK
MAIL SWITCH
M 98 OK
REROUTING
Reroute fax and voice messages
M 981 OK
ON
Switch on the rerouting function
M 982 OK
OFF
Switch off the rerouting function
M 983 OK
SETTINGS
Set rerouting parameters
47
48
48
LIASSE 232690216-5TDM.fm Page 5 Mardi, 11. décembre 2001 3:49 15
&217(176
,1752'8&7,21 8QSDFNLQJ
&RQQHFWLRQV 6ZLWFKLQJRQ /RDGLQJWKHSDSHU &KRRVLQJWKHRSHUDWLQJPRGH 7KHPHQXV 7(/(3+21,1* &DOOLQJ $QVZHULQJDFDOO )XQFWLRQVDYDLODEOHGXULQJDFDOO ',5(&725<0(18 &UHDWLQJDUHFRUG 0DNLQJDFDOOIURPWKHGLUHFWRU\ (GLWLQJDUHFRUG 'HOHWLQJDUHFRUG 3ULQWLQJWKHGLUHFWRU\ 6(77,1*60(18 'DWH7LPH 1XPEHU1DPH 5LQJLQJPHORG\DQGNH\EHHSV 1HWZRUN 1LJKWPRGH 1XPEHURIULQJVIRUWKHDXWRPRGH &RUGOHVVSKRQH 3URWHFWLRQRI\RXUPDFKLQH &KRLFHRIODQJXDJHDQGQHWZRUN )$;0(18 ,QVHUWLQJWKHGRFXPHQWLQWRWKHIHHGHU 6HQGLQJDID[ 5HFHLYLQJDID[ 'XULQJWUDQVPLVVLRQ $GYDQFHGIXQFWLRQV 7$'0(18 *UHHWLQJPHVVDJHV 6ZLWFKLQJRQ
0HVVDJHV
5HPRWHDFFHVV
$GYDQFHGIXQFWLRQV
35,17,1*/2&$/&23<0(18 3ULQWLQJ /RFDOFRS\ 5LEERQJDXJHGLVSOD\ 3ULQWLQJWKH:HEVLWHGLUHFWRU\ LIASSE 232690216-5TDM.fm Page 6 Mardi, 11. décembre 2001 3:49 15
'2&80(17&21752/0(18 ([HFXWLQJDSHQGLQJFRPPDQG
0RGLI\LQJDFRPPDQGID[RQO\
'HOHWLQJDFRPPDQGIURPWKHTXHXH
3ULQWDGRFXPHQWZDLWLQJIRUWUDQVPLVVLRQ 3ULQWLQJRXWWKHOLVWRISHQGLQJRSHUDWLRQV $'9$1&(')81&7,2160(18 0DLOER[0%; 7HFKQLFDOSDUDPHWHUV 5HPRWHFRQWUROIURPDQH[WHQVLRQ 6(59,&(60(18 6066HUYLFH :HEWRSULQWVHUYLFH ,17(51(70(18 7UDQVPLVVLRQ5HFHSWLRQRQWKHLQWHUQHW 6HWWLQJV 237,216 'LVSOD\
8VLQJWKH5NH\ $33(1',; 5HSODFHPHQWRIFRQVXPDEOHV 7URXEOHVKRRWLQJ 7UDQVPLVVLRQUHSRUWFRGH 7HFKQLFDOVSHFLILFDWLRQV This unit has been designed in accordance with European standards I-CTR37 and CTR21,
it is designed for connection to the Public Switched Telephone Network (PSTN). In case of
any problems, first contact your Supplier.
The CE mark attests that the product complies with the essential requirements of Directive
R&TTE 1999/5/EC, for user safety, in accordance with Directives 73/23/EC for
electromagnetic interference, in accordance with Directive 89/336/EC.
And that it makes efficient use of the radio spectrum allocated to terrestrial communications.
The manufacturer declares that the products are manufactured in
ANNEX II of Directive R&TTE 1999/5/EC.
accordance with
LIASSE 23690216-5A.book Page 1 Lundi, 10. décembre 2001 10:42 10
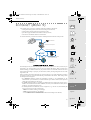
Introduction
Introduction
,1752'8&7,21
The SAGEM Internet SMS Phonef@xes™ are both versatile and powerful communication tools. You
can use them to phone and fax documents, but also to send faxes that addresses will receive as e-mail, or
else to print out pages from an Internet site the address of whom you know. You can also receive e-mails
which can be printed on your fax machine. Because you can use this new generation of fax machines to
send your faxes via the Internet, you will benefit from reduced rates since you will be charged only for a
local call for all the calls you make (please refer to the section entitled INTERNET (MENU 9) on
page 43).
Telephoning
1
Directory
The installation of your machine and the operation of all of its functions and features require a telephone
socket and a mains socket near the machine. Internet connections require Internet access (or
subscription).
Your unit can also send text-messages (SMS) to mobile phones (please refer to the section entitled SMS
SERVICE on page 37).
2
Settings
3
Fax
Fax transmission
and reception
TAD
Cordless handset
("Cordless Telephone kit"
necessary)
Send text-messages
(SMS) to a mobile phone
4
TAD
5
Fax reception through message service
fax converted into an e-mail
Printing
eb pages
W
Fax transmission and
reception on the Internet
P ri
6
Printed fax message transmission
(e-mail converted into a fax)
Doc control
nti n g
7
,QWHUQHW3KRQHI#[606
Advanced
functions
813$&.,1*
Check for the following items when unpacking your machine:
• Main unit,
• Power cord,
• Telephone handset,
• Telephone line cord,
• Paper tray
Services
8
@
9
Internet
(*),
• DECT kit (cordless phone, charger and base station)(**).
A complementary starter ribbon and its gauge card have been pre-installed in the machine. You will have
to replace them when they are worn (please refer to § Replacement of consumables on page 53).
(*)
(**)
Models with a fixed paper tray (100 sheets).
Depending on model.
Options
Appendices
1
LIASSE 23690216-5A.book Page 2 Lundi, 10. décembre 2001 10:42 10
Introduction
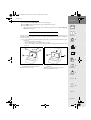
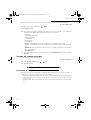
&211(&7,216
Caution - Please refer to the Safety Instructions at the beginning of this User’s manual.
1
1
3
2
3
4
+ Turn your machine upside down.
+ Insert the plug (1) of the power cord into the connector (2) of the main unit.
+ Run the power cord (3) into the groove (4).
6
5
+ Connect
the telephone handset cord to the
handset connector (5) on the main unit.
+
+ Connect
the telephone line cord plug to the
telephone connector line (6) on the main unit,
and connect the other end to the wall telephone
socket.
Connect the power plug to the mains socket.
6:,7&+,1*21
Connect the power plug to the mains wall socket.
+
+
+
+
+
+
2
When switched on for first time, the screen displays SELECT LANGUAGE.
Press OK to display list of available languages.
Select desired language by using the
and
key, and then validate by pressing OK.
The screen then displays SELECT NETWORK (in the selected language).
Press OK to display the list of available languages.
Select the network corresponding to your country by using the
or
key (so that the specific services:
caller identification, SMS, etc., are operational) and then validate by pressing OK.
LIASSE 23690216-5A.book Page 3 Lundi, 10. décembre 2001 10:42 10
Introduction
Introduction
+
+
+
The unit displays CHECK DATE (with the selected language).
Press OK and enter the date and time, using the alphanumeric keypad.
Press OK to confirm.
Then, you can select another language, using the MENU 29 (please refer to § Choice of language
and network on page 16).
Telephoning
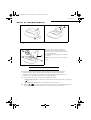
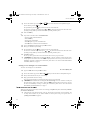
/2$',1*7+(3$3(5
1
You may use any standard plain paper (A4 format photocopying paper, approx. 80 g/m²). However, for
optimal print results, we suggest you use the type of paper recommended (please refer to the last page of
this User's manual).
❑ To avoid malfunctions and obtain optimal print quality, you should observe the following basic
instructions:
• use new paper folds or rolled edges,
• do not reload the paper tray while printing is in progress,
• always remove all the remaining pages in the tray before reloading paper.Models with a fixed
paper tray
2
1
Directory
2
Settings
3
Fax
2
4
3
3
TAD
4
5
Printing
+ Snap the paper holder (1) in the two slots (2) +
+
provided at the top of the sheet feeder.
Open the feeder cover (3)
+
+
Prepare a stack of plain paper (100 sheets
maximum)
Place the paper stack into the feeder (4).
Close the feeder cover (3).
6
Doc control
7
Advanced
functions
Services
8
@
9
Internet
Options
Appendices
3
LIASSE 23690216-5A.book Page 4 Lundi, 10. décembre 2001 10:42 10
Introduction
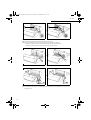
02'(/6:,7+$5(029($%/(3$3(575$<
3
1
2
+ To open the cover (1), use notch (2) on the + Lift the paper support bracket (3).
side.
+ Prepare a stack of paper (30 sheets max.).
+ Insert it between the paper guides (4 and 5).
+ Press the clip (6) to insert the paper in the fax
4
machine's paper store.
7
5
+ Adjust the left paper guide (4) to the width of
the paper.
Caution - Lift the support bracket to allow printout
stacking.
6
&+226,1*7+(23(5$7,1*02'(
Your Internet Phonef@x™ SMS machine has three operating modes, which are described below:
• automatic mode with TAD: your machine answers all calls and records incoming messages,
• automatic mode without TAD: your machine sorts incoming calls before presenting them to you,
• manual mode: your fax machine will not answer any calls automatically.
❑ In each of these three modes, you may pick up the handset at any time:
• when receiving a fax call, you can switch your fax machine to the fax reception mode by pressing the
key,
• when receiving a voice call, talk with the caller as you would on the phone.
+
4
Press the
key to select the required reception mode: the icons corresponding to each mode are
deleted (function off) or displayed (function on), as shown in the following three sections.
LIASSE 23690216-5A.book Page 5 Lundi, 10. décembre 2001 10:42 10
Introduction
Introduction
$8720$7,&02'(:,7+7$'
Your unit works like a telephone answering device combined with a fax machine. Select this mode
when you go out or if you do not want to lose any fax or voice calls.
When your machine rings, it answers after a couple of rings and plays the greeting message you have
recorded on your TAD:
• if the call is a fax call, it automatically switches to the fax reception mode,
• if the call is a voice call, the caller will be able to leave a message on your TAD.
Telephoning
1
❑ You can set the number of rings before your machine automatically answers
Directory
(please refer to § Number of rings for the auto mode on page 15).
$8720$7,&02'(:,7+2877$'
Your machine automatically sorts the calls before presenting them to you. Select this mode if you
receive many faxes and you do not want to be disturbed by their reception.
When it receives a call, your machine automatically answers without ringing(*), then it emits a waiting
signal, and:
• if the call is a fax call, it switches to the fax reception mode,
• if the call is a voice call, it rings (warning ring) for 30 seconds(**) and the caller can hear a ringing
tone. you can then pick up and talk. Otherwise, the caller will be able to leave a message on your
TAD, which will activate after 30 seconds and play the greeting message.
2
Settings
3
Fax
0$18$/02'(
4
Your machine mainly works like a telephone : select this mode if you usually do not receive many faxes.
TAD
In that mode, your machine never answers automatically (except after 10 rings if remote interrogation is
enabled. In that case, it will play the greeting message).
5
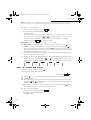
7+(0(186
Printing
$&&(66,1*7+(0(186
As described in the next sections, your machine features many functions accessible through the menus,
which allow you to set and modify them: recording a directory of numbers, memorising received or sent
faxes, setting the number of rings, etc.
As can be seen in the menu guide, all functions are numbered in a main menu (e.g.1. Directory), from
which you can access the various settings for the selected function (e.g. 1.1 Add, 1.2 Modify or 1.3 Delete
a directory record).
6
Doc control
7
Advanced
functions
0DLQPHQXDFFHVVWRIXQFWLRQV
+
Press the M key.
Services
8
@
9
6XEPHQXVDFFHVVWRIXQFWLRQVHWWLQJV
+
Press the
key to select the previous menu line.
+
Press the
key to select the next menu line.
(*)
(**)
Internet
Options
All other telephone sets in your installation, if any, will ring normally.
All other telephone sets in your installation, if any, will not ring.
Appendices
5
LIASSE 23690216-5A.book Page 6 Lundi, 10. décembre 2001 10:42 10
Introduction
+
Press the OK key to confirm and go on to the next menu.
+
Press the C (ECM) key to return to the previous menu.
+
Press the
(START) key to confirm and exit from the main menu.
+
Press the
(STOP) key to exit from the current menu.
0RYLQJLQVLGHDGDWDHQWU\ILHOG
+
+
Press the C key to delete the last character.
Hold the C key down to delete all the characters entered.
+
Press the
key to move the cursor to the left within a data entry field
+
Press the
key to move the cursor to the right within a data entry field
+
Press the
+
Press the OK key to confirm entry and go on to the next menu item.
+
Press the
(START) key to confirm entry and exit from the current menu.
+
Press the
key to cancel entry and return to the initial value.
key to insert a space.
35,17,1*7+(0(18*8,'(
To print the menus and thus get an overview of menus, proceed as follows:
+
+
Insert paper.
Press the M, 5, 1 and OK keys or the F3 and OK keys.
The menus are classified in their order of function number (please refer to the section entitled QUICK
REFERENCE GUIDE, MENU GUIDE). The functions are classified in their order of appearance in this manual.
Tabs are provided for quick access to the required information.
6
LIASSE 23690216-5A.book Page 7 Lundi, 10. décembre 2001 10:42 10
Telephoning
Introduction
7(/(3+21,1*
Although it features advanced functions, your Internet PhoneF@x™ SMS machine is also a telephone set
providing a whole range of user-friendly functions.
Telephoning
&$//,1*
1
Directory
&$//,1*86,1*7+(+$1'6(7
You can also dial the number before picking up the handset. This allows you to correct any dialling errors
by means of the C key.
❑ You can use the
and
&$//,1*86,1*7+(
2
Settings
keys to adjust the volume.
.(<
3
/RXGVSHDNHUOLVWHQLQJ
+
+
+
+
+
Fax
Dial your party's number. This is displayed on the screen.
Pick up the handset, the machine dials automatically.
When your party answers, press the
You can use the
Press the
and
4
key to activate loudspeaker listening.
keys to adjust the volume.
TAD
key again to de-activate loudspeaker listening.
5
+DQGVIUHHPRGHRQKRRNOLVWHQLQJ
+
+
+
Printing
Dial your party's number.
Press the
You can use the
key: the machine dials automatically.
and
keys to adjust the volume..
❑ At any time, you can pick up the handset and continue the call (in which case the speaker and
microphone are automatically disabled).
6
Doc control
&$//,1*86,1*7+(',5(&725<
Your machine can store phone numbers in a directory. To know the applicable procedure, please refer to
the section entitled DIRECTORY (MENU 1) on page 9.
5(',$//,1*21(2)7+(/$677(1180%(56&$//('
+ Press the (REDIAL) key.
+ Select the required number using the and keys .
+ To call the number displayed press the
key or pick up your handset.
❑ At any time, you can delete the REDIAL number by pressing the C,
Services
(REDIAL) and OK
keys.
the
icon blinks. Pick up your handset (or press
) key) and speak. To end the call, hang up the handset (or press the
@
Internet
$16:(5,1*$&$//
When someone calls you, your phone rings and the LINE
7
Advanced
functions
Options
key).
Appendices
7
8
9
LIASSE 23690216-5A.book Page 8 Lundi, 10. décembre 2001 10:42 10
Telephoning
)81&7,216$9$,/$%/('85,1*$&$//
.12:,1*7+('85$7,212)7+(&$//
Ten seconds after dialling, a counter displays the approximate duration of the call.
$&7,9$7,1*/28'63($.(5/,67(1,1*
During the call, press the
key. This will activate the loudspeaker, enabling another person to listen to
the conversation.
6:,7&+,1*)520/28'63($.(5/,67(1,1*72+$1'6)5((02'(
+ Hold down the
key.
+ Hang up the handset.
+ Release the
key. Conversation then goes on in the hands-free mode.
$&7,9$7,1*7+(6(&5(702'(
During a call, if you want to activate mute, press the
key. Press that key again to resume your conversation.
5(&25',1*$&$//
During a handset call, you can record the conversation.
+
+
Press the M and
To stop recording, press
keys: recording starts.
.
5(5287,1*$&$//
To re-route a call to another phone (connected to the same telephone line):
+
+
+
Press the M and
keys.
Hang up the handset.
Go to the other set, pick up and continue the call.
❑ You should hang up the handset within 4 seconds. You have about 25 seconds to pick up the other handset.
6:,7&+72)$;5(&(37,2102'(
If you pick up a secondary handset or take the line from a cordless phone and you cannot hear anyone speaking,
you can switch your machine remotely to fax reception mode by typing # then 7 (please refer to the section
entitled FAX (MENU 3) on page 17).
8
LIASSE 23690216-5A.book Page 9 Lundi, 10. décembre 2001 10:42 10
Directory (Menu 1)
Introduction
',5(&725<0(18 The directory is a file in which you can store phone and fax numbers, especially those called most
frequently. So, instead of dialling a phone or fax number or entering an e-mail address each time you want
to communicate with one of your parties, you have only to select their name from the directory. Using the
data you have stored, your Internet Phonef@x™ SMS machine will dial automatically for you.
❑ The records stored in the directory are classified in alphabetical order.
Telephoning
1
Directory
&5($7,1*$5(&25'
2
To fill in the directory, enter each party's phone number and name in a record. To create a new record and
add it to the directory:
Settings
+ PRESS THE M, 1, 1, OK KEYS
❑ You can cancel the process at any time by pressing
3
.
Fax
5(&25'
61$0(
+ Enter your party's name.
+ Press the OK key to confirm.
4
❑ You can move in the data entry field using the
or
key, delete the last character entered by
briefly pressing the C key, delete all the characters entered by holding down the C key.
3+21($1')$;180%(56
+ Then, enter your party's phone and/or fax number.
+ Press the OK key to confirm.
TAD
5
Printing
❑ If your fax machine is in the premises of a company, it may be connected to a private automatic
branch exchange (PABX). Some of these telephone exchanges require the insertion of a dialling
prefix (e.g. 0). All numbers should be stored in the directory without that prefix. You can program the prefix automatically for all numbers (please refer to § Prefix on page 14). Some telephone exchanges also require the insertion of a post-dial delay. If such is the case, press the R key
in order to insert the post-dial delay (the character / is inserted in the number displayed).
6
Doc control
7
,17(51(7$''5(66
+ Then, enter your party's e-mail address, if any, and press OK to confirm.
Advanced
functions
or
+
press the OK key if your party does not have an e-mail address.
❑ To enter the character @, press the
To enter the dot, press the
and
Services
keys at the same time.
key.
@
92,&(0(02
The voice memo is a text-message that you record and associate to the party stored in the record. You will
hear the voice memo each time you call them or they call you. For instance, if you select "Robert Smith"
and record "It's Robert" as a voice memo, you will hear "It's Robert" each time he calls you and each time
you call him. The voice memo thus informs you on your party's identity before you answer the call.
+
8
Internet
Options
Enable or disable this function using the
or
key:
• WITHOUT MEMO: no memo is associated to the record. Press OK to confirm.
• VOX MEMO: enables you to record a memo associated to the party: press OK to confirm,
Appendices
9
9
LIASSE 23690216-5A.book Page 10 Lundi, 10. décembre 2001 10:42 10
Directory (Menu 1)
pick up the handset, record your memo and hang up.
Caution - The voice memo is always enabled for outgoing calls (only in the case of hands-free calls). To enable
the voice memo feature for incoming calls, you should first subscribe to the Display Caller service.
0$.,1*$&$//)5207+(',5(&725<
Once you have stored all your parties’ numbers and names in the directory, you can select one of them (to phone
or send a fax or an e-mail) using either their name or abbreviated number as explained below.
6(/(&7,21%<1$0(
+ Type in the first letters of your party’s name or press the
key: names are classified in alphabetical
order.
+
If several names begin with the same letters, you can refine the search by entering extra letters or using the
and
keys.
Then you can:
• pick up the handset or press
to call them,
or
• place a document in the document feeder and press
to fax the document,
or
• place a document in the document feeder and press @ to send them an e-mail.
6(/(&7,21%<$%%5(9,$7('180%(5
Your fax machine has automatically associated a 2-digit abbreviated number to each newly created record: 00 for
the 1st record, 04 for the 5th record, and so on.
+
Press the
, key to dial your party's abbreviated number.
Then you can:
• pick up the handset or press
to call,
or
• place a document in the document feeder and press
to fax the document,
or
• place a document in the document feeder and press @ to send them an e-mail.
❑ If you do not remember which abbreviated number corresponds to such or such record, you can print out
the directory for a copy of all the information it contains (please refer to § Printing the directory on
page 11).
(',7,1*$5(&25'
+
+ PRESS M, 1, 2, OK
To select a record:
• type in the first letters of the required name
or
• use the
+
10
and
Press the OK key.
keys to select the required name.
LIASSE 23690216-5A.book Page 11 Lundi, 10. décembre 2001 10:42 10
Directory (Menu 1)
Introduction
+
+
+
To correct the data in the record (name, phone/fax number, e-mail address or abbreviated number),
use the
or C key: edit the relevant data using the alphabetic and/or numeric keypads.
Press OK to confirm and go on to the next data.
To enable/disable the voice memo option, make your choice using the
and
keys and press
OK to confirm.
• VOX MEMO:
- if no voice memo is associated to the record, you should record one (if you want to use this
option): pick up the handset, record the memo and hang up.
- if a voice memo is associated to the record, you can choose KEEP MEMO if you want to
keep it, or NEW MEMO to record a new memo as described above and press OK to confirm.
• WITHOUT MEMO: if any memo is associated to the record, it will be deleted.
If you have subscribed to the Display Caller service (please refer to § Display on page 51), you can
customise some of your incoming calls:
• through a specific ringing melody,
• by assigning them a specific mailbox number,
• by assigning them a specific cordless phone.
+
+
Move the pointer > to the required option using the
or
keys:
• Choose PHONE CALL if the number associated to the record is a phone number.
Press OK, select the ringing melody you want to associate to the calls of this party using the
or
, keys and press OK again to confirm.
• Choose FAX CALL if the number associated to the record is a fax number and press OK to
confirm. Select the mailbox number you want to associate to the calls of your party (please
refer to § Mailbox (MBX) on page 33). Press OK.
Telephoning
1
Directory
2
Settings
3
Fax
4
TAD
Select the number of the cordless phone you want to associate to the calls of your party (if at least
one cordless phone is connected to your machine) and press OK.
5
Printing
'(/(7,1*$5(&25'
+
+ PRESS M, 1, 3, OK
6
Doc control
Select the record you want to delete by typing in the letters of your party's name or using the
or
, keys and press OK twice to confirm: the record will be deleted.
7
35,17,1*7+(',5(&725<
Advanced
functions
+ PRESS M, 1, 4, OK
The directory is printed automatically. This document contains all the information you have entered
(names, phone/fax numbers, e-mail addresses, as well as the abbreviated numbers automatically
associated to each record).
Services
@
Internet
Options
Appendices
11
8
9
LIASSE 23690216-5A.book Page 12 Lundi, 10. décembre 2001 10:42 10
Directory (Menu 1)
12
LIASSE 23690216-5A.book Page 13 Lundi, 10. décembre 2001 10:42 10
Settings (menu 2)
Introduction
6(77,1*60(18
The different settings enable you to customise calls and the operating mode of your machine (choosing a
ringing melody, storing faxes, etc.), but also set technical and security parameters (choosing a type of
network, locking, using an access code, etc.).
1
'$7(7,0(
+
Telephoning
Directory
+ PRESS M, 2, 1, OK
Enter the date and time using the numeric keypad and press OK to confirm.
Example: 7 May 2002, 9.15: press 0705020915 and OK.
2
Settings
180%(51$0(
3
The data you enter in these fields will automatically be inserted in the headers of the faxes you will send,
so that they will be printed on the faxes received by your contacts.
+
+
+
To do so, the TX HEADER setting should be enabled (please refer to § Technical parameters on
page 35).
+ PRESS M, 2, 2, OK
Enter your name and press OK to confirm.
5
Printing
You can choose between 4 melodies or NO MELODY and adjust the volume of the selected melody. You
can also program beeps that you will hear each time you press a key.
+ PRESS M, 2, 3, 1, OK
Select the required melody using the
To adjust the volume, press the
or
or
$/$50
+
+
7
Advanced
functions
key and press OK to confirm.
Services
key and press OK to confirm.
.(<%((36
+
6
Doc control
If you choose NO MELODY, the
icon will blink permanently. In that case, only the message
INCOMING CALL, which is displayed on the screen when you receive a call, will tell you someone
is calling you.
5,1*,1*0(/2'<
+
+
4
TAD
Enter your fax number and press OK to confirm and go on to the next field.
5,1*,1*0(/2'<$1'.(<%((36
+
Fax
+ PRESS M, 2, 3, 2, OK
Select WITH or WITHOUT and press OK to confirm.
@
Internet
+ PRESS M, 2, 3, 3, OK
Select the required option using the
or
key and press OK to confirm.
• START: alarm switch-on.
Enter the time at which you want the alarm to ring out, and press the OK key to confirm: to the
right of the time, the screen displays a symbol indicating the alarm is in service.
• STOP: alarm switch-off.
The alarm rings for 30 seconds. Press any key on the keypad to stop it earlier.
Options
Appendices
13
8
9
LIASSE 23690216-5A.book Page 14 Lundi, 10. décembre 2001 10:42 10
Settings (menu 2)
1(7:25.
7<3(2)1(7:25.
The telephone line to which your machine is connected may be linked either to the public network or to a private
network (e.g; in a company with a PABX).
35(),;
+
+ PRESS M, 2, 4, 1, OK
Select the type of network, PABX or PSTN, to which you are connected and press
to confirm.
If your machine is connected to the private automatic branch exchange (PABX) of a company, you have to enter
a prefix (generally 0) for outgoing calls before the number you want to call, provided that:
• the intercom numbers (for which no prefix is required) are short numbers not exceeding the minimum
length from which the prefix should automatically be inserted (to be defined),
• the external numbers (for which a prefix is always required) are long numbers exceeding or equalling the
minimum length from which the prefix should automatically be inserted (to be defined, for instance 10
digits in the UK).
+
IMPORTANT NOTE: Do not change anything in the numbers you have stored in the directory. Indeed,
enabling or disabling the prefix will respectively switch your machine to PABX operation (WITH prefix)
or PSTN operation (WITHOUT prefix).
To set the local prefix
+
+
+
+ PRESS M, 2, 4, 2, OK
Select the WITH option using the
or
key and press OK to confirm.
Enter the number used by your PABX to access the public telephone network (e.g. 0) followed by the /
sign (or pause, access by pressing the R key, and press OK to confirm.
If necessary, enter the phone number length from which the prefix should automatically be added (e.g. 10
digits in the UK) and press OK to confirm.
1,*+702'(
This mode enables you to switch off the ringing of your machine for a given period of time (during the night for
instance), while still receiving your calls. The machine then switches to automatic reception/TAD mode and will
answer after 5 rings. It will automatically receive all voice and fax messages. At the end of the NIGHT mode, the
screen displays the number of messages received and the
and
keys blink, and your
machine automatically switches to the current reception mode. To activate the night mode:
+
+
+
+ PRESS M, 2, 5, OK
OR + PRESS F2
Select
using the
or
key and press OK to confirm.
Select the night mode start time and press OK to confirm.
Select the night mode stop time and press OK to confirm.
To deactivate the night mode,
+
14
+ PRESS M, 2, 5, OK
Select
using the
or
key and press
to confirm.
LIASSE 23690216-5A.book Page 15 Lundi, 10. décembre 2001 10:42 10
Settings (menu 2)
Introduction
180%(52)5,1*6)257+($87202'(
This function enables you to set the number of rings before the automatic activation of your telephone
answering device.
+
Telephoning
+ PRESS M, 2, 6, OK
Change the number of rings and press OK to confirm.
1
Directory
&25'/(663+21(
The machine can be used together with one or more cordless phone sets, which require the installation
of the cordless phone kit supplied with your machine or available from your supplier. Please refer to the
instructions coming with the kit for more information. When fitted with this kit, your machine gives you
access to the functions described below.
2
Settings
5(*,67(5,1*$&25'/(663+21(
3
For each cordless phone you want to register on your machine:
+
+ PRESS M, 2, 7, 1, OK
Fax
On the cordless phone, press OK and 6. A number specific to each handset appears on its display
screen.
'(5(*,67(5,1*$&25'/(663+21(
4
TAD
+ PRESS M, 2, 7, 2, OK
The main unit’s screen displays the numbers for the registered handset.
+
5
Enter the number corresponding to the handset you want to de-register and press OK. Your
machine emits a series of beeps telling you that de-registration is in progress.
%$6(67$7,215(*,675$7,21&2'(
Printing
6
+ PRESS M, 2, 7, 3, OK
This function enables you to define a 4-digit registration code intended to protect your base station, e.g.
from the registration of a handset that does not belong to you but is in the same reception zone as your
machine.
Doc control
7
Advanced
functions
3527(&7,212)<2850$&+,1(
3527(&7,212)92,&(25)$;0(66$*(6
Services
8
You can protect all of your messages by using a four digit access a code, which must be entered to access
your messages. To do so, you must set a message access lock and choose a passcode other than 0000.
0HVVDJHDFFHVVORFN
+
+
+ PRESS M, 2, 8, 1, OK
@
Internet
Select the required option using the
or
key:
• WITHOUT: no access code for local access to the messages,
• WITH: local access to the messages is possible only after entering the access code.
Options
Press OK to confirm.
Appendices
15
9
LIASSE 23690216-5A.book Page 16 Lundi, 10. décembre 2001 10:42 10
Settings (menu 2)
$FFHVVWRORFNHGPHVVDJHV
If you have chosen WITH message access lock, the message access procedure is as follows:
+
+
+
Press the
or
key, depending on the type of messages (fax or voice messages).
Type 0 or, if you have a personal mailbox, enter its number (please refer to the section entitled
ADVANCED FUNCTIONS (MENU 7) on page 33) and press the OK key.
Enter the remote passcode or your mailbox code.
5(027($&&(66&2'(
This function is used to define the remote interrogation code for any voice or fax messages received.
+
+
+ PRESS M, 2, 8, 2, OK
Enter your code.
Press OK to confirm.
&+2,&(2)/$1*8$*($1'1(7:25.
You can choose the language displayed on the screen:
+
+
16
+ PRESS M, 2, 9, OK
Select the desired language using the
or
key and press twice on OK.
Select the network corresponding to your country by using the
or
key (so that the specific services:
caller identification, SMS, etc., are operational) and then validate by pressing OK..
LIASSE 23690216-5A.book Page 17 Lundi, 10. décembre 2001 10:42 10
Fax (Menu 3)
Introduction
)$;0(18 Telephoning
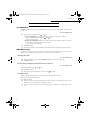
,16(57,1*7+('2&80(17,1727+()(('(5
02'(/6:,7+$),;('3$3(575$<
1
Directory
2
1
Settings
2
3
Fax
+ The document feeder (1) holds
to 15 pages.
4
+ Insert the document, printed face down, into
+
TAD
the document feeder. If necessary, adjust the
left paper guide (2) to the width of the
document.
The machine displays READY.
5
❑ Your machine has an automatic document feeder. The last sheet in the stack will be sent out first.
Printing
02'(/6:,7+$5(029($%/(3$3(575$<
6
1
Doc control
3
2
7
4
Advanced
functions
Services
+ Lift the fax access door (1).
+ Lift the document support bracket (2).
+ The document feeder (3) receives up
pages.
+ Insert the document, printed face down, into
to 15
+
@
the document feeder. If necessary, adjust the
left paper guide (4) to the width of the
document.
The machine displays READY.
Internet
❑ Your machine has an automatic document feeder. The last sheet in the stack will be sent out first.
Options
Appendices
17
8
9
LIASSE 23690216-5A.book Page 18 Lundi, 10. décembre 2001 10:42 10
Fax (Menu 3)
6(1',1*$)$;
'2&80(175(62/87,21
Your Internet Phonef@x™ SMS machine has three resolution modes. You can select one of these modes
according to the type and print quality of the document you want to fax.
• standard mode: for a good quality document without minute details.
•
•
+
(FINE) mode: for a document with small characters or drawings.
(PHOTO) mode: when the document is a photograph.
Press the
and
icons.
key to change the resolution mode. The mode selected is indicated by the status of the
6(1',1*$)$;
,PPHGLDWHWUDQVPLVVLRQ
+
+
Insert the document into the feeder, printed face down, first page last in the stack of sheets.
Dial the addressee's fax number and press
to confirm.
7UDQVPLVVLRQIURPWKHGLUHFWRU\
Select the addressee’s two digit directory number or name to sent a fax, please refer to the section entitled
DIRECTORY (MENU 1) on page 9 for further information.
%URDGFDVWWUDQVPLVVLRQ
To send the same document to several addressee’s, proceed as follows:
+
+
+
+
Place the document into the feeder, dial the fax number of the first addressee, or select it from the directory.
Press the OK key to confirm.
Dial the fax number of the next addressee or select it from the directory. Press the OK key to confirm.
Repeat the procedure for each individual addressee (10 addressees max.), making sure you press the OK
key each time.
Press
to send the document..
❑ You can move in the data entry field using the
or
,
delete the last character entered by briefly pressing the C key,
delete all the characters entered by holding the C key down.
'HOD\HGWUDQVPLVVLRQ
To program delayed transmission for a document, proceed as follows:
+
+
+
Insert the document into the feeder.
+ PRESS M, 3, 1, OK
Dial the addressee's fax number.
Press OK if you want to enter another addressee.
or
+
+
+
+
+
18
Enter the time at which you want your fax to be sent and press OK to confirm.
Choose the required type of transmission (from the machine's MEMORY or from the document FEEDER)
and press OK to confirm. (please refer to § Transmission from the machine’s memory or the document
feeder on page 19, for further information).
Enter the number of pages of the document and press OK to confirm.
Choose or not a cover page for your document and press OK.
Enter the text for the cover page as appropriate and press OK to confirm.
LIASSE 23690216-5A.book Page 19 Lundi, 10. décembre 2001 10:42 10
Fax (Menu 3)
Introduction
6HQGLQJDVKRUWPHVVDJH
Your Internet Phonef@x™ SMS machine enables you to type in a message intended for the addressee.
Such a message will be either inserted on the cover page of the faxed document or directly printed on a
sheet of unstamped paper. To send a short message, proceed as follows:
+
+
+ PRESS M, 3, 1, OK
Dial the addressee's fax number.
1
Press OK if you want to enter a second addressee,
or
+
+
+
+
+
+
Telephoning
Directory
Press OK twice to go on to the next menu item.
Enter the time at which you want your message to be sent and press OK.
Choose ALPHA KEYPAD using the
or
2
key and press OK.
Choose WITH HEADER PG or WITHOUT PAGE using the
or
key and press OK to confirm.
Settings
Type in the message you want to send using the alphabetic keypad.
Press OK to send the message.
3
&+226,1*7+(7<3(2)75$160,66,215(3257
Fax
You can program your machine so that a transmission report is printed each time you send a fax. There
are three types of reports available:
+
+ PRESS M, 3, 4, OK
Select the required option using the
or
:
• WITH: a transmission report is printed if there has been no transmission problem or if the transmission has failed (i.e. after 6 unsuccessful attempts). So, there is one report for each transmission.
• WITHOUT: no report is printed following a fax transmission (consult the transmission log to
keep track of all communications).
• IF ERROR: a transmission report is printed only if the transmission is unsuccessful.
• Press OK to confirm.
75$160,66,21)5207+(0$&+,1(
60(025<257+('2&80(17)(('(5
You can choose between two modes of transmission:
• from the machine's memory: the document to be faxed is stored in your machine's memory before
it is sent. This mode enables you to pick up original copies more quickly.
• from the document feeder: the document is faxed right after placing it in the feeder and dialling.
This mode enables you to send large documents whose size may exceed the memory capacity.
+
+
4
TAD
5
Printing
6
Doc control
7
Advanced
functions
+ PRESS M, 3, 5, OK
Select the required option using the
or
key.
• MEMORY:
The document is stored in the memory of your fax machine, then it is transmitted.
• ADF:
Document scanning and transmission are performed at the same time. If the addressee's fax
machine does not answer, the documents remain in the feeder.
Services
@
Internet
Press OK to confirm.
Options
Appendices
19
8
9
LIASSE 23690216-5A.book Page 20 Lundi, 10. décembre 2001 10:42 10
Fax (Menu 3)
5(&(,9,1*$)$;
Your machine has a reception memory enabling it to receive your faxes or e-mail even when out of paper.
Depending on the settings made, your machine can print out your faxes as soon as they are received or store them
in its memory. Faxes and e-mail will be received automatically if the
is on. If the icon is off, press the
key (please refer to § Choosing the operating mode on page 4 for more information).
When at least one fax is present in the memory, the
key of your machine blinks. The key switches off
if there are no faxes in the memory or if you have printed all the faxes received.
35,17,1*)$;(65(&(,9(',17+(0(025<
+ To print out stored faxes, make sure there is paper in the paper tray, and press the
key.You can
protect the access to your faxes by means of a passcode (please refer to § Protection of voice or fax
messages on page 15 for more information).
5(&(37,21)5207+(0(025<)$;$16:(5,1*0$&+,1(257+()(('(5
When activated, this function enables you to store all messages received in the memory, until you choose to print
them out. When the function is de-activated, all documents are printed as soon as they are received.
+
+ PRESS M, 3, 6, OK
Select the required option using the
or
key:
• WITH: the documents you receive are stored in the memory,
• WITHOUT: the documents you receive are printed at once (if there is paper in the feeder),
+ Press OK to confirm.
5(027($&&(662)7+()$;$16:(5,1*0$&+,1(
If you are away and have a fax machine where you are (set the tone dialling mode), you can retrieve and print the
faxes received on your own fax machine.
❑ As delivered, the remote access option of the fax answering machine of your Phonef@x™ SMS is not
available: to access your fax answering machine remotely, you should first enter a passcode, which is
shared with the TAD so that you can also listen to your voice messages (please refer to § Remote access
code on page 16 for more information) and set your machine to the "automatic reception mode with
TAD" mode.
+
+
+
+
On a remote fax machine featuring a telephone, dial your own number.
Press the * key during the greeting message, then enter the 4 digits of your passcode: the machine first
delivers the voice messages.
As you hear the beeps, press the 8 then 0 keys.
Switch on the fax machine by pressing the
key as soon as you hear the fax tones: your own fax
machine will then forward all the faxes stored in its memory.
Caution - When you access your fax answering machine remotely, the forwarded documents are automatically
erased from its memory.
5(&(37,210(025<6$785$7,21
When there are too many documents or voice messages in the memory, the machine is saturated and will not be
able to received any further messages: the
or
blinks and the message MEMORY
displayed on the screen. Print the stored faxes and/or erase all voice messages to free up memory.
The memory status is indicated by these icons:
20
...
FULL
is
LIASSE 23690216-5A.book Page 21 Lundi, 10. décembre 2001 10:42 10
Fax (Menu 3)
Introduction
'85,1*75$160,66,21
67233,1*$75$160,66,21
+ Press the key.
+ Press the key again to confirm you want to stop the current transmission.
3+21(&$//6
Telephoning
1
Directory
7RPDNHDFDOO
You can make a call just after sending or receiving a fax. To do so, while the document is being
transmitted (send or receive mode), you should:
+
Press the
key while your fax machine displays TRANSMIS or RECEPTION. Your fax
machine then displays PHONE:
• once the fax has been transmitted, the addressee’s phone rings, (if the machine is compatible),
• if the call is answered, your machine starts ringing: pick up and speak.
:KHQ\RXDUHFDOOHG
2
Settings
3
Fax
When you are called, your phone rings and you can pick up and speak.
4
$'9$1&(')81&7,216
TAD
32//,1*$'2&80(17
Polling a document consists of leaving a document in your machine’s memory or document feeder, thus
making it available to one person (single polling), or several people (multi polling), to access the
document remotely. This requires that your machine be set to the automatic mode.
+
+
+
+
+
5
Printing
+ PRESS M, 3, 3, OK
Select one of these two options using the
or
key:
• SINGLE POLLING: the document will be deleted from the memory as soon as it has been retrieved.
• MULTI POLLING: the document can be retrieved by several people.
6
Doc control
Press OK to confirm.
Select one of these three options using the
or
key:
• MEMORY: the document is stored in your machine’s memory. This solution frees your machine
and the document can be retrieved by several people.
• PAPER FEEDER: the document can be retrieved by only one person (only in the case of SINGLE
POLLING).
• ALPHA KEYPAD: the document is a text you type using the alphabetic keypad.
7
Advanced
functions
Services
8
Press OK to confirm.
Enter the number of pages in the document and press OK to confirm.
❑ A message on the screen tells you if there is any document available for polling. A single polling
document will automatically be deleted from the memory as soon as it is retrieved, unlike multipolling,multi polling can be cancelled through menu 63 (please refer to § Deleting a command
from the queue on page 31).
5(75,(9,1*$'2&80(17
@
Internet
Options
When a document has been polled on a remote fax, you can perform "active polling" on it (i.e. print it out
on your own fax machine), only if there is no document in your feeder.
+ PRESS M, 3, 2, OK
21
Appendices
9
LIASSE 23690216-5A.book Page 22 Lundi, 10. décembre 2001 10:42 10
Fax (Menu 3)
+
+
Dial the number of the fax machine containing the polled fax and press the OK key.
Press the
key for immediate active polling.
or
+
Press OK for multiple active polling (maximum 10 addressees).
or
+
Press OK twice for delayed active polling:
• Enter the time required for active polling, and press the
• When active polling is performed on the document, the
key to confirm.
key blinks (in the AUTOMATIC
operating mode, please refer to § Choosing the operating mode on page 4). Press the
print the document.
22
key to
LIASSE 23690216-5A.book Page 23 Lundi, 10. décembre 2001 10:42 10
TAD (Menu 4)
Introduction
7$'0(18 Your machine features a telephone answering device (TAD) whose simple and extensive functions
provide a wide range of possibilities: leaving a message to persons calling you in your absence, letting
them leave you a accessing message, your machine remotely as done for faxes, etc.
Your TAD features two options:
• ANSWERING MACHINE: callers are unable to leave you a message after your greeting, which just
gives them information.
• ANSWERING-RECORDING MACHINE: callers are able to leave you a message after the greeting message.
*5((7,1*0(66$*(6
Telephoning
1
Directory
2
Settings
The machine has 2 distinct greeting messages, corresponding to the two functions of the TAD (answering
machine or answering-recording machine); the answering-recording machine’s greeting message is prerecorded. You can change it by recording your own greeting message.
3
Fax
$16:(5,1*5(&25',1*0$&+,1(
5HFRUGLQJWKHJUHHWLQJPHVVDJH
+
+
4
+ PRESS M, 4, 1, 1, OK
TAD
Pick up your handset and record your greeting message (20 seconds max.).
The time in seconds is counted down as you record your message.
Hang up your handset to stop the recording. Your message is then played back, after which you
can put your TAD into service.
5
Printing
3OD\LQJEDFNWKHJUHHWLQJPHVVDJH
+
+ PRESS M, 4, 2, 1, OK
6
Doc control
Your machine plays back the greeting message you have recorded.
$16:(5,1*0$&+,1(
5HFRUGLQJWKHJUHHWLQJPHVVDJH
+
+
7
+ PRESS M, 4, 1, 2, OK
Pick up your handset and record your greeting message (90 seconds max.).
The time in seconds is counted down as you record your message.
Hang up your handset to stop the recording. Your message is then played back, after which you
can put your TAD into service.
3OD\LQJEDFNWKHJUHHWLQJPHVVDJH
+
+ PRESS M, 4, 2, 2, OK
Your machine plays back the greeting message you have recorded.
Advanced
functions
Services
@
Internet
Options
Appendices
23
8
9
LIASSE 23690216-5A.book Page 24 Lundi, 10. décembre 2001 10:42 10
TAD (Menu 4)
6:,7&+,1*21
6(/(&7,1*7+(7<3(2)7$'
+
+ PRESS M, 4, 5, OK
Select the required type of TAD (ANSWERING MACHINE or ANSWERING-RECORDING MACHINE) using the
or
key and press OK to confirm.
6:,7&+,1*7+(7$'21 2))
6ZLWFKLQJRQ
Press the
key. When the
icon is on, your TAD is in service.
key. When the
icon is off, your TAD is not in service.
6ZLWFKLQJRII
Press the
0(66$*(6
When you have received at least one message, the screen displays the total number of messages (except in the
case of delayed transmission or active polling, or passive polling) and the
key on your machine blinks.
This key is off if there are no pending messages, and is steady on when all received messages have been listened
to.
/,67(1,1*720(66$*(6
+ Press the
key. For each message being listened to, the screen displays the sequence number
together with the date and time of reception.
While listening to the messages, you can press the following keys:
•
or
to adjust the audio volume,
• C twice to return to the beginning of the message,
• OK to skip to the next message,
•
for a pause. Press the same key again to resume listening,
• you can also use the remote access controls (please refer to § Remote access on page 25).
/2&$/0(66$*(
You can record a local message on your TAD, which will be like a message left by a remote caller. This function
is very useful when you have to go out of your office or home and you want to leave a message for anyone coming
in after you.
5HFRUGLQJWKHORFDOPHVVDJH
+ PRESS M AND
+
+
+ PRESS M, 4, 3, OK
Pick up the handset and record your message.
Hang up the handset to stop the recording.
3OD\LQJEDFNWKHORFDOPHVVDJH
+
24
, OR
Press the
key.
LIASSE 23690216-5A.book Page 25 Lundi, 10. décembre 2001 10:42 10
TAD (Menu 4)
Introduction
'(/(7,1*0(66$*(6
'HOHWLQJDOOPHVVDJHV
+ PRESS M, 4 ,4, OK
'HOHWLQJDVHOHFWHGPHVVDJH
+
Telephoning
Press the C key, then OK during the message you want to delete.
1
❑ You cannot delete the messages you have not listened to.
6$785$7,212)7+(7$'·60(025<
Directory
When a large number of faxes has been received and lots of messages have been recorded, your machine
will be saturated and will not allow the reception of further messages: the
or
icon blinks and the
message MEMORY FULL is displayed. Print out the faxes and/or delete the voice messages to free up the
memory.
2
Settings
5(027($&&(66
3
Fax
You can interrogate your TAD remotely and thus listen to the messages you have received, only if the
telephone you are calling from supports the tone dialling mode.
4
❑ As delivered, this option is not available: to interrogate your TAD remotely, you should first enter
a remote access code, which is shared with the fax answering machine (so that you can also print
out the faxes received). Please refer to § Remote access code on page 16 for more information.
+
+
+
TAD
On a remote telephone set, dial your own number.
Press the * key during the greeting message, then enter the 4 digits of your access code: the
machine delivers all the voice messages you have received.
After the last message or if there are no messages, the machine emits a series of beeps.
5
Printing
List of available remote operations:
6
While listening:
• Pause or resume message listening by pressing
• Go to the next message by pressing
Doc control
.
.
• Listen to the same message by pressing
7
.
• Go back to the previous message by pressing
Advanced
functions
. twice
After listening:
Services
• Delete received messages by pressing
then
• Record your greeting message by pressing
then
and
@
stop the recording by pressing any key.
• Listen to your greeting message by pressing
• Switch on your TAD by pressing
.
• Switch off your TAD by pressing
.
• Resume message listening by pressing
8
.
.
Internet
Options
.
Appendices
25
9
LIASSE 23690216-5A.book Page 26 Lundi, 10. décembre 2001 10:42 10
TAD (Menu 4)
$'9$1&(')81&7,216
&$//6&5((1,1*
This function enables you to listen to the caller leaving you a message on your TAD, before deciding whether to
pick up or not.
+
+
+ PRESS M, 4, 6, OK
Select the required option using the
or
key:
• WITH CALL SCREENING: you can hear the messages as they are recorded on your TAD, and:
- adjust the SPEAKER volume using the
and
keys,
- pick up to answer the call.
• WITHOUT CALL SCREENING: messages are recorded in silence, only a message on the screen tells you
you are receiving a call and a message is being recorded:
- you can pick up to answer the call.
Press OK to confirm.
❑ The call screening feature is not available if you have activated the privileged access mode (see below).
35,9,/(*('$&&(66
This function enables you to choose a code, which you will give to those people who may call you at a given
moment (e.g. your colleagues during a meeting or your close relatives at a certain time).
6HWWLQJWKHFRGH
+
+
+ PRESS M, 4, 8, OK
Enter a privileged access code other than 0000 and different from the remote access code.
Press OK to confirm.
3XWWLQJWKHSULYLOHJHGDFFHVVIXQFWLRQLQWRVHUYLFH
+
+
+ PRESS M, 4, 7, OK
Choose WITH using the
and
keys.
Press OK to confirm.
❑ When the privileged access function is in service, the
icon blinks.
3ULYLOHJHGFDOOV
Only those privileged callers having your privileged access code will be able to call you.
To do so, they should proceed as follows:
+
+
Dial your number.
Press the * key during the greeting message, then enter the 4 digits of your privileged access code: your
machine only starts ringing after the code has been entered.
❑ If you do not answer, the caller will have the possibility to leave a message on your TAD, if this is in service.
26
LIASSE 23690216-5A.book Page 27 Lundi, 10. décembre 2001 10:42 10
TAD (Menu 4)
Introduction
'(7$&+$%/(48,&.5()(5(1&(&$5'
4XLFNUHIHUHQFHFDUGIRURSHUDWLQJ
\RXU7$'IHDWXULQJ
WKHUHPRWHDFFHVVIXQFWLRQ
Telephoning
1
Your TAD code: *
Directory
• Go to the next message by pressing
.
• Listen to the same message by pressing
.
2
• Go back to the previous message by pressing
Settings
twice.
• Delete the received messages by pressing
then
3
.
• Record your greeting message by pressing
then
Fax
and stop the recording by pressing any key.
• Listen to your greeting message by pressing
• Switch on your TAD by pressing
.
• Switch off your TAD by pressing
.
• Resume message listening by pressing
4
.
TAD
5
.
Printing
From a fax machine:
• After listening to the message: 8, 0 then
to retrieve
the faxes stored in your machine’s memory.
6
Doc control
7
Advanced
functions
Services
@
Internet
Options
Appendices
27
8
9
LIASSE 23690216-5A.book Page 28 Lundi, 10. décembre 2001 10:42 10
TAD (Menu 4)
28
LIASSE 23690216-5A.book Page 29 Lundi, 10. décembre 2001 10:42 10
Printing & local copy (Menu 5)
Introduction
35,17,1*/2&$/&23<0(18 Printing (MENU 5) can be accessed directly using the
Telephoning
key.
35,17,1*
1
Directory
)81&7,21*8,'(
+ PRESS M, 5, 1, OK
2
Prints the list of the numbered functions.
/2*6
Settings
+ PRESS M, 5, 2, OK
3
Prints the transmission and reception logs, which list the last 30 communications.
',5(&725<
Fax
+ PRESS M, 5, 3, OK
4
Prints the directory.
6(77,1*6
TAD
+ PRESS M, 5, 4, OK
Prints the list of your machine’s settings.
/$7(6775$160,66,215(3257
5
+ PRESS M, 5, 5, OK
Printing
Prints the last transmission report (fax or Internet).
6
Doc control
/2&$/&23<
3+272&23<
+ Insert the document to be copied in the document feeder, as for transmission.
+ Choose the resolution mode by pressing the
key.
+ Press the key.
08/7,&23<
+ PRESS M, 5, 6, OK
+ Type in the number of copies you want to print on the numeric keypad (1 to 99).
+ Press the OK key: the document is stored and then printed.
❑ The multicopy function cannot be used to print out a received fax; it applies only to a printed
7
Advanced
functions
Services
@
Internet
document of which you want one or more duplicates.
Options
Appendices
29
8
9
LIASSE 23690216-5A.book Page 30 Lundi, 10. décembre 2001 10:42 10
Printing & local copy (Menu 5)
5,%%21*$8*(',63/$<
+ PRESS M, 5, 7, OK
The ribbon gauge shows the percentage of ribbon available.
35,17,1*7+(:(%6,7(',5(&725<
+ PRESS M, 5, 8, OK
Prints the Web site directory.
For any information on the Web site directory, please refer to § Creating and automatically updating the Web
site directory on page 39.
30
LIASSE 23690216-5A.book Page 31 Lundi, 10. décembre 2001 10:42 10
Document control (Menu 6)
Introduction
'2&80(17&21752/0(18 A set of menus enables you to control all the pending commands.
Telephoning
(;(&87,1*$3(1',1*&200$1'
1
Directory
This function is used to immediately execute a pending command:
+ PRESS M, 6, 1, OK
The status of the pending documents is shown:
• DOC : PASSIVE POLLING
• POL : ACTIVE POLLING
• TX : DELAYED TRANSMISSION
• NET : INTERNET TRANSMISSION (fax or e-mail)
• CNT : INTERNET CONNECTION
• SVA : ADDED VALUE SERVICE (service Web to print)
• MBX : TRANSMISSION TO A MAILBOX
• POL : ACTIVE POLLING TO A MAILBOX
• SMS: TRANSMISSION SMS (text-message to a mobile phone)
+
+
Select the required command using the
or
2
Settings
3
Fax
4
TAD
key.
Press the OK key to execute it.
5
02',)<,1*$&200$1')$;21/<
+
+
+
Printing
+ PRESS M, 6, 2, OK
Select the command you want to consult or modify using the
or
6
key.
Press the OK key and modify the parameters for the displayed transmission request.
Doc control
Press the OK key to confirm your changes.
7
'(/(7,1*$&200$1')5207+(48(8(
+
+
+
+ PRESS M, 6, 3, OK
Select the command you want to delete using the
or
key.
Advanced
functions
Services
Press the OK key to delete the request from the queue.
Press the OK key to confirm deletion.
@
35,17$'2&80(17:$,7,1*)2575$160,66,21
Internet
This function enables you to know the content of a document waiting for transmission.
+
+
8
+ PRESS M, 6, 4, OK
Select the pending document using the
or
key.
Options
Press the OK key to print out the selected document.
Appendices
31
9
LIASSE 23690216-5A.book Page 32 Lundi, 10. décembre 2001 10:42 10
Document control (Menu 6)
35,17,1*2877+(/,672)3(1',1*23(5$7,216
This list shows, for each pending document: the sequence number of the pending operation, the addressee’s name,
the scheduled transmission time, the type of pending operation, the number of pages in the document and its size
(percentage of memory taken up by the document).
To print out the list,
+ PRESS M, 6, 5, OK
32
LIASSE 23690216-5A.book Page 33 Lundi, 10. décembre 2001 10:42 10
Advanced functions (Menu 7)
Introduction
$'9$1&(')81&7,2160(18 Telephoning
0$,/%2;0%;
If you create a mailbox on your machine, you can receive faxes and messages confidentially: indeed, by
transmitting a given number to your machine using his/her numeric keypad, your party will deposit the
messages into your personal mailbox. You will just have to enter this number to print out your faxes or
listen to your messages.
&5($7,1*$0$,/%2;
+
+
+
1
Directory
2
+ PRESS M, 7, 1, 1, OK
Settings
Type in a number between 1 and 5, this will be your mailbox number.
Press the OK key twice.
Then, enter a 4-digit code (other than 0000, and different from both your remote access and
privileged access codes) and press OK twice.
3
Fax
❑ This 4-digit code enables you to interrogate your mailbox remotely and/or protect it.
4
$FWLYDWLQJWKHDFFHVVFRGH
+
+
TAD
Using the
or
key, choose between:
• WITH: to protect your mailbox by means of the access code,
• WITHOUT: to disable protection.
5
Press OK to confirm.
Printing
5HFRUGLQJDJUHHWLQJPHVVDJH
You can record a greeting message specific to your mailbox, which will be played each time someone
accesses it to leave a message.
+
Select MBX ANNOUNCE and press the OK key.
• Pick up your handset and record your greeting message.
• Hang up the handset: the message is then played back, and will be played to anyone accessing
your mailbox.
5HJLVWHULQJDKDQGVHW
+
❑ The value 0 means there is no handset associated to the mailbox.
+
+
7
Advanced
functions
Choose HANDSET NUMBER if you have a cordless phone and you want to consult the contents of
your mailbox from that phone without having to enter the mailbox protection code:
• Press the OK key.
• Type a number between 1 and 4 corresponding to your cordless phone.
• Press OK to confirm.
'(/(7,1*$0$,/%2;
6
Doc control
Services
@
+ PRESS M, 7, 1, 2, OK
Internet
Type in the number of the mailbox you want to delete and press OK.
Press OK again to confirm deletion.
Options
Appendices
33
8
9
LIASSE 23690216-5A.book Page 34 Lundi, 10. décembre 2001 10:42 10
Advanced functions (Menu 7)
86,1*<2850$,/%2;
:KDWFDOOHUVQHHGWRGRWRGHSRVLWDPHVVDJHRUDID[LQ\RXUPDLOER[
For your mailbox to accept a message or a fax, your machine should be in the
reception mode. Then,
callers should follow this procedure:
+
+
+
+
For a fax, insert the document to be sent in the feeder.
Dial your number: they can hear your greeting message.
Press the # and 1 keys and type your mailbox number (between 1 and 5): they can hear the greeting
message specific to the mailbox.
After the beep, record their message or press
to send their fax.
'HSRVLWLQJDID[RUDWH[WPHVVDJHLQ\RXUSDUW\·VPDLOER[
If your party has a compatible machine, you can deposit a fax directly in his/her personal mailbox.
To do so, follow this procedure:
+
+
+
+
+
+
+ PRESS M, 7, 1, 3, OK
Dial your party’s number and press OK twice.
Enter his/her mailbox number and confirm with
transmission.
for immediate transmission, or with OK for delayed
In the latter case, enter the required time for fax transmission and press OK to confirm.
Select the type of document to be sent (memory, feeder or keypad) and press OK to confirm.
If you have chosen either one of the first two alternatives, enter the number of pages to be sent, insert the
document and press OK to confirm.
If you have chosen ALPHA KEYPAD, type in your message and press OK to confirm.
3ROOLQJDSDUW\·VPDLOER[
If your party has a compatible machine, you can poll the documents he/she has received in his/her mailbox. To
do so, follow this procedure:
+
+
+
+ PRESS M, 7, 1, 4, OK
Dial your party’s number and press OK twice.
Enter your party’s mailbox number (between 1 and 5) and press OK to confirm.
Enter the code for access to your party’s mailbox and press
delayed polling.
for immediate polling or OK to schedule
+ In the latter case, enter the required polling time and press OK to confirm.
$&&(66,1*<2850$,/%2;
+ Press the
key to listen to a message, and the
key to print out a fax.
+ Enter your mailbox number (between 1 and 5) and press the OK key.
• If the access to your mailbox is not protected (MEM ACCESS =NO), you can hear your voice message or
your fax gets printed,
• If the access to your mailbox is protected (MEM ACCESS =YES), enter your 4-digit mailbox code.
❑ To listen to a message or print out a fax not received in a mailbox, enter 0 as the mailbox number.
0$,/%2;5(027($&&(66
+ Dial your number from a remote telephone set or fax machine; you can hear your TAD’s greeting message.
+ Press #, 1 then enter your mailbox number (between 1 and 5).
+ Then enter the 4 digits of your mailbox access code:
• listen to deposited messages, if any (you can hear beeps if there are no messages),
34
• if calling from a fax machine, press 8 and 0 as you hear the fax machine beeps and press the
you hear a shrill sound in order to switch your machine to fax reception mode.
key as
LIASSE 23690216-5A.book Page 35 Lundi, 10. décembre 2001 10:42 10
Advanced functions (Menu 7)
Introduction
7(&+1,&$/3$5$0(7(56
Your machine has been configured for operation on all telephone networks. However, some of its
technical parameters may be changed.
The technical parameters are arranged into a list in which you move using the
technical parameters:
and
Telephoning
keys. To access
1
+ PRESS M, 7, 9, OK
Directory
01 DIALLING
choice of the type of dialling ( pulse or tone)
02 TX HEADER:
you can insert your name, your fax number, the date and time on the
header of the fax received by the addressee.
03 TX LOCK UP:
lock up the fax transmission speed.
04 ANTI ECHO:
inhibit the satellite echo in case of fax problems in long-distance calls.
05 DISTINCTIVE RING
for Australia only : signal voice calls by the normal ringing pattern, and
fax transmission by a special ringing pattern.
10 RX HEADER:
print the sender’s name and fax number as well as the date and time on
the header of the fax you receive.
11 RX LOCKUP:
lock up the fax reception speed.
20 REDUCE MODE:
choose the printing reduction mode (received faxes, local copies):
automatic or manual.
21 REDUCE RATE:
set the printing reduction mode.
22 NB OF PAGES:
enter the number of pages printed (received faxes and local copies) since
machine switch-on.
40 FLASH LENGTH:
choose the in-line interrupt time (long or short) of the R key "Flash"
signal.
50 SORTED PRINT:
print documents in reverse order of reception (or scanning for a local
copy).
71 NET ACTIVE:
choose whether automatic Internet connections are authorised on weekend days.
72 MODEM LOCK UP:
lock up the transmission/reception speed via the Internet.
73 RECORD REP@:
automatically record the Internet address of a fax addressee into the
directory.
74 EMPTY MBX:
delete the first message from the mailbox at the next connection.
75 PPP COMPRESS.:
for connection to certain access providers.
2
Settings
3
Fax
4
TAD
5
Printing
6
Doc control
7
Advanced
functions
Services
5(027(&21752/)520$1(;7(16,21
You can control your machine remotely from an extension tone dialling telephone set in your installation,
i.e. a set connected to another socket on the same line (same subscriber’s number).
❑ If the extension is configured in pulse dialling mode, type * to switch it to tone dialling mode.
@
Internet
Options
Appendices
35
8
9
LIASSE 23690216-5A.book Page 36 Lundi, 10. décembre 2001 10:42 10
Advanced functions (Menu 7)
6:,7&+,1*2))7+(7$'
If you take the line from an extension and your machine pick up before you and is playing your TAD’s greeting
message, press # then 0 to switch off the TAD.
6:,7&+,1*72)$;5(&(37,2102'(
If you take the line from an extension and you cannot hear anyone speaking, you can switch your machine
remotely to fax reception mode by typing # then 7.
36
LIASSE 23690216-5A.book Page 37 Lundi, 10. décembre 2001 10:42 10
Services (Menu 8)
Introduction
6(59,&(60(18 Telephoning
6066(59,&(
1
SMS ("Short Message Service") is designed for sending short messages to mobile phones.
Directory
Attention - the SMS service will have special pricing.
Your Phonef@x™ SMS allows you to send this type of text-message to a mobile phone: just press the
SMS
2
key.
Settings
35(6(17$7,212)7+(7(;70(66$*(6(1'(5
Your Phonef@x™ SMS automatically adds your name to the start of the text-message in the following
format:
" From: M.Jones " (M.Jones is the name you stored in MENU 22) or " From: 013073000 ", if no name
has been stored. For further information, please refer to the section entitled NUMBER/NAME on
page 13.
3
Fax
4
If you do not want the sender to appear when your text-message is received:
+
+
+ PRESS THE FOLLOWING KEYS: M, 8, 4, 1 OK
Select WITHOUT with the
or
keys.
Press OK to confirm.
5
Printing
6(1'$7(;70(66$*(72$02%,/(3+21(
+ PRESS THE SMS
+
Use the
Doc control
key at the same time as the letter you want to enter.
7
key to go to the next line.
To move in the entry field, press the
cursor, press the C key.
OR
6
KEY
Enter the text-message you want to send using the alphabetic keypad.
❑ For uppercase letters, press the
+
+
TAD
or
key. To delete the character on the left side of the
Advanced
functions
Press OK to confirm.
Enter the mobile phone number(*) or enter the international number of the mobile phone: insert the
+ sign by pressing the
and
keys simultaneously, then enter the international number
(for example: 44 000000000 where 44 is the country code).
use the directory: enter the first few letters of the person's name you want to call, or press the
key until the person's name is displayed : records are sorted in alphabetical order.
Services
8
@
9
Internet
Options
(*)
If you use your SMS Phonef@x™ behind a private company network, remember to program the prefix in an
automatic way (please refer to § Prefix on page 14).
Appendices
37
LIASSE 23690216-5A.book Page 38 Lundi, 10. décembre 2001 10:42 10
Services (Menu 8)
Caution - the number of your SMS correspondent memorized in the directory must also be entered in its
international format (of form: +33 6 00 00 00 00). This directory card is then dedicated to sending text-messages.
+
Then you have two possibilities:
• Immediately send the text-message: Press the
SMS
key
• To send this document to several recipients :
- Press OK to confirm.
- For the other recipients: enter the mobile phone number or enter the international number of the mobile
phone: insert the + sign by pressing the
and
keys simultaneously, then enter the international
number (for example: 44 000000000 where 44 is the country code) and validate by pressing OK.
SMS
- Validate by pressing the
key for the last recipient.
SENDING SMS is displayed on the screen: the text-message is sent very quickly.
When SENDING SMS is no longer displayed, the text-message has been sent and it is stored in the
key.
❑ If SMS and a differed time are displayed, the text-message is waiting to be sent (stored in the
key)
and the system will try again in a few minutes. Then when SMS is displayed alone on the screen, you
have the choice of immediately executing or deleting this transmission, please refer to the section entitled
DOCUMENT CONTROL (MENU 6) on page 31.
❑ To check that the text-message was sent correctly, you can print the transmission / reception log (please
refer to the section entitled LOGS on page 29).
❑ To send a text-message to a mobile phone abroad, you must enter the mobile phone's number in international format: insert the + sign by pressing the
and
keys simultaneously, then enter the interna-
tional number (for example: 33 0000000000 where 33 is the country code). Here is a list of some country
codes:
)UDQFH
*HUPDQ\
33
49
(QJODQG
44
6SDLQ
34
,WDO\
39
-
6(1'$7(;70(66$*()5200(025<
All text-messages you have sent are stored in the
key.
To send a stored text-message, follow these steps:
+ PRESS THE SMS
+
+
+
Press the
Press OK to confirm.
Enter the mobile phone number or enter the international number of the mobile phone: insert the + sign by
pressing the
and
keys simultaneously, then enter the international number (for example: 44
000000000 where 44 is the country code).
OR use the directory: enter the first few letters of the person's name you want to call, or press the
the person's name is displayed : records are sorted in alphabetical order.
+
Then you have two possibilities:
• Immediately send the text-message: Press the
• To send this document to several recipients :
- Press OK to confirm.
38
KEY
key one or more times until the text-message you want to send is displayed.
SMS
key
key until
LIASSE 23690216-5A.book Page 39 Lundi, 10. décembre 2001 10:42 10
Services (Menu 8)
Introduction
- For the other recipients: Enter the mobile phone number or enter the international number of the
mobile phone: insert the + sign by pressing the
and
keys simultaneously, then enter
the international number (for example: 44 000000000 where 44 is the country code)..
- Press OK to confirm.
- Press OK again for the last recipient.
Telephoning
9,(:$7(;70(66$*(,10(025<
+ PRESS THE SMS
Directory
+ Press the
key one or more times until the text-message you want to view is displayed.
+ To move in the entry field, use the or keys.
+ To stop viewing the message and return to the idle screen, press the
key.
02',)<$7(;70(66$*(,10(025<
+ PRESS THE SMS
+
+
Press the
2
Settings
KEY
3
key one or more times until the text-message you want to modify is displayed.
Fax
Then you can:
• Move in the entry field: press
or
.
• delete the character to the left of the cursor: press the C key
• modify the text-message: use the alphabetic keypad.
4
+ To confirm your changes, press OK.
+ To stop viewing the message and return to the idle screen, press the
'(/(7($7(;70(66$*(,10(025<
TAD
key.
+ PRESS THE
+
+
+
Press the
1
KEY
5
SMS
KEY
Printing
key one or more times until the text-message you want to delete is displayed.
To delete the selected text-message, press and hold down the C key.
6
Press OK to confirm.
Doc control
:(%7235,176(59,&(
7
Advanced
functions
To be able to use this service, you should first create your Internet mailbox (please refer to the section
entitled INTERNET (MENU 9) on page 43).
Your Internet Phonef@x™ SMS machine will then provide you access to selected Internet sites and
enable you to print out the related Web pages.
The Web pages are defined by their addresses (called URL: Uniform Resource Locator) with the
following format: http://www.sagem.com (for the Sagem Web site).
These addresses are stored in a directory called the Web site directory.
The
@
Services
8
@
9
Internet
key and the
or
keys provide direct access to that directory.
&5($7,1*$1'$8720$7,&$//<83'$7,1*7+(:(%6,7(',5(&725<
Your Web site directory enables you to store Web addresses. It is controlled and handled like a phone and
fax number directory.
Options
Appendices
39
LIASSE 23690216-5A.book Page 40 Lundi, 10. décembre 2001 10:42 10
Services (Menu 8)
It contains addresses to specific Web sites, selected by your machine (news, travelling, culture, leisure, sport,
weather...).
This directory is automatically created as you first connect to the Internet (please refer to the section entitled
INTERNET (MENU 9) on page 43)
The directory can then be updated:
• periodically (please refer to § My log: periodic printing of a set of Web pages): getting connected to the
site called "UPDATE" will automatically update the directory,
• whenever required, by proceeding as follows:
+ PRESS M, 8, 1, 2, OK
Your fax machine connects to the Internet and automatically updates the list of Web sites added to your
directory during the update process.
35,17,1*2877+(:(%6,7(',5(&725<
To print out the Web site directory at any time,
35,17,1*287$:(%3$*(
+ PRESS M, 8, 1, 6, OK
0\ORJSHULRGLFSULQWLQJRIDVHWRI:HESDJHV
This function enables you to select a list of sites (10 sites max.) for which you want to schedule Internet
connection at the same dates and times for Web page printout purposes.
So, you will have to enter these connection parameters only once for all the sites you have selected.
To draw up the site list,
+
+
+ PRESS M, 8, 1, 1, OK
Select the first site and press OK to confirm.
Repeat the procedure for all the other sites and press OK to confirm.
❑ You can select UPDATE among the sites to programme automatic directory update, at the same time as
the printout of selected Web pages.
+
+
+
Press OK again to confirm the last selected site once you are finished with your selection.
Choose the days of the week for which you want to schedule the printing of selected Web pages. To do so:
• use the
and
keys to move to the different days (M T W T F S S),
• select or de-select the days by means of the C key (the screen displays the letter corresponding to the
day of the week when this is selected, or "-" otherwise),
• press OK to confirm.
Enter the time at which you want to connect and print out these Web pages and press OK to confirm.
Your machine will connect to the selected sites as chosen to print out the corresponding Web pages.
3HULRGLFDOO\SULQWLQJD:HESDJHIURPWKHGLUHFWRU\
If you have selected a time and one or more days for connection to a Web site in the directory (through
Menu 813), your fax machine will periodically connect to that site at the scheduled time and automatically print
out the relevant Web page.
,PPHGLDWHSULQWLQJRID:HESDJHIURPWKHGLUHFWRU\
+
+
+
40
Press the
@
key,
Select the Web site of which you want to print out the page using the
@
Press the
key.
Your fax connects and automatically prints out the relevant Web page.
and
keys.
LIASSE 23690216-5A.book Page 41 Lundi, 10. décembre 2001 10:42 10
Services (Menu 8)
Introduction
,PPHGLDWHO\SULQWLQJD:HESDJHLQWKHPDQXDOPRGH
+
+
@
Press the
key, and type the Web site address (e.g. http ://www.sagem.com) or the
corresponding key word.
@
Press
to confirm.
Your fax gets connected and automatically prints out the relevant Web page.
Telephoning
0$18$//<83'$7,1*7+(',5(&725<
1
You can customise and complement the Web site directory created by your machine by adding other sites.
$GGLQJD:HEVLWHLQWKHGLUHFWRU\
+
+
+
+
+
Directory
+ PRESS M, 8, 1, 3, OK
2
Enter the Web site name and press OK to confirm,
Type the Web site address (e.g.: http://www.sagem.com) or the corresponding key word and
press OK to confirm,
You can choose to print out the Web page:
• on request (MANUAL ACCESS),
• or by getting connected periodically at a given time on certain days of the week (AUTO
ACCESS).
Settings
3
Fax
Press OK to confirm your choice.
If you have chosen AUTO ACCESS, you should set the connection days and times as follows:
• choose the days of the week on which you want to get connected. To do so:
- use the
and
keys to move to the different days,
- select or de-select the days by means of the C key (the screen displays the letter corresponding to the day of the week when this is selected, or "-" otherwise),
- Press OK to confirm,
• enter the time at which you want to get connected and press OK to confirm.
4
TAD
5
Printing
A record associated to the selected Web site has been created. Your fax machine has assigned a sequence
number to it, namely the "assigned number".
6
Doc control
(GLWLQJD:HEVLWHLQWKHGLUHFWRU\
+
+ PRESS M, 8, 1, 4, OK
Select the required Web site using the
and
keys and press OK to confirm. You can edit the
following elements:
• the name of the Web site, its address or the corresponding key word, the connection day(s), the
connection time using the
and
keys and C.
• Confirm each change you make by pressing the OK key.
'HOHWLQJD:HEVLWHIURPWKHGLUHFWRU\
+
+
+ PRESS M, 8, 1, 5, OK
Select the required Web site using the
and
keys and press OK to confirm.
7
Advanced
functions
Services
8
@
9
Internet
Press OK to confirm deletion.
Options
Internet Printing is a free-of-charge service (you will only be charged for calls).
SAGEM SA reserves the right to suspend that service at any time and shall in no case be held responsible for
that. SAGEM SA shall not be held responsible for the contents and availability of the Internet sites accessible
through that Service.
Appendices
41
LIASSE 23690216-5A.book Page 42 Lundi, 10. décembre 2001 10:42 10
Services (Menu 8)
42
LIASSE 23690216-5A.book Page 43 Lundi, 10. décembre 2001 10:42 10
Internet (Menu 9)
Introduction
,17(51(70(18 Your machine gives you access to a number of functions available on the Internet :
• sending and receiving faxes, e-mail and voice messages via the Internet,
• sending a short message which will be received by e-mail,
• print out the pages of a Web site the address of which you know ,
• send a fax to a standard fax machine via the Internet.
Telephoning
1
Directory
To use these functions, you must have an Internet subscription from an Internet access provider.
2
Internet Mailbox
Settings
Internet server access provider
3
Fax
Internet server access provider
4
TAD
b pages
We
Printed fax message transmission
(e-mail converted into a fax)
5
Fax, e-mail, vocal messages
transmission and reception
on the Internet
P ri
Printing
nti n g
)XQFWLRQVDYDLODEOHYLDWKH,QWHUQHW
6
The advantage to send your faxes and messages via the Internet is plain to see: when you take out your
subscription, your access provider gives you a local or regional call number. When you send a long
distance message, your machine routes it to your provider’s server on a local call cost basis. The server
then forwards the message to your party via the Internet, without you being charged for the cost of the
long distance call.
When you take out an Internet subscription, the access provider gives you some information concerning
the settings necessary to get connected and identify your machine on the network. These settings can be
divided up into three categories:
• the connection parameters include the information necessary to the establishment of the
communication : your call number, a connection identifier (your name for instance) and a password
(which will not be displayed on the screen),
• the e-mail parameters enable you to define your identifier and your password for access to your emailbox once communication has been established, as well as your e-mail address whose syntax is
as follows: < first [email protected] >.
• the servers parameters are addresses (4 sets of 3 digits max., e;g. 193.252.13.0) which identify the
servers of your access provider on the Internet :
- SMTP servers (used for sending your messages),
- POP3 server (for receptions in your mailbox),
- servers PRIMARY DNS and SECONDARY DNS (which routes messages on the Internet).
Doc control
7
Advanced
functions
Services
@
Internet
Options
Appendices
43
8
9
LIASSE 23690216-5A.book Page 44 Lundi, 10. décembre 2001 10:42 10
Internet (Menu 9)
To perform your Internet settings, collect the information given by your provider and proceed as follows:
+
+
+
+ PRESS M, 9, 1, OK
Select your access provider using the
or
key.
Press OK to confirm.
Then, define all the Internet parameters that have not yet been set, referring to your subscription
confirmation. Press OK to confirm each parameter and go on to the next one:
• call number,
• connection identifier (login),
• connection password,
• e-mail identifier,
• e-mail password,
• e-mail address,
• SMTP server: automatically gives the server address for any transmission on the Internet,
• POP3 server: automatically gives the server address for any document reception in your Internet mailbox,
• PRIMARY DNS: routes the messages on the Internet (the server address is composed of 4 sets of 3 digits
max. separated by dots),
• SECONDARY DNS.
❑ If your access provider did not specify any particulars for the SECONDARY DNS, enter those for the PRIMARY DNS.
,*125,1*7+(,17(51(7)81&7,216
If you do not want to use the Internet functions:
+
+
+ PRESS M, 9, 1, OK
Select WITHOUT ACCESS using the
or
key.
Press OK to confirm.
75$160,66,215(&(37,21217+(,17(51(7
&211(&7,21727+(,17(51(7
When connected to the Internet (immediate or scheduled connection, depending on your settings), it enables you
to send and receive documents during the same connection, as follows:
• transmission to the Internet mailbox(es) of your party (parties) of all the pending Internet documents (faxes,
e-mail, voice messages). If the addressee is a PC, the voice or fax message will be received as the attachment to an e-mail.
• reception of all the Internet documents (faxes, e-mail or voice messages) deposited in your Internet mailbox.
44
LIASSE 23690216-5A.book Page 45 Lundi, 10. décembre 2001 10:42 10
Internet (Menu 9)
Introduction
,PPHGLDWHFRQQHFWLRQ
You have two immediate connection alternatives available:
Access through the menu,
+ PRESS M, 9, 2, OK
Telephoning
Access through the keys,
+
Press the
@
key twice.
1
6FKHGXOHGFRQQHFWLRQ
Directory
To get scheduled connections, you should first set your machine (please refer to § Connection on
page 47).
75$160,66,219,$7+(,17(51(7
2
Whatever the document to be transmitted (fax, e-mail or voice message), this is stored in the machine’s
memory and will be transmitted via the Internet the next time you get connected.
Settings
7UDQVPLVVLRQWRDQHPDLODGGUHVV
3
7UDQVPLWWLQJDID[WRDQHPDLODGGUHVV
+
+
+
Fax
Place the document in the feeder.
Press the
@
key.
Type your party’s e-mail address (or use either the directory key or the
4
(BIS) key.
TAD
❑ To enter the character @, use the
and
keys at the same time on the alphabetic
keypad.
To enter the dot, press the
For capital letters, press the
5
key.
Printing
key and the relevant letter at the same time.
You can move in the data entry field using the
or
key, delete the character to the left of
the cursor by briefly pressing the C key or delete all characters by holding the C key down.
+
+
Press the
or
@
6
key to confirm.
Doc control
If you want to send the document to several addressees:
• Press the OK key then
@
.
7
• Type the next e-mail address.
• Repeat the procedure for each new e-mail address.
+
Advanced
functions
@
Press the
key.
The document will be transmitted via the Internet the next time you get connected.
❑ If INTERNET and a differed time are displayed, the document to send via Internet is ready and
the system will try again in a few minutes. Then when SMS is displayed alone on the screen,
you have the choice of immediately executing or deleting this transmission, please refer to the
section entitled DOCUMENT CONTROL (MENU 6) on page 31.
6HQGLQJDQHPDLOWRDQHPDLODGGUHVV
@
Internet
To send a typed message to an e-mail address:
+
Services
+ PRESS M, 9, 3, OK
Enter your party’s e-mail address.
Options
Appendices
45
8
9
LIASSE 23690216-5A.book Page 46 Lundi, 10. décembre 2001 10:42 10
Internet (Menu 9)
❑ To enter the character @, use the
To enter the dot, press the
For capital letters, press the
and
keys at the same time on the alphabetic keypad.
key.
key and the relevant letter at the same time.
You can move in the data entry field using the
or
key, delete the character to the left of the cursor
by briefly pressing the C key or delete all characters by holding the C key down.
+
Press twice OK key.
or
+
+
+
If you want to send the e-mail to several addressees:
• Type the e-mail of the first addressee,
• Press the OK key.
• Type the next e-mail address.
• Press OK again to type new e-mail addresses.
• Press OK twice to confirm the last e-mail address.
Type in the subject of the message and press OK to confirm.
Then type in the text of your message.
❑ For capital letters, press the
key and the relevant letter at the same time.
You can move in the data entry field using the
or
key, delete the character to the left of the cursor
by briefly pressing the C key or delete all characters by holding the C key down.
+
Press OK to confirm.
The text you have typed in will be sent via the Internet the next time you get connected.
❑ If INTERNET and a differed time are displayed, the text to be sent via Internet is ready and the system
will try again in a few minutes. Then when SMS is displayed alone on the screen, you have the choice of
immediately executing or deleting this transmission, please refer to the section entitled DOCUMENT
CONTROL (MENU 6) on page 31.
6HQGLQJDYRLFHPHVVDJHWRDQHPDLODGGUHVV
To send a voice message to an e-mail address:
+
+ PRESS M, 9, 4, OK
Type the e-mail address and press OK to confirm.
❑ To enter the character @, press the Ctrl and
+
+
keys at the same time on the alphabetic keypad.
Pick up the handset and record your voice message.
Hang up the handset after the recording.
The voice message will be sent via the Internet the next time you get connected.
❑ If INTERNET and a differed time are displayed, the voice message to be sent via Internet is ready and
the system will try again in a few minutes. Then when SMS is displayed alone on the screen, you have
the choice of immediately executing or deleting this transmission, please refer to the section entitled
DOCUMENT CONTROL (MENU 6) on page 31.
5(&(37,219,$7+(,17(51(7
Whatever the document received (fax, e-mail or voice message), reception takes place automatically each time
you connect to the Internet.
❑ A file other than a fax (Word processing, CAD, etc, file) cannot be processed by your fax machine. You
can keep these documents in your Internet mailbox for future process using a PC (please refer to
§ Sorting received mails on page 48).
46
LIASSE 23690216-5A.book Page 47 Lundi, 10. décembre 2001 10:42 10
Internet (Menu 9)
Introduction
5HFHLYLQJID[HVDQGHPDLORQWKH,QWHUQHW
To print out your faxes or e-mail, press the
key as you would do for a fax.
5HFHLYLQJDYRLFHPHVVDJHYLDWKH,QWHUQHW
To listen to a voice message, press the
Telephoning
key, as you would do for a message received on your
TAD.
1
6(77,1*6
Directory
35,17,1*287,17(51(76(77,1*6
2
The Internet settings can be printed out through two menus:
+ PRESS M, 9, 5, 4, OK
Settings
or
+ PRESS M, 5, 4, OK
(this will print out all the machine settings).
3
Fax
&855(176(77,1*6
4
&RQQHFWLRQ
TAD
To choose your mode of connection to the Internet:
+
+ PRESS M, 9, 5, 1, OK
Choose either one of the following two options using the
or
key and press OK to confirm :
• VOLONTARY
The connection to the Internet will be established only at your request as you press:
@
5
Printing
TWICE or M, 9, 2, and OK (INTERNET/IMMEDIATE ACCESS).
• PERIODICAL
The connection will be established a certain number of times a day. To do so, define:
- THE FIRST CALL: this is the time of the first connection. Press OK to confirm.
- THE NUMBER OF CALLS: this is the required number of connections each day. Press OK to
confirm.
- THE LAST CALL: this is the time of the last connection (this parameter appears only if you
have chosen to make at least 2 calls). Press OK to confirm.
6
Doc control
7
Advanced
functions
❑ The Internet connection start and end times are extended to +/- 15 mn around the chosen time, to
avoid Internet access saturation.
Services
8
7UDQVPLVVLRQ
To choose your Internet transmission mode:
+
+ PRESS M, 9, 5, 2, OK
@
Choose using the
or
key and press OK to confirm:
• IMMEDIATE
A connection takes place as soon as a fax, e-mail or voice message to be sent via the Internet is
stored in the machine’s memory, generating the immediate transmission of that document.
• AT CONNECTION
The faxes, e-mail or voice messages to be sent via the Internet will be transmitted only at the
time of connection (whether automatic or manual).
Internet
Options
Appendices
47
9
LIASSE 23690216-5A.book Page 48 Lundi, 10. décembre 2001 10:42 10
Internet (Menu 9)
6HUYHUV
To access the servers parameters (if you did not choose OTHERS as the access provider) :
+
+ PRESS M, 9, 5, 3, OK
Modify one of the following servers as required:
• SMTP server: shows the address of the Internet transmission server, which you can modify. Press OK to
confirm.
• POP3 server: shows the address of the Internet reception server, which you can modify. Press OK to
confirm.
• PRIMARY DNS and SECONDARY DNS servers: shows the addresses of the servers routing messages on
the Internet, which you can modify. Press OK to confirm.
6RUWLQJUHFHLYHGPDLOV
To choose the destination of the e-mail received on your fax machine.
+ PRESS M, 9, 6, OK
Then, choose one of the following three options using the
+
+
+
F@X™ ONLY:
or
key, and press OK to confirm:
all mail is received by your fax machine.
PC ONLY: all mail is kept in the mailbox to be read from a PC.
Your fax machine then only indicates the number of messages (faxes, e-mail or voice messages) received
in your Internet mailbox, avoiding you to needlessly connect your PC when you have not received any
message.
SHARE PC:
the documents processable by your fax machine (faxes, e-mail and voice messages) can be
printed out or listened to. All other documents are kept in the mailbox to be read from a PC.. Choose one
of these options using the
or
key and press OK to confirm:
• FORWARD TO PC: enter your PC’s e-mail address (assuming in that case that the PC subscription differs from the fax machine subscription) and press OK to confirm. Choose the type of e-mail to be sent
on the PC (all e-mail, or only those with unprocessable attachments), and press OK to confirm.
• SHARED PC MBOX (the PC and fax machine share the same e-mail address).
Choose and press OK to confirm:
- to delete the e-mail from your mailbox,
- to keep them.
❑ If you have chosen PC SHARING or PC ONLY, your fax machine will tell you the number of mails present
in your mailbox at the end of the connection.
5HOD\LQJUHFHLYHGGRFXPHQWV
$FWLYDWLQJ'HDFWLYDWLQJWKHUHOD\IXQFWLRQ
You can automatically relay all received messages (faxes, e-mail or voice messages) to another telephone set, fax
machine or PC.
+ PRESS M, 9, 8, OK
Choose one of the following three options using the
+
or
key, and press OK to confirm:
ON
• If you choose WITH RELAIS and press OK to confirm, all your messages (faxes, voice messages and
readable attachments) are relayed to a phone/fax machine.
- Enter the destination phone/fax number. Press OK to confirm.
- Choose the type of messages to be forwarded (VOICE, FAX or FAX/VOICE RELAY) and press OK to
confirm.
- If you have chosen VOICE or FAX/VOICE, enter the remote access code of the fax/voice answering
machine (if not already done), and press OK to confirm.
48
LIASSE 23690216-5A.book Page 49 Lundi, 10. décembre 2001 10:42 10
Internet (Menu 9)
Introduction
- Choose WITH or WITHOUT OGM and press OK to confirm.
If you choose WITH OGM, this will inform you on the destination phone / fax of the incoming
of relayed documents. To record the greeting message, pick up the handset, record the OGM
and hang up.
- Choose SECURED RELAY or FREE RELAY and press OK to confirm.
- If you have chosen FAX and SECURED RELAY, enter the remote access code of the fax/voice
answering machine (if not already done), and press OK to confirm.
• If you choose WITH RELAY @ and press OK to confirm: all your messages will be relayed to
an e-mail address. Choose one of the following two options using the
or
key and press
OK to confirm:
- TO MY MAIL, to relay all your messages to your own e-mail address (shared with a PC for
instance),
- TO OTHER ADD: enter the relay e-mail address and press OK to confirm. The connection will
be established a certain number of times a day, depending on the Connection settings made
(please refer to § Connection to the Internet on page 44)
+
+
DEACTIVATE:
Telephoning
1
Directory
2
Settings
all your messages will be kept in your fax machine.
SETTINGS: if you have already activated the relay function once, this menu enables you to change
a number of parameters (addressee’s phone/fax number or e-mail address, type of messages to be
relayed, remote access code, OGM, secured relay or free relay, etc.).
Once you have made the changes, validate menu 981>Activate again by pressing the OK key in
order to re-activate the relay function taking the changes into account.
3
Fax
4
5HWULHYLQJUHOD\HGGRFXPHQWV
When receiving your relayed documents on the destination phone/fax, you should apply the following
procedure:
+
+
+
TAD
Pick up the handset.
5
Enter the remote access code as you hear the beeps or the relay message.
Then, follow the same procedure as for remote access to listen to the voice messages and/or
receive the fax messages and/or e-mail.
Printing
6
Doc control
7
Advanced
functions
Services
@
Internet
Options
Appendices
49
8
9
LIASSE 23690216-5A.book Page 50 Lundi, 10. décembre 2001 10:42 10
Internet (Menu 9)
50
LIASSE 23690216-5A.book Page 51 Lundi, 10. décembre 2001 10:42 10
Options
Introduction
237,216
Telephoning
',63/$<
If you subscribe to a caller display service, the machine will show the caller information on its display
and on the handset display.
0DFKLQHGLVSOD\
2
NUMBER ONLY
Settings
alternating with
NUMBER/NAME
------
INCOMING CALL
Number withheld
Directory
+DQGVHWGLVSOD\
INCOMING CALL
Number
1
3
alternating with
WITHHELD
Fax
INCOMING CALL
Number unavailable
alternating with
4
UNAVAILABLE
INCOMING CALL
Operator
TAD
alternating with
UNAVAILABLE
International
5
INCOMING CALL
Printing
alternating with
UNAVAILABLE
NUMBER
INCOMING CALL
Payphone
6
alternating with
Doc control
NUMBER
NUMBER ONLY
INCOMING CALL
Ringback
alternating with
NUMBER/NAME
7
If the call is from a number stored in the machine’s directory, the display will show the name it belongs
to rather than the number. The handset display will only show the number.
The machine stores the date, time and number or name of up to 10 calls - after 10 calls have been stored
it retains the last 10. If a new call is from the same number as an earlier call only the later call details will
be stored. Number Withheld, Number Unavailable, Operator and International calls will not be stored.
The list of stored call details can be reviewed from the base station and from the handset.
and
Internet
keys to scroll through the list.
• To call a number from the stored list press the
• To fax to a number from the list press
Services
@
To review the list from the base station
• Press M then
. The display shows details of the last call.
• Use the
Advanced
functions
key while the number is displayed.
while the number is displayed.
Options
When displaying call details the display alternates between the name (or number) and the date and time
of the call. It will also show a T to indicate a telephone call, or, if the call was a fax and was answered,
an F.
Appendices
51
8
9
LIASSE 23690216-5A.book Page 52 Lundi, 10. décembre 2001 10:42 10
Options
To review the list from the cordless handset
• Press i then
. The display shows details of the last call.
• Use the
and
keys to scroll through the list.
• To call a number from the stored list press the
key while the number is displayed.
86,1*7+(5.(<
5.(<
If your machine is connected to a private network (PABX), this key usually enables you to transfer a call (refer
to the automatic switchboard documentation).
52
LIASSE 23690216-5A.book Page 53 Lundi, 10. décembre 2001 10:42 10
Appendix
Introduction
$33(1',;
Telephoning
5(3/$&(0(172)&21680$%/(6
Consumables (ink ribbon and ribbon gauge card) are already installed in your machine, but you will
eventually have to change them. To do so, please refer to the instructions given in the following
paragraphs.
1
Directory
,1.5,%%21
2
The ink ribbon enables the unit to print on normal paper.
Only use the ink ribbon matching the manufacturer’s specifications. To use other types of ink ribbon could
damage the unit and invalidate the guarantee. Documents printed by your unit can be read from the used
portion of the worn ink ribbon. If these documents are considered as confidential, you may want to
remove the ink ribbon whenever you leave the unit.
+
Pick up the handset and put it on the side.
Settings
3
Fax
4
TAD
OR
5
Printing
6
+ Open the front cover: lift it towards you until it remains open.
Doc control
7
1
1
1
OR
Advanced
functions
1
Services
@
+ Open the rear cover: unlock the latches (1) before pushing the cover towards the rear.
Internet
Options
Appendices
53
8
9
LIASSE 23690216-5A.book Page 54 Lundi, 10. décembre 2001 10:42 10
Appendix
2
2
OR
+ Remove the worn ink ribbon from its housing.
+ Position the ink ribbon above its housing under the rear cover.
+ Insert the ink ribbon into its housing without removing the adhesive strip (2):
• Position the right-hand (white) end of the main roller onto the retractable axis.
Position the left-hand (green) end of the main roller onto the left axis.
OR
2
2
+ Pull off the adhesive strip (2) from the ink ribbon.
5
6
6
5
OR
3
3
4
4
+ Insert the small roller into its housing:
+ Check that the gear axis (3) is correctly positioned in its slot (4) as is the other axis (5) in its corresponding slot (6).
54
LIASSE 23690216-5A.book Page 55 Lundi, 10. décembre 2001 10:42 10
Appendix
Introduction
5,%%21*$8*(
The gauge card enables screen display, after printout, of the percentage of remaining ink ribbon.
Telephoning
7
1
Directory
2
Settings
+ The front cover being open, locate the gauge
card housing (7).
+ Push downward on the gauge card housing to
unlock it: it opens automatically, letting you
access the worn gauge card.
3
Fax
4
TAD
8
9
5
7
Printing
+ Remove
the worn gauge card (8) from its
housing.
+ Remove the new (pre-cut) gauge (9) from the
ribbon gauge card (8).
6
Doc control
7
Advanced
functions
9
Services
@
10
+ Insert the new gauge card (9) into its hou-
+ Close the flap of the gauge card housing by
sing. Make sure the chip (10) of the gauge
card (9) is upwards, bevelled corner to the
top left side.
rotating it. Once into place, push it upward to
block it. Close the cover and replace the
handset.
Internet
Options
Appendices
55
8
9
LIASSE 23690216-5A.book Page 56 Lundi, 10. décembre 2001 10:42 10
Appendix
❑ The gauge card displays on the screen, after each printing, the percentage of remaining ink ribbon. If the
gauge is not installed or not properly installed, the unit displays: MISSING GAUGE .
❑ If you forgot to change the gauge at the same time as the ribbon, the unit displays: GAUGE EMPTY .
7528%/(6+227,1*
)DLOXUHV
5HPHGLHV
• The screen remains blank.
• Check that the power cord is correctly connected on both its
sides.
• The machine does not answer the
call.
• The
icon may be off: check the reception mode.
• Check the number of rings (please refer to § Number of rings
for the auto mode on page 15).
• Configure the machine on "private network" (please refer to
§ Type of network on page 14).
• The printed photocopy is blank.
• The document was placed upside down in the document feeder.
• The telephone exchange does not
recognise the number you have
called.
• Check that the telephone line cord is correctly connected to the
device.
• Check the telephone line and the phone outlet.
• The machine does not ring.
• The
icon flashes: restore ringing (please refer to § Ringing
melody on page 13).
• The telephone does not work.
• Check that the power cord is correctly connected on both its
sides.
• There may be a power failure.
• Check the telephone line and the phone outlet.
• One or several vertical black strips
appear on the documents copied or
received.
• Open the front cover and clean the scanning device (analysis)
located in front of the white roller with a soft lint-free rag
soaked with alcohol. After cleaning, close the front cover and
make a copy to check that the black strips have disappeared.
• The gauge card
unclipped.
• You may easily put it back into place: approach the gauge card
housing, striations downwards, and position both axes towards
the slots of the housing lower part, then push until clipped in
(please refer to § Replacement of consumables on page 53).
housing
has
The screen displays:
OUT OF PAPER
PRINTER COVER
56
• Put paper into the paper feeder.
• Close the rear cover.
PAPER JAM
• Open the rear cover to access to the paper path and remove the
sheet of paper. Make sure the rear cover is properly closed
afterwards.
OVERHEATING
• The last printed documents show a lot of black smears, the
printer temperature is too high. Wait a few moments for it to
cool.
LIASSE 23690216-5A.book Page 57 Lundi, 10. décembre 2001 10:42 10
Appendix
Introduction
)DLOXUHV
5HPHGLHV
GAUGE EMPTY
• You probably forgot to replace the gauge when you replaced
the printer ribbon.
MISSING GAUGE
• Remove the gauge housing cover and make sure the gauge is
present and correctly positioned.
CHANGE RIBBON
• The ink ribbon is completely used: install a new printer ribbon
with its new gauge.
Telephoning
1
Directory
• Open the front cover and check the document path.
REMOVE DOCUMENT
• Print the received faxes (and/or listen to the voice messages
received).
MEMORY FULL
• Other cases
2
Settings
• Unplug your device from the mains socket, then plug it back.
If the failure persists, call your after-sales service.
3
75$160,66,215(3257&2'(
Fax
The result of each communication is given by the logs (transmission/reception) and the communication
report. In case of failure, the result is a code, whose meaning is as follows:
)$,/85(&2'(62)7+(3+21()#;606
4
TAD
Code 01 - You get no answer
Please call later.
5
Code 02 - The called number is may be incorrect, since no fax answers
Check the number of your party.
Printing
Code 03 - STOP
You pushed on STOP during the communication.
6
Code 04 - Invalid abbreviated number
Check the number.
Doc control
Code 05 - Document feeder failure during the communication
Document jam or failure of the document feeder.
Code 07 - Failure in the operation of the remote terminal or line
Restart the communication.
7
Advanced
functions
Code 08 - The document you sent may not have been correctly received
Send it again and check with your the addressee.
Code 0A - Active polling
You tried an active polling while the remote terminal had no polled document.
Services
Code 0B - Difference between the number of pages forecast at transmission and the number of
pages sent
Check the number of pages.
Code 13 - Full memory
Fax reception has become impossible. Print the received faxes and/or listen to your calls.
@
Internet
Code 17 - Protected access
Your machine is in protected access; someone tried to call you while he/she did not have your password.
Options
Code 23 - Unknown mailbox number
The number of mailbox you entered is unknown by your party’s machine.
Appendices
57
8
9
LIASSE 23690216-5A.book Page 58 Lundi, 10. décembre 2001 10:42 10
Appendix
,17(51(7&20081,&$7,21)$,/85(&2'(6
Codes 40 et 41 - No answer from the access provider
Establishing a modem communication with the access provider is impossible. If the failure is systematic, check
the call number of your access provider.
Code 42 - Connection with the access provider is impossible
The access provider refuses the connection; the service is momentarily unavailable. If the failure is systematic,
check your Internet connection parameters.
Code 43 - Connection with the SMTP server is impossible
Establishing a communication with the SMTP server delivering the mail is impossible; the service is momentarily
unavailable. If the failure is systematic, check the Internet mail and servers’ parameters.
Code 44 - Connection with the POP3 server is impossible
Establishing a communication with the POP3 server recovering the mail is impossible; the service is momentarily
unavailable. If the failure is systematic, check the Internet mail and servers parameters.
Code 45 - Disconnection of the access provider
The service is momentarily unavailable. Retry later.
Code 46 - Disconnection of the SMTP server
Disconnection of the SMTP server delivering the mail; the service is momentarily unavailable. Retry later.
Code 47 - Disconnection of the POP3 server
Disconnection of the POP3 server recovering the mail; the service is momentarily unavailable. Retry later.
Code 48 - Disconnection of the Internet
The service is momentarily unavailable. Retry later.
7(&+1,&$/63(&,),&$7,216
Your Phonef@x™ SMS operates with any Internet access provider complying with all of the following
specifications:
• § modem access: V42bis (14400 b/s) or (9600 b/s) - V42
• § protocols:
TCP / IP / PPP
• § mail:
SMTP-POP3
58
NG 23260924-7 CERTIF GARANTIE UK.fm Page 1 Mercredi, 5. décembre 2001 11:12 11
23260924-7
GUARANTEE (UK Terms and Conditions)
In order to apply the guarantee, you should contact your dealer. Proof of purchase will be required. Should malfunctioning arise, the dealer will advise you
what to do.
If you bought your equipment from SAGEM directly, the following shall apply :
A
SAGEM undertakes to remedy by repair, free of charge for labour and replacement parts, any defects in the equipment
during a period of twelve (12) months from the date of original delivery of the Equipment, where those defects are a result
of faulty workmanship.
During this twelve month guarantee period, the defective equipment will be repaired free of charge; the
customer must however return the defective equipment at his/her own expense, to the address given by
SAGEM After Sales Department, the phone number of which can be found on the delivery slip. Unless
the customer has concluded with SAGEM a maintenance contract in respect of the equipment which
specifically provides for repairs to be carried out at the customer’s premises, the repairs will not be carried
out on the equipment at the customer’s premises.
The following sentence applies to purchases of equipment for the customer’s trade, business or
profession. Except as otherwise expressly provided in this Document and to the extent permitted by law,
SAGEM makes no representations or warranties, express or implied, statutory or otherwise, and to such
extent, all terms and conditions implied by law are hereby excluded.
This guarantee does not affect the Customer’s statutory rights.
B
Exclusions From Guarantee
SAGEM shall have no liability under the guarantee in respect of :
•
damage, defects breakdown or malfunction due to :
- failure to properly follow the installation process and instructions for use; or
- an external cause to the equipment (including but not limited to, lightening, fire, shock or
water damage of any nature); or
- modifications made without the written approval of SAGEM SA; or
- a failure or neglect to maintain the equipment or inappropriate maintenance; or
- unsuitable operating conditions, particularly of temperature and humidity; or
- repair or maintenance of the equipment by persons not authorised by SAGEM; or
•
wear and tear from normal daily use of the equipment and its accessories
•
damage due to insufficient or bad packaging of equipment when returned to SAGEM
•
supply of new versions of software
•
work on any equipment or software modified or added without the prior written consent of
SAGEM
•
malfunctions not resulting from the Equipment or from software installed in user workstations for
the purpose of use of the equipment
•
communication problems related to an unsuitable environment, including :
- problems related to access and/or connection to the Internet such as interruptions by access
networks or malfunction of the line used by the subscriber or his correspondent
- transmission faults (for example poor geographical coverage by radio transmitters,
interference or poor line quality)
- the local network fault (wiring, servers, workstations) or the failure of the transmission
network
•
the normal servicing (as defined in the user guide supplied with the equipment) as well as
malfunctioning due to servicing not being carried out, servicing costs are in any event always
borne by the customer.
C
In the cases set forth in § B) as well as after expiry of the twelve month guarantee period, the customer must ask SAGEM
for an estimate, and he/she must accept the estimate and agree to pay the charges mentioned in it before returning the
equipment to SAGEM. The repair and delivery costs will be invoiced to the customer.
The foregoing shall apply unless otherwise agreed in writing with the customer and only for the UK. If
any provision of this guarantee shall be held to be in whole or in part invalid or illegal due to an
obligatory rule applicable to consumers pursuant to their national legislation, such invalidity or
illegality shall not impair or affect the remaining provisions or parts of this guarantee.
4COUV 23690216-5.fm Page 4 Vendredi, 7. décembre 2001 1:35 13
To order ribbon
7225'(55,%%21
Your fax machine uses the TTR 900 serial ribbon (Warning: the following ribbons are not compatible : TTR 812, 815 and
816).
Please use the following reference to order new ribbons:
TTR 900 RIBBON, Reference: 23 690 211-5
Attention - The free sample ink ribbon delivered with your unit is good for about 25 pages.
*23690216-5*
User’s manual 23 690 216-5 Ind A
DATA SUBJECT TO CHANGE WITHOUT NOTICE
27, rue Leblanc - 75512 PARIS CEDEX 15 - FRANCE
http://www.sagem.com