1
Pi Aero
USER GUIDE
3L$HUR8VHU*XLGH
Part Number: 29P-071189-3E
Issue 3.0 Date May 1999
Pi and the Pi Logo are trademarks of Pi Group Limited
© Pi Research 1999
1
Disclaimer
Pi Research makes no representation or warranties of any kind whatsoever with
respect to the contents hereof and specifically disclaims any implied warranties of
merchantability or fitness for a particular purpose. Pi Research shall not be liable for
any errors contained herein or for incidental or consequential damages in connection with
the furnishing, performance or use of the software, associated hardware, or with this written
material.
Pi Research reserves the right to revise this publication from time to time, and to
make changes in the content hereof without obligation to notify any person of such revision
or changes.
A copy of the Pi Research Terms and Conditions of Sale is available on request, and
includes a declaration of the warranty and limitation of liability which apply to all Pi Research
products and services.
2
Pi Aero User Guide
&RQWHQWV
Introduction......................................................................................... 7
Results Database (*.aero_rdb files) ...................................................... 7
Inventory database (*.aero_idb files) .................................................... 8
Placement files (*.aero_pla files) .......................................................... 9
Channel file
(*.aero_cdb files)......................................................... 10
Workspaces (*.aero_wsp files) .......................................................... 10
Operation ............................................................................................ 10
Computer configuration................................................................... 13
Setting up for networked usage .......................................................... 14
Workspaces....................................................................................... 15
Saving a workspace............................................................................ 15
Opening a workspace ......................................................................... 16
Closing a workspace........................................................................... 17
Results storage................................................................................. 18
Opening and creating Results Databases .......................................... 20
Folders................................................................................................ 22
Runs ................................................................................................... 22
Active database .................................................................................. 23
Run comments.................................................................................... 24
3
Car configuration.............................................................................. 26
Component types................................................................................ 27
Properties ........................................................................................... 27
Parts ................................................................................................... 29
Configuration layout............................................................................ 31
Setting the configuration for a run....................................................... 32
Placement definitions ...................................................................... 35
Opening / creating a Placement file .................................................... 36
Selecting the target Excel worksheet.................................................. 38
Selection Group .................................................................................. 39
Defining a placement .......................................................................... 41
1D table placement........................................................................... 42
Step 1 of the Wizard ........................................................................... 43
Qualifiers ............................................................................................ 44
Step 2 of the Wizard ........................................................................... 45
Sorting the data .................................................................................. 46
Step 3 of the Wizard ........................................................................... 53
2D table placement........................................................................... 55
Wizard step 1...................................................................................... 56
Wizard step 2...................................................................................... 56
Wizard step 3...................................................................................... 58
Configuration values placement ..................................................... 59
Wizard step 1...................................................................................... 60
Wizard step 3...................................................................................... 60
4
Pi Aero User Guide
Sending data to Excel ...................................................................... 62
Triggering Excel macros ..................................................................... 63
PiAero Options ................................................................................. 65
Data Recovery................................................................................... 69
PiAero Administration...................................................................... 72
Selecting channel and inventory databases........................................ 72
Deleting channels ............................................................................... 73
Compacting databases ....................................................................... 73
Installation......................................................................................... 74
System requirements.......................................................................... 74
Installation procedure ......................................................................... 74
Windows Registry ............................................................................... 76
Contact information ......................................................................... 78
5
6
Pi Aero User Guide
,QWURGXFWLRQ
PiAero provides the following basic functions:
■
takes data on-line from Pi's wind tunnel instrumentation and stores it in a
database
■
allows you to develop an inventory of parts, used to describe the model
configuration for each run
■
places result and model configuration data in an Excel spreadsheet
Excel is intended to be the primary means for displaying the data, for generating reports and
printouts. The Excel spreadsheet is linked 'live' to PiAero, so that data appears the moment
it becomes available from the instrumentation. PiAero can also trigger macros in Excel upon
receipt of data, so that printouts and other function calls can be run automatically.
The tables injected into the spreadsheet by PiAero can be used as sources of data for Excel
charts and pivot tables. By spending a little time customising the Excel spreadsheet, you can
create any number of reports, summary sheets, trend graphs etc... Once this has been
done, it becomes a trivial task to select and load in data for the runs that you want to view.
There are four types of data files used by PiAero. The distinction between them helps to
explain the structure of the program.
5HVXOWV 'DWDEDVH
DHURBUGE ILOHV
A Results Database stores data generated by the wind tunnel instrumentation (forces,
pressures etc...) run by run, together with the model configuration for each run.
You can create any number of results databases, which could be used to separate out data
for different projects, different cars, or perhaps each wind tunnel session.
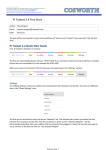
A results database is displayed in PiAero as shown overleaf:
7
Name of results
database file
Folders containing
run data
List of runs
contained in the
highlighted folder
Model configuration for the highlighted run
,QYHQWRU\ GDWDEDVH
DHURBLGE ILOHV
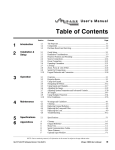
An Inventory Database stores all the details of the model parts.
List of available
parts for the
highlighted
component
When you define the model configuration for a particular run, you are associating the run
with various parts in the inventory. However, the details of the parts actually remain in the
Inventory database.
8
Pi Aero User Guide
Note: If you delete a part from an inventory, then the information about it will be lost from
every run that used that part
Although it is possible to create a number of inventory databases, this should only be done if
you have distinct projects with no commonality of parts. The best strategy is to maintain a
single inventory database that is carefully controlled - e.g. only one user should update the
inventory at a time.
3ODFHPHQW ILOHV
DHURBSOD ILOHV
A Placement file contains instructions for putting data into an Excel spreadsheet. It contains
one or more Selection Groups, each of which contains the following:
■
a source of data (i.e. one or more runs)
■
a number of methods for placing data from that source into the spreadsheet
The spreadsheet will be populated with data whenever you change a data selection. If that
includes the current run, then the spreadsheet will be change in real-time as results are
generated.
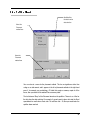
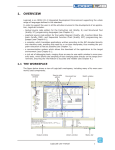
A Placement file is displayed in PiAero as follows:
Excel file into which the data will be placed
Name of the
placements file
Selection group
containing one run
Selection group
containing three
runs including the
current run
List of placement methods defined for
the two Selection Groups
9
You will typically create a spreadsheet and a placement file as a matched pair: the
formatting, charts and reports of the spreadsheet will correspond to the placement methods
of the placement file.
&KDQQHO ILOH
DHURBFGE ILOHV
PiAero maintains a channel file containing a record of all the channel names that PiAero has
ever encountered. These are used when presenting the user with a list of channels from
which to select.
It is possible to delete redundant channels from this file using PiAero Administrator - a
separate program. If you delete a channel, but PiAero encounters it again (for example,
when opening an old results database), then it will re-insert the channel name into the
channel file.
More details are available on PiAero Administrator in a later section.
:RUNVSDFHV
DHURBZVS ILOHV
The workspace is the collection of active windows such as Results, Configuration, and
Placement. Having created a workspace it can be saved for future recall and use.
Saving a workspace saves the active windows in the position and size / configuration you
defined when using them. See the section on Workspaces on page 15.
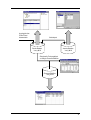
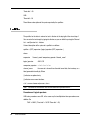
2SHUDWLRQ
The interaction of data in PiAero is best shown by the diagram on the next page:
10
Pi Aero User Guide
Incoming data from
Pi Wind Tunnel
Instrumentation
Selected parts
Inventory Database
*.aero_idb file
Results Database
*.aero_rdb file
Data placed in Excel spreadsheet
according to Placement Definitions
Placement Definitions
*.aero_pla file
11
Setting up
To set up PiAero for regular use, you should do the following:
■
create a Results Database with suitable folders (e.g. February, March...)
■
create an inventory of model parts
■
create one or more placement files and corresponding spreadsheet templates
Regular operation
Once this is done, you will typically operate PiAero as follows:
12
■
From run to run... make sure the model configuration accurately describes the
model being tested.
■
When analysing data... generate spreadsheet reports by dragging runs from the
Run Databases into Data Selections
Pi Aero User Guide
&RPSXWHUFRQILJXUDWLRQ
At the tunnel, PiAero needs to be running on a computer connected to the instrumentation
by a serial communications link or on a network.
Printer
Wind Tunnel Instrumentation
Computer running PiAero
Away from the tunnel, it is likely that others will want access to the data, perhaps using a
fileserver as a central repository.
Server
Laptop returned from tunnel
If a computer (e.g. a laptop) is taken to the wind tunnel to collect results, then it is very
important to maintain control over the "master" copies of the data files. If, for example, two
13
engineers are both editing different copies of the Inventory database, one on the tunnel
laptop, one on the factory server, then you have lost control over the master copy.
It is not necessary to be strict about the control of Placement files and Excel templates, as
these do not store unrecoverable information. It is likely that each user of PiAero will have
their own Placement files and Excel templates to match their own requirements for viewing
the data. You may, however, keep a library of these files on the fileserver for common
access.
6HWWLQJ XS IRU
QHWZRUNHG XVDJH
You can easily change the results and placement files that PiAero is using, simply by
selecting Open or New from the File menu. With the correct network configuration, you can
read and write to these files on remote computers as if they were on your own machine.
PiAero also needs an inventory and a channel file. To select which files PiAero uses, you
need to start PiAero Administrator and change the choice of file. See the section towards the
end of this manual.
14
Pi Aero User Guide
:RUNVSDFHV
The workspace is the collection of active windows such as Results, Configuration, and
Placement you have used during aerodynamic analysis. Saving a workspace saves these
active windows in the position and size / configuration you defined when using them.
Once created the workspace is automatically saved when you close it, when you open
another workspace or when you exit PiAero.
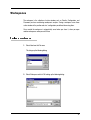
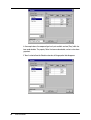
6DYLQJ D ZRUNVSDFH
1.
Select New from the File menu.
This brings up the following dialog:
2.
Select Workspace and click OK to bring up the following dialog:
15
3.
Choose a Drive and Directory in which to save the workspace, enter the File
name and click Save.
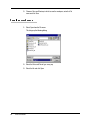
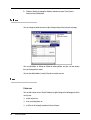
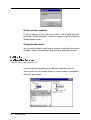
2SHQLQJ D ZRUNVSDFH
16
1.
Select Open from the File menu.
This brings up the following dialog:
2.
Select the Drive and Files of type .aero_wsp.
3.
Select the file and click Open.
Pi Aero User Guide
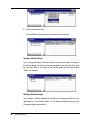
&ORVLQJ D ZRUNVSDFH
1.
Select Close Workspace from the File menu.
This brings up the following dialog:
2.
Click Yes or No as appropriate.
17
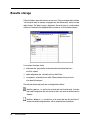
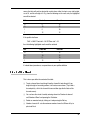
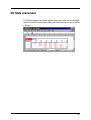
5HVXOWVVWRUDJH
A Results Database stores data from one or more runs. These can be organised into folders
- which might be used, for example, to segregate runs from different days, months, or major
model changes. The folder structure is displayed in the top left pane of a results window,
and the runs contained in the highlighted folder are shown as a list in the bottom left pane.
A run contains three types of data:
■
wind tunnel data - generated by the instrumentation and imported into over a
serial link / network
■
model configuration data - entered by the user within PiAero
■
run comments - entered by the user within PiAero by double-clicking on the run
in the lower left-hand pane
Runs with and without wind tunnel data are distinguished as follows:
identifies a past run - i.e. one that has received data from the wind tunnel. It contains
both model configuration data and wind tunnel data, and cannot be deleted from the
database.
identifies a future run - i.e. one that has yet to receive data from the wind tunnel. It
contains only model configuration data, and can be deleted from the database.
18
Pi Aero User Guide
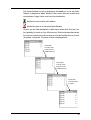
Each Results Database has one run designated as the current run. In turn, one Results
Database is designated as active. Whenever PiAero receives data from the wind tunnel
instrumentation, it assigns it to the current run in the active database.
Identifies the current run in the active database.
identifies the current run in a non-active Results Database
Since the runs are listed chronologically, a folder always contains firstly all the past runs,
then (optionally) the current run, then all the future runs. When the instrumentation indicates
that a new run is starting, the current run moves on to the next available future run. If one is
not available, it creates one. This process is shown in the diagram below
new run data
received: current
moves on to next
available future run
new run data
received: current
moves on to next
available future run
new run data
received: new run
is created
19
By creating a number of future runs, you can set up a sequence of model configurations in
advance of the wind tunnel test.
The minimum that you need to do to run PiAero is as follows:
■
open or create a results database
■
create a series of folders in which to store the runs
■
set the active results database
■
set the current run
You can optionally create a number of future runs.
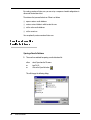
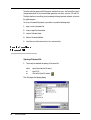
2SHQLQJ DQG FUHDWLQJ
5HVXOWV 'DWDEDVHV
Opening a Results Database
3.
There are three methods for opening a results database file:
either:
or:
or:
select Open from the File menu
type Ctrl-O;
click on the Open file button
This will bring up the following dialog:
20
Pi Aero User Guide
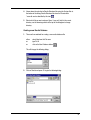
4.
Narrow down the selection to Results Database files using the file type filter at
the bottom of the dialog. Results Database files have the file extension
*.aero.rdb. and are identified by this icon.
5.
Select which file you want and press Open. If you can't find it in the current
directory, use the browsing controls at the top of the dialog box to change
directory.
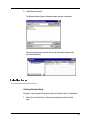
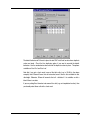
Creating a new Results Database
1.
There are three methods for creating a new results database file:
either:
or:
or:
select New from the File menu
type Ctrl-N
click on the New Database button
This will bring up the following dialog:
2.
Click on Results and press OK to give the following dialog:
21
3.
Choose a directory for storing the database and enter its name. Press Open to
create and start the database.
)ROGHUV
You can change the folder structure by right-clicking on the part that you want to change.
You can add folders as siblings or children of existing folders, and you can also rename
them by clicking on their names.
You can also delete folders, but only if they do not contain any runs.
5XQV
Future runs
You can add a future run to a Results Database by right-clicking on the following parts of the
run list pane:
22
■
on the last past run
■
or on an existing future run
■
or (if the run list is empty) anywhere in the run list pane
Pi Aero User Guide
The only restriction is that you cannot insert a new run between past runs.
Current run
In order to import data from the instrumentation, one run in the database must be selected
as the current run. This must be the first future run in a folder.
1.
If the folder doesn't contain any future runs, right-click on the last run and select
New Run Æ After Selection.
2.
Right-click on the first future run in the folder and select Current Run.
Deleting runs
To delete a run, right-click on a run and either select Delete or press the Del key. You
cannot delete the current run.
$FWLYH GDWDEDVH
Incoming wind tunnel data will get assigned to the current run in the active database. To
make a database active:
■
make sure the Results Database is open
■
select Active Results Database from the Settings menu.
A check sign ( 9 ) appears next to the Active Results Database whenever the currently
opened database is the active one.
23
Menu item for forcing a Results
Database to become the Active
Current runs in an
inactive database
Current runs in the
active Results
database
5XQ FRPPHQWV
Run comments appear in the lower left-hand pane of the results window, and can be edited
by double clicking on a run, as shown overleaf.
24
Pi Aero User Guide
Double-click
25
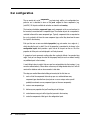
&DUFRQILJXUDWLRQ
The car consists of a set of components (e.g. front wing), and the car's configuration for a
particular run is described in terms of the parts assigned to those components (e.g.
'part#123'). All the parts available for selection are stored in an inventory.
The inventory also defines component types: each component on the car and each part in
the inventory is associated with a component type. The selection of parts for a component is
restricted to those of the same component type. Typically, components that are repeated on
the car (e.g. wheels) will share the same component type, so that they draw from the same
list of parts in the inventory.
Each part has one or more user-defined properties (e.g. part number, size, angle etc...),
which describe the part in detail. One of the properties is nominated to be shown in the
configuration layout, which provides a quick view of all the parts on the car. All of the
properties of all the parts can be displayed in an Excel placement.
If a property of a part represents a setting rather than a physical attribute - for example 'wing
angle' - then you can change the value for that property locally for each run without creating
any additional parts in the inventory.
A useful thing to bear in mind is that once you have entered data into the inventory, it can
never be removed entirely. PiAero offers various ways of hiding obsolete data, but it will still
remain in the database and can be recovered at a later date.
The steps you need to follow when building an inventory for the first time are:
26
1.
make a list of the components that make up your car, and decide how many
component types describe them (most parts on a car are unique, and so you will
probably have almost as many component types as there are components)
2.
create a new component type
3.
define any new properties that you'll need for parts of that type
4.
create however many parts of that type that you want in the inventory
5.
create the components of that type in the configuration layout
Pi Aero User Guide
&RPSRQHQW W\SHV
First, bring up the inventory from the View menu.
Creating a component type
On the left are the currently available component types. To create a new one, type its name
into the box to the left of the New button and click New.
To start with, no parts or properties are defined in the right-hand pane for that type.
Deleting / recovering a component type
If you want to delete a component type, then right-click on it and select Delete. If you wish to
recover it at a later date, then choose to show the obsolete 'Parts, Properties and Types'
from the box at the bottom left - all the deleted component types will now appear, marked by
a red cross. You may now right-click on a deleted type and select it to be 'Marked available'.
3URSHUWLHV
Click on the Add Property... button.
27
The properties shown are universal for the inventory, and can be re-used by many different
component types.
Creating a new property
To create a new property, enter its name and units into the boxes at the bottom. Also select
a 'type' - this affects how the property information is stored in the database and will restrict
the values that you can enter. Click the Add button.
The new property appears in the list.
Note: To enter the units symbol for degrees °, hold down the Alt key on your keyboard,
type 248 on the numeric keypad, then release the Alt key.
Editing a property
You can edit a property simply by clicking on it and changing the name, units or type down
at the bottom of the window. Do not press the Add button, as this will create another
property with your changed settings. When you click to another property, you will see your
edited changes appear.
Deleting / restoring a property
To delete a property from the global list, click on it and press the Delete key. A red cross will
appear against it.
Note: This will affect all parts that have this property, so proceed with care.
To restore it, click on it and press the Add button.
28
Pi Aero User Guide
3DUWV
First, add the properties that you require to the component type.
1.
click on the Add Property... button in the Inventory window.
2.
click on the property you wish to add.
3.
click on the OK button
4.
go back to step (1) and repeat until you have all the properties you want.
Now enter as many parts as you want into the inventory.
1.
enter values for the properties for a part. If the property is a setting (such as wing
angle) that you will change for each run, then just leave it blank
2.
press the tab key to move on and create a new row.
Changing the displayed property
The first property that is listed (i.e. the left-most column) is the property that will be displayed
in the configuration layout. To change this, right-click on the top row of the property that you
want to display and select 'Displayed property'. This property will now move to become the
left-hand column.
Removing / restoring properties
To remove a property, right-click on the top row of the property and select 'Marked
Obsolete'. Unless 'Properties' are selected in the Obsolete values box at bottom left, its
column will disappear. Otherwise, the column will remain, but greyed out. To restore it, rightclick again and select 'Marked Available'.
Removing / restoring parts
A similar technique is used to remove or restore parts from the inventory.
To remove a part, right-click on the left-hand cell of the part and select 'Marked Obsolete'.
Unless 'Parts' are selected in the Obsolete values box at bottom left, its row will disappear.
Otherwise, the row will remain, but greyed out. To restore it, right-click again and select
'Marked Available'.
29
In the example above, the component type has 4 parts available, and one ('Zany') which has
been made obsolete. The property 'Colour' has been made obsolete, and so is also shown
greyed out.
If 'None' is selected from the Obsolete values box, all the greyed out data disappears.
30
Pi Aero User Guide
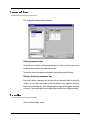
&RQILJXUDWLRQ OD\RXW
Once you have defined some component types in your inventory, you can define the list of
components that make up the car. This is displayed as a treeview, and appears in the righthand pane of the Results window.
From the main menu, select Configuration Layout from the View menu.
On the right are all the available component types. On the left is the treeview representing
all the components on the car.
Note that there is only one configuration layout defined in PiAero at a time. All results
windows will show the car's configuration using the same layout, even for a run performed
years previously with a completely different set of components on the car. Components that
were in use at the time of the run, but which no longer feature in the configuration layout, are
bundled together in the 'Obsolete Components' folder.
Defining a new component
To define a new component on the car, drag a component type from the right pane to the
relevant folder in the left pane.
Note that PiAero will not let you have two components with the same name. If you are using
the same component type more than once in the configuration layout, then PiAero will
prompt you to enter a new name.
31
Deleting / restoring a component
To delete a component, click on it and press the Del key. It will be moved down to the
bottom folder - 'Obsolete Components'. To restore the component, drag it back up from the
Obsolete Components folder.
Changing the folder structure
You can create new folders by right-clicking on the parent or sibling folder and selecting
'New folder'. Folders can be renamed by clicking on the name and typing the new name.
6HWWLQJ WKH
FRQILJXUDWLRQ IRU D UXQ
Once the inventory has been defined, you can define the configuration for each run.
When you select a run in the bottom left pane of a Results window, its configuration is
shown in the right-hand pane.
32
Pi Aero User Guide
Note that when a new run is created, either because run data has arrived, or because you've
created one manually, it will have the same configuration as the previous run.
Selecting a part
To select a different part for a component, double-click on it in the right-hand pane, or rightclick and choose Select Part...
Click on the part you want and press OK. If the part you require is not in the list, or if the list
is incorrect, then press the Modify Inventory button and make the necessary adjustments.
Note: If you edit the properties of an existing part, then the new properties will apply to all
runs where that part was selected.
Making a local property change
If you want to change the value of a property without changing the inventory then right-click
on the component and choose Override Part...
33
Enter the new value that you want and press OK. This will appear in the configuration layout
next to the displayed property.
Copying configurations from one run to another
To copy a whole configuration:
■
Right-click on the source run in the bottom left pane of the Results window, and
select Copy Configuration.
To copy part of a configuration:
■
Right-click on the part of the configuration to copy and select Copy Subcomponent
To paste the selected configuration data:
■
Right-click on the destination run, and select Paste Configuration.
Undoing Paste Configuration
The paste configuration operation can be undone by right clicking on a run and selecting
Undo Paste Configuration.
34
Pi Aero User Guide
3ODFHPHQWGHILQLWLRQV
A Placement file defines what data gets placed in an Excel worksheet, and in what format.
The format is determined by placement methods, which define which channels go where, in
what order, with what qualification etc... The three types of placement method are:
■
1D table
■
2D table
■
Configuration values
You can define any number of placement methods.
Selection Groups determine which runs are to be used as a source of data. Again, you can
define any number of selection groups.
You might typically have
selection group containing
groups in different areas
spreadsheet that takes the
between runs.
one selection group containing a datum run, and a second
a run for comparison. By placing data from these two selection
of the workbook, you could create another area within the
difference between the two. This therefore enables comparisons
In the example above, there are two selection groups:
■
Datum
■
Comparison
The selection group called 'Datum' has one placement method, called 'Chassis Forces'. This
is a 1D table that places data starting at the Sheet/Cell Datum!A1. Run 120 is currently the
only run in the selection group, so the 1D table will contain data for that run only.
35
The other selection group called 'Comparison' contains three runs - the Current Run (which
changes dynamically as the instrumentation generates new data), and runs 123 and 124.
The data from these runs will be placed according to three placements methods, as listed in
the right-hand pane.
To set up a Placement file properly, you need to carry out the following steps:
1.
open / create a placement file
2.
select a target Excel worksheet
3.
create a Selection Group
4.
define a Placement Method
5.
select the runs which you want to act as a source of data
2SHQLQJ FUHDWLQJ D
3ODFHPHQW ILOH
Opening a Placement file
1.
There are three methods for opening a Placement file:
either:
or:
or:
select Open from the File menu;
type Ctrl-O;
click on the Open File button
This will bring up the following dialog:
36
Pi Aero User Guide
2.
Narrow down the selection to Placement files using the file type filter at the
bottom of the dialog. Placement files have the file extension *.aero_pla, and are
identified by this icon.
3.
Select that file you want and press Open. If you can't find it in the current
directory, use the browsing controls to change directory.
Creating a new Placement file
1.
There are three methods for creating a new Placement file:
either:
or:
or:
select New from the File menu
type Ctrl-N;
click on the New File button
This will bring up the following dialog:
2.
Click on Placement and press OK. This automatically starts an unnamed
Placement file.
37
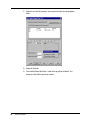
3.
You will then need to save it with a file name using Save As... from the file menu
(see over):
4.
Choose a directory and enter a file name, then press Save.
6HOHFWLQJ WKH WDUJHW
([FHO ZRUNVKHHW
You cannot create a new worksheet from within PiAero, so make sure that you have an
Excel file available before you proceed.
Typically you will devise a spreadsheet that matches the placement methods, and then use
the same spreadsheet over and over as a template.
To select a worksheet:
1.
38
Pi Aero User Guide
Right-click on the Excel file icon at the top of the selection tree in the left-hand
pane.
2.
Choose Select worksheet...
The following dialog will appear, allowing to browse and select a worksheet:
When you have made your selection, the name of the worksheet appears at the
top of the Selection tree:
6HOHFWLRQ *URXS
Creating a Selection Group
By default, a new Placement file will always contain one Selection Group. To add another:
1.
Right-click on the Excel file icon at the top of the selection tree in the left-hand
pane.
39
2.
Choose New Selection Group.
The new Selection Group will appear at the bottom of the selection tree.
Naming a Selection Group
You can change the names of Selection Groups by clicking on their names. The names of
the Selection groups are used by the Placement methods so that they know where to get
their data from. Below is an example of two Selection groups that have been renamed
"Datum" and "Compare".
Deleting a Selection Group
You can delete a Selection Group either by clicking on it and pressing the Del key, or by
right-clicking on it and choosing Delete. This will delete the Selection Group and the
Placement methods associated with it.
40
Pi Aero User Guide
'HILQLQJ D SODFHPHQW
To create a new placement method, follow these steps:
1.
select the Selection Group that you want to act as the source of data for the
placement method
2.
Right-click in the right hand pane
3.
choose New Placement...
You have now started the "Placement Method Wizard" which will guide you through the
steps required to define the placement in detail.
The first thing to select is whether you want a 1D table, a 2D table or the model
configuration placed on the spreadsheet. This is done by selecting the appropriate method
at the top left of Step 1 of the wizard.
41
'WDEOHSODFHPHQW
A 1D table has (horizontally) one or more columns, each corresponding to a channel, and
(vertically) one or more "bands", each containing a single result drawn from the Results
Database. Typically a band will consist of one row in the spreadsheet, but it is possible to
define a band with more than one row, such that (for example) the wheel drag forces can be
laid out with rear forces positioned below the front forces.
Examples
A 1D table with 5 columns and three 1-row bands:
Front ride
Rear ride
Total Lift
Body Drag
Rear lift%
10
10
15
10
15
20
2198
2178
2092
456
449
427
37.21
38.09
37.98
A 1D table with 4 columns and two 2-row bands:
Front ride
Rear ride
FL wheel
RL wheel
FR wheel
RR wheel
10
10
15
20
208
376
215
380
209
388
217
391
Placements are defined using the placement wizard as described overleaf.
42
Pi Aero User Guide
6WHS RI WKH :L]DUG
Qualifiers filter
the data from the
data selection
Select the
Placement
method here
Name the
Placement
method here
You can also set a name for the placement method. This has no significance other than
acting as an aide memoir, and it appears in the list of placement methods in the right hand
pane. If, for example, you are defining a 1D table that creates a summary report of all the
forces, then you could call the method "Force summary table".
The last feature of Step 1 of the Placement wizard are the qualifiers. These act as a filter for
the data from the data selection. For example, if you only want to place data into the Excel
spreadsheet for results where Front ride = 10 and Rear ride = 10, then you would enter the
qualifier shown overleaf.
43
"Front ride" = 10
AND
"Rear ride" = 10
There follows a description of the syntax required by the qualifiers.
4XDOLILHUV
The qualifier for the data is entered as text in the box at the top right of the wizard step 1.
You can enter the text simply by typing into the box, or you can build it up using the Channel
List... and Operator List... buttons.
A formal description of the syntax of a qualifier is as follows:
qualifier = (NOT) expression { logical_operator (NOT) expression }
where:
expression
"channel_name" comparison_operator "channel_name"
logical_operator
AND | OR
comparison_operator
< | <= | = | >= | > | <>
channel_name
the name of a channel from the wind tunnel data, the inventory, or a
label generated internally by PiAero
() indicates an optional entry
{} indicates zero or more iterations
a | b | c means choose only one or a, b or c
Note: The names of the channels must be contained within quotation marks "".
Precedence of logical operators
AND takes precedence over OR, in the same way that multiplication takes precedence over
addition. So:
"Roll" = 0 AND ("Front ride" = 10 OR "Rear ride" = 10)
44
Pi Aero User Guide
means that data will only be selected for results where either the front or rear ride heights
are at 10, and the roll angle is 0. E.g. from the following set of results, only the highlighted
one will be selected:
Roll
Front ride
Rear ride
0
0
1
1
5
10
5
15
15
15
10
15
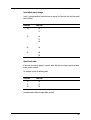
If the qualifier had been:
"Roll" = 0 AND "Front ride" = 10 OR "Rear ride" = 10
then the following highlighted results would be selected:
Roll
Front ride
Rear ride
0
0
1
1
5
10
5
15
15
15
10
15
If in doubt about precedence, use parentheses in your qualifier definition
6WHS RI WKH :L]DUG
This is where you define the contents of the table:
■
To put a channel into a band, drag it from the channel list onto the grid. If you
drag to the right of an existing column, it will create a new column. (Tip: to find a
channel quickly, click in the channel list area and then type the first letter of the
channels name).
■
You can force the size of a band by entering values into "Number of columns"
and "Number of Rows" and pressing the Set button.
■
Delete an unwanted entry by clicking on it and pressing the Del key.
■
Number of rows to fill : sets the maximum number of rows that PiAero will try to
place into Excel
45
Drag and drop a
channel into a
location in the
grid
Note that the available channels are divided into the following:
■
Tunnel Data - channels generated by the wind tunnel instrumentation
■
Configuration Data - values from the inventory
■
PiAero Labels - these are values generated by PiAero to help it keep track of the
data.
6RUWLQJ WKH GDWD
When PiAero places a 1D table into the Excel worksheet, it will, by default, place the data in
the order in which it finds it in the Results Database. You can force it to place the data in a
specific order as follows:
46
■
each column can be sorted ascending or descending. Left-hand columns take
precedence over right hand columns.
■
you can force one or more columns to be sorted using a specified value order.
Pi Aero User Guide
In addition, you can force PiAero to insert a blank row every time the value of a column
changes, and you can make it so that the value is only displayed in the column when it
changes.
Sort ascending / descending
Right-click on the channel that you want to sort, and select Sort Ascending or Sort
Descending from the drop down menu.
Left hand columns take precedence over right hand columns. So, for example, if both Front
ride and Rear ride are sorted ascending, then the following would occur:
47
Unsorted
Sorted
Front ride
Rear ride
Front ride
Rear ride
15
20
25
10
10
25
15
15
10
20
50
15
10
30
15
20
10
10
15
15
15
20
25
25
10
15
10
15
20
20
30
50
Show value only on change
If you had also specified that the Front ride should "Show value only on change", then the
table would look as follows:
Front ride
10
15
20
25
48
Pi Aero User Guide
Rear ride
10
15
10
15
20
20
30
50
Insert blank row on change
Lastly, if you had specified "Insert blank row on change" for Front ride, then the table would
look as follows:
Front ride
Rear ride
10
10
15
15
10
15
20
20
20
25
30
50
Special sort order
If you want the results to appear in a specific order, then you can assign a special sort order
to one or more channels.
For example, to force the following order:
Front ride
10
15
20
Rear ride
10
15
20
you would need to follow the steps shown overleaf.
49
50
1.
Right-click on Front ride and select "Uses special sort order" from the drop down
menu.
2.
Repeat for Rear ride.
3.
Press the Edit Special Sort Order... button at the top right of the Wizard. This
brings up a table with the special sort columns.
Pi Aero User Guide
4.
Enter the values that you want in the sort order:
When you are editing the special sort order, you can use many of the shortcuts found in a
Microsoft Word table:
■
use the tab key to go from one cell to the next
■
tabbing off the last cell will create a new row
■
select a row or column by clicking on the row or column label
■
delete the contents of a selected cell(s) by pressing the Del key
■
use cut (Control-X) to remove a row
You can even paste contents in directly from another package - e.g. copy a table of values
from a Word table or an Excel spreadsheet (Ctrl-C) , click on the selected cell in the Special
Sort table and paste (Ctrl-V).
The 1D table will now be forced to use those values for Front ride and Rear ride, even if
there are no results available for all of them.
51
Take the following example data set, which has various results for different roll angles, front
and rear ride heights:
Roll
Front ride
Rear ride
Total Lift
0
0
0
2
2
1
3
10
10
15
20
10
10
15
10
15
15
20
10
10
20
2198
2178
2092
2052
1996
2007
1975
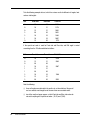
If the special sort order is used for Front ride and Rear ride, and Roll angle is sorted
ascending, then the 1D table would look as follows:
Roll
Front ride
Rear ride
Total Lift
0
0
0
1
1
1
2
2
2
10
15
20
10
15
20
10
15
20
10
15
20
10
15
20
10
15
20
2198
2092
2007
1996
2052
Note the following:
52
■
three roll angles were detected in the results set, so three blocks of the special
sort are created, even though four of the rows have no associated results
■
two of the results no longer appear, as their Front ride and Rear ride values do
not match anything in the special sort order - (10,15) and (15,20).
Pi Aero User Guide
6WHS RI WKH :L]DUG
This is where you define where to place the data in the worksheet.
This is the top-left
cell of the 1D
table
A quick method of selecting the top-left cell of the 1D table is as follows:
1.
Click on Show Excel Workbook...
This brings Excel up as the active application.
2.
Click on the cell that you want to be the top left cell.
3.
Go back to PiAero (e.g. press Shift-Tab).
The name of the sheet and cell number will be entered into the wizard.
Once you have completed the third wizard step, you have finished defining the Placement
Method. This will now appear in the right hand pane.
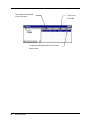
53
This is the name that you defined
in step 1 of the wizard
the 1D table
This placement method draws data from the "Compare"
Selection Group
54
Pi Aero User Guide
Top left cell for
'WDEOHSODFHPHQW
A 2-D table is defined by two channels (typically indices such as front and rear ride height)
which are used for the row and column indices, and a third channel whose value is inserted
in the table.
55
:L]DUG VWHS This is where you define qualifiers, which act exactly as for a 1D table (i.e. they filter the
data in the Data Selection).
:L]DUG VWHS This is where you define the following:
56
■
which channels are to be used for the indices (e.g. Front ride)
■
which channel is to be used to fill out the table
■
the values of the indices (e.g. 10, 15 etc...)
Pi Aero User Guide
The default behaviour of PiAero is to place the text 'DUP' into Excel for data where duplicate
values are found. Check the Use duplicates option, if you want to override the default
behaviour. Use the combo box to select which of the duplicate values to place. The options
available are 'Use First' and 'Use Last'
Note that if you put a check mark in one of the table cells (e.g. in (10,30) in the above
example) then PiAero will leave that cell untouched, even if there is data available for that
ride height. Otherwise, PiAero will overwrite that cell - with data if it is available, or with a
blank if there is no data.
If you are putting Excel formulae into some of the cells (e.g. an interpolation function), then
you should protect those cells with a check mark.
57
:L]DUG VWHS This defines where to put the data in the spreadsheet:
58
Pi Aero User Guide
&RQILJXUDWLRQYDOXHVSODFHPHQW
This placement method simply dumps the entire car configuration to a spreadsheet in the
following format:
■
there is one row for each property for each component
■
the first row contains the run IDs (for internal use by PiAero)
■
the second row contains headings to describe the columns
■
column 1 contains the name of the components
■
column 2 contains the names of the component properties
■
column 3 contains the units of the component properties
■
columns 4 onwards contain the values of the component properties for each run
in the placement selection.
There is very little to define for this placement method.
59
:L]DUG VWHS There are no qualifiers relevant for this placement.
Note that since Wizard step 2 does not apply in this case, the step 3 dialog box appears
immediately.
:L]DUG VWHS Select where you want to place the configuration data.
60
Pi Aero User Guide
61
6HQGLQJGDWDWR([FHO
Once you have defined a placement and a Selection Group, you can send data over to the
Excel worksheet by:
1.
Putting one or more runs into the Selection Group.
2.
Enabling the "Update Excel" tool on the toolbar button
3.
Pressing the "Refresh" tool on the toolbar
If Update Excel is enabled, then each time you make a change to any Selection Group, the
data will automatically be updated in the Excel worksheet. This may sometimes be
inconvenient, especially if you are wanting to make a lot of changes to the Selection Groups.
Depressing the "Update Excel" button will stop changes being reflected in Excel.
The "Refresh" button will update the view of runs in the results database and then populate
Excel - providing that the "Update Excel" tool is enabled.
There are three ways of putting runs into the Selection Group:
Individual runs
Drag one or more runs from the Results Database into the Selection Group.
■
If you drag the run over the Selection Group name, you will add the run to the
Selection Group
■
If you drag the run over a run in the Selection Group, then you will replace that
run
Current run
The current run can be included in the Selection Group. This means that each time a result
comes in from the instrumentation, the spreadsheet will be updated.
To include the current run, right-click on the Selection Group name and choose Include
Current.
62
Pi Aero User Guide
Folders of runs
You can include an entire folder of runs into a Selection Group. This is particularly useful if
you want to create a summary report of a day's testing.
Drag a folder from the Results Database into the Selection Group.
■
If you drag the folder over the Selection Group name, you will add the run to the
Selection Group
■
If you drag the folder over another folder in the Selection Group, then you will
replace it
Note that if the folder in the Results Database includes the current run, it this will be included
in the Selection Group, and the worksheet will be updated each time a result comes in.
7ULJJHULQJ ([FHO PDFURV
The following Excel macros are called by PiAero. If you want to make use of this facility,
simply define macros with these names in the Excel that is linked to PiAero:
OnPiAeroRefresh
Triggered whenever PiAero has finished refreshing the placements in Excel. This will
therefore happen as follows:
■
When you activate the Update Excel button
■
Each time a 'DATA' line is received from the instrumentation (i.e. when data is
reduced at the end of a sample), but only if the Update Excel button is active and
one of the placements contains the current run
This macro could be used to refresh pivot tables or charts that are hanging off the placed
data.
63
OnPiAeroEndRun
Triggered whenever PiAero receives an 'END' line from the instrumentation. This happens at
the end of a run that got as far as sending data to PiAero. This macro could be used to print
out a run summary, or bundle the data off to your simulation package...
These macros will only be triggered by the copy of PiAero that is receiving the data. If you
want to get other networked copies of PiAero to run macros automatically, then you will have
to get the receiving machine to relay on the calls.
64
Pi Aero User Guide
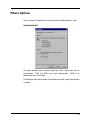
3L$HUR2SWLRQV
There are various PiAero options that can be accessed via the Settings\Options... menu.
Communication tab
The options presented under Connection define how PiAero receives data from the
instrumentation.
COM1 and COM2 are for serial communication.
DCOM is for
communication over a local network
The Notification option selects whether PiAero notifies the user with a 'beep' when new data
is received
65
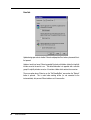
Excel tab
Update during open selects whether PiAero should populate Excel when a placement files is
first opened.
Update at end of run forces PiAero to populate Excel only with folders of data that implicitly
include current at the end of a run . The default behaviour is to populate with a selection
group if it explicitly includes current, or if it contains a folder which contains the current run
The macro option forces PiAero to run the "OnPiAeroEndRun" macro when the "Refresh"
button is pressed. This is useful when working off-line (i.e. not connected to the
instrumentation), but you want PiAero to behave as if it were on-line.
66
Pi Aero User Guide
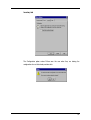
Inventory tab
The Configuration option makes PiAero warn the user when they are altering the
configuration of a run that already contains data:
67
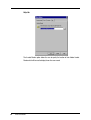
Help tab
The Acrobat Reader option allows the user to specify the location of their Adobe Acrobat
Reader which will be used to display the on-line user manual
68
Pi Aero User Guide
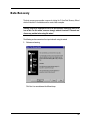
'DWD5HFRYHU\
The data recovery menu provides a means of starting the Pi Aero Data Recovery Wizard
which will rebuild a Pi Aero database in the event of data corruption.
Warning: Incorrect or inappropriate use of the Data Recovery Wizard may result in the
loss of data. For this reason, users are strongly advised to contact Pi Research and
discuss any problem before using this wizard.
The following section summarises the steps involved in using the wizard:
1.
Welcome and warning
Click Next > to move between the different steps.
69
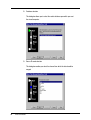
2.
Database selection
This dialog box allows you to select the results database upon which you want
the wizard to operate.
3.
Source Channel selection
This dialog box enables you select the channel from which the data should be
merged
70
Pi Aero User Guide
4.
Destination channel selection
This dialog box enables you to select the channel into which the data should be
merged.
5.
Summary of what is about to happen
The wizard performs the data recovery operation if the Finish button is pressed.
71
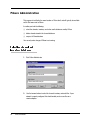
3L$HUR$GPLQLVWUDWLRQ
This program is installed in the same location as PiAero itself, and will typically be available
on the Start menu next to PiAero.
It enables you to do the following:
■
select the channels, inventory, and active results databases used by PiAero
■
delete channels stored in the channel database
■
compact a PiAero database
You can only make changes if PiAero is not running.
6HOHFWLQJ FKDQQHO DQG
LQYHQWRU\ GDWDEDVHV
72
1.
Start PiAero Administrator
2.
Use the browse buttons to select the channel, inventory and result files. If your
network is properly configured, this should enable you to access files on a
remote computer.
Pi Aero User Guide
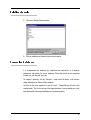
'HOHWLQJ FKDQQHOV
1.
Click on the Maintain Channels button.
2.
Click on and delete any channels that you want to remove.
&RPSDFWLQJ GDWDEDVHV
It is recommended that databases are compacted from time-to-time, as it improves
performance and reduces the size of databases. PiAero files which can be compacted
include: aero_rdb, aero_idb, aero_cdb.
To compact a database, click the "Compact..." button which will display a file selection
dialog, allowing you to choose a PiAero database:
Once the file has been compacted, a new file called *.*_CompactBackup will exist in the
selected folder. This file is a backup of the original database; it can be deleted once it has
been confirmed that the compacted database is functioning properly.
73
,QVWDOODWLRQ
6\VWHP UHTXLUHPHQWV
The requirements for a PC to run PiAero are as follows:
■
The PC must be running Windows 95
■
Microsoft Excel V7.0 or later must be installed.
■
Performance specification:
Processor
RAM
Hard drive
Minimum
Recommended
25 Mhz 386
16 Mbytes
20 Mbytes free
100 MHz Pentium
32 Mbytes
200 Mbytes free
■
Note that the installation comes on 31/2" disks: it is therefore advisable to have a
suitable floppy drive.
■
If PiAero is to run on-line to Pi's wind tunnel instrumentation, then it must have
one spare RS232 port if serial communication is to be used
,QVWDOODWLRQ SURFHGXUH
Pi Aero is supplied on a set of floppy discs containing:
■
DAO Installation - this puts a copy of the Microsoft database engine on your PC
■
PiAero Installation - this is the actual program
If you are upgrading from a previous version of PiAero, then you do not need to perform the
DAO installation unless specifically requested in the release literature.
74
Pi Aero User Guide
DAO installation
This puts a copy of Microsoft's Data Access Object on your PC. This is the engine for
Access Version 7, which is used by PiAero for managing its databases. If you have this
version of Access on your PC, then DAO may already be installed. However, you cannot do
any harm by re-installing it, so it is recommended that you follow this installation procedure
regardless.
Note that Pi have a licence to distribute the DAO to you with PiAero. It may not be legal for
you to pass it on to a third party.
1.
Insert DAO Disk 1 in your floppy drive.
2.
Select Run... from the Win95 Start button, and enter a:\setup in the Run dialog box.
3.
Walk through the DAO Setup to completion
PiAero installation
This installs the PiAero program and associated files onto your hard disk, and places a
PiAero shortcut into your Start menu.
The files include sample databases for PiAero. If you are upgrading from a previous version
of PiAero, then do not worry: none of your existing database files will be overwritten.
There are also various files for icons etc... which will be placed in standard Windows
directories.
1.
Insert PiAero Disk 1 in your floppy drive.
2.
Select Run... from the Win95 Start button, and enter a:\setup in the Run dialog box.
3.
The InstallShield Wizard is initialised, then the PiAero Setup program starts with a
Welcome dialog. Select Next > to take you to the Working Directory selection dialog.
4.
Choose a working directory for the program. This determines where the program
files and the databases files go. The default is \Program Files\Pi Research\PiAero.O
ONCE PiAero IS INSTALLED, IT IS EXTREMELY INADVISABLE TO MOVE IT TO
ANOTHER DIRECTORY. MAKE SURE YOU CHOOSE A WORKING DIRECTORY
THAT YOU CAN STICK WITH.
5.
Select Next > to take you to the Program Folder dialog.
75
6.
Choose a program folder. This determines where the PiAero shortcut appears on
the Start menu. The default is PiAero, which will create a new folder with a single
item in. If you already have other Pi software on your PC (e.g. V6), then you may
want to put them all into the one folder.
7.
Select Next >.
8.
The confirmation window shows the settings you have selected so far. If you
wish to change any of these, then select Back >; otherwise, select Next >.
9.
When asked, insert PiAero Disk 2 in your floppy drive and select Next>.
The installation will complete itself, install all the components and terminate.
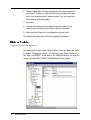
:LQGRZV 5HJLVWU\
The windows registry contains various settings for PiAero, such as the defaults files used by
the program. Changing these settings is an alternative to using PiAero Administrator. To
view these, start REGEDIT (usually found in the \WINDOWS directory) and locate the
settings in the folder \HKEY_CURRENT_USER\Software\Pi Research\PiAero
76
Pi Aero User Guide
77
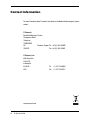
Contact information
For more information about Pi products and details of worldwide authorised agents, please
contact:
Pi Research
Brookfield Motorsports Centre
Twentypence Road
Cottenham
CAMBRIDGE
UK
Customer Support Tel +44 (0) 1954 253600
CB4 8PS
Fax +44 (0) 1954 253601
Pi Research, Inc.
8250 Haverstick
Suite #275
Indianapolis
IN 46240
USA
www.piresearch.com
78
Pi Aero User Guide
Tel
Fax
+1 (317) 259-8900
+1 (317) 259-0137