1
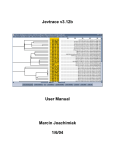
User Manual
Before connecting, to start up,
or to form its new terminal of sale,
thoroughly read this user manual.
Page
1
Copyright
This publication, including all the photographs, illustrations, and software, is protected by the international laws of
property, with all rights reserved. No part of this manual and any of the materials contained in this document,
can be reproduced without the consent of the author.
Clarification
The information contained in this document is subject in writing to changes without previous warning.
Registered Trademark
All the product names in this manual are property of their respective owners.
Revisions History
Version 1.11 - August 2010
Page
2
Index
Start
4
Sections of the program
6
Files
Articles
Prices
Sales Displays
Profiles
Salesmen
Modes of payment
Taxes
Currencies
Loyalty cards
Password
Change of Language
6
6
8
9
10
11
11
12
12
12
13
13
Statistic
14
Documents
15
Stores
16
Export
18
Import
18
Backups
19
Page
3
Start
HiOffice is a program for centralizing HioPOS data and to manage
your setup (items, prices, users, user
permissions...).
LINK HIOFFICE – HIOPOS
The following process only applies to
the first HioPOS that connects with the
HiOffice. If you have more than one
HioPOS, then this process does not
apply since the configuration and setup
will be handled by the HiOffice.
For HioPOS to run with the HiOffice, it
should not contain any information.
Steps to follow:
• Begin the installation of your
HioPOS.
• In HiOffice, go to “Shops” and
click “File” to access the store.
Once inside click “Automatically
Create” i .
By clicking “Automatically Create”,
the necessary values have been
created to communicate with
HioPOS. These values have been
created under the “Terminals” tab
of the store. Note that the values
generated are: Username, Password, Terminal, Series of documents (tickets, ticket subscriptions,
invoices, and credit memos) and
Warehouse.
• In HioPOS, access “Connection to
HiOffice” under “Configuration”.
Once inside enter the communica-
Store automatic creation
i
Page
4
Start
ii
iv
tion license ii that you were given
(this is not included in HioPOS)
and you will access a screen where
you could enter the address iii of
your HiOffice (IP of the computer
on which it is installed), Username,
and Password. The last two values
were created in the “Automatic
Creation” process in “HiOffice
Shops” (Both are the same value).
• Once you have entered the required
information in HioPOS, you will be
asked if you would like to connect to
the server since there is no information. At this point you should click
iv “Start Central” or “Initialize”.
iii
Pantallas de inicialización de HiOffice
• It has sent the configuration created
in the installation of the HioPOS to
the HiOffice.
When implementing HioPOS. you can
also enter the data manually or import
the data from an external file. The latter
process is described on page 18 of this
manual under “Import”.
Page
5
Sections of the program
The main menu of HiOffice is located at
the top of the screen of HiOffice, and is
formed by the buttons Files, Statistic,
Documents, Stores, Export, Import
and Backup. Descriptions and functions
of the buttons are listed below.
FILES
When clicking on Files, a menu drops
down with the following choices:
Articles, Prices, Sale Screen,
Profiles, Salesmen, Modes of
Payment, Taxes, Currencies, Loyalty
Cards, Password and Language.
The common characteristic of these
buttons is that they serve to create all
the aspects that we will have to define
in our HioPOS so that it can function
properly. The functionality of each one
of the options is described next.
Page
6
ARTICLES
Accesses the list of articles created.
From this list you can access the file
to which you want to add or modify
the information within. In order to gain
access to the list, select an article
already created or click on “File”.
The tabs of the article are divided into
3 zones:
MENU OPTIONS
It consists of the following buttons :
New: it allows you to gain access to
an empty article from which you can
create a new article where you could
input the data. The section of prices
and tariffs does not appear until you
fill up the fields with the information of
the product and save the information.
Save: Saves the changes that you
make in the file. In the event that you
try to close the file without saving,
the program will prompt you if you
would like to save your changes.
Delete: Deletes the file you’re
viewing.
Cancel: Discards the changes
made to the file and returns the file
to its previously saved state.
Search: Searches through the file
for the data that you’re looking for.
Sales: Access the records of sales
of this file. In the history you can see
all sales of that product with the date
of sale, the Series and ticket number
in which it has sold, the customer
to whom it was sold to (If indicated
at time of sale), units sold in that
Sections of the program
sale, price, discount (if any), the net
price, and the total. If sales are not
updated, click on Recalculate and
the data will be updated. You can
print this listing by clicking Print.
In the right margin of this Menu are
the arrows with that it can change of
article.
ARTICLE INFORMATION
Fill in the fields with information on
the following : Description, Barcode,
Department, Section, Family, Subfamily,
Tax, & Take Away (option available in
the U.S. only) and select a picture for
this article If you want to.
On the right side there are a few boxes
you can check or uncheck for to give
effect to the options listed , Print
Kitchen 1, Print Kitchen 2, Print
kitchen 3 (the first three fields are
definable printing Items if you wish to
configure HioPOS for it), EBT (option
available in the U.S. only) and Modifier
(Means to modify a item reporting the
state of another. Example: cold, hot, well
done, just done...).
Page
7
Sections of the program
Fields Department, Section, Family
and Subfamily serve to classify your
Articles . There are different levels
that take shape as the information is
filled.
PRICES AND TAXES
It shows the associated fees in this
article with the respective prices. It also
lets you enter a period which implements a special price.
In order to apply these charges, first
the Prices fields should be filled in
which you can find under Files in the
menu of HiOffice. By default there are
3 created.
Page
8
PRICES
This section you should define the
prices you want to work with. By default
there are three that are created that you
can modify by clicking on File. Pressing
the File button accesses the file with
the price where you’ll see the code and
name of the price , the start and end
date to this price (meaning the validity
of the price) and the option to set the
price with taxes included.
In the bottom of this file are items
that are included and prices for them.
In the top of this list are buttons with
which you can apply filters to this list,
add new articles, or change the prices
of these.
Sections of the program
The Add button gives you access
to the list of items in your HiOffice and
add those that are not within the price,
while the button Add Price lets you
apply a filter with which you can add a
group of items to the price.
With the Delete button you can
delete the Prices of the items you select.
Finally, the button Change Prices
allows you to change prices of the
selected items applying different
options for change to be marked, as if
the price you want change is the default
price or the supply. Rounding options
and price change apply to percentage
increase and new price.
SALE SCREEN Here you must define the family you
want to show in HioPOS and that will
contain the items with which you work.
Click on this option to access the list of
families that are working with HioPOS.
In case you have none created, click on
File to create a file to make them.
Once inside the family tab click New
to create it. Enter the description and
select the color you want to apply to the
Family in HioPOS, in case you don’t
want to assign an image to the family.
On the right side 9 are a number of
features that can apply collectively to
all articles of the family.
9
Page
9
Sections of the program
Once you have created and assigned
the description and the common cha–
racteristics of all items in the family, at
the bottom of the screen you should
define what articles you want the
family to contain. For this press the
Add button and select one by one
the items you want to include in the
family you created. From this you can
assign special features on every one of
the articles.
Once created, you can sort the buttons
that are at the top of the list of items
that will contain the family on the sale
screen.
10
Page
10
PROFILES
Profiles is the concept under which
sellers who have same user permissions are grouped together in HioPOS.
Click on the button 10 Profiles to
access the profiles you have created.
By default a profile named Supervisor is created with all permissions
disabled.
Clicking over the profile Supervisor or
over the button Files you can access
the files of the profile where you can
modify the permissions or create a new
one by clicking the New button.
Sections of the program
11
SALESMEN
In this section you should create all
vendors who will work in HioPOS.
Initially the seller “Supervisor”. is
created. Clicking on the seller or on the
button “File” can access the information the sellers, where you can modify
or create sellers.
To create a new vendor, enter the
description and assign a user password
with which to access your salesperson
on the screen of HioPOS sellers. This
option is optional, if not assigned you
can enter without giving a password.
Similarly the registration password
must be used by the seller at the Entry
and Exit of the working hours in order to
have their working time recorded.
If you have created user profiles, select
them to assign this vendor the permissions 11 you have defined in this profile.
In case you haven’t created them, you
can assign permissions to this vendor
by marking the boxes at the bottom
of the screen. By default, the vendors
created have all their permissions
unchecked.
MODES OF PAYMENT
By default the created forms are
CHECK, CASH, ACCEPTED BILL, PAY,
BANK RECEIPTS, REPLACEMENT,
CREDIT CARD, BANK TRANSFER,
and VOUCHER. Although they are
created, this does not mean that they
all apply to HioPOS, but you must
define which one of them should be
used in HioPOS.
Page
11
Sections of the program
If you want to modify, delete, or create
a new form of payment, select one of
them or press the “File”. button. Within
the tab of the form payment is the
opportunity to perform the proposed
options.
TAXES
It has created by default 16%, 7% and
4%. If you want to modify or create other
taxes, select one of them or press the
button “File”. In the form of taxes you
can implement the proposed options.
CURRENCIES
The Euro is created by default. You
can access your file by selecting it or
12
Page
12
pressing on the File button. In case you
want to create a new currency, press
“New” in the Currency tab created.
LOYALTY CARDS
When you connect with HiOffice,
HioPOS will implement the functionality
“Loyalty” in HioPOS. This function
operates when HioPOS is connected
to HiOffice.
In this section you must create Loyalty
cards you accept in your business,
having the possibility of using not only
the ones you create, but also the possibility of using cards from other companies or businesses, thus be able to
apply promotions with them.
Sections of the program
To create these cards, go to Loyalty
Cards and press the button “File”.
Once inside the tab press New.
Enter the Description of the card
and apply the conditions you want
by selecting the following options 12 :
Apply discount, Apply Rates, or
Apply Type of Payment. The three
options are compatible between them.
Once you have entered the description and conditions you have to define
the characteristics of the card for the
reader of HioPOS to recognize the
card and apply sale promotion. You
may do it manually or use the Wizard
that is in the top menu of the screen.
Follow the steps in the Wizard to
configure the Loyalty card should
you not have the expertise to enter
it manually. For this you will need to
connect a magnetic tape reader to your
computer.
ENTRY PASSWORD
Here you can set the password for
HiOffice.
CHANGE OF LANGUAGE
You can change the language for
HiOffice from the languages available
from the list.
Page
13
Sections of the program
13
14
STATISTIC
HiOffice has a statistics module which
generates general statistics and can
filter on the same graph to obtain more
concise information.
The following describes the operation
of the Statistics module in HiOffice:
The statistics module has two menus
with different options at the top and
bottom of the screen.
In the top menu 13 there are options that
can be applied on the graph shown at
the time, such as filters by day, week,
month or year, filter between dates, top
10 sales, or graph design.
Page
14
In the lower menu 14 there are filters
to modify the graphs and the ability to
obtain others. When making a change
in the first graph, a second graph opens
that allows you to see both. In the same
way you can get more graphs applying
different filters on the graph you have
opened. Other options you can select
from the menu are displaying the graph
as a table and copy the chart to make
several from the same.
Sections of the program
DOCUMENTS
In this section of the program you may
see all the Tickets Sold, Subscription
Tickets, Invoices, Payment Invoices,
Cash Count, Audit and Presence Control.
• Ticket Sold: tickets of HioPOS with
no associated client.
• Subscription Tickets: subscription
ticket sales.
• Invoices: tickets of HioPOS associated with a client.
• Payment Invoices: payment of
sales invoices.
• Audit: information is collected from
all returns, rebates, and invitations
grouped by vendor.
Within the paragraphs of sales,
Subscription tickets, Invoices,
Payment Invoices, and Audit, you
can filter the listings by doing a
search in the document. You can
print one or more documents
according to the filter or apply a more
general filter that shows the day of
week, month or year of the document. All these options are applied
using the buttons on the top menu
for each of the screens.
• Cash Count: Z Cash Count in
HioPOS. In this section you can
apply a filter between dates to
consult one or more closing days, in
addition you can print the listings of
all the cash counts.
Page
15
Sections of the program
• Presence Control: You can get
two separate reports. One from
the Summary, where you can get
sales records by vendor during the
times they worked. The other from
Extract, where you can control the
entry and exit time of the vendors.
You can narrow your search using
a filter and Print the information
obtained.
STORES
This section of the program you must
enter the information of the HioPOS
connecting to your HiOffice.
Within this section you can define
different stores and within these, several
boxes. In this way HiOffice receives
all the information from the HioPOS
you have in your business. Next we
describe the process of creating a store
with a box.
Press Shop. You’ll see a list of stores
created in your HiOffice, In order to
create a new store or modify an already
created one, go to the store or click on
File. Once inside the Store tab press
New.
If you want to import information from
a HioPOS that already has the information entered, press
Automatic
Creation. In this case, HiOffice will
create a store with the necessary information so that HioPOS can connect
to with it, assigning a password and
a default user (011). Once created,
you can import information from the
HioPOS listed in the steps of setting up
Page
16
your HioPOS with HiOffice.
Continuing with the manual creation of
the store, you must complete the store
tab, completing all sections found in the
left margin Screen 15 .
These sections are:
• Company Details: must enter
general information of the store.
It also has the ability to assign an
image of the store you want on the
ticket, and to define a Stores Group
to which it belongs.
• Terminals: as discussed earlier
in the manual, a store may have
several HioPOS. If so, in this
section you can configure them
using the HioPOS, name of the
user and password to connect with
HiOffice and the series of documents to which you’re going to work
on in HioPOS.
• Configuration: You must define the
general use and the function that
can be given at the store to HioPOS.
You can turn off the different permissions that are presented.
To be able to assign the values that
need to work with the store, sections
Currencies, Forms of Payment,
Tax, Sales, and Families have to
have been created in each of these
sections in Files on the HiOffice
main menu. In these sections you
can only select values or specifications already created, they can not
be created from this section.
• Discount Reasons: from here you
may create motives or reasons so
Sections of the program
15
that your salespeople can apply
deductions and the amount of
these. In the event that you create
a discount motive, when you apply a
discount on HioPOS you may select
from a list of discount motives.
To create one, click on Discount
Motive and then the button “Add”.
In this way you are accessing the
list of discount motives you have
created. To create a new one click
“File” and it’ll indicate that you want
to create a new one. Then fill in the
fields and save them. In this way
it has already created a discount
motive and is ready to send to
HioPOS.
• Return Reasons: this section has
the same functionality as Discount
Reason, but applied to returns. The
process of creating Return Reasons
is the same as creating Discount
Reasons.
• Incidents: Browsing this section you
can find and solve problems that may
have arisen when communicating
with HioPOS. These problems are
shown depending if HiOffice has
configuration problems or problems
sending information to HioPOS.
Page
17
Sections of the program
• Forwarding: In the section
Forward, you can set a period
between two dates to send HioPOS
information gathered from HiOffice
between those dates.
EXPORTATION
This module has joined HiOffice to
facilitate the export of Documents,
Taxes, and Sales lines generated in
HioPOS and stored in HiOffice.
You can filter a period between two
HiOffice dates for you to generate a file
with the desired information.
IMPORTING
With the module import in HiOffice,
you can import articles to HiOffice
from 3 different file formats: Text, Excel,
or XML.
To import items to HiOffice, you must
select the file you want to import,
knowing that it must contain the
following fields:
- DESCRIPTION
- BARCODE
- DEPARTMENT
- SECTION
- FAMILY
- SUBFAMILY
- SALES TAX
- TAKE AWAY
- PRINT KITCHEN 1
- PRINT KITCHEN 2
- PRINT KITCHEN 3
Page
18
- EBT
- MODIFIER
- PRICE
- NET
- NEW OFFER PRICE
- FROM
- TO
To import a file it must have the fields
required by HiOffice, The fields you
don’t plan to fill can be left blank. In
addition the fields FROM and TO should
be formatted using a “/” to separate the
values, even if they’re blank.
Once it has imported the file, in the
inferior part of the screen it will show
the number of lines that have been
imported and those that have been
excluded, giving you the chance to
modify the file to import it completely.
Backup
16
BACKUP
This section is very important since you
are solely responsible for your information. HiOffice facilitates the capability
to backup your information regularly in
case of a sudden loss of data. You can
restore your information using these
backups.
To perform backups, access 16 Backup
from the main menu of HiOffice and
choose the destination to which you
want your backup saved. The backup is
done automatically.
Page
19
For more information on the different features that
can be done with HiOffice, visit our website:
www.hiopos.com
Page
20