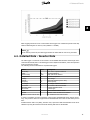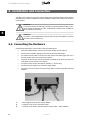
1
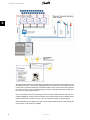
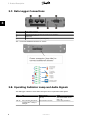
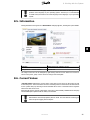
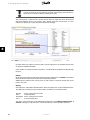
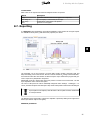
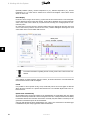
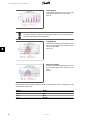
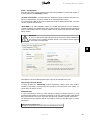
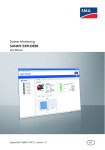
MAKING MODERN LIVING POSSIBLE
ComLynx Datalogger / Datalogger +
User Manual
DANFOSS SOLAR INVERTERS
Contents
Contents
1. About This User Manual
Symbols
3
3
2. Safety Instructions
4
Safety Instructions
4
3. Product Description
5
The Data Logger
5
PC-Software
5
System Requirements
7
Intended Use
7
Scope of Delivery
7
Recommended Accessories
7
Modem
7
Data Logger Connections
8
Operating Indicator Lamp and Audio Signals
8
4. Data and Events
10
Data Logger Memory Capacity
10
Detailed Data - Inverter Data
11
Sum Data
12
Additional Measurement Data - Sensors (+ Version)
12
Events
12
Event Notification Data Logger
13
Inverter Event Notification
13
5. Installation and Connection
14
Connecting the Hardware
14
Connections to the Mains Network
15
CompactFlash® Memory Card
15
Connection to the PC
15
Installation Check
17
6. Installation and Uninstallation of the PC-Software
18
Installation
18
Program Updates
18
Uninstallation
18
7. Start-up
19
Start-up
19
Connection to the Data Logger
19
C00410328-01
1
Contents
Direct Connection via Null Modem Cable
19
Modem Connection
19
Setup and Configuration of the Data Logger
20
Time Synchronisation
20
Teaching the Data Logger to Recognise Inverters
21
Sensor Configuration
21
Installation Check Using Current Values
22
8. Working with the System
2
23
Working with the System
23
User Rights, Access Rights
23
Status Bar
23
Language
24
Information
25
Current Values
25
Reporting
27
Diagram Editing Functions
29
Report Types
29
Data Export
31
Settings
32
PV Plant
32
Reimbursement
34
Data Logger
35
Main Settings (Admin)
35
Inverter
37
Identifying Inverters
38
Monitoring
38
Alarm
40
Disabling Alarm Sound
40
Enabling Alarm Sound
41
Sensors (+ version)
41
Firmware Update
41
Firmware Update with the CompactFlash Memory® Card
42
Firmware Update via ComLynx Monitor (Admin)
42
New Configuration of the Data Logger
43
9. Technical Data
44
10. Disposal
45
11. Declaration of Conformity
46
C00410328-01
1. About This User Manual
1. About This User Manual
1
This user manual provides detailed product information and instructions on how to use the
ComLynx Datalogger and Datalogger + and the associated PC-Software.
To achieve optimal legibility ComLynx Datalogger and Datalogger + will be identified as Data
logger. The advanced unit with the capability of connecting various sensors will be identified as
the + version.
This user manual describes the data logger version at the time of writing. Modifications to this
user manual may be added as a result of new functionality or improvements to the data logger.
Product and company names mentioned in this manual may be registered trademarks of their
respective owners.
1.1.1. Symbols
Throughout this user manual important information will be emphasised by using the following
symbols:
Attention!
This symbol means that this type of information should not be disregarded as it may
result in damage to equipment and/or harm to persons. Information thus marked
must be observed on all accounts.
Note:
Information!
This type of information is important for the protection of property. Disregard of this type of
information may cause damage to property or loss of functionality.
C00410328-01
3
2. Safety Instructions
2. Safety Instructions
2
2.1. Safety Instructions
Readers of this user manual are assumed to be familiar with regulations and guidelines concerning
electrical installations and connections to the public mains network. Particular attention must be
paid to general safety regulations for working with electrical installations.
Please observe the safety instructions below to prevent injury to persons and damage to the
connected equipment.
Contact with electrically conductive parts can be life-threatening even after their
disconnection from the mains network. Installation should only be performed
in the de-energised state.
Equipment must be installed only in protected/dry environments. Outdoor installation only in an appropriate control cabinet (protection level IP65).
Prevent cables and terminals from being exposed.
The power connection must be equipped with a fuse and earthing.
The power plug must be accessible at all times.
Maintenance by qualified electrician/technician only.
Equipment must only be operated at the rated supply voltages (12-24 VDC, correct
polarity). A suitable power supply unit is included in the scope of delivery.
Note:
Observe the manufacturer's instructions regarding the handling of power supply units (especially switching units).
Observe the manufacturer's instructions regarding the handling of inverters.
4
C00410328-01
3. Product Description
3. Product Description
3.1. The Data Logger
3
The data logger is an independent free programmable measuring and data logging unit on CompactFlash® basis. It records data from the connected inverters, saves the data, and then forwards
the data via interfaces to another media (PC and mobile phone) in a defined format. A data logger
supports up to 20 inverters. The files or rather data are stored on a replaceable Compact
Flash® memory card in the data logger.
Optionally, additional sensors such as radiation, module temperature, and temperature of the
environment can be recorded and read out by the data logger + version.
The data logger is equipped with an alarm function for sending alarm notifications. Communication
with the data logger takes place per modem, null modem or GSM modem via data interface (9pole Sub-D adapter).
3.2. PC-Software
The data logger is delivered with the PC-Software ComLynx Monitor for communication and operation via a Windows® PC.
Using the PC-Software the following functions are available:
•
Data logger configuration
•
Setting of parameters (e.g. detection of inverters in the network, configuration of the
logging interval and selection of which parameters to monitor)
•
Plant status display (“At a glance” values for the monitored inverters and overall plant)
•
System information (inverter and data logger events)
•
Data connection to one or multiple data loggers
•
Plant data and event administration
•
Reports and diagrams
•
Export of logged data to Microsoft® Excel (xls), XML or Text (txt) files for further processing using other programs
•
Data logger maintenance through firmware updates (exchange of data logger operation
software)
•
Dynamic language change for the user
One advantage of this system exists in the intelligence of the data logger itself (specified as
project). This is the basis for the locally independent monitoring.
The following chart provides an overview of the components associated with the system:
C00410328-01
5
3. Product Description
3
After successful installation of the data logger and learning of the inverters of the PV plant, as well
as additional sensors (+ version only), all logged data of the PV plant are saved as daily protocols
on the memory card of the data logger. Special information such as events are saved in a separate
file on the CF card. In order for the data logger to function correctly all necessary settings must
have been set using ComLynx Monitor.
Once a connection between the data logger and the ComLynx Monitor Software has been successfully established, ComLynx Monitor transfers only the data needed for the standard reports
together with the list of events to the PC. The rest of the data remains on the data logger.
Once downloaded, the PC analyses the data. For this purpose different reports such as yield and
power reports or CO2 saving are available.
6
C00410328-01
3. Product Description
3.3. System Requirements
The software ComLynx Monitor is made and tested for Microsoft® operating systems Windows®
2000/ XP/ Vista.
Further system requirements are:
Hardware:
3
Recommended processor capacity: minimum 800 MHz
RS232 interface (or via USB-RS232 Adapter)
50 MB free hard disk space
Microsoft® .Net Framework Revision 2.0 (where necessary available to download
from http://www.microsoft.com)
Software:
Generally, the computing power of the PC should not be less than Pentium III class and it should
not be more than 5 years old.
3.4. Intended Use
The data logger is exclusively for the data reports of the supporting inverter types. Information
about inverter types is available from the manufacturer.
Any mechanical or physical modifications to the equipment - including the drilling of
holes - will result in damage and invalidate all guarantee claims.
3.5. Scope of Delivery
•
ComLynx Datalogger
•
256 MB Compact Flash® memory card with current firmware
•
Power Supply, 12...24 V-, Typ. 0,8 W
•
Null modem cable, 3 m
•
Terminator plugs for RS485 inverter network:
•
-
2 x termination plugs for RJ45 indoor
-
1 x termination plug for RJ45 outdoor
CD with the PC-Software “ComLynx Monitor” and the user manual
3.6. Recommended Accessories
3.6.1. Modem
For problem-free communication with the ComLynx Datalogger we recommend the following modems:
Analogue:
ISDN:
GSM:
DEVELO Microlink 56K i, Longshine LCS-8560 VA-A 56k, INSYS Modem 56k small
EU 2.0
DEVELO Microlink ISDN i, INSYS ISDN 4.0
MC35 Siemens, INSYS GSM
C00410328-01
7
3. Product Description
3.7. Data Logger Connections
3
①
②
③
④
⑤
⑥
Power supply connector
RJ45 data interface for connection to the inverter network
RS232 Communication Interface for modem or PC connection
CompactFlash® card slot
Function key
2 LEDs for status indication (red and green)
The + version has additional interfaces for sensors:
3.8. Operating Indicator Lamp and Audio Signals
The data logger reflects its current status through a series of optical and audio signals:
8
LED
On
LED green -
Blink Interval
Firmware update (alternately
with red)
LED red
Alarm situation occurred
RTC (real time clock) failure,
Compact Flash® missing or
damaged
C00410328-01
Flash
Dataset, event will be saved,
data communication via modem or PC
Unit is being switched on
3. Product Description
Loudspeaker Signal
2 tones, low – high
3 tones, ascending
||: 1 tone, medium :||
||: 2 tones, high-low:||
||:3 tones, high: ||
1 tone short, high
Alternating tone
Description
OK, ready (at start-up)
Modem recognised and initialised
Modem is being dialed-up
Memory card failure/missing
Clock not set, Real Time Clock failure
Dataset saved, event saved (only if function has been activated)
Alarm has occurred
3
C00410328-01
9
4. Data and Events
4. Data and Events
4.1. Data Logger Memory Capacity
After successful installation of the data logger to the inverters of the PV plant, as well as additional
sensors (optional), all logged data from the PV plant are saved as daily protocols on the memory
card of the data logger.
4
The data logger logs:
-
Detail data of the inverter
-
Sum data
-
Additional measurement data (sensors)
-
Events
The data logger sums up AC-power and yield values of the individual inverters for the total plant.
These are supplemented by optionally connected sensor values for directed Radiation, module
and environment temperature. Furthermore the amount of energy supplied to the mains network
(based on the real power) can be logged with an energy impulse counter.
Inverter data from one inverter after the other is being periodically requested. Each data set is
labelled with the actual timestamp and supplemented with additional data (example radiance).
The data logger saves the requested data sets from the individual inverters and the sum data sets
of the total plant together with the timestamp corresponding to the query interval. This means
that all data sets will appear to have the same timestamp, even if the individual query times are
a few seconds apart. This allows for a chronologically synchronised report.
The logging interval/period affects the memory capacity of the data logger. A reduction of the
logging interval results in higher quantities of data and also an increase in data transfer time. The
logging capacity of the data logger can also be shortened.
The standard setting of 10 min. permits one year of logging from 20 inverters with a CompactFlash® memory card of 256MByte. The data logger time limit is 500 consecutive days of logging.
The diagram below shows the memory allocation of the CompactFlash® associated with the number of inverters at the different logging intervals.
10
C00410328-01
4. Data and Events
4
With a logging interval of 10 min. inverter data can be logged over a maximum period of 500 days
without exhausting the CF memory card (standard = 256 MB).
Note:
If the memory card is full, the data logger deletes the oldest data in order to log new data.
4.2. Detailed Data - Inverter Data
The data logger is connected to the inverter via the RS485 data interface and through this it
communicates directly with it. The data logger receives dynamic information, events and operation
mode sent from the inverter.
The following inverter information is requested and logged:
Value
Timestamp
Power
Income today
Temperature
Voltage
Current
Frequency
PV voltage
PV current
Operating mode
DC-Module
Event
Module
Additional measurement data
Unit
W
kWh
°C
V
A
Hz
V
A
-
Description
Time of the respective data set
Current production
Daily yield of the inverter
Inverter temperature
Grid voltage
Grid feed (effective power ratio)
Grid frequency
DC-voltage of the PV-Generator
DC-current of the PV-Generator
Inverter operation mode
Inverter type
Shows current inverter events
Number of the associated DC-Modules
See additional measurement data
In order to guarantee an exact comparison of the inverter and additional sensor data (if connected), every inverter data set is supplemented with additional sensor data for that same point in
time.
Detailed inverter data is very bulky, therefore only a part of this data is downloaded to the PC as
standard. By using the software function all existing data can be downloaded.
C00410328-01
11
4. Data and Events
4.3. Sum Data
After successful request of the inverter data and data from additional sensor a sum data set for
the total plant will be generated and saved.
The data logger sum protocol will log:
4
Value
Timestamp
Serial number
Power
Unit
W
Income today
Additional measurement
data
kWh
V-
Description
Time of the respective data set
Identification of the inverter
Current production of the total plant (sum from the inverters)
Daily yield of the total plant (sum from the inverters)
See additional measurement data
4.4. Additional Measurement Data - Sensors (+ Version)
The data logger + version can in addition log 2 x PT1000, 1 x impulse and 1 x voltage value 0..150
mV, for environment temperature, module temperature, radiation and impulse count logging. The
relevant sensors are connected to the plug on the back side of the data logger.
Value
Counted yield
Radiance
Unit
kWh
W/m²
Environment temperature °C
Module temperature
°C
Description
Calculated of counted impulse, 0..400 kWh
Directed radiation calculated of sensor voltage value, 0 ..
1200 W/m²
Resistance value PT1000, -40 .. 160 °C
Resistance value PT1000, -40 .. 160 °C
Attention!
A very long cable to the temperature sensor will result in a decreased accuracy of
the measurement. A copper cable with 10 metres length and 0.25 mm² profile will
cause a measurement error of approx. 0.5°C if using a PT1000 sensor.
The yield recording with an impulse counter is much more accurate than the summing up of values of each inverter. Therefore PC-Software uses the range of values
from the impulse couNter of the total plant (Settings → Data logger → Sensors).
4.5. Events
All events will be indentified as one-off or permanent events or messages of the PV plant, which
are either reported from the inverter to the data logger or “recognised” by the data logger due to
his programming. Events are classified as follows:
Event = Information with high importance on critical events and failures, which require immediate
attention.
Warnings = Information with less importance which is generally not to be regarded as critical.
Information = Information on internal data logger events, for example the maintenance occurring at midnight, configuration changes etc.
12
C00410328-01
4. Data and Events
4.5.1. Event Notification Data Logger
In the event protocol the following events are displayed as type “FAIL”:
Event
Modem PIN not accepted
Event Cause
GSM-Modem has not accepted the configured
PIN code.
Modem PIN invalid configu- GSM-modem has alration
ready rejected the PIN
code once.
Inverter <Nr.>:
Inverter <Nr.> has been
no communication for XX
unattainable for XX
hours
hours.
Inverter <Nr.>:
The alarm “income deviincome deviation: -XX %
ation“ was activated in
the inverter <Nr.> because the daily yield was
XX % lower than the
plant average.
Inverter <Nr.>:
Inverter <Nr.> noticed
<event notification>
an event
Inverter <Nr.> since xxx
Inverter <Nr.> noticed
min. Status <event notifica- an event for XX minutes
tion>
Inverter <Nr.>:
The problem with inverProblem solved
ter <Nr.> no longer occurs
CF error
Compact Flash Card®
missing
RTC (Real Time Clock) in- RTC (Real time clock)
valid
missing
RTC (Real Time Clock) in- Invalid time
valid
Troubleshooting
On the tab page “Settings → Data logger → Main settings” enter a new PIN code and restart the data
logger.
In tab page “Settings → Data logger → Main settings“
enter a new PIN code and restart the data logger.
4
Check inverter status and cables.
Check inverter and plant installation.
See event notification inverter.
See event notification inverter.
Please contact your supplier.
Please contact your supplier.
Please contact your supplier.
In the event protocol the following events are shown as type „INFO“:
Event
SMS sent to xxx
SMS could not be sent, will be retried.
Firmware start with version xxx
Phone number transferred to xxx
Configuration xxx changed
Configuration entry <entry> has
been changed to <new entry>.
Description
Alarming sms successfully sent to phone number.
Alarm sms could not be sent to the phone number. Sms dispatch will
be repeated.
Firmware start (data logger start-up, midnight restart).
Alarm Call number transfer successfully.
User has changed the configuration.
User has changed the configuration entry.
4.5.2. Inverter Event Notification
The event notifications are generated by the inverters themselves and are dependent on the inverter! Details to the occurred inverter events can be found in the corresponding inverter user
manual.
C00410328-01
13
5. Installation and Connection
5. Installation and Connection
The data logger is delivered in a robust, fanless casing and is intended for indoor switch cabinet’s
installations. For outdoor installation an electro-installation cabinet with protection level IP65 is
recommended.
Attention!
As all electric devices the data logger should be protected against humidity, in particular against condensation of water. Condensation is reduced with circulation of
air as a complete unit seal-up.
5
Attention!
The cables or the CompactFlash® memory card must only be installed or removed
when the device is switched off.
5.2. Connecting the Hardware
Connecting the data logger to the inverter is done the following way:
1
2
3
14
•
Insert the Compact Flash® Card into the card slot (already done at delivery).
•
Plug the RJ45-Terminator (black) into the RJ45-socket of the data logger.
•
Use a RJ45-network cable to wire the free RJ45-socket of the data logger with one of
the RJ45-sockets of the last inverter in the network.
•
Terminate the inverter bus with the other RJ45-Terminator at the other end of the network (please see the inverter user manual).
•
If required connect sensors and impulse generator (+ version only).
•
Connect the power supply to the electricity supply system.
•
Connection to the PC is achieved via null modem cable or modem depending on desired
variation.
Power supply through external network adapter.
Connection to the PC via “null modem cable”.
Connection to the inverter network via RJ45 network cable + RJ45 terminator.
C00410328-01
5. Installation and Connection
The LEDs and the internal loudspeaker of the data logger switch on briefly once the data logger
is connected to the power supply. The system has been started successfully if both signals are
heard. If this is not the case please check the power supply.
If the red LED continuously flashes, the data logger is not configured correctly. Please check with
the PC-Software. If this issue cannot be solved, please get in touch with your supplier.
The data logger should only be used in conjunction with the appropriate adapters
and cables (e.g. commercially RJ45 TP10/100 network cables). This version needs
a termination.
5.3. Connections to the Mains Network
5
For connection to the mains network use the (included in the scope of delivery) network adapter
(12 VDC) or an adequate voltage source 12-24 VDC. The power consumption of the data logger
amounts to max. 0.8 Watt.
Attention!
Connection to the mains network should only be done after the installation of hardware and other cables.
5.4. CompactFlash® Memory Card
The data logger is only operational with an installed CompactFlash® memory card. On every connection to the data logger the PC-Software automatically checks this for faults and events.
Attention!
Removing this during operation (power supply active!) can lead to damage to the
data logger as well as the memory card and all data held therein! Only remove the
memory card when the device is switched off.
Attention!
The memory card is made in such a way that it can only be inserted into its slot one
way. Do not bend or force the memory card on insertion!
5.5. Connection to the PC
There are two possibilities to connect the data logger to the PC:
Direct connection with a RS232 Null modem cable:
An RS232 null modem cable is included in the scope of delivery of the data logger. Cable lengths
of 10-15 m and are not critical. Longer distances however, must be covered by a commercially
available extension cable. Using hardware flow control the PC recognizes almost all the necessary
settings itself.
C00410328-01
15
5. Installation and Connection
The null modem cable must have the following (commercially available) structure:
1<->4, 2<->3, 3<->2, 4<->1, 5<->5, 7<->8, 8<->7 (9<->9 not necessary).
Modem connection
For this both the PC and the data logger must be equipped with a modem. Normally all ISDN-,
GSM- or standard analogue modems are usable, as long as they are based on the HAYES standard.
Modem recommendations are also available in chapter 3.6.1.
ISDN Modems (X.75) are usable on the data logger side when both the PC and the data logger
are using the same type of modem.
ISDN card/Modems which support so called analogue-Modem Emulation (e.g. AVM ISDN Fritz
cards®) are equally functional on the PC side. The receiver (data logger) can then be set up with
either an analogue or GSM modem.
5
Attention!
The modem must be installed in the PC before start-up and checked for functional
capability (see WINDOWS® manufacturer's guide).
A PC reset is necessary after having installed the modem driver on the PC.
The data logger must be connected via a terminal interface (Sub-D9) to the modem. All required
cables are delivered with the modem. Instructions for start-up and use of the modem can be found
in the corresponding user manual of the modem.
If the data logger is switched on when a modem is connected to it, it acknowledges whether it
can communicate with the modem. It does so using acoustic signals, see chapter 3.8.
Signals sound only when the acoustic signal is switched on, see chapter 3.8.
When using a GSM modem it is imperative that either the PIN code on the GSM card in use is
deactivated, or that the correct PIN code has been successfully entered in the data logger (see
basic set-up of the data logger in Chapter 8.8.3.1).
Attention!
The PIN code must be entered before connecting the GSM modem!
If the PIN code given is not accepted by the GSM modem, login will only be repeated after reentering the PIN code. This avoids repeatedly entering a false authentification, which could
otherwise lead to the locking of the SIM card. If a false PIN code is given three times in succession
the SIM card must be unlocked by using a mobile phone and entering the PUK code! The PUK
code cannot be entered via ComLynxMonitor.
With some modems which operate over a telephone switchboard, it can occur that
communication does not take place immediately. The reason for this is the high
density of ring signals, whereby the modem cannot recognise its own “RING” properly. The only solution to this problem is either to use a different modem, or to
configure the switchboard so that the modem has a standard ring signal.
16
C00410328-01
5. Installation and Connection
5.5.1. Installation Check
After a successful installation of the data logger ComLynx Monitor verification is necessary.
Complete verification can only be done during the day when the inverters are active
(sufficient sunshine is needed).
5
C00410328-01
17
6. Installation and Uninstallation of the PCSoftware
6. Installation and Uninstallation of the PC-Software
6.1. Installation
The PC-Software ComLynx Monitor is included on a CD in the data logger delivery box and is
installed the following way:
6
1.
Log in on local computer as administrator.
2.
Insert the software CD into the CD/DVD-drive of the PC.
3.
Start the installation program located on the CD.
4.
If Microsoft® Net Framework Revision 2.0 is not already installed, the following message
box will be shown (otherwise continue to step 6):
5.
Repeat the installation as soon as Microsoft® Net Framework Revision 2.0 has been successfully installed.
6.
Choose your language.
7.
If not automatically entered, the license number must be entered during installation (this
can be found on the CD cover).
8.
Click on the menu Start/Programs to start the PC-Software “ComLynx Monitor”.
Without a valid license number the program will only start in demo mode! The license number can
be entered later at any time (see chapter 8.5). After entering the license number a new entry field
or tab page must be selected. The system will automatically check the validity of the license number.
6.1.1. Program Updates
ComLynx Monitor will continuously be improved just like the operating system of the data logger
(firmware). Updates may be needed as a result of changes to the system components (inverter,
solar controller etc.), new views on data evaluation, new user requirements and changes on the
operating systems of the PCs.
Therefore it is recommended always to perform a data backup of the projects and existing data
before installing an update. After a successful data backup the new version should be reinstalled
according to manufacturer details. Firmware-Updates for the data logger are described in chapter
810.
6.1.2. Uninstallation
The uninstallation of the software is established using the Control Panel → Software with “Uninstall ComLynx Monitor”. Data already downloaded to projects on the PC is not lost, as standard
they are saved under "My documents".
18
C00410328-01
7. Start-up
7. Start-up
7.1. Start-up
When starting the PC-Software for the first time, only a demo project exists. This project can be
used for checking the functionality of the PC-Software.
After connecting to the data logger ComLynx Monitor must “learn” which data the connected
system provides.
7.2. Connection to the Data Logger
Connection between data logger and the PC can be established using either a direct connection or a modem connection.
7.2.1. Direct Connection via Null Modem Cable
7
A direct connection is carried out with the provided null modem cable. The appropriate COM
port will automatically be found or can manually be chosen by the user. After successfully connecting to the data logger, it must be configured, if not already done.
Attention!
ComLynx Monitor is only compatible with data logger’s running minimum firmware
2.0! If a connection to the device is not possible, please ensure that the firmware
of the data logger is the current version. Information about firmware updates can
be found in Chapter 8.10.
7.2.2. Modem Connection
With a modem connection the modem to be used and the telephone number of the respective
data logger (which should also have a modem available) must be entered.
If no modem configuration has been made, ComLynx Monitor automatically opens the relevant
tab page for “Modem Configuration”:
C00410328-01
19
7. Start-up
7
The connection type to be used is chosen under “Connection”.
All available COM ports are automatically added to the list of available COM ports, and the direct
connection is automatically established.
Connection to the data logger is made by clicking on “Connect now”.
Note:
Available COM ports can be found in the device manager of the operating system (see the user
guide of the operating system).
The “Modem” drop down box allows access to all modems available on the PC. Instructions for
use of modems on the data logger side can be found in chapter 5.4 (modem connections).
With “Properties” and “Dial parameter” changes to the standard settings of the modem can
be made.
If the “Auto connect after program start” check box is checked, the connection and data
transfer to the data logger is automatically activated immediately when the program is started.
“Close connection after idle time of” is a safety setting for cost control. The connection with
the data logger is automatically closed after 5 minutes "idle" (no data download running) as
standard.
7.3. Setup and Configuration of the Data Logger
7.3.1. Time Synchronisation
Generally it is necessary to synchronise the system time of the data logger to that of the PC on
first use. If the system time of the data logger diverges from that of the PC by more than 10
minutes a “time synchronisation” window will automatically appear. It is recommended to set the
time sync.
20
C00410328-01
7. Start-up
The time can automatically be synchronised to that of the PC or manually by the user.
Attention!
If time synchronisation is carried out during operation, a time discrepancy of more
than 10 minutes can lead to loss of the logged data.
7
7.3.2. Teaching the Data Logger to Recognise Inverters
On first use, the PC-Software will need to perform a network scan in order to be able to log data
from the connected inverters.
Functionality
Yes
No
Description
Starts networkscan and starts data logging
Opens “My plant“ without carrying out networkscan
Under “Settings → Data logger → Inverter“ a logging interval can be given for the
frequency of data logging. This value is set to 10 minutes as default.
7.3.3. Sensor Configuration
To log data from sensors (+ version) such as directed radiation, the specific sensor needs to be
enabled and the calibration value entered, as well as the data logging under “Settings →
Datalogger Sensors“ activated.
C00410328-01
21
7. Start-up
7.4. Installation Check Using Current Values
After installation and configuring of the data logger, correct functioning must be checked. This is
easiest done using the tab page “Current values“. Here the actual values for the connected
inverters together with the sensor values are shown via the inverter status.
The inverter status shows the current values for connected inverters and measurement data as
they are currently being read by the data logger.
7
By clicking on an inverter bar the relevant actual values and sensor values of the selected inverter
are shown on the right.
Further information about inverter status can be found in the corresponding inverter user manual.
22
C00410328-01
8. Working with the System
8. Working with the System
8.1. Working with the System
ComLynx Monitor displays all views in one window using tab pages. Using just a few mouse clicks
the user can directly access all relevant functionality.
The following chapters describe how to configure, load and display logged data.
8.2. User Rights, Access Rights
The use of the PC-Software allows access on two levels:
Access as “User”
Provides the user with read and write access to all information and data, except data logger settings.
Access as “Admin”
Provides the Admin (Administrator) with rights to change the data logging settings. When using
ComLynx Monitor every user is logged on as "user". If the user requests a functionality which
requires the "Admin" user level, the PC-Software automatically asks for the password.
8
Attention!
In delivery status no password is set. To avoid misuse a password should be configured on first use.
8.3. Status Bar
The status bar at the bottom of the window shows the current communication status between the
ComLynx Monitor and the data logger. Additionally the progress bar shows optical and percentage progresses of the data download.
The status bar can show the following status:
C00410328-01
23
8. Working with the System
Status
Offline (red)
Online
Data Description
Data Download
Networkscan
Data Export
Description
No communication is currently possible with the plant (disconnected)
- only data up to the last download is shown.
Data connection established (Online data queried).
Loads the data descriptions stored in the data logger.
All data stored in the data logger will be downloaded (from the last data
set logged in ComLynx Monitor).
Networkscan is running.
Data export is running.
The download can be stopped at any time by clicking “Cancel Download” and started again by
clicking “Continue Download”.
The status bar is fixed at the bottom of the program window and is visible in every tab page,
regardless of which tab page is selected.
The modem connection is automatically closed when the data download has finished, is paused, or when the idle time expires (see Chapter 7.1.2).
8.4. Language
8
The program language can be chosen during software installation, but also changed during operation.
German
English
French
Spanish
Italian
The language is changed by selecting the desired language from the drop down box (Settings →
PV Plant tab page).
The program will be automatically restarted by the system after confirmation of the dialog shown
below.
24
C00410328-01
8. Working with the System
With Windows the language used for the text on the button on dialogues is dependent on the language of your operating system. Therefore, it is recommended
to install ComLynx Monitor in the same language as the language of your operating
system.
8.5. Information
Having started the PC Program the “Information” tab page appears, showing the system details.
8
1 Graphic
2 Plant status
3 Registration + License number
4 Manufacturer & Software version
5 Contact data
6 Status bar
The image on the left can be changed by right-clicking with the mouse. Below an overview is
shown of the power, yield, revenue and CO2 savings of the total plant.
8.6. Current Values
“Current Values” displays the current status of the plant, current power of all inverters as well
as the total power. The current data is shown as it is being read from each inverter at that moment
in time (online data). By selecting a bar the detailed values of the connected inverters together
with sensor data can be seen.
When this tab page is opened a data logger connection is automatically established and the page
will immediately be updated with the newly received data.
Online data is continuously updated, but not saved. The next data set will be logged
when the preset logging interval expires.
C00410328-01
25
8. Working with the System
In order to check the current status of the plant, this tab page should always be
visited when a connection with the data logger is made.
The current power of each inverter is shown as a bar chart. An empty bar shows the achieved
and saved maximum power of an inverter, and a full bar shows the current power. If a new
maximum is detected, the empty bar will be adjusted accordingly.
8
Inverters that do not respond or inverters with a current output power of null will be shown using
an empty bar labelled “OFFLINE“.
If the number of connected inverters exceeds 10, a scroll bar allows navigation scrolling through
the view.
Details
By selecting a power bar, the data of this particular inverter will be show in “Details”. Information
about the inverter data can be found in the corresponding chapter.
Additionally the maximum and current power of each inverter is shown by moving the mouse
pointer over a bar.
Display
The total power of the plant is illustrated in the same way as the power of each individual inverter.
The display of current power bars are shown either as absolute or normalised values:
Absolute
Value:
Normalised
Value:
Power of the power bar shown
as absolute value.
Power of the power bar shown
as a percentage value.
The colour of the power bars can be individually configured on the “Settings → Data logger →
Inverter” tab page, except the colour of the total power bar, which cannot be changed.
26
C00410328-01
8. Working with the System
Context-Menu
With a click on the right mouse button the diagram function are opened.
Status
Copy
Save image as ...
Page setup
Print
Description
Copies the contents of the current graph to the clipboard.
Current display is saved locally as an image.
Configuration of the image to be printed.
Prints the current graph.
8.7. Reporting
In “Reporting” the logged data is represented graphically. In the first line the energetic reports
are available in which power, yield and events, if present, are shown.
8
The total plant, one or more inverters, as well as daily, weekly, monthly, and yearly yield, and
daily and weekly power can be shown. Also the revenue and the CO2 savings can be illustrated.
Several menu items allow the selection of different reports. Upon selection the program will generate a report as to plant/inverter and period.
Additionally a tool tip is shown when the mouse pointer is moved over an inverter bar. The tool
tip is dependent on the context and reports.
The colour of the power bar can be individually configured under “Settings → Datalogger → Inverter”, with the exception of the total power bar, which is always dark red and cannot be changed.
A prerequisite for the display is that the data of the PV plant has been downloaded
to ComLynx Monitor.
The diagram can be saved locally, copied to the clipboard or printed by clicking on the right mouse
button (see internet explorer user guide).
Additional parameters
C00410328-01
27
8. Working with the System
Optionally radiation (W/m2), module temperature in (C°), ambient temperature (C°), inverter
temperature (C°) or events can be selected to be shown in the diagram. These values will be
shown on the Y axis.
Event display
Events are shown using a colour and a (!) symbol next to the relevant inverter or the total plant.
If a line diagram is shown in the time window, events will be displayed using a symbol. When an
event occurs, each event is shown by a symbol. Events occurring over a longer period are connected by a line.
On a bar chart an event is shown in the time window above the appropriate bar when the event
occurs. If the mouse pointer is moved over the event, a window will appear showing a list of all
events which have occurred within that time line.
8
For further information regarding inverter events, please refer to the inverter user
manual.
If the diagram is printed together with the “events”, all events which have occurred within this
time line will be shown under the diagram.
Period
It is possible to choose periods of day, week, month and year for the current graph. A calendar
allows the direct selection of a specific date and time line. The calendar adjusts itself to the selected time line.
Update view automatically
An essential function of ComLynx Monitor is the administration of logged plant data. This allows
data to be effectively transferred to the PC saving time and costs. ComLynx Monitor has the ability
to limit data transfers and automate the transfer. Generally only data which is necessary for the
generation of standard reports will be downloaded.
If project data already has been downloaded to a PC, when a new connection to the data logger
is established only the newly logged data will be downloaded.
28
C00410328-01
8. Working with the System
For a direct data transfer the check mark “Update view automatically” should be removed.
Only existing data will be downloaded.
For an automatic download of the logged data the check mark “Update view automatically”
should be set. As soon as new data are available, the reports will be updated automatically, and
the shown period will be updated with the timestamp of the last logged data.
Attention!
A prerequisite for generating graphs is that the data of the PV plant has been downloaded to the ComLynx Monitor.
Due to the large amount of data to be handled there may be a delay in the generation
of the yearly reports.
8.7.1. Diagram Editing Functions
Scaling
To increase or decrease the scale and null point of the graph, position the mouse pointer over the
graph window and turn the mouse wheel until the desired arrangement has been reached.
8
Zooming
To pull up a zoom window, use the mouse to select a frame within the graph. On release the
contents of the frame will be zoomed in. By clicking the right mouse button, the zoom functionality
will be closed.
Context Menu
By clicking the right mouse button on the graph window, the following functions will be available:
Status
Copy
Save image as ...
Page setup ...
Print
Un-Zoom
Undo all Zoom/Pan
Description
Copies the contents of the current display to the clipboard.
Current graph will be saved locally as an image.
Configuration of the image to be printed.
Prints the current graph.
Undo the the last scaling, this function is only active if a scaling has
been performed.
Undo all scaling actions.
8.7.2. Report Types
Yield Report
This diagram shows the yield for the inverters
and total plant as a bar chart.
Unit: kWh
C00410328-01
29
8. Working with the System
Power Report
This diagram shows the power curve of the
inverters and total plant as a line graph.
Unit: W
If several inverters are selected, the bars will be stacked one on top of the other.
This will not be the case for line diagrams.
Yield Report €
Calculates the earnings yield (Maximum- Minimum) of the inverters and total plant and is
shown as a bar chart.
Unit: Euro
8
Report CO2 Saving
Shows the CO2 saving achieved by the inverters and total plant, and is shown as a bar
chart.
Unit: kg
Earning yields and CO2 savings, which are shown for each inverter (bar), are dependent on the
defined period. This means:
Period
Day
Week
Month
Year
30
Yield
Hourly
Daily
Daily
Montlhy
C00410328-01
8. Working with the System
8.8. Data Export
For the data comparison a compressed form is downloaded to ComLynx Monitor and processed.
If the logged data needs to be further processed in another program such as Microsoft® Excel it
is necessary to convert the data to a generally workable format such as ASCII-format.
8
Files in ASCII-Format can be processed by many commercially available programs
e.g. Microsoft® EXCEL®, Sigma Plot®, etc.
A data export to the PC is possible by selecting the data, period and file format.
Data
The selection of sum, detail or event data of all inverters is possible. The data type selected determines which data is available on the Left side.
Period
A prerequisite for exporting data is the definition of the period of which the data should be exported. The beginning ”from” and the end “to” should be defined.
Generally the whole protocol is exported.
File format
Data can be exported in the following file format:
•
Excel-Document (*.xls)
•
XML-File (*.xml)
•
Text-File (*.txt)
Due to technical limitations of Microsoft® Excel documents, no more than 20000 data sets can be
imported in an Excel document! If the limit is exceeded a warning notification will open and the
end date of the time line will be set to that of the last value within range. If more data should be
needed, several Excel sheets with different periods must be made.
C00410328-01
31
8. Working with the System
Some special settings are available for the export:
Selection
Line numbering
Output timeline
Description
The individual logged data sets are numbered.
For the linearisation, as the logged data will not be recorded with
constant intervals (for example logged data will save from
8:00a.m. – 8:00p.m.).
A lot of end-user applications do not have the possibility to linearise
the time axis which displays the curves distorted. This avoids a
timeline of an x axis.
Output headline
A header row with field descriptions of the different data columns
is displayed.
Column separator (txt selec- Shows a selection of separators between the measurement value
tion only)
columns.
Column Selection
The window on the left shows the data elements available for export. The window on the right
shows the data elements in the export data files.
The individual data elements can be sorted into desired position in the export list using the following keys:
Selection
8
Description
Enter all data into the export list.
Enter only selected data into the export list.
Remove only selected data from the export list.
Remove all from the export list.
Shift data element up.
Shift data element down.
To start the data export press “Start export” and enter the output folder and file name for the
data.
8.9. Settings
The “Settings” tab page is divided into several tabs. In this case the data logger, inverter, sensor
configuration, as well as the monitoring and reimbursement, can be configured.
The configuration is dependent on the authority level of the user (see Chapter 8.1).
8.9.1. PV Plant
In the settings for the “PV plant” alongside the plant administration, the connection settings
between the data logger and the PC-Software can be found.
32
C00410328-01
8. Working with the System
8
Plants
In the plant list all available plants and if available also the date of the last connection is shown.
The plant currently open is emphasised in colour and is also shown in the title list.
When ComLynx Monitor is restarted the plant which have previously been used, will
be opened.
Below the list of available plants, the menu for opening, creating and deleting a plant can be found.
New Plants
By clicking on “New” a new plant to the connected PV plant can be setup.
Under “Plant name” a new plant name must
be given.
Default path for the plant is C:\Documents
and settings\ users\ my documents\...“ .
Change of this directory is made with “…“.
Every project gets its own sub directory based
on the name of the plant.
With “OK” the new project is saved and an networkscan can be started immediately.
C00410328-01
33
8. Working with the System
Language Settings
The language of ComLynx Monitor can be changed dynamically, further information can be found
in Chapter 8.4.
After a language change the program will automatically be restarted.
Data logger connection
Under “Connection” a connection to the data logger is selected and configured.
If a modem connection should be used the “Modem” connection should be selected and configured.
Modem Connections
A modem can be chosen among all the modems installed on the PC. Standard settings such as
Telephone- and modem options can be set under “Properties” and “Selection parameter”.
The telephone number of the modem connected to the data logger has to be entered as “Phone
number”.
For further information about modem connections see Chapter 7.1.2.
8
Data download
One function of ComLynx Monitor is the administration of the logged data produced by the plant.
Above all, this means that data can be effectively downloaded to a PC, saving costs and time. The
program allows the data transfer to be limited and automated. The available types of data transfer
are:
Minimal:
Complete:
Power, yield and events are downloaded.
All data available in the data logger such as details and events are downloaded.
Additionally, the date from which the data download should start can be specified. The date of
the last data transfer is automatically shown.
The last 30 days are preset by default.
8.9.2. Reimbursement
To show the financial yield as reports certain settings have to be made. It is possible to either
calculate the reimbursement according to the German Gesetz für den Vorrang Erneuerbarer Energien (EEG) or to freely define the reimbursement sets. Depending on selection only the left or
right side is active.
34
C00410328-01
8. Working with the System
Reimbursement according to German EEG Novelle
To calculate the reimbursement according to EEG, the plant type, plant size in kW and the startup year must be entered. The reimbursement according to EEG is predetermined and is calculated
automatically.
8
User manual definition of reimbursement and timeframes
By clicking on “New column” the reimbursement period and “Cent per KWh” can be defined.
With this all possible international reimbursement models should be calculable. However, this
manual definition requires an good knowledge of the individual reimbursement models.
Definition of Variables
The “CO2-emissions factor” allows the conversion of yield/kWh to CO2/kg. This calculation
factor for CO2 saving depends on the energy source to power generation ratio. Please ask your
local electricity provider for the exact value.
For the total yield, which can be found under plant status (see Chapter 8.5), an offset (delta value)
can be set for the calculation of the total yield. The “Start value for yield count” defines the
value from where the yield count begins.
8.9.3. Data Logger
On this tab page, all relevant functions for data logger configuration are found.
8.9.4. Main Settings (Admin)
Here the fundamental system settings can be view and changed. Only an user with admin access
is allowed to make changes on this page.
C00410328-01
35
8. Working with the System
The general system functionalities and information are divided into information, system and actions.
8
Information
General and non-configurable information of the data logger:
Function
Hardware
Firmware
Serial number
Description
Hardware version of the data logger.
Current Firmware version of the data logger.
Manufacturer assigned identification number
System
Individual system settings of the data logger:
Function
Real Time Clock
User Password
Admin Password
Acoustic Signals
GSM-Modem-PIN
Additional modem configuration
Count of Rings
36
Description
Shows the current system time of the data logger (Real Time Clock –
RTC).
Standard, empty („”); max. 8 characters possible. As validity check the
password must be entered twice.
Standard, empty („”); max. 8 characters possible. As validity check the
password must be entered twice.
Configuration of the system data logger loudspeakers “Off“ deactivates
all signals except serious failures (Real Time Clock, Compact Flash®
card defect). “Events“, “Logging“, “Events and Logging“ (Standard)
activate the audio signal for the selected type.
For the usage of GSM-modems the entry of a PIN code will most likely
be necessary. At each restart the data logger will check the GSM-modem and if a PIN code is required, it will use the stored PIN code. 4
figures must be entered.
Normally no further settings are required. Few modems require special
settings. Via “ATM0”, for example, an additional setting is necessary
to deactivate the modem speakers. Please also see the modem user
manual of the corresponding modem.
The data logger modem initiates link connection after the stated number of “tone signals“, at the latest after 40 seconds
C00410328-01
8. Working with the System
Attention!
By setting the system time backwards, logged data can be lost. By setting the time
forward gaps may appear in the data logging.
With some modems the flow control is deactivated as standard when they are
switched on. Therefore these modems MUST be given the additional command to
activate the flow control hardware!
The following modems require the following commands:
Siemens® MC/TC35 und INSYS® GSM: “AT\Q3“
INSYS ISDN 4.0: “AT&R1&S1”
For all other recommended modems no extra command is required (Chapter 3.6.1)
Function
UPDATE
RESET
Description
Updates the Firmware of the data logger.
Resets to factory setting. All settings will be deleted and must be re-entered.
Attention!
During a firmware update, logged data can be lost, see chapter 8.10.
8
8.9.5. Inverter
It is generally necessary on first use or after having made changes to the PV plant to do a one off
“identification“ of the inverters. On this tab page, the logging interval and maximum power can
be changed.
The list of the inverters can be sorted by clicking on the relevant column header.
Individual configuration of each inverter is possible by selecting the relevant inverter.
The following functions are available:
C00410328-01
37
8. Working with the System
Function
Serial number
Name
Colour
Pac max [Wp]
Active
Alarm
Description
The first 4 digits, from the manufacturer serial number, cannot be
changed. The whole serial number can be found on the inverter.
Identification of an inverter for the presentation within ComLynx Monitor; max. 12 characters possible.
Selection of inverter colour for presentation within ComLynx Monitor.
Maximum power of the inverter; max. 12 characters possible.
Add (☑ ) / remove (☐ ) inverter from data query.
Activate (☑ ) / Deactivate (☐ ) the inverter alarm.
Recording of Pac max [Wp]
ComLynx Monitor updates the value of the maximum power Pac max (Power AC Maximum) with
the latest largest value measured, this value can be entered manually if necessary.
This allows a direct comparison between rated power and actual output of the device as long as
a long term trend is visible.
If no maximum power Pac max is set, the PC-Software will use the initial value 1 W.
8
8.9.6. Identifying Inverters
The Networkscan is automatically carried out on start-up or done manually by pressing the networkscan button.
The “Networkscan” button will search for connected inverters.
Attention!
A networkscan will reset the daily yield of all of the inverters calculated up to that
point.
By using the serial number, it is possible to check whether all inverters have been found and
recognised by the system. Additionally, the logging interval can be changed (standard 10 min). A
shorter recording interval leads to a larger data amount and therefore a longer data transfer time.
8.9.7. Monitoring
The data logger has the ability to recognize events and to notify about them:
•
As soon as an event occur the red LED flashes and an internal alarm signal sounds.
•
An alarm symbol will be shown on the status bar.
And/or
•
38
Via distant communication, which is configurable in “Monitoring“ and sent after a defined
period.
C00410328-01
8. Working with the System
Alarm – Configuration
Apart from the switch-off (set by default) there is also the possibility to “Transfer call number” or
to “Send SMS” for the “Alarming” function.
”Transfer call number”: If a modem has been installed and phone connection have been configured for transmissions, the phone number can be transmitted with one ring.
It is a requirement is that the phone to be called must be able to display “Missed Calls”. The callee
can then recall the system via PC.
“Send SMS”: If an SMS compatible modem (for example GSM Modem) has been installed a
message containing event details will be sent via SMS. Event type, details and system information
will be communicated. Therefore a phone number must be entered into the input field “Alarm
phone number”.
Attention!
By the use a GSM modem with a prepaid card no connection is being established if
the credit is too low (example: minimum amount <2 €). Minimum amount depends
on the mobile network operator.
8
Generally there are three different alarm types. They can be activated one by one:
Monitoring of Inverter Events
To initiate an alarm, the “Monitoring” must be activated by setting a check mark. It will be
initiated by overvoltage, overtemperature and grid failure. The time period to the “Alarm” (response time) can also be set here.
Multiple Events
In case of simultaneous events (or events with short interval) on different inverters, it is not
guaranteed that all SMS’s are sent because it depends on the time it takes sending a SMS and the
time interval between the events. This is also the case when selecting “Transfer call number”.
The alarming therefore indicates that the user needs to connect to the data logger for further
information.
SMS-Text for an inverter error:
Message from WR S/N 1234: Event 'XXX' since DD.MM.YYYY hh.mm
C00410328-01
39
8. Working with the System
Inverter communication failure during the day
An alarm will be triggered at 6.00 pm if the data logger has not been able to communicate with
some of the inverters all day. For this the check box must be marked “Active”.
In case of both a communication error and an income deviation error it is only guaranteed that
one of the alarms is sent (call number transfer or SMS shipping). The alarming therefore indicates
that the user needs to connect to the data logger for further information.
SMS-Texts for a communication error:
No inverter contact today. Inv S/N: 1234 Date: DD.MM.YYYY
Yield Comparison
Every day at 6.00 pm the daily yields of all inverters are compared against each other. An alarm
occurs in case an inverter supplies less power in comparison to the other inverters on the day
before. The cause can be pollution or partial failure of the solar cells or it could be caused by
inverter problems.
The following settings must be made:
8
•
Income comparison: The percentage variance of the mean value.
•
Minimum income: In order to prevent an alarm occurring on days with less solar radiation, it is possible to set a minimum income per day. If the total income of the entire
plant is less than the minimum income no yield comparison is triggered.
The income comparison is performed in the following way:
The daily yield of the inverter is divided by the maximum power (installed peak power) of the solar
cells connected to this inverter.
The relative income of each individual inverter is calculated as follows:
Relative income = Daily yield [kWh] / installed peak power [kWp]
The relative income of the individual inverter is then compared to the values of the other inverters.
If the percentage variance is above the configured value an alarm is initiated.
The income comparison is only made when two or more inverters in the network are active.
SMS Texts of an income deviation error:
Inverter income deviation on Inv S/N 1000: -100 % Date: DD.MM.YYYY
8.9.8. Alarm
If an alarm is initiated, the optical as well as the audio signals will be enabled (see 8.9.3) an alarm
bell symbol will also appear in the status bar.
The alarming bell will be shown in the status bar until the event has disappeared or until the
function key (see chapter 3.7) is pressed, or the alarm is quit by clicking on the bell symbol.
8.9.9. Disabling Alarm Sound
When an alarm occurs there are two ways of turning off the sound:
40
•
Press the function key on the data logger (see Chapter 3.7)
•
Select Audible indicators “Off” in “Settings → Datalogger → Main settings” (see Chapter
8.9.3).
C00410328-01
8. Working with the System
8.9.10. Enabling Alarm Sound
Select Audible indicators “Off” in “Settings → Datalogger → Main settings” (see chapter 8.9.3).
It is not possible to turn the alarm sound on by pressing the button on the data logger.
8.9.11. Sensors (+ version)
For data logger + version the function “Sensors” also exists to configure the calibration values,
which are needed for the sensor inputs, as well as to activate the data logging.
8
The sensors do not need to be “identified” as these are automatically recognised by the PC. In
“Current values” the values for all sensors at that moment in time will be shown.
“Radiation” has a calibration value to show how much voltage would be produced by a sensor
if radiation strength of exactly 1000 W/m2 was achieved. Normally this value is written on the
radiation sensor.
The “Impulse counter” has a calibration value which shows how many impulses kWh is produced by the yield meter. Here the standard value is given as “1000“, that is after 1000 impulses
the registered yield increases by 1 kWh.
An “Offset” (Delta value) for the “Environment temperature” and “Module temperature” adjusts the logged data to the real data (compensation cable length for PT1000 sensors).
All 4 sensor inputs also feature a check box “connected” to activate the relevant sensor input.
If this is not checked no measurements will be recorded from that input, and also not displayed
in current values.
8.10. Firmware Update
For daily use, firmware updates are not necessary. However, it might be necessary to reprogram
the data logger (due to improved functionality etc.). Firmware updates can be carried out either
directly from the CompactFlash® memory card or via ComLynx Monitor. Information of the currently used data logger firmware can be requested at any time.
C00410328-01
41
8. Working with the System
Attention!
Data backup (download all data to PC) must be made before starting the update in
order not to loose the valuable data protocols of the data logger. Where required
the old CompactFlash® memory card can be replaced with a new (min. 128 MByte
big) card.
8.10.1. Firmware Update with the CompactFlash Memory® Card
The CompactFlash® memory card of the data logger (or a new card) is connected to the PC.
Where possible, the FIRMWARE.BIN found on the CompactFlash® memory card should be secured
by copying or renaming.
The firmware to be installed must be copied to the CompactFlash® memory card under the name
FIRMWARE.BIN.
Now the data logger must be switched while pressing the function key (see data logger connections) (the button should be pressed for at least 8 seconds). The new firmware will now be saved
in the data logger. During this time the LEDs will flash.
This procedure must not be interrupted. However, if this happens the data logger will not start
properly and the procedure must be repeated.
8.10.2. Firmware Update via ComLynx Monitor (Admin)
8
A firmware-update can also be done using with ComLynx Monitor and remote modem connection.
In this case the operator must have “Admin“ rights.
Updates are only possible this way when the chosen firmware is a newer version
than the one currently on the data logger, and the current firmware is compatible
with the ComLynx Monitor version! A firmware update is only possible when no
download is running.
The following steps should be carried out when updating the firmware:
•
Perform data backup with a complete data transfer to the PC (see Chapter 8.8.1).
•
Connect to the PV plant.
•
Installation of the new data logger firmware.
•
Create new PV plant (Project).
Attention!
After a firmware update it is no longer possible to connect to a plant set up on an
older firmware version!
To carry out a firmware update a connection with the data logger as Admin is essential.
Settings → Data logger → open Main settings click on “UPDATE“, and enter Admin password where
necessary.
Make a note of all of the settings from configuration tab page. After installation of the new firmware the settings (e.g. sensor calibration values) must be checked and where necessary reentered.
In the function “UPDATE” information about the firmware currently in use can now be seen. Here
it is also possible to choose a new firmware file from the PC hard drive (using “search“ function).
If a new firmware file is chosen from the hard drive, a tab page will open with the relevant firmware
information. “Select” selects this file for installation, with “Cancel“ it will be discarded. If the current
version is not compatible with the ComLynx Monitor version, a message box will appear. In this
case the firmware update updated with the original version delivered with the PC!
42
C00410328-01
8. Working with the System
The transfer (Upload) of the firmware can now be started. The firmware update must be conducted until the confirmation message appears. After this the connection to the data logger will
be automatically disconnected.
8.10.3. New Configuration of the Data Logger
Having installed the new firmware, all data logger settings must be checked. For this purpose a
new plant project must be opened:
•
“Settings → Datalogger → Main settings” and click on “RESET”.
•
Enter Admin Password.
Attention!
After reset, the data logger will load the factory settings; therefore the old settings
will be lost and must be re-entered.
Check all settings via “Current values”, “Settings → Datalogger → Inverter” and “Settings →
Data logger → Sensors” and adjust where necessary.
After a RESET a new network scan must be done!
8
Generally this procedure requires the system to be restarted. The update is complete when new
data can be successfully downloaded.
A firmware update leads to the automatic restart of the data logger, thereby disconnecting the
connection to the PC. When using a remote connection, the connection must be re-established
manually.
C00410328-01
43
9. Technical Data
9. Technical Data
ComLynx Datalogger
COM-Ports
1x RS232 (Modem, PC)
1x RS485 (Data via RJ45 double socket)
PC Connection
Null modem cable
Analogue modem, ISDN-Adapter, GSM-Modems
Memory
Compact Flash® Card type I (up to max. 2G)
Delivery scope 256 MB
Casing
Aluminium, degree of protection IP20
Weight
180 Grams (without power supply)
Environmental Humidi- Interior / switch cabinet
ty
Operating temperature Minimum 0 to 40°C
Dimensions
143 x 70 x 30 mm (L x W x H)
Power supply Power
Power supply: 100 -240 VAC, 50-60 Hz, 12...24 VDC, 0,5 A (power 6 W)
Software
Firmware (operating system for the data logger)
PC-Software ComLynx Monitor for Windows® PCs
ComLynx Datalogger +
Radiation 0 – 150 mV
Radiation
Accuracy: ± 1%
Module temperature
PT1000, -40 to 160 °C
Accuracy: ± 1°C
Outdoor temperature PT1000, -40 to 160 °C
Accuracy: ± 1°C
Output counter
Pulse input: Can be driven either via switch contact or Open-Collector/
Open-Drain-Output (NPN, ensure correct polarity)
9
44
C00410328-01
10. Disposal
10. Disposal
Disposal of Waste Equipment by Users in Private Households in the European Union:
This symbol on the product or on its packaging
indicates that this product must not be disposed of with your other household waste.
Instead, it is your responsibility to dispose of
your waste equipment by handing it over to a
designated collection point for the recycling of
waste electrical and electronic equipment.
The separate collection and recycling of your
waste equipment at the time of disposal will
help to conserve natural resources and ensure
that it is recycled in a manner that protects
human health and the environment.
For more information about where you can
drop off your waste equipment for recycling,
please contact your local city office, your
household waste disposal service or the shop
where you purchased the product.
10
C00410328-01
45
11. Declaration of Conformity
11. Declaration of Conformity
11
46
C00410328-01
Danfoss Solar Inverters A/S
Jyllandsgade 28
DK-6400 Sønderborg
Denmark
Tel: +45 7488 1300
Fax: +45 7488 1301
E-mail: [email protected]
www.solar-inverters.danfoss.com
Danfoss can accept no responsibility for possible errors in catalogues, brochures and other printed material. Danfoss reserves the right to alter its products without notice. This also applies to products
already on order provided that such alterations can be made without subsequential changes being necessary in specifications already agreed.
All trademarks in this material are property of the respective companies. Danfoss and the Danfoss logotype are trademarks of Danfoss A/S. All rights reserved.
C00410328-01 Rev. date 2008-07-08