1
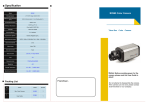
User Manual Product Features With/Without HDMI video output 2.4-inch LTPS TFT LCD screen 4 pieces of prime lens. Focus range is 12cm to infinity. HD wide angle lens Video format: MJPEG (AVI) Built-in Microphone & speaker Filming while charging Supports high capacity SD (SCHC) memory card Supports TV-OUT Infrared video recording Motion detection video recording Charging: The device has a built-in rechargeable battery that has to be charged fully after having been used up for the first three times of charging so as to activate the maximum capacity of the battery. Charging time: 12 hours Operation Instructions Switching modes 1) Press the "POWER" button to turn on the device 2) The MODE is defaulted to video recording while starting. Press the "OK" button to begin recording Press the "OK" button again to pause the recording and save files automatically. 3) Press the "MODE" button to select the mode among photo, audio recording, playback, and video recording. 4) Press the "PWOER" button and hold 3 second to shut down the device when it is in the pause state. Function Keys Video recording / Photo / Playback "POWER" to turn on or turn off the device "OK" to confirm the mode you select "UP" go up, or 1/2/3/4 x digital zoom in "DOWN" go down, or 4/3/2/1 x digital zoom out "MODE" mode switching among Photo/Video Recording/Playback "MENU" Recording/ Audio MENU Setting Video I System Setting Power on. Press "MENU" to enter menu setting when it is in video recording mode. Then choose the Video Setting I System Setting, and press "OK" button to confirm. 1. Video format: 1280*720 /848*480 /640*480 for option 2. Video time stamp: with / without time stamp during video recording 3. Motion detection: On/Off. The device will start video recording automatically while there is an object moving. During recording, the device will save each video file in every 2 minutes automatically. When there is no object moving in two minutes, it enters into standby state, and re-start when object moving again. 4. Cycle shooting: turn on/turn off 5. Cycle shooting time: the saving time of each section: 2 minutes/ 5 minutes /10 minutes 6. Sound: Turn on/off to select the sound 7. Power off delay: Delay for 10 minutes or 20 minutes. After selection, click "OK" button to confirm, setting completed. Then click "MENU" to exit. Photos Setting Power on; Press "MODE" button to enter photos mode. Choose "MENU" to enter the menu setting mode. Then press "DODE" to select: 1 .Photos size: 2592x1944 / 2048x1536 / 1600x1200 /1280x1024, 2. Photos quality: Very Good I Good / Normal 3. Photos mode: Turn Off/ 2S autodyne/10S autodyne/ Continuous 4. Exposure: Exposure luminance adjustment; 5. Date stamp: Turn Off / Date/ Time After selection, click "OK" to confirm, setting completed, Then click "MENU" to exit. Playback Setting Power on; Twice-press "MODE" button to enter the audio recording mode, and three-press to playback mode. Select "MENU" button to enter the menu setting mode. Then press "MODE" to select: 1. File locking: Lock / Unlock single / Lock all / Unlock all. 2. File deletion: Delete single / Delete all 3. Slide show: Start / 2S intervals / cycle /yes 4. Voice Memo: Add. Delete; 5. Setting as Theme Power Up Image: Yes / No After selection, press "OK" to confirm, setting completed. Then press "MENU" to exit. System Setting Power on; Press "MENU" to enter menu setting when it is in video recording mode. Then choose the System Setting by "MODE" button, and press "OK" to confirm. 1. Sound Setting: Shutter Sound: Turn On / Turn Off. Power On Sound: Three sounds for selection, Or no sound. Keypad tone: Turn On / Off. Volume: 0. 1. 3, "0" is silence 2. Power Frequency: 50HZ. 60HZ 3. Auto Power Off: 1 MIN, 3 MINS, 5MINS 4. Screensaver: Turn Off, 10 Seconds, 20 Seconds, 30 Seconds 5. Date and Time Setting: Month/Day/Year Hour/Minute 6. Language: English, Chiness (Simplified), Chinese (Traditional), Spanish, French, Portuguese, German. Japanese, Russian 7. TV Systems: NISC/PAL 8. Theme Power Up Image: Turn Off, System, Custom 9. Formatting: Yes/No 10 Reset to defaults: Yes/No 11 .Version Information: It shows the software information. Press "DOWN/UP" button to select, and press "OK" to confirm. Press "MENU" to exit after setting completed. Setting works after restart the device. Operation Get started and loop shooting 1. Press the "ON/OFF" button to enter into video recording mode. A red camera icon would be displayed on the upper left corner. 2. Press the "ok" button to start video recording Loop recording: During recording, the device will save each video file in every 2 minutes automatically. When the SD card is full, the device will delete the first video file automatically. The Infrared video recording function: It would be turned on automatically under low-light circumstances Shooting while charging 1. Connect the device to a power adapter or car charger. 2. Press the "ON/OFF" button to enter into loop recording mode. 3 Press the "OK" button to pause. Audio Recording Mode 1) Press "OK" button to get started. 2) Press the "OK" button again in the audio recording state to stop recording and save the audio file. 3) Press the "DOWN" button to pause or begin recording again. Playback Mode 1.Press the "Mode" button three times to enter into playback mode. The upper left corner of 2.screen will display "Playing" Press the "DOWN/UP" button to choose the files HD TV-OUT If the device with HDMI video output, please use the included HDMI cable to connect the device to a HDTV.