1
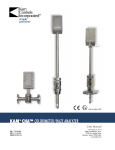
Nevco
Message Center
Installation Manual
Retain this manual in your permanent file.
08/27/2014
135-0144 Rev. C
Table of Contents
INSTALLATION INSTRUCTIONS.............................................................................................. 1
UNPACKING THE EQUIPMENT ....................................................................................................... 1
MESSAGE CENTER MOUNTING ..................................................................................................... 1
MESSAGE CENTER CONNECTIONS ............................................................................................. 3
Ethernet Cables .................................................................................................................. 4
. SOFTWARE SETUP ....................................................................................................................... 5
Computer is Not connected to existing Network ................................................................... 5
Computer is Connected to an existing Network .................................................................... 6
INSTALLER’S TROUBLESHOOTING GUIDE ....................................................................... 7
GLOSSARY.................................................................................................................................... 9
Installation Instructions
Installation consists of four steps, Unpacking the Equipment, Message Center mounting, Connections, and
Software setup. Be sure to read and understand all of the instructions before installing the equipment. Consult
the “installer’s trouble shooting guide” following this section for verifications each step has been installed and
is working correctly.
1. Unpacking the Equipment
Inspect the shipping container for damage. If any damage can be seen, contact the carrier
immediately.
Carefully remove all equipment from its packing carton. Do not pry against the message center
in any way.
2. Message Center Mounting
Nevco strongly encourages you to check local codes before beginning the installation. You may
wish to contact a local architect, contractor, or sign installer for assistance. Your Nevco Sales
Representative may be able to assist you in finding professional installers who are familiar with
this type of equipment.
Always use good mechanical practices when mounting the message center.
Use plated fastening devices to prevent rust or corrosion.
Mount the optional temperature sensor / photocell out of direct sunlight to avoid an elevated
reading.
Mount the two wireless devices (if present) in clear line of sight with each other.
For indoor installations, install angle iron on wall or other structure prior to attaching the
message center. Angle iron and attachments (bolts, washers, etc.) are not included. See
installation drawings for approximate distance between angle iron supports.
For outdoor installations, install tubing laterals on columns prior to installing the message center.
Laterals should be welded or bolted to steel columns. Laterals and attachments (bolts, washers,
nuts, etc.) are not included. See installation drawings for approximate distance between lateral
supports. Brackets on message centers can be welded or bolted to the laterals.
Each message center comes with 2 lifting points on the top of the unit. When using the lifting
points, make sure cables are vertical and not putting an undue horizontal force on the lifting
points. Use of a spreader bar is recommended when using the lifting points.
For multi-section message centers, make sure the cabinets and supports line up vertically and
horizontally. Cabinets should be installed as tight as possible to each other. Where the sections
join together, a bracket shall be installed at the top and bottom. Half of the bracket should
support each section.
Your Message Center was designed so that it can be mounted in a variety of ways. Please
examine the installation drawings to determine the best mounting method for your location.
Access to all internal components is through the front, accessibility to the rear of the cabinet is
NOT necessary. The standard mounting brackets are shipped on the Message Center in a
“retracted” position and must be unbolted and rotated 180°, then reattached with the same bolts
before starting the installation.
135-0144 Rev. C
Page 1
Additional Suggested Mounting Methods
Indoor Mount
Outdoor Mount on Laterals
Note: Please see installation drawings for more details and options.
135-0144 Rev. C
Page 2
3. Message Center Connections
Each message center, whether it is made up of two cabinets end to end, or two cabinets back to back
(double sided), or a single cabinet, requires that power and signal be supplied to each cabinet by the
installer. All internal connections have been completed and tested at the factory.
Both power and data should enter each message center cabinet at its lower left corner as viewed from
the front. An access panel is provided for these connections. The “signal in”
conduit attaches to the panel and a junction box is mounted on the panel for
power connections. Similar access panels are installed on the back and
bottom of the cabinet. All three panels are interchangeable so that the one
with the junction box can be located in the most favorable position. The panel
with the junction box can be moved to either of the other locations without
disconnecting any cables inside the message center.
Be sure to reattach all panels so as to maintain a weather tight seal.
The optional temperature and light sensors should be mounted near this location and need to be
connected to a cable inside the message center behind the access panel.
At the lower right corner of the message center as viewed from the front is a
similar arrangement for the “signal out” if needed. Used for side 2 of a two sided
message center, and message centers made up of two cabinets mounted end to end.
Note: Please see installation drawings for more details.
135-0144 Rev. C
Page 3
Electrical Connections
Refer to installation prints for illustration of electrical
connections.
Power Service
20mm
Color
This sign is intended to be installed in
accordance with the requirements of Article 600
of the National Electrical Code and/or other
applicable local codes. This includes proper
grounding and bonding of the sign.
Consult table 1 for power requirements for your message
center model. Provide for a 30% safety factor to guard
against tripping of the circuit breaker under low line
conditions.
16mm
(Amber
*Denoted values require 2 separate 20A breakers.
/
Be sure to include any lighted signs, and account for Red)
double sided displays when sizing the supply wiring
necessary to support the circuit load.
A disconnect switch should be lockable or within sight of
the sign per NEC article 600.
Ethernet Cables
In a wired configuration, connect from the PC to the
controller with a crossover connection.
If rigid EMT is used, use ¾” rain-tight conduit fittings to
avoid cutting the ends off included pre-made cables.
WARNING! Take care not to reverse the connections on
32mm
the POE adapter as this will damage the controller. Refer
(Amber
to installation print and color coding for details.
/
Red)
The diagrams below show Ethernet connections:
• Ethernet Straight through cable
• Ethernet Crossover cable
PC
POE
Wireless
AP
Wireless
Bridge
2.4Ghz
Wireless
Cabinet
Dimensions
2x8
3x8
3x10
3x12
4x8
4x10
4x12 Left
4x12 Right
4x16 Left
4x16 Right
1x6
1x8
2x6
2x8
2x10
2x12
3x6
3x8
3x10
3x12
3x16 Left
3x16 Right
4x8
4x10
4x12 Left
4x12 Right
4x16 Left
4x16 Right
1x6
1x8
2x6
2x8
2x10
2x12
3x6
3x8
3x10
3x12
3x16 Left
3x16 Right
4x8
4x10
4x12 Left
4x12 Right
4x16 Left
4x16 Right
POE
Sign
Current @
120VAC
5.3
8.8
11.3
13.8
12.3
15.8
8.8
10.5
12.3
14.0
0.9
1.3
1.8
2.6
3.2
4.1
2.6
3.9
4.8
5.7
3.5
4.4
5.3
6.4
3.5
4.8
4.8
6.0
0.9
1.4
1.8
2.7
3.3
4.2
2.7
4.1
5.0
6.3
3.6
4.5
5.4
6.6
3.6
4.8
5.8
7.2
T
R
Rain-tight Box
Current @
240VAC
2.6
4.4
5.7
6.9
6.2
7.9
4.4
5.3
6.2
7.0
0.4
0.7
0.9
1.3
1.6
2.0
1.3
2.0
2.4
2.8
1.8
2.2
2.6
3.2
1.8
2.3
2.4
3.0
0.5
0.7
0.9
1.4
1.7
2.1
1.4
2.0
2.5
3.2
1.8
2.3
2.7
3.3
1.8
2.4
2.9
3.6
Sign Side 2
if double sided
Figure 1 – Wireless Configuration
PC
Sign
T
R
Less than 325’
Sign Side 2
if double sided
Figure 2 – Wired Configuration Ethernet
PC
Media Converter
Media Converter
Fiber 325’ – 1.2 Miles
Rain-tight Box
Sign
T
R
Sign Side 2
if double sided
Figure 3 – Wired Configuration Fiber Optic
135-0144 Rev. C
Page 4
4. Software Setup
The message center can be connected to a dedicated computer for setting up new messages, or integrated as part
of an existing computer network. The system is shipped in the first case as described in “Not connected to
existing Network”.
Computer is Not connected to existing Network
The message center controller and wireless equipment (optional) are pre-configured to a default network
configuration. The IP address of the controller is set to 192.168.0.210. Wireless Bridge and AP are
192.168.0.211 and 192.168.0.212 respectively.
When the software is installed, the default projects are configured to talk to the default controller IP address.
Follow these steps to set the controlling PC’s IP address to one that can communicate with the message
center.
1. Click the start button and select Control Panel. Double click Network Connections. Double click your
network card or “Lan Connection”. On Win XP select properties. You will see the window on the left.
Select Internet Protocol (TCP/IP) and click Properties. You will see the window on the right.
2. Click the Radio Button “Use the following IP address” and enter 192.168.0.10 and the subnet mask
255.255.255.0 and click ok on each window. You may be prompted to insert your Win98/2000 CD.
3. When you open Nevco Composer™, the button in the lower right hand corner of the screen should say
“Update Message Center” showing that you are connected. (Be sure the license key is in the USB port
and the LED is on)
4. Consult the Nevco Composer™ user’s manual for troubleshooting.
If you are using a laptop, make sure to turn off the wireless LAN in the laptop (if present). This can be done
on most laptops by pressing a button in the area above the keyboard that looks like an antenna.
135-0144 Rev. C
Page 5
Computer is Connected to an existing Network
The message center controller and wireless equipment (optional) are pre-configured to a default network
configuration. The IP address of the controller is set to 192.168.0.210. Wireless Bridge and AP are
192.168.0.211 and 192.168.0.212 respectively.
The steps to change the IP address on each of the devices are explained in detail in the user’s manuals for
each device. Consult these manuals for more information. The wireless devices support DHCP, but the
message center’s IP address must be static. To integrate the equipment into your existing network, in this
order you must change the IP address on a computer, use that computer to change the message center IP
address, change the outdoor bridge IP address, and then change the Access Point IP address. Follow these
steps:
1. Connect the access point to the LAN with a straight through Ethernet cable. The unit is shipped with a
crossover cable for connecting directly to a PC.
2. Change a PC on the network’s IP address as instructed in “Not connected to an existing Network”
above.
3. Change the Message Center’s IP address by following these steps.
a. Install Nevco Composer™ on the Computer. Be sure to plug the license key into the USB port.
b. Enter “Password” as instructed in the manual. As long as the password remains “Password” you
will be prompted to change it each time the program is loaded.
c. Go to Message Center=>Configure Password and Message Center
d. Enter your current password and click connect on the right hand side of the window.
e. Enter the new IP address and subnet mask and click Update.
4. Change the Outdoor wireless client’s IP address by following these steps.
a. Open internet explorer and in the Address Bar type 192.168.0.211
b. Refer to the sticker in your user’s manual for the username and password.
c. A web page called Wireless Client Bridge will come up. Click on “TCP/IP Settings” and select
“LAN Interface”.
d. Change the network settings as necessary to fit your network topology and click “Apply
Changes”.
e. You may also want to change the wireless settings to suit your own security needs. Be sure to
change the Access Point to match in the next section.
5. Change the Access Point’s IP address by following these steps.
a. Open internet explorer and in the Address Bar type 192.168.0.212
b. Refer to the sticker in your user’s manual for the username and password.
c. A web page called Wireless LAN Access Point will come up.
d. Follow the same steps as 4, steps c - e. Make sure any security settings changed on the Client
Bridge match settings on the Access point.
6. You may now change your PC’s IP address back to its original configuration. Test the new
configuration by opening Nevco Composer™, going to Project=>Configure, enter the new IP address of
the message center and click “OK”. The status at the bottom of the screen should now be “Display
Connection = Ethernet”.
135-0144 Rev. C
Page 6
INSTALLER’S TROUBLESHOOTING GUIDE
The figure below labels the connections made by the installer from A – K. The chart below lists the problem that
can be identified should each connection be faulty. Should a problem arise on any one component, consult the
trouble shooting guide specific to that device.
.Note: All connections inside the Message Center have been made at the NEVCO Factory. Each Message
Center requires Signal from the controlling PC. Each Message Center also requires Power (see Table 1).
Note: For double sided and/or double cabinet message centers. The input signal for subsequent cabinets comes
from the output of the previous cabinet. A separate power circuit is required for each cabinet.
MESSAGE CENTER
A
Temperature & Light
G
J
D
F
H
Sensors
C
POE
PC
Wireless
AP
2.4Ghz
Wireless
Wireless
Bridge
POE
K
E
J
Power
Ethernet In
Power
B
Power In
Ethernet Out
To side 2
(if applicable)
Rain-tight Box
If Outdoors
135-0144 Rev. C
Page 7
Situation
Symptom
The fans on ALL power supplies are
running
The message
Center is not
displaying a
message
The fans on ALL power supplies are not
running
Replace crossover cable
In Composer, check the scheduling for the Project, then
click the button to send the project to message center
Check Power Switch on disconnect box inside message
center
B
Check connections in disconnect box (power hookup)
K,c
Ensure an Ethernet straight through cable has been used, is
making a good connection at both ends.
“DSP” LED on controller IS blinking,
but the CASCAN card has no LED’s
blinking rapidly (like DSP on the
controller).
D
Ensure an Ethernet crossover cable has been used, is
making a good connection at both ends.
No Red Power LED lit on Wireless
Bridge POE.
E
Check branch circuit and power at the receptacle. Adapter
has LED indicator
No Red Power LED lit on Wireless
Access Point POE.
J
Check branch circuit and power at the receptacle. Adapter
has LED indicator
D
Ensure an Ethernet crossover cable has been used and is
making a good connection at both ends
F
Ensure an Ethernet straight through cable has been used and
is making a good connection at both ends.
H
Ensure an Ethernet straight through cable has been used and
is making a good connection at both ends.
I
Ensure an Ethernet crossover cable has been used and is
making a good connection at both ends. Check to see that
the network interface is enabled and follow the procedure in
“Not connected to existing Network above.
G
Reorient the wireless device’s antennas to eliminate
obstructions between them
LAN LED on Controller not ON solid
LAN LED on PC Ethernet port not ON,
or PC says “network unplugged”, “not
connected”.
User’s manual on CD with wireless
equipment explains how to measure the
wireless signal strength
Part of
message
center
appears
“dead”
C,D
Solution
Check branch circuit; was there a photocell on an existing
sign install?
On a double sided Message Center, One
side is displaying the message, the other
is not
I cannot
communicate
with the
message
center
Connection
In Composer, check the zone section to make sure the
project is set to use the whole message center
Only part of message center will light
Temperature
Sensor does
NOT work
Not installed
Light Sensor
does NOT
work
Not installed
A
Make sure the temperature sensor is enabled in Composer
Not enabled
Not enabled
Install sensor in message center
A
Install sensor in message center
Make sure the light sensor is set to auto in Composer
If the problem persists please contact the Nevco Service Department.
800-851-4040
135-0144 Rev. C
Page 8
GLOSSARY
ACCESS POINT (WIRELESS AP)
A hardware device that allows wireless
communication devices to connect to a
network.
Can also be configured as a
WIRELESS BRIDGE
A hardware device used to connect two or
more network segments.
CASCAN card
Distributes the data inside the Message
Center.
CASCAN card
135-0144 Rev. C
Page 9
DISPLAY Panel
A group of pixels. Several Display Panels are combined to form the message center.
DSP
Digital Signal Processing.
PIXEL
A group of one or more LEDs.
POE
Power Over Ethernet.
Used to inject power for use by
A device connected to the
Ethernet cable.
POWER SUPPLY
Converts the line voltage to 12 volts or 5 volts.
POWER SWITCH
Disconnects power to a portion of the message center components. Cabinet may contain more than one.
RIBBON CABLE
Flat 16 conductor cable used to carry the data from the CASCAN card to the display panels and from display panel to
display panel.
WIRELESS BRIDGE
A hardware device used to connect two or more network segments. (See Access Point)
135-0144 Rev. C
10
Page 10
X-6 (CONTROLLER)
Stores, processes, and distributes the message center data to the CASCAN card(s).
X-6 CONTROLLER
11