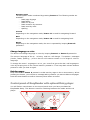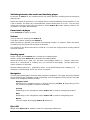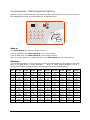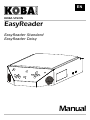
1
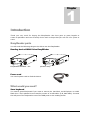
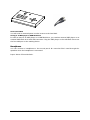
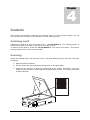
EN KOBA VISION EasyReader EasyReader Standard EasyReader Daisy Manual This manual describes the following KOBA Vision EasyReader versions: EasyReader Standard 4.0.45 EasyReader Daisy 4.0.45 Slight differences are possible if another version is used. A recent manual can be downloaded from the KOBA Vision website, http://www.kobavision.be i EASYREADER Manual KOBA Vision De Oude Hoeven 6 • 3971 Leopoldsburg • Belgium Tel: +32 11 51 70 80 • Fax +32 11 51 70 81 [email protected] http://www.kobavision.be 1 Index Index ............................................................................................................................. 2 Introduction .................................................................................................................. 4 EasyReader parts .................................................................................................................................. 4 Reading device KOBA Vision EasyREader ..................................................................................... 4 Power cord ....................................................................................................................................... 4 What would you need? .......................................................................................................................... 4 Save keyboard ................................................................................................................................. 4 Headphone ....................................................................................................................................... 5 Safety and maintenance instructions .......................................................................... 6 Safety instructions ................................................................................................................................. 6 Maintenance instructions....................................................................................................................... 6 First-time use ................................................................................................................ 7 Connecting cables ................................................................................................................................. 7 Checking whether the device works ...................................................................................................... 7 Correct sitting position ........................................................................................................................... 7 Controls ......................................................................................................................... 8 Switching on/off ..................................................................................................................................... 8 Scanning................................................................................................................................................ 8 EasyReader control panel ..................................................................................................................... 9 Volume ............................................................................................................................................. 9 Reading speed ................................................................................................................................. 9 Scan page ........................................................................................................................................ 9 Pause/start the reading .................................................................................................................... 9 Navigation ........................................................................................................................................ 9 Change language or voice ............................................................................................................. 10 Deleting pages ............................................................................................................................... 10 Control panel of EasyReader with optional Daisy player .................................................................... 10 Switching between the reader and the Daisy player ...................................................................... 11 Pause/start cd player ..................................................................................................................... 11 Volume ........................................................................................................................................... 11 Reading speed ............................................................................................................................... 11 Navigation ...................................................................................................................................... 11 Eject CD ......................................................................................................................................... 11 Control panel – Save keyboard (option).............................................................................................. 12 Save to ........................................................................................................................................... 12 Structure ......................................................................................................................................... 12 Groups ............................................................................................................................................ 13 Positions ......................................................................................................................................... 13 Listening to saved texts .................................................................................................................. 13 Saving texts .................................................................................................................................... 13 2 Connecting an MP3 player or USB flash drive............................................................................... 13 Usage tips............................................................................................................................................ 13 Reading thick books ....................................................................................................................... 13 Empty page .................................................................................................................................... 13 Photos ............................................................................................................................................ 13 Layout ............................................................................................................................................. 13 Troubleshooting .......................................................................................................... 14 Warranty ...................................................................................................................... 15 Express warranty ................................................................................................................................. 15 Warranty provisions ............................................................................................................................. 15 Service fulfillment ................................................................................................................................ 15 Data chart ................................................................................................................... 16 EasyReader Standard ......................................................................................................................... 16 EasyReader Daisy ............................................................................................................................... 16 3 1 Chapter Introduction Thank you very much for buying the EasyReader. We have gone to great lengths to create a qualitative and user-friendly device and we hope that you will use it for years to come. EasyReader parts You will need the following things to be able to use the EasyReader: Reading device KOBA Vision EasyREader EasyReader Standard Eas yReader Daisy Power cord You need a power cord to feed the device. What would you need? Save keyboard You need a special keyboard if you want to save to the hard disk, an MP3 player or a USB flash drive. The keyboard is conn ected by means of a USB cabl e (A-B, Male-Male). Connect the USP port of the keyboard to one of the USB ports on the reading device. 4 Save to hard disk You will need no external parts in order to save to the hard disk. Saving to an MP3 player or USB flash drive In order to save to an MP3 player or a USB flash drive, you need an external MP3 player or an external USB flash drive with USB connector. Plug the MP3 player or the USB flash drive into the free USB port on the reading device. Headphone You can connect a headphone t o the con trol pan el. N o sound w ill be h eard th rough th e speakers when the headphone is connected. Input: Stereo 3.5mm MiniJack. 5 2 Chapter Safety and maintenance instructions Safety instructions Save this manual carefully. It contains all necessary information about your device. Keep the device in a dry, well-vented and clean spot. Do not place the device in direct sunlight or next to a source of heat. Never use this device in ambient temperatures higher than 35°C. The design of the inputs allows for them to force a connector. It is compulsory t o elect rically ground the de vice. T he manufacturer cannot be held responsible for any in juries to humans or animals or for any d amage to objects caused b y non-compliance wi th thi s sa fety instruction. Never attempt to repai r the de vice by yo urself. It is dan gerous to remove prot ective covers which are there to prevent electric shock. Yo u m ust conta ct KOBA Vision or your dealer in case of defects. To avoid electrocution, do contact with liquids. be used in one way excl usively. Never not place the de vice in a spo t where it can come into Maintenance instructions The de vice can be clea ned with a damp cloth. Never use chemicals for they ca n damage the finish and/or other parts. Occasionaly clean the glass plate of the scanner using a damp cloth. Treat your device with care and you will enjoy it for many years to come. Your product is designed and manufactured with high quality materials and components, which can be recycled and reused. Do not dispose of your old product i n your genera l house hold was te bi n. Di spose of the compl ete product (including its c ables, plug s and ac cessories) in the designate d collection facilities. 6 3 Chapter First-time use You need to go through the following steps to use the reading device for the first time: Connect cables Check whether the device works Connecting cables Connect the power cord at t he back of t he EasyReader. Then connect the reading device to the mains supply. Checking whether the device works Please check whether the device works after the installation. Switch the EasyReader on. (See next chapter – Switching on/off) Correct sitting position The operating height is ideal when the reading device is placed on a normal table. 7 4 Chapter Controls After having successfully connected the reading device in the previous chapter, we will now go into the controls and the operation of the reading device. Switching on/off Switching o n and off is done by means of the on/off button 1. T he read ing device is ready for use after the report „The device is ready for use“. To switch off the devic e, press the on/off button 1. The device will report "T he device is being switched off. One moment please“. Scanning Before the reading device can read out a tex t, you must always scan the text first. This goes as follows: 1. Open the lid of the device. 2. Put the sheet with the printed text facing down on the glass plate. 3. Close the lid. There is no need to close the lid whe n using a thick book . Y ou must however press the book closely against the glass plate surface. Then press the button to start scanning. 1 3 2 8 Page 1 of 4. Manual: Reading device KOBA Vision EasyReader. EasyReader Standard. EasyReader Daisy. KOBA Vision thanks you for the trust placed in the EasyReader reading device. You have after all bought a high-tech and modern device which you will be able to use for a long time. The device owes its success to its simple controls. Hence the name EasyReader. The following series of important remarks is meant to familiarize you with the device. The following text is divided into 5 parts. Part one: Generalities. The device is switched on by briefly pressing the on/off switch. This red button is above at the left and has a square shape. You will hear that the device has been switched on as the blades of the fan will start to turn. Always wait to press a button until the device reports that it is ready for use. To turn off the device, press the on/off button once more. The device will report that it is being turned off. You will find the buttons for volume and reading speed below at the left in a group of four buttons. Briefly press the blue arrow-shaped buttons on the left to adjust the volume. The upper button is for turning up the volume and the lower button for turning down. Briefly press the blue speed buttons to change the reading speed. These buttons are arrow-shaped and are at the right side of the volume buttons. You can increase the speed with the upper button and decrease the reading speed with the lower button. No help messages will be heard when the device is reading. Part two: The EasyReader as a device for reading out texts. You must scan a text first before you can have it read out. Put the sheet with the text facing down on the glass plate. Then briefly press the scanning button. This is the round blue button at the front centre. Once you have pressed the scanning button, the scanner will start scanning and analyzing the text. A tune is audible in the mean time. The text will be read out as soon as the tune ends. The scanning button can also be used to delete scanned pages by keeping the button pressed in. Press again to confirm this command. Cancel by pressing any other button. The five blue buttons standing in two crossing straight lines will help you to navigate through the text. They are grouped at the right. The round button at the centre can be used to pause the reading or to start reading by pressing it briefly. By keeping this button pressed in, the current word, sentence, line, page or letter will be repeated. The left arrow will help you to navigate back into the text and the right one forward into the text. The upper and lower arrows are for selecting the various reading options. Back, repeat or forward depends on the reading modes. Page 2 of 4. The different reading modes are: Spelling: The device will navigate letter by letter. You will hear nothing for an interspace between two words. Word by word: The device will navigate word by word. A word is a chain of letters. Sentence by sentence: The device will navigate sentence by sentence. A sentence is marked by full stops. The device will therefore read from one full stop to the next, which means that the reader may stop halfway through a sentence when say an abbreviation is encountered. Line by line: The device will navigate line by line. A line consists of a series of words or sentences in a row from left to right within a text. Reading tables: The device will navigate per column. When a table is scanned, it will be recognized by the device. You can either go back one cell or square or continue. Page by page: The device will navigate page by page. This will allow you to consult the last scanned page once more. To repeat a page, you must first use the upper or lower button to select reading page by page and then keep the button in the middle pressed in to repeat the page. Some important remarks: • Depending on the greyscale, texts in drawings or photos will not be read. • Crumpled sheets must be flattened out first. If necessary, place a magazine or book on the sheet to flatten it. • The lid can stay open when using thick books. Closing the lid is necessary only when there is excessive incidence of light or when the sheet is crumpled. • You can already have a new sheet scanned while the previous one is still being read out. • The last text is saved when the device is switched off. It will be available as soon as you switch the device on again by pressing the pause button at the centre of the navigation buttons. If you scan a new sheet, the previous text will be deleted. • When several languages are installed, you can change the language by keeping one of the volume buttons pressed in. • A text in columns will be properly read by the device, except when, for example, the title of the article is at the centre of the text and not at the top. A reading device will often make errors in those cases where even a sighted person has to search where the text continues. The device does not comprehend the text and is therefore unable to find where the text continues. Page 3 of 4. Part three: The EasyReader for reading Daisy books on a CD. Press the square button below at the centre to switch to the CD player. When no CD is loaded in the device, the CD tray at the right will open automatically. Press the pause/start button to start reading. Navigating through the book is done at the exact same way as with the reader. To eject a CD, you must first stop reading by pressing the pause button. This allows the device to save the exact text position. You can eject the CD by pressing the scan button, which is the round button at the top centre. Bear in mind that many books have not been recorded to meet navigation requirements. As a consequence, peculiar leaps within the text are possible. Many Daisy books were made by recording the old cassettes on a CD one after the other. Reading from chapter to chapter is like reading from cassette to cassette. Part four: Separate keyboard for saving When you have purchased the separate keyboard, you can use it to save texts on the hard disk, on an MP3 player or a USB flash drive. Above on the right are two buttons for navigating through groups of ten positions on the hard disk, the MP3 player or USB flash drive. Above on the left is the switch to select the storage location. You can either select the hard disk or the MP3 player. The 12 buttons which are grouped together (4 columns and 3 rows) represent the positions depending on the group. A position is a location on the hard disk or MP3 player and is marked by a number. For example: - Group 1 to 12 represents the first button, position 1, and the last, position 12; - Group 10 to 22 represents the first button, position 10, and the last, position 22. To read a text that has been saved on a position, briefly press the button. Then press the same button to confirm or any other button to cancel. To save a text, keep the button pressed in. Press once more to confirm or press any other button to cancel. To delete a text, replace the current text by a new one, overwriting the old one. Part five: Maintenance and service. • • • • Place the device in a dry, well-vented, clean spot. Do not place the device into direct sunlight or next to a source of heat. To avoid electrocution, do not place the device in a spot where it can come into contact with liquids. The design of the connectors allows for them to be used in one way exclusively. Never force a connector. Never attempt to repair the device by yourself. You must contact KOBA Vision or your dealer in case of defects. Page 4 of 4. • • • The device can be cleaned with a damp cloth. Never use chemicals for they can damage the finish and/or other parts. Occasionally clean the glass plate of the scanner using a damp cloth. Treat your device with care and you will enjoy it for many years to come. Contact KOBA Vision or your dealer for repairs or service. Write down product name, serial number, purchase date, invoice number and any error messages or particular problem aspects. EasyReader control panel 1 6 9 10 2 4 3 5 8 12 11 9 7 Volume Turn up volume: Briefly press button 2. Turn down volume: Briefly press button 3. When the device is paused, yo u will hear the help message „louder“ or „quieter“ . When the device is reading out, the volume will increase or decrease. The volume of the device cannot be t urned off. You will hear a sign al when having reached minimum volume. Reading speed Faster: Briefly press button 4 to increase the reading speed. Slower: Briefly press button 5 to decrease the reading speed. When the device is pa used, yo u will hear the message „faster“ or „slower“. When the device is in t he process of readin g ou t, y ou will hear a short beep and the speed will either increase or decrease. Normal reading speed is signalled by a do uble beep during reading or by the m eassage „normal speed“ when the device is paused. Scan page Press button 6 to scan a page. A page must be scanned before it can be read out. A t une w ill signal t hat th e dev ice is operat ing w hen scann ing. Y ou can t urn of f th e t une by holding either speed buttons pressed in until the device gives a signal. You can already have a new sheet scanned while the previous one is still being read out. You will hear a beep if the machine starts to scan. The machine will automatically the next after the existing page is terminated. Pause/start the reading Press button 8 to start or pause the reading. Navigation The reading dev ice f eatures Daisy st ructure navigation: 5 blue butt ons in two crossing straight lin es. Th e upper an d low er arrow- shaped but tons are f or select ing the n avigation mode. The arrow-shaped buttons on the right ar e for navi gating forward or back. The round blue button in the centre is for pausing or starting the device. 9 Navigation mode The navigation mode is selected by pressing button 9. The following modes are available: - Read page by page - Read tables - Read line by line - Read sentence by sentence - Read word by word - Spelling Forward Depending on the navigation mode, button 11 is used for navigating forward. Back Depending on the navigation mode, button 10 is used for navigating back. Repeat Depending on the navigation mode, the text is repeated by keeping button 8 pressed in. Change language or voice The device will change language or voice by keeping button 2 or button 3 pressed in. The voice or language of the te xt being read out will change . T he spoken messages (louder, f aster, spellin g,…) of th e dev ice w ill h owever remain in t he origin al voice or language. To change the menu l anguage or voi ce, you must fi rst go to the desi red l anguage or voice by ke eping one o f the volume buttons pressed in. T hen keep both volume buttons pressed in until you hear a signal. Deleting pages Keep sca n button button 6 pressed i n to del ete the p ages i n the a ctive memo ry. W hen pressing the button, you will hear a message asking whether you want to delet e the pages. Press the same button to confirm. Press any other button to cancel. Control panel of EasyReader with optional Daisy player You will find an extra button on the control panel when you have purchased an EasyReader Daisy. This button is used for switching between the reader and the cd player. 1 6 9 10 2 4 3 5 8 9 7 10 12 11 Switching between the reader and the Daisy player By means of button 7, the reading device will switch between reading scanned texts and playing CDs. When the button is pressed in, the reading device will automatically check whether or not a CD is loaded. The disk tray is automatically opened when there is no CD. You can then insert the CD at the right side of the device. Press button 8 to start reading. When a CD is loaded, it will play automatically. Pause/start cd player Press button 8 to pause or start. Volume Turn up volume: Briefly press button 2. Turn down volume: Briefly press button 3. When the device is paused, you will hear the message "louder" or "quieter". When the device is reading out, the volume will increase or decrease. The volume of the device cannot be t urned off. You will hear a sign al when having reached minimum volume. Reading speed Faster: Briefly press button 4 to increase the reading speed. Slower: Briefly press button 5 to decrease the reading speed. When the device is pa used, yo u will hear the message „faster“ or „slower“. When the device is in t he process of readin g ou t, y ou will hear a short beep and the speed will either increase or decrease. Normal reading speed is s ignalled by mean s of a double beep when reading or th message „normal speed“ when the device is paused. e Navigation The CD player/Daisy player features Daisy structure navigation: The upper and lower buttons are for selecting the navigation mode. Depending on the na vigation mode, the left and right button is for navigating forward or back. Navigation mode Selecting t he n avigation mo de is done by pressing button 9. Depe nding on th e CD, various navigation modes are available. Forward Depending on the navigation mode, button 11 is used for navigating forward. Back Depending on the navigation mode, button 10 is used for navigating back. Repeat You can repeat by keeping button 8 pressed in. Eject CD Briefly press button 6 for loading a new CD or ejecting a loaded one. 11 Control panel – Save keyboard (option) When the e xtra keyboard has been provided with the reading device, you can sa ve texts o n the reading device itself, on an MP3 player or a USB flash drive. mp3 1 4 USB 2 3 3 3 3 3 3 3 3 3 3 3 3 mp3 Save to Use slide switch 4 to select storage medium. Save to hard disk: Put slide switch 4 in the lower position. Save to USB stick: Put slide switch 4 in the middle position. Save to an MP3 player or a USB flash drive: Put slide switch 4 in the top position. Structure The keyboard contains 12 round blue keys. Each key corresponds with a location on the hard disk, o n the MP3 player or on the USB flash drive. To select sever al locations, you ca n navigate to a higher or lower group by means of the red arrow-shaped buttons. Group 1-12 Position 1 Position 2 Position 3 Position 4 Position 5 Position 6 Position 7 Position 8 Position 9 Position 10 Position 11 Position 12 Group 11-22 Group 21-32 Group 31-42 Group 41-52 Group 51-62 Group 61-72 Group 71-82 Group 82-92 Group 91-99 Position 11 Position 12 Position 13 Position 14 Position 15 Position 16 Position 17 Position 18 Position 19 Position 20 Position 21 Position 22 Position 21 Position 22 Position 23 Position 24 Position 25 Position 26 Position 27 Position 28 Position 29 Position 30 Position 31 Position 32 Position 31 Position 32 Position 33 Position 34 Position 35 Position 36 Position 37 Position 38 Position 39 Position 40 Position 41 Position 42 Position 41 Position 42 Position 43 Position 44 Position 45 Position 46 Position 47 Position 48 Position 49 Position 50 Position 51 Position 52 Position 51 Position 52 Position 53 Position 54 Position 55 Position 56 Position 57 Position 58 Position 59 Position 60 Position 61 Position 62 Position 61 Position 62 Position 63 Position 64 Position 65 Position 66 Position 67 Position 68 Position 69 Position 70 Position 71 Position 72 Position 71 Position 72 Position 73 Position 74 Position 75 Position 76 Position 77 Position 78 Position 79 Position 80 Position 81 Position 82 Position 81 Position 82 Position 83 Position 84 Position 85 Position 86 Position 87 Position 88 Position 89 Position 90 Position 91 Position 92 Position 91 Position 92 Position 93 Position 94 Position 95 Position 96 Position 97 Position 98 Position 99 - 12 - Groups Higher group: Press button 1. Lower group: Press button 2. Positions The buttons 3 indicate the positions. Listening to saved texts Briefly press the position (button 3) to open the text. The device will ask to confirm. Confirm by pressing the same button once more. Cancel by pressing any other button. Saving texts Keep the position (button 3) where you want to save the text pressed in. The device will ask to confirm. Confirm by pressing the same bu tton on ce mor e. Ca ncel b y pressi ng a ny o ther button. During the process of saving, the first forty characters of the text are automatically entered as the title. The device will report whether the position is empty or not. Press the same button once more to confirm whether you still want to save the text on this position. Cancel by pressing another button. Connecting an MP3 player or USB flash drive An exter nal MP3 player or US B fl ash d rive ca n be co nnected to the second USP port. The device will always save the text as an MP3 file as well as a text file. Usage tips Reading thick books When reading a thick book, it is important to press it closely against the glass plate. The lid of the device can be left open as long as you apply manual pressure on the book. Empty page When reading an empty page, the device will say „End of document“. Photos Photos on a page will not be read out. Layout The layout of a text is very important to understand the text properly. Some magazines place titles at the centre of a page or arrange their pages in a confusing manner. This can result in the text being confusing and even unintelligible at times. 13 5 Chapter Troubleshooting Below is a l ist of problems th at may occu r with yo ur read ing devi ce. Consult t he l ist fi rst before contacting KOBA Vision or your dealer. Symptom The reading device won’t turn on Possible causes • The power cord is not connected What to do • Check whether the power cord is in the device and check whether the plug is in the power point. Odd punctuation marks are being read out • The page lacks contrast • The print of the sheet or the paper itself lacks quality • The text is printed within a photo or against a coloured background • The sheet is not placed flat into the scanner • Close the scanner lid so that the sheet is in a flat position • Use your hand to press a thick book closely against the glass plate • Sometimes it is impossible to read badly printed texts or texts before an uneven background The device says: „End of document“ • You have scanned an empty sheet • Turn around the sheet with the printed text against the glass plate 14 6 Chapter Warranty Express warranty KOBA Vision bvba offers a two- year warranty on every KOBA Vision reading device, starting from the purchase date. The warranty covers materials and workmanship. Warranty services are provided by KOBA Vision bvba or a dealer acting for KOBA Vision bvba. When the reading devi ce cannot b e repaired correctly, KO BA Vision can decide on its own inititiative t o replace t he readin g device by an other readin g dev ice f eaturing the same specifications. All compon ents and prod ucts r eplaced within the warranty period becom e property of KOBA Vision bvba. Warranty provisions 1. The warranty becomes invalid when the Koba Vision reading device: • Was not used according to instructions or was misused, • Was damaged as a result of a fall or blow, • Was disassembled or tinkered with, • Was repaired earlier by a non-official service partner. 2. Consequential loss is under no circumstances covered by the warranty. KOBA Vision bv ba w ill n either assume an y liabi lity w hatsoever n or accept any possibil ity of liability ex cept f or the warranty prov isions ex pressedly st ated abov e. This limit ation t o th e liability does n ot imply a breach of th e customer’s legal consumer rights or his or her rights vis-à-vis the seller. Service fulfillment Before claiming the warranty or service and before contacting KOBA Vision bvba or a dealer, you must write down product name, serial number, purchase date, invoice number and any error messages or particular problem aspects. 15 7 Chapter Data chart EasyReader Standard Type: KOBA Vision EasyReader Standard Inputs: Audio mini-jack, 2x USB, mains supply Power supply: 100VAC-240VAC 6A/3A 60Hz/50Hz Measurements: Height X Width X Depth 135 x 275 x 470 mm Weight 16.5 Lbs Warranty: 2 year EasyReader Daisy Type: KOBA Vision EasyReader Daisy Inputs: Audio mini-jack, 2x USB, mains supply Power supply 100VAC-240VAC 6A/3A 60Hz/50Hz Measurements: Height X Width X Depth 135 x 275 x 470 mm Weight: 16.5 Lbs Warranty: 2 year 16 Brief manual 1 6 9 10 2 4 3 1 2 3 4 5 6 7 8 9 10 11 12 5 7 8 12 11 9 On/off switch Press briefly: Increase volume Press long: Change languages/voices Press briefly: Decrease volume Press long: Change languages/voices Increase reading speed Decrease reading speed Reader: Press briefly: Scan page and initiate automatic reading Press long: Erase pages CD player: Eject CD (CD player) Switch between document reader/ CD reader Press briefly: Start/pause Press long: Repeat Navigation modes Back Forward Headphone jack 2008 KOBA Vision De Oude Hoeven 6 • 3971 Leopoldsburg • Belgium Tel +32 11 51 70 80 • Fax +32 11 51 70 81 [email protected] http://www.kobavision.be Sample text: Snow White and the Seven Dwarfs Once upon a time in the middle of winter, when the flakes of snow were falling like feathers from the sky, a queen sat at a window sewing, and the frame of the window was made of black ebony. And whilst she was sewing and looking out of the window at the snow, she pricked her finger with the needle, and three drops of blood fell upon the snow. And the red looked pretty upon the white snow, and she thought to herself, would that I had a child as white as snow, as red as blood, and as black as the wood of the window-frame. Soon after that she had a little daughter, who was as white as snow, and as red as blood, and her hair was as black as ebony, and she was therefore called little snow-white. And when the child was born, the queen died. After a year had passed the king took to himself another wife. She was a beautiful woman, but proud and haughty, and she could not bear that anyone else chould surpass her in beauty. She had a wonderful looking-glass, and when she stood in front of it and looked at herself in it, and said, looking-glass, looking-glass, on the wall, who in this land is the fairest of all. The looking-glass answered, thou, o queen, art the fairest of all. Then she was satisfied, for she knew that the looking-glass spoke the truth. But snow-white was growing up, and grew more and more beautiful, and when she was seven years old she was as beautiful as the day, and more beautiful than the queen herself. And once when the queen asked her looking-glass, looking-glass, looking-glass, on the wall, who in this land is the fairest of all. It answered, thou art fairer than all who are here, lady queen. But more beautiful still is snow-white, as I ween. Then the queen was shocked, and turned yellow and green with envy. From that hour, whenever she looked at snow-white, her heart heaved in her breast, she hated the girl so much. And envy and pride grew higher and higher in her heart like a weed, so that she had no peace day or night. She called a huntsman, and said, take the child away into the forest. I will no longer have her in my sight. Kill her, and bring me back her lung and liver as a token. The huntsman obeyed, and took her away but when he had drawn his knife, and was about to pierce snow-white's innocent heart, she began to weep, and said, ah dear huntsman, leave me my life. I will run away into the wild forest,