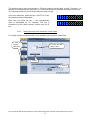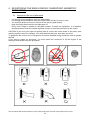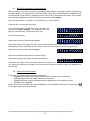
1
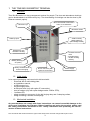
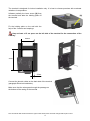
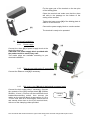
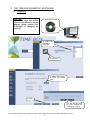
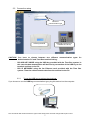
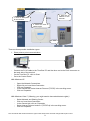
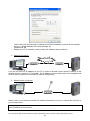
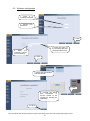
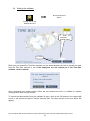
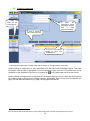
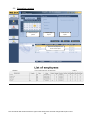
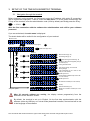
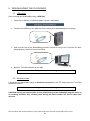
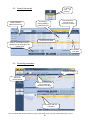
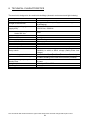
TIME BOX BIOMETRIC
TECHNICAL INSTRUCTIONS AND
QUICK START GUIDE
IT IS RECOMMENDED TO READ THIS MANUAL BEFORE
OPERATING THE SYSTEM
BODET Software
B.P. 40211
Boulevard du Cormier
F-49302 CHOLET Cedex
www.bodet.com
[email protected]
Ref. 640161 A
Non-contractual data. Bodet reserves the right to make functional or technical changes without prior notice.
1
TABLE OF CONTENTS
1.
THE TIME BOX BIOMETRIC TERMINAL .............................................................................. 3
1.1
1.2
1.3
1.4
2.
THE TIME BOX BIOMETRIC SOFTWARE ............................................................................ 6
2.1
2.2
2.3
2.4
2.5
2.6
3.
Installation ........................................................................................................................................ 6
Connection setup ............................................................................................................................. 7
Software configuration.................................................................................................................... 11
Starting the software ...................................................................................................................... 12
Creating employees ....................................................................................................................... 13
Generating a printout...................................................................................................................... 14
SETUP OF THE TIME BOX BIOMETRIC TERMINAL ......................................................... 15
3.1
3.2
3.3
3.4
4.
Navigation through the terminal ..................................................................................................... 15
Terminal address (with option IP connection) ................................................................................ 16
Synchronising software data with the terminal ............................................................................... 16
Setting the time of the terminal ...................................................................................................... 16
REGISTERING THE EMPLOYEES BY FINGERPRINT (BIOMETRIC ENROLMENT) ......... 18
4.1
4.2
4.3
5.
Advices for the use of biometrics ................................................................................................... 18
Biometric enrolment on the terminal .............................................................................................. 19
More terminal functions .................................................................................................................. 19
DOWNLOADING THE CLOCKINGS ................................................................................... 20
5.1
5.2
6.
USB mode ...................................................................................................................................... 20
Ethernet mode ................................................................................................................................ 20
TIME BOX DAY-TO-DAY USE ............................................................................................ 21
6.1
6.2
6.3
6.4
7.
8.
Overview........................................................................................................................................... 3
Initial check ....................................................................................................................................... 3
Mechanical installation ..................................................................................................................... 3
Electrical installation ......................................................................................................................... 5
Understanding the logic of screens ................................................................................................ 21
Consult the results .......................................................................................................................... 22
Correcting anomalies ..................................................................................................................... 22
Consulting the on-line help ............................................................................................................. 23
SAFETY INFORMATION AND PROTECTING THE DEVICE .............................................. 23
TECHNICAL CHARACTERISTICS ...................................................................................... 24
WARNING
This document is intended to help you install Time Box and to introduce you to the basic
capabilities that you need to know. As a result, some of the more advanced capabilities will not be
described here. For more information, please consult the on-line help manual available via a click
on
in the upper-right corner of the screen. The manual can be viewed or printed from the
installation CD-ROM of Time Box.
Non-contractual data. Bodet reserves the right to make functional or technical changes without prior notice.
2
1. THE TIME BOX BIOMETRIC TERMINAL
1.1 Overview
Time Box Biometric is a time management terminal for people. The time and attendance clockings
can be downloaded via a USB memory key. The downloading of clockings can also be done by the
Ethernet network (option).
Blue LCD backlit screen with 2
lines of 12 characters
2 function keys
Biometric reader
USB key input
STID Proximity
badge reader (if
option badge reader)
Keyboard for non
biometric clocking
- Accurate real time
clock
- Internal buzzer
- 10,000 clocking
memory
Battery backup (as
an option)
Relay terminal block
for the bell ringing
RJ 45 connector (with
option IP connection)
Power supply
1.2 Initial check
In its original packaging, each terminal is delivered with:
- a terminal with a wall holding plate,
- an installation manual,
- a USB memory key,
- a mains supply block,
- an Ethernet cord (only with option IP connection),
- a set of badges (only with option badge reader 125Khz STID),
- 1 software CD,
- a bag containing a connector for the bell ringing relay and 2 clamping collars,
- a bag containing 3 screws and rawplugs.
1.3 Mechanical installation
Any use that does not comply with these instructions can cause irreversible damage to the
device and invalidates the warranty. Before installing and using the terminal, please read
the safety instructions mentioned in the “Safety information and protecting the device”
section of these instructions.
Non-contractual data. Bodet reserves the right to make functional or technical changes without prior notice.
3
The terminal is designed for indoor installation only. It is best to choose premises with moderate
variations in temperature.
Unfasten partially the lower screw [A] from
the terminal and take the holding plate off
the terminal.
[A]
Fix the holding plate on the wall with the
help of the 3 screws and rawplugs.
Keep at least a 15 cm space on the left side of the terminal for the connection of the
USB key.
80mm
115m
15mm
Connect the electric cables on the back side of the terminal
(paragraph Electrical installation).
Make sure that the wires pass through the passage on
the bottom of the casing of the terminal.
Non-contractual data. Bodet reserves the right to make functional or technical changes without prior notice.
4
Fix the upper part of the terminal on the two pins
of the holding plate.
Close the terminal and make sure that the wires
still stick in the passage on the bottom of the
casing of the terminal.
Tighten the lower screw [A] of the holding plate in
order to fix the terminal.
[A]
Connect the power supply block to a mains socket.
The terminal is ready to be operated.
1.4 Electrical installation
1.4.1
Power supply
[A]
Connect the wires [A] of power supply block at the
back of the terminal.
CAUTION! The power supply block provided with
the product must be used in any case.
Two mains plugs are available according to your
electrical installation.
1.4.2
Ethernet cord (with option IP connection)
Connect the Ethernet cord [C] if necessary.
[B]
[C]
1.4.3
Bell ringing relay (Warning! Authorized personnel only)
Connect the bell ringing relay if necessary. Connect
the contacts of the relay terminal block [B] (230Vac
50/60Hz, 1A max.). First turn off the concerned circuit
breaker/disconnecting switch, then connect the
cables on the terminal block (cross-section of 0.5 to
1.5 mm² max, bare on a 5mm length). Secure the live
and neutral wires close to the 2-pin terminal block,
with one of the clamping collars provided.
Clamping
collar
Non-contractual data. Bodet reserves the right to make functional or technical changes without prior notice.
5
[B]
2. THE TIME BOX BIOMETRIC SOFTWARE
2.1 Installation
CAUTION!
Do not use large but normal
fonts for the Windows display
(90ppp). Please contact your
IT-manager for changing the
font size.
1. Time Box CD-Rom
2. Select the
installation
language
3. Click here
4. Select the directory
or leave the default
path
5. Click
6. If the directory does
not exist, validate the
message to create it
Non-contractual data. Bodet reserves the right to make functional or technical changes without prior notice.
6
2.2 Connection setup
Choice of
communication type
Clocking terminal
Biometric terminal (not
available in France)
CAUTION! You have to choose between two different communication types for
Administration PC and Time Box terminal linking:
-
BIO USB KEY MODE using the USB key provided with the Time Box system. In
this case the data transmission will be done by connection of the USB key to the
terminal and then to the PC.
-
BIO IP NETWORK using the 2m Ethernet cord provided with the Time Box
system. Then the cable transmits data from the terminal to the PC.
2.2.1
To use the USB key to retrieve the clockings:
If you choose to use the USB key communication type, plug this device into the computer.
Non-contractual data. Bodet reserves the right to make functional or technical changes without prior notice.
7
1. Enter a description
for the terminal
2. Select the BIO USB
Key type
3. Click
Possible error:
Insert an USB key into one of the USB ports on the PC and click on OK or Cancel, then Next to
continue the installation. The USB key can then be inserted later.
2.2.2
If you wish to use the cable communication type to get the clockings:
If you choose to download the clockings with an IP connection (Ethernet) to the Time Box PC,
plug an end of the 2m cable into the network switch or in your PC and the other end to the RJ45
connector on the back side of the terminal. It is possible to raise distance between the terminal and
the PC with a RJ45 straight through cable.
RJ 45
Non-contractual data. Bodet reserves the right to make functional or technical changes without prior notice.
8
3. Enter the IP
address of the
terminal
1. Enter a description
for the terminal
2. Select the BIO IP
Network type
4. Click
There are three possible installation types:
1. Direct point-to-point communication:
-
Connect the RJ 45 cable to the Time Box PC and the other end to the RJ45 connector on
the back side of the terminal.
On the Time Box PC, click on Start.
Go to the Control Panel
With Windows XP
-
Open the Network Connections.
Right click on Local Area Connection.
Click on Properties.
In the General tab, select Internet Protocol (TCP/IP) in the scrolling menu.
Click on Properties.
With Windows Vista / 7 (Warning, you might need to have administrator rights!)
-
Select Network and Sharing Center.
Click on Local Area Connection.
In the General tab, click on Properties.
Select Internet Protocol version 4 (TCP/IPv4) in the scrolling menu.
Click on Properties.
Non-contractual data. Bodet reserves the right to make functional or technical changes without prior notice.
9
-
Tick the box Use the following IP address and enter the address as shown in the example
above (cf. default address of the terminal page 16).
Validate with OK.
Restart your PC if needed in order to make the address change effective.
2. Network connection
Ethernet network
Switch
Switch
If you do not know the IP address of your PC in order to allocate a same class IP address to the
terminal, please contact your IT manager. The IP address must be static and is not compatible with
a DHCP server (system for automatic IP address assignment).
3. Modem/router connection
@
Modem/router
Please refer to your Internet provider for detailed information on how to connect the terminal on
your modem/router.
Memo:
New IP address for the terminal: _ _ _ . _ _ _ . _ _ _ . _ _ _
Non-contractual data. Bodet reserves the right to make functional or technical changes without prior notice.
10
2.3 Software configuration
1. Enter a 4numbers password
2. Confirm your
password
3. Click
4. Enter the name of
the Company that has
purchased the licence
5.
Enter
your
customer number
(not mandatory)
6. Click
7. Select the desired time
and date format
8. Click
9. Activate the boxes
that
correspond
to
access modes to be
created for starting the
application
10. Click
Non-contractual data. Bodet reserves the right to make functional or technical changes without prior notice.
11
2.4 Starting the software
OR
Run from the Start
button
Double click on the
Desktop shortcut
1. Enter the
password
defined earlier
2. Click
Each time you access the Time Box software you are asked whether you wish to transfer the data
from the Time Box terminal or not. If the employees are not created yet in the Time Box
software, click on Cancel.
Once employees are created select Since the last transfer and click on Validate to transfer
clockings done after the last transfer.
To launch the data transfer when the software is open, click on the Exit button in the upper-right
corner of the screen and select Transfer terminal data. The same screen as the one above will
appear.
Non-contractual data. Bodet reserves the right to make functional or technical changes without prior notice.
12
2.5 Creating employees
1. Click to
open the list
of employees
3.
Enter
the
employee’s name
and badge number
with
5
digits
*
(inferior to 65000)
2. Click on Create to
add a new employee
4. Click on the Validate
button to save the
modifications.
*
If the employee clocks with a badge, enter the N° written on the right bottom of the card.
When creating an employee it is only necessary to fill the name and the badge number. The other
information can be filled in afterwards. For more details you can refer to the Time Box User Guide
available on the installation CD-Rom or by clicking on
in the upper-right corner of the screen.
Before starting the registration on the terminal, we recommend you to first create the employees in
the software and to assign them a badge number. Afterwards, print out the list of employees (cf.
page 14) and start the enrolment (cf. page 18) equipped with this list.
Non-contractual data. Bodet reserves the right to make functional or technical changes without prior notice.
13
2.6 Generating a printout
Select the report
period
Report page
layout
Customise the
report
Select the employees to be
shown in the report
Non-contractual data. Bodet reserves the right to make functional or technical changes without prior notice.
14
3. SETUP OF THE TIME BOX BIOMETRIC TERMINAL
3.1 Navigation through the terminal
Before clocking in on the terminal, you first have to enter the IP address (with option IP connection)
and to register the employees. To do so, enter the main menu. To do so, press consecutively the
F2 key on the terminal, enter the administration code (1234 by default) and finally press the E key.
+ 1234 +
F2
E
After the first connection with the software the administration code will be your software
password.
If you are authorised, the main menu is displayed.
The sketch below will be useful for the configuration of your terminal:
Welcome screen:
1 0 : 4 2
0 9 / 0 4 / 2 0 1 0
F2
Main menu:
B I O = 1
N U M = 2
R E T = F 1
C O N F = 3
F1
E
Return to the upper level
Submenu:
3
Hour
+ Administration code (4 digits) +
1
H O U R
S E T = 1
R E T = F 1
S H F T = 2
1
Date and time setup (p. 16)
2
Time drifting setup (p. 16)
E T H
I P = 2
B O O T = 1
P I N G = 3
1
2
IP address, subnet mask and gateway setup of
the terminal (p. 16)
P U R G E
R E T = F 1
T O T = 2
P A R T = 1
1
Clearing the terminal data
2
Total clearing (purge) of the terminal
(factory settings)
S O U N D ? = 1
R E T = F 1
O N ( 1 )
1
Listen subsequently to the 5 tunes or OFF
mode (cf. on-line manual)
F1
Validate your choice
B E E P E R ? = 1
O N
R E T = F 1
1
Choice between keyboard beeper ON or OFF
(cf. on-line manual)
F1
Validate your choice
N U M
A D D = 1
R E T = F 1
D E L = 2
1
Non biometric enrolment (cf. on-line manual)
2
Deletion of a non biometric enrolment (cf. on-line
manual)
B I O
A D D = 1
R E T = F 1
D E L = 2
1
Biometric enrolment (p. 18)
2
Deletion of a biometric enrolment (cf. on-line
manual)
2
IP*
1
2
1
2
PURG
E
1
2
Sound
1
2
Beeper
*Only if IP option
1
&
3
Boot and Ping of the terminal (p. 16)
After 20 seconds without any activity, the display returns progressively from the
submenus to the welcome screen.
By default, the terminal is set up in English. On the first data synchronisation with the
software (either by USB key or in wired mode) described hereafter, the terminal will be set
in the language of the software.
Non-contractual data. Bodet reserves the right to make functional or technical changes without prior notice.
15
3.2 Terminal address (with option IP connection)
The default IP address of the terminal is configured at 192.168.1.233, the subnet mask at
255.255.255.0 and the gateway at 0.0.0.0. If you have to change the configuration (cf. page 8):
Enter the main menu (cf. sketch p. 15), press the key 3 (menu CONF=3) in the main menu to
access the setup of the terminal.
Press the key 2 in order to scroll through the menu.
Press the key 1 for setting up the IP address, then the key 2.
Press the key 1 and enter the address of the terminal,
confirm by pressing the E key.
I P
1 9 2 .
1 6 8 . 0 0 1 . 1 1 5
If necessary; change the subnet mask and the gateway by proceeding in the same way.
Press the key F1 to exit the submenu and start a
reboot of the terminal by pressing the key 1. After the
reboot, the terminal displays the welcome screen.
E T H
I P = 2
B O O T = 1
P I N G = 3
3.3 Synchronising software data with the terminal
The synchronisation process will import the employees created in the software and set up the
language of the terminal.
USB key mode:
1. Check if the USB key is initialised (Menu System | Hardware).
2. Connect the USB key to the USB port on the terminal for data synchronisation.
3. Wait until the end of the synchronisation process and remove the key from the terminal
when being asked for it.
IP network mode:
For data synchronisation and checking the network connection, please return into the software and
start a data transfer (cf. page 12).
3.4 Setting the time of the terminal
3.4.1
Manually setting the time of the terminal
To set up the time on the terminal, enter the main menu with the administration code, then follow
the steps below:
Press the key 3 (menu CONF=3) in the main menu (cf. page 15).
Press the key 1.
H O U R
S E T = 1
Press the key 1 for setting up the date and time.
Enter the date and the time. Confirm with the E key,
return with the F1 key.
R E T = F 1
S H F T = 2
1 0 : 4 2
0 9 / 0 2 / 2 0 1 0
Non-contractual data. Bodet reserves the right to make functional or technical changes without prior notice.
16
The terminal has its own time reference. This time might be drifting after a while. Therefore, it is
possible to compensate the drifting by +10.0 seconds maximum (terminal time base too slow) to 10.0 seconds maximum (terminal time base too fast) per day.
In the hour submenu, press the key 2 (SHFT=2). Then
the following screen is displayed:
2 = +
1 = S H I F T = + 0 0 , 0 s
Each time you press the key 1, the compensation
value is decreased by 0.1 seconds. The key 2
increases it by the same interval. Confirm with the E
key.
2 = +
1 = S H I F T = + 0 0 , 1 s
3.4.2
Setting the time of the terminal in wired mode
For setting the time on the terminal via the software, go to System | Date/Time.
1. Click on
System,
Date/Time
2. Enter the date
and the time
3. Click
4. Confirm
Non-contractual data. Bodet reserves the right to make functional or technical changes without prior notice.
17
4. REGISTERING THE EMPLOYEES BY FINGERPRINT (BIOMETRIC
ENROLMENT)
4.1 Advices for the use of biometrics
-
It is strongly recommended to enrol the index finger.
It is strongly recommended to keep the fingers clean and dry to clock or enrol.
You must not press too much or too little on the sensor glass surface.
Keep the finger placed until the red light goes off.
Every time a finger is placed on the glass surface, it leaves an impression. It is therefore
recommended to clean the surface regularly in order to avoid any confusion by the sensor.
CAUTION! If you enrol your finger too quickly there is a risk it will not be saved. In this case, each
clocking results in an error message. You must therefore take your time when you enrol.
To guarantee the correct level of recognition, the score obtained during enrolment must be greater
than 90.
If you want to restart an enrolment, you must delete the enrolment of all the fingers of the
employee and restart the entire procedure.
Non-contractual data. Bodet reserves the right to make functional or technical changes without prior notice.
18
4.2 Biometric enrolment on the terminal
We recommend you to first create the employees in the software (see page 13) and to assign them
a badge number (= 5 digits number inferior to 65000, which has to be entered in the Badge field in
the employees' setup screen). Afterwards, print out the list of employees (see page 14) and start
the enrolment equipped with this list. Every user must enrol two fingers.
Enter the main menu (cf. sketch p. 15), press the key 1 (menu BIO=1).
Press the key 1 to start the enrolment.
The employee being enrolled must be identified by
entering his badge number. The blinking cursor will
help you with the entry. Confirm with the E key.
O K = E
1 2 3 4 5
The enrolment begins:
P U T
If there are no errors, the terminal displays:
X X X
R E T = F 1
R E M O V E
F I N G R
R E T = F 1
R E T = F 1
F I N G E R
Place and remove the finger as many times as requested. XXX is the quality of the enrolment
executed out of 100. When the score is inferior to 90, it is recommend to restart the enrolment.
P U T
O T H E R
If there are no errors, the terminal displays:
R E T = F 1
F I N G E R
Repeat the enrolment procedure for another finger.
When both fingers are enrolled, the terminal displays:
E M P L O Y E E
E N R O L L E D
Just place the finger on the biometric reader for clocking in or
out. When the clocking is successful, the time and the employee's badge number are displayed on
the terminal.
4.3 More terminal functions
For further information about terminal functions like:
- Registering the employees using a badge number (non biometric enrolment),
- Deleting fingerprints or a badge code from the terminal,
- Setting up the bell ringing, the beeper and the adjustment of the display contrast,
- Possible error messages,
please refer to the Time Box user manual available on the installation CD-Rom or by clicking on
in the upper-right corner of the screen.
Non-contractual data. Bodet reserves the right to make functional or technical changes without prior notice.
19
5. DOWNLOADING THE CLOCKINGS
5.1 USB mode
If the clockings are downloaded using a USB key:
1. Check if the USB key is initialised (Menu System | Hardware).
2. Connect the USB key to the USB port on the terminal for downloading the clockings.
3. Wait until the end of the downloading process! Connect the key to the Time Box PC after
being asked to remove it from the terminal.
4. Start the Time Box software on the administration PC.
To transfer data, please refer to Starting the software
5.2 Ethernet mode
If clockings are downloaded using an Ethernet connection to the PC simply start the Time Box
software on the PC.
To transfer data, please refer to Starting the software
CAUTION! During the data transfer or the downloading of the embedded program, there is
no clocking possible. Any clocking done during the data transfer will not be taken into
account.
Non-contractual data. Bodet reserves the right to make functional or technical changes without prior notice.
20
6. TIME BOX DAY-TO-DAY USE
6.1 Understanding the logic of screens
Time Box offers user-friendly “Internet” type displays which follow a Master/Detail principle.
MENU
Shows the 5 points to enter all the functions of the
program:
1. Administration: daily use: clockings and results
management
2. Reports: to start the various printouts
3. Anomalies: display and correction of forgotten
clockings
4. Setup: create / modify the items required for the
software operation
5. System: configuration of the items required for
the correct operation of the whole system:
hardware, date, time, ...
MASTER AREA
Area where one or more
employees can be selected
(according to the type of screen).
One click in this area will
automatically show the time and
attendance data in the detail area
DETAIL AREA
Area for the display / entry /
correction of the data related to
the employee(s) selected in the
master area.
Non-contractual data. Bodet reserves the right to make functional or technical changes without prior notice.
21
1. Click to
open the
clocking
6.2 Consult the results
Daily schedule
planned for the day
Correcting a
total by adding /
deducting hours
New total taking
account of the
corrections of totals
Clockings and totals
Change-over button from the
weekly view of clockings to the
monthly view
Comment
entry area
6.3 Correcting anomalies
Forgotten clockings
Select the
viewing period
Button to zoom on the
day to locate the
anomaly more easily
Employee with the
anomalies
Non-contractual data. Bodet reserves the right to make functional or technical changes without prior notice.
22
6.4 Consulting the on-line help
You have an on-line manual at your disposal for quick access to the information that you may be
seeking from any Time Box screen. Just click on the
button. Then you will display a help page
offering you access to the information specific to the screen from which you activated the
help.
You can also access a general schematic index or consult and print your manual by opening the
PDF file supplied on the CD-Rom of your software. You will find this file in the software installation
directory on the hard disk.
7. SAFETY INFORMATION AND PROTECTING THE DEVICE
The terminal must not be connected to the power supply until it is securely fitted.
In case of the use of the bell ringing relay, the material should be installed by authorized personnel.
This equipment should also be maintained by authorized personnel.
In this regard, the installation must comply with CEI364 standards in force (NFC15-100 for France).
It is a class II appliance.
Provide a circuit-breaker or fast accessible fuse disconnecting switch in the facility for the
connections to the relay contacts (if dangerous voltage). The Circuit breaker/Disconnecting
switch must cut the phase and the neutral at the same time.
In case of maintenance on the terminal and before detaching the holding plate and the casing from
the terminal, unplug the power supply block and shut off the mains supply circuitbreaker/disconnecting switch for relay-commutated dangerous voltages, if any.
This equipment has been tested and found to comply with the limits for a Class A digital device.
These limits are designed to provide reasonable protection against harmful interference. Operation
of this equipment in a residential area is likely to cause harmful interference in which case the user
will be required to correct the interference at his own expense.
Apart from the relay connection, all devices or circuits connected to the terminal MUST be of SELV
type (safety extra low voltage).
The use of clamping collars on the relay terminal block is necessary (see paragraph Electrical
installation).
WARNING: There are explosion risks if the internal Lithium battery is replaced by a battery
of the wrong type.
The time and date are stored by the internal Lithium battery for a period equal to or greater than 10
years. The battery replacement is only done by maintenance staff. The battery must be a CR1225type Lithium battery.
This symbol means that you must consult these instructions.
Non-contractual data. Bodet reserves the right to make functional or technical changes without prior notice.
23
8. TECHNICAL CHARACTERISTICS
The terminal is designed to be used inside buildings (domestic environment and light industry).
Description
Dimensions (mm)
Weight of the terminal
Mains supply voltage (power
supply bloc)
Max. electrical consumption
Under 230 VAC
Power supply class
EMC
Mains supply diagram
Protection index
Operating temperature
Relative humidity
Time backup
Relay switch
Cable on relay terminal block
Ethernet 10/100 Mbits link (option)
Clocking storage capacity
Backup time
Badge reader
Clocking distance
Ethernet connection
Features
Width=131 Height =189 Depth=59
0.6 kg (terminal alone), 1.2Kg (terminal with equipment in
its packaging)
110/230 VAC, 50/60 Hz
65mA
Class II
Class A
TT or TN diagram
IP31
0° to +40 ℃
15 to 90% without condensation
10 years with internal CR1225 Lithium battery
Disconnection 230VAC 50 Hz/60Hz 1A maximum.
Possibility to switch a SELV voltage (Safety Extra Low
Voltage).
Cross-section 0.5mm2 to 1.5mm2, bare on a 5 mm length
Use a category 5 or 5e shielded network cable (connect
the cable shielding to the host terminal block provided)
10,000 max
10 years
Proximity, 125Khz STID
4cm
10/100Mb/s
Non-contractual data. Bodet reserves the right to make functional or technical changes without prior notice.
24