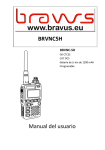
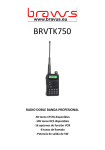
1
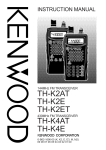
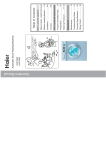
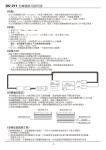
NEW CENTURY COMMUNICATION TO USER Thank you for purchasing NEW CENTURY serial transceiver. We appreciate your trust in our products and believe that this easy to operate and state of the art 2-way transceiver would well serve your diverse communication needs. MODEL COVER BY THIS MANUAL: TK-750A VHF FM TRANSCEIVER TK-760A UHF FM TRANSCEIVER CONTENTS SAFETY INFO UNPACKING AND CHECKING EQUIPMENT SUPPLIED ACCESSORIES BATTERIES PREPARATION INSTALLING/REMOVING THE BATTERY PACK INSTALLING THE ANTENNA INSTALLING THE BELT CLIP GETTING ACQUAINTED BASIC OPERATIONS AUXILIARY FUNCTIONS MONITOR/SQUELCH OFF CALL ALARM TONE SELECTIVE CALL VOX TRANSMIT SAFETY INFO NOTICES TO THE USER Government law prohibits the operation of unlicensed radio transmitters within the territories under government control. Illegal operation is punishable by fine or imprisonment or both. Refer service to qualified technicians only. SAFETY: It is important that the operator is aware of and understands hazards common to the operation of any transceiver. NEW CENTURY does not guarantee the safety and operation of the transceiver when using accessories and /or attachments not sold by NEW CENTURY. WARNING EXPLOSIVE ATMOSPHERES(GASES,DUST,FUMES,etc.) Turn off your transceiver while taking on fuel,or while parked in gasoline service stations. PRECAUTIONS Observe the following precautions to prevent fire,personal injury and transceiver damage. Do not modify or attempt to adjust this transceiver for any reason. Do not expose the transceiver to long periods of direct sunlight,nor place it close to heating appliances. Do not place the transceiver in excessively dusty,humid,and/or wet areas,nor on unstable surfaces. If an abnormal odor or smoke is detected coming from the transceiver,switch OFF the power immediately and remove the optional battery pack from the transceiver.Contact your NEW CENTURY dealer. UNPACKING AND CHECKING EQUIPMENT Carefully unpack the transceiver.We recommend that you identify the items listed in the following table before discarding the packing material.If any items are missing or have been damaged during shipment,file a claim with the carrier immediately. SUPPLIED ACCESSORIES Item Quantity Antenna 1 Charger(with adaptor) 1 Li-ion Battery Pack(or Ni-MH Battery Pack) 1 Belt clip 1 User’ s manual 1 BATTERIES CHARGING WARNINGS: Initially charging the battery pack after purchase or extended storage(greater than 2 months)will not bring the battery pack to its normal operating capacity. After repeating the charge/discharge cycle two or three times, the operating capacity will increase to normal. Please replace or charge the battery pack while while low power alarm. AVAILABLE BATTERIES Please use NEW CENTURY special battery to charge transceiver, it may happen explode and damaged body if using other brand batteries. Notice: 1. Do not short the battery terminals or dispose of the battery by fire. Never attempt to remove the casing from the battery pack. 2. The ambient temperature should be between 5 and 40℃ while charging is in progress. Charging outside this range may not fully charge the battery. 3. Always switch OFF the transceiver equipped with a battery pack before charging. Using the transceiver while charging its battery pack will interfere with correct charging. 4. Do not plug/unplug the AC adaptor and battery during charging, to avoid interference charging program. 5. The battery pack life is over when its operating time decrease even though it is fully and correctly charged. Replace the battery pack. 6. Do not recharge the battery pack if it is already fully charged. Doing so may cause the life of the battery pack to shorten or the battery pack may be damaged. 7. Do not charge transceiver while the battery or units were wet. Ought to dry it with cloth before charging, avoide to damage the unit. Notice: All batteries can cause property damage and/or bodily injury such as burns if a conductive material such as jewelry, keys, or beaded chains touch exposed terminals. The conductive material may complete an electrical circuit (short circuit) and become quite hot. Exercise care in handling any charged battery, particularly when placing it inside a pocket, purse, or other container with metal objects. CHARGE OPERATION If installing battery, the transceiver lights red and three beeps sound each 30 seconds, it means low power, please start to charge the transceiver. Please use NEW CENTURY special charger for battery charging, the charger LED display charger cause. LED appears status Battery Type Lights red charging Ni-MH/Li-ion battery Lights green Fully charging Li-ion battery TO CHARGE BATTERY PACK, PERFORM THE FOLLOWING STEPS: 1. 2. 3. 4. Plug the AC adaptor cable into the adaptor jack located on the rear of the charger. Slide the battery pack or transceiver with a battery pack into the charger. Plug the AC adaptor into AC outlet. Make sure the battery pack contacts are in contact with the charging terminals, the charger LED lights red and charging begins. 5. The supplied charger LED lights green(Li-ion battery), complete charged. Remove it or the transceiver equipped with it from the charger. Notice: 1. The charger LED brights before unplug battery pack, it is normal. 2. When replace a battery pack to charge, please charging after LED is steady. 3. The charger lights red while charging after plug the battery, brights mesns damage battery or the degree is too high or low. PREPARATION INSTALLING/REMOVING THE BATTERY PACK The battery pack is not charged at the factory;charge it before use. 1. 2. Match the two bulges of the battery pack with the corresponding guides on the back of the transceiver, then press the battery pack and transceiver firmly together until the release latch on the base of the transceiver locks. While pressing the release latch,pull the battery pack away from the transceiver. INSTALLING THE ANTENNA Screw the antenna into the connector on the top of the transceiver by holding the antenna at its base and turning it clockwise until secure。 Note : The antenna is neither a handle , a key ring retainer , nor a speaker/microphone attachment point. Using the antenna in these ways may damage the antenna and degrade your transceiver’ s performance. INSTALLING THE BELT CLIP If necessary,attach the belt clip using the two supplied screws。 Caution: Do not use glue which is designed to prevent screw loosening when installing the belt clip,as it may cause damage to the transceiver。Acrylic ester,which is contained in these glues,may crack the transceiver’ s back panel. Your first QSO FIRST QSO Are you ready to give your transceiver a quick try? Reading this chapter should get your voice on the air right away. The instructions below are intended only for a quick guide. If you encounter problems or there is something you would like to know more, read the detailed explanations given later in this manual. 1. Turn on the transceiver, example shown below 2. 3. 4. 5. 6. 7. A high pitched double beep sounds and a Power-ON message appears momentarily. The various indicators and the current operating frequency appear on the LCD. The transceiver stores the current parameters when it is turned OFF and automatically recalls these parameters the next time you turn the transceiver ON. Turn the PWR/VOL control clockwise. Press【▲/▼】keys to select a reception frequency. You may further turn the PWR/VOL control to adjust the volume level of the signal. To transmit, hold the transceiver approximately 5 cm (2 inches) from your mouth. Press and hold [PTT], then speak in your normal tone of voice. Release [PTT] to receive. Repeat steps 4, 5 and 6 to continue communication. GETTING ACQUAINTED KEYS AND CONTROLS Antenna Display 1. Appears when the Reverse function is activated 2. Appears when the repeater shift function is activated 3. Appears when the CTCSS function is activated 4. Appears when the DCS function is activated 5. Appears when the call alarm tone is activated 6. Appears when the VOX function is ON 7. Appears when set the unit in saving mode 8. Displays the frequencies, Menu settings and other information. 9. Appears when the Lock function is ON 10. Displays the Menu No., memory channel number, and status 11. Appears when the displayed memory channel has data 12. Displays the battery power remaining 13. Appears when the memory channel lockout function is ON 14. S-meter (RX) and TX Power Output indicator when the transceiver transmits 15. Appears when a Priority Scan function is activated 16. Appears when setting shortcut function 17. H appears when high power transmission is selected, M appears when medium power is selected, and L appears when low power is selected BASIC OPERATION Switching the Power ON/OFF Switch ON the unit by turning the POWER SWITCH/VOLUME CONTROL knob clockwise. A high-pitched double beep sounds, full display and a POWER-ON message appear briefly followed by the frequency and others indicators. To switch the unit OFF by turning the POWER SWITCH/VOLUME CONTROL knob anticlockwise. The unit stores the current frequency and parameters when it is turned OFF and recalls their parameters the next time you turn the unit ON. Adjusting the Volume Turn the POWER SWITCH/VOLUME CONTROL knob clockwise to increase the audio output level and anticlockwise to decrease the output lever. If you are not receiving a signal, press and hold 【MON】key to unmute the speaker, then adjust the POWER SWITCH/VOLUME CONTROL to a comfortable audio output level. Adjusting the Squelch The purpose of squelch is to mute the speaker when no signals are present. With the squelch level correctly set, you will hear sound only while actually receiving signals. The higher the selected squelch level, the stronger the signals must be to receive. The appropriate squelch level depends on the ambient RF noise conditions. 1. Press 【MENU】key, and then press【MENU】. The current squelch level appears. 2. 3. Press【▲/▼】key to adjust the level. Select the level at which the background noise is just eliminated when no signal is present. The higher the level, the stronger the signals must be to receive. 9 different levels can be set(0: minimum, 9: Maximum, Default value: 5). Press【MENU】key to store the new setting and continue to set other functions. Or press【F】key to store the new setting and exit Menu mode. Transmitting 1. To transmit, hold the transceiver approximately 5 cm (2 inches) from your mouth, then press and hold 【PTT】and speak into the microphone in your normal tone of voice. The LED lights red and the bar-graph meter appear. 2. When you finish speaking, release【PTT】. Note: If TOT function is activated, continuously transmit for longer than the time specified, the internal timeout timer generates a warning beep and the transceiver stops transmitting. In this case, release【PTT】and let the transceiver cool down for a while, then press【PTT】 again to resume transmission. Selecting an Output Power Selecting a lower transmission power is the best way to reduce battery consumption, if communication is still reliable. You can configure different power levels for transmission. 1. 2. 3. Press【MENU】key. Press【▲/▼】key to select Menu No. 10(POW). Press【MENU】key. Appears on the display 4. Press【▲/▼】key to select a desired transmission power and cycle between “H ”(high), “M”(medium), and “L ”(low). 5. Press【MENU】key to store the new setting and continue to set other function. Or press【F】key to store the new setting and exit Menu mode Selecting a Frequency VFO Mode This is the basic mode for changing the operating frequency. Press【▲】 to increase the frequency and press【▼】 to decrease the frequency. MHz Mode If the desired operating frequency is far away from the current frequency, it is quicker to use the MHz Tuning Mode to adjust the MHz digit: 1. Press 【F】 The MHz digit blinks. 2. 3. 4. Press【▲/▼】key to select the desired MHz value. After selecting the desired MHz value, press【F】 to exit the mode and return to normal VFO Mode. Continue adjusting the frequency as necessary, using the【▲/▼】key . Direct Frequency Entry In addition to pressing【▲/▼】key, there is another way to select the frequency. When the desired frequency is far away from the current frequency, you can directly enter a frequency using the numeric keypad. 1. Press the numeric keys (【0】 to 【9】) to enter your desired frequency. 2. Press【VFO】key to delete if you enter wrong number. Note: If the entered frequency does not match the current frequency step size, the frequency is automatically rounded down to the next available frequency. When the desired frequency cannot be entered exactly, confirm the frequency step size. If you press【▲/▼】key while entering the frequency, the transceiver clears the entry and changes to the next available frequency. MENU SETUP WHAT IS A MENU? Many functions on this transceiver are selected or configured via a software-controlled Menu rather than through the physical controls of the transceiver. Once you become familiar with the Menu system, you will appreciate its versatility. You can customize the various timings, settings, and programming functions on this transceiver to meet your needs without using many controls and switches. MENU ACCESS 1. Press【MENU】. A brief explanation of the Menu, and the setting and Menu No. appear on the display. 2. Press【▲/▼】key to select your desired Menu. As you change the Menu No., a brief explanation of each Menu appears along with its current parameter. 3. Press【MENU】to configure the parameter of the currently selected Menu No. 4. Press【▲/▼】key to select your desired parameter. 5. Press【MENU】to store the new setting. press【▲/▼】key to continue to select other Menu, or press【F】key to store the new setting and exit Menu mode. MENU FUNCTION LIST On the display Menu No. Function Selection Default Description SQL 1 Squelch Setting 00 to 09 05 5 level STP 2 Frequency step 5,6.25,10,12.5,25KHz 25KHz 25KHz CT.DCS 3 CTCSS/DCS selection OFF/CTCSS/DCS OFF OFF RC 4 RX CTCSS setting 67.0-254.1Hz OFF OFF TC 5 TX CTCSS setting 67.0-254.1Hz OFF OFF CT 6 RX/TX CTCSS setting 67.0-254.1Hz OFF OFF Rd 7 RX DCS setting 023N-754N 023I-754I OFF OFF Td 8 TX DCS setting 023N-754N 023I-754I OFF OFF dC 9 RX/TX DCS setting 023N-754N 023I-754I OFF OFF POW 10 H, M, L H High power OFFSET 11 Offset frequency 0.00-50MHz 10.000MHz 10MHz SFT 12 Offset direction OFF/-/+ OFF OFF TOT 13 Time-out timer OFF/1/3/10 minutes 1 1 minute VOX 14 VOX function OFF/1-16 OFF OFF BP 15 Beep ON/OFF ON ON LEd 16 Lamp setting ON/OFF/AUT AUT Auto SCAN 17 Scan resume method TO/SO/SE TO Time CK 18 Call tone selection OFF/1-8 /1750MHz 1 1 SAV 19 Save power selection OFF/0.2/0.4/0.6/0.8/1.0 0.4 0.4 second KY 20 Keypad lock selection MANU/AUTO MANU Manual TX power selection OPERATING THROUGH REPEATERS Repeaters, which are often installed and maintained by radio clubs, are usually located on mountain tops or other elevated locations. They generally operate at higher ERP (Effective Radiated Power) than a typical station. This combination of elevation and high ERP allows communications over much greater distances than communicating without using repeaters. Most repeaters use a receive and transmit frequency pair with a standard or non-standard offset (odd-split). In addition, some repeaters must receive a tone from the transceiver to be accessed. For details, consult your local repeater reference. OFFSET PROGRAMMING FLOW Select a receive frequency. Select an offset direction. Select an offset frequency (only when programming odd-split repeater frequencies). Activate the Tone function (if necessary). Select a tone frequency (if necessary). If you store all the above data in a memory channel, you will not need to reprogram the parameters every time. Refer to “MEMORY CHANNELS”. Programming an Offset You must first select an amateur radio repeater downlink frequency as described in “Selecting an Offset Frequency”. Selecting an Offset Direction Select whether the transmission frequency will be higher (+) or lower (–) than the reception frequency. 1. Press 【MENU】. 2. Press【▲/▼】key to select Menu No. 12(SFT). 3. Press 【MENU】. 4. 5. Press【▲/▼】key to select “+”or “–”. Press【MENU】to store the new setting. press【▲/▼】key to continue to select other Menu, or press【F】key to store the new setting and exit Menu mode . “+”or “–”appears above the frequency, indicating which offset direction is selected. If the offset transmission frequency falls outside the allowable range, transmission is inhibited. In this case, adjust the reception frequency so that the transmission frequency is within the band limits. Selecting an Offset Frequency To access a repeater which requires an odd-split frequency pair, change the offset frequency to avoid effecting normal communication. 1. Press [MENU]. 2. Press【▲/▼】key to select Menu No. 11 (OFFSET). 3. Press [MENU]. Appear the currently offset frequency on the display 4. 5. Press【▲/▼】key to select the appropriate offset frequency or enter the desired offset frequency numeral. The selectable range is from 0.000 MHz to 50.0000MHz. Press【MENU】to store the new setting. press【▲/▼】key to continue to select other Menu, or press【F】key to store the new setting and exit Menu mode. Activating the Tone Function 1. Press [MENU]. 2. Press【▲/▼】key to select Menu No. 3 (CT.DCS). Appear on the display 3. 4. 5. Press [MENU]. Press【▲/▼】key to select “DCS”. Press【MENU】to store the new setting. press【▲/▼】key to continue to select other Menu, or press【F】key to store the new setting and exit Menu mode “DQT”appears when the DCS function is ON. Note: You cannot use the Tone and CTCSS/ DCS functions at the same time. Switching the CTCSS function ON after activating the DCS deactivates the DCS function. Reverse Function The Reverse function exchanges a separate reception and transmission frequency. So, while using a repeater, you can manually check the strength of a signal that you receive directly from the other station. If the station’ s signal is strong, both stations should move to a simplex frequency and free up the repeater. To swap the transmission and reception frequencies: Press【F】, 【MENU】 to switch the Reverse function ON(or OFF). “R”appears when the function is ON. Note: You can turn the Reverse function ON when you are operating in Simplex Mode. However, it does not change the Transmission/Reception frequency. MEMORY CHANNELS In memory channels, you can store frequencies and related data that you frequently use so that you do not need to reprogram that data every time. You can quickly recall a programmed channel through simple operation. A total of 199 memory channels are available for storing frequencies, modes and other operating conditions. SIMPLEX & REPEATER OR ODD-SPLIT MEMORY CHANNEL? You can use each memory channel as a simplex & repeater channel or an odd-split channel. Store only one frequency to use as a simplex & repeater channel or two separate frequencies to use as an odd-split channel. Select either application for each channel depending on the operations you have in mind. Simplex & repeater channels allow: Simplex frequency operation Repeater operation with a standard offset (if an offset direction is stored) Odd-split channels allow: Repeater operation with a non-standard offset Note: Not only you can store data in memory channels, but you can also overwrite existing data with new data. The operating of Memory channel Please confirm the desired store functions prior to store operating. 1. Power output selection(H, M, L) 2. RX/TX CTCSS selection 3. RX CTCSS selection 4. TX CTCSS selection 5. RX/TX DCS selection 6. RX DCS selection 7. TX DCS selection 8. Offset frequency 9. Offset direction(+, -) Storing operation 1. Press【▲/▼】key to select desired frequency. You can enter a desired frequency by numeric keypad directly. 2. press【F】key and then press【MR】key. A memory channel number appears and blinks. 3. 4. Press【▲/▼】key to select a desired channel number. Press【MR】key to store. Recall a memory channel 1. Press 【MR】 to enter Memory Recall Mode. The memory channel last used is recalled. 2. Press【▲/▼】key to select your desired memory channel. You cannot recall an empty memory channel. To restore VFO Mode, press【VFO】. Using a Numeric Keypad to recall a memory channel You can also recall a memory channel by entering a desired memory channel number with the keypad. Press 【MR】 to enter Memory Recall Mode. And then enter the channel number using 3 digits. For example, to recall channel 90, press【0】, 【9】,【0】. Note: You cannot recall an empty memory channel. An error beep sounds. When you recall an odd-split memory channel, “+”and “–”appear on the display. Press 【F】,【MENU】 (Reverse function) to display the transmission frequency. After recalling a memory channel, you may modify data such as power output. However, these settings are cleared once you select another channel or the VFO Mode. To permanently store the data, overwrite the channel contents. Channel lock-out In order to avoid deleting channel data, please activate the channel lock-out as you stored data in memory channel. 1. Press【MR】key to recall a memory channel. 2. Press【▲/▼】key to select a desired channel to lock-out. 3. Press【F】key, and then press【0】key. Appears “★”under channel number on the display. 4. Press【F】and 【0】to un-lock channel(“★”un-appears on the display). Clearing a Memory Channel To clear the data from an individual memory channel: 1. Recall the memory channel you want to clear the data. 2. And then turn OFF power 3. Press【MR】key to turn ON power A confirmation message appears. 4. Press【MR】to clear the channel data. The contents of the memory channel are cleared. Note: While the transceiver is in Channel Display Mode or Lock function is activated, you cannot clear the channel data. To clear the channel data, must be free from channel lock-out. Channel Display While in this mode, the transceiver displays only memory channel numbers (or Memory names if they have been stored), instead of frequencies. 1. Press【PTT】+【MENU】. The transceiver displays the memory channel number in place of the operating frequencies. 2. Press【▲/▼】key to select your desired memory channel number. While in Channel Display Mode, only the following functions can be operated. 1. Squelch setting 2. Power output 3. TOT function 4. VOX function 5. BP 6. LAMP 7. Scan function 8. CK(Call tone) 9. SAV(save power) 10. Keypad lock-out(manual/auto) Resuming the Operating of Channel Display Mode. Press【PTT】+【MENU】and Turn the power ON. SCAN Scan Resume Method The transceiver stops scanning at the frequency (or memory channel) where a signal is detected. It then continues or stops scanning according to which Resume Mode you have selected. Time-Operated Mode (default) The transceiver remains on a busy frequency (or memory channel) for approximately 5 seconds, and then continues to scan even if the signal is still present. Carrier-Operated Mode The transceiver remains on a busy frequency (or memory channel) until the signal drops out. There is a 5-second delay between signal dropout and scan resumption. Seek Mode The transceiver moves to a frequency or memory channel where a signal is present and stops. To change the scans resume method: 1. Press【MENU】. 2. Press【▲/▼】key to select Menu No. 17 (SCAN). 3. Press【MENU】. 4. Press【▲/▼】key to select “TO”(Time-Operated), “CO”(Carrier-Operated), or “SE” (Seek) Mode. 5. Press【MENU】key to store new setting and continue to set other function, or press 【F】key to store new setting and exit Menu mode. Activate Scanning Activate scanning function under frequency and channel mode. 1. Press【F】key and then press【3】key to start scanning. 2. Press any key to cannel except【MONI】and【LAMP】key. SELECTIVE CALL CTCSS and DCS You may sometimes want to hear calls from only specific persons or groups. In this case, use the Selective Call. This transceiver is equipped with CTCSS (Continuous Tone Coded Squelch System) and DCS (Digital Coded Squelch). These Selective Calls allow you to ignore (not hear) unwanted calls from other persons who are using the same frequency. The transceiver unmutes only when it receives a signal having the same CTCSS tone or DCS code. Note: CTCSS and DCS do not cause your conversation to be private or scrambled. It only relieves you from listening to unwanted conversations. CTCSS A CTCSS tone is a sub-audible tone and is selectable from among the 50 tone frequencies listed in the table. Using CTCSS 1. Press【MENU】and then press【▲/▼】key to select Menu No. 3 (CT.DCS). 2. Press【MENU】and then press【▲/▼】key to select “CTCSS”. 3. As you press【▲/▼】key, the selection cycles as follows: “OFF” “CTCSS” “DCS” “OFF”. Press【MENU】key to store new setting and continue set other function. Or press【F】 key to store new setting and exit Menu mode. “QT”appears on the upper part of display, indicating that the CTCSS function is activated. Note: When CTCSS is ON, you will hear calls only when the selected CTCSS tone is received. To answer the call, press and hold【PTT】, then speak into the microphone. Note: You cannot use the CTCSS and DCS functions simultaneously. Switching the DCS function ON after having activated the CTCSS functions deactivates the CTCSS functions. If you select a high CTCSS frequency, receiving audio or noise that contains the same frequency portions may cause CTCSS to function incorrectly. To prevent noise from causing this problem, select an appropriate squelch level. Selecting a RX/TX CTCSS Frequency 1. Press【MENU】and press【▲/▼】key to select Menu No. 6 (CT). The current CTCSS frequency appears. 2. Press【MENU】and press【▲/▼】key to select your desired CTCSS frequency. The selectable CTCSS frequencies refer to the table on the following page. 3. Press【MENU】to store the new setting and continue to set other function. Or press 【F】key to store new setting and exit Menu Mode. Note: To use the selected CTCSS tone, you must turn the CTCSS function ON. Selecting RX CTCSS frequency 1. Press【MENU】key, and then press【▲/▼】key to select Menu No. 4(RC). The current CTCSS frequency appears on the display 2. 3. 4. Press【MENU】key. Press【▲/▼】key to select desired CTCSS frequency. Press【MENU】to store the new setting and continue to set other function. Or press 【F】key to store new setting and exit Menu Mode. The selectable CTCSS frequencies refer to the table on the following page. Selecting TX CTCSS frequency 1. Press【MENU】key, and then press【▲/▼】key to select Menu No. 6(TC) The current CTCSS frequency appears on the display 2. 3. 4. Press【MENU】key. Press【▲/▼】key to select desired CTCSS frequency. Press【MENU】to store the new setting and continue to set other function. Or press 【F】key to store new setting and exit Menu Mode. The selectable CTCSS frequencies refer to the table on the following page. Available CTCSS Tone Frequencies OFF 91.5 127.3 167.9 67.0 94.8 131.8 171.3 69.3 97.4 136.5 173.8 71.9 100.0 141.3 177.3 74.4 103.5 146.2 179.9 77.0 107.2 151.4 183.5 79.7 110.9 156.7 186.2 82.5 114.8 159.8 189.9 85.4 118.8 162.2 192.8 88.5 123.0 165.5 196.6 199.5 254.1 203.5 206.5 210.7 218.1 225.7 229.1 233.6 241.8 250.3 DCS DCS is similar to CTCSS. However, instead of using an analog audio tone, it uses a continuous sub-audible digital waveform that represents a 3-digit octal number. You can select a DCS code from among the 104 DCS codes listed in the table on the following page. Using DCS 1. Press【MENU】and then press【▲/▼】key to select Menu No. 3 (CT.DCS). 2. Press【MENU】and then press【▲/▼】key to select “DCS”. 3. As you press【▲/▼】key, the selection cycles as follows: “OFF” “CTCSS” “DCS” “OFF”. Press【MENU】key to store new setting and continue set other function. Or press【F】 key to store new setting and exit Menu mode. “DQT”appears on the upper part of display, indicating that the DCS function is activated. Note: When DCS is ON, you will hear calls only when the selected DCS tone is received. To answer the call, press and hold【PTT】, then speak into the microphone. Note: You cannot use the CTCSS and DCS functions simultaneously. Switching the CTCSS function ON after having activated the DCS functions deactivates the DCS functions. Selecting a RX/TX DCS Frequency 1. Press【MENU】and press【▲/▼】key to select Menu No. 9 (DC). The current DCS code appears. 2. Press【MENU】and press【▲/▼】key to select your desired DCS code. The selectable DCS code, refer to the DCS code table(Normal“N”/Reverse “I”). The available DCS code(Normal“N”) OFF 065 N 134 N 223 N 265 N 351 N 446 N 526 N 662 N 023 N 071 N 143 N 225 N 266 N 356 N 452 N 532 N 664 N 025 N 072 N 145 N 226 N 271 N 364 N 454 N 546 N 703 N 026 N 073 N 152 N 243 N 274 N 365 N 455 N 565 N 712 N 031 N 074 N 155 N 244 N 306 N 371 N 462 N 606 N 723 N 032 N 114 N 156 N 245 N 311 N 411 N 464 N 612 N 731 N 036 N 115 N 162 N 246 N 315 N 412 N 465 N 624 N 732 N 043 N 116 N 165 N 251 N 325 N 413 N 466 N 627 N 734 N 047 N 122 N 172 N 252 N 331 N 423 N 503 N 631 N 743 N 051 N 125 N 174 N 255 N 332 N 431 N 506 N 632 N 754 N 053 N 131 N 205 N 261 N 343 N 432 N 516 N 645 N 054 N 132 N 212 N 263 N 346 N 445 N 523 N 654 N The available DCS code(Reverse“I”) OFF 065 I 134 I 223 I 265 I 351 I 446 I 526 I 662 I 023 I 071 I 143 I 225 I 266 I 356 I 452 I 532 I 664 I 025 I 072 I 145 I 226 I 271 I 364 I 454 I 546 I 703 I 026 I 073 I 152 I 243 I 274 I 365 I 455 I 565 I 712 I 031 I 074 I 155 I 244 I 306 I 371 I 462 I 606 I 723 I 032 I 114 I 156 I 245 I 311 I 411 I 464 I 612 I 731 I 036 I 115 I 162 I 246 I 315 I 412 I 465 I 624 I 732 I 043 I 116 I 165 I 251 I 325 I 413 I 466 I 627 I 734 I 047 I 122 I 172 I 252 I 331 I 423 I 503 I 631 I 743 I 051 I 125 I 174 I 255 I 332 I 431 I 506 I 632 I 754 I 053 I 131 I 205 I 261 I 343 I 432 I 516 I 645 I 054 I 3. 132 I 212 I 263 I 346 I 445 I 523 I 654 I Press【MENU】to store the new setting and continue to set other function. Or press 【F】key to store new setting and exit Menu Mode. Selecting RX DCS code 1. Press【MENU】key, and then press【▲/▼】key to select Menu No. 7(Rd). The current DCS code appears on the display 2. 3. 4. Press【MENU】key. Press【▲/▼】key to select desired DCS code. The selectable DCS code, refer to the DCS code table(Normal“N”/Reverse “I”). Press【MENU】to store the new setting and continue to set other function. Or press 【F】key to store new setting and exit Menu Mode. Selecting TX DCS code 1. Press【MENU】key, and then press【▲/▼】key to select Menu No. 8(Td) The current DCS code appears on the display 2. 3. Press【MENU】key. Press【▲/▼】key to select desired DCS code The selectable DCS code, refer to the DCS code table(Normal“N”/Reverse “I”) 4. Press【MENU】to store the new setting and continue to set other function. Or press 【F】key to store new setting and exit Menu Mode. LAMP To illuminate the display and keys: Press【LAMP】. If no other key is pressed, the light turns OFF approximately 5 seconds after releasing【LAMP】. Press any key other than 【LAMP】 while the display and keys are lit to restart the 5-second timer. Press 【LAMP】 while the display and keys are lit to immediately turn the light OFF. Note: LAMP setting, refer to “Operator Conveniences”. Lock Function The lock function disables most of the keys to prevent you from accidentally activating a function. 1. Press【F】 (3 s). appears when this function is ON. The following keys cannot be locked: 【PTT】 、【F】 (3s) 、【LAMP】、 【MONI】、 PWR/VOL control 2. Press【F】(3s)to unlock keys. Note: Manual/Auto lock function setting, refer to Operator Conveniences. Monitor 1. When you are receiving as the squelch function is ON, weak signals may become intermittent. 2. If the CTCSS or DCS function is ON, you may want to disable the squelch function temporarily to monitor the current channel activities. 3. In both of these cases, use the Monitor function to temporarily disable the squelch function. To activate the Monitor function: 1. Press and hold【MON】key The speaker is unmuted and you can monitor the signals. 2. Release【MON】key to return to normal operation. Operator Conveniences Remining Battery Capacity Before you operate the transceiver outside using a battery pack, it is important to know how long the battery pack will last. The battery remaining indicator shows the remaining capacity. High battery power Medium battery power Low battery power Recharge or replace the batteries. Channel Step When press【▲/▼】key to select a receiving frequency, you must select correct frequency step. You can select a desired frequency step from following value. 5KHz, 6.25KHz, 10KHz, 12.5KHz, 25KHz. To Change the Frequency Step 1. Press【MENU】key, and then press【▲/▼】key to select Menu No.2(STP). The currently frequency step appears on the display. 2. 3. Press【MENU】key and then press【▲/▼】key to select a desired frequency step. press【MENU】key to store new setting and continue to set other function. Or press 【F】key to store new setting and exit Menu mode. Note: If you change a frequency step does not match the current frequency step size, the transceiver is automatically adjust the frequency to match the new frequency step size. Time-Out Timer The Time-out Timer limits the time of each transmission. The built-in Time-out Timer limits each transmission time to a maximum of 1(default), 3 or 10 minutes. Just before the transceiver stops the transmission, a warning beep sounds. This function is necessary to protect the transceiver from thermal damage and can therefore not be turned OFF. 1. Press【MENU】, and then press【▲/▼】key to select Menu NO.13(TOT). 2. 3. Press【MENU】, and then press【▲/▼】key to select 1(default), 3 or 10 minutes. Press【MENU】key to store the new setting and continue to set other function. Or press【F】key to store new setting and exit Menu mode. VOX (VOICE-OPERATED TRANSMISSION) VOX eliminates the necessity of manually switching to the Transmission Mode each time you want to transmit. The transceiver automatically switches to Transmission Mode when the VOX circuitry senses that you have begun speaking into the microphone. To turn the VOX function ON: 1. 2. Press【MENU】then press【▲/▼】key to select Menu No. 14 (VOX). Press【MENU】then press【▲/▼】key to select the desired VOX gain level from 1 (least sensitive) to 16 (most sensitive). 3. To turn OFF the VOX function, select “OFF”in step 2. Note: While in Menu Mode, the VOX function is temporarily disabled. Since the VOX circuit must detect the presence of your voice, you may notice a slight delay in transmission; the very first part of your message may not be transmitted. VOX cannot be used with an optional Speaker/ Microsphone. VOX Gain To enjoy the VOX function, take the time to properly adjust the VOX Gain level. This level controls the VOX circuit to detect the presence or absence of your voice. While the VOX function is ON: 1. Speak into the headset microphone using your normal tone of voice to transmit. If the transmission does not begin, you must readjust the VOX Gain so that transeiver transmits while you are speaking. To select a more sensitive gain level. 2. Adjust the VOX Gain, the transceiver reliably switches to transmission mode each time you speak while the transceiver is transmitting. From the Menu: 1. Continue from step 1 and 2 from VOX (Voice-Operated Trasmission). 2. Press【MENU】to store the net setting and continue to set other function. Or press 【F】key to store new setting and exit Menu mode. “VOX”appears on the top right of the display when the VOX function is ON. 3. Press【MENU】to store the net setting and continue to set other function. Or press 【F】key to store new setting and exit Menu mode. 4. Adjust the VOX Gain, performing steps 1 to 3 until the transceiver reliably switches between transmission and reception each time you speak. Note: The setting should not allow background noise to switch the transceiver to Transmission Mode. BEEP FUNCTION The Beep function provides confirmation of entry, error status, and malfunctions of the transceiver. We recommend you leave this function ON in order to detect erroneous operations and malfunctions. However, to turn the beep function OFF: 1. Press【MENU】. 2. Press【▲/▼】key to select Menu No. 15 (BP). 3. Press【MENU】. 4. Press【▲/▼】key to select “OFF”. 5. Press【MENU】to store the net setting and continue to set other function. Or press 【F】key to store new setting and exit Menu mode. Note: The beep output level is linked to the VOL control position. LAMP To illuminate the display and keys: 1. Press【MENU】. 2. Press【▲/▼】key to select Menu No.16(LED) 3. Press【MENU】. The currently parameter appears on the display. 4. 5. Press【▲/▼】key to select a desired parameter. Aut: The light turns OFF approximately 5 seconds OFF:To keep the light OFF continuously ON :To keep the light ON continuously Press【MENU】to store the net setting and continue to set other function. Or press 【F】key to store new setting and exit Menu mode. Selecting Call Tone 1. Press【MENU】. 2. Press【▲/▼】key to select Menu No. 8(CK). 3. Press【MENU】. 4. Press【▲/▼】key to select a desired call tone(1-8 or 1750Hz). 5. Press【MENU】to store the net setting and continue to set other function. Or press 【F】key to store new setting and exit Menu mode BATTERY SAVER The Battery Saver extends the operating time of the transceiver. It automatically activates when the squelch is closed and no key is pressed for more than 10 seconds. To reduce battery consumption, this function shuts the receiver circuit OFF for the programmed time, then momentarily turn it back ON to detect a signal. To program the receiver shut-off period for the battery saver: 1. Press【MENU】 2. Press【▲/▼】key to select Menu No. 19(SAV). The currently parameter appears on the display 3. 4. Press【MENU】. Press【▲/▼】key to select the receivewr shutoff period from OFF, 0.2, 0.4(default), 0.6, 0.8 and 1.0 seconds. 5. Press【MENU】to store the net setting and continue to set other function. Or press 【F】key to store new setting and exit Menu mode. Note: The longer the shut-off period, the more you can save on battery consumption. However, there is a greater chance of missing a signal. Keypad Lock-out 1. Press【MENU】then press【▲/▼】key to select Menu No. 20(KY) The currently parameter appears on the display 2. Press【MENU】then press【▲ /▼ 】key to select a desired lock mode. MANU: manual mode(press【F】key 3 seconds) AUTO: auto mode(auto lock the keypad while you didjn’ t press any keys approximately 60 seconds) 部份功能快捷操作及键作用说明 键作用说明 Key Function 【▲】 Up 【▼】 Down 【F】 Function 【MENU】 Menu Access 【CALL/PO.H.L】 呼叫键及配合功能键使用 【VFO/MR】 调出存储频道及配合功能键使用 【0~9】 数字键及配合功能键使用 部分功能快捷操作 设置名称 快捷操作 Adjust Squelch Press【F】then press【1】key Selecting CTCSS/DCS Press【F】then press【2】key Start to scan Press【F】then press【3】key RX CTCSS setting Press【F】then press【4】key TX CTCSS setting Press【F】then press【5】key RX/TX CTCSS setting Press【F】then press【6】key RX DCS setting Press【F】then press【7】key TX DCS setting Press【F】then press【8】key RX/TX DCS setting Press【F】then press【9】key Channel Lock-out Press【F】then press【0】key Storing Channel Press【F】then press【VFO】key Selecting TX power Press【F】then press【CALL】key 主要性能 Frequency Range VHF UHF 频率范围 136-174MHz 400-480MHz Channel 199 Workshop 6.0V(Ni-MH)/7.4V(Li-ion) DC ±15% 天线阻抗 50Ω 信道间隔 5,6.25,10,12.5,25KHz 工作温度 -30℃~+60℃ 载波容差 ±2.5PPM 外形尺寸 92×53×30mm 重量 200g 电池 H-1300mAh(Li-ion)A-1100mAh(Ni-MH) Specification Transmit Part Power Output 4/5W Modulation FM Max.Freq.Deviation ≤±5KHz Spurious Radiation <-60dB 预加重特性 每倍频程 6dB Transmitting Current 1300mA Receiver Part Sensitivity <0.2uV(12dB SINAD) Squelch Senstivity 0.15uV Intermodulation Rejection 50dB Audio Power 450mW Accessories Description Qty Interphone 1 Antenna 1 Ni-MH battery pack(Or Li-ion battery pack) 1 Charger(AC adaptor included) 1 Belt Clip 1 User’ s manual 1 Extra Accessories Earphone 1 Enhanced Antenna 1