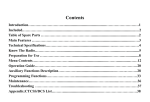
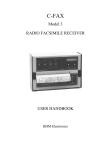
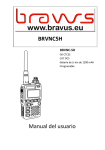
1
Introduction to NF-368 Index Introduction……………………………………2 Thanks for purchasing NANFONE UHF FM Including…………………………………………3 transceiver NF-368. Please read this manual NF-368 Diagram………………………………4 carefully to learn its functions and operations before Main Features……………………………………5 using. L C D I n d i c a t i on … … … … … … … … … … … 7 With mini compact size, large LCD display, stable Preparation for Using…………………………9 performance, and easy-to-use feature, transceiver Operation Guide ………………………………14 NF-368 will be your best choice. Functions Setting………………………………15 Key Combination…………………………………17 Menus…………………………………………19 Menu Description and Function Setting ……………………………………………20 Other Features and Setting………………………28 Maintenance……………………………………31 Including Please take the radio out carefully from the package, and check again before disposing of the packing to make sure that all the following items are contained in the packaging. If any of them are missing or damaged during transportation, please contact with the vendor for service. Troubleshooting………………………………32 1 2 ĉ.NF-368 Diagram Accessories List: Description Antenna Belt clip Hand strap Lithium battery pack Charger User Manual Earphone Warranty card QC passed card Unit pc pc pc pc pc pc pc pc pc 3 Quantity 1 1 1 ƻ ƻ ƻ ƻ ƻ ƻ ƻ 1 ƻ 1 ƻ ƻ ƻ ƻ ƻ 1 ƻ ƻ 1 ƻ 1 1 1. Battery snap; 2.Antenna; 3.Volume knob; 4.Coded selector; 5.PTT button; 6.Power supply jack; 7.Indicator light; 8.Monitor/FM radio; 9.FUN key; 10.MENU key; 11.MR key; 12.Power control button; 13.MIC jack; 14.Speaker; 15.Hand strap hole; 16.Earphone jack 4 13.Dual-frequency standby Ċ.Main Features 14.CTCSS 1.Easy operation following menus with clear LCD display 2.Battery: 3.7V 1200mAh rechargeable Lithium battery 15.DCS 16.Code 17.Scan˖VFO scan/channel scan 3.Frequency: 400MHz̚470MHz 18.Squelch level setting˄level 0-4˅ 4.Wide/Narrow band selectable˖25KHz/12.5KHz 19.Signal/power indicator table 5.TX output power˖High˖2W,Low˖0.5W 20.Background light ON/OFF 6.CTCSS˄40˅and DCS˄82˅ 21.Power-save function 7.Memory channels ˖ 99 memory channels ˄ 1 emergency channel˅ 22.Monitor function 8.TOT (Time-Out-Timer)˄OFF, 30s, 60s, 90s, 120s, 150s, 180s˅ 9.VOX function˄OFF/1/2/3˅ 10.Audio-call ˄1750KHz˅function 23.Automatically check when powered on and then display voltage 24.Low battery alert 25.Keypad indicate tone 26.Keypad locked 11.Emergency channel operating ˄ Emergency Alarm˅ 27. 12.Busy channel lockout˄BCLO˅ 28. FM radio function ˄ frequency range: 87.500 ̚ 108.000MHz˅ 5 APO˄Automatically Power Off˅ 6 ċ. LCD Indication No. Icon Description Operation 6 Dual frequency standby Use menu 01 7 High/Low power Use menu 13 8 Power save function Use menu 8 9 APO Use menu 10 10 Keypad locked [F]+[MODE] 11 Keypad indicate tone Menu 9 12 Low battery alert Wide/Narrow band setting 1 Memorize the using memory channel No. in call-out state [MR] 2 CTCSS Use menu 02 and 03 Č.Preparation Before Using 3 DCS Use menu 02 and 03 Install belt clip overlay 5 Activate another function 7 13 [F] W Menu 14 Install the belt clip overlay on the back of NF-368 8 rechargeable battery case as following (Usually, it Install rear case has been installed well in factory.). Install the battery rear case properly as following picture. Install Lithium battery pack Put the original Lithium battery pack into the transceiver correctly as following picture shows. Fix the rear case As picture, pull up the button in “lock” direction to avoid the rear case sliding. 9 10 Install the belt clip Charge Install the belt clip as picture. The battery pack is without power when finished, and please charges it before using. When used for the first time after purchased or stored over two months, the capacity of battery pack is less than normal. However, it will return normal after charged and discharged for five times. Install the antenna Please Install the antenna as picture and rotate it clockwise properly as following picture. connect charger to till tight. 11 12 the transceiver V. Operation Instruction Quickly press it to select VFO mode or channel mode, and hold it to memorize channels. Key functions: 377EXWWRQ 䱰 05NH\ TX key. Hold this key to transmit and release after transmission finished. VI. Functions Setting POWER key ˄1˅Press [MODE] key to enter [01]DW dual Key for powering ON/OFF, transceiver will be turned on or turned off by pressing and holding this key for 2 seconds. 021,725)0 Quickly press to monitor, and hold it to turn on or turn off the FM radio. ',$/NQRE This knob is for main tuning, which is for frequency standby selecting. ˄2˅Press [MODE] key and then rotate the “DIAL” knob clockwise or withershins to enter [02] CODE selecting. operating frequency setting, function menu selecting and ˄3˅Press [MODE] key and then rotate the “DIAL” other adjustment. knob clockwise or withershins to enter [03] CTCSS 92/NQRE Volume control knob. Rotate it clockwise to turn up. setting. ˄4˅Press [MODE] key and then rotate the “DIAL” )NH\ Quickly press it to activate another function, knob clockwise or withershins to enter [04] DCS and hold it to make emergency call. setting. 02'(NH\ Setting functions via MODE key. 13 ˄5˅Press [MODE] key and then rotate the “DIAL” 14 knob clockwise or withershins to enter [05] SQL [10]APO to set the automatically power off function. level setting. ˄ 11 ˅ Press [MODE] key and then rotate the ˄6˅Press [MODE] key and then rotate the “DIAL” “DIAL” knob clockwise or withershins to enter knob clockwise or withershins to enter [06] BCLO [11]TOT to set the TX time limit. busy channel lockout setting. ˄ 12 ˅ Press [MODE] key and then rotate the ˄7˅Press [MODE] key and then rotate the “DIAL” “DIAL” knob clockwise or withershins to enter knob clockwise or withershins to enter [07] LIGHT [12]VOX to adjust the VOX function. turn on or turn off the background light. ˄ 13 ˅ Press [MODE] key and then rotate the ˄8˅Press [MODE] key and then rotate the “DIAL” “DIAL” knob clockwise or withershins to enter knob clockwise or withershins to enter [08] SAVE to [13]POWER to select high or low power output. activate power-save function. ˄ 14 ˅ Press [MODE] key and then rotate the ˄9˅Press [MODE] key and then rotate the “DIAL” “DIAL” knob clockwise or withershins to enter knob clockwise or withershins to enter [09]K TONE [14]HLF DEV to select wide or narrow band. to turn on or turn off the keypad tone. ˄ 10 ˅ Press [MODE] key and then rotate the “DIAL” knob clockwise or withershins to enter 15 16 VII. Functions of Key Combination LCD. Rotate the code selector clockwise to scan in ascending order, and rotate the code selector 1ˊ[F]+[MODE] for keypad locked icon will be showed on Press [F] key and the the bottom-left corner of LCD, and then press [MODE] to lock the keypad. Repeat above steps to unlock the keypad. withershins to scan channels in descending order. To stop scanning, please press [MR],[MODE]or [PTT] button to stop scanning (the channel will stay at current channel). icon will display on the LCD when keypad locked.( Operation of MODE key, 3ˊ[F]+[DIAL] Wide Range Frequency Tuning MR key and DIAL key will be invalid after keypad Press [F] key and then rotate the [DIAL] knob to locked. ) start tuning at 1MHz space when there is a icon on bottom left corner of the LCD. Rotate the 2ˊ[F]+[MR] for scanning Frequency scanning in VFO mode˖ Press [F] key and then press [MR] button to start scanning (channel spacing is 12.5KHZ)when there is a icon on bottom left corner of the LCD; short press [MR],[MODE]or [PTT] button to stop scanning (the frequency will stay at current frequency). code selector clockwise to tune in ascending order, and rotate it withershins to adjust in descending order. 4. [PTT] + [MON / FM] for Audio Call Press [PTT] and then [MONITOR / FM] buttons to start Audio Call (1750 KHz) function: The [MONITOR / FM] key to exit. Channel scanning in channel mode: Press [F] key and then press [MR] button to start scanning when there is a icon on bottom left corner of the 17 18 VIII. Menu Description No. Display & Description DW ˄ Dual-frequency standby setting˅ OFF--ON 2 CODE˄Code setting˅ OFF/CTCSS/DCS 3 CTCSS˄CTCSS setting˅ 4 DCS ˄DCS setting˅ 023N---754N 5 SQL ˄ Squelch setting˅ 0---4 6 BCLO˄Busy channel lockout OFF--ON setting˅ 7 LIGHT˄Background light setting˅ OFF--ON 8 SAVE ˄ Power-save function setting˅ OFF--ON 9 KTONG˄Keypad locked or unlocked setting˅ OFF--ON 10 APO ˄ Automatically OFF—ON(30 minutes) power off function setting˅ 11 TOT ˄TX time limit˅ 19 VOX ˄ VOX function setting˅ OFF, level 1-3 13 POWER (High/Low power setting˅ HIGH--LOW 14 HLFDEV˄Wide/Narrow band OFF--ON selection˅ Setting Contents 1 level 12 67Hz—254.1HZ OFF-15/30/45/60/75/ 90/......./600S đ. Menu Function Description and Setting 1. Dual-frequency function (DW) It is dual channels monitor scanning function, via which it can inspect a custom monitoring channel (channel 00) at VFO mode and channel mode operation. Namely: monitor and scan the current channel frequency and 00-channel frequency. If there is signal received at monitor channel, the scan stop at that frequency. Following is process to start dual-channel monitoring function: 1) Press [MODE] key, and then tune [DIAL] knob to enter the menu 01. And DW is displayed. 20 2) Press [MODE] key again to enter the menu. 3) Clockwise or counterclockwise rotate [DIAL] knob to select: OFF to turn off dual-frequency standby, and ON to activate dual-frequency standby function. 4) After selected, press [MODE] key to confirm. 5) Press [PTT] key to save the new settings and exit to normal operating mode. 2. CODE selection This feature allows your radio keeping quiet when there is no specific call. Please set it as following steps: 1) Press [MODE] key, and then tune [DIAL] knob to enter menu 02. And CODE is showed. 2) Press [MODE] key again to enter the menu. 3) Clockwise or counterclockwise rotate [DIAL] knob to select: OFF / CTCSS / DCS. 4) Press [MODE] key to confirm after selected. 5) Press [PTT] key to save the new settings and exit to normal operating mode. 3. CTCSS code selection The audio system called "consecutive single-audio squelch system ". Please set the CTCSS as following steps: 1) Press [MODE] key, and then tune [DIAL] knob to enter menu 03. And CTCSS displays. 2) Press [MODE] key again to enter the menu. 3) Clockwise or counterclockwise rotate [DIAL] knob to select: 67Hz--254.1Hz (40 groups totally). 4) Press [MODE] key again to confirm after selected. 5) Press [PTT] key to save the new settings and exit to normal operating mode. 4. DCS code setting This is a relatively new anti-jamming advanced audio system which is better than CTCSS. Please set the DCS as following steps: 1) Press [MODE] key, and then tune [DIAL] knob to enter menu 04. And DCS displays. 2) Press [MODE] key again to enter the menu. 3) Clockwise or counterclockwise to rotate [DIAL] knob to select: 023N-754N (totally 82 groups). 5. SQL level setting Squelch system can eliminate background noise when there is no signal received, which not only make it more comfortable at standby mode, but also significantly reduces the standby power consumption. Please set the squelch level following 21 22 steps below: 1) Press [MODE] key and then tune [DIAL] knob to enter menu 05. And SQL is showed. 2) Press [MODE] key again to enter the menu. 3) Clockwise or counterclockwise rotate [DIAL] knob to select: 0/1/2/3/4 (usually set as 1, which is the best sensitivity point). 4) Press [MODE] key again to confirm after selected. 5) Press [PTT] key to save the new settings and exit to normal operating mode. 6. Busy channel lockout setting (BCLO) BCLO function is for prohibiting transmitter when there are other signals to prevent breaking other people's communications inadvertently. Please set it as following steps: 1) Press [MODE] key and then tune [DIAL] knob to enter menu 06. And BCLO is displayed. 2) Press [MODE] key again to enter the menu. 3) Clockwise or counterclockwise rotate [DIAL] knob to select: ON or OFF. 4) After selected, press [MODE] key again to confirm. 5) Press [PTT] key to save the new settings and exit to normal operating mode. 7. LIGHT--Background Light ON / OFF Selection 1) Press [MODE] key and then tune [DIAL] knob to enter menu 07. And LIGHT displays. 2) Press [MODE] key again to enter the menu. 3) Clockwise or counterclockwise rotate [DIAL] knob to select: ON / OFF. 4) Press [MODE] key again to confirm after selected. 5) Press [PTT] key to save the new settings and exit to normal operating mode. When "OFF" is selected, the backlight will automatically turn off as the transceiver is at Sleep mode. 8. SAVE -- Power-saving function The transceiver has a very important automatic power-saving receive function, which allows the radio to enter sleep state and wake up periodically to check and receive signal. If there is call in the channel, NF368 will stay at active status and then get back to sleep state after call finished. This feature can reduce battery consumption effectively. Following is the steps to activate the power-saving 23 24 function: 1) Press [MODE] key and then tune [DIAL] knob to enter menu 08. And SAVE displays. 2) Press [MODE] key again to enter the menu. 3) Clockwise or counterclockwise rotate [DIAL] knob to select: ON / OFF. 4) Press [MODE] key again to confirm after selected. 5) Press [PTT] key to save the new settings and exit to normal operating mode. (ON is to activate the power-saving mode: LCD " power-saving icon and the shows " transceiver will enter power-saving mode without signal receiving in 10 seconds at standby state. OFF is to turn off power-saving feature.) 9. KTONE – Keypad tone setting ON / OFF If the keypad tone causes inconvenience (especially operating in the quiet room), it can cancel easily as following steps: 1) Press [MODE] key and then tune [DIAL] knob to enter menu 09. And KTONE displays. 2) Press [MODE] key again to enter the menu. 3) Clockwise or counterclockwise rotate [DIAL] knob to select: ON / OFF. 4) Press [MODE] key again to confirm after selected. 5) Press [PTT] key to save the new settings and exit to normal operating mode. (ON is for activating the keypad tone, and LCD displays icon . OFF is to turn off keypad tone). 10. APO Automatically Power Off setting Automatically Power OFF (APO) function refers to the transceiver turns off automatically without any operation when there is no signal received in 30 minutes, which helps extend the battery life. Following is steps to start the APO function: 1) Press [MODE] key and then tune [DIAL] knob to enter menu 10. And APO displays. 2) Press [MODE] key again to enter the menu. 3) Clockwise or counterclockwise rotate [DIAL] knob to select: ON / OFF. 4) Press [MODE] key again to confirm after selected. 5) Press [PTT] key to save the new settings and exit to normal operating mode. 11. TOT – Time Out Timer Time Out Timer (TOT) feature is to limit the continuous launching over time by a safety switch. 25 26 Please follow below steps to activate TOT function: 1) Press [MODE] key and then tune [DIAL] knob to enter menu 11. And TOT displays. 2) Press [MODE] key again to enter the menu. 3) Clockwise or counterclockwise rotate [DIAL] knob to select: ON / OFF. 4) Press [MODE] key again to confirm after selected. 5) Press [PTT] key to save the new settings and exit to normal operating mode. 12. VOX – Voice-operated Setting VOX function allows launching by voice only without pressing PTT key and launching stop automatically once speak stops. Following is VOX setting process: 1) Press [MODE] key and then tune [DIAL] knob to enter menu 12. And VOX displays. 2) Press [MODE] key again to enter the menu. 3) Clockwise or counterclockwise rotate [DIAL] knob to select: ON / OFF. 4) Press [MODE] key again to confirm after selected. 5) Press [PTT] key to save the new settings and exit to normal operating mode. Note: 3 = high sensitivity, which is used when there is only low background noise. 2 = Medium sensitivity, which is used in most situations. 1 = low sensitivity, which is used in situation with high background noise. 13. POWER -- Power Selection Power of NF-368 can be set as high or low power according to actual using range and surrounding to reduce battery consumption. Following is process of high and low power settings: 1) Press [MODE] key and then tune [DIAL] knob to enter menu 13. And POWER displays. 2) Press [MODE] key again to enter the menu. 3) Clockwise or counterclockwise rotate [DIAL] knob to select: ON / OFF. 4) Press [MODE] key again to confirm after selected. 5) Press [PTT] key to save the new settings and exit to normal operating mode. (HIGH refers to high-power 2W, and LOW refers to low-power 0.5W. When LOW is selected, the ). LCD displays icon 14. HLF DEV -- Wide / Narrow band selection 27 28 In many areas, the required channel spacing is very small, which need to reduce the modulation bandwidth of launching to avoid interference to adjacent channels. Please adjust settings following steps below: 1) Press [MODE] key and then tune [DIAL] knob to enter menu 14. And HLF DEV displays. 2) Press [MODE] key again to enter the menu. 3) Clockwise or counterclockwise rotate [DIAL] knob to select: ON / OFF. 4) Press [MODE] key again to confirm after selected. 5) Press [PTT] key to save the new settings and exit to normal operating mode. (ON is to turn on narrowband 12.5KHz, and OFF is to activate wideband 25KHz. When OFF is selected, there is a W icon display on the bottom left corner of the LCD.) X. Other features and settings 1. Channel memorization: A) Conventional channels memorization, numbered from 01-99. channel), No. 00. Channel memorizing steps are as follow: 1) At VFO mode, select the required frequency, as well as setting the required CTCSS and DCS. 2) Hold the [MR] key for 2 seconds till display channel 00-99 flashes on the LCD. And then rotate [DIAL] knob and select a channel among 00-99 channels. 3) Press [MR] key again to store frequency and other data into the channel. 4) It is still working at the frequency mode (VFO) at this time. Meanwhile, repeating above steps to input another frequency and save it to other channels. (Note: To launch and receive different frequency needs to programmed with Frequency Programmed Software) 2. Emergency channel operations (emergency calling function) NF-368 is built-in a very useful “emergency call" B) One special memorized channel (emergency 29 feature. Hold the [F] key for over 1 second and the 30 "emergency call" function can be activated. At this radio mode. time: ƾ At FM radio state, walkie-talkie function retains A) The radio switch to the most commonly used priority always, which means FM radio function channel (OO-channel) to launch. exits B) The red indicator light flashes. communication once there is same frequency signal C) The radio releases loud alarm sound. received at FM radio receiving mode. D) This function can be turned off by pressing ƾ At FM radio frequency mode: FM radio channel launch button. memorizing mode can be entered by pressing [MR] When come across danger while walking automatically and turns to transceiver key (there is 15 stored channels) outdoors, this function allows alarming to the ƾ FM Radio Scanner family quickly. Loud alarm sound may set back ķ Scanning frequency: at FM radio frequency mode, attack from gangster and avoid hurt. press [F] key and then [V / M] key is for whole 3. FM Radio (FM) frequency scanning: start from the current frequency 1) Hold [MONITOR / FM] button once for over 2 to scan the whole frequency range. Clockwise rotate seconds to enter FM radio receiving mode. the encoder to scan from low to high and 2) Rotate [DIAL] knob to tune the frequency (the anti-clockwise rotate to scan in descending order. It frequency range is among 87.5 ~ 108.0MHz, and stays when there is signal scanned. Rotate the step is 100KHZ). encoder to continue to scan up or down, and press 3 ˅ Hold the [MONITOR/FM] key for over 2 any key to exit. seconds again or press [PTT] button to exit FM ĸ Channel scanning: at FM radio frequency mode, 31 32 press [V / M] key once to enter channel state. And 3. Please don’t put the transceiver in sun or hot place press [F] and [MR] keys to enter channel scanning. for long time, because the high temperature will Clockwise rotate the encoder to scan channels from shorten use life of electronic parts and cause low to high and anti-clockwise rotate to scan in distortion to plastic parts. descending order. It stays when there is signal 4. Please keep the transceiver dry, because rain and scanned. Rotate the encoder to continue to scan up moisture will erode the electronic circuits. or down, and press any key to exit. ƾ radio-channel memorizing (The same as transceiver channel memorization) 5. Please power off the transceiver and remove its ƹ Maintenance battery pack immediately once there is peculiar smell or smog emit from the device. ƹ Troubleshooting Transceiver NF-368 you purchased is an exactitude Trouble design electronic products and please use it carefully. Following maintenance ways may help extend its lifetime. No power 1. Please don’t try to disassemble the transceiver because non-technicians’ processing may cause damage to the device. 2. To use stable power supply, please connect the specified USB cable to the DC jack of the transceiver. 33 The battery used out soon after recharged. Unable to talk with Solution z The battery pack has been exhausted. Please change a new battery or recharge the battery. z The battery pack may be not installed correctly. Please install it again. z The use-life of the battery is over, please change new battery. z Please check the 34 other members in the same group. Other (not from group members) sound heard in channels. frequency and CTCSS/DCS you use are the same as other members use in the same group. z The distance between you and other group members may be too far. Please check if you are in the cover range of other group transceivers. z Please change your CTCSS/DCS NO. And it has to change all signal sound of the group transceivers. 35