1
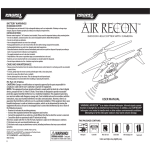
TRIM YOUR SKYWRITER UFO:
Based on the speed of flight, the scrolling direction and speed of the words will need to be
adjusted for easier viewing. It is always easier to view the words when the UFO is hovering
at a constant height and speed. To adjust the text speed, press the "◄" or "►" buttons
accordingly. If the word is scrolling too quickly to the right, tap the "◄" button until the desired
scrolling speed is attained. If the word is scrolling too quickly to the left, press the "►" button
until the desired scrolling speed is attained.
IMPORTANT: YOUR SKYWRITER UFO is extremely sensitive to throttle movements.
When flying your SKYWRITER UFO always make small, smooth, slow, consistent
movements up or down on the throttle stick. Try not to use quick and jerky
movements on the throttle as this will cause the SKYWRITER UFO to fly out-ofcontrol.
TROUBLESHOOTING
PROBLEM
SOLUTION
SKYWRITER UFO
does not respond to
controller
1) Make sure the SKYWRITER UFO is fully charged and the batteries in your controller are new
2) Turn your controller and SKYWRITER UFO off and then on again to reset the connection between
the two devices.
3) Make sure there is no signal interference caused by being outdoors, in direct sunlight or under an
intense light source like a spotlight, halogen light or track light directly over the toy and/or controller.
4) Make sure there is nothing blocking the infrared window on the controller and that no paint or decals
have been added to the SKYWRITER UFO body. This could result in signals being blocked.
UFO is flying
erratically or is unable
to achieve lift off
1) Make sure that the connecting rods are intact and not broken.
2) Make sure that no hair or carpet fiber is stuck in the metal rotor shaft or gears. If you find
hair carefully remove it with a tweezer. Never run or wash your UFO under water. See
Care and Maintenance instructions.
Controller POWER
LED LIGHT keeps
flashing
1) Push the throttle all the way up and then pull the throttle all the way down.
Low battery indicator
1) Simply change the batteries in your controller.
LIGHT keeps flashing
REPLACING CONNECTING ROD
There are four propeller
connecting rods on the upper and
bottom propeller.
Replacing connecting rod
Broken connecting rod
BATTERY WARNINGS
RECHARGEABLE BATTERY:
This UFO uses an internal Li-poly rechargeable battery that is not replaceable. If battery no
longer stays charged, dispose of battery properly according to local disposal requirements.
CONTROLLER BATTERIES:
Remote control requires 4 “AA” batteries (not included). Please read the important battery
safety warnings below.
• Do not mix alkaline, standard (carbon-zinc) and rechargeable batteries (Nickel Metal Hydride).
• Do not mix old and new batteries.
• Non-rechargeable batteries are not to be recharged.
• Rechargeable batteries are to be removed from the controller before being charged (if removable).
• Rechargeable batteries are only to be charged under adult supervision.
• Exhausted batteries should be removed immediately and must be recycled or disposed of
properly according to state or local government ordinances and regulations.
• The supply terminals are not to be short-circuited.
• Only batteries of the same or equivalent type as recommended are to be used.
• Batteries are to be inserted with the correct polarity.
• Do not dispose batteries in a fire-batteries may leak or explode.
THE SCROLLING MESSAGE HELICOPTER
CARE AND MAINTENANCE
• Always remove the batteries from the wireless infrared remote control when it is not being
used for an extended period of time.
• To clean, gently wipe the remote control and UFO with a clean damp cloth.
• Keep the toy away from direct heat or sunlight.
• Do not submerge the toy in water. This can damage the unit beyond repair.
• Parental guidance recommended when installing or replacing the batteries.
FCC Part 15 B Notice
CAUTION: Changes or modifications not expressly approved by the party responsible for
compliance could void the user’s authority to operate the equipment.
NOTE: This equipment has been tested and found to comply with the limits for a Class B
digital device, pursuant to Part 15 of the FCC Rules. These limits are designed to provide
reasonable protection against harmful interference in a residential installation. This
equipment generates, uses and can radiate radio frequency energy and, if not installed and
used in accordance with the instructions, may cause harmful interference to radio communications. However, there is no guarantee that interference will not occur in a particular
installation. If this equipment does cause harmful interference to radio or television reception,
which can be determined by turning the equipment off and on, the user is encouraged to try
to correct the interference by one or more of the following measures:
• Reorient or relocate the receiving antenna.
• Increase the separation between the equipment and receiver.
• Connect the equipment into an outlet on a circuit different from that to which the receiver is
connected.
• Consult the dealer or experienced radio/TV technician for help.
This device complies with Part 15 of the FCC Rules. Operation is subject to the following two
conditions :
(1) this device may not cause harmful interference, and
(2) this device must accept any interference received, including interference that may cause
undesired operation.
Proper connection
SKYWRITER UFO
TM
©2012 Rooftop Brands™ All rights reserved Patent Pending
Conforms to safety requirements ASTM, CPSIA and FCC.
Tel: + (1) 949-566-9573 • www.rooftopbrands.com
CHOKING HAZARD - Small parts.
Not for children under 3 years.
WARNING: SKYWRITER UFO™ is an indoor, infrared flying toy. Infrared signals cannot function in
daylight due to interference from the sun. In addition, your SKYWRITER UFO™ is not suited to
handle wind or other outdoor environmental conditions. Attempting to fly this toy outdoors may lead
to severe damage.
USER MANUAL
Please read this instruction manual as it contains valuable information
on how to properly fly and care for your SKYWRITER UFO.
Product may vary slightly from photograph
CHARGING THE UFO
UFO DIAGRAM
Stabilizer Bar
Connecting Rod
Main Rotor Blade
LED Lights
Charging
Socket
REMOTE DIAGRAM
Power
Switch
Landing Gear
The SKYWRITER UFO should be charged using the included USB cable only. Use the
included charging cable with either your computer or the included controller.
1. Make sure the SKYWRITER UFO power switch is set to the OFF position. All lights and
propellers should be off. Make sure the controller's power switch is set to OFF as well.
2. Connect the round charging pin on the included USB charging cable to the socket on
the side of the SKYWRITER UFO (See diagram B).
3. With Computer: Plug the open end of the USB cable into an open USB port on your
computer. Make sure your computer is turned on to begin charging.
With Controller: If using controller to charge, the open end of the USB cable should be
plugged into the USB socket at the base of the controller (See diagram B). Turn on the
controller to begin charging (See diagram C).
4. The USB plug lights red when charging is complete. During charging, the USB plug
does not light up. (See diagram D).
USB charging time may vary depending on the amount of charge needed to fill the
SKYWRITER UFO battery. The average TRIM
USB charging time is about 20 minutes.
ENTER
LEFT
RIGHT
A-Z,SPACE
SYMBOL
Infrared Transmitter
AUTO
OFF - ON
Red LED light will
appear on USB
when SKYWRITER UFO
is charged
Slide
Show
Mode
Word/Trim Control
TRIM
ENTER
AUTO
Power
Indicator
Light
LEFT
RIGHT
OFF - ON
A-Z,SPACE
SYMBOL
PREPARATION
• Verify that there are 4 “AA” batteries inside the infrared remote control unit (see
diagram A) and that the SKYWRITER UFO has been fully charged.
• Make sure your SKYWRITER UFO is turned ON.
• Make sure the room has no obstacles and the highest ceiling possible.
NOTE: ONLY ONE UFO CAN FLY IN THE SAME ROOM AT THE SAME TIME
FLYING YOUR SKYWRITER UFO
TAKING OFF: There are two ways to safely launch your SKYWRITER UFO. Though it is
recommended to always launch your product by placing it on a smooth, level surface, you
may also launch it safely from your hand. See Diagram E below. Be sure to keep the blade
system clear of your fingers or anything else before flying.
LCD Screen
Program
Mode
5. RESET Memory:
The user can Reset the memory and Blank all stored entries. To do this, make sure the
controller and UFO are both in the OFF mode. Holding down the SLIDES key, now turn
ON the controller. The LCD screen will flash rapidly between "RESET" and "Y / N". Press
the "◄" button to select "Y" and Reset the memory. Pressing the "►" button will select
"N" and cancel the Reset action.
6. LOW BATTERY INDICATOR LIGHT:
The low battery indicator light located on the right side of the throttle button will notify you
when it is time to change the batteries. If the battery power becomes too low, a flashing
RED LED indicator light will appear. If this happens simply change the batteries in your
controller.
Diagram B
HOW TO USE THE CONTROLLER
Low Battery Indicator Light
Power ON/OFF
AA
AA
AA
Throttle
AA
Battery Compartment
(4 “AA” batteries)
Diagram A
CONTROLLER BATTERY
INSTALLATION
Diagram D
NEVER USE ANY OTHER USB CABLE OR ADAPTER TO CHARGE YOUR SKYWRITER UFO
AS THIS MAY DAMAGE YOUR BATTERY AND SHORTEN THE LIFE OF THE PRODUCT.
Character/Word Scroll
USB Charging Port
Diagram C
1. Remove the battery cover from the remote control.
2. Install 4 new “AA” alkaline batteries (see diagram A).
3. Replace the battery cover.
• Verify that there are 4 “AA” batteries inside the infrared remote control unit (see diagram A).
1. Switch ON the controller. The Green POWER Indicator should flash. Push the throttle all
the way up and then slide it all the way down. The Green POWER Indicator should now
glow in a solid GREEN. This indicates that the controller is ready for flight.
Note: Upon turning ON the controller, a quick BOOTUP display will show on the LCD
screen. This should last for one or two seconds and is normal.
2. Editing functions:
Your SkyWriter UFO can store up to 20 entries (words), with each entry being up to 7
characters long. (Actually, since spaces are also allowed, you could have more than
one word per entry, such as “BIG DOG”.)
Use the "▲" and "▼" buttons to select which entry to edit. A number at the bottomcenter of the displays shows the number of the entry. When you reach the entry (word)
number you wish to edit, press the PROGRAM button once to enter the Program
Mode. The first character of the entry will display a flashing cursor. Use the "▲" and
"▼" buttons to select the desired character, and the "►" and "◄" to move to the next or
previous character of the current entry. Press the PROGRAM button again to save your
changes to this entry and exit Program Mode.
Character sequence is: “A - Z”, “0-9”, “+ - × ÷ = !? \ \ / / _ / ◄ ► (space)”
3. BLANK Mode allows you to Erase the current word. First make sure you are in
Program Mode; you should see a flashing cursor. Next, hold down the "◄" button for
two seconds. The LCD Screen will flash rapidly between "BLANK" and "Y / N". Press
the "◄" button to select "Y" and delete the current entry. Pressing the "►" button will
select "N" and cancel the Delete action.
4. SLIDE SHOW Mode:
In Slide Show Mode, the UFO will automatically switch between entries every 5 seconds,
starting with the currently selected entry. The controller's LCD will also show display the
entries in sync with the UFO's display. Use this feature to sequentially display entire
phrases or sentences.
NOTE: The slide show will start over upon encountering the first blank entry, regardless
of whether there are non-blank entries after the blank one.
To activate Slide Show Mode, be sure you are not in Program Mode and press the
AUTO button. The entry number will blink. To exit Slide Show Mode, press the AUTO
button again. The entry number will stop blinking.
CORRECT
INCORRECT
FLAT SURFACE - OK
CARPET IS NOT OK
Diagram E
HOVERING YOUR SKYWRITER UFO:
Start to fly your SKYWRITER UFO by slowly and consistently pushing upward with your
thumb on the center throttle stick. This will cause your SKYWRITER UFO to ascend. Slowly
pushing down with your thumb will cause your SKYWRITER UFO to descend. Practice
hovering in the center of the room by making small up/down adjustments on your throttle
stick. Remember practice makes perfect!
TRIM
ENTER
AUTO
LEFT
TRIM
RIGHT
A-Z,SPACE
SYMBOL
OFF - ON
Move the throttle control UP to increase
the speed of the main rotor blade and the
SKYWRITER UFO will ascend.
ENTER
AUTO
LEFT
RIGHT
A-Z,SPACE
SYMBOL
OFF - ON
Move the throttle control DOWN to
decrease the speed of the main rotor and
the SKYWRITER UFO will descend.