1
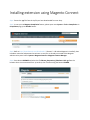
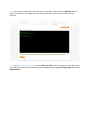
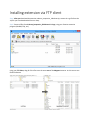
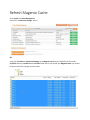
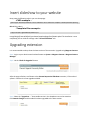
User’s manual Magento extension eDream RESPONSIVE SLIDESHOW eDream Market www.edreamag.com [email protected] CONTENTS About extension ...............................................................................................................................................3 Features Highlights ...........................................................................................................................................4 Compatibility ....................................................................................................................................................4 Extension Support and installation service ......................................................................................................4 Package structure .............................................................................................................................................5 Installing extension using Magento Connect ....................................................................................................6 Installing extension via FTP client .....................................................................................................................8 Refresh Magento Cache ...................................................................................................................................9 Insert slideshow to your website ....................................................................................................................10 Upgrading extension ......................................................................................................................................10 Uninstalling extension ....................................................................................................................................11 Adding Slides ..................................................................................................................................................12 Reset Slide Data ..............................................................................................................................................12 Add Slide – General Information ....................................................................................................................13 1. Slideshow Settings > Configuration ........................................................................................................13 1.1 General Settings ..................................................................................................................... 13 1.2 Thumbnails Settings ................................................................................................................ 14 1.3 Loader Settings....................................................................................................................... 14 1.4 Appearance Settings ............................................................................................................... 14 2. Slideshow Settings > Mobile Configuration ............................................................................................16 3. Slideshow Settings > Caption Configuration ...........................................................................................16 TROUBLESHOOTING .......................................................................................................................................17 eDream Responsive Slideshow is a full Responsive Magento professional extension, that supports HTML5 / CSS3, for big businesses or presentation sites / portfolio. Extension uses the newest programming technics, technologies and is compatible with most of the present mobile platforms. It is optimized to perfectly operate on touch screen devices. It is a Premium Responsive Magento extension with powerful advanced admin panel and unlimited colors, extremely customizable, easy to use and fully responsive. You can change the visual appearance of every pixel of the design, the sky is the only limit. eDream Responsive Slideshow comes with touch navigation for mobile devices. With eDream Responsive Slideshow, you can make a mark of color and professionalism for your store. Responsive Slideshow will operate without problems reducing or enlarging the slideshow images without cropping them as other available slideshows do. eDream Responsive Slideshow will always have the perfect resolution, both on desktop / laptop, and on any tablet or iPhone/iPad/Android mobile device. Also, our slider is ready for touch function, so that with the help of your fingers you will navigate through all the images of the slide. On desktop / laptop you can navigate also with the help of the arrows left / right from the keyboard. You will be able to create your own style very simply using the advanced interface of slideshow administration, containing more than 600 Google Fonts, very many effects of movement and graphics. This way the slider will be unique and will powerfully impress the site visitors. An image is worth a thousand words. How would it be if we add to this image a text formatted with a quality font, specially colored and with an effect applied on it and a link to the detailed information? eDream Responsive Slideshow does that: it adds an infinite number of images with which you will better represent the profile of your business. Due to the image manager you can sort and arrange as you like, each image you can add a text, special effects, color, links etc. Also, in the slideshow administration interface you will find a great many settings, you can differently configure the style of the desktop slider and another one for the mobile devices. Features Highlights Easy to install and easy to use 100% Magento Community Edition 1.4.x - 1.8.x compatible Fully Responsive Layout HTML5 CSS3 Unique admin panel with configurable options and features Unlimited colors Unlimited images slideshow Touch navigation for mobile Touch Swipe Support for Mobile Devices Keyboard Navigation – Navigation throughout the slides with the help of left / right keys Option to enable / disable Thumbnails Two Thumbnails Style: Bullets or Pagination Option to show / hide Thumbnails NEXT and PREV Arrows Ability to choose Thumbnails Wrapper Width 600+ Google Web Fonts Cross browser compatible Easily Customizable Enable or Disable jQuery Add anywhere you like Home Page only or in All Pages Custom background textures 33 different colors for the icons A lot of effects and animations Ability to link each and every image to any website or URL Option to set caption for each image No core files changed or modified! Well documented, full installation and configuration guide included! Excellent FREE support And more… Compatibility This extension supports Magento Community Edition 1.4.x (1.4.0.0, 1.4.1.0, 1.4.2.0), 1.5.x (1.5.0.1, 1.5.1.0), 1.6.x (1.6.0.0, 1.6.1.0, 1.6.2.0), 1.7.x (1.7.0.0, 1.7.0.1, 1.7.0.2), 1.8.x as there are NO modifications in core files. And we make sure it will work with any future Magento releases. Extension Support and installation service Please use our support system if you have any questions about extension, but make sure that you have read latest theme documentation. We provide Magento and extension installation service for extra cost. Package structure edream_responsive_slideshow.zip • Edream_Slideshow-1.0.3.tgz - extension files; o app folder o js folder o skin folder • Edream_Resposive_Slideshow.pdf - documentation files for current package; • license.txt – License file; Installing extension using Magento Connect Step1. Extract the .tgz file from the zip file you have downloaded from our shop. Step2. In case you use Magento Compilation feature, please open menu System > Tools > Compilation. In Compilation page, press Disable button. Step3. Refer to http://www.domain.com/downloader/. (‘domain’ - URL where Magento is installed), then introduce username and password to connect. In case you are already connected to the Magento administration panel select: System > Magento Connect > Magento Connect Manager. Step4. Press button BROWSE and select the file Edream_Responsive_Slideshow-1.0.3.tgz from the location where it was extracted from .zip archive, then continue using the button UPLOAD. Step5. Wait until the upload and install processes are completed. Then press button REFRESH that will appear on the bottom of the page under the command line after the successful installation of the extension. Step6. Go to www.domain.com/admin or press “Return to Admin” from the upper part of the page. If you are already connected to the administration panel of Magento please log out and login again. Now refresh Magento Cache. Installing extension via FTP client Step1. After you download the extension edream_responsive_slideshow.zip, extract the .tgz file from the .zip file you have downloaded from our shop. Step2. Extract all files from Edream_Responsive_Slideshow-1.0.3.tgz, using your favorite extraction program (WinRAR, 7Zip, etc). Using your FTP client, drag all of the files onto the store root of the Magento instance. In this case we use FileZilla software. Refresh Magento Cache Go to System ->> Cache Management Click on the “Flush Cache Storage” button OR Using your FTP client or cPanel File Manager go to Magento root directory and delete all files inside var/cache directory. Do NOT delete var/cache folder. When you refresh your Magento Cache, you should be able to see all the changes you have made. Insert slideshow to your website Now, paste the following code in your cms homepage: -CMS example – {{block type="slideshow/slideshow" name="slideshow" alias="slideshow" template="edream/slideshow.phtml"}} OR add this code in -Template files example - <?php echo $this->getChildHtml('slideshow')?> In app/design/frontend/default/yourtheme/template/page/html/header.phtml The installation is now completed, you can view the settings under “eDream Slideshow” tab. Upgrading extension It is recommended to always have the latest version of the extension. Upgrade using Magento Connect. Step1. Log in to your administrator backend browse to System > Magento Connect > Magento Connect Manager. Step2. Hit the ‘Check for Upgrades’ button. After the page refreshes, scroll down to the eDream Responsive Slideshow extension, it’ll be marked yellow in case there’s a new upgrade available. Step3. Select the “Upgrade to ...” latest stable version in the dropdown next to the extension. Click Commit Changes and the module has been upgraded to the latest version. Uninstalling extension Step1. Log in to your administrator backend browse to System > Magento Connect > Magento Connect Manager. Step2. Scroll down to the eDream Responsive Slideshow extension and select ‘Uninstall’ button from the dropdown box. Step3. Hit the Commit Changes button. Alternatively, prevent Magento from loading the extension by changing the active tag from “true” <?xml version="1.0"?> <config> <modules> <Edream_Slideshow> <active>true</active> <codePool>community</codePool> </Edream_Slideshow> </modules> </config> to “false” <?xml version="1.0"?> <config> <modules> <Edream_Slideshow> <active>false</active> <codePool>community</codePool> </Edream_Slideshow> </modules> </config> in the following file: app/etc/modules/Edream_Slideshow.xml *It is not recommended to alter or delete database tables. Adding Slides You can use as many images you like because eDream Responsive Slideshow will accept an unlimited number. In order to add / edit or delete the slides select eDream Slideshow > Manage Slides from the menu up the administration page of Magento. The accessed page will contain a grid with existent slides. In order to add a new slide, you should press button Add Slide, then in field Image press button Browse, select desired image from your computer. We will use the buttons Save Slide or Save and Continue Edit to upload the image in server. Reset Slide Data In case you have incorrectly introduced a data or you want to delete all the data added in slide press button RESET from the top of the page. Add Slide – General Information Data Alignment – data alignment introduced in slide will be done according to the chosen position. Available values: 'topLeft', 'topCenter', 'topRight', 'centerLeft', 'center' , 'centerRight', 'bottomLeft', 'bottomCenter', 'bottomRight', 'none'; Slide Text – will contain information displayed on slide, the introduced text can contain html and css elements; Slide URL - is web address of destination for the slide. URL Target - ‘_blank’, ’_new’, ‘_parent’, ‘_self’, ‘_top’, the target values for the Slide URL; Text Effect - is the effect that will be used when the slide will be displayed: 'moveFromLeft', 'moveFomRight', 'moveFromTop', 'moveFromBottom', 'fadeIn', 'fadeFromLeft', 'fadeFromRight', 'fadeFromTop', 'fadeFromBottom'; Slide Image – main image of the slide; Slide Thumbnail – miniature of the slide; Status – will be set up with ‘enabled’ – for slide display and with ‘disabled’ – for deactivation; Sort Order – slides display order (ex.: in order to display the slide in the second position you should introduce digit 2); 1. Slideshow Settings > Configuration 1.1 General Settings Enabled Slideshow – ofers the possibility to activate or deactivate the extension at global level. If option will be set up with No – all defined slides will be stopped and the extension will not be uploaded into the sistem; Enabled jQuery – extension uses jQuery library. If you have installed more than one extensions using jQuery, a conflict will be inevitably created amidst. To avoid it we can choose Disable, and jQuery will not be uploaded into the system; Show on – will indicate the place of slideshow display. If “HomePage Only” is set up, the slideshow will be displayed only on the front page. To display slideshow in all pages of the site select option “All Pages”; Skin – you can select the global color of display of the slideshow buttons. Ex.: If you will select Red Skin, the buttons: Next, Prev, Play, Pause will have the red color; Height – represents the global height of slideshow. Here you can type pixels (for instance '300px'), a percentage (relative to the width of the slideshow, for instance '50%') or auto; minHeight – is the minimum height of slideshow. For example, if minHeight will be 100px when you will resize the browser, the slideshow images will be automatically resized until the height of 100px; 1.2 Thumbnails Settings Thumbnails – enable / disable slideshow thumbnails; Thumbnails Style – choose between two predefined styles: Bullets or Pagination; Thumbnails Wrapper Width – is the width of the thumbnails container, you can type pixels (for instance '300px'), a percentage (relative to the width of the slideshow, for instance '50%') or auto; Thumbnails Wrapper Left – move wrapper from left with eg. 10px or 5%; Next / Prev Arrows – enable / disable thumbnails arrows; Thumbnails Wrapper Position – choose position of thumbnails container. Available options: inside and outside; Thumbnails Wrapper Alignment – align thumbnails container to the top or bottom; Thumbnails Wrapper Color – change thumbnails container background color, in order to define the color click on the indicator from the right, then select the favourite color from the color panel displayed or you can just type the desired color. eg.: ‘rgb(255,255,255)’, ‘#FFF’; 1.3 Loader Settings Enable Loader – is an indicator that will display the time left until display of following slide. To activate the indicator we will set up Yes and No for deactivation; Loader Type – the indicator is of two types: Bar or Pie, we can choose any of the two according to our wish; loader Bar Position – you can choose the position of the indicator Bar in slideshow. Available options: left, rigt, top, bottom loaderStroke – is the loader’s thickness, this thickness will be used both for the Pie type of indicator and for Bar, the value must be less than a half of the pie diameter. Example of configuration - loaderStroke: 5, do not use other indicators as px, %, vm because you risk malfunction of the slideshow; loaderPadding - how many empty pixels you want to display between the loader and its background, value must contain pixels. Example of configuration – loaderPadding: 2px; pieDiameter – diameter of pie loader. Example of configuration – pieDiameter: 35; piePosition - select the position of pie loader. 'rightTop', 'leftTop', 'leftBottom', 'rightBottom'; loaderOpacity - select opacity of loader; Bar Direction - select direction of bar loader; loaderColor – in order to define the color of the loader click on the indicator from the right, then select the favourite color from the color panel displayed or you can just type the desired color; loaderBackground Color - in order to change the background color of the indicator we will use the same procedure as in loaderColor;1.4 Appearance Settings 1.4 Appearance Settings Time – is the total time of one slide display. You will be able to introduce de duration of display in miliseconds. Example of configuration – time: 7000; transPeriod – is the maximum duration of display of effects applied on a slide, the value will be introduced in miliseconds. Example of configuration – transPeriod: 500; gridDifference - to make the grid blocks slower than the slices, this value must be smaller than transPeriod. Example of configuration – gridDifference: 250; opacityOnGrid - apply a fade effect to blocks and slices; FX effect – apply effects to the slideshow. The effect will be visible at slides emergence. You can also use more than one effect. In order to select multiple items, you must Ctrl-Click (or Cmd-Click on Mac) items to add them; Image Alignment – if the images from the defined slides will not have the same size, than this option will be automatically activated and will display the images according to the chosen alignment; autoAdvance – if we will select “Yes” the defined slides will automatically run (auto-sliding), if we select “No” then slides ongoing will be made manually using the buttons next / prev; Show Next/Prev - if 'Yes' the navigation button (prev, next and play/stop buttons) will be visible, if 'No' they will be always hidden; navigationHover - if 'Yes' the navigation button (prev, next and play/stop buttons) will be visible on hover state only, if 'No' they will be visible always; playPause - Yes' or 'No', to display or not the play/pause buttons; pauseOnClick - It stops the slideshow when you click the sliders; Pagination - select the desired pagination; Portrait - select 'Yes' if you don't want that your images are cropped; Easing - for the complete list click here; Columns Number - number of columns in the image animation; Rows Number - number of rows in the image animation; slicedCols Number - number of slicedCols in the number of columns you entered. if 0 the same value of Columns Number; slicedRows Number - number of slicedRows in the number of row you entered. if 0 the same value of Rows Number; Overlayer - decide to put a layer on the images to prevent the users grab them simply by clicking the right button of their mouse; Pattern – in order to create a unique style of the slide, you can apply a pattern on it. Select one of the 10 available models. If you do not want a pattern applied on the image of the slide select “no pattern”; 2. Slideshow Settings > Mobile Configuration mobileAutoAdvance – if “Yes”, then the defined slides will automatically run (auto-sliding), if “No” the slides will run manually using buttons next / prev; mobileFx – apply effects on the slideshow. The effect will be applied only on the mobile devices at the slides’ display. Also, you can use more than one effect. In order to select multiple items, you must Ctrl- Click (or Cmd-Click on Mac) items to add them. A Touch Swipe effect will be obtained for the mobile devices with Touch function, selecting option scrollHorz; mobileEasing – for the complete list click here; mobileNavHover - if 'Yes' the navigation button (prev, next and play/stop buttons) will be visible on hover state only, if 'No' they will be visible always; 3. Slideshow Settings > Caption Configuration Enable Caption - if you select option No all the Caption settings will be stopped at global level. You can create your own style using HTML and CSS elements; Google Font - If choose disable option a default website font will be used; Font – in order to stylize the texts use one of the 600 and more of predefined Google fonts; Font Size - Recommend using the vw (viewport) unit, for your text Font Weight – refers to the thickness of the displayed letter. Caption Width - example: 50%. Recommend using the % (percent) unit, your caption remains fully scalable for mobile devices and for accessibility; Caption Text Color – color of the texts in Caption; Caption Background Color – background color on which the texts will be displayed; Caption Opacity – opaqueness of the Caption background; TROUBLESHOOTING Here you will find useful tips for the most frequently asked questions. EDREAM RESPONSIVE SLIDESHOW IS NOT DISPLAYED Check in System > Configuration > Slideshow Settings if option Enabled Slideshow is YES; Check in System > Configuration > Slideshow Settings if option Enabled jQuery is YES. ATENTION in case you use other extensions besides eDream Responsive Slideshow, there is a possibility for them also to use jQuery libraries, which will lead to an inevitable conflict. In this case you can set up Enable jQuery to No; Check if there are any images of the slides and if the upload of the images is correctly done; Check if the code is correctly introduced in the header. phtml or in CMS Homepage; EDREAM RESPONSIVE SLIDESHOW HAS NO NORMAL SIZE Check Height field in System > Configuration > Slideshow Settings; THE FUNCTION SWIPE DOES NOT OPERATE ON THE MOBILE DEVICES Check in System > Configuration > Mobile Configuration if mobileFx is scrollHorz; I'M GETTING A 404 ERROR You need to Log Out from admin and Login again to refresh access control system in admin.