1
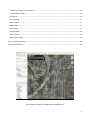
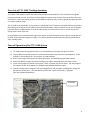
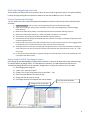
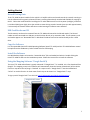
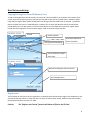
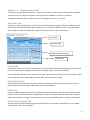
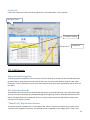
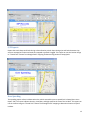
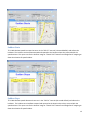
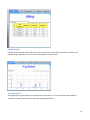
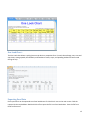
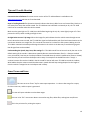
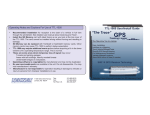
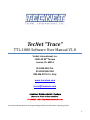
TecNet “Trace” TTL‐1000 Software User Manual V1.0 TecNet International, Inc. 11535 W 83rd Terrace Lenexa, KS 66214 913‐859‐9515 Tel. 913‐859‐9550 FAX 800‐456‐2071 U.S. Only www.tecnetusa.com [email protected] American Communication Systems Discover the Power of Communications ™ TO ORDER – VISIT http://www.ameradio.com This manual assumes general working knowledge of Microsoft® Windows® Operating System. 1 Table of Contents Table ...................................................................................................................................................................... 2 Overview of TTL‐1000 Tracking Operation ................................................................................................................ 4 General Operation of the TTL‐1000 System .............................................................................................................. 4 TTL‐1000 Main Screen ........................................................................................................................................... 5 Select Drive Section ............................................................................................................................................... 5 Select Report Period .............................................................................................................................................. 5 File Folder/Magnifying Glass Icon ......................................................................................................................... 6 Screen Controls and Settings ................................................................................................................................. 6 Using Google Earth® Trip Image Feature .............................................................................................................. 6 Getting Started .......................................................................................................................................................... 7 Record Driving Data ............................................................................................................................................... 7 USB Card Reader and PC ....................................................................................................................................... 7 Copy the Software ................................................................................................................................................. 7 Install the Software ............................................................................................................................................... 7 Using the Mapping Software “Google Earth”® ...................................................................................................... 7 Hard Drives and Setup ............................................................................................................................................... 8 Copying Driving Data From SD Memory Card ....................................................................................................... 8 Registration ........................................................................................................................................................... 8 Register or… “Register and Format” ..................................................................................................................... 9 The Delete Tab ....................................................................................................................................................... 9 Setup Menu ........................................................................................................................................................... 9 Setting Work Dates ................................................................................................................................................ 9 Folder Tab .............................................................................................................................................................. 9 The External Program Tab ..................................................................................................................................... 9 Locale Tab ............................................................................................................................................................ 10 TTL‐1000 Reports ..................................................................................................................................................... 10 Reports From Driving Data .................................................................................................................................. 10 O.R. (Operation Record) ...................................................................................................................................... 10 2 “Thumb Tack” Map Location Feature.................................................................................................................. 10 Traveled Routes Report ....................................................................................................................................... 11 S/P Reports .......................................................................................................................................................... 12 Over Speeding ..................................................................................................................................................... 12 Sudden Starts....................................................................................................................................................... 13 Sudden Stops ....................................................................................................................................................... 13 Idling Report ........................................................................................................................................................ 14 Average Speed ..................................................................................................................................................... 14 One Look Chart – ................................................................................................................................................. 15 Exporting Excel Data ............................................................................................................................................ 15 Tips and Trouble Shooting ....................................................................................................................................... 16 Some Terms and Icons ............................................................................................................................................. 16 Typical satellite image of a trip depicted by Google Earth®. 3 Overview of TTL1000 Tracking Operation TTL‐1000 is a GPS satellite receiver that obtains GPS (Global Position Satellite) "fixes" (latitude and longitude locations) at timed intervals. These fixes are time and date stamped. They are then collected in files that can be copied to PC, saved, and used to generate several different report formats, as well as graphically depict locations on a map or satellite image. The TTL‐1000 is the "Black Box" for any vehicle. It records GPS “fixes” (locations) with date and time everywhere the vehicle goes as long as the TTL‐1000 is powered on and operating. There are options for the user to change how often fixes are obtained from 1 to 120 second intervals or to record "fixes" only on certain days or only during certain hours of the day. Driving records can be saved and used to generate reports of vehicle locations to verify that the vehicle was at a location, for business miles expense records, or to improve fleet driving efficiencies by studying speeds, starts, stops, and idle times. General Operation of the TTL1000 System 1) TTL‐1000 creates driving data and saves it to the SD Memory Card while the vehicle is driven. 2) Transfer data from the SD card to PC via USB connector/cable. Copy from the “removable disk” to the directory in the Hard Drive of a PC using the TTL‐1000 software. 3) Select a date range of driving data for report generation. TTL‐1000 software generates reports. 4) Select from different report formats by clicking on the report name tabs above the report screen. 5) To see a map image of a location in the report “check” a location line on the report. The map image of the location (Thumb Tack) appears in a Google® maps window beside the report. 6) To view a Google Earth® image of a trip, start Google Earth, click File/Open the dialog box, change the file selection to GPS (Gpx…), find the directory path of the “route” files (usually c:\Program Files\Trace\Export\GoogleEarth) Trip Image 4 TTL1000 Main Screen TTL‐1000 Screen File Menu/PC Icon Select Report Dates and Time Setup Menu/Gears Icon View Excel Files Print Report/Print Icon Google Earth® Link Select Drive View Google® Files ENTER Report Fix/Location “thumb tack” Select Drive Section The Select Drive allows selection of a drive to copy data from. Select SD to view or copy new data collected by TTL‐1000, HDD to select data from the hard drive to generate reports, or User Select to see a Directory Tree of all the PC drives and select other data directories (i.e. archived data from previous records). Select Report Period Use these select controls to set the range of dates used to generate reports. Menu Icons control menus as follows: 1) PC Image – File menu options including delete and user register options. 2) Gears Image – Setup menu used to set report parameters, constrain data collection times and dates, verify data folders, set locale info (time zone), and external program settings. 3) Printer Icon – Prints output from current selected report. 4) Google Earth Icon – Opens Google Earth® program. 5) Excel® Icon – Opens the Excel® folder storing all Excel® data export files. 6) Google® File Icon – Opens the Google® file folder storing all the Route files (GPX) used to display trip graphics. 7) Arrow Icon – Serves as the “Enter” button for generating reports from data date range selected. 5 File Folder/Magnifying Glass Icon The file folder Icon displays the current path for data retrieval in order to generate reports. This path and folder is where driving/tracking data are copied to a Hard Drive from the SD Memory Card in TTL‐1000. Screen Controls and Settings The TTL‐1000 screen uses conventional Micro Soft Windows® controls to operate the various available menus as follows: 1) Large Arrow Button serves as “Enter” key for generating reports from selected date ranges. 2) Single mouse clicks open the PC, Gears, and Printer Icons as well as the Google Earth®, Excel and Google Earth® file Icons. 3) Mouse clicks select the SD, HDD, or User Select drives and leaves a black dot indicating selection. 4) Mouse clicks select Report Periods as in Today, Last Week, Last Month, or User Select. 5) 3 Dot Buttons activate pop out windows with calendars for date selections. 6) Arrow Buttons activate drop down windows with hour selections. In the pop out calendars clicking the arrows scrolls through the months. 7) Scroll bar next to the report screen will scroll the screens in a report one full screen at a time. Dragging the bar to the bottom of the scroll bar will move the report screen to the end of the data. 8) The Google Earth® controls allow click and grab moving of the screen or 4 direction movement by clicking the arrows above the scale bar. The scale bar increases or decreases the map scale with clicks on the + or – ends of the scale. 9) In setup screens where data input is required, clicking in the space will leave a text cursor and allow for most conventional text edit functions. Using Google Earth® Trip Image Feature After signing up and downloading the Google Earth® software, a route can be depicted on map, satellite image, or hybrid of both from Google Earth®. The GPX data files created by TTL‐1000 software and stored in the Trace/Export/Google directory can be opened in Google Earth® to depict the route from the TTL‐1000. 1) Start Google Earth® program 2) Under “File” menu click “Open” 3) Change “File of Type” drop down menu to GPS (GPX …. Etc) 4) Select route file (dated in file name) to map 5) Google will plot the route on a map 6) Use Google controls to manipulate the map for details File Type Route and Date Change to File of Type GPX 6 Getting Started Record Driving Data If the TTL‐1000 has been installed in the vehicle it is helpful to drive and record several trip records. Learning to use the software will be greatly enhanced if there is tracking data already recorded and available for copying to the PC. Follow the Install Guide for installing the TTL‐1000. Make sure the unit has power (red light), and that it is initialized (solid green light). Drive the vehicle to create driving records. Several short trips with approximately 5 minute stops in between will be sufficient to make learning the software more effective. USB Card Reader and PC The SD memory card must be removed from the TTL‐1000 and inserted in the SD card reader. The SD card reader must be connected to a USB port on the PC either directly or by extension cable. The SD memory card and reader appear as a “Removable Disk” in Windows File Menus and can be read and used just like a hard drive. Copy the Software It is recommended that theTTL‐1000 Operating Software (Install TTL‐1000) and this TTL‐1000 Software manual be copied from the SD Memory Card to a hard drive for safe keeping. Install the Software Use MS Windows Explore to locate the “removable drive” (SD card reader)and select it. Double clicking the Install TTL‐1000 file will start the installation process. Follow the instructions to install the software. Using the Mapping Software “Google Earth”® The use of TTL‐1000 and software is greatly enhanced if “Google Earth” ® is installed. It is a free download from Google®. The mapping screen in the software will automatically show the location (thumb tack) of the vehicle fixes on a map when the Lat/Long is “checked” in a report screen. “Google Earth”® must be installed and “online” to use this function. A visual route of each trip can be shown in a “Google Earth”® map. To sign up with “Google Earth”® use this link: http://code.google.com/apis/maps/signup.html Google Earth® Screen 7 Hard Drives and Setup Copying Driving Data From SD Memory Card To copy tracking data from the SD memory card to the PC, select the SD drive in the Select Drive section of the screen, select the File Menu (PC Icon), and use the Copy tab to copy files to the hard drive. A hard drive (HDD Path) and the range of dates (Select Period) when the driving record was made must be selected. The default HDD is the path where the TTL‐1000 Software is installed. This is where the data files will be stored. Default Period (date) is current date (today). If the vehicle was driven on earlier dates that need to be copied, Select Period must be changed for the correct date range in order to select and copy that data. File Menu ‐ PC Icon SD Card Hard Drive/Path Driving Record Date Range Drop Down Window to Select Drive/Path. Pop Up Calendar to Select Date range File Menu ‐ PC Icon New SD Card Register and Format Only Normal Registration Registration The File Menu (PC Icon) has a tab for registration. Completing the ID and Name will register the SD Memory Card with the ID and User named. If more than one user were to use the same vehicle, additional SD cards could be formatted and used for the same TTL‐1000. Caution: The “Register and Format” function will delete all files on the SD Card. 8 Register or… “Register and Format” To complete the registration process with a “New Card” that did not come with the TTL‐1000 (has no software or data on it) use the “Register and Format” tab to format the SD Memory Card for TTL‐1000 use. To register an SD card that came with the unit use the “Register” tab only… then Finish. The Delete Tab Delete tab is used to delete data from the SD card that has already been copied to Hard Drive (HDD). Since the SD card will hold 1Gb of information (about 3650 hours or 5 months) the delete function is not needed often. The TTL‐1000 will visibly and audibly warn when only 10 hours space remains on the SD card. Setup Menu ‐ Gears Icon Vehicle MPG Fuel Price/Gal Sudden Start/Stop Setting s Speed Limit Setup Menu Selecting the “Gears” Icon will open a setup menu for setting vehicle information, recording days and times, file paths, time locale, external program and map key for Google® (may or may not be required). It is here that MPG and fuel cost can be entered. The O.R. report will then calculate $$ cost of each trip (or leg of the trip) based on miles traveled, MPG of vehicle, and cost of fuel entered in setup. Setting Work Dates Setting work dates will allow the unit to only record fixes during pre‐set hours on pre‐set days. The user can define the dates and times from the Work Dates tab in the Setup Menu. Folder Tab Folder tab indicates paths/file locations for all filing functions of the software. What drive the SD card is; What hard drive the TTL‐1000 data files are created/saved on; what drive and path the Excel report data is saved to; what drive and path the “Google®” files are saved to. User can use the default paths or change to other paths. The External Program Tab External program tab is the mapping program that provides the “map location” (thumb tack). In this package, Google Earth® is the External Program. 9 Locale Tab Locale tab is where the current time zone, gallons/liters, miles/kilometers, can be selected. OR Report Screen “Checked” Location Thumb Tack TTL1000 Reports Reports From Driving Data Once driving data is copied from the SD memory card to the hard drive, the data can be retrieved and used to generate reports. Select Report Period section of the screen is used to select the date range for each report. Clicking the “arrow” generates all report forms. Selecting the tab for each report type displays the full screen of the report. O.R. (Operation Record) The Operation Records reports start location and end location of each individual trip in the report date range. The start and end are date and time stamped. Mileage from beginning to end is calculated and cost based on vehicle mileage and fuel cost is calculated. There is a remark column shown that will allow for hand written comments if the report is printed. “Thumb Tack” Map Location Feature This feature requires “Google Earth”® to be installed and “online”. Each start or end line in the report can be “checked” (click anywhere on the line). The checked location is depicted on the “Google Earth”® map screen 10 (thumb tack). All reports that use lat/long locations will display the corresponding Google Earth® map location when the lat/long is checked (click on report line to see the location on the map). Traveled Routes Screen Traveled Routes Report Traveled routes reports a time and date stamped lat/long location as well as speed, and azimuth (direction) for each “fix” at the pre‐set intervals (1 – 120 sec). The default setting for fix intervals is every 10 seconds. The traveled routes report will show the date/time stamped location, speed, and direction of each 10 second interval. The GPS column indicates if the location is an actual fix or the previously taken fix. If the receiver loses signal under a bridge or in a tunnel, the receiver will store the last known location every 10 seconds until the receiver is able to obtain a new fix. This report will have a large number of entries depending on the length of the trip. Traveled routes data is used by Google Earth® to plot a graphic depiction of a trip. 11 S/P Reports Report that tracks Stops and Parks during a data collection period. Stops during trips and Parks between trips are time stamped at location and total time stopped or parked is logged. This report can use the location image or “Thumb Tack” feature from Google Earth® mapping for determining location of stops/parks. Over Speeding The speeding report collects incidents when the vehicle exceeds the pre‐set speed limit in Setup (Gears Icon – Report Tab). The report indicates location, time/date, and high speed at the time of the incident. This report can use the location image or “Thumb Tack” feature from Google Earth® mapping to determine location of speed incident. 12 Sudden Starts TTL‐1000 calculates speed increases that occur in the “GPS Fix” intervals (10 second default) and collects the incidents. The incidents are time/date stamped and reported at the location where they occurred with the speed variance. This report can use the location image or “Thumb Tack” feature from Google Earth® mapping to determine location of speed incident. Sudden Stops TTL‐1000 calculates speed decreases that occur in the “GPS Fix” intervals (10 second default) and collects the incidents. The incidents are time/date stamped and reported at the location where they occurred with the speed variance. This report can use the location image or “Thumb Tack” feature from Google Earth® mapping to determine location of speed incident. 13 Idling Report Indicates times stopped in traffic and other stops with durations at indicated dates and times. Ratio is time stopped idling compared to time driven each trip (between complete stops). Average Speed Average Speed is a graphic depiction of speeds over trip durations. It is not a calculated average speed. It indicates at a glance speed variations and those exceeding speed limit. 14 One Look Chart – The One Look chart allows a quick glance at trip data in a composite form. For each date mileage, cost, start and stop times, average speed, the Idle Ratio, and numbers of starts, stops, and speeding incidents that occurred during the trip. Exporting Excel Data Each report form can be exported to an Excel worksheet. Click the Excel Icon on the main screen. Find the report with the required date. Double click the file to open the file in an Excel worksheet. Save the file from Excel for future use. 15 Tips and Trouble Shooting Current Version of Software The most current version of the TTL‐1000 software is available on the www.tecnetusa.com web site as a free download. Gaps In Tracking Records The Operation Records indicates that the trip didn’t start until several feet, blocks, or a mile away from where the vehicle started. The TTL‐1000 was not initialized or oriented yet. Or, the TTL‐1000 could not see a satellite when the vehicle started. Make sure the green light on TTL ‐1000 is on solid before beginning the trip. Or, move slightly to get a fix. Then proceed on the trip when a solid greed light is seen. Straight Paths Across a Trip Image When the image of a path indicates that the vehicle moved straight across terrain where there was no road, the TTL‐1000 lost signal and indicated the path from last known location to the next known location as a straight line. This cannot be corrected. It is inherent in GPS systems. Making sure the TTL‐1000 is mounted in the best possible signal location in the vehicle is the best way to avoid missing signals. Not all signal loss can be avoided. Understanding the Speed, Stop, Start, Idle settings The TTL‐1000 records fixes at intervals set by the user or the default setting of 10 seconds. It determines speed by distance traveled between fixes (i.e. distance traveled every 10 seconds). Fast Start or Fast Stop incidents are created when the vehicle’s speed varies (faster or slower) more than the pre‐set level from the Report tab in setup. For example if the Sudden Start Set is 3 mph, a variance increase of more than 3 MPH in the 10 second fix interval will cause TTL‐1000 to record the incident. With Sudden Stop the variance would be a decrease in speed. Idle and Stop settings depend on the length of time the vehicle is stopped as set in the Report tab in Setup. Some Terms and Icons This Icon serves as “Enter” key for most report operations. i.e. select a date range for a report, click the arrow Icon, and the report is generated. This Icon will open calendars to select date ranges. This Icon is the “File” menus Icon. Menus are used to copy files, delete files, and register user/drivers. This is the print Icon for printing the reports. 16 This is the Google Earth® Icon. Clicking will go directly to Google Earth®. This Icon opens the Excel directory. Excel reports can be managed from this directory. This Icon opens a Google Earth® file directory where files created for Google Earth® maps are stored. These files can be managed or selected for Google Earth®. This Icon opens a directory tree of the hard drive where Trace (TTL‐1000) files are installed. GPS Fix The GPS fix is a location determination made by the TTL‐1000 based on timing from as many satellites as it can “see” (receive a signal from). TTL‐1000 uses the timing from each satellite and considerable mathematics to determine a geographic fix in latitude and longitude. These lat and long measurements can be accurately translated to maps and a location depicted. The TTL‐1000 can take as many as 1 fix per second. This is very quick by 10 years ago standards in GPS. It stores these fixes and uses them to generate the reports used in the software. Accuracy of Locations The accuracy of locations can vary. But, it is possible for GPS in general to achieve accuracy to 2 meters in certain conditions. Accuracy is largely dependent on the TTL‐1000 view of the satellites. The more satellites that can be received the more accurate the Fix. The TTL‐1000 can look at and process up to 20 satellites if they are visible on its horizon. Marginal Percentage Addition The marginal percentage addition (MPA) is a factor that can be used to adjust for elevation of roadways that GPS mileage calculations do not allow for. For example, the distance between two points in GPS terms may be 5 miles. But, the distance traveled up and down a mountain in between the two points could be 5.5 miles on the odometer in the vehicle. The MPA can be set (best guess) to compensate for this. Perhaps rugged terrain normally driven could be compensated by as much as 5% more added to the report mileage. It is a best guess process and is not intended to suggest that any degree of accuracy can be achieved. Comparing odometer to GPS readings over time in an area regularly driven could yield some data to determine a percentage of variance to use. Note: This document will be available on the www.tecnetusa.com web site. It will be updated to reflect questions asked by users as the installed base increases. Checking back from time to time could be useful in learning to maximize the potential of the TTL‐1000. 17