1
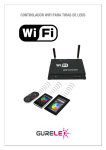
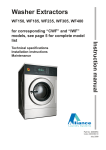
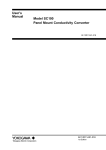
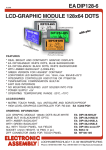
WWW.LEDWORLD.IT
Product Specification
Name: WiFi-DMX Converter
Model: WF310
I. Product Summarization
WWW.LEDWORLD.IT
1. Product constitution
NO.
Name
Instruction
1
WF310 Controller
It is the core of product, is responsible for receiving control signal
and sending DMX Signal.
2
Disk
Include mobile software of IOS operating system and Android
operating system
3
User manual
Detailed instructions of product using methods
4
USB data line
Using when connected with computer
5
DMX data line joint
Using for connect DMX equipment
6
Power adapter
DC12V/1A
2. Product summarization
WF310 is another WIFI controller independently developed by our company, following our WF100,
WF400, when using WF310, you do not need to switch wireless networks, it is more convenient for user go on
internet, you can choose encryption network, also can choose open network. Coordinate with WiFiManager
network management software, WF310 network configuration is more convenient, can autonomous choose
wireless network. Can choose our company autonomous developed mobile phone control software EasyDmx
or widely used the Art - Net protocol software to use, make WF310 more strong on the function
Trough the use of WIFI technology, it provides more comfortable, safer and convenient intelligent lighting
control than traditional lighting control, optimizes the lighting control methods, bring a new, comfortable lighting
environment to users.
II. Technical Parameters
1. Software technical parameters
1.1 Control software:
1. Name: Easy Dmx
2. Runtime platform: Android system (iphone, ipad), equipment must have WIFI function
3. Language: English
4. Category: communications
5. Other: Free, no plug-ins
1.2 Configuration software
1. Name: WifiManager
2. Runtime platform: Win 7/Windows Vista/Win2003/WinXP/Win2000
3. Language: English
4. Category: communications
5. Other: Free, no plug-ins
WWW.LEDWORLD.IT
2. Controller technical parameters
1. Working voltage: DC12V
2. Working temperature: -20-60℃
3. Working Power consumption: less than 2W
4. Output: DMX Signal
5. Receiving sensitivity: 802.11b/g DSSS(-5dBm),802.11b CCK (-10dBm),802.11g OFDM(-15dBm)
III. Instruction for use
Correct use of controller mainly includes the following steps:
Step1: Recognize and identify the controller interfaces
Understand the function of each interface on the controller, basic usage and connect way. Refer to
the controller interface instructions.
Step 2: Configure the controller
Through WiFiManager, you can configure various parameters of the controller, including the name,
location, network, protocol,IP address and so on, facilitate user to recognize and control. Refer to WiFiManager
instructions.
Step 3: Install controller
Understand specific connect way of controller and installation requirements. Refer to hardware
installation instructions of controller.
Step 4: Mobile phone control
Brief description control method of mobile phone. Refer to Easy Dmx instructions.
1. Controller Interface Description
1. Indicator status and front-end interface instruction
No.
Mark
Function description
1
Power
Power indicator light, long-time bright shows power supply normally
2
WIFI
WIFI signal indicator
3
Link
Signal indicator of mobile phone control
4
Signal
5
Mic
6
Audio
External audio joint
7
USB
USB interface
8
DC12V
Protocol state indicate and button mode switch indicate
Built-in audio joint
Input power supply
WWW.LEDWORLD.IT
Power: indicator bright shows power supply is normal, otherwise the power supply is not normal;
WIFI: when connected with network normally, indicator flashes slowly, when the network is
experiencing a problem, indicator flashes fast;
Link: If can not operation, the indicator is off, when control with mobile phone, it flashes;
Signal: Protocol state indicate(long time off-EasyDmx protocol, long time bright-ArtNet protocol)
Button mode switch indicate(under EasyDmx protocol, Led flash means switch success)
Mic: Built-in audio input, when don't connect the external audio, it will works.
Audio: External audio input
USB: Communication with the computer interface, coordinate with WIFIManager software to use,
used to configure the controller parameters, including working mode, WIFI network, controller name, controller
position, protocol type, read equipment serial number, etc.
2. Back-end interface description
1. FUN
Button(short press 1s): controller mode switch(just can support EasyDmx protocol, Led flash).
Mode include 8 static scene, 8 dynamic scene and voice control, in total 15 modes;
(long press 5s): black scene switch
2. DMX OUT
DMX signal output.
3. ANT
WIFI antenna.
1. WiFiManager Instruction for use
1. Summarization
WWW.LEDWORLD.IT
WiFiManager setup software is connected with controller through host USB. It mainly used to modify
the network configuration of the controller, select wireless network, switch network mode, modify properties,
such as the controller’s name, location, type and so on. User can flexibly choose the wireless network, modify
the information of controller.
2. Instructions for use
2.1 Install WiFiManager
Remove the disc include with the controller into disc drive. Open the disc and find “WiFiManager.exe” to
install software.
2.2 Use methods of WiFiManager
Open WiFiManager, it appears interface as shown below (figure 2.1): buttons of window are gray, this is
because the controller is not connected. After connecting the controller through USB cable, it will appear the
interface as shown in figure 2.2. Then you can operate the controller.
Figure 2.1
Figure 2.2
WWW.LEDWORLD.IT
1. Name of controllers:
The name of current connected controllers, it can be modified in the settings
2. Output type of controllers:
This product fixed for WF310, can not be modified in the settings.
3. Installation location of controllers
This option displays the installation location of controller, it can be modified
4. Networking methods
Connection mode of current connected controllers
5. Serial number of controllers
Serial number of current connected controller, it can not be modified.
6. Searching
Search available wireless networks. The results of searching will display on the area “8”, this is all
currently available networks.
7. Setting
Set the parameters of controllers. (for detailed description, refer to 2.3)
8. Current wireless network
Wireless networks list of currently searching
9. Connecting
Connected to the currently selected network. Click “connect” to join the current network, if the
network is encrypted, it will prompt you to enter your password, if it is not, it will connected to this
network directly.
2. 3 Descriptions of parameters in setting page (Figure 2.3)
Figure 2.3
1. WIFI working mode
Infra: Infra network, connect with existing wireless network;
Adhoc: Ad hoc network, you do not need to connect with an external router, use mobile phone to
control the controllers directly.
WWW.LEDWORLD.IT
Note: Currently it only supports Infra mode
2. SSID (suitable for Adhoc mode)
Under Adhoc mode, you can set SSID, under Infra mode, it is invalid.
3. Encryption (suitable for Adhoc mode)
Open network: No security
Encrypted network: support encryption such as WEP64/WEP128/TKI/AES etc.
4. Encryption password (suitable for Adhoc mode)
Set the encryption password (at least 8 characters)
5. Set the name of controller
User can set the name of controller according to their needs (up to 16 characters), this makes the
controller more humane.
6. Set the location of controller
Set the location of controller (up to 16 characters). User can set specific location according to their
arrangement, facilitate users to identify the location of lamps.
7. Controller choose the protocol
Set the protocol to Art-Net or EasyDmx.
8. Current wireless network
Currently can search the wireless network list.
9. OK/ Cancel
OK: confirm the operation, the setting will take effect;
Cancel: cancel the operation, the setting will be canceled.
2. EasyDmx instructions
1. Summarization
EasyDmx is the control software which coordinate use with controller, this software can edit 36 channels
DMX signal. User can edit and invoking 8 static scene and 6 dynamic scene, the dynamic scene can realize
fifty kinds of mode change. Also can through outer net to remote operation the controller, detail operate
description, please refer to software instruction.
2. Instruction for use
2.1 Install EasyDmx
Firstly make sure that you have already installed iTunes, if you have not installed, please download the
newest version of iTunes, after installation is complete, search “EasyDmx” in application, install the software to
your mobile phone or ipad.
2.2 Connect WiFi network
Firstly using WiFiManager software, connect all the controllers to user’s wireless network, then connect the
mobile phone with “EasyDmx” to the wireless network, search equipments, add the equipments into control list,
then you can control the controllers. for detailed instructions, please refer to the software manual.
WWW.LEDWORLD.IT
3. Art-Net protocol software instructions
3.1. Summarization
Art-Net protocol software also can coordinate use with controller, this software can edit 512 channels DMX
signal, can through related software to edit dynamic scene and static scene.
3.2. Note
When use Art-Net protocol software to control controller, you must first open controller for a few minutes
after the software (for search IP), then the user can search to LeynewDevice - WF310 equipment
4. Controller mode description
The detail mode table of controller is as below:
No.
Modes
No.
Modes
1
Static scene 1
9
Dynamic scene 1
2
Static scene 2
10
Dynamic scene 2
3
Static scene 3
11
Dynamic scene 3
4
Static scene 4
12
Dynamic scene 4
5
Static scene 5
13
Dynamic scene 5
6
Static scene 6
14
Dynamic scene 6
7
Static scene 7
15
Music voice control
8
Static scene 8
5 Hardware installation description
1. Install ANT
ANT's installation drawing:
clockwise install WIFI antenna and anticlockwise take down the antenna.
2. Typical connect diagram
WWW.LEDWORLD.IT
IV. Notice
1. Please don't install controller in a seal off , high magnetic field or high pressure area;
2. In order to reduce the risk of fire disaster and device damage caused by short circuit , please make sure
correct connection;.
3. Please do install controller in a well-ventilated area to insure appropriate temperature .
4. Installation position of controller should be as near as possible to the router so as to ensure controller normal
working ;
5. Check out whether the supply voltage and power is in the range of controller required or not .
6. Before power on , please inspect the line is correct connection, and test it whether there is a short circuit ;
7. Any problem , please do not open the shell of controller .
8. This manual is only applicable to this model of controller, if there is an update without notice.