1
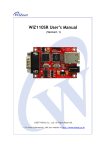
JFP User Manual Contents Main User Interface .......................................................................................................................... 2 Before Start ....................................................................................................................................... 2 What to do if Flash ID check failed .................................................................................................. 4 Set TCK Frequency ........................................................................................................................... 4 Lighten LED ..................................................................................................................................... 5 Erase.................................................................................................................................................. 7 Programming..................................................................................................................................... 7 Batch Programming .......................................................................................................................... 9 Read Flash....................................................................................................................................... 10 Finalization ..................................................................................................................................... 13 For more info please visit http://www.zhefar.com JFP User Manual Note: There may be some changes between versions. So, your software may look a bit different from this manual. Main User Interface Before Start 1, Please get target board configuration file (.ini file), all BSDL files of devices in JTAG chain and the programming file (usually it’s a .bin file). Put all these files under the same folder with the software. 2, Power off the target board. 3, Connect the cables between computer and target board. 4, Power up the target board; 5, Click to run the software. 6, When you see the main UI dialog: 6.1 If the software has loaded the configuration file you want, please go to Step 7; 6.2 If the software doesn’t load a configuration file for you, or the loaded file is not what you expect, please select menu File – Open Configuration File... to load the configuration file. See screenshot below: For more info please visit http://www.zhefar.com JFP User Manual If file loaded successfully, the configuration file name will be displayed at the status bar. If any error, please check the configuration file. For detailed error info and instructions please read “FPLib Error Code” manual. 7. After file loaded, please select menu Target Device – Self Test to check the Flash ID on target board. See screenshot below. If you see “CheckFlashID() success” message box, that means the cable is connected OK and the configuration file works. For more info please visit http://www.zhefar.com JFP User Manual If any error, please follow instructions below to check. What to do if Flash ID check failed Refer to “FPLib Error Code” manual for error info. Suggestions: Is the configuration file designed for current target board? Is the cable connection right, such as pin order? If there is LED controlled by the JTAG device, please Lighten LED to find whether the JTAG function works or not; If you are using WH-USB-HiJTAG cable, you could try to slow the TCK frequency, please refer to Set TCK Frequency. When the TCK frequency is too high, you will see info similar to this: Set TCK Frequency Menu: Options / TCK Frequency. See screenshot below: For more info please visit http://www.zhefar.com JFP User Manual Input the frequency you want to set. For example, if you want to change TCK frequency to 15MHz, you should input 15000000. See screenshots below: Or: 、 Note: If the software could get max frequency from BSDL file, the software will tell you the max allowed frequency of the JTAG chain (fTCK of Chain) which depends on the min value of all devices. To WH-USB-HiJTAG cable, the frequency could be 30000000, 1500000, 10000000, and 6000000 and so on. To WH-USB-JTAG cable, the frequency could be 6000000, 3000000 and so on. Lighten LED To help find the cause when checking Flash ID failed, the software could lighten LED connected to the JTAG device. Note: This menu is only enabled when you have specified at least one LED connected to the JTAG device in configuration file. Menu JTAG Device / Lighten LEDs. See screenshot below. For more info please visit http://www.zhefar.com JFP User Manual The software will lighten LEDs listed in the configuration file in particular order (First darken all LEDs, then lighten LED one by one, and lighten all LEDs at last). The progress bar will move at the same time. See screenshot below: Message box popped when finished: Attention: The software only know the LightenLED() function returns successfully, but you should observe the LEDs on the target board to check whether the LEDs are lightened as the manual describes. For more info please visit http://www.zhefar.com JFP User Manual Erase Note: This operation will only erase corresponding blocks without programming. If you want to erase then program Flash, you should select Programming, and tick Auto Erase checkbox. Select menu Target Device / Erase. See screenshot below: Input Begin Block (0 based) and End Block, then click OK. See screenshot below: Programming Attention: You could program data to blank/erased Flash area. If you are not sure whether the programming area is blank or not, please tick the “Auto Erase” checkbox. 1, Select menu Target Device / Program. When Program dialog appears, click “Browse file...” button to choose the file that you want to program. See screenshot below: For more info please visit http://www.zhefar.com JFP User Manual Attention: The file size should be aligned. That is, if the data bus is 16bit wide, the file size should be a multiple of 2. If the data bus is 32bit wide, the size should be a multiple of 4. 2, Confirm the programming options: Flash Begin Address: It’s 0 in many cases. The default value is 0. Attention: The begin address should be aligned. That is, if the data bus is 16bit wide, the file size should be a multiple of 2. If the data bus is 32bit wide, the size should be a multiple of 4. Auto Unlock: If checked, the software will unlock corresponding blocks before programming. By default, the software will set this parameter automatically by the Flash type : to P30, P33 Flash, the software will tick this checkbox by default; to other Flash, the software will not tick this checkbox by default. Auto Erase: If checked, the software will calculate begin and end block, then erase the blocks before programming. By default, the software will tick this checkbox. Note: This operation will erase then program Flash. If you want to only erase corresponding blocks without programming, you should run Erase. Check status after writing, continue next writing(s) only when check passed: This option control the software to check the Flash status register after programming. By default, the software will set this automatically: If the Flash supports Buffer Write, the software will tick the checkbox by default; otherwise not. It’s suggested to tick the checkbox. 3, Click “OK” button, the software will show confirmation message box. If you want to program, please click “OK”, click “Cancel” if you don’t want to program now. 4, The software will be programming after your confirmation. To get good programming performance, it’s strongly recommended that you don’t run other software when waiting programming to finish, especially software which will occupy lot of CPU resource. For more info please visit http://www.zhefar.com JFP User Manual 5, A message box will be popped when finished. 6, Please follow Finalization to see whether the Flash data is OK or not. 7, Troubleshooting: If the board doesn’t work as expected, you can read the data from Flash and compare with original file. Also, you can program a small file to fasten this troubleshooting. The file size should be greater than 64byte (greater than one Flash programming buffer) and less than 2kbyte (to shorten the programming time). Batch Programming Select menu Target Device / Batch Programming. See screenshot below: When Batch Programming dialog appears, tick the checkboxes of those files you want to program. See screenshot below: For more info please visit http://www.zhefar.com JFP User Manual Click OK when you have confirmed the selection. The software will do these jobs one by one automatically. Read Flash Menu Target Device / Read. See screenshot below: Read Dialog: For more info please visit http://www.zhefar.com JFP User Manual Parameters: Read Begin Address: The Flash address you want to read. Integer only. It should be in range of Flash address. Attention: Begin Address should be aligned. That is, if the data bus is 16bit wide, the file size should be a multiple of 2. If the data bus is 32bit wide, the size should be a multiple of 4. Read Size: How many bytes you want to read. Integer only. It should be in range of Flash address. Attention: Read Size should be aligned. That is, if the data bus is 16bit wide, the file size should be a multiple of 2. If the data bus is 32bit wide, the size should be a multiple of 4. Storage: Choose whether to put the content: Buffer, Disk File or Both. Click OK button after setting done. The software will prompt to you confirm: Click “Yes” to return the main UI. See screenshot below: For more info please visit http://www.zhefar.com JFP User Manual Message box popped after reading finished: If you choose to display the content in buffer, you could see them in main UI. See screenshot below: If you choose a disk file to store the data, the software will create a new file named yyyyMMdd Hhmmssread.bin (characters in red means the beginning timestamp) at current folder. For more info please visit http://www.zhefar.com JFP User Manual Finalization Power off the board, and disconnect the cable. For more info please visit http://www.zhefar.com JFP User Manual Revision History Date Version Author Changes 2014/6/9 Add line above footer; 2013/9/29 Add ‘Attention: You could program data to blank/erased Flash area. If you are not sure whether the programming area is blank or not, please tick the “Auto Erase” checkbox.’ to ‘Programming’ section; 2013/9/27 In Step 6 of ‘Before Start’ section, add “If the software has loaded the configuration file you want, please go to Step 7”; 2013/9/27 2013/9/4 Add ‘Batch Programming’ section; 2013/7/30 Format optimization; 2013/7/28 Fix spelling error; 2013/7/27 Replace Chinese suspension points with dots; 2013/7/26 First Release; Add notice to ‘Auto Erase’ option of Programming; Add ‘Erase’ section; For more info please visit http://www.zhefar.com