1
1.2.2 Installation of 500 Series Units
Follow the instructions provided by the manufacturer of your 500 series
rack and power supply to install your Mic Pre 500. Make sure the card is
firmly seated in the slot and fully screw the installation screws into the
500 series rack enclosure. Your input and output connections will be
provided on the rear of the rack enclosure either as XLR connectors or
part of a DSUB 25 array.
1.2.3 Power Up Procedure
When you first power up your 500 series rack enclosure the Mic Pre 500
goes into a test cycle while the Class A amplifier warms up. First all 8
LEDs for the meter will illuminate for a fraction of a second and up to a
couple of seconds. This is the processor for the level meter booting up
and beginning to run the metering program. Next four LEDs will light at a
time, with every other LED flashing back and forth for about three
seconds. Next it will start to show audio levels if audio is present.
1.2.4 Power Supply Fault
There are many 500 series racks available, each with slightly different
power supplies. Some older 500 racks are notorious for power supply
problems. 500 series power supplies are actually two supplies, a +16 Volt
and a -16 Volt source. If you turn on the unit, but get no audio, there is a
chance that one of the supplies in the rack has either gone down or is in
protection mode. This has the potential to cause damage to your Mic Pre
500 if left like this for a long time.
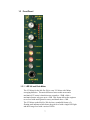
To verify that a power supply fault has occurred, engage all of the push
buttons including the 1/4" input switch with the blue LED. If the blue
LED does NOT light, then there is a problem with your power supply.
1.2.5 Basic Set Up
The job of a microphone amplifier is to make a mic level signal into a line
level signal so that it can be recorded, mixed or processed.
Plug a microphone into the Input Jack for the Mic Pre 500 on the rear of
the 500 series enclosure using a microphone (XLR Female to XLR Male)
cable. If the mic you are using is a condenser microphone that requires
phantom power, push in the +48 Button to engage phantom power. Patch
out of the Output Jack of the same preamp to the line level input of your
recording device using the appropriate cable.
5