1
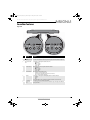
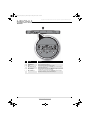
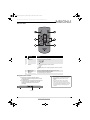
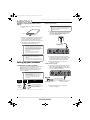
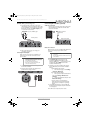
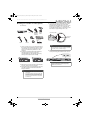
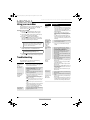
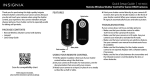
NS-SB314_14-0307_MAN_V2_ENG.book Page 0 Friday, March 14, 2014 8:50 AM
User Guide
Soundbar Home Theater Speaker
System with Bluetooth
NS-SB314
Before using your new product, please read these instructions to prevent any damage.
NS-SB314_14-0307_MAN_V2_ENG.book Page ii Friday, March 14, 2014 8:50 AM
Contents
Important safety instructions . . . . . . . . . . . . . . . . . . . . . . . . . . . . . . . . . . . . .1
Placement . . . . . . . . . . . . . . . . . . . . . . . . . . . . . . . . . . . . . . . . . . . . . . . . . . . . . . . 1
Using close to a TV or computer . . . . . . . . . . . . . . . . . . . . . . . . . . . . . . . . . . 1
Introduction. . . . . . . . . . . . . . . . . . . . . . . . . . . . . . . . . . . . . . . . . . . . . . . . . . . . . .2
Package contents. . . . . . . . . . . . . . . . . . . . . . . . . . . . . . . . . . . . . . . . . . . . . . . . .2
Soundbar features . . . . . . . . . . . . . . . . . . . . . . . . . . . . . . . . . . . . . . . . . . . . . . . .3
Top view . . . . . . . . . . . . . . . . . . . . . . . . . . . . . . . . . . . . . . . . . . . . . . . . . . . . . . . . .
Back view . . . . . . . . . . . . . . . . . . . . . . . . . . . . . . . . . . . . . . . . . . . . . . . . . . . . . . . .
Remote control . . . . . . . . . . . . . . . . . . . . . . . . . . . . . . . . . . . . . . . . . . . . . . . . . .
Using the remote control . . . . . . . . . . . . . . . . . . . . . . . . . . . . . . . . . . . . . . . . .
Installing or replacing the remote control battery . . . . . . . . . . . . . . . . .
3
4
5
5
6
Setting up your soundbar. . . . . . . . . . . . . . . . . . . . . . . . . . . . . . . . . . . . . . . . .6
Connecting the soundbar (required) . . . . . . . . . . . . . . . . . . . . . . . . . . . . . .
Connecting the soundbar (optional) . . . . . . . . . . . . . . . . . . . . . . . . . . . . . .
Positioning the soundbar. . . . . . . . . . . . . . . . . . . . . . . . . . . . . . . . . . . . . . . . .
Mounting your soundbar on a wall (optional) . . . . . . . . . . . . . . . . . . . . .
6
7
8
9
Using your soundbar . . . . . . . . . . . . . . . . . . . . . . . . . . . . . . . . . . . . . . . . . . . 10
Troubleshooting. . . . . . . . . . . . . . . . . . . . . . . . . . . . . . . . . . . . . . . . . . . . . . . . 10
Specifications . . . . . . . . . . . . . . . . . . . . . . . . . . . . . . . . . . . . . . . . . . . . . . . . . . 11
Legal notices . . . . . . . . . . . . . . . . . . . . . . . . . . . . . . . . . . . . . . . . . . . . . . . . . . . 11
One-year limited warranty - Insignia. . . . . . . . . . . . . . . . . . . . . . . . . . . . . 13
ii
www.insigniaproducts.com
NS-SB314_14-0307_MAN_V2_ENG.book Page 1 Friday, March 14, 2014 8:50 AM
Important safety
instructions
1
2
3
4
5
6
7
8
9
10
11
12
13
14
15
16
17
18 Batteries should not be exposed to excessive
heat such as sunshine, fire, or the like.
Warning
Read these instructions.
Keep these instructions.
Heed all warnings.
Follow all instructions.
Do not use this apparatus near water.
Clean only with dry cloth.
Do not block any ventilation openings. Install in
accordance with the manufacturer's
instructions.
Do not install near any heat sources such as
radiators, heat registers, stoves, or other
apparatus (including amplifiers) that produce
heat.
Do not defeat the safety purpose of the
polarized or grounding-type plug. A polarized
plug has two blades with one wider than the
other. A grounding type plug has two blades
and a third grounding prong. The wide blade or
the third prong are provided for your safety. If
the provided plug does not fit into your outlet,
consult an electrician for replacement of the
obsolete outlet.
Protect the power cord from being walked on or
pinched particularly at plugs, convenience
receptacles, and the point where they exit from
the apparatus.
Only use attachments/accessories specified by
the manufacturer.
Use only with the cart, stand,
tripod, bracket, or table specified
by the manufacturer, or sold with
the apparatus. When a cart is used,
use caution when moving the
cart/apparatus combination to
avoid injury from tip-over.
Unplug this apparatus during lightning storms
or when unused for long periods of time.
Refer all servicing to qualified service personnel.
Servicing is required when the apparatus has
been damaged in any way, such as
power-supply cord or plug is damaged, liquid
has been spilled or objects have fallen into the
apparatus, the apparatus has been exposed to
rain or moisture, does not operate normally, or
has been dropped.
To reduce the risk of fire or electric shock, do not
expose this device to rain, moisture, dripping, or
splashing, and no objects filled with liquids,
such as vases, shall be placed on it.
An apparatus with a three-prong,
grounding-type plug is a Class I apparatus,
which needs to be grounded to prevent
possible electric shock. Make sure that you
connect any Class I device to a grounding-type,
three-prong outlet.
The wall plug is the disconnecting device. The
plug must remain readily operable.
Danger of explosion if battery is incorrectly replaced.
Replace only with the same or equivalent type.
Placement
• The soundbar cabinet is made out of plastic and is
therefore sensitive to extreme temperatures and
humidity. Do not put it in locations subject to
direct sunlight or in humid places, such as near an
air conditioner, humidifier, bathroom, or kitchen.
• Do not put water or other liquids close to the
soundbar. If liquid is spilled over the soundbar, it
may be damaged.
• The soundbar should be placed on a sturdy, flat
surface that is free from vibration, or mounted on
a wall. Do not put the soundbar on an uneven or
unstable surface, where it may fall and cause
damage.
Using close to a TV or computer
Some older TVs and computer monitors are
magnetically sensitive devices and as such are likely
to suffer discoloration or picture distortion when
conventional speakers are placed nearby. If
discoloration problems persist, try moving the
soundbar away from your TV or monitor.
www.insigniaproducts.com
1
NS-SB314_14-0307_MAN_V2_ENG.book Page 2 Friday, March 14, 2014 8:50 AM
NS-SB314 Soundbar Home Theater Speaker System with Bluetooth
NS-SB314
Soundbar Home Theater Speaker
System with Bluetooth
Introduction
Congratulations on your purchase of an Insignia Soundbar Home Theater Speaker System with Bluetooth. The
soundbar is designed to be suitable for use with today’s LCD and plasma flat panel displays and it can either be
mounted on the wall or placed on a TV stand.
This user manual explains how to correctly install, operate, and get the best performance from your Soundbar
Home Theater Speaker. Read this user manual carefully before installing your system, and then keep it handy for
quick reference.
Package contents
LEVELING EDGE
Drill a hole here
Select a location close to your TV and directly in
front of the viewing/listening position. For best
sound quality, choose a location where sound waves
are not blocked by furniture or other obstacles.
Position the wall mount template on the wall where you
want to mount your soundbar, level the template, then
tape it to the wall.
Wall
Note: Make sure that the template is level.
Soundbar
LEVELING EDGE
Hold a level to the Leveling Edge of this template
Drill a hole here
20.43 inches (519 mm)
Drill two holes in the wall where the template indicates,
then remove the template.
Wall
Soundbar
Wall
Tools Needed
Approx. 1/4 in
(6.8 mm)
Wall
Anchor
If you are mounting on drywall or concrete, insert wall
anchors (not included) into the holes and use a hammer
to make sure that the anchors are flush against the wall.
Secure two screws (not included) to the wall or wall anchors
(if required). The screws must protrude from the wall by
about 1/4". Use a #10 wood screw (or similar), 1 1/2" in
length. The screw width must be about 3/16" and the screw
head must be approximately 1/4" to 3/8".
Wall mount template
Wall
Wall
anchors (2)
Position holes onto studs behind drywall or use anchors for mounting
Warning: Improper installation can result in serious injury or damage to your soundbar.
If necessary, seek the assistance of a professional.
Align the speaker hanging brackets with the screws,
then hang the soundbar on the screws.
Screws (2) - #10 x 1 ½"
wood screw (or similar)
V1 14-0130
Mounting Template
Quick Setup Guide
Soundbar Home Theater Speaker System with Bluetooth | NS-SB314
Congratulations on your purchase of
an Insignia Soundbar Home Theater
Speaker System with Bluetooth. Your
NS-SB314 represents the
state-of-the-art in home theater
soundbars and is designed for reliable
and trouble-free performance.
FEATURES
CONNECTING THE SUBWOOFER
(OPTIONAL)
CONNECTING THE SOUNDBAR
Top view
player, or gaming console).
AUDIO QUALITY
JACK TYPE (on source device)
BEST
Soundbar
Subwoofer
Connect one end of the subwoofer speaker
cable (not included) to the subwoofer and the
other end to the soundbar.
CAUTION:
NOTE: If you mounted your soundbar on a wall, you must use the included right-angle cable connectors for the AUX IN or
RCA cable connections.
Package contents
CABLE
3.5 mm audio cable (included)
GOOD
RCA audio cable (included)
Subwoofer cable
(not included)
Back of the soundbar
Digital optical cable (not included)
GOOD
- PICK ONE Remote control
Back view
Remote control
AC adapter
RCA audio cable
User Guide
3.5 mm audio cable
Wall mounting template
AC Adapter
ITEM
1
Standby indicator
2
(Power) button and
indicator
DESCRIPTION
Lights when the soundbar is in standby mode.
Press to turn on the soundbar. The indicator turns green.
Press again to return the soundbar to standby mode.
3
(source) button
Press repeatedly to cycle through the available sound sources:
• - Bluetooth
• Source 1 - Optical
• Source 2 - AUX IN
• Source 3 - RCA
4
Input source indicator
Indicates which source is selected to provide sound for the
soundbar.
• - Bluetooth
• Source 1 - Optical
• Source 2 - AUX IN
• Source 3 - RCA
5
Sound mode indicator
Lights to indicate the DSP sound mode selected.
• Standard - Lets you enjoy normal sound.
• Theater - Best for enjoying movies. Bass frequencies are
enhanced.
• News - Select for clear voice reproduction.
6
DSP (Digital Signal
Processor) button
Press repeatedly to cycle through the available DSP sound
modes (Standard>Theater>News).
7
VOL +/– buttons
Press to increase or decrease the volume of the soundbar.
8
BASS button and indicator
RCA Audio Cable
2
3.5 mm Audio Cable
www.insigniaproducts.com
Back of the soundbar
1 Connect the AC adapter to the DC IN jack
on the back of the soundbar.
2 Plug the other end of the AC adapter into
a power outlet or surge protector.
Back of the soundbar
- OR -
#
9
10
11
12
ITEM
Hanging brackets
SUBWOOFER OUT jack
DESCRIPTION
Use to hang the soundbar on a wall.
Connect a powered subwoofer to this jack.
DC IN jack
Connect the AC adapter to this jack to power the soundbar.
SOURCE 3 - RCA IN
(R and L) jacks
If your TV (or other audio source device) has RCA OUT jacks,
connect the RCA cables to your source device and these jacks.
13
SOURCE 2 - AUX IN jack If your TV (or other audio source device) has an AUX OUT or
headphone jack, connect the 3.5 mm audio cable to your source
device and this jack.
14
SOURCE 1 - OPTICAL
jack
15
(Power) button
16
SOURCE buttons
17
DSP buttons
18
(Mute) button
Press to activate the bass frequency enhancement. The
frequency enhancement.
User Guide
CONNECTING THE AC ADAPTER
CAUTIONS:
• Make sure that the electrical outlet matches the AC adapter’s
input requirements of 100-240 V, 50/60 Hz before connecting.
• Use only the AC adapter provided.
• Plug in the AC adapter only after all other connections
have been made.
Digital optical cable
(not included)
Quick Setup Guide
Before using your new product, please read these
instructions to prevent any damage.
#
Remote Control
TV or DVD/Blu-ray
player
Digital connections (BEST)
1 Connect one end of the digital optical cable (not included)
to your soundbar. Connect the other end into the Digital
Optical Output port on your audio source device.
2 Change the device’s audio output to ‘PCM’ format
(typically found in Audio Settings). Refer to the
documentation that came with your audio source device
for more information.
3 After connecting power, see USING YOUR SOUNDBAR on the
next page.
If your TV (or other audio source device) has an Optical OUT jack,
connect a digital optical cable (not included) to your source device
and this jack.
Press to turn on the soundbar. Press again to put the soundbar
into standby mode.
Press to select the sound source for your soundbar:
• Source 1 - Optical • Source 3 - RCA
• Source 2 - AUX IN
• - Bluetooth
Press to select the Digital Signal Processor (DSP) sound mode:
• Standard • Theater • News
The corresponding indicator on the soundbar top panel lights to
indicate the sound mode selected.
Back of the soundbar
AUX IN connections (GOOD)
1 Connect the right-angled end of the 3.5mm audio cable to
your soundbar. Plug the other end into the Audio Output
port or headphone jack on your audio source device.
2 After connecting power, see USING YOUR SOUNDBAR on
the next page.
TV or DVD/Blu-ray
player
3.5 mm audio cable (included)
- OR RCA Audio connections (GOOD)
1 Connect the right-angled connectors of the RCA audio
cables to your soundbar. Connect the other end of the RCA
cables into the Audio Output ports on your audio source
device.
2 After connecting power, see USING YOUR SOUNDBAR on
the next page.
TV or DVD/Blu-ray
player
RCA audio cable
(included)
NOTE: Make sure that the cable ends match the color of the ports.
4
CONNECTING BLUETOOTH (OPTIONAL)
NOTES:
• Your soundbar must be on to make a Bluetooth connection.
• Place the Bluetooth device within 30 ft. (10 m) of your soundbar.
1 Select Bluetooth as the input source by pressing the (Bluetooth) button on the remote control or
the (source) button on the soundbar. The Bluetooth indicator on the soundbar will blink slowly.
2 Navigate to your device's Bluetooth settings, turn on Bluetooth, then search for available devices.
a. For iPad/iPhone/iPod touch:
i. From the home page, touch Settings > General > Bluetooth.
b. For Android Phone/Tablet:
i. From your smart phone/tablet home page, touch Settings >Wireless and networks.
ii. Click to activate Bluetooth, then touch Bluetooth settings.
c. For a PC or Mac, see the instructions that came with your computer or operating system for more
information.
3 On your Bluetooth device, select “NS-SB314” from the device list. Repeat step 2 if “NS-SB314” is not
displayed.
4 If a PIN code is requested, enter “0000.”
5 When pairing is completed the Bluetooth indicator on the top of your soundbar turns on.
Press to mute the sound from the soundbar. Press again to restore
the sound.
19
VOL +/– buttons
Press to increase or decrease the volume of the soundbar.
20
BASS button
Press to activate the bass frequency enhancement.
Back of the soundbar
Quick Start Guide
OVER
NS-SB314_14-0307_MAN_V2_ENG.book Page 3 Friday, March 14, 2014 8:50 AM
NS-SB314 Soundbar Home Theater Speaker System with Bluetooth
Soundbar features
Top view
#
Component
1
2
Standby indicator
Lights when the soundbar is in standby mode.
(Power) button and Press to turn on the soundbar, the indicator turns green. Press again to return the soundbar to standby mode.
indicator
(source) button Press repeatedly to cycle through the available sound sources:
•
- Bluetooth
• Source 1 - Optical
• Source 2 - AUX IN
• Source 3 - RCA
Input source indicator Indicates which source is selected to provide sound for the soundbar.
•
- Bluetooth
• Source 1 - Optical
• Source 2 - AUX IN
• Source 3 - RCA
Sound mode indicator Lights to indicate the DSP sound mode selected.
• Standard - Lets you enjoy normal sound.
• Theater - Best for enjoying movies. Bass frequencies are enhanced.
• News - Select for clear voice reproduction.
DSP button
Press repeatedly to cycle through the available Digital Signal Processor (DSP) sound modes:
• Standard
• Theater
• News
The corresponding indicator on the soundbar top panel lights to indicate the sound mode selected.
VOL +/– buttons
Press to increase or decrease the volume of the soundbar.
BASS button and
Press to activate the bass frequency enhancement. The indicator turns green. Press again to turn off the bass
indicator
frequency enhancement.
3
4
5
6
7
8
Description
www.insigniaproducts.com
3
NS-SB314_14-0307_MAN_V2_ENG.book Page 4 Friday, March 14, 2014 8:50 AM
NS-SB314 Soundbar Home Theater Speaker System with Bluetooth
Back view
4
#
Component
Description
1
2
3
4
Hanging brackets
SUBWOOFER OUT jack
DC IN jack
SOURCE 3 - RCA (R and L) jacks
5
SOURCE 2 - AUX IN jack
6
SOURCE 1 - OPTICAL jack
Use to hang the soundbar on a wall.
Connect a powered subwoofer to this jack.
Connect the AC adapter to this jack to power the soundbar.
If your TV (or other audio source device) has RCA OUT jacks, connect the RCA cables to
your source device and these jacks.
If your TV (or other audio source device) has an AUX OUT or headphone jack, connect the
3.5 mm audio cable to your source device and this jack.
If your TV (or other audio source device) has an Optical OUT jack, connect a digital
optical cable (not included) to your source device and this jack.
www.insigniaproducts.com
NS-SB314_14-0307_MAN_V2_ENG.book Page 5 Friday, March 14, 2014 8:50 AM
NS-SB314 Soundbar Home Theater Speaker System with Bluetooth
Remote control
#
Component
Description
1
2
(Power) button
SOURCE buttons
3
DSP buttons
4
5
6
(Mute) button
VOL +/– buttons
BASS button
Press to turn on the soundbar. Press again to put the soundbar into standby mode.
Press to select the sound source for your soundbar:
• Source 1 - Optical
• Source 2 - AUX IN
• Source 3 - RCA
•
- Bluetooth
Press to select the Digital Signal Processor (DSP) sound mode:
• Standard
• Theater
• News
The corresponding indicator on the soundbar top panel lights to indicate the sound mode
selected.
Press to mute the sound from the soundbar. Press again to restore the sound.
Press to increase or decrease the volume of the soundbar.
Press to activate the bass frequency enhancement.
Using the remote control
Cautions
1 Remove the plastic tab from the battery
compartment before using the remote control
for the first time.
2 Point the remote control directly at the IR sensor
on the front of the soundbar. You must be
within approximately 23 ft. (7 m) of the
soundbar.
•
•
•
•
Do not spill water or any liquid on the remote
control.
Do not place the remote control on a wet
surface.
Do not place the remote control in direct
sunlight or near sources of excessive heat.
If you are not going to use the remote control
for a long time, remove the battery to avoid any
damage that may be caused by leakage and
corrosion.
IR Sensor
www.insigniaproducts.com
5
NS-SB314_14-0307_MAN_V2_ENG.book Page 6 Friday, March 14, 2014 8:50 AM
NS-SB314 Soundbar Home Theater Speaker System with Bluetooth
Installing or replacing the remote control
battery
1 Open the battery cover latch on the remote
control.
Digital connections (best)
Note
If you use the OPTICAL connection, change the
device’s audio output to “PCM” format. Refer to the
manual you received with the output device for
additional information.
1 Connect one end of the digital optical cable (not
included) to your soundbar. Connect the other
end into the Digital Optical Output port on
your audio source device.
Squeeze
Pull
2 Remove the old battery (if necessary) and insert
the new 3V lithium battery (CR2025) into the
battery tray. Match the polarity of the new
battery with the plus sign (+) in the battery tray.
3 Slide the battery tray back into the battery
compartment until it clicks into place.
Digital optical cable
(not included)
Cautions
•
•
•
The battery should not be exposed to excessive
heat, such as sunshine, heat registers, or fire.
Battery chemicals can cause a rash. If the battery
leaks, clean the battery compartment with a
cloth. If chemicals touch your skin, wash
immediately.
Make sure that the battery is disposed of
correctly. Do not burn or incinerate.
Backpanel of the soundbar
Notes
•
•
•
Do not mix old and new batteries.
Remove the battery when the charge is
depleted.
If the remote control is not going to be used for
an extended period of time, remove the battery.
Setting up your soundbar
Connecting the soundbar (required)
Choose one connection option shown below that
fits your audio source device, such as a TV,
DVD/Blu-ray player, or gaming console. You can
connect several devices and switch the sound
source as required.
2 Change the device’s audio output to 'PCM'
format (typically found in audio settings). Refer
to the documentation that came with your
audio source device for more information.
3 After connecting power, see “Using your
soundbar” on page 10.
AUX IN connections (good)
1 Connect the right-angled end of the 3.5 mm
audio cable to your soundbar. Plug the other
end into the Audio Output port or headphone
jack on your audio source device.
Caution
•
•
Audio
Quality
6
Turn off or unplug all devices while you are
making connections.
If you mounted your soundbar on a wall, you
must use the included right-angle cable
connectors for the AUX IN or RCA cable
connections.
Jack Type
Cable
Backpanel of the soundbar
3.5 mm audio cable (provided)
TV, CD, MP3 player, smartphone, etc.
Best
Digital optical cable (not included)
Good
3.5 mm audio cable (included)
Good
RCA audio cable (included)
Note: Some TVs may only have this
type of connection available.
2 After connecting power, see “Using your
soundbar” on page 10.
www.insigniaproducts.com
NS-SB314_14-0307_MAN_V2_ENG.book Page 7 Friday, March 14, 2014 8:50 AM
NS-SB314 Soundbar Home Theater Speaker System with Bluetooth
Connecting the soundbar (optional)
RCA Audio Analog connections (good)
1 For an RCA audio connection, connect the
right-angled connectors of the RCA audio cable
to your soundbar. Connect the other end of the
RCA audio cable into the Audio Output ports
on your audio source device.
Subwoofer connection
• Connect one end of the subwoofer speaker cable
(not included) to the subwoofer and the other
end to the soundbar.
TV, projector, or DVD/Blu-ray player
Subwoofer speaker cable
(not provided)
RCA cable (provided)
Backpanel of the soundbar
Backpanel of the soundbar
Bluetooth connection
2 After connecting power, see “Using your
soundbar” on page 10.
Before you can use your soundbar with a Bluetooth
device, you need to pair your device to the
soundbar.
Notes
Connecting the AC adapter
•
After you have connected your soundbar to an
audio source, you need to connect it to an AC
power outlet.
•
Your soundbar must be on to make a Bluetooth
connection.
Place the Bluetooth device within 30 ft. (10 m) of
your soundbar.
T
Cautions
•
•
•
Make sure that the electrical outlet matches the
AC adapter’s input requirements of 100-240 V,
50/60 Hz before connecting.
Use only the AC adapter provided.
Plug in the AC adapter only after all other
connections have been made.
1 Connect the AC adapter to the DC IN jack on the
back of the soundbar.
2 Plug the other end of the AC adapter into a
power outlet or surge protector.
To pair your devices using Bluetooth:
1 Select Bluetooth as the input source by
pressing the (Bluetooth) button on the
remote control or the
(source) button on the
soundbar. The Bluetooth indicator on the
soundbar will blink slowly.
2 Navigate to your device's Bluetooth settings,
turn on Bluetooth, then search for available
devices.
a. For iPad/iPhone/iPod touch:
i. From the home page, click Settings
> General > Bluetooth.
b. For Android Phone/Tablet:
i. From your smart phone/tablet home
page, click Settings >Wireless and
networks.
ii. Click to activate Bluetooth, then click
Bluetooth settings.
c. For a PC or Mac, you can find these
instructions in the documentation that
came with your computer or operating
system.
3 On your Bluetooth device, select “NS-SB314”
from the device list. Repeat step 2 if “NS-SB314”
is not displayed.
4 If a PIN code is requested, enter “0000.”
www.insigniaproducts.com
7
NS-SB314_14-0307_MAN_V2_ENG.book Page 8 Friday, March 14, 2014 8:50 AM
NS-SB314 Soundbar Home Theater Speaker System with Bluetooth
5 When pairing is completed the Bluetooth
indicator on the top of your soundbar turns on.
Positioning the soundbar
Warning
Notes
•
•
•
Some devices, such as an iPhone, connect
immediately after pairing so the Bluetooth
indicator on your soundbar remains on. Other
devices, such as notebook computers, may ask
you if you wish to connect. In this instance, the
Bluetooth indicator continues to blink until a
connection is established.
Your soundbar saves pairing information for up
to eight devices. However, it can only be
connected and playing content from one device
at a time.
When you turn on your soundbar, it
automatically connects to the last connected
device if that device is in range. To connect to a
different paired device, you have to turn off
Bluetooth or unpair from the currently paired
device and manually connect to the other
paired device.
Improper installation can result in serious injury or
damage to your soundbar. If necessary, seek the
assistance of a professional.
Cautions
If you are installing screws into drywall or concrete,
use wall anchors designed for that type of surface.
• You can set the soundbar on a flat surface.
Disconnecting your device:
• Turn off the Bluetooth function on your
device.
Reconnecting your device
If you move out of range or turn off the Bluetooth
feature on your Bluetooth device, the soundbar
disconnects from your device. When this happens,
the Bluetooth indicator blinks on and off.
-OR• You can mount the soundbar on a wall.
To Restore the connection:
• Move the music device back into range (within 33
feet), and make sure there is a clear line of sight
and there are no obstructions between the
soundbar and the device.
The connection is automatically reestablished and
the Bluetooth indicator lights solid blue.
Notes
The auto-connect feature may not work with some
Bluetooth devices, if this occurs use your Bluetooth
device settings menu to manually select the
soundbar from the list of found Bluetooth devices.
Connecting to a different device
1 On your Bluetooth device you are currently
connected to, turn off the Bluetooth function or
unpair the soundbar in your Bluetooth device
list.
The soundbar can now be connected to another
Bluetooth Device.
2 Follow the section “Bluetooth connection” to
connect a new device.
Receiving a phone call while playing music
• When a call is received while playing music
through a phone, the music will stop
automatically.
• When the call ends, depending on the setting
of your phone, the current track may resume
playback.
8
www.insigniaproducts.com
NS-SB314_14-0307_MAN_V2_ENG.book Page 9 Friday, March 14, 2014 8:50 AM
NS-SB314 Soundbar Home Theater Speaker System with Bluetooth
Mounting your soundbar on a wall (optional)
You will need:
LEVELING EDGE
Drill a hole here
Select a location close to your TV and directly in
front of the viewing/listening position. For best
sound quality, choose a location where sound waves
are not blocked by furniture or other obstacles.
LEVELING EDGE
Hold a level to the Leveling Edge of this template
Drill a hole here
20.43 inches (519 mm)
Position the wall mount template on the wall where you
want to mount your soundbar, level the template, then
tape it to the wall.
Wall
Soundbar
Wall
Drill two holes in the wall where the template indicates,
then remove the template.
Wall
Tools Needed
Approx. 1/4 in
(6.8 mm)
Wall
Anchor
If you are mounting on drywall or concrete, insert wall
anchors (not included) into the holes and use a hammer
to make sure that the anchors are flush against the wall.
Note: Make sure that the template is level.
5 Secure two screws (not included) to the wall or
wall anchors (if required). The screws must
protrude from the wall by about 1/4”. Use a #10
wood screw (or similar), 1 1/2" in length. The
screw width must be about 3/16” and the screw
head must be approximately 1/4” to 3/8”.
Secure two screws (not included) to the wall or wall anchors
(if required). The screws must protrude from the wall by
about 1/4". Use a #10 wood screw (or similar), 1 1/2" in
length. The screw width must be about 3/16" and the screw
head must be approximately 1/4" to 3/8".
Wall mount template
Wall
Wall
anchors (2)
Position holes onto studs behind drywall or use anchors for mounting
Align the speaker hanging brackets with the screws,
then hang the soundbar on the screws.
Warning: Improper installation can result in serious injury or damage to your soundbar.
If necessary, seek the assistance of a professional.
Screws (2) - #10 x 1 ½"
wood screw (or similar)
V1 14-0130
Stud finder
(optional for
wood stud
installation)
Level
Wall mounting template
Drill and
drill bit
20.43 inches (519 mm)
Approx. 1/4 in
(6.8 mm)
Screws (2) - #10 x 1 ½”
wood screw (or
similar)
Tape measure
Hammer
Screwdriver
Tape
Wall
Wall anchors (2)
Caution
1 Select a location close to your TV and directly in
front of the viewing/listening position. For best
sound quality, choose a location where sound
waves are not blocked by furniture or other
obstacles.
2 Position the supplied wall mount template to
the wall where you want to mount the
soundbar. Make sure the template is level (A),
then tape the template to the wall (B).
A
Make sure that you use wall anchors that are suitable
to your wall type if you need to mount the soundbar
to drywall, concrete, or similar wall type.
6 Align the speaker hanging brackets with the
screws, then hang the soundbar on the screws.
B
LEVELING EDGE
Drill a hole here
Select a location close to your TV and directly in
front of the viewing/listening position. For best
sound quality, choose a location where sound waves
are not blocked by furniture or other obstacles.
Position the wall mount template on the wall where you
want to mount your soundbar, level the template, then
tape it to the wall.
Wall
Note: Make sure that the template is level.
Hold a level to the Leveling Edge of this template
Drill a hole here
Drill a hole here
Soundbar
Wall
Secure two screws (not included) to the wall or wall anchors
(if required). The screws must protrude from the wall by
about 1/4". Use a #10 wood screw (or similar), 1 1/2" in
length. The screw width must be about 3/16" and the screw
head must be approximately 1/4" to 3/8".
Select a location close to your TV and directly in
front of the viewing/listening position. For best
sound quality, choose a location where sound waves
are not blocked by furniture or other obstacles.
Tools Needed
Approx. 1/4 in
(6.8 mm)
Wall
Anchor
If you are mounting on drywall or concrete, insert wall
anchors (not included) into the holes and use a hammer
to make sure that the anchors are flush against the wall.
LEVELING EDGE
LEVELING EDGE
20.43 inches (519 mm)
Drill two holes in the wall where the template indicates,
then remove the template.
Wall
Wall
Wall mount template
Position holes onto studs behind drywall or use anchors for mounting
Align the speaker hanging brackets with the screws,
then hang the soundbar on the screws.
Warning: Improper installation can result in serious injury or damage to your soundbar.
If necessary, seek the assistance of a professional.
Position the wall mount template on the wall where you
want to mount your soundbar, level the template, then
tape it to the wall.
Wall
Wall
anchors (2)
Screws (2) - #10 x 1 ½"
wood screw (or similar)
Note: Make sure that the template is level.
Hold a level to the Leveling Edge of this template
LEVELING EDGE
Drill a hole here
20.43 inches (519 mm)
Drill two holes in the wall where the template indicates,
then remove the template.
Wall
Soundbar
Wall
Tools Needed
Approx. 1/4 in
(6.8 mm)
Wall
Anchor
If you are mounting on drywall or concrete, insert wall
anchors (not included) into the holes and use a hammer
to make sure that the anchors are flush against the wall.
Secure two screws (not included) to the wall or wall anchors
(if required). The screws must protrude from the wall by
about 1/4". Use a #10 wood screw (or similar), 1 1/2" in
length. The screw width must be about 3/16" and the screw
head must be approximately 1/4" to 3/8".
Wall mount template
Wall
Position holes onto studs behind drywall or use anchors for mounting
Align the speaker hanging brackets with the screws,
then hang the soundbar on the screws.
Warning: Improper installation can result in serious injury or damage to your soundbar.
If necessary, seek the assistance of a professional.
Wall
anchors (2)
Screws (2) - #10 x 1 ½"
wood screw (or similar)
V1 14-0130
V1 14-0130
Warning
3 Drill two holes into the wall, where the template
indicates, then remove the template.
4 Install wall anchors (not included) into the holes
you drilled, using the instructions that came
with your anchors.
Improper installation can result in serious injury or
damage to your soundbar. If necessary, seek the
assistance of a professional.
Notes
•
•
If you have drilled into a stud, wall anchors are
not required.
If you cannot drill into wall studs and must drill
into drywall, concrete, or another type of wall,
wall anchors are required. See the instructions
that came with your wall anchors to determine
the drill bit size.
www.insigniaproducts.com
9
NS-SB314_14-0307_MAN_V2_ENG.book Page 10 Friday, March 14, 2014 8:50 AM
NS-SB314 Soundbar Home Theater Speaker System with Bluetooth
Using your soundbar
Problem
This system lets you to access four different sound
sources (Source 1 - Optical, Source 2 - AUX IN,
Source 3 - RCA, and - Bluetooth).
• Make sure all connections are secure and cables are not
broken or damaged.
• If you are using the OPTICAL connection, make sure the
source device’s audio source is set to “PCM” format. Refer
to the documentation your received with the audio
source device (such as a TV, DVD/Blu-ray player, etc.) for
additional information.
• Connect to a different source device (such as a TV,
DVD/Blu-ray player) to see if the buzzing still occurs. If it
does not, this may be an issue with the original source
device.
• Use a different connection method (for example, try
Optical instead of AUX) between the soundbar and the
source device to make sure the jacks on both devices are
still working.
I can hear sound
from both my TV and
my soundbar.
My TV remote does
not control the
volume of my
soundbar.
No sound or low
volume in Bluetooth
mode
• Turn off or mute the internal speakers of your TV. Refer
to the TV’s manual for instructions.
Cannot establish
Bluetooth
connection
• Shorten the distance between your soundbar and your
Bluetooth device.
• Turn your devices off, then on. Re-pair your soundbar
and your Bluetooth device.
• Make sure that your soundbar is not paired to another
Bluetooth device.
• Make sure that your soundbar and Bluetooth device are
both in pairing mode.
• Make sure that your Bluetooth device is not connected
to any other device.
• Make sure that you have selected “NS-SB314” on your
Bluetooth device.
My Bluetooth device
keeps unpairing
• Shorten the distance between your soundbar and your
Bluetooth device.
• If battery on your Bluetooth device is low, recharge the
battery.
“NS-SB314” does not
appear on my
Bluetooth device
• Shorten the distance between your soundbar and your
Bluetooth device.
• Put your soundbar into pairing mode, then refresh your
list of Bluetooth devices. For more information, see the
documentation that came with your Bluetooth device.
Listening to your soundbar
1 Press the (Power) button to turn on your
soundbar. The power indicator turns green.
2 Turn on the audio source device connected to
your soundbar and begin playback.
3 Press the
button on the soundbar
repeatedly to select the audio source or press
the source button on the remote control until
you hear sound from your soundbar.
Note
If you use the OPTICAL connection, you must change
your device’s audio output setting to “PCM” format.
Refer to the manual you received with the output
device for additional information.
4 Adjust the volume on your soundbar or the
audio component to a comfortable level.
Warning
Continuous use of high volume sound may
permanently damage your hearing.
5 Press the (Power) button again to turn off
your soundbar. The standby indicator lights red.
Troubleshooting
Check this list for a possible troubleshooting
solution before calling for service.
Problem
Possible Solutions
The power does not
come on.
• Make sure that the AC adapter is securely plugged into
the power outlet and the soundbar.
The remote control
does not work.
• Remove any obstacles between the remote control and
the IR sensor on the soundbar.
• The remote control battery is exhausted, replace it.
• Point the remote control at the IR sensor on the
soundbar.
• Move closer to the soundbar. The remote control is only
effective to approximately 23 ft.
No sound or very
low-level sound is
heard from the
soundbar.
• Make sure that the volume level of the soundbar or your
component is set to an adequate level.
• Make sure that the volume level is not muted. Press the
(mute) button on the remote control again to
restore the sound output.
• Make sure the correct audio source is selected. Press the
button repeatedly to switch to the correct audio
source.
• Make sure that the power is on and all connections are
secure.
• Make sure that the audio cable is connected to the audio
output (not the audio input) of the source device.
• If you are connected to an MP3 player, make sure that
the volume is turned up on the MP3 player.
Your soundbar is not
working properly.
• Unplug the AC adapter from the wall outlet and then try
plugging it in again after 30 seconds.
10
Possible Solutions
The sound is
breaking up or
buzzing.
www.insigniaproducts.com
• In most cases, your TV remote will not control your
soundbar.
• Make sure that your Bluetooth device is turned on,
Bluetooth is turned on, and “NS-SB314” is selected.
• Turn up the volume on your soundbar.
• Turn up the volume on your Bluetooth device.
• Make sure that your Bluetooth device is not muted.
• Make sure that you are playing music from your
Bluetooth device.
• Make sure that you have selected the Bluetooth source
on your soundbar.
• Make sure that your soundbar is not paired to another
Bluetooth device.
• Make sure that your Bluetooth device is not paired to a
different Bluetooth speaker.
NS-SB314_14-0307_MAN_V2_ENG.book Page 11 Friday, March 14, 2014 8:50 AM
NS-SB314 Soundbar Home Theater Speaker System with Bluetooth
Specifications
Designs and specifications are subject to change
without notice.
Power output
Frequency response
Subwoofer output
Dimensions (approx.)
Weight
39W total: left and right channel 8W (10% THD+N),
built-in subwoofer 23W (1% THD+N)
150 Hz ~ 15 kHz
2V
31.5 x 3.4 x 2.5 inches (800 x 87 x 64 mm) (WxDxH)
4.6 lbs. (2.1 kg)
Legal notices
FCC Part 15
This device complies with Part 15 of the FCC Rules. Operation of
this product is subject to the following two conditions: (1) this
device may not cause harmful interference, and (2) this device
must accept any interference received, including interference
that may cause undesired operation.
This equipment has been tested and found to comply within the
limits for a class B digital device, pursuant to Part 15 of the FCC
Rules. These limits are designed to provide reasonable
protection against harmful interference in a residential
installation. This equipment generates, uses, and can radiate
radio frequency energy and, if not installed and used in
accordance with the instructions, may cause harmful
interference to radio communications. However, there is no
guarantee that interference will not occur in a particular
installation. If this equipment does cause harmful interference to
radio or television reception, which can be determined by
turning the equipment off and on, the user is encouraged to try
to correct the interference by one or more of the following
measures:
• Reorient or relocate the receiving antenna.
• Increase the separation between the equipment and
receiver.
• Connect the equipment into an outlet on a circuit different
from that to which the receiver is connected.
• Consult the dealer or an experienced technician for help.
FCC warning
Changes or modifications not expressly approved by the party
responsible for compliance with the FCC Rules could void the
user’s authority to operate this equipment.
Canada ICES-003 statement
This device complies with Industry license-exempt RSS
standard(s). Operation is subject to the following two conditions:
(1) this device may not cause interference, and (2) this device
must accept any interference, including interference that may
cause undesired operation of the device.
Ce dispositif est conforme à la norme de l'industrie RSS exempts
de licence (s). Son fonctionnement est soumis aux deux
conditions suivantes: (1) cet appareil ne peut pas provoquer
d'interférences et (2) cet appareil doit accepter toute
interférence, y compris les interférences qui peuvent causer un
mauvais fonctionnement du dispositif."
This equipment complies with IC radiation exposure limits set
forth for an uncontrolled environment.
Cet équipement est conforme à l'exposition aux rayonnements
IC limites établies pour un environnement non contrôlé.
www.insigniaproducts.com
11
NS-SB314_14-0307_MAN_V2_ENG.book Page 12 Friday, March 14, 2014 8:50 AM
NS-SB314 Soundbar Home Theater Speaker System with Bluetooth
12
www.insigniaproducts.com
NS-SB314_14-0307_MAN_V2_ENG.book Page 13 Friday, March 14, 2014 8:50 AM
NS-SB314 Soundbar Home Theater Speaker System with Bluetooth
One-year limited warranty Insignia
Definitions:
The Distributor* of Insignia branded products warrants to you,
the original purchaser of this new Insignia-branded product
(“Product”), that the Product shall be free of defects in the
original manufacturer of the material or workmanship for a
period of one (1) year from the date of your purchase of the
Product (“Warranty Period”).
For this warranty to apply, your Product must be purchased in
the United States or Canada from a Best Buy branded or Future
Shop branded retail store or online at www.bestbuy.com,
www.bestbuy.ca, or www.futureshop.ca and is packaged with
this warranty statement.
How long does the coverage last?
The Warranty Period lasts for 1 year (365 days) from the date you
purchased the Product. Your purchase date is printed on the
receipt you received with the Product.
What does this warranty cover?
During the Warranty Period, if the original manufacture of the
material or workmanship of the Product is determined to be
defective by an authorized Insignia repair center or store
personnel, Insignia will (at its sole option): (1) repair the Product
with new or rebuilt parts; or (2) replace the Product at no charge
with new or rebuilt comparable products or parts. Products and
parts replaced under this warranty become the property of
Insignia and are not returned to you. If service of Products or
parts are required after the Warranty Period expires, you must
pay all labor and parts charges. This warranty lasts as long as you
own your Insignia Product during the Warranty Period. Warranty
coverage terminates if you sell or otherwise transfer the Product.
How to obtain warranty service?
If you purchased the Product at a Best Buy or Future Shop retail
store location, please take your original receipt and the Product
to any Best Buy or Future Shop store. Make sure that you place
the Product in its original packaging or packaging that provides
the same amount of protection as the original packaging. If you
purchased the Product from a Best Buy or Future Shop online
web site (www.bestbuy.com, www.bestbuy.ca, or
www.futureshop.ca), mail your original receipt and the Product
to the address listed on the web site. Make sure that you put the
Product in its original packaging or packaging that provides the
same amount of protection as the original packaging.
To obtain warranty service, in the United States call
1-888-BESTBUY, Canada call 1-866-BESTBUY for Future Shop call
1-800-663-2275. Call agents may diagnose and correct the issue
over the phone.
•
•
Connection to an incorrect voltage or power supply
Attempted repair by any person not authorized by Insignia
to service the Product
• Products sold “as is” or “with all faults”
• Consumables, including but not limited to batteries (i.e. AA,
AAA, C etc.)
• Products where the factory applied serial number has been
altered or removed
• Loss or Theft of this product or any part of the product
• Display panels containing up to three (3) pixel failures (dots
that are dark or incorrectly illuminated) grouped in an area
smaller than one tenth (1/10) of the display size or up to
five (5) pixel failures throughout the display. (Pixel based
displays may contain a limited number of pixels that may
not function normally.)
• Failures or Damage caused by any contact including but
not limited to liquids, gels or pastes.
REPAIR REPLACEMENT AS PROVIDED UNDER THIS WARRANTY IS
YOUR EXCLUSIVE REMEDY FOR BREACH OF WARRANTY. INSIGNIA
SHALL NOT BE LIABLE FOR ANY INCIDENTAL OR
CONSEQUENTIAL DAMAGES FOR THE BREACH OF ANY EXPRESS
OR IMPLIED WARRANTY ON THIS PRODUCT, INCLUDING, BUT
NOT LIMITED TO, LOST DATA, LOSS OF USE OF YOUR PRODUCT,
LOST BUSINESS OR LOST PROFITS. INSIGNIA PRODUCTS MAKES
NO OTHER EXPRESS WARRANTIES WITH RESPECT TO THE
PRODUCT, ALL EXPRESS AND IMPLIED WARRANTIES FOR THE
PRODUCT, INCLUDING, BUT NOT LIMITED TO, ANY IMPLIED
WARRANTIES OF AND CONDITIONS OF MERCHANTABILITY AND
FITNESS FOR A PARTICULAR PURPOSE, ARE LIMITED IN
DURATION TO THE WARRANTY PERIOD SET FORTH ABOVE AND
NO WARRANTIES, WHETHER EXPRESS OR IMPLIED, WILL APPLY
AFTER THE WARRANTY PERIOD. SOME STATES, PROVINCES AND
JURISDICTIONS DO NOT ALLOW LIMITATIONS ON HOW LONG AN
IMPLIED WARRANTY LASTS, SO THE ABOVE LIMITATION MAY NOT
APPLY TO YOU. THIS WARRANTY GIVES YOU SPECIFIC LEGAL
RIGHTS, AND YOU MAY ALSO HAVE OTHER RIGHTS, WHICH VARY
FROM STATE TO STATE OR PROVINCE TO PROVINCE.
Contact Insignia:
For customer service please call 1-877-467-4289
www.insigniaproducts.com
INSIGNIA is a trademark of Best Buy and its affiliated companies.
Registered in some countries.
Distributed by Best Buy Purchasing, LLC
7601 Penn Ave South, Richfield, MN 55423 U.S.A.
©2014 Best Buy. All rights reserved.
Made in China
Where is the warranty valid?
This warranty is valid only in the United States and Canada at
Best Buy or Future Shop branded retail stores or websites to the
original purchaser of the product in the county where the
original purchase was made.
What does the warranty not cover?
This warranty does not cover:
• Customer instruction/education
• Installation
• Set up adjustments
• Cosmetic damage
• Damage due to weather, lightning, and other acts of God,
such as power surges
• Accidental damage
• Misuse
• Abuse
• Negligence
• Commercial purposes/use, including but not limited to use
in a place of business or in communal areas of a multiple
dwelling condominium or apartment complex, or
otherwise used in a place of other than a private home.
• Modification of any part of the Product, including the
antenna
• Display panel damaged by static (non-moving) images
applied for lengthy periods (burn-in).
• Damage due to incorrect operation or maintenance
www.insigniaproducts.com
13
NS-SB314_14-0307_MAN_V2_ENG.book Page -1 Friday, March 14, 2014 8:50 AM
www.insigniaproducts.com
1-877-467-4289 (U.S. and Canada) or 01-800-926-3000 (Mexico)
INSIGNIA is a trademark of Best Buy and its affiliated companies.
Registered in some countries.
Distributed by Best Buy Purchasing, LLC
7601 Penn Ave South, Richfield, MN 55423 U.S.A.
©2014 Best Buy. All rights reserved.
Made in China.
V2 ENGLISH
14-0307