1
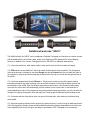
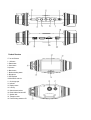
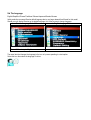
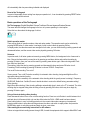
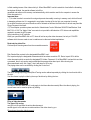
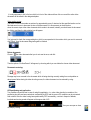
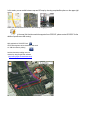
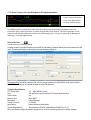
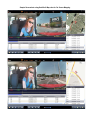
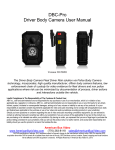
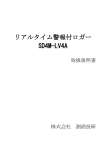
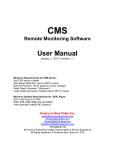
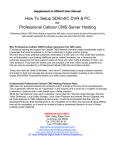
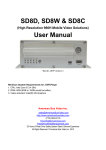
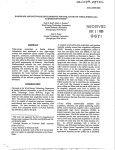
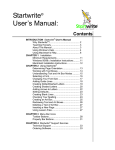
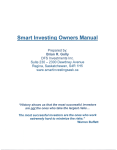
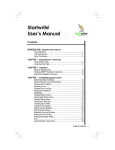
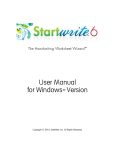
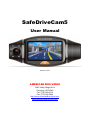
SafeDriveCam5
User Manual
Version 6.1.2012
AMERICAN BUS VIDEO
2545 Valley Ridge Drive
Cumming, GA 30040
Tel: (770) 263-8118
Fax: (770) 887-5944
http://www.AmericanBusVideo.com/
[email protected]
Public Notice Compliance
American Bus Video Inc. makes no representations concerning the legality of certain product applications such as
the making, transmission, or recording of video and/or audio signals of others without their knowledge and / or
consent. We provide public notice decals of recording of Audio & Video for public awareness with shipments of
systems. Should you purchase single components these public notice decals will not be provided, should you
require them please ask. We encourage you to check and comply with all applicable local, state, and federal laws
and regulations before engaging in any form of surveillance or any transmissions of radio frequencies.
Basic PC Skills Required (Agency implies Stewardship)
The Mobile Digital Video Recorders (MDVR) we provide operate on a PC program viewer called a Graphical User
Interface or GUI. These programs have been designed to be intuitive and require no formal training to operate the
program, as long as the user possesses basic PC skills. This is where some problems with PC skills begin for
some who are not well versed in the use of their district or company computers. Use of these GUI programs are
predicated on the assumption/requirement that the customer of this high tech video file management tool has
authorized personnel who will be operating this program who are competent with the basic operation of their own
company PCs. Companies lacking a trained PC competent authorized user for this system will need to have their
designated persons trained on the basic use of their company PC prior to using this product, as lack of basic PC
operation skills and use could compromise the integrity of the product application, the video files and possibly
their admissibility as evidence in a court litigation procedure. The manufacturer and their representatives are not
responsible, licensed or certified to train users of this program on the basic functions of a customer or company’s
own company PCs.
Simply stated; if the intended customer system operator is incapable of downloading files from the internet, open,
running or executing application files, cannot download Media Player Program codec plug-ins, cannot save a file,
transfer a file or browse for a file, nor make a screen capture of the program viewer GUI, cannot send a saved file
by e-mail, cannot save a file to a portable digital storage device, then you are not ready for a digital vehicle
surveillance system. Basic PC skills are a requirement of all who intend to operate these products.
Notice on Tampering:
Mobile video solutions like the SD1m, SD4m and SD4 are of conventional multi component design with
heavy-duty metal case camera, steel-locking devices to limit the access to the memory cards and deter
vandalism and driver tampering. Non conventional solutions like those listed on this page are susceptible to
vandalism and driver tampering so they are not intended for or well suited for applications or environments where
those being monitored have direct access to the recording devices. All applications or environments that expose
the devices to vandalism or tampering should be equipped with the conventional vandal resistant products such
as the SD1m, SD4m and SD4 series systems.
What can a Mobile Digital Video Security Recording System Do for your vehicle fleet?
Excerpt from: "Buyers Guide To Digital Bus Video Systems" with permission.
Can Provide A Deterrence
Digital pupil transit camera systems on buses are a proven deterrent to help prevent some student behavioral
problems. This is not debatable and has been not only used as a primary deterrence by security and law
enforcement in the past but by school districts throughout the USA. Digital video surveillance systems are
management tools to increase the safety of your able and disabled student transit passengers, increase driver
awareness of supervision so they are mindful of their actions.
Can Act As Expert Witness
Documentation of child or driver incident by use of a school bus camera system, of the actions and or statements
made without bias, prejudice or outside influence. Recorded video evidence has and can be used in court as long
as legal guidelines and access controls are maintained.
Can Overcome Perspective Bias
These products provide a means to verify or dismiss actions and events that may be claimed by children, parents
or others who may be responding to incorrect information, lies, slander or false perceptions. Children and
politicians share a propensity to fabricate falsehoods. Like so many "Washington Weasels" who only admit their
deceit when it is played in high definition video for all to see, School bus camera systems provide a similar
service as up to the point a parent sees their angel with his hands around another child's neck, nothing you could
have told those parents would have changed their minds that their child was being falsely accused.
Can Prove A Negative or Non-Event
Documented events, actions or lack of them, can help defend your driver, students, school administration or
school system against liability lawsuits. One of the most damaging to a persons reputation and hardest to defend
against can be malicious, baseless or unfounded accusation against a person in authority by someone they are
charged to protect. It is impossible to prove something did not happen between 2 individuals when there is no
evidence, witnesses or confession. Digital bus video systems can provide impartial documentation to help resolve
complaints or concerns.
Can Help Criminal Documentation For Prosecution
Mobile digital video observation systems can document incidents of; aggravated assault, assault, rape, sexual
assault, assault, hate crimes, bulling, terrorist threats, for legal prostitution of the perpetrator in defense of the
victim. The best evidence in court is often video file of the incident from a scientific recording instrument like a
student video surveillance system as it is impartial.
Can Help Prevent Vandalism
When vandals are documented by Digital vehicle recorder they can be proved guilty as charged and punished,
protecting the district from unnecessary waste due to continued vandalism. Can Provide Piece of Mind
In knowing you have taken positive public and verifiable steps to either stop or prevent unwanted behavior on
your vehicle by addition of these vehicle camera systems.
SafeDriveCam5 aka “SDC5”
The SafeDriveCam5, aka “SDC5” can be considered a Graphical Tachograph as it functions as a motion recorder
with the added ability to record video, audio, inertia, event triggers and GPS speed and On Screen Mapping
functions. In addition to the common Tachograph functions, the SDC5 has additional characteristics:
(1) It has internal dual lens, which makes it able to catch and shoot both of the front and back images.
(2) GPS module has been added to it, which can record the driving/travel track completely. The driving/travel
track can be showed on the map by connecting Google map through Internet while you can watch the video on
the computer by using the special accompanying software, which can help you to track the driving/travel track of
the vehicle.
(3) It has been equipped with internal G-Sensor i.e. Gravity sensor, which may record the gravity sensing
information and which may judge according to the up and down deviation, left and right deviation and front and
back deviation of the vehicle, when the deviation approaches a certain value, it will consider that abnormality
occurred to the vehicle and it will automatically give lock protection to the current video. At the same time of
viewing/watching the video on the computer by using the special accompanying software, you also can watch the
changes of the gravity sensing data, which may help you to track the gravity status during the travelling course.
(4) Continuous real time video without even one second of missed video, which makes your evidence being
more reliable.
(5) Special encryption protection function protects your personal privacy. In order to bring the maximum function
of the Tachograph into full play, please read this handbook before using (please understand that we will not give
notice separately if there’s any change to the design or specification of the Tachograph or its accessories).
User Manual Contents
Public Notice Compliance
Basic PC Skills Required (Agency implies Stewardship)
Notice on Tampering:
What can a Mobile Digital Video Security Recording System Do for your vehicle fleet?
Can Provide A Deterrence
Can Act As Expert Witness
Can Overcome Perspective Bias
Can Prove A Negative or Non-Event
Can Help Criminal Documentation For Prosecution
Can Help Prevent Vandalism
Product Structure
Begin to use the Tachograph
Charge the battery
Preparation for the memory card
Adjust the position of the lens
Turn on and off the Tachograph
Basic operations of the Tachograph
Switch operation modes
Set menu
Video shooting
Using of shortcuts during video shooting
Video reading/access and using instructions for AP software
Read and play video files
Filing of video documents
Delete documents
Documents restoring
GPS positioning and application
Using of tool box
Technical Specifications
Accessories Table
Product Structure
1.Turn on/off button
2. OK button
3. Reset button
4. Down button
5.Up button
6. Menu button
7. Modes switching button
8. Microphone
9. GPS interface
10.MicroSDHC card slot
11. Car charger port
12. Indicator
13. Display screen
14. Lock key
15. Optical screen resistor
16. Inside Vehicle Camera w/IR
17. Speaker hole
18. Triangle nut hole
19. Forward facing camera no IR
Set The Language:
English/Simplified Chinese/Traditional Chinese/Japanese/Russian/German
Initial production runs were Russian default language due to very large demand from Russia for this model.
Should your unit display Russian as the default language, this is the process to change language:
Russian Language Default Menu
English Language Menu
Press “OK” to change to English
The menu item that changes the language is the icon of a person speaking in a text caption.
Select this icon then select the language of choice.
Begin to use the Tachograph
Charge the battery
The process to charge the battery:
Charge the batteries by using the attached vehicle power.
The green charging indicator will be lightened during the course of charging, and the indicator will go out
automatically after the charging finished. The time for the entire charging is approximately four hours.
Preparing the memory card (MicroSDHC)
Requirements on MicroSDHC card: The Tachograph requires that the card capacity should be 4GB – 32GB, and
its speed should be and be more than Class 6.
Since the Tachograph uses an independent special file structure system, it should be formatted on the DVR to
establish the special file structure system when you use memory card in it for the first time. Be aware that when
you format the SD card, all the data on the memory card will be deleted and cannot be restored, including the
video under protection.
Therefore, please copy and make backup of and for the important data before formatting the memory card.
Note: AP software
For the customer use will be generated in the DVR and written to the MicroSDHC card after the Tachograph has
been formatted.
The icon below is the Video Player for the system that is recorded to the MicroSDHC card by the DVR.
Since it has GPS positioning and time service function, it should be set with the time zone it locates, while the
current time zone will be set automatically only by turn on AP in the MicroSDHC card.
The icon below is the GPS indication.
This GPS icon will be displayed on its screen and the time service cannot be realized by GPS positioning if the
aforesaid operation has not been carried out, however, which will not affect other functions.
Adjust the position of the lens
Its front/back lens can be rotated for 270 degree to the front or back, so as to cooperate with the fixing position of
the Tachograph with better effect to reach a better video shooting effect.
Note only one lens has built in IR LEDs to illuminate the inside of the vehicle at night and this lens is the one that
must be pointed inside the vehicle as the IR LEDs will cause a “ghosting” effect when reflected back from the
windshield if pointed forward of the vehicle.
Turn on and off the Tachograph
1. Turn on and off manually: Press and hold the power button one time, and the red Turning On indicator will be
lightened, then it will be started after the sound Tick and video shooting can be carried out. You can turn off it by
pressing and holding the power button again.
2. Turn it on or off while driving / travelling: Connect with the vehicle power first, then it, when the vehicle is
starting, will be turned on automatically and begin to shoot videos after time delaying.
Note: If the Tachograph uses internal power, in case of low power, the Tachograph will save the videos and turn
off automatically after low power being indicated and displayed.
Reset of the Tachograph
In event of abnormality occurs arising from improper operation to it, it can be started by pressing RESET button
and its normality will be restored.
Basic operations of the Tachograph
Set The Language: English/Simplified Chinese/Traditional Chinese/Japanese/Russian/German
The menu item that changes the language is the icon of a person speaking in a text caption.
Select this icon then select the language of choice.
Switch operation modes
There are two kinds of operation modes: video and replay modes. The operation mode can be switched by
pressing MODE button. In video mode, it can begin or stop to shoot videos by pressing OK key.
In Replay mode, the video documents are arranged in time order, you can check them by pressing upwards and
downwards buttons, and the current video can be played by pressing OK button.
Set menu
In preview mode, it will enter system set menu by pressing MENU button, the background color of menu set is
blue. Choose the items which you need to set by pressing up and down button and confirm the setting by
pressing OK button, then your can exit the menu by pressing menu button again. Video shooting mode: Duallens /front lens /back lens
Time setting: Adjust the time by pressing upwards and downwards buttons and press OK button to exit.
Formatting: Enter formatting by pressing OK button to choose YES/NO. Prompt tone:
Turn on/off Voice recording: Turn on/off
Screen pre-set: Turn on/off Protection sensitivity for automatic video shooting: low/general/high/turn off the
automatic video protection function.
(The function set the sensitivity of the automatic video shooting while the gravity sensor is starting) Frequency:
50HZ/60HZ. Default set: Yes/No(Choose to decide whether to restore the default factory parameter setting)
Video shooting
Begin/Stop video shooting: Video shooting will begin automatically when it starts or the TF is inserted. The video
shooting may be stopped during video shooting course by pressing OK button, which may be re-begin by
pressing OK button again.
Using of shortcuts during video shooting
Press downwards button to turn off/on voice recording function. Press turn on/off button to switch between front
and back lens in full screen (which only can take effect when the DUAL- LENS mode has been chosen).
Press locking button to carry out locking protection to the current video under emergency circumstances.
Pressing mode button to stop video shooting and save the video, and switch to replay mode. And press the
MODE button again to exit replay mode and begin to shoot a new video.
Video reading/access and using instructions for AP software
It does not support direct reading/access through USB, it needs the equipment which supports MicroSDHC card
to finish reading/access of the videos shot by it. When MicroSDHC card is inserted into it and after the formatting
having been finished, the special software tool will be
generated and written on the memory card automatically, which must be used for the computer to access the
video documents in it.
Important Note:
( 1 )In order to make it convenient for using and prevent abnormality occurring to memory card, which will result
in damaging software tool, it is suggested to copy/make a backup of the tool into your computer for saving.
As we know the above may never be either read or followed we will have the files online for all who may need the
Player Program in the future.
(2)The computer operation system must be the “Administrator” level of Windows 2000/XP/Vista/Windows 7and
MAC OS x 10.3.6.The “limited “User” accounts do not provide the full selection of PC drivers and capabilities
required to operate the AP Program.
Using instructions for AP software
When you open MicroSDHC disk on PC, there will not be any other video document, but only a J PLAYER
software which the user needs to use to read/access to video and related applications.
Read and play video files
Click and open choosing menu from the occurred documents.
Disk: Read all the contents in the designated MicroSDHC card .
File: Import and play the designated documents which have been saved into PC. Route: Import AP for all the
video documents which are under the designated PC folders. Password: If it is MicroSDHC card and this card has
a password, then it only can be read provided that the password has been input. After choosing the
above-mentioned route, click “Apply”, then it will return to AP to play.
The playing status can be controlled by clicking the Control icon:
The Slow Turning/Stop/Play (pause)/Quick Turning can be realized separately by clicking the icon from the left to
the right.
You can choose to play the video by the way of dual lens by clicking the icon:
Dual lens /Front lens /Back lens (It is only apply to dual lens video documents) When the video is playing, the
current frame can be saved as picture by clicking.
Filing of video documents
Two type of file saving:
one type is to file and save the entire video document,
another type is to file and save a certain section of the video chose by you.
File and save the entire video document:
it is only necessary to tick in the box which is in front of the video and then click as a result the entire video
document will be saved in the designated place.
Video section saving:
The video of it will not be made as sections for approximately every 3 minutes, but the specified section can be
filed and saved, so as to decrease the size of the documents. It is unnecessary to check the box
when the cursor stops at the video document which needs to be saved, instead, you should save the document
by clicking, and then the below dialog box will appear.
You just need to check the corresponding box, which is correspondent to the section which you want to save and
click “Filing”, then the document filing/saving will be finished.
Delete documents:
Choose
the video documents that you do not want to save, and click
Then the options “Confirm/Cancel” will appear, by choosing which you can delete the chosen video document.
Documents restoring:
Damage may have occurred to the document which is being shooting currently arising from card problem or
abrupt power failure during the video shooting course, the video document can be restored by using:
GPS positioning and application:
Two conditions should be met in case of using this application, i.e.: when video shooting is carried out, the
positioning should have been carried out successfully by GPS and the current PC computer can be connected
with network. After the video having been positioned by GPS successfully, a notice in respect of latitude,
longitude and moving speed will appear at the upper side of AP:
then you can open or close
the map by clicking.
In this mode, you can switch between map and 3D map by choosing map/satellite options on the upper right
corner.
While you can shoot the real lens on the street by dragging the icon
to the map (this function needs the supports from GOOGLE, please contact GOOGLE for the
details of specific area and country).
KML application of GOOGLE Earth:
GPS Positioning data can be downloaded and saved
as *.KML document by clicking
.
And then the entire travelling route can
restored by using Google Earth software
(http://www.google.com/earth/index.html).
3 “G” Sensor Function for Crash & Dangerous Driving Documentation
• X axis: Front & rear movement
• Y axis: Left & right movement
• Z axis: Up & down movement
The SafeDriveCam5 is a passive Driver Safety & Eco Driver Device that can document Driver Safety & Eco-Driver
Conservation of fuel, reducing fuel costs, air pollution and your fleet’s carbon footprint. The SDC1 incorporates a Driver
Safety Recorder with dual vehicle video cameras, built in GPS module, built in "G" sensors, passive Driver Management
technology in a compact digital Recorder.
Using of tool box:
You can enter into toolbox by clicking
to realize a series of practical functions such as SD card formatting, software upload (upload the software into SD
card), SD card speed testing, map selection and user password setting etc.
Password setting: In need of protection, the user can encrypt a password to MicroSDHC card. And the video in
MicroSDHC card only can be opened /unfolded by using the password.
Technical Specifications
LCD Screen Size
2.7” High definition screen
Lens
140-degree front super-wide lens/120 degree back wide lens
Video Format
AVI
Memory Card
Micro SDHC
Microphone /
Internal Speaker
Vehicle Power DC
5V 500MA
Input Battery
Internal lithium polymer battery
System Requirements
Above Windows 2000/XP/Vista/Windows 7,MACOS x 10.3.6
Note: specifications subject to frequent change without notice as technology improves or design changes.
Sample Screenshots using Satellite & Map view for On Screen Mapping
Optional Accessories & MicroSD cards
MicroSD cards
Class 6-10 in sizes of 6GB-32 GB SDHC micro, provided with SD adapter cards so they can be used with standard SD card
slot readers or built in slots on your PC, laptop or Mac.
Receptacle Extension:
This is used for those wanting Continuous recording power for the DVR.
With the addition of an optional extension receptacle, it is possible to wire the extension receptacle directly to permanent
vehicle power from the vehicle battery. When the DVR power plug is inserted into this Extension port, the DVR is now
provided power all of the time. This permits the DVR to record continuously, whether the vehicle ignition is on or off. Over
time this will drain the battery of the vehicle. This may be acceptable during work days to permit the vehicle to be on all
night long, but for weekend the DVR should be turned off so the 2 days and 3 nights do not drain the vehicle battery
Security Tampering Decal:
These are sold in rolls of 100 & 500, these decals self-destruct when removed so when placed over SD card slot they can
deter & detect tampering or unauthorized card access.
AMERICAN BUS VIDEO
Tel: (770) 263-8118
Fax: (770) 887-5944
http://www.AmericanBusVideo.com/
[email protected]