1
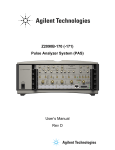
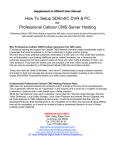
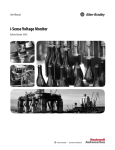
SD8D, SD8W & SD8C
(High Resolution 960H Mobile Video Solutions)
User Manual
March 1, 2015 Version 1.1
Minimum System Requirements for: DVR-Player
1. CPU: Intel Core i5 3.4 GHz
2. RAM: 6GB (8GB or 16GB would be better)
3. Video standard: Intel(R) HD Graphics
American Bus Video Inc.
[email protected]
http://www.americanbusvideo.com
(770) 263-8118
DriverSafetyCameras.com
FleetDriverRiskManagement.com
25 Years of Fleet Driver Safety System Sales & Service Experience
All Rights Reserved. © American Bus Video Inc. 2015
Important User Information
About On Screen GPS Mapping
This feature requires unrestricted access to Google maps, so some highly restricted proxies servers may prevent this. If the
Internet access is prevented at the customer side, the free On Screen Mapping feature may be prevented from functioning. This
does not affect the speed of the vehicle recorded on the screen during the trip. Also we have found the GPS antenna location
needs to be on the vehicle roof to assure the best function.
Memory Storage Required
The SD8D, SD8W & SD8C series High Resolution mobile vehicle video solutions are sold WITHOUT memory storage device,
as the type of SATA 2.5” internal drive will be up to the customer either SSD or HDD depending on their preference and
budgets, up to 2TB capacity.
Basic PC Skills Are Required
The Mobile Digital Video Recorders (MDVR) we provide operate on a PC program viewer program called a Graphical User
Interface aka GUI. These programs have been designed to be intuitive and require no formal training to operate the program,
include a manual for those who seek additional guidance, as long as the user possesses basic PC skills. This is where some
problems with PC skills begin for some who are not well versed in the use of their district or company computers. Use of these
GUI programs are predicated on the assumption/requirement that the customer of this high tech video file evidence
management tool has authorized personnel who will be operating this program who are competent with the basic operation of
their own company PCs.
Companies lacking a trained PC competent authorized user for this system will need to have their designated persons trained
on the basic use of their company PC prior to using this product, as lack of basic PC operation skills and use could compromise
the integrity of the product application, the video files and possibly their admissibility as evidence in a court litigation procedure.
The manufacturer and their representatives are not responsible, licensed or certified to train users of this program on the basic
functions of a customer or company’s own company PCs.
ABV does not supply the resources required to teach customers how to operate their PCs to a degree that they may then
operate programs running on them. It is the customer’s responsibility to learn how to operate their own PC before implementing
a product that requires operation on their PC. Simply stated; if the intended customer system operator is incapable of
downloading files from the internet, opening programs under Administration access, running or executing application files under
Administration access, cannot download Media Player Program codec plug-ins, cannot save a file, cannot transfer a file or
browse for a file, nor make a screen capture of the program viewer GUI, cannot send a saved file by e-mail, cannot plug a HDD
or SSDD SATA card Reader into a removed memory storage device, cannot save a file to a portable digital storage device, then
you are not ready for a digital vehicle surveillance system. Basic PC skills are a requirement of all who intend to operate these
products.
Basic PC Skills Are Required
The Mobile Digital Video Recorders (MDVR) we provide operate on a PC program viewer program called a Graphical User
Interface or GUI. These programs have been designed to be intuitive and require no formal training to operate the program, as
long as the user possesses basic PC skills. This is where some problems with PC skills begin for some who are not well versed
in the use of their district or company computers. Use of these GUI programs are predicated on the assumption/requirement
that the customer of this high tech video file management tool has authorized personnel who will be operating this program who
are competent with the basic operation of their own company PCs. Companies lacking a trained PC competent authorized user
for this system will need to have their designated persons trained on the basic use of their company PC prior to using this
product, as lack of basic PC operation skills and use could compromise the integrity of the product application, the video files
and possibly their admissibility as evidence in a court litigation procedure. The manufacturer and their representatives are not
1
responsible, licensed or certified to train users of this program on the basic functions of a customer or company’s own company
PCs. ABV does not have the unlimited resources required to teach customers how to operate their PCs to a degree that they
may then operate programs running on them. It is the customer’s responsibility to learn how to operate their own PC before
implementing a product that requires operation on their PC. Simply stated; if the intended customer system operator is
incapable of downloading files from the internet, opening programs, running or executing application files, cannot download
Media Player Program codec plug-ins, cannot save a file, cannot transfer a file or browse for a file, nor make a screen capture of
the program viewer GUI, cannot send a saved file by e-mail, cannot save a file to a portable digital storage device, then you are
not ready for a digital vehicle surveillance system. Basic PC skills are a requirement of all who intend to operate these products.
System Administrator Access Required
Some PC Operating Systems limit access permissions and control as well as require applications to be downloaded, opened
and run as an Administrator, making Limited User access problematic for the proper operation of the programs. It is the
customer responsibility to secure IT authority to run the video player or CMS programs as Administrator, if the customer PC is
operating in a limited access user environment.
Special Notice Regarding “SD8W & SD8C” with Wi-Fi & 3G/4G CMS Network Systems
Those customers incorporating the Central Management Software into their mobile video application must have in-house a
Network Administrator with at least the training and certification of Microsoft Certified Systems Administrator (MCSA) to install,
setup, configure or operate the higher functions of the program capabilities as they require access to your Wi-Fi network and
your mail server. It is solely the responsibility of the purchaser to provide competent certified network administration for
installation, setup, and maintenance of the network. Manuals are provided instructing trained MCSA network specialist in how to
setup, configure and program the network software if you choose to use it. Customer PC hardware and software vary widely,
configuration is specific to each customer application and it is the customers responsibility to have in house staff who are MCSA
trained in order to setup, configure, program the DVR and maintain all network related networks.
ABV provides no CMS server installation support, no CMS server setup support, no training and no technical expertise in the
use or operations of any customer network, or CMS software program provided for use on said network.
In simple terms, if you do not have a competent in house Network Administrator with at least the training and certification of
Microsoft Certified Systems Administrator (MCSA) who will be installing the CMS, setting up the CMS, programming the DVR,
operating the CMS program who are competent with the operation of their own company Wi-Fi network and mail server
networks, then you should not be purchasing the Wi-Fi or 3G Cellular CMS Network driven module for the SD8W & SD8C
systems.
Minimum System Requirements for: DVR-Player
1. CPU: Intel Core i5 3.4 GHz
2. RAM: 6GB (8GB or 16GB would be better)
3. Video standard: Intel(R) HD Graphics
2
Before installing and using, be sure to read the Manual, then you will properly use and protect your
machine. The first part of the statement concerns the matters to be attention before installing and using.
!
Attention
"
To protect your rights, before using and installing, please carefully read the contents of the
manual.
"
This product is used for car inside, in order to prevent short-circuit or the risk of electric shock, do
not make the machine in the rain or humidity environment.
"
Event of any solid or liquid into the machine, please disconnect the power of the machine
immediately, and ask the qualified technical staff to check, then restart it.
"
The product is high-tech equipment; machines can not be repaired by users even very small
original part. Once failure occurs, please ask for the qualified technical personnel, or contact with
the dealer. Do not repair it by users themselves.
!
Installation Environment
"
8-36V DC power supply, please confirm the local power supply before power on.
"
If the machine were not used for a long time, please completely disconnect the video’s power
supply.
"
Please select the appropriate location for the installation of the machine, where the air can flow
freely around the machine to avoid overheating or water inflow.
"
Machine can not be installed near the radiators, or near the ventilation road which is near heat, or
directly under sunshine, or too much dust, or rain water, or near the area where the mechanical
vibration or impact happens.
!
Package List
Name
3
Quantity
HDD Mobile DVR
1
User Manual
1
Certificate of approval
1
Remote Control (not include battery)
1
Connecting Cable
3
Key
1
Note: When the specification or parameters changes, no other announcement in addition.
Contents
1
2
3
4
5
6
Product Overview ..................................................................................................................................................... 5
Basic functions .......................................................................................................................................................... 5
2.1
Audio/Video Compression Format ................................................................................................................. 5
2.2
Audio/video recording mode........................................................................................................................... 5
2.3
Image quality when monitoring, recording, playback..................................................................................... 6
2.4
Total Resources ............................................................................................................................................... 6
2.5
Audio video synchronous recording ............................................................................................................... 6
2.6
Access detection.............................................................................................................................................. 6
2.7
Signal loss alarming function.......................................................................................................................... 6
2.8
Alarm linkage.................................................................................................................................................. 7
2.9
Alarm pre-recording........................................................................................................................................ 7
2.10 Full duplex....................................................................................................................................................... 7
2.11 Malfunction alarming function........................................................................................................................ 7
2.12 Self-test the status and self-recovery............................................................................................................... 7
2.13 Front-end device control and multi-channel monitor and switch ................................................................... 7
2.14 Networking...................................................................................................................................................... 7
2.15 Data backup..................................................................................................................................................... 8
2.16 Authority, encryption, data safety ................................................................................................................... 8
2.17 Log function .................................................................................................................................................... 8
Features ..................................................................................................................................................................... 8
3.1 Operating system................................................................................................................................................... 8
3.2 Compression format .............................................................................................................................................. 8
3.3 Monitoring and Recording .................................................................................................................................... 8
3.4 Index and Playback ............................................................................................................................................... 9
3.5 HDD storage and data backup............................................................................................................................... 9
3.6 Control................................................................................................................................................................... 9
3.7 Others .................................................................................................................................................................... 9
Technical Parameters ............................................................................................................................................ 10
Instruction of Installation........................................................................................................................................ 12
5.1
Instruction of External Interface Wiring ....................................................................................................... 12
5.2
Instruction of HDD Installation..................................................................................................................... 13
Instruction of Using................................................................................................................................................... 15
6.1
Instruction of Front Panel.............................................................................................................................. 15
6.2
Instruction of Remote Control Operation...................................................................................................... 16
6.3
Menu Setting Instruction:.............................................................................................................................. 18
6.4
DVR Video Playback Instruction.................................................................................................................. 30
4
6.5
6.6
6.7
6.8
6.9
Video Backup................................................................................................................................................ 32
PTZ control ................................................................................................................................................... 33
Video Data Volume....................................................................................................................................... 33
Extranet Port Mapping .................................................................................................................................. 34
Domain binding setting ................................................................................................................................. 38
1 Product Overview
The four-channel embedded digital hard disk video recorder is designed for car safety. It uses embedded
processor and embedded operating system, combined with video / audio compression / decompression, GPS,
car recorder, and the capacity hard disk storage technology to confirm the high intelligence and high stability.
Widely used for bus, ship, train, and other areas of security.
2 Basic functions
2.1
Audio/Video Compression Format
The video adopts latest IS014496-10 (H.264) video compression technology, high compression rate to
ensure a better image quality under less storage; the audio adopts ADPCM compression method, output a
better voice with low distortion.
2.2 Audio/video recording mode
"
Compression format
The audio video data are stored through special files, encrypted to prevent data loss under
frequent power failure circumstances.
"
Compression stream
Image quality with 8 levels and adjustable (192Kbps-2.0Mbps/channel) to meet different
requirements.
"
Storage
2.5 inch SATA hard disk 2TB maximum.
5
2.3
Image quality when monitoring, recording, playback
"
Resolution
Monitoring: 704*576/CH
Playback: 704*576/CH
"
960*576/CH; Recording: 704*576/CH
960*576/CH;
960*576/CH;
Frequencies
The monitoring, recording and playback are all with 25fps or 30fps
"
"
Horizontal resolution for monitoring
704*576 / 960*576/channel
Horizontal resolution for playback
704*576 /960*576/ channel .
2.4
Total Resources
"
Support 8 channels D1 (704*576)
960H(960*576) simultaneous recording, total 240fps.
"
Support 8 channels D1 (704*576)
960H(960*576) simultaneous playback, total 240fps.
2.5
Audio video synchronous recording
"
Record and playback the audio/video/GPS positioning data simultaneously. The information can
be checked by CMS software which can be installed on computer.
2.6
Access detection
"
When after open motion detecting video recording equipment in camera detects movement, the
monitoring area can start recording, trigger the alarm, warning area size, location, number, area
and alert in sensitivity or removal of alert, and other functions, can be set up.
2.7
Signal loss alarming function
"
When the video signal gets lost, the device will send alarm signal via internet. Responding in less
than 5 seconds with log information. NOTE this function will not work when a channel is not in
recording status or if a channel is displaying in full screen.
6
2.8
Alarm linkage
"
Support 4CH alarm input (8-36v high level voltage to trigger); 1CH alarm out (by relay, max.
500mA, switch ON);When the alarm is triggered, the audio recording will be started automatically
(30-330s, adjustable).Alarm out will close for (5s-330s, adjustable) and send alarming signal,
responding in less than 1s.
2.9
Alarm pre-recording
"
Alarm video mode, alarm pre - recorded more than 5 s video, audio, positioning data.
2.10 Full duplex
"
Under full loading status, users can index, playback the recorded data with no frame loss.
2.11 Malfunction alarming function
"
When the DVR fail to work, the alarm switch is ON, showing alarm information for 5 minutes at
least.
2.12 Self-test the status and self-recovery
"
When in working status, the “RUN” indicator will constantly flashes and check the device.
Recovery will take no more than 3 minutes when device crashes.
2.13 Front-end device control and multi-channel monitor and switch
"
The DVR can control PTZ cameras through default protocols (RS-485, PELCO-D, 9600 baud
rate), 8 channels real time, switchable to monitoring mode.
2.14 Networking
"
7
Combining the CMS software. With built-in 3G module, the car can be monitored remotely.
2.15 Data backup
"
To backup the HDD data into computer via HDD card reader;
"
Downloading the HDD data remotely through network.
"
Transfer the HDD data to computer, download and play the media via our unique DVR player
software. Users can also switch the HDD files into universal AVI format to make it workable in
other players.
2.16 Authority, encryption, data safety
"
Enter the DVR by password, default for “6666”. Data is stored in a special file system to ensure
it’s encrypted and safe..
2.17 Log function
"
The log includes the alarming and malfunction information, stored into HDD. It can be checked via
computer.
3 Features
3.1 Operating system
"
Embedded Linux operating system, high stable, free from virus.
"
English/ Chinese/ Russian/ Portuguese menu switchable.
"
Graphical user interface
3.2 Compression format
"
H.264 format: more excellent frame rate, quality image output
3.3 Monitoring and Recording
"
Monitor: 8CH D1(704*576)/ 960H (960*576 )
"
Record: PAL 200fps, NTSC 240fps, full real-time 8CH D1(704*576)/960H recording.
8
"
Record mode: by alarm, schedule, manual, motion detection.
"
Support 8CH video and 8CH audio meanwhile recording.
"
Record image quality: 8 levels adjustable
"
Video recorded in special file system to ensure lifespan and safety of HDD
"
Reliable evidence with unchangeable audio/video data.
3.4 Index and Playback
"
Index and playback by time.
"
Support 8CH audio, 1CH video (any channel can be chosen), index and playback at the same
time, support amplifying in one channel.
"
Data only played by DVR playback software
3.5 HDD storage and data backup
"
Support 2.5 HDD max 2TB.
"
The HDD data can be backed up via PC software.
"
Support USB backup.
3.6 Control
"
Dual MCU control, to ensure DVR stability.
"
Support remotely control by remote controller
3.7 Others
9
"
Upgrade through USB , easy to maintain.
"
Protect by password, to avoid data damage.
"
Delayed shutdown: default for 5s, adjustable
"
Anti-pulse and low voltage protection
"
Real-time timer
"
Anti-shock for the PCB panel and parts.
"
Watch dog function to avoid system crush.
4 Technical Parameters
Items
Device parameters
Performance index
Name
Product Name
8 Channel Mobile DVR(HDD Storage)
Operation System
Linux
Operation Interface
Graphical Interfaces, Chinese/English optional
File System
Proprietary Format
System Privileges
User Password
System
Video Input
Video Output
Video
Audio
USB
Interface
Network
Interface
GPS
Interface
Extend
Interface
1 Channel PAL/NTSC Output, 1.0Vp-p
75Ω
Composite Video Signal
1 Or 8Screen Display
Video Standard
PAL:25frames/Sec;NTSC:30frames/Sec
System Resources
PAL:100 Frames; NTSC:120 Frames
Audio Input
8 Channels Independent Input 600Ω
Audio Output
1 Channel(8 Channels Can Be Convert Freely)
Basic Output Level
1.0—2.2V
Distortion Plus Noise
≤-30dB
Recording Mode
Sound And Image Synchronization
Audio Compression
ADPCM
Image Compression
H.264 Fixed Code Stream
Video Stream
Alarm
75Ω.Both B&W and Color Cameras
Video Display
Image Format
Digital
Processing
& Storage
8ch Independent Input: 1.0Vp-p
Video Taking Up Of Hard Disk
Playback Resolution
8*960H 960*576
8*D1
704*576
1.0M-6.0Mbit/s
450M-2.6GByte/hour
1or8*960H
1or8*D1
Audio Bitrate
4KByte / s / channel
Audio Taking Up Of Hard Disk
14MByte / hour / channel
HDD Storage
Support Max 2TB
Image Quality
Eight Grades to Choose
Alarm in
8 Channels Independent Input. High Voltage Trigger
Alarm out
2 Channels Independent output
Move Detect
available
Host Access
Can Expand One For USB Disk Backup
Wire line Access
Can Expand One RJ45 Ethernet Port
Wifi
Can Expand One Wifi Module Inside
3G
Can Expand One WCDMA or CDMA2000 Module Inside
GPS
Can Expand GPS Module Inside
RS232
Extensible,it is convenient to connect with other vehicle equipment
RS485
Extensible,it is convenient to connect with other vehicle equipment and PTZ
10
Camera
Intercom
Can Expand Intercom Module Inside
G-Sensor
Can Expand G-Sensor Module Inside
Canbus
Can Expand Canbus Module Inside
Power Consumption
Others
Working Temperature
Clock
Product Size
DC8-36V
-20
~ +85
Built-In Clock, Calendar
245(L)*190(W)*71(H)mm
with Holder
3.0KG(without HDD)
Package
Each In a Box, 5 set/Canton
Box Size
245(L)*190(W)* 71(H)mm
Carton Size
650(L)*375(W)* 255(H)mm
Carton Weight
14kgs/ 18kgs (without HDD)
Optional functions:
Basic Type (Pin Aviation Connector)
+A: GPS Function
+B: 3G Function
+C: Pin Aviation Connector
+D: RS485&RS232
+E: Lan Port
+G: G-Sensor Function
+H: Intercom Function
+W: Wifi Function
11
12W
Product Weight
Packaging
+K: Canbus
5%
5 Instruction of Installation
5.1
Instruction of External Interface Wiring
Remarks:
"
If the power supply is 12V, then the current of 12V output can be just 1A. So if there are more than
3pcs cameras, we suggest customers to get power for other cameras from the 12V vehicle power
directly or use Our special car power supply.
"
RS485
RS232
LINK CANBUS interface are optional interface, available only when you listed
in the order for this interface.
"
Ports:
DEBUG: testing port
EXTEND: intercom connecting port
SENSOR: alarm port
12
5.2
13
Instruction of HDD Installation
9
10
Make sure whether power switch is turned on or turned off, if it is turned on, please use the key, turn the
indentation on the “turn off” position.
"
Pull the front panel of the hard drive box. Carry out the hard drive and drop it on the table.
"
Set down the two screws of the hard drive by cross-screwdriver.
"
Drop the under backer of hard drive box, and then check the line whether it is on top of the under
backer or not.
"
Bring here the SATA hard drive which needs installation; connect the line joint of hard drive box
to the hard drive. Please note the heading of the line while connecting. Make sure all of the
connecting is complete done.
"
Put the hard drive in the hard drive box. The obligate line of hard drive needs longer, the line of
hard drive needs to lie on the right position.
"
Let the four white screws of the machine through the center hole of the four shockproof rubber
pads. Fix hard drive on the four holes of hard drive box, do not make the screws too taut, leave a
little space for hard drive to move. So it can reach a perfect effect.
14
"
Insert the hard drive under backer which has hard drive to the hard drive top backer, and then,
use cross screwdriver and the screw to fix the under backer and the top backer.
"
Aimed the hard drive box towards the groove of the front board, level push. Please note the face
and back while pushing. Upturn the silk-screen on the right position.
"
Wring the lock of the front board by key. Turn the groove on the “turn on” position, lock hard drive
box to prevent hard drive from moving out.
Note : Hard drive fixing lock besides fixing the hard drive, also take the place of host power switch .So
do this operation, make sure all lines are completely connected. Otherwise, if car‘s power have
been connected with the standard input voltage, the machine should be destroyed. So while
installation, if the line has not been completely connected, please stop to do this step. More
careful when installation. The hard drive can not roll out even it has not been locked.
6 Instruction of Using
6.1
Instruction of Front Panel
"
15
LED
#
PWR LED: lighting while work starts. Power LED on.
#
RUN INDICATOR: flashing when machine work well
#
ACC INDICATOR: ACC controller signal regularly,it would indicate
#
HDD INDICATOR: record, play, backup data flashing
#
GPS INDICATOR: with GPS moduel, DVR work well indicate
#
3G INDICATOR: When with 3G or WIFI module, or with LINK, this led will be on if the
settings are all right and the network connects well
#
Wifi INDICATOR: When with WIFI module, it will be on if WIFI module works well.
#
ALM INDICATOR: When have alarm signal, it would be on when alarm signal disappear it
would be off.
#
SD INDICATOR: When the model has SD card storage function SD card read normally then
it would indicate.
#
"
LINK INDICATOR: when wired network connect normally, it would indicate.
Key and Other Descriptions
#
DEBUG Debug interface
#
SIM interface: 3G interface
#
IR: infrared receiving window.
#
LOCK: while removing the hard drive, use the key to unlock in order to remove the hard
drive, unlock after machine’s auto-disconnects the power, the power auto-connect after
being locked.
#
USB: backup the video data of hard drive via USB .
NOTE: Recommend to use the SanDisk brand of the USB disk , the minimum volume 256M, must
support the FAT32 file system.
6.2
Instruction of Remote Control Operation
"
Record
"
Lead to menu
Enter the submenu to do the settings and also confirm the
"
settings
"
For playback on the mobile DVR
16
: Stop when record and playback
"
"
Pause/Play when playback
"
Into PTZ control mode.
Mute key, to turn on or turn off audio output when playback videos with audio.(The
"
audio input of the playback device must be connected to the audio output of the DVR.)
Fast-forward when video playback, play speed can be x2, x4, x8, press one time is x2,
"
press two times is x4, and press 3 times is x8.
Exit when video playback or backup.
"
"
: Upward for MENU selection.
"
: Downward for MENU selection.
:
"
Exit from PTZ mode.
”UP” direction for PTZ control mode.
”Down” direction for PTZ control mode.
Towards to left for MENU selection or MENU setup.
”Left” direction for PTZ control
mode.
"
:
Towards to right for MENU selection or MENU setup.
”Right” direction for PTZ control
mode.
:
"
screen zoom the first channel video when surveillance, record
Enter
password
screen zoom the second channel video when surveillance, record
Enter
or set system password.
:
"
password or set system password.
:
"
screen zoom the third channel video when surveillance, record
Enter
password or set system password.
:
"
Enter
"
17
screen zoom the fourth channel video when surveillance, record and playback
password or set system password.
: Enter password or set system password.
"
: Enter password or set system password.
"
: Enter password or set system password.
"
: Enter password or set system password.
"
: Enter password or set system password.
:
"
4 channel display when surveillance, record and playback.
Enter password or set
system password.
Remark: When the DVR is in alarm condition, the remote control is invalid.
Menu Setting Instruction:
6.3
First press"
then press“
"key, next press"
" to enter the default password"6666",
”to enter the main menu interface;
There are "System" "Disk" "Record" "Playback" "Network" and "Alarm"options, select the option by
pressing these buttons"
,
,
,
" ,then press "
"to enter.
Basic Settings: includes options of “system setting”, “PTZ setting” ,”system info”, “vehicle
info”. .
18
System Setting: " Setup" and "Info "
$
"
19
Setup: Set the System time, Car Number, TV system, Language etc.
#
Date format: Offer 3 display methods like “y/m/d, m/d/y, d/m/y” for personal habit.
#
Daylight saving time: suitable for according countries or areas.
#
Date: Adjust the date of HDD recorder
#
Time: Adjust the time of HDD recorder
#
Time zone: differs by countries, e.g: China for UTC+08
#
Language: Set "Chinese" or "English", have to restart the DVR after setting.
#
Video Mode: Set "PAL" or "NTSC", have to restart the DVR after setting.
#
Delay Time: DVR Time-lapse turn off function after the car ignition off, the default time is 5S,
and 30s,60s,120s,300s,600s,1200s,1800s,3600s,7040s all could be set have to restart the
DVR after setting.
#
Speed unit: KM/H and M/H, e.g: China is KM/H
#
Amplifying channel: Choosing which channel to see when power on each time. This is also
useful when backing the car.
#
Password: Enter the default password before changing the new password(Note: You have to
enter the original password after press "OK", otherwise the DVR will keep staying in the
changing password status, and the remote control will not work.
#
New password
Enter the new password
Operating Way:
Enter the menu, press“
”to select the options ,then press“
modification mode adjust the number by pressing“
save after adjustment Press”
,
,
,
”to enter the
” press“
”to
”key to exit after all settings done.
" PTZ settings: Adjust and control the camera with external PTZ device.
# Protocols: default PELCO-D, support PELCO-D.PELCO20
# Bit rate: under RS485 port: 2400bps,4800bps,9600bps,38400bps,57600bps
# Channel-Address: Channel one-Device address
# Channe2-Address: Channel two-Device address
# Channe3-Address: Channel three-Device address
# Channe4-Address: Channel four-Device address
" System Info: Display DVR hardware code number software version information( only view,
couldn’t be changed) Reset the Factory Settings
# Device encoding: only for this DVR, the code is unique.
# Software version: the version No. of DVR software.
# IMIE: IMIE No. of 3G network or module
# Strength Of 3G signal: strength value:99, unknown: 0-31
# Strength Of GPS signal: AA-BB(AA: GPS No.;BB: GPS strength. Show signal strength of
max.3
# satellite each cycling time.
# Reset the Factory Settings:
# Select “Reset CFG” there is a Reset interface after press“
return the original interface.
21
”,confirm to Reset ,cancel to
"
Car information: details of car plate number, route and driver code.
#
Car plate number: can be showed by English, Chinese simplified language, Numbers or
common symbols.
#
Route: the driving route and code
#
Driver code: set up the driver code information
#
VGA Output:1920*1080
"
G-sensor:
#
GSensor-X
0000mg( default value, this value will change accordingly if the X direction
gravity accelerated speed value is changeable)
22
#
GSensor-Y 0000mg(default value, this value will change accordingly if the Y direction
gravity accelerated speed value changeable )
#
GSensor-Z 0000mg(default value, this value will change accordingly if the Z direction
gravity accelerated speed value is changeable)
$
23
"
LOG information
#
User action log, alarm logging, equipment status log
Disk
Check and format
#
Disk Name
Display the system recognized HDD name
#
Total Size: Display the total size of HDD
#
Free Size: Display the remaining Capacity of HDD
#
Format: Format HDD(only format the head files of HDD)
Select this item there is a format interface after press“
”,confirm to format, cancel to return
the original interface.
$
Record: the video files setting
#
Channel: select the channel setting (the information of each channel could be set
independently)
#
Resolution
CIF/HD1/D1
The left side is the local storage information,
The right side is network transmission information; local “CIF,HD1,D1”is optional, only “CIF” for
network transmission
#
Frame
1-25/30fps
The left side is local storage information,
The right side is network transmission information.
24
#
Quality
Video quality setting
The left side is the local video quality(total 8 grade LOWEST—HIGHEST)
The right side is the network transmission quality( total 9 grades
32kbps/48kbs/64kbps/80kbps/112kbps/144kbps/192kbps/256kbps/384kbps)
#
Rec mode
#
File Len
VIDEO ,Audio +Video A+V ,No record
N
the packaged video files length setting
300/600/900/1200/1500/1800/2100/2400/2700/3000/3300/3600s optional
#
Save
save after finished video parameter setting (have to restart the DVR after setting.)
The operating method is similar to the "basic settings" operating
$
Playback:
the recorded video Playback
There are video date in the menu, it will display the vide time after enter the date, choose the
playback time range as needed, press “Play” or click the interface “Playback “button to replay the video.
25
Said is power outage file suffix "_P", suffix "_S" indicates an alarm trigger video files.
Channel: 1CH/4CH Video playback video playback on each channel or full screen, playback
#
and record simultaneously
#
Playback: Select the video files and channel to replay
#
Backup: Select the HDD video files backup to USB Disk
The operating method refers to “local video playback instruction”
$
Network Setting: LAN, 3G, WIFI
"
#
LAN: connecting via RJ45
#
3G: insert 3G SIM card into the slot
#
WIFI: connecting the network of WIFI
Local Network Setting
LAN
#
Network Type: LAN / 3G-WIFI optional
#
DHCP: Automatically get the IP address( in order not conflict with the LAN, pls enable ON,
and also enable DHCP on the router, P.S, only one DHCP server can be enable in one LAN)
#
Static IP: setup under LAN and WIFI mode
#
Net mask: Subnet mask under LAN or WIFI mode
26
#
Gateway: gateway under LAN or WIFI mode
#
DNS: Pls input when the server IP is DNS, and not necessary when IP is static.
#
Server IP: If the units login on our server, pls use 122.013.152.212, and if the units login on
your own server, pls use yours.
#
"
Server Port: Keep it as default of 8101
3G Network Setting:
#
Net type: select 3G-WIFI if you are going to use 3G mode.
#
DHCP: ON
#
Access into “Network”→”3G”
#
APN: Access Point Name
#
Dialup Num: Get this info from your carrier
#
User Name: Fill in if you have
#
Password: Fill in if you have
Note: Pls make sure you select the proper SIM card fit for 3G module.
27
Here is a example for Chinese carrier.
"
WCDMA
EVDO
APN
3gnet
card
Dialup Num
*99#
#777
User name
3gnet
card
Password
3gnet
card
WIFI Setting:
#
Net type: Select 3G-WIFI when the type is under LAN.
#
DHCP: ON
#
Access Network setup →“WIFI”
#
SSID: WIFI router device name.
#
Password: using password for SSID
#
Certificate: Support both “WPA-PSK” and “WPA2-PSK”
28
#
#
Encryption: Support both “CCMP” and ”TKIP”
Access router, check its “WIFI “encryption.
Notes:
Pls make sure the router WIFI encryption keep the same with the setup in MDVR if the units use WIFI.
$
29
Alarm
#
Alarm REC
Alarm-triggered video duration
#
Positioning Interval
#
Alarm out
30-330s optional 30s unit
GPS Data upload interval, used with other system interface
Alarm output time
(5s-900s)
#
Over speed
Set the over speed alarm value
#
Motion Detect
Open and close motion detect record and motion detect sensitivity selection
such as“off”,“high”,“medium”,“low”.Opening motion detect recording, also need to set the
icon“S”(alarm record)for time range of the detect record in “Record Setting” status except
select“High”,“Medium”,“Low”. “High”,“Medium”,“Low” is the grade of detect sensitivity, higher
grade,record easier.
#
DET AREA
No detect
#
Record Sequence
White blank
Low sensitivity
High sensitivity
Set the record mode of the different time range
no record
Red blank record
S blank
Alarm record
If the record mode set to“continuous recording”or alarm recording”,the remote control stop key
“
6.4
”will not work.
DVR Video Playback Instruction
Enter the main menu,move to“search/playback”option ,press“
key“
”or“
”to select the playback date, then press “
the selected date(file named by the record time),same press “
”to enter,next press the
”key to display the video files of
”or“
” again to select the
30
time to play.If your required time is not available in the current page,press “
page,till you find the required time,then press “
“
”or“
”key to move the option“play channel”,again press
”to select the playback channel.If you need to reselect the files,press keys“
repeat the previous steps to select again, then press“
channel,then press“
”or press “
”key to the next
”.Press “
”or“
”or“
”to
”to select the replay
” to button“playback”,next press “
”to replay, the system
will switch to the video playback status,you can see the playback video in the selected channel. Press
“
,
Press“
“
,
”keys to switch the channel,and press “
”to stop, press again for replay.Press“
”back to the quad screen.
”to exit and back to 4ch record status, press
”and back to the “search/playback”interface, then press “
playback.
31
,
”or“
”to select other video
6.5
Video Backup
Our company System support 2 video backup ways.
1)
Connect the USB disk to the DVR’s USB port for backup Ports on Demand
Operating method as
follows
$
Connect USB disk to the DVR’s USB port ( FAT32 format, backup Max.20G)
$
On the video playback interface,select the backup video files first,then move
to“backup”option,and press “OK”to backup, “COPY END”display after backup finished,the USB
disk could be taken away,then press”
$
2)
If you need to backup another files,press“
”to exit if no other operations.
”to repeat the previous steps to backup
Take the HDD box out from DVR, then connect the HDD reader to the PC, you can check the video
playback on PC via the installed our company’s local playback analysis software .( Suitable for large
amount data backup, simple and flexible. The proprietary data files also could be converted to the
common format, suitable for different reading demands). Specifics refer to the local playback analysis
32
software instruction).
6.6
PTZ control
This function just used to has PTZ function models Operations are as followings
When DVR is working click“
”
entre“PTZ control”mode,If DVR has connect with screen then on
screen’s left above would show “PTZ”,click“
”, “
”, “
”, “
”, PTZ would scroll as it
showes the ptz camera would rotate after each command by clicking ptz icon in the cms or operating the
control board Control over if wanna quit at all click“
6.7
”
Video Data Volume
The required volumes of video and video-related settings
please see the following table
VIDEO QUALITY
Total Record Frame
Data Size Per Hour
2.0 Mbps
200 frame
7.2GB
1.5 Mbps
200 frame
5.3GB
1.2 Mbps
200 frame
4.2GB
1.0 Mbps
200 frame
3.6GB
768 Kbps
200 frame
2.7GB
512 Kbps
200 frame
1.8GB
320 Kbps
200 frame
1.1GB
192 Kbps
200 frame
0.67GB
1080P
Note: Based on users matching conditions to apply the appropriate drive and related settings.
33
6.8 Extranet Port Mapping
#
Install the CMS server in LAN, Pls refer to the manual how to install CMS server.
#
First, make sure the PC which installed the server use Static Public IP, not automatically get.
#
Access into “Program”→”Run”→”CMD”, fill in “ipconfig”→”Enter” to see if the server IP has been
set successfully.
#
Open the file of “DVR_Server.cfg” in the server installation path, can check whether the ports have
been set successfully.
34
Port: 8001, 9001, 8101
35
#
Access into router→”Advanced”→”Port forwarding “
#
Add the ports of 8001, 8101, 9001 to the port forwarding.
#
a)
Name: fill in a name for MDVR port.
b)
Ports to Open: 8001, 8101, 9001
c)
IP Address: Server IP address
d)
Inbound Filter
e)
Schedule
TCP
UDP Allow ALL, Pls select “Allow All”
select “Always”
Fill in the ports, and click” Save settings”.
36
#
After the port mapping settings, find the “IP Address” in the WAN, the IP Address is your CMS server
IP. login the server IP on the CMS client to access.
Notes: When extranet access into LAN server, it need do mapping on the router. Then extranet can
access into WAN IP.
#
Change the Server IP to the related one, Access into MDVR
“menu”→”Network setting”→”LAN”→”Server IP”→XXX.XXX.XXX.XXX
37
6.9
Domain binding setting
After finished the server set up and the port mapping, you can login via network IP.
There are two ways to access the network as follow.
ADSL dial-up: It will assign a different dynamic IP address for each dial
Leased line: It will assign a static IP address, and you can access directly
So, when set up the server with the way of ADSL dial-up, you can binding DDNS via domain in order to
prevent the distribution of different dynamic IP in each dial.
Note 1 : DDNS is used to mapping the dynamic IP address to a static DNS. Client program will send the
dynamic IP to the server program when the user access the network, then the server program will provide the
DNS server to realize dynamic DNS.
Note 2 : If the dynamic domain name is free, you will temporarily unable to access via the free domain
name when things going wrong with the the domain name service provider’s server.
The related parameters below is for routers test. Please refer to actual network environment when
installation.
# Access into router setup, select ”Dynamic DNS” to check the related setup.
38
a)
Enable Dynamic DNS
Enable ON if you need to use DDNS
b)
Server Address: Fill in accordingly
c)
Username or Key: Fill in applied user name
d)
Password or Key: Fill in password
e)
Verify Password or Key: confirm the password
f)
Timeout:Timeout setting
g)
Status: Status of connection
Notes: DDNS need to be applied by customers if necessary.
#
Fill in the user name and password, use DDNS login, it shows connect successfully if login properly,
and will display the applied the DNS.
Notes: Pls refer to the Oray for the DNS apply.
#
39
After DNS binding, you can access into server via DNS.