1
Lotus Foundations Start
Users Guide
Lotus Foundations Start Users Guide
Lotus Foundations Start Users Guide
Contents
• 1 Introduction ... page 6
• 2 First-time Lotus Foundations setup - Net Integrator ... page 6
• 2.1 Net Integrator Components ... page 6
• 2.2 Meet Your Net Integrator ... page 6
• 2.3 Connecting the Power ... page 8
• 2.4 Ethernet Connections ... page 9
• 2.5 Connecting Ethernet Port 0 ... page 9
• 2.6 Connecting Ethernet Ports 1 and 2 ... page 10
• 2.7 Connecting an External Dial-up Modem ... page 11
• 2.8 Power-up Sequence - Mark I and Mark II ... page 11
• 2.9 Manually Setting the IP Address - Mark I and Mark II ... page 12
• 3 First-time Lotus Foundations setup - third-party hardware ... page 14
• 3.1 Minimum server requirements ... page 14
• 3.2 Before you begin ... page 14
• 3.3 Configuring the system ... page 14
• 3.4 Manually setting the IP address ... page 15
• 4 Connecting to WebConfig ... page 17
• 4.1 What is WebConfig? ... page 17
• 4.2 Secure WebConfig ... page 17
• 4.3 Configuring TCP/IP ... page 17
• 4.4 Creating an administrator account ... page 19
• 4.5 Software activation keys ... page 20
• 4.6 System status screen ... page 21
• 4.7 Notices box ... page 24
• 4.8 System status details ... page 24
• 5 Installing the Lotus Foundations virtual server ... page 26
• 5.1 Lotus Foundations virtual server introduction ... page 26
• 5.2 Lotus Foundations installation ... page 26
• 5.3 ECL alerts ... page 27
• 6 Configuring Lotus Foundations ... page 28
• 6.1 Proceeding with configuration ... page 28
• 6.2 Configuring General Network Settings ... page 28
• 6.3 Configuring advanced DHCP settings ... page 29
• 6.4 Configuring advanced network settings ... page 30
• 6.5 Network devices ... page 31
• 6.6 Network routes ... page 32
• 6.7 Network configuration scenarios ... page 33
• 6.8 Configuring your internet connection ... page 36
• 7 Client access licenses ... page 39
• 7.1 Client access licensing requirements ... page 39
1
Lotus Foundations Start Users Guide
Lotus Foundations Start Users Guide
• 7.2 License information ... page 39
• 8 DoubleVision ... page 41
• 8.1 What is DoubleVision? ... page 41
• 8.2 What DoubleVision offers ... page 41
• 8.3 Modem connections ... page 42
• 8.4 How DoubleVision and internet failover work ... page 42
• 9 User & team management ... page 45
• 9.1 Service integration ... page 45
• 9.2 User accounts ... page 46
• 9.3 Modifying user email settings ... page 50
• 9.4 Mailing lists ... page 51
• 9.5 Team accounts ... page 52
• 9.6 Password policy ... page 54
• 10 File services ... page 56
• 10.1 File sharing services ... page 56
• 10.2 Configuring file services ... page 56
• 10.3 Active server connections ... page 57
• 10.4 Access control lists ... page 57
• 10.5 Setting permissions in Windows ... page 59
• 11 Disk quotas ... page 60
• 11.1 Setting default disk quota values ... page 60
• 11.2 Setting individual user disk quotas ... page 60
• 11.3 Quota limit ... page 61
• 12 NT domain services ... page 62
• 12.1 Configuring Lotus Foundations Domain Settings ... page 62
• 12.2 What is a domain controller? ... page 62
• 12.3 Configuring the domain controller ... page 63
• 12.4 What is a Windows NT domain member? ... page 63
• 12.5 Configuring the domain member ... page 64
• 12.6 Connecting the active directory member ... page 64
• 12.7 Verifying server connectivity ... page 65
• 12.8 Monitoring machine accounts ... page 66
• 12.9 Importing domain users and groups ... page 66
• 12.10 File mounting/drive mapping ... page 68
• 12.11 Joining Windows systems to a domain ... page 68
• 12.12 Logon scripts ... page 70
• 12.13 Automated drive mapping ... page 70
• 12.14 Workstation administrative rights ... page 70
• 13 Email services ... page 72
• 13.1 Configuring email services ... page 72
• 13.2 Features handled by IBM Lotus Domino ... page 73
• 13.3 Email DNS configuration ... page 78
• 13.4 Email client configuration ... page 79
• 13.5 Using Domino email ... page 81
• 14 Web services ... page 83
• 14.1 Web server ... page 83
• 14.2 Master Web server ... page 83
• 14.3 Virtual Web servers ... page 85
601-0011-01
2
Lotus Foundations Start Users Guide
•
•
•
•
•
•
3
• 14.4 Hosting multiple Web sites ... page 86
• 14.5 Secure Web services ... page 87
• 14.6 SSL certificate ... page 87
• 14.7 Web caching ... page 88
15 Web filtering ... page 89
• 15.1 Web and content filtering ... page 89
• 15.2 Enabling the Web filter ... page 89
• 15.3 Providing full internet access ... page 89
• 15.4 Port exemptions ... page 89
• 15.5 Adding Permitted Websites ... page 90
• 15.6 Adding denied Web sites ... page 90
• 15.7 Accepting access requests ... page 90
• 15.8 Denying access requests ... page 91
• 15.9 List management ... page 91
• 15.10 Email reporting ... page 92
16 FTP services ... page 93
• 16.1 FTP Server ... page 93
• 16.2 Anonymous FTP Server ... page 93
• 16.3 Enabling the FTP server ... page 93
• 16.4 Enabling FTP access ... page 94
• 16.5 User vs. team FTP access ... page 94
17 Backup & restore ... page 95
• 17.1 Intelligent disk backup (idb) ... page 95
• 17.2 Configuring idb ... page 95
• 17.3 idb backup ... page 97
• 17.4 idb restore ... page 98
• 17.5 Domino restore procedures ... page 102
• 17.6 idb hot swap ... page 104
18 Software update ... page 106
• 18.1 Software Updates ... page 106
• 18.2 Upgrading Lotus Foundations ... page 106
• 18.3 Switching languages from English to Japanese ... page 107
• 18.4 Switching languages from Japanese to English ... page 107
19 Virtual private networks ... page 108
• 19.1 Private networks ... page 108
• 19.2 Virtual private networks ... page 108
• 19.3 VPN network topologies ... page 109
• 19.4 How TunnelVision works ... page 110
• 19.5 Creating a VPN (server-to-server) ... page 112
• 19.6 Configuring a TunnelVision master server ... page 113
• 19.7 Configuring a TunnelVision client ... page 113
• 19.8 TunnelVision status ... page 114
• 19.9 The idle time-out ... page 114
• 19.10 Licensing ... page 114
20 IPsec ... page 116
• 20.1 Known configurations ... page 116
• 20.2 Adding an IPsec route ... page 116
• 20.3 Adding an anonymous incoming connection IPsec route ... page 116
Lotus Foundations Start Users Guide
Lotus Foundations Start Users Guide
•
•
•
•
•
•
•
•
• 20.4 Editing an IPsec route ... page 117
• 20.5 Setting up third party IPsec clients ... page 117
21 Remote access services ... page 119
• 21.1 What is RAS? ... page 119
• 21.2 PPTP - client-to-server VPN service ... page 119
• 21.3 Dial-in service ... page 122
• 21.4 Terminating a connection from WebConfig ... page 123
22 Firewall services ... page 124
• 22.1 ICSA Firewall Security Compliance ... page 124
• 22.2 Traffic denied inbound ... page 124
• 22.3 Traffic permitted inbound ... page 124
• 22.4 Traffic permitted outbound ... page 124
• 22.5 Firewall log ... page 125
23 Domain name services ... page 126
• 23.1 What is DNS? ... page 126
• 23.2 DNS Services ... page 126
• 23.3 Configuring Public DNS ... page 126
• 23.4 How the DNS system works ... page 127
• 23.5 Dynamic DNS ... page 127
• 23.6 Manually creating DNS entries ... page 128
24 Workstation viewer ... page 131
• 24.1 What is the workstation viewer? ... page 131
• 24.2 Accessing the workstation viewer ... page 131
• 24.3 Virtual network computing (VNC) ... page 131
• 24.4 Configuring VNC ... page 131
25 FastForward ... page 134
• 25.1 What is FastForward? ... page 134
• 25.2 Introduction to TCP/IP ... page 134
• 25.3 Proxy servers ... page 135
• 25.4 Configuring FastForward ... page 136
• 25.5 Forwarding scenarios ... page 137
• 25.6 Multiple static IP addresses ... page 138
• 25.7 Common port numbers ... page 138
• 25.8 Troubleshooting FastForward ... page 138
26 Disk management ... page 140
• 26.1 Disk configuration (idb and RAID) ... page 140
• 26.2 Reconfiguring your disks ... page 141
• 26.3 Disk status messages ... page 142
• 26.4 Recovering from disk failure ... page 143
• 26.5 Disk recovery (SystemER) ... page 143
• 26.6 Hard disk failure ... page 144
• 26.7 Installing a new hard drive ... page 144
• 26.8 Disk install from Lotus Foundations CD ... page 144
27 MySQL server ... page 146
• 27.1 What is the MySQL Server? ... page 146
• 27.2 Setting up Windows for MySQL Access ... page 146
• 27.3 What is a dynamic Web site? ... page 147
28 Hardware components reporting ... page 149
601-0011-01
4
Lotus Foundations Start Users Guide
• 28.1 Hardware components reporting ... page 149
• 29 Log messages ... page 150
• 29.1 Accessing log messages ... page 150
• 29.2 Customizing message display ... page 150
• 29.3 Firewall log ... page 150
• 30 Network file system ... page 152
• 30.1 What is NFS? ... page 152
• 30.2 Installing and configuring ugidd ... page 152
• 30.3 Mounting an NFS directory ... page 152
• 30.4 Unmounting an NFS directory ... page 153
• 31 rsync ... page 154
• 31.1 What is rsync? ... page 154
• 31.2 Enabling rsync ... page 154
• 31.3 Rsync From a Telnet session ... page 154
• 32 Spam scanner ... page 157
• 32.1 Spam scanner ... page 157
• 32.2 To activate your spam scanner license: ... page 157
• 32.3 Configuring users' spam filters: ... page 158
• 32.4 Configuring whitelists and blacklists ... page 158
• 33 Virus scanner ... page 159
• 33.1 Virus scanner ... page 159
• 33.2 Activating your file virus scanner license ... page 159
• 33.3 Activating your mail virus scanner license ... page 160
• 34 Glossary ... page 161
• 35 Copyright ... page 166
• 36 Copyright statement ... page 166
5
Lotus Foundations Start Users Guide
Lotus Foundations Start Users Guide
Introduction
Welcome to the Lotus Foundations Start Users Guide. This document is intended for
administrators and provides the instructions required to install a completely functional Lotus
Foundations Start server. In addition, core Lotus Foundations features are included to
provide you with an understanding of the Lotus Foundations Start server overall.
First-time Lotus Foundations setup - Net Integrator
Net Integrator Components
You should have received the following components in your Net Integrator package:
Mark I and Mark II
1.
2.
3.
4.
5.
Net Integrator Mark I or Mark II server (1)
Lotus Foundations User Manual CD (1) and Net Integrator Quick Start Guide (1)
Hard disk keys (2) and Face Plate Keys (2)
Power supply cord (1)
Category 5 Ethernet cables (3)
Meet Your Net Integrator
Mark I and Mark II
601-0011-01
6
Lotus Foundations Start Users Guide
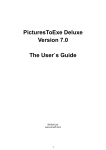
Front View
These images correspond to our Mark I and Mark II models.
1.
2.
3.
4.
5.
6.
7.
8.
9.
10.
11.
12.
13.
14.
15.
7
System Failure LED - lights up when there is a failure on the system.
Ethernet 0 Activity LED - indicates activity on the Ethernet 0 interface.
Ethernet 1 Activity LED - indicates activity on the Ethernet 1 interface.
Ethernet 2 Activity LED - indicates activity on the Ethernet 2 interface.
Boot Activity LED - lights up while the software is booting.
Power LED - lights up when power is on.
Power button - used to turn the box on and off.
Removable hard disk trays - houses the hard disk(s).
Hard disk key lock - locks the face plate preventing physical access.
Hard disk power LEDs - both light up when power is on.
Control panel - contains the display panel and all control buttons.
Display panel - displays the status of the Net Integrator.
Direction arrows - used to execute commands from the control panel.
Enter and Cancel buttons - used to execute commands from the control panel.
Backup and Restore buttons - used to initiate backup and restore procedures.
Lotus Foundations Start Users Guide
Lotus Foundations Start Users Guide
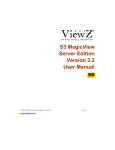
Back View
1.
2.
3.
4.
5.
6.
7.
8.
9.
10.
Power socket - where the power cord is connected.
VGA port - used to connect a monitor to the server.
USB ports - reserved for future use.
Serial port - for an external dial-up modem.
Power supply fan - provides cooling for internal components.
Parallel printer port - used for a shared printer.
Primary cooling fan - provides additional cooling for internal components.
Ethernet Port 0 - used to connect to the local area network (LAN).
Ethernet Port 1 - used to connect to a LAN segment or to the Internet.
Ethernet Port 2 - used to connect to a LAN segment or to the Internet.
Connecting the Power
1. Ensure that the Net Integrator has adequate ventilation. Place the back of the unit at
least one to two feet (12"-24") away from the wall. Make sure the front of the unit is
easily accessible.
601-0011-01
8
Lotus Foundations Start Users Guide
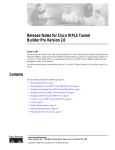
2. Connect one end of the power cord into the power socket on the back of the Net
Integrator:
The left image is of a Mark I or Mark II and the one on the left is a Micro unit.
3. Connect the other end of the cord into a standard power outlet.
4. Turn on the main power switch.
5. Press the power button. Certain power line surges can cause the server to reset. It
is recommended that you install an uninterruptible power supply (UPS) to protect
against such surges.
Ethernet Connections
What is Ethernet?
Ethernet connects computers in a local area network (LAN). An Ethernet connection is very
fast, and unlike modem and ISDN connections, one Ethernet network can have many
computers attached to it. There are different kinds of Ethernet cables: category 3 and
category 5 are two examples. It is recommended that you use category 5 at minimum for
100baseT networks, and category 5e at minimum for 1000baseT networks.
10baseT, 100baseT, and 1000baseT hubs and switches have a number of ports that you
connect to workstations, routers, servers, printers, or other devices, using Ethernet cables.
Connect your Net Integrator to a free port using one of the supplied category 5 cables. If the
port lights up after you connect and then turn on your Net Integrator, you have a proper
connection.
You can cascade more hubs or switches to increase the number of available ports. (Consult
the manual that comes with your hub/switch before trying this).
Connecting Ethernet Port 0
1. Connect one end of an Ethernet cable into Ethernet Port 0 on your Mark I and Mark
II, (located on the back of your Net Integrator).
9
Lotus Foundations Start Users Guide
Lotus Foundations Start Users Guide
The left image is of a Mark I or Mark II and the one on the left is a Micro unit.
2. Connect the other end of the cable into your LAN hub or switch. Ethernet Port 0
should not be connected to a router providing internet access. Ethernet Port 0 is
typically reserved for internal (Local Network) access.
Connecting Ethernet Ports 1 and 2
Ethernet ports 1 and 2 are used to connect to the internet or to other segments of your
LAN. Use an Ethernet cable to connect to your high-speed internet routing device. Some
devices may require the use of a cross-over cable that is normally supplied with the device.
The left image is of a Mark I or Mark II and the one on the left is a Micro unit.
If you are using your Net Integrator as a workgroup server without a direct connection to the
internet, it is possible to use Ethernet ports 1 and 2 to connect to other segments of the
LAN. This is typically done to improve network throughputs when large numbers of users
are connected to Net Integrator.
Secondary segments must be physically separate from the primary network segment
connected to the Ethernet 0 port. You cannot connect all Ethernet ports to the same
segment in order to improve network throughput.
601-0011-01
10
Lotus Foundations Start Users Guide
Connecting an External Dial-up Modem
1. Connect the cable included with your own external dial-up modem to the Serial port
on the back of your Net Integrator.
The left image is of a Mark I or Mark II and the one on the left is a Micro unit.
2. Connect one end of the standard telephone cable to the external modem, and
connect the other end to your telephone wall jack.
The external modem will be auto-detected when the server goes through a
power-up sequence.
Power-up Sequence - Mark I and Mark II
1. Press the Power button (located on the front of your Net Integrator).
2. The Net Integrator needs a few moments to start up. During the start-up you will
observe the following sequence of events:
• The hard drive and fans start up.
11
Lotus Foundations Start Users Guide
Lotus Foundations Start Users Guide
• The Net Integrator beeps several times.
• The LCD panel will become active and the Boot Activity LED will blink as the
software loads.
3. Let your Net Integrator sit undisturbed while it discovers its surroundings and
auto-configures its network parameters. Messages indicating what kind of network
discovery is being performed appear on the display panel. After approximately
10-30 seconds, the IP address that the Net Integrator has chosen for itself will be
displayed. The number will look something like this: 192.168.0.1 (based on the LAN
to which it is connected).
4. When the start-up sequence is over, the display panel will show the status of
various Net Integrator systems. The first line on the display panel shows Net
Integrator's IP address; the second line cycles messages displaying the current
date, time, and operating system version. You are ready to proceed with the setup
when an IP address appears on the display panel. In the event that the Net
Integrator server is unable to detect an appropriate IP address for your LAN, you will
have to manually set the IP address for the server. Refer to Manually Setting the IP
Address for more information.
Manually Setting the IP Address - Mark I and Mark II
Follow these steps if your Net Integrator is unable to automatically select an IP address (the
display continues to read Choosing Address) or if you want to change the chosen address:
1. Press the Enter button on control panel. The following menu will be displayed:
MENU [Net] Info
Dialer System
2. [Net] is already selected. Press the Enter button. The following menu will be
displayed:
NETWORK [IPAddr]
Netmask DHCP
3. [IPAddr] is already selected. Press the Enter button. The current IP address (e.g.
192.168.0.1) will be displayed. If the Net Integrator was unable to select an IP
address, 0.0.0.0 will be displayed.
4. Use the Left and Right direction arrows to move the cursor from digit to digit. Use
the Up and Down direction arrows to increase or decrease a digit’s value.
5. Press the Enter button to save the new IP address.
6. Navigate to Netmask using the direction arrows. Press Enter and the default
Netmask will be displayed.
7. Use the Left and Right direction arrows to move the cursor from digit to digit. Use
the Up and Down direction arrows to increase or decrease a digit’s value.
8. Press the Enter button to save the new Netmask.
9. You may also turn on or off the DHCP server (which automatically assigns IP
addresses to the workstations connected to your local network). Unless you have
some other server providing DHCP services, it is recommended that you turn DHCP
on. To do so, navigate to DHCP using the direction arrows. Press the Enter button.
10. Navigate to On using the direction arrows. Press Enter. The DHCP server is now
on.
601-0011-01
12
Lotus Foundations Start Users Guide
11. Press the Cancel button twice to return back to the standard status display.
13
Lotus Foundations Start Users Guide
Lotus Foundations Start Users Guide
First-time Lotus Foundations setup - third-party
hardware
When setting up Lotus Foundations on third-party hardware, please refer to the vendor’s
documentation for product overview and installation instructions.
Minimum server requirements
To successfully run the Lotus Foundations operating system, the following requirements
must be satisfied:
Minimum server requirements:
•
•
•
•
•
•
x86 based system
At least one hard disk
At least one Network Interface Card
CD-ROM drive
VGA based video card
One GB of memory
Required external peripherals:
• Monitor
• Keyboard
Before you begin
1. Connect the monitor cable to the VGA based Video Card output on the server.
2. Connect the keyboard to the keyboard input on the server.
3. Plug in the power cords for the server and monitor.
Configuring the system
For installation, the system must boot from the CD-ROM. This can be accomplished
through the boot settings in the motherboard's BIOS. Lotus Foundations installs onto the
hard disks after they have been configured through the WebConfig menu. For first time disk
configuration, do not use the "Disk Installation" option on the Console menu. For more
information on configuring your hard disks, see Chapter 26: Disk management.
601-0011-01
14
Lotus Foundations Start Users Guide
Important Note
If you are running Lotus Foundations from the CD-ROM without configured
hard disks, configurations are lost when you reboot.
These are general setup guidelines.
1. Connect the power cord and turn on the main power.
2. Connect the LAN connection to the Ethernet port 0 on the server. Connect the other
end of the cable into your LAN hub or switch. If you have additional Ethernet ports
to connect to the internet or to other segments of your LAN, connect them now.
3. Connect a monitor and keyboard to the appropriate connectors on the server.
4. Turn on the power button.
5. When the system boots, the Lotus Foundations boot screen will be displayed. To
load Lotus Foundations, select option #1 Launch Lotus Foundations by typing 1 and
then pressing Enter.
If you do not select an option, the Lotus Foundations OS will automatically load after
10 seconds.
6. When the Lotus Foundations operating system has finished loading, the following
prompt is displayed:
Press ENTER for a shell...
7. Press Enter. A Configuration screen is displayed.
8. A red warning box might be displayed advising you to set up the server using Lotus
Foundations’s Web-based configuration screen. Press Enter to continue.
9. Take note of the display’s Settings and Status boxes. These display various
information about the server.
10. Take note of the WebConfig URL shown in the Status box. This is the LAN IP
address of the server. You will need this IP address to finish the configuration of
your server. In the event that the server is unable to detect an appropriate IP
address for your LAN, you have to manually set the IP address for the server. Refer
to Manually Setting the IP Address in this chapter for more information.
11. You are now ready to proceed with the setup (see Chapter 3: Connecting to
WebConfig) when an IP address is displayed in the console’s Status box.
Manually setting the IP address
Follow these steps if your Lotus Foundations-powered server is unable to automatically
select an IP address (the console’s Status box continues to read Choosing Address) or if
you want to change the chosen address:
1. Select IP Address from the Main Menu box on the Configuration screen (see
above).
2. You are prompted to enter a new IP address. Enter the new IP address and press
<Enter>.
3. Confirm the new IP address by pressing <Y>.
15
Lotus Foundations Start Users Guide
Lotus Foundations Start Users Guide
4. You can turn on or off the DHCP server that automatically assigns IP addresses to
the workstations connected to your local network. Unless you have some other
server providing DHCP services, turn DHCP on. To turn DHCP on, select DHCP
server from the Main Menu on the Configuration Screen - if a message is displayed
communicating that, “The DHCP server is currently DISABLED”, press <Y> to
enable the DHCP server.
601-0011-01
16
Lotus Foundations Start Users Guide
Connecting to WebConfig
What is WebConfig?
Although some basic system configuration can be done through the front control panel on
Net Integrator hardware, the Web-based configuration system (WebConfig) is where you
set most Lotus Foundations options.
Secure WebConfig
Lotus Foundation's WebConfig uses 128-bit encryption to protect administrator information
and passwords. Most recent versions of Web browsers contain built-in support for this. The
following Web browsers are specifically supported by Lotus Foundation's WebConfig:
• Internet Explorer 6 and any later versions.
• Firefox 1.0.5 and any later versions.
Failure to support 128-bit encryption results in WebConfig being unreachable.
Other Web browsers which might work but are not explicitly supported are:
•
•
•
•
Opera
Safari
Netscape
Mozilla
Configuring TCP/IP
Before you can access WebConfig, you have to configure your workstation to use TCP/IP.
If TCP/IP is already configured, proceed to Creating an administrator account. If TCP/IP is
not configured, follow the appropriate steps for your operating system.
For Windows 95/98/ME:
1. In Windows, select Start > Settings > Control Panel. The Control Panel window is
displayed.
17
Lotus Foundations Start Users Guide
Lotus Foundations Start Users Guide
2. Select Network from the list. The Network window is displayed.
Click Add if TCP/IP is not displayed in the installed components list.
3. The Select Network Component window is displayed. Select Protocol from the
window and click Add.
4. The Select Network Protocol window is displayed.
5. Select Microsoft in the Manufacturers section of the window. Select TCP/IP in the
Network Protocols section of the window. Click OK. TCP/IP is now displayed in the
Network window.
6. Select TCP/IP from the installed components list on the Network window. Click
Properties. The TCP/IP Properties window is displayed.
7. Click the IP Address tab. Select Obtain an IP address automatically.
8. Click the DNS tab. Select Enable DNS.
9. Select all entries in the DNS Server Search Order section of the window and click
Remove.
10. Select all entries in the Domain Suffix Search Order section of the window and click
Remove.
11. Select Obtain an IP address automatically.
12. Click the Gateway tab. Select any entries in the Installed gateways section of the
window and click Remove.
13. Click the WINS Configuration tab. Select all entries in the WINS Server Search
Order section of the screen and click Remove. Select Use DHCP for WINS
Resolution.
14. Click OK. The Network window is displayed. Click OK again.
15. Reboot the computer.
For Windows 2000/XP:
1. In Windows, select Start > Settings > Control Panel (or in Windows XP, Start >
Control Panel).
2. Select Network and Dial-up Connections from the list. The Network Connections
screen is displayed.
3. Click Local Area Connection and the Local Area Connection window is displayed.
4. Click Properties and the Local Area Connection Properties window is displayed. If
Internet Protocol (TCP/IP) is not in the Components checked are used by this
connection list, click Install.
5. The Select Network Component Type is displayed. Select Protocol from the
window. Click Add.
6. The Select Protocol window is displayed.
7. Select Internet Protocol (TCP/IP) from the list. Click OK. TCP/IP should now be
displayed in the Local Area Connection Properties window.
8. Select Internet Protocol (TCP/IP) from the list, and click Properties.
9. The Internet Protocol (TCP/IP) Properties screen is displayed. Select Obtain IP
Address automatically. Select Obtain DNS server address automatically.
601-0011-01
18
Lotus Foundations Start Users Guide
10. Click Advanced. The Advanced TCP/IP Settings window is displayed. Select any
entries in the Default gateways section of the window, and click Remove.
11. Click on the DNS tab. Select any entries in the DNS server addresses section of the
window, and click Remove. Select Append primary and connection specific DNS
suffixes. Select Append parent suffixes and primary DNS suffixes.
12. Click on the WINS tab. Select any entries in the WINS addresses section of the
window, and click Remove. Select the Default NetBios setting.
13. Click OK. Click OK on the TCP/IP Properties screen.
14. Reboot the computer.
For Mac OS 9:
1. Click the Apple icon in the top menu bar. Select Control Panel > TCP/IP.
2. The TCP/IP window is displayed.
3. Select Connect via Ethernet. Select Connect via DHCP. Leave the other fields
blank.
4. Click the Close Window button. The Save screen is displayed.
5. Click Save.
6. If the Internet connection does not function immediately, reboot the computer.
For Mac OS X:
1. Click the Apple icon in the top menu bar. Select Control Panel > System
Preferences. The System Preferences window is displayed.
2. Click the Network icon. The Network screen is displayed.
3. Select Automatic for location. Select Built-in Ethernet for connection. In the TCP/IP
tab, select the DHCP configuration.
4. Click Apply Now.
5. If the Internet connection does not function immediately, reboot the computer.
Creating an administrator account
At this point, the Lotus Foundations-powered server should have an IP address, the
workstation should have TCP/IP configured, and both the Lotus Foundations server and the
workstation should be connected to the LAN. You now need to create an Administrator
account:
1. Open a Web browser on the workstation.
2. Read the IP address on the display panel/console. For demonstration purposes, an
example address is: 192.168.0.1
19
Lotus Foundations Start Users Guide
Lotus Foundations Start Users Guide
3. Enter https://192.168.0.1:8043 into the browser’s address bar. Press Enter. The
Create Administrator Account page is displayed.
4. Enter a User ID. The default User ID is root - you can use that name or you can
create a new ID by typing over the existing text.
5. Enter the administrator’s full name.
6. Enter a password.
7. Re-enter your password to ensure that it was entered correctly.
8. Enter your organization’s registered internet domain name.
• The domain name must be entered at this point and cannot be changed
once you have installed Lotus Foundations Start.
9. Enter the Software Activation Key in the Activation Key text box.
10. Click Save Changes. This takes you directly to Lotus Foundation's main WebConfig
page.
• Some browsers take you to an Administrator Account Created page. If this
occurs, click Login and you are taken to the main WebConfig page. Clicking
Cancel Changes resets the Create Administrator Account form.
Important Note
Some Lotus Foundations services are not enabled unless hard disks are
configured through the WebConfig menu. For first time disk configuration, do
not use the "Disk Installation" option on the Console menu. For more
information on configuring hard disks, see the user manual chapter Disk
Management.
Software activation keys
By default, Lotus Foundations comes configured in a 30-day Trial mode. To get out of Trial
mode and activate the features and licenses that you have purchased, you must enter a
Software Activation Key.
When you purchase Lotus Foundations software, a Software Activation Key is provided.
Important Note
An Internet connection is required for activating the Lotus Foundations software
license. It is the user's responsibility to ensure that an Internet connection is
established when attempting to install the software.
Enter activation key to exit trial mode
1.
2.
3.
4.
Login to WebConfig with an administrator account.
Click Software Update.
Enter your Activation Key in the Activation key field.
Click Save Changes.
601-0011-01
20
Lotus Foundations Start Users Guide
Updating your activation key
To replace an existing activation key with a new one:
1.
2.
3.
4.
5.
Login to WebConfig with an administrator account.
Click Software Update and you see the current activation key displayed.
Click the Edit action button and the Lotus Foundations Registration box is displyed.
Enter the new activation key in the Lotus Foundations Registration box.
Click Save Changes.
System status screen
The system status screen displays the status of the services running on Lotus Foundations.
The WebConfig menu helps you to access and configure various Lotus Foundations
subsystems.
Features of the system status screen
Displays the utilization of the system’s central processing unit (CPU) in
numerical form and as a bar graph. During intensive operations (such as
backups or very heavy file transfers), the CPU utilization bar might show
100%. This is normal. One hundred per cent utilization simply means that
CPU utilization the CPU is being fully utilized and does not necessarily mean that your
Lotus Foundations-powered server is being overloaded or that
performance will suffer. However, if the CPU utilization is constantly at
100%, and you experience service slow-downs, you might want to contact
support for a services review.
Displays the speed of data transfer through Ethernet Port 0 (measured in
Ethernet 0
kbps or Mbps). The bar graph displays the speed as a percentage of the
highest transfer rate recorded since the last power-up.
Displays the speed of data transfer through the Ethernet Ports 1 and 2
Ethernet 1 and
(measured in kbps or Mbps). The bar graph displays the speed as a
2
percentage of the highest transfer rate recorded since the last power-up.
Displays the speed of data transfer through the DSL PPPoE or dial-up
PPP link
Internet connection (measured in kbps). The bar graph displays the speed
as a percentage of the maximum measured speed.
Displays the amount of data being transferred to and from the hard disk
Disk load
(measured in kbps or Mbps). The bar graph displays the amount as a
percentage of the highest amount recorded since the last power-up.
Shows how full your server hard disk is by displaying the usage and
Disk space used
capacity of the drive.
21
Lotus Foundations Start Users Guide
Lotus Foundations Start Users Guide
System status
details button
Internet status
Firewall
TunnelVision
IPsec
connections
PPTP
connections
Displays System Status resource information in a graphical representation,
on a variable time basis, for example, half hour, 1 month, 1 year, etc. Also
includes graphs for Physical Memory and Virtual Memory.
Displays the status of your internet connection(s). The status light is green
when an internet connection is configured properly. The default route used
to transfer data to destinations on the internet is also displayed. If a
modem is configured, clicking dial modem initiates a connection to the
internet. The administrator can choose to terminate the connection through
this screen.
Displays the status of the firewall (enabled/disabled).
Displays the status of all TunnelVision connections.
Displays the status of all IPsec connections.
Displays the status of all PPTP connections and provides an option to
disconnect active connections.
Displays the status of the subsystem that automatically checks for
available software updates. When the subsystem is active and retrieving a
list of available software updates, the status light is green. When the
SoftUpdate
subsystem is operational but idle, the status light is gray. A red status light
indicates a problem with the subsystem (usually an inability to access the
distribution server). Refer to the Log Messages chapter for more
information on download errors.
Displays the status of your disk configuration, provides disk reconfiguration
Disk status
options, displays the status of a rebuilding RAID array, and displays idb
drive hotswap status.
Displays the status of the idb backup disk. It displays how much of the idb
Backup status disk space is currently available for backups and when the next backup is
scheduled to be done.
Displays if there are any users over their quota limit. See Quota Setup in
Quota status
the User & Team Management chapter for more information.
NS3 status
Displays the status of the Lotus Foundations Scalable Services Structure.
Displays the status of services running in the Virtual Server. In Lotus
Virtual server
Foundation Start, Domino specific information is displayed.
Displays the method of authentication currently enabled. It displays "Using
normal password authentication" if Lotus Foundations is in Domain
User
Controller Mode or Non-Domain mode. It will display "Using the
authentication
‘domainname’ Windows domain" if Lotus Foundations is in Domain
method
Member mode. It also displays the number of Lotus Foundations Client
Access Licenses (CALs) available for use.
WebMail
Displays the address for Domino Web Access.
If the Virus Scanner is licensed and if the File Virus Scanner and/or Mail
Virus definition Virus Scanner are enabled, it displays when the virus definitions were last
updates
updated, how many viruses you are protected against, and links to a report
on how many viruses were detected since the last reboot.
If the Virus Scanner is licensed and File Virus Scanner is enabled, it
File virus
displays how many files were scanned and how many viruses were found
scanner
during the last scan once the scan has completed.
601-0011-01
22
Lotus Foundations Start Users Guide
If the Virus Scanner is licensed and the Mail Virus Scanner enabled, it
displays when the definitions were last updated and how many virulent
emails have been identified since system startup.
Displays whether or not there is a valid Spam Scanner license, and the last
Spam scanner reported definitions update. It also displays the number of definite and
probable spam that have been detected since the last reboot.
Displays the status of MySQL services. The number of sessions displayed
represents the number of active users currently connected to Lotus
Foundations and using MySQL database services. The CPU utilization bar
MySQL server graph indicates how much processor time is being used by this service.
The status light is gray if service is disabled, green if service is operational,
yellow if service is used heavily, and red if there is a problem with the
service.
Displays the status of Web publishing services. The number of sessions
displayed represents the number of active Web sessions currently open.
The CPU utilization bar graph indicates how much processor time is being
WWW server
used by this service. The status light is gray if service is disabled, green if
service is operational, yellow if service is used heavily, and red if there is a
problem with the service.
Displays the status of the secure Web server. The number of sessions
displayed represents the number of active secure Web sessions currently
Secure WWW open. The CPU utilization bar graph indicates how much processor time is
server
being used by this service. The status light is gray if service is disabled,
green if service is operational, yellow if service is used heavily, and red if
there is a problem with the service.
DNS server
Displays the status of the DNS servers.
Displays the status of file services for Windows and NT clients. The
number of sessions displayed represents the number of active users
currently connected to Lotus Foundations and using file services. The CPU
Windows file
utilization bar graph indicates how much processor time is being used by
server
this service. The status light is gray if service is disabled, green if service is
operational, yellow if service is used heavily, and red if there is a problem
with the service.
Displays the status of file services for Apple Macintosh clients. The number
of sessions displayed represents the number of users currently connected
to Lotus Foundations and using file services. The CPU utilization bar graph
Apple file server indicates how much processor time is being used by this service. The
status light is gray if service is disabled, green if service is operational,
yellow if service is used heavily, and red if there is a problem with the
service.
Displays the status of the NFS file server for UNIX and similar systems.
The number of sessions displayed represents the number of active users
currently connected to Lotus Foundations and using file services. The CPU
NFS file server utilization bar graph indicates how much processor time is being used by
this service. The status light is gray if service is disabled, green if service is
operational, yellow if service is used heavily, and red if there is a problem
with the service.
Mail virus
scanner
23
Lotus Foundations Start Users Guide
Lotus Foundations Start Users Guide
FTP server
SMTP server
Mail queue
status
Displays the status of FTP services. The number of sessions displayed
represents the number of active FTP downloads currently in progress. The
CPU utilization bar graph indicates how much processor time is being used
by this service. The status light is gray if service is disabled, green if
service is operational, yellow if service is used heavily, and red if there is a
problem with the service.
Displays the status of SMTP services. The number of sessions displayed
represents the number of emails being transferred by this server (normally
none). The CPU utilization bar graph indicates how much processor time is
being used by this service. The status light is gray if service is disabled,
green if service is operational, yellow if service is used heavily, and red if
there is a problem with the service.
Displays the number of remote email messages in the email queue.
Displays the status of servers responsible for delivery of email messages
from IMAP and POP3 mailboxes. The number of sessions displayed
IMAP and POP3represents the number of users currently downloading email messages
server
from their IMAP or POP3 mailboxes. The status light is gray if service is
disabled, green if service is operational, yellow if service is used heavily,
and red if there is a problem with the service.
Displays the status of the LDAP server, which is used to publish user
names and email addresses into the internal directory. The number of
sessions shows how many users are connected. The status light is gray if
LDAP server
service is disabled, green if service is operational, yellow if service is used
heavily, and red if there is a problem with the service. The CPU utilization
bar graph indicates how much processor time is being used by this service.
Reboot button Click on this button to reboot your Lotus Foundations-powered server.
Click on this button to properly shut-down your Lotus Foundations-powered
Shutdown
server. Failure to click on the Shutdown button means that your RAID array
button
has to rebuild. See Disk Status Messages in the Disk Management chapter
for more information.
Other items might be displayed on the system status screen depending on
the addition of any optional software modules. Please refer to the
*Others
appropriate software documentation for the description of the status
indicators.
Notices box
In most cases, when you change a service option in WebConfig and click Save Changes,
Lotus Foundations displays a drop down list of major actions that are happening in the
background at the top of that sub-service screen. Failure notices also are displayed in the
Notices drop down box.
601-0011-01
24
Lotus Foundations Start Users Guide
System status details
The System Status Details page is a history of critical system information that has been
stored by Lotus Foundations and can be viewed using an array of graphs. These graphs
represent the usage of CPU load, memory usage, ethernet traffic, and more.
Historical system status graphs
In addition to the real time status indicators on the system status page, located under these
bars is a button that leads to a page which displays historical graphs of system status.
1. Click system status in the left menu bar.
2. Underneath the system status snapshot is a button labeled system status details.
Click this button to navigate to the historical graphs.
3. On this page is a number of graphs for various resources on the server.
These graphs incorporate a new graphical representation of server usage. The system
status history graphs have been extended to include not only the average resource usage
over various time periods but also the minimum and maximum resource usages
experienced during these periods. The average resource usage is displayed as a
brightly-colored line against a background of progressively darker colors that show the
variance of resource usage over various time periods. For example, on the above graph,
the brightly colored line sits near the bottom of the graph, while the differently-shaded
bands of color sit above and below the average.
The most important aspect of the improved status history graphs is that it is immediately
evident on all the graphs for all time periods if there is a high variance for the resource
usage because the shaded backgrounds corresponding to the ranges of measurements will
be much wider. On the other hand, if these backgrounds are narrow, the system does not
experience much variation in the resource usage at all.
25
Lotus Foundations Start Users Guide
Lotus Foundations Start Users Guide
Installing the Lotus Foundations virtual server
Lotus Foundations virtual server introduction
The Lotus Foundations virtual server is designed to provide an environment where Domino
can run alongside Lotus Foundations. This enables the customization of the environment
for Domino without affecting the core Lotus Foundations system. Lotus Foundations can
still be relied upon to provide security, backup, remote connectivity, internet uptime, and
more.
Important Note
Before you start the Lotus Foundations installation, make sure you have an
administrative user account on the server named root. If the account root is not
present on the system, the Lotus Foundations installation will not work properly.
Lotus Foundations installation
If you are installing Lotus Foundations on a Net Integrator Mark II, begin at step 1.
If you are installing Lotus Foundations on an IBM server or other third party hardware,
insert the Lotus Foundations CD into the CD-ROM drive of that server. Lotus Foundations
automatically detects the installation in the SoftUpdate section of WebConfig. You can then
proceed immediately to step 7.
1. With the Lotus Foundations server booted, insert the Lotus Foundations CD into a
workstation.
2. Explore the contents of the CD and copy the folder with the .pkg extension .
3. Connect to the autoinstall file share on the Lotus Foundations server. To do this,
click Start in Windows, select Run..., then enter the server IP address followed by
\autoinstall.
4. Log in using the administrative account credentials you created on Lotus
Foundations.
5. Paste the .pkg folder into autoinstall share.
6. Wait for all files to copy from the CD.
7. Go to the Lotus Foundations WebConfig screen and click the reload button to reload
the status page.
8. Select SoftUpdate from the menu on the left side of the WebConfig screen.
601-0011-01
26
Lotus Foundations Start Users Guide
9. A list of installable packages are displayed, with only one package available. If there
is no list of installable packages, wait several minutes and refresh the screen again.
The Lotus Foundations package should be listed, and should read:
Team autoinstall/FILENAME: NVS 1.0a - Lotus Foundations v1.0
10. Click Install on the far right side of the of the Lotus Foundations line in the Add-on
section of the screen.
11. Read the terms of the Domino license agreement and click Accept License. The
Lotus Foundations installation process then begins automatically.
12. After the installation process finishes, it typically takes a few more minutes for the
NVS status in WebConfig to display a green light. Wait until the light turns green
before proceeding.
ECL alerts
To avoid client side security alerts popping up in Notes, the server ID and any administrator
IDs need to be added to the server ECL. This should be done using the AppExpress setup
in Notes, prior to installing and configuration of the Notes clients.
Modifying the ECL list
Immediately after installing Lotus Foundations, the administrators on the server will receive
an email providing a Lotus Notes link to the LotusFoundations App Express administrator's
page.
This page contains instructions for modifying and adding administrators as trusted senders
of Domino related actions. By adding these administrators, users do not have to accept
these warnings, as they are authorized automatically by the Notes clients.
Recognizing and accepting ECL alerts
For any existing sites that already have Notes clients installed, you might encounter the
circumstance where users have to accept the a security alert at least once.
If the signed by section is an known administrator on the server, the user can select "Start
Trusting the signer..." option.
27
Lotus Foundations Start Users Guide
Lotus Foundations Start Users Guide
Configuring Lotus Foundations
Proceeding with configuration
You are ready to proceed with the system configuration once you have:
1.
2.
3.
4.
Configured your workstation to use TCP/IP.
Created an administrator account.
Logged in and connected to WebConfig.
Configured disks. For instructions, see the user manual chapter Disk Management
for details on configuring your disks.
Important Note
Some Lotus Foundations services are not enabled unless hard disks are
configured through the WebConfig menu. For first time disk configuration, do
not use the Disk Installation option on the Console menu. For more information
on configuring your hard disks, see Chapter 26: Disk Management.
Configuring General Network Settings
1. Select Local from the Network Setup menu on the left side of any WebConfig
screen. The Local Network Options screen is displayed.
2. Lotus Foundations NetIntelligence feature automatically assigns a random host
mame to the Lotus Foundations server during the first boot-up. If appropriate, enter
a new host name by typing over the existing text. The new hostname should be
unique, it should use only numbers and letters, and it should contain no spaces.
• Host names should be unique because they are used to distinguish your
server from others on the local network and are used by local users to
identify Lotus Foundations file and print-sharing resources. In addition, the
host name (in conjunction with the domain name) forms a unique internet
name under which the Lotus Foundations server and its Web, FTP, and
email services are addressed on the internet.
3. Indicate whether or not you want to Display the system status page for non-admin
users? on users’ personal WebConfig screens.
4. Once you have installed Lotus Foundations Start into the NVS, the Domain Name is
no longer modifiable.
• Domain Names are part of the Internet naming standard (which applies to
every device connected to the Internet). Each host has a unique name,
601-0011-01
28
Lotus Foundations Start Users Guide
5.
6.
7.
8.
9.
10.
11.
12.
13.
14.
29
which consists of a host name and domain name. In general, all Internet
hosts owned by your company belong under the same domain.
Indicate whether or not you want the rsync server to be enabled. This option is for
Unix-style clients only. Leave the default setting.
Select the appropriate public DNS resolution option.
• Select Yes if you want Lotus Foundations to perform DNS resolution for
Internet hosts.
• Select No if you do not want Lotus Foundations to perform DNS resolution.
• Select Dynamic if you want Lotus Foundations to perform Dynamic DNS
resolution.
If the public DNS server is enabled, internet hosts can resolve name-to-IP number
queries for internet services provided by Lotus Foundations. Dynamic DNS
resolution helps you to host email, Web, and FTP services using an internet
connection with a dynamic IP address.
The DHCP server is set by default to “turned off” on eth0, if no other DHCP server is
on that segment. Turn this on.
Indicate whether or not you want to enable the SNMP (Simple Network
Management Protocol) server.
• SNMP is used to collect statistical information from the host about
parameters such as network throughput and CPU utilization. It is also used
for network monitoring.
If you enable the SNMP server, enter an appropriate SNMP community name.
Indicate whether or not you want to enable the Network Information Server (NIS).
Leave NIS disabled if you are using Windows. If you are using Unix or a similar
system, leave it disabled unless you need NIS Service.
• Lotus Foundations built-in Network Information Server (NIS) is used to share
usernames and groups across a network to simplify user access. Unix and
similar systems can be configured to use NIS. Lotus Foundations uses NIS
version 2.
Indicate whether or not you want to enable Lotus Foundations as a Network Time
Protocol (NTP) Server.
• An NTP client is required to synchronize the desktop clocks to the Lotus
Foundations server.
Choose whether or not to Restrict Outgoing Connections.
• As part of Lotus Foundations ICSA compliance, Lotus Foundations can
restrict outgoing connections to a few protocols. Enabling this option enables
outgoing traffic based on the server’s configuration. All other traffic is
blocked. See Chapter 22: Firewall Services for more information.
Lotus Foundations synchronizes its clock with a source on the Internet. To set the
proper time, select your Time Zone from the drop-down list. Lotus Foundations
attempts to auto-detect the proper time-zone and display its detected results for
you.
Click Save Changes.
Lotus Foundations Start Users Guide
Lotus Foundations Start Users Guide
Configuring advanced DHCP settings
DHCP lease length
For each interface that has DHCP enabled on it, a row is displayed listing the Interface,
Length, and Actions you can perform on it. You can click the edit button on any of these
rows to select the lease time that should be applied to that interface.
DHCP ranges
This is a list of ranges, giving Interface, the Range, and Actions you can perform on them.
You can create a new DHCP range by clicking New DHCP Range.
1. Choose a starting IP address and ending IP address that you want to have the
DHCP server give out.
2. Click Save Changes for it to take effect.
You can also edit the ranges in a similar fashion by selecting the edit action button in the
DHCP Ranges list.
Static DHCP leases
Static DHCP Leases help you to choose which Workstation receives a particular IP address
by assigning that IP to its MAC Address.
1.
2.
3.
4.
Click New Static DHCP.
Enter the interface on which this static lease should occur.
Enter the MAC address of the workstation to receive an IP.
Enter the IP address that the workstation should receive.
You can also edit leases in a similar fashion by clicking on the edit button in the Action
column of the Static DHCP Leases list.
DHCP leases
This section displays a table of current leases that have been served to workstations. You
can determine which MAC addresses are currently receiving specific IP addresses.
601-0011-01
30
Lotus Foundations Start Users Guide
Configuring advanced network settings
The Advanced Network Settings screen helps you to configure some of Lotus Foundations
more advanced features. Changing advanced network settings can potentially cause odd
behavior on your network; for example, if you change your Lotus Foundations-powered
server's IP address or network mask to an incorrect value, you may not be able to reach it
from your web browser to change it back. If something goes wrong with these settings, you
may be forced to change them back by logging into the local console menu, or use the
control panel on the front of a Lotus Foundations-powered Net Integrator server.
If you intend to use TunnelVision or IPsec, every network in each office location that will be
connected through a VPN must have a separate network subnet. If Lotus Foundations
servers in various locations auto-configure their local network interfaces to the same
subnet, you have to change your subnet number and IP address to a different value. Refer
to Reconfiguring network devices in this chapter for information on how to do that.
Advanced network settings screen
To access the advanced network settings screen:
1. Select Local from the Network Setup menu found on the left side of any WebConfig
screen. The Local Network Options screen is displayed.
2. Click Advanced... at the bottom of the screen. The Advanced Network Settings
screen is displayed.
Network devices
The following list describes the network devices section of the screen:
Column
Description
Lists the network interfaces installed on the Lotus Foundations-powered
Device
server. Eth0 should be connected to your LAN. Eth1, Eth2, and PPP0 should
be connected to the Internet
IP Address Lists the IP addresses to the interfaces.
Netmask
Lists the IP network mask assigned to a particular interface.
Describes how an IP address was assigned to an interface.
• "Forced" means that a permanent IP address was assigned by an
administrator. Eth0 should always have a forced IP address.
• "DHCP" means that a temporary IP address was assigned by the
Mode
DHCP server. DHCP addresses change each time you turn-on your
Lotus Foundations-powered server.
• "NetMap" indicates that the IP address was automatically assigned by
Lotus Foundations.
31
Lotus Foundations Start Users Guide
Lotus Foundations Start Users Guide
Trust
An important parameter that needs to be set with careful consideration.
• "Yes" signifies a trusting relationship with all hosts attached to that
interface (meaning that no firewall protection is applied to that
interface). Eth0 should always be configured as trusted.
• "No" means that any traffic arriving at that interface is considered
non-trusted; as such, appropriate firewall protection is applied. All
Internet connections should be configured as non-trusted.
Action
Button
Clicking this button displays a screen where interface settings can be changed.
Reconfiguring network devices
1. Select Local from the Network Setup menu found on the left side of any WebConfig
screen. The Local Network Options screen is displayed.
2. Click Advanced.... The Network Devices list is displayed. Click on an interface’s
Action button.
3. The Network Settings screen for that interface is displayed.
4. Optional: Enter a new IP address (in the format 192.168.12.10 ).
5. Optional: Enter a new network mask (in the format 255.255.255.0 ).
6. Optional: Indicate whether or not to trust computers on this network.
7. Optional: Indicate whether or not you want Lotus Foundations to automatically
choose an IP address and network mask.
• The default setting is "Yes", meaning that Lotus Foundations automatically
selects an IP address and network mask.
• The default setting is changed to "No" (and autoconfiguration is disabled) if
you entered a new IP address or a new network mask and clicked Save
Changes.
• Eth0 should never be set to choose automatically. Once an IP has been
chosen, the interface should have its option forced (not automatic) unless
you are running a separate DHCP server on the local network.
8. Optional: If your DHCP server, for example, your cable modem provider, pecified
that you need a DHCP Client ID when setting up your network, enter it here.
9. Optional: Indicate whether or not you want Lotus Foundations to use this link as the
default gateway.
• If this is set to "Yes", Lotus Foundations will create a default route to the
network through this interface at the highest priority level, so this link will be
used by default for incoming and outgoing traffic.
• If this is set to "Only as last resort", Lotus Foundations will create a default
route to the network through this interface with a lower priority level, so it will
be used only if your higher-priority ("Yes") links stop working.
10. Click Save Changes.
601-0011-01
32
Lotus Foundations Start Users Guide
Network routes
The Network routes section of the screen displays the IP routes known to Lotus
Foundations. Because Lotus Foundations automatically discovers its network surroundings
and sets up routing tables, you generally do not need to edit them. However, depending on
your Internet connection, your ISP might assign you a new route (in which case you have to
edit the default route).
Whether or not you have to change any route settings depends on your network setup and
Lotus Foundations connection to the LAN and to the internet.
Deleting network routes
1. Select Local from the Network Setup menu found on the left side of any WebConfig
screen. The Local Network Options screen is displayed.
2. Click Advanced.... The Network Routes list is displayed.
3. Click on the appropriate route’s delete button.
4. In the window that appears, confirm the deletion by clicking OK.
If the server prevents the route from being deleted, the server deems the route as required
or important, as it must relate to another setting or subnet in your Device list. If you continue
to have issues, review FAQs for a Netscan option or contact support.
Editing network routes
1. Select Local from the Network Setup menu found on the left side of any WebConfig
screen. The Local Network Options screen is displayed.
2. Click Advanced.... The Network Routes list is displayed.
3. Click on the appropriate route’s edit action button. The Route Modification screen is
displayed.
4. Optional: Enter a new destination IP address and netmask (in the format
192.168.12.0/24 ).
5. Optional: Click on the Interface drop-down and select the interface over which this
network can be accessed.
6. Optional: If this is not a local network route entry (eth1 or eth2), enter the network’s
gateway address.
7. Click Save Changes.
Network configuration scenarios
33
Lotus Foundations Start Users Guide
Lotus Foundations Start Users Guide
1. Lotus Foundations-powered server as a Workgroup Server without a direct
connection to the Internet
In this scenario, you would go to the Advanced Network Settings screen to change
the IP address or the network mask of the local network interface or Lotus
Foundations default route. Although you generally do not need to change these
settings, you can still do so:
1. In the Network Devices or Network Routes section of the Advanced Network
Settings screen, click the appropriate action button.
2. Depending on your choice, the Modify Route or the Network Settings screen
is displayed. Refer to Reconfiguring Network Devices and Editing Network
Routes earlier in this chapter for full descriptions of these two screens.
3. Change the appropriate settings and click Save Changes.
4. Lotus Foundations-powered server as a Workgroup Server and Dial-up Gateway to
the Internet
If Lotus Foundations has automatically chosen the proper IP addresses, there is
nothing else for you to change. If you want to change the Lotus
Foundations-powered server’s local IP addresses, you can do so by clicking the edit
button on the line describing the parameters for the Ethernet 0 interface.
The default route is automatically determined when Lotus Foundations dials in to
the Internet. In this case, there should be no default route entry in the Routes Table.
5. Lotus Foundations-powered server as a Workgroup Server and High-speed
Gateway to the Internet
601-0011-01
34
Lotus Foundations Start Users Guide
Lotus Foundations auto-configures its parameters if the ISP uses DHCP as a
means of automatic network configuration. In this case, there should be nothing for
you to do on the Advanced Network Setup screen (although you can change the
address of your local network interface if you wish to do so).
If your ISP assigns a unique static IP address, network mask, and default route,
Lotus Foundations discovers the proper default route, but does not know which IP
address to select. Although Lotus Foundations finds the available address and
establish a proper connection to the internet, you should change the IP address of
your Internet interface to the address assigned by your ISP. You should do the
same with the default route setting. If you run into problems configuring advanced
network settings, contact technical support.
To change these settings:
1. In the Network Devices section of the Advanced Network Settings screen,
click the eth1 action button.
2. The Network Settings screen is displayed. Enter the new IP address and
click Save Changes.
3. In the Network Routes section of the Advanced Network Settings screen,
click the default action button which the last entry in the list.
4. The Modify Route screen is displayed. Change the default route and click
Save Changes.
5. Lotus Foundations-powered server as a Domain Controller and High-speed
Gateway to the Internet.
Lotus Foundations can serve as a Windows NT style domain controller for all the
computers running Windows on the network. As the domain controller, Lotus
Foundations provides authentication services for the computers on the network.
When this function is enabled, the Windows file server is set up as a domain
35
Lotus Foundations Start Users Guide
Lotus Foundations Start Users Guide
controller, and a domain replaces the Windows workgroup. For specific information
on configuring domain controllers, please see Chapter 10: NT Domain Services.
Configuring your internet connection
Configuring a dial-up modem
1. Select Dial-up from the Network Setup menu found on the left side of any
WebConfig screen. The Dial-up Networking Setup screen is displayed.
2. Optional: If you have an external modem connected, you might need to click Detect
Modems to initiate the Modem Detection Cycle. Refer to Chapter 6: DoubleVision
for information on using multiple dial-up modems.
• If the modem is undetected, check cables/power, etc. Cycle power on the
modem and initiate a new Detect Modems test. Refer to FAQ for more
troubleshooting tips.
3. Click on the Modem #1 action button. The Dial-up networking setup screen is
displayed.
4. Enter the phone number provided by your ISP. If you have to dial 9 to get an outside
line, enter this number. For example, enter: 9, 123-123-1234 .
5. Enter the Internet account username provided by your ISP.
6. Enter the account password provided by your ISP.
7. Re-enter your password to ensure that it was entered correctly. If the passwords do
not match, you are asked to re-enter your password in both fields.
8. Indicate the number of idle seconds before automatic disconnection.
• If you enter zero, the connection never automaticallys disconnect. Be careful
with this setting, especially if you do not have an unlimited internet access
package from your ISP.
9. Select the appropriate dialing mode:
• Select Yes if you want the Lotus Foundations-powered server to dial
automatically to the internet when someone tries to reach it.
• Select No if you want to manually initiate a connection by clicking Dial
Modem on the System Status page.
• Select Only as a last resort if you want to use a dial-up connection when one
or more of your high-speed connections fail. The dial-up connection stays
active until one of the high-speed connections becomes functional. Although
all traffic is forwarded to the high-speed connection when it returns to
normal, the dial-up connection remains active for a few minutes in case the
high-speed connection fails again. In that case, the system re-routes traffic
back to the dial-up connection immediately without having to wait for a
dial-up connection to be re-established.
10. Indicate whether or not you want your Lotus Foundations-powered server to
emulate Windows Dial-up Networking.
601-0011-01
36
Lotus Foundations Start Users Guide
• Some internet providers are setup to work only with Windows dial-up clients.
If you have problems establishing dial-up connection, try enabling this
option.
11. Indicate whether or not users are able to establish a remote dial-in modem
connection to the internal network.
• VPN (PPTP) and Dial-In access has to be enabled before you establish a
remote connection. See Creating Users in Chapter 7: User & Team
Management for more information.
12. Click Save Changes.
Configuring a DSL connection (PPPoE)
1. Select Dial-up from the Network Setup menu found on the left side of any
WebConfig screen. The Dial-up Networking Setup screen is displayed.
2. Click the action button in the appropriate ADSL row (eth1 or eth2 only). The ADSL
Dialer Options screen is displayed.
3. Enter the Internet account username provided by your ISP.
4. Enter the account password provided by your ISP.
5. Re-enter your password to ensure it was entered correctly. If the passwords do not
match, you are asked to re-enter your password in both fields.
6. Optional: Enter your gateway IP address. Leave this blank if you do not know the
address.
7. Indicate whether or not you want to enable the connection.
• Select Yes if you want to establish a permanent connection.
• Select No if you do not want to establish a connection.
• Select Only as a last resort if you want to use this connection only if the
primary connection fails.
8. Click Save Changes.
Configuring a leased line connection
1. Select Dial-up from the Network Setup menu found on the left side of any
WebConfig screen. The Dial-up Networking Setup screen is displayed.
2. Click the Leased Line action button. The Configuring a Leased Line screen is
displayed.
3. Enter the account username provided by your ISP.
4. Enter the account password provided by your ISP.
5. Re-enter your password to ensure that it was entered correctly. If the passwords do
not match, you are asked to re-enter your password in both fields.
6. Indicate whether or not you want to enable this connection.
• Select Yes if you want to establish a permanent connection using the leased
line. This is the recommended setting.
• Select No if you do not want to establish a connection using the leased line.
37
Lotus Foundations Start Users Guide
Lotus Foundations Start Users Guide
• Select Only as a last resort if you want to use the leased line connection
only if the primary connection fails.
7. Click Save Changes.
Take a snapshot
Now that you have taken the time to configure Lotus Foundations you can use the Take
Snapshot item in the menu to display all the information available on one scrollable page.
601-0011-01
38
Lotus Foundations Start Users Guide
Client access licenses
Client Access Licenses, or "CALs," help individuals within a company to legally use the
Lotus Foundations server operating system: when you purchase a Lotus Foundations CAL,
you are purchasing the rights for a user to use the software.
Client access licensing requirements
Lotus Foundations uses a "Per User" licensing model. That is, any number of individuals
can connect to the Lotus Foundations-powered server; however, you must purchase a
Lotus Foundations Client Access License (CAL) for each individual, or "user account,"
where access to Lotus Foundations services (such as email, file, print, MySQL and FTP
services) is needed. For example, if an individual is only utilizing the Lotus
Foundations-powered server as gateway or firewall, that person does not require a CAL.
See Chapter 7: User & Team Management for more information.
Lotus Foundations CALs are not required for team accounts without a password; team
members can still access team data/services using their personal user account passwords.
A defined number of Lotus Foundations CALs come with each version of the Lotus
Foundations server operating system. One additional "free" Lotus Foundations CAL is
allocated for a Lotus Foundations administrator.
License information
To see how many Lotus Foundations CALs are licensed for the system and currently being
used:
1. Login to WebConfig with your administrator username and password.
2. Select Software Update from the WebConfig screen.
3. Click "Show Licenses" after entering the Software Update section in order to see the
license information.
4. The Software Update screen is displayed with a Notices box at the top of the screen
showing how many Lotus Foundations CALs you have.
The User Authentication Method line on WebConfig’s main System Status screen also
displays how many Lotus Foundations CALs are licensed for the system and currently
being used.
39
Lotus Foundations Start Users Guide
Lotus Foundations Start Users Guide
If you exceed your licensed number of Lotus Foundations CALs, a Notices box will appear
at the top of each page in WebConfig. To purchase additional Lotus Foundations licenses,
please contact your authorized reselling partner.
601-0011-01
40
Lotus Foundations Start Users Guide
DoubleVision
What is DoubleVision?
DoubleVision is a Lotus Foundations feature that helps you to configure two or more
internet connections. For example, you can combine a cable modem and an ADSL link, two
ADSL links, multiple dial-up modems (to the same ISP or different ISPs), or any
combination of internet connections supported by Lotus Foundations.
There is no single place to configure DoubleVision. Instead, it is automatically configured
when more than one internet connection is used at the same time.
Important Note
For DoubleVision to activate, you must have at least two gateway connections.
You can choose a default connection.
What DoubleVision offers
Using Double Vision technology, Lotus Foundations helps you to set up as many internet
connections as you want and use them all simultaneously.
For example:
• You can have two ADSL lines and subscribe to two different ADSL services, so if
either service fails, you are still online. When both services are working, your
connection is twice as fast.
• You can have a cable modem and an ADSL line at the same time, and share the
load between them.
• In areas without high-speed internet support, you can configure multiple dial-up
modems using multiple accounts, and reach ISDN-equivalent speeds at a fraction of
the price.
• You can set up a dialup modem as a fallback connection. Lotus Foundations
automatically switchs to your dial-up ISP when your normal internet connection (one
or more ADSL, cable, or other high-speed lines) fails.
41
Lotus Foundations Start Users Guide
Lotus Foundations Start Users Guide
Advantages to DoubleVision
Increased
performance
Increased
reliability
Last Resort
dial-up mode
Dynamic DNS
Integration
NetIntelligence
Full automation
Internet traffic is increased by being able to use the bandwidth of both
lines. You cannot specify which connection is used. It is automatically
chosen by NetIntelligence.
If one ISP’s internet connections fails, the remaining ISP’s connection
stays functional. This means that your downtime is limited (also known
as fail-over, or redundant connectivity).
If one or more of your high-speed internet connections fail, Lotus
Foundations can dial your modem automatically and use dial-up access
instead. When your high-speed links are restored, the modem
automatically disconnects after it verifies that the high-speed
connections are stable and active. The same applies to high-speed
connections if you choose to use them as a last resort connection.
If you are using Dynamic DNS, Lotus Foundations automatically
publishes appropriate DNS names so that people can always find your
Web site, even if your high speed links are down and you need to use a
dial-up connection. See Chapter 23: Domain Name Services for more
information.
No human intervention is required to activate and deactivate internet
services when they fail or are restored. NetIntelligence automatically
takes care of these situations.
You do not have to reconfigure any client workstations on your local
network to take advantage of DoubleVision. DoubleVision is fully
automated and managed by the server.
Modem connections
Since modems are normally much slower than other internet connections, you probably do
not want to use a modem as your primary connection. Instead, you can configure your
modem as a "last resort" option, meaning that your modem only connects if one or more of
the high-speed connections fails.
If a modem is configured as the primary connection, it connects to the internet even if
high-speed connections are available. This is useful if you want to test the modem
connection.
How DoubleVision and internet failover work
601-0011-01
42
Lotus Foundations Start Users Guide
What internet failover does
• You can set up multiple links in order of priority by setting some to Enable: As last
resort instead of Enable: yes. These links only get activated when the primary links
are marked broken by NetIntelligence.
• We detect broken links using a method called Demi-Ping. It detects most kinds of
link failures to the Internet, although certain kinds of partial failures cannot be
detected. Net Intelligence should always notice if you unplug the physical
connection to a link and automatically switch to your secondary links, and this is the
easiest way to check that it is working.
• You can see that you are using Internet Failover by checking the "number.letter."
code next to your various Internet links on the status page of WebConfig. Ignoring
the letter, the different numbers imply the different backup priorities. For example, if
you have "1.a. Indirect on eth1", "1.b. Indirect on eth2", and "2.a. Modem", then your
primary links (1.x) are the first two and your secondary link (2.x) is the last (modem)
link.
• The DNS server (including Dynamic DNS) will publish one of the IP addresses for
the "most important non-broken link" as the IP address for your domain. That is, if a
#1 link is non-broken, then is publishs its address; if all #1 links are broken, then it
publishes a #2 address.
• Because incoming connections are usually addressed to your domain name,
whichever IP your DNS is publishing is the one to receive most incoming traffic.
However, if there is more than one non-broken link, any of those should be able to
receive incoming traffic if you ping the IP address of that link.
• All outgoing connections go through the first non-broken link. There is no way to
force an outgoing connection to use another link.
What Double Vision Does
• Double Vision does outgoing load balancing, or load sharing, between multiple links
at the same priority level. In the previous example, if you have 1.a. Indirect on eth1,
1.b. Indirect on eth2, and 2.a. Modem, then if all links are non-broken, Double Vision
will split outgoing web traffic between the two 1.x. links.
• Double Vision's load sharing works differently from typical load balancing routers. It
takes each individual session, such as a single Web page, and assigns it to one
internet link or another, and all packets for that session go through the same link.
This is unlike the usual load balancing routers, which split packets randomly across
links, even packets belonging to the same session. This means two things:
1. You do not need both links to be through the same co-operating ISP that
can decode a single session from multiple links which is the major
advantage of Double Vision.
2. If you only have one session at a time or your sessions are unluckily
assigned to links, you get little to no performance improvement.
• Some types of outgoing traffic either cannot be or should not be load shared in this
way: for example, FTP, ping, traceroute, and SMTP. This is usually because many
protocols, such as FTP, ping, and traceroute use multiple TCP sessions for one
43
Lotus Foundations Start Users Guide
Lotus Foundations Start Users Guide
logical session. SMTP is special because of spam relay protection, which makes it
so you have to use a different outgoing SMTP server depending which link is in use.
To avoid these problems, we only use Double Vision for outgoing Web sessions; for
other kinds of sessions, Net Intelligence chooses the best link as a "default" link and
uses that for all outgoing non-HTTP traffic. In practice this is not much of a problem,
since almost all high-bandwidth traffic comes from the Web.
• Incoming traffic is treated very differently from outgoing traffic: we accept
connections on all non-broken links, but the DNS for your domain name is only
registered to point at the default link chosen by Net Intelligence. This is because you
cannot actually tell client software to use the best link or alternate between these
two links in a reasonable way, so we have to choose the best one and tell them to
use that. Occasionally, the DNS-advertised best link starts to get too loaded down,
probably because all the incoming traffic is using it, so Net Intelligence decides to
advertise the second-best link for a while instead. Of course, remote users may
have a DNS cache of 5 minutes or more, so this change does not take effect
immediately.
Quick summary version
• You are using Internet Failover if you have multiple links with different numbers:
"1.a.", "2.a.", etc.
• You are using Double Vision if you have more than one highest-priority non-broken
link with the same number and more than one letter: "2.a.", "2.b.", etc.
• With either Double Vision or Internet Failover, unplugging any link should cause Net
Intelligence to switch you over to a different, working one. If it does not, something
is misconfigured or you have encountered one of the limitations below.
• Your DNS server always publishes the address of its favorite non-broken,
high-priority link. So incoming traffic generally comes in on that address.
• Incoming traffic is always accepted at the address of any non-broken link, even if
DNS currently gives users no way of actually getting there.
• Outgoing Web traffic always goes through all highest-priority Double Vision links.
• Outgoing non-Web traffic always goes through Net Intelligence's favorite
highest-priority link.
Code limitations
• Currently TunnelVision, like all non-Web traffic, just uses Net Intelligence's favorite
route. Eventually it supports using all the highest-priority Double Vision routes.
• Net Intelligence's favorite route selection algorithm, while not bad, could be better. It
should choose a different favorite route as soon as possible if the current one starts
getting overloaded - right now it waits too long.
• When transmitting a lot of data, sometimes this dramatically slows down receiving;
this is counterintuitive, but it is a general problem for ADSL and cable modem links,
where uplink speed is much slower than downlink speed. This tends to confuse Net
Intelligence's link selection, but this is with the active queue management feature.
601-0011-01
44
Lotus Foundations Start Users Guide
User & team management
Service integration
User and team management is integrated with a number of other Lotus Foundations
services. It is very important that you understand how user and team management relates
to these other functions before creating, editing, and deleting users and teams. Please read
the following section carefully.
Lotus Foundations email, file, Web, and FTP services are tightly integrated. Every user and
team account that is created has instant and automatic access to all of these services.
When a user is created, a number of things happen in the background:
• a login account is created and the password defined by the administrator is
assigned to that account.
• a personal user directory is created on the server. This directory is accessible in
Windows’ Network Neighborhood or on Macintosh’s AppleShare drive. If NFS is
enabled, UNIX and similar systems can use the path /export/home/USERNAME to
access this directory. For example, the path for someone with the username
janedoe would be /export/home/janedoe.
• a WWW directory is created within the user’s personal directory. Any file stored in
this directory is automatically published on the user’s personal Web page.
• an FTP account (which points directly to the user’s personal directory) is created for
the user. If the user logs in to the FTP server using the proper username and
password, they can access the files in their personal directory.
• an email account is created for the user. Email is available through either POP3,
IMAP, WebMail or the Domino mail protocol.
Similarly, when a team is created, a number of things happen in the background:
• a team login account is created and the password defined by the administrator is
assigned to that account.
• a team directory is created. This directory is accessible to all team members in
Windows’ Network Neighborhood or on Macintosh’s AppleShare drive. If NFS is
enabled, UNIX and similar systems can use the path /export/home/TEAMNAME to
access this directory. For example, the path for a team named sales would be
/export/home/sales.
• a WWW directory is created within the team directory. Any file stored in this
directory is automatically published on the team's Web page.
45
Lotus Foundations Start Users Guide
Lotus Foundations Start Users Guide
• an FTP account (which points directly to the team directory) is created for the team.
If a team member logs into the FTP server using the proper team name and
password, they can access the files in the team directory.
• an email distribution account is created for members of the team. Team email can
be accessed through either POP3 or IMAP mailboxes. Email received by the team
email account can be set to be automatically forwarded to all members of the team.
Important Note
All Lotus Foundations user and team accounts with a password require a Lotus
Foundations CAL. Lotus Foundations CALs are not required for team accounts
without a password; team members can still access team data/services using
their personal user account passwords. Users who do not need to access Lotus
Foundations services (such as email, file, print, MySQL, and FTP services), do
not require a CAL. One additional "free" Lotus Foundations CAL is allocated for
a Lotus Foundations administrator. See Chapter 5: Client Access Licenses for
more information.
User accounts
Browsing users
Users are listed in the User Setup section of WebConfig. You can search for users and
teams by user id, team id or full name. Teams will always be listed first, followed by
administrators, then regular users.
Disabled users show up in this list with “(disabled)” appended to the Full Name field. Users
are considered disabled when they have no password set.
Creating users
1. Select User Setup from the menu on the left side of any WebConfig screen.
2. Click Add New User.
3. Enter the User ID (also known as a "username") that serve as the user’s login and
personal directory name.
Important Note
User IDs cannot contain spaces or any punctuation other than hyphens,
periods, and underscores, for example, jane-doe, jane.doe, jane_doe are
all acceptale user IDs.
• With Lotus Foundations Start installed, this user ID becomes part of the
user’s email address. For example, if the username janedoe is created on
a Lotus Foundations-powered server that resides in the example.com
domain, Jane's email address is [email protected].
601-0011-01
46
Lotus Foundations Start Users Guide
4. Enter the user’s full name. This full name must be unique to all other names when
running Lotus Foundations Start.
5. Enter a password for the user. User passwords should also be unique.
6. Re-enter the password to ensure that it has been entered correctly. If the passwords
do not match, you will be asked to re-enter the password in both fields.
7. Indicate whether or not this user will have administrative privileges.
• Administration privileges means that this user has unrestricted access to all
configuration functions of Lotus Foundations. If you give a user
Administrative privileges disk and email quota values are not configurable.
Admin users automatically have unlimited quotas.
8. Indicate whether or not this user will have FTP access to his or her private directory.
• FTP has to be enabled before the user has FTP access. If FTP is enabled in
Trusted Hosts Only mode, the user can access files from a trusted, internal
network or from a VPN. If FTP is enabled in open mode, the user can
access files using FTP from anywhere on the Internet.
9. Indicate whether or not the user is allowed to establish a remote VPN (PPTP) or
dial-in modem connection to the internal network.
• For security reasons, most users should not be able to establish a remote
connection. VPN services must be enabled before a user can establish a
VPN connection. Similarly, dial-in for a specific modem has to be enabled
before a user can establish a dial-in connection on that modem. See the
user manual chapter Remote Access Services for more information.
10. If the domain controller is enabled, choose a drive that the user’s files can be
automatically mounted to when logged into a domain workstation. The default drive
is X:.
• Be sure to choose a drive that is not already in use. For more information,
see the user manual chapter NT Domain Services.
11. Select a quota value for this user. For more information, see the user manual
chapter Disk Quotas.
12. Select an email quota value for this user.
13. Enter any nicknames that are required for this user. Email sent to any of these
nicknames will be delivered to this user.
14. Under Join Teams, select the team(s) from the Available Teams list that this user is
a part of. Click Join. The teams are displayed in the Member of Teams box.
Important Note
Team membership gives users full access to the team’s shared
directory. If one of the joined teams is a member of any other team(s),
when it is added to the Member of Teams list it will have (# inherited)
listed after it. The user has "inherited" team membership to those other
team(s).
15. Click Save Changes. This returns you to the main User Setup page, and the user is
displayed in the list of previously created users.
Editing users
47
Lotus Foundations Start Users Guide
Lotus Foundations Start Users Guide
1. On the main User Setup page, click the appropriate user’s edit action button. The
Modify User screen is displayed.
Important Note
While running Lotus Foundations Start, User and Team names are not
modifiable.
2. Change the user’s information as necessary. Refer to Creating Users (in this
chapter) for a description of the fields on this screen.
3. Click Save Changes.
Other Actions
• Remove a user’s password to disable the account.
Deleting Users
Important Note
Deleting a user means that all of the user’s personal files, email settings,
mailbox, and any undelivered email in the mailbox is deleted. Once this is done,
none of the above can be recovered (unless you restore the data from a
previous backup).
To delete an individual user:
1. On the main User Setup screen, click the appropriate user’s Delete button.
2. An “Are you sure you want to delete user” confirmation box is displayed. Click OK to
continue and delete the user.
To delete multiple users
To delete multiple users, you can use pre-existing pwdump2 or spreadsheet data using the
following syntax:
username1, username2, username3, username4.
Usernames should be separated by new lines or commas.
Fields other than the username field are optional and should use the following syntax:
username[,user2,user3(...)]:password:full_name
601-0011-01
48
Lotus Foundations Start Users Guide
The ":" (colon) separator can be replaced by ";" (semi-colon) or [TAB].
1.
2.
3.
4.
In WebConfig, click User Setup in the menu.
Click Import Users and the Import Users screen is displayed.
In the Action field, select "Delete Users".
Right-click the field called Import Users Info. Select Paste. This copies the contents
of the file.
5. Click Save Changes.
6. Click Save Changes.
Import users from Windows
To upload user information from a Windows 2000 or NT server:
1. You need to download an executable file called pwdump2. The program is freely
available online and can be found at various locations on the Internet. Here is one:
"pwdump2." by BindView. Accessed 2007-01-09.
2. Download the file called pwdump2.zip and unzip the contents to its own folder. For
example, extract the contents to a folder called pwdump2 on your C drive.
3. Click on the Start menu, and choose Run.
4. Enter cmd, then click OK.
5. Type the following, then press Enter:
cd pwdump2
6. This changes the directory to the folder you created on your C drive that contains
the contents to the file pwdump2.zip.
7. Type the following, then press Enter:
pwdump2 > list.txt
8. This runs the file called pwdump2.exe and generates a text file called list.txt in
the same folder.
9. Open the file called list.txt. This contains a list of Windows users. Highlight the
users that you wish to import, right-click and choose Copy.
10. In WebConfig, click User Setup in the menu.
11. Click Import Users.
12. Right-click the field labelled Import Users Info. Select Paste. This copies the
contents of the file called list.txt into this space.
13. When importing users, you can specify each user’s quota value as small, medium,
or large by using the following syntax: (For more information on quota values, see
Chapter 9: Disk Quotas.)
username[,user2,user3(...)]:password:full_name:quota.
14. Click Save Changes. The Import Users screen is displayed.
15. Click Save Changes.
49
Lotus Foundations Start Users Guide
Lotus Foundations Start Users Guide
Because Windows uses a one-way hash algorithm for storage of passwords, the passwords
are not easily recovered. The Administrator needs to create new passwords for each
imported user from the Modify User screen.
You can only import either a block of pwdump2-generated data or a block of
spreadsheet-generated data at one time. If you need to import both, import each type
separately.
Export users
Exported user information from a Lotus Foundations server can only be imported to another
Lotus Foundations server.
To export user information from a Lotus Foundations server:
1. Click User Setup in the WebConfig menu. The main User Setup screen is displayed.
2. Click Export Users. A File Download screen is displayed.
1. Click Save, and save the file as a .dat file.
Modifying user email settings
1. Click User Setup in the WebConfig menu. The main User Setup screen is displayed.
2. Click the appropriate user’s edit action button. The Modify User screen is displayed.
3. Click E-mail... (located at the bottom of the screen).
The following fields are displayed on the user email page:
• Retrieve Mail from POP Server:
• Used to POP mail from your current mail provider and/or used to pull third
party POP mail (i.e. Yahoo/Hotmail).
• Configure by entering the full server name used to pull mail down from your
ISP (i.e. pop1sympatico.ca).
• Remote POP Username:
• Enter the appropriate account credentials for the mail service you are
retrieving from.
• Remote POP Password:
• Enter the password for the POP account.
• Re-enter POP Password:
• Re-enter the password for the POP account to ensure that it was typed
correctly.
For more information about the following Spam related fields, please see the Spam
Scanner chapter.
601-0011-01
50
Lotus Foundations Start Users Guide
•
•
•
•
Treatment of definite spam:
Treatment of probable spam:
Spam Scanner Whitelist/Blacklist:
Receive Spam Summary Notification?
Mailing lists
To subscribe to a mailing list, perform the following steps:
1. Assume that the mailing list is named 'maillist'.
2. Send an email, similar to the following:
To: [email protected]
Subject: <provide an appropriate subject>
subscribe maillist
3. You will receive a response asking you to send a confirmation request. The confirmation
request looks similar to the follwing:
<email starts here>
To: [email protected]
Subject: <provide an appropriate subject>
auth <some key code subscribe maillist <your email address>
<email ends here>
Unsubscription is similar. However, majordomo does not use unsubscription confirmation
unless you send the unsubscribe email from the same address that you subscribed from.
For example, if you subscribed as [email protected] but you sent the following
message as [email protected].
unsubscribe maillist [email protected]).
After you have subscribed to the mailing list you can send messages to
[email protected] as usual to send emails to other members of the mailing list.
You can use Mozilla Thunderbird clients to send email however, to check mail you have to
log in to the box and check the Maildir since there's no IMAP on the boxes.
51
Lotus Foundations Start Users Guide
Lotus Foundations Start Users Guide
Old mailing lists will not be migrated from the old system. This is relatively easy but time
consuming.
Team accounts
Creating teams
1. Select User Setup from the WebConfig menu. The main User Setup screen is
displayed.
2. Click Add New Team. The Create New Team screen is displayed
3. Enter a team ID.
• This ID serves as the name of the team’s shared directory and as the team’s
FTP login name (which gives team members FTP access to the shared
directory and the WWW directory). Team IDs cannot contain spaces or any
punctuation other than the hyphen, the dot, or the underscore.
4. Enter a descriptive name for the team in the Full Name field. This descriptive name
must be unique.
5. Enter a login password for the team. Team passwords should be unique.
6. Re-enter the password to ensure it was entered correctly. If the passwords do not
match, you are asked to re-enter the password in both fields.
7. Indicate whether or not the team has FTP access to the team directory.
• FTP has to be enabled before the team has FTP access. If FTP is enabled
in Trusted Hosts Only mode, the team can access files from the internal
network or from a VPN. If FTP is enabled in open mode, the team can
access files using FTP from anywhere on the Internet.
8. Indicate whether or not team members are allowed to establish a remote VPN
(PPTP) or dial-in modem connection to the internal network. For security reasons,
most teams should not be able to establish a remote connection.
• VPN services and dial-in services have to be enabled before a team
member can establish a VPN or dial-in connection. See Chapter 21: Remote
Access Services for more information.
9. Select the team type to create this team as:
• Normal Team
• Room
• Resource
Teams created as a room or a resource can be reserved by users using Lotus
Notes.
10. If you chose to create the team as a room please select the capacity of the room
referred to.
11. Select a Quota Value for this team. For more information, see Chapter 9: Disk
Quotas.
12. Enter any Nicknames required by this team. Email sent to any of these nicknames
are delivered to the team.
601-0011-01
52
Lotus Foundations Start Users Guide
13. Under Team Members, select the user(s) from the Users list who are a part of this
team. Click Add. The user(s) is displayed in the Team Members box.
• Team membership gives users full access to the team’s shared directory.
• If one of the members is a team, when it is added to the Team Members list
it has (# members) listed after it. That team's members have "inherited"
team membership.
14. Click Save Changes. This returns you to the main User Setup page, and the team is
displayed in the list of previously created teams.
Editing Teams
1. On the main User Setup screen, click the appropriate team’s edit action button.
2. The Modify Team screen is displayed.
Important Note
While running Lotus Foundations Start the team name and the team type
are not modifiable. If you created a team as a room you cannot convert it
to a resource, but you can modify the capacity of the room. Similarly if
you created a team as a normal team or a resource, you cannot convert
it to another team type.
3. Change team information as necessary. Refer to Creating Teams (in this chapter)
for a description of the fields on this screen.
4. Click Save Changes.
Other actions
• Click Send to send this team a test email.
Deleting teams
Important Note
Deleting a team means that the team’s shared network directory and all of the
files contained within the directory are deleted. Once this is done, none of the
above can be recovered unless you restore the data from a previous backup.
1. On the main User Setup screen, click the appropriate team’s Delete button.
2. In the confirmation dialog that displays, click OK.
53
Lotus Foundations Start Users Guide
Lotus Foundations Start Users Guide
Searching for users
The User Setup screen restricts the number of entries that are displayed by default. If there
are a large number of users, only the first 30 users are displayed in the User Setup section.
At the bottom of the section there are links to a series of users. For example, if you have 43
users, the screen displays: [show all] [a - o] [p - y]. Clicking on the [p - y] link displays all
users with usernames beginning P through Y. To help administrators to easily locate users'
records, there is a Search field at the top of the User Setup screen. To search for a user,
type in that user's UserID (or portion thereof) and click Search.
Password policy
The Password policy feature helps an administrator to set restrictions on the format of
passwords chosen by users. For example, the administrator can specify that uppercase and
lowercase letters must be included in the password and/or that passwords must be of a
particular minimum length.
Creating a password policy
1. Select User Setup from the WebConfig menu.
2. Click Password Policy.
3. Choose whether or not to enforce the password policy on passwords set by admins.
• The Password Policy settings are always enforced for passwords chosen by
users. If this option is enabled, the Password Policy settings are also
enforced for passwords chosen by administrators, including their own
passwords.
4. Select which Password Policy criteria should be enforced by checking the
appropriate boxes. Passwords must contain letters.
• The Passwords must contain letters and "Passwords must contain both
uppercase and lowercase letters rules are tied to each other. Therefore,
enabling the Passwords must contain both uppercase and lowercase letters
rule enables the Passwords must contain letters rule, and vice versa.
5. If you wish to enforce a minimum password length, enter the number of characters
in the Password minimum length text box. Use 0 for no minimum.
6. Click Save Changes.
Illegal passwords
When a password that does not conform to the policy as specified by the administrator is
entered for a user, that user receives an email notifying them that they need to change their
601-0011-01
54
Lotus Foundations Start Users Guide
password to one that conforms to the policy. The email also includes instructions on how to
perform this password change.
If a user changes their password in their personal WebConfig to one that does not meet the
policy criteria, they get a pop-up error message.
They also receive an error message in WebConfig’s Notices box telling them that their
password was not changed.
If the Enforce password policy on passwords set by admins option is set to No,
Administrators are able to change a user’s password to one that does not meet the policy
criteria. This helps administrators to set an easy-to-remember temporary password for a
new user, until that user can set his or her own password.
The administrator receives a warning message in WebConfig’s Notices box informing him
or her that the password does not meet the Policy criteria, but that the password has been
changed.
If a user is already set up and the administrator creates or changes a password policy, that
user’s password will be valid -- even if it does not meet the policy criteria -- until the next
time he or she logs onto WebConfig.
55
Lotus Foundations Start Users Guide
Lotus Foundations Start Users Guide
File services
File sharing services
Lotus Foundations is designed to provide high performance file sharing services for
Windows, Macintosh, and UNIX-style clients. Files created by Windows users can
transparently be seen by Macintosh users and vice versa.
The management and administration of file services is tightly integrated with user
management and administration. Please refer to Service Integration in user manual chapter
User & team management for a detailed explanation of how file sharing services are
automatically set up during user and team creation.
Configuring file services
1. Click File, located in the main menu of WebConfig.
2. If appropriate, enable the file virus scanner. With this option selected, all files on the
system will be automatically scanned for viruses every 12 hours. When a virus is
encountered, it will be cleaned, if possible. Otherwise it will be renamed to
“filename-INFECTED” and the user whose directory the file was found in will be
informed via email of the virus.
• This option is only available if you have purchased Lotus Foundations
AntiVirus software.
3. If appropriate, enable the NFS files server, which allows UNIX, GNU/Linux, and
similar computers to access shared directories on the server.
4. If appropriate, enable the Macintosh File Server.
• If Macintosh file services are not enabled, users will not have access to their
personal network directories or shared team directories from Macintosh
workstations.
5. In the Windows File Server section, enable the file server by selecting Stand Alone
from the drop down box. If you want to turn off the file server, select Disabled. If you
would like to enable NT Domain Controller or NT Domain Member, please read the
chapter NT Domain Services for further instructions.
6. Enter a workgroup name if you are not acting as a domain member or a domain
controller. This name indicates the workgroup under which the Lotus
Foundations-powered server is listed as a resource in Windows Network
Neighborhood.
• Enter the Windows workgroup name being used by other workstations in the
office. If you are setting up a new network, you can use any workgroup
601-0011-01
56
Lotus Foundations Start Users Guide
7.
8.
9.
10.
name you want (just make sure that you configure your Windows
workstations so that they belong to the same workgroup).
In the section labeled WINS Support select whether or not the Lotus Foundations
server responds to WINS requests by clicking "Enable" or "Disable".
If you select "Enabled" for the option above, specify the WINS server on the network
in WINS Server section. If you want that Lotus Foundations server to act as the
WINS server, leave the text box as is. If you want to use another server on the
network to act as the WINS server, enter the IP address of that server.
Click Save Changes.
To ensure that the status of the file server has changed, select System Status from
the WebConfig menu. The Windows, Apple, and NFS File Server sections of the
System Status screen should display the updated status.
• It may take up to 15 seconds for file services to start, and during that time
the status may read Error starting service.
Active server connections
The Active Connections section displays which server resources, such as opened files, are
being used by client workstations.
To view the current active connections in Nitix:
1.
2.
•
•
•
•
•
From the main Files section in WebConfig, click Active Connections.
In the main window you see a table that displays the following:
User Name indicates which user account is used to login to the network share.
Machine Name indicates the workstation used to log into the network share.
IP Address indicates the IP associated with the Machine Name.
Connection Time indicated what time the share was connect to.
Action provides the option of looking into further details of the connection by clicking
(...) button, or deleting the connection by clicking 'X'.
• If you click the edit (...) button, you see a screen that displays the following:
• User Name indicates which user account is used to login to the network share.
• Machine Name indicates the workstation used to log into the network share.
• Path indicates the path location of the share connection. If a file is in use, the actual
file may display.
• Time indicates when the share was initially accessed.
Access control lists
An Access Control List (ACL) is a set of data that informs a computer's operating system
which permissions, or access rights, that each user or team has to a specific file or
directory.
Administrators can modify a Lotus Foundations user or team's permissions ("Read Only,"
"Read/Write" or "None") on directories through the Lotus Foundations Permissions feature.
57
Lotus Foundations Start Users Guide
Lotus Foundations Start Users Guide
Setting a user's permissions
1. Click File in the WebConfig main menu. Locate the Permissions button.
2. Click Permissions at the bottom of the screen. The Select Folders screen is
displayed.
3. Scroll down the list of teams, admins, and users in the selection box and click on the
directory of the user to whom you want to assign permissions. Click on the check
mark icon to the right of the list.
4. The Modify Folder Permissions screen is displayed showing the current permissions
for that directory.
5. Modify the user's permissions by selecting either the Read Only, Read/Write, or
None radio button. Click the check mark button in Include Subfolders if you want the
same permission applied recursively, then click the check mark symbol in Action.
6. To set all of the files and folders under the current directory back to the default
permission value, click Resent Folder.
7. To set all of the files and folders under the current directory, including all sub-folder
files back to the default permission value, click Resent Folder.
Setting a team's permissions
1. Click File in the WebConfig main menu. Locate the Permissions button.
2. Click Permissions. The Select Folders screen is displayed.
3. Scroll down the list of teams, admins, and users in the selection box and click on the
directory of the team to whom you want to assign permissions. Click on the check
mark icon to the right of the list.
4. The Modify Folder Permissions screen is displayed, showing the current
permissions for that directory.
5. Modify the team's permissions by selecting either the Read Only, Read/Write, or
None radio button. Click the check mark button in Include Subfolders if you want the
same permission applied recursively, then click the check mark symbol in Action.
6. To view the permissions of all users assigned to that team, click on the Plus symbol
to the left of the team name in the Modify Folder Permissions section. This expands
the team list and show all users within that team as well as their permission levels.
7. To set all of the files and folders under the current directory back to the default
permission value, click Resent Folder.
8. To set all of the files and folders under the current directory, including all sub-folder
files back to the default permission value, click Resent Folder.
601-0011-01
58
Lotus Foundations Start Users Guide
Setting permissions in Windows
Alternatively, you can configure file and folder permissions in Windows. Please refer to the
following links for further information:
"How to Share and Set Permissions for Folders and Files Using WindowsXP." by Microsoft
TechNet. Accessed 2007-02-06.
"File and Folder Permissions (Windows 2000)." by Microsoft TechNet. Accessed
2007-02-06.
59
Lotus Foundations Start Users Guide
Lotus Foundations Start Users Guide
Disk quotas
Disk quota defines the maximum amount of hard disk space allowed for a user's files and
email. The disk quota feature in Lotus Foundations Start helps administrators to set specific
disk quotas for individual users.
For example, a user's disk quota value can be set to predetermined values such as small,
medium, or large, to a specified value for that user, or you can choose not to have the
user's disk usage subject to a quota.
Disk quotas pertain to a user's files and email data, which can each be configured
separately. The ability to modify the quotas for files and email separately is unique to Lotus
Foundations Start.
Setting default disk quota values
To set default disk quota values that can be used when assigning disks quotas to users:
1. Select Quota Setup from the menu on the left side of any WebConfig screen. The
main Quota Options Setup screen is displayed.
2. Enter a Default Small Quota Value.
3. Enter a Default Medium Quota Value.
4. Enter a Default Large Quota Value. The maximum size that a Disk Quota value can
be is 2 TB.
5. Click Save Changes to save the default quota values.
Setting individual user disk quotas
To define a user's disk quota:
1. Select User Setup from the menu on the left side of any WebConfig screen. The
main User Setup screen is displayed.
2. Click on the appropriate user's edit action button. The Modify User screen is
displayed. There are two separate sections for Quota Setup. Quota Value is for the
user's files and Email Quota Value is for the user's emails.
3. In each field, select a quota value from the drop-down list for that user. Your options
are:
• Unlimited (no limit set for this user)
601-0011-01
60
Lotus Foundations Start Users Guide
•
•
•
•
Small (uses the value from the Quota Setup page)
Medium (uses the value from the Quota Setup page)
Large (uses the value from the Quota Setup page)
Specified... (When selected, a text field opens that allows the user to specify
the quota in MB.)
4. The value set within Quota Setup can be used for both files and emails. Therefore, if
you have set a quota value of 100 MB, you can assign 100 MB for files and 100 MB
for email. The maximum size that a Disk Quota value can be is 2 TB.
5. Click Save Changes to save the quota values for that user.
Quota limit
All Disk Quota limits on Lotus Foundations are enforced, or hard limits. This means that
administrators can only define an absolute maximum and not a soft limit for warnings to
users. When a user's quota limit is reached, the system prevents that user from using any
more space on the hard disks by preventing them from creating new files, editing existing
files, receiving emails, etc.
User accounts with a quota over the limit will:
• not be permitted to write anymore to the disk (until having cleared some space).
• be unable to login to WebMail.
• not receive any new email.
Administrators will:
• see a yellow warning light in the Quota section on the System Status screen and it
will tell you that there are users over their quota.
• notice the user's Disk Space Used column on the User Setup screen says
something similar to: "4.1 MB / 1.5 MB ( 274 % )".
• see a list user(s) over their quota on the Quota Setup screen.
• receive an Email Report when the server’s disks reach 90% full (another notice will
not be sent unless the disk space drops below 85% usage and then rises again
above 90%).
61
Lotus Foundations Start Users Guide
Lotus Foundations Start Users Guide
NT domain services
Configuring Lotus Foundations Domain Settings
The domain settings for Lotus Foundations are located in the File section in WebConfig.
The options for configuring domain settings are located in the Windows File Server section
drop down box.
The four options listed provide you with the following:
• "Disabled" disables Windows file sharing and domain services in Lotus
Foundations.
• "NT Domain Controller" configures the Lotus Foundations server as a domain
controller.
• "NT Domain Member" configures the Lotus Foundations server as a domain
member.
• "Active Directory Member" configures the Lotus Foundations server as a member of
an Active Directory environment.
• "Stand Alone" enables Windows file sharing services in Lotus Foundations and
disable the domain settings.
See the user manual chapter File Services for more information on:
• File services in "Stand Alone Mode"
• The Permissions section
• The Active Connections section
Important Note
Because different versions of Lotus Foundations can contain modifications to
domain functionality, it is strongly recommended that the same version of Lotus
Foundations be run on each server. Running different versions of Lotus
Foundations can have adverse effects on features such as authentication and
file sharing.
What is a domain controller?
A domain controller provides authentication services to the rest of the computers on the
network. It stores user account and security information in a central database for one
601-0011-01
62
Lotus Foundations Start Users Guide
domain. When a user logs on to a computer that is part of the domain, the domain controller
authenticates the username and password against the information in the directory
database.
Lotus Foundations can serve as a Windows domain controller for all the computers running
Windows on the network. When this function is enabled, the Windows file server is set up
as a domain controller and a domain name replaces the Windows workgroup.
The network domain name has nothing to do with the internet domain name. They do not
interact and are independent of each other.
Important Note
Do not use the same internet domain name as your local network domain
name.
Configuring the domain controller
To enable Lotus Foundations as a domain controller:
1. Select File under Server Setup from the menu on the left side of any WebConfig
screen. The File Server Setup screen is displayed.
2. From the Windows File Server drop down box, select "NT Domain Controller".
3. Enter a name in the Windows Workgroup/Domain name field. This is the domain
name once the domain controller is enabled. Avoid using the default name of
Workgroup.
4. In the Domain Admin Team section, you can select any additional users to add to
the domain_admins team. Members of this team have the exclusive ability to
authenticate workstations to the Lotus Foundations domain.
5. Use the Roaming Profiles section to select whether or not you want to enable
roaming profiles for Windows workstations.
6. In the section labeled WINS Support select whether or not the Lotus Foundations
server responds to WINS requests by clicking Enable or Disable.
7. If you select Enabled for the option above, specify the WINS server on the network
in WINS Server section. If you want that Lotus Foundations server to act as the
WINS server, leave the text box as is. If you want to use another server on the
network to act as the WINS server, enter the IP address of that server.
8. Click Save Changes.
You need to set each Windows workstation’s domain name to match this in order for
Windows file and printer sharing to work properly.
63
Lotus Foundations Start Users Guide
Lotus Foundations Start Users Guide
What is a Windows NT domain member?
Lotus Foundations can become a member of a Windows NT domain, enabling Lotus
Foundations to authenticate users using a pre-existing Windows NT domain controller
rather than local passwords.
The Windows NT domain stores all user account and security information in a central
database. When a user logs on to Lotus Foundations, the Windows NT domain
authenticates the username and password against the information in the directory
database. This means that you do not need to maintain a separate directory database for
both Lotus Foundations and Windows systems; Lotus Foundations users can access their
network files from both Windows and Lotus Foundations systems with the same username
and password. All administration can be done with Windows NT.
Configuring the domain member
To enable Lotus Foundations as a domain member:
1. Select File under Server Setup from the menu on the left side of any WebConfig
screen. The File Server Setup screen is displayed.
2. From the Windows File Server drop down box, select NT Domain Member. The
Domain Member Enabled page is displayed.
3. Enter the domain name in the Windows Workgroup/Domain text box.
4. In the Domain Admin Username section, enter the username of a member of the
domain_admins team on the Lotus Foundations domain controller. If you are
authenticating to a Windows domain controller, enter a username belonging to the
domain_admins group on the Windows server.
5. In the Domain Admin Password section, enter the corresponding password to the
username you provided in the previous box.
6. In the section labeled WINS Support select whether or not the Lotus Foundations
server responds to WINS requests by clicking "Enable" or "Disable".
7. If you select Enabled for the option above, specify the WINS server on the network
in the WINS Server section. If you want that Lotus Foundations server to act as the
WINS server, leave the text box as is. If you want to use another server on the
network to act as the WINS server, enter the IP address of that server.
8. Click Save Changes.
Connecting the active directory member
To add the Lotus Foundations server as a member of an active directory environment:
1. Select File under Server Setup from the menu on the left side of any WebConfig
screen. The File Server Setup screen is displayed.
2. From the Windows File Server drop down box, select NT Domain Member.
601-0011-01
64
Lotus Foundations Start Users Guide
3. Enter the domain name in the Windows Workgroup/Domain text box.
4. In the Domain Admin Username section, enter the username of a member of the
domain_admins team on the domain controller. If you are authenticating to a
Windows domain controller, enter a username belonging to the domain_admins
group on the Windows server.
5. In the Domain Admin Password section, enter the corresponding password to the
username you provided in the previous box.
6. In the section labeled WINS Support select whether or not the Lotus Foundations
server responds to WINS requests by clicking Enable or Disable.
7. If you select Enabled for the option above, specify the WINS server on the network
in the WINS Server section. If you want that Lotus Foundations server to act as the
WINS server, leave the text box as is. If you want to use another server on the
network to act as the WINS server, enter the IP address of that server.
8. Click Save Changes.
Verifying server connectivity
Once you have selected and configured a mode in Lotus Foundations, you can verify the
status on the main System Status page of WebConfig in the User Authentication Method
section.
If you have set Windows File Server to Disabled you should see:
User Authentication Method:
Using normal password authentication. x of x user
licenses available.
If you have set Windows File Server to NT Domain Controller you should see:
User Authentication
Method:
Authenticating users for domain DOMAIN_NAME as a
Windows NT domain controller. Using normal password
authentication. x of x user licenses available.
If you have set Windows File Server to NT Domain Member you should see:
Windows Domain
Membership:
User Authentication
Method:
Joined domain DOMAIN_NAME
(SERVER_NAME/IP_ADDRESS)
Using Windows domain DOMAIN_NAME via password server
SERVER_NAME/IP_ADDRESS. x of x user licenses available.
If you have set Windows File Server to Stand Alone you should see:
65
Lotus Foundations Start Users Guide
Lotus Foundations Start Users Guide
User Authentication Method:
Using normal password authentication. x of x user
licenses available.
Monitoring machine accounts
Machine account monitoring is available in NT Domain Controller mode and lists all
machine trust accounts of the current domain.
Click the Machine Account link in the main File section in WebConfig.
The status of a machine trust accounts is displayed as one of the following:
Joining: The machine is in the process of joining the current domain.
Joined: The machine has already joined the domain, but no user is currently accessing the
domain controller through that machine.
Active: One or more users are currently accessing the domain controller through that
machine.
If you want to remove a machine account from the list, click X. This can be used to clean up
the list or remove domain access for a workstation which will occur during the next login.
Importing domain users and groups
Important Note
Each account that is imported uses a license on the member server. If there are
not enough licenses on the member server, you receive an error message
indicating that your CAL limit has been exceeded and accounts might not work
correctly.
From a member server, you can import domain groups and users from the domain
controller. This helps you to selectively choose which accounts you want to import and
ensures that authentication and other domain related features are consistent across the
network.
The Import Users section can be used for importing accounts using the pwdump2 utility or
by manually entering the accounts syntactically. For more information, please read the
section Import users from Windows in the user manual chapter User & team management.
601-0011-01
66
Lotus Foundations Start Users Guide
To import domain users and groups:
1. Click User Setup in the WebConfig main menu.
2. Click Import Users.
3. From the Domain Controller Groups and Domain Controller Users fields, highlight
the accounts that you want to import to the member server and click Import.
Important Note
The only user account that cannot be imported is root.
4. Click Save Changes. A page displaying the imported items, along with other
information is displayed.
• PWDUMP2 Generated Users - Indicates which accounts have been
imported using the pwdump2 utility. The information provided includes the
user name of the account, along with the Lanman hash and MD5 hash
strings.
• Syntactically Generated Users - Indicates user accounts that have been
manually entered into the Import Users section. The information provided is
the user name of the account, the password for the account (in plain text),
the full name, and the quota and quota type, if one has been assigned.
• Imported Domain Groups - Indicates which groups you have specified to
import to the member server. The information provided will be the group
name, the members of that group, and the quota and quota type, if one has
been assigned. Group members who exist in the domain controller, but not
in the domain member, will not show up in the Members field.
• Imported Domain Users - Indicates which users you have specified to import
to the member server. The information provided will be the user names, their
passwords (in plain text), and the quota and quota type, if one has been
assigned.
5. Once you have verified all of the imported accounts, click Save Changes.
Authentication status
Once a domain member server is connected to the domain controller and all of the desired
accounts have been imported, you can verify the authentication status. In the User Setup
section in WebConfig, a new column labeled Authenticate is displayed and indicate whether
an account is local or remote.
If the status indicates local, the account only exists on the member server. If the status
indicates remote, the account exists on both the member server and the domain controller.
Important Note
If the same user account exists on both servers, prior to domain connectivity,
the accounts synchronize and automatically use the authentication on the
domain controller.
67
Lotus Foundations Start Users Guide
Lotus Foundations Start Users Guide
File mounting/drive mapping
Once the domain controller is enabled, a user’s files can be mounted directly onto any
domain workstation upon login. The shared files of any team that the user belongs to can
also be mounted.
For users:
1. Select User Setup from the menu on the left side of any WebConfig screen. Click on
the edit action button for the appropriate user. The Modify User screen is displayed.
2. From the drop-down menu in the Automatically mount files as field, select the drive
that the user’s files should be mounted as on the workstation. The default drive is X.
• Be sure to choose a drive that does not conflict with drives already in use.
3. Click Save Changes.
This can also be done when the user is created.
For teams:
1. Select User Setup from the menu on the left side of any WebConfig screen. Click on
the edit action button for the appropriate user. The Modify Team screen is
displayed.
2. From the drop-down menu in the Automatically mount files as field, select the drive
that the team’s shared files should be mounted as on the workstation. The default,
None, is to not mount the files at all. This ensures that there is no conflict between
use of drive space.
3. Click Save Changes.
This can also be done when the team is created.
Joining Windows systems to a domain
All Windows workstations need to authenticate to the domain once the domain controller is
enabled. Authentication to the domain only works using a user account that belongs to the
domain_admins team.
Once a Windows workstation has joined the domain, users can change their passwords
using the standard Windows interface or from WebConfig.
Windows operating systems which are not officially supported for use with Lotus
Foundations domain controllers are:
• Windows 95
601-0011-01
68
Lotus Foundations Start Users Guide
• Windows 98
• Windows ME
For Windows NT:
1. In Windows, select Start > Settings > Control Panel. The Control Panel window is
displayed.
2. Select Network from the list. The Network window is displayed. Click the
Identification tab.
3. Click Change. The Identification Changes window is displayed.
4. In the Member of section of the window, select Domain. Enter the name of the
domain as entered in the Windows workgroup name field on the File Server Setup
WebConfig screen.
5. Check the box for Create a Computer Account in the Domain. Enter a
domain_admins username, and the corresponding password.
6. Click OK. The Network window is displayed. Click OK again.
7. Reboot the workstation. The next time you log in to Windows, a drop down box is
displayed. Select the domain name, for example, MAINOFFICE, and a user account
and password belonging to that domain.
For Windows 2000:
1. In Windows, select Start > Settings > Control Panel. The Control Panel window is
displayed.
2. Select System from the list. The System Properties window is displayed. Click the
Network Identification tab.
3. Click Properties. The Identification Changes window is displayed.
4. In the Member of section of the window, select Domain. Enter the name of the
domain as entered in the Windows workgroup name field on the File Server Setup
WebConfig screen.
5. Click OK. The next time you log on, the login window has an additional Domain
field.
For Windows XP Professional:
1. Install the registry patch:
http://www.nitix.com/support/registry_patch/samba_xp_domain_member.reg For
information on the latest features available in Samba as a domain controller,
download this PDF: http://www.nitix.com/support/docs/csamba6.pdf
69
Lotus Foundations Start Users Guide
Lotus Foundations Start Users Guide
2. In Windows, select Start > Settings > Control Panel. The Control Panel window is
displayed. On the left menu bar under Control Panel, select Classic View if you are
currently in Category View.
3. Select System from the list. The System Properties window is displayed. Click the
Computer Name tab.
4. Click Change.... The Computer Name Changes window is displayed.
5. In the Member of section of the window, select Domain. Enter the name of the
domain as entered in the Windows workgroup name field on the File Server Setup
WebConfig screen.
6. Click OK. The next time you log in to Windows, a drop down box is displayed.
Select the domain name, for example, MAINOFFICE, and a user account and
password belonging to that domain.
Logon scripts
Logon scripts are supported through DOS batch files found at \\Servername\netlogon.
All scripts are called USERNAME.bat. These batch files call upon _logon.bat. If manual
modifications are required, create a file called _logon.bat. All manual modifications
should be made to _logon.bat as USERNAME.bat is automatically generated, and
modifications will be lost.
To prevent conflicts, if you upgrade to Nitix version 3.75 or higher from a previous version,
your logon.bat file is automatically renamed _logon.bat and a new file called
logon.bat is created. The new logon.bat file links to your _logon.bat file.
Automated drive mapping
User folders and team folders can be automatically mounted through the selection of a
drive mount in the User/Team setup. These drive mappings are done through the Logon
scripts. Note that any drives previously mounted are not be automatically disconnected as
Windows caches these drive connections.
Workstation administrative rights
Administrators can add users to the domain_admins team to give them workstation
administrative rights to all computers running Windows on the network. Users have full
control over workstation administration without giving them access to other server
administrator functions.
601-0011-01
70
Lotus Foundations Start Users Guide
To give users workstation administrative rights
1. Select User Setup from the menu on the left side of any WebConfig screen. The
main User Setup screen is displayed.
2. Add any users to the domain_admins team that you want to grant access to
workstation administrative features. See the user manual chapter User & Team
Management for instructions on how to create a team.
3. The next time that user logs in to the domain, they have workstation administrative
rights.
When you import users from a Windows NT domain, those users are automatically
added to the domain_admins team.
71
Lotus Foundations Start Users Guide
Lotus Foundations Start Users Guide
Email services
Configuring email services
The Email Setup section is divided into several tabbed sections that allow you to effectively
manage all of the email services offered in Lotus Foundations Start.
The tabbed sections are as follows:
Summary tab
The Summary tab displays a list of services, indicates the status and provides additional
comments where necessary.
The options displayed are:
• POP3 Server: A system that receives a user’s email messages and stores them in
the user’s mailbox. When a user’s email client checks for new mail, it communicates
with the POP3 server, which ensures proper user authentication and delivery of
email to the user’s email client. POP3 is the most commonly used mail delivery
protocol.
•
• SSL Server (POP3): This is the secure POP3 server. The Secure Sockets
Layer (SSL) is a commonly-used protocol for managing the security of a
message transmission on the Internet.
• IMAP Server: An advanced system that is similar to POP3. Because IMAP is
relatively new, not all mail clients support it. IMAP offers superior user
authentication and allows users to store their email on a server instead of
downloading messages to a workstation (as is the case with POP3). This allows
users to check their email from various workstations and lets them see a complete
list of the emails kept in their folders.
•
• SSL Server (IMAP): This is the secure IMAP server. The Secure Sockets
Layer (SSL) is a commonly-used protocol for managing the security of a
message transmission on the Internet.
• ExchangeIt! Server: Allows Microsoft Outlook clients to share information through
the server. This option also requires MySQL to be enabled.
• SMTP Server: A mail delivery system. When you send an email, the SMTP server
takes this message from your email client and delivers the message to the
recipient’s POP3 server. If your ISP forces you to use a specific SMTP server, Lotus
Foundations can deliver to that server rather than directly to the destination servers.
This is known as a “ smarthost”.
601-0011-01
72
Lotus Foundations Start Users Guide
•
•
•
•
•
•
•
•
• Virus scan: Scans all outgoing and incoming mail for viruses. If a virus is
found, it is immediately removed from the email. A warning is then sent to
the sender and all recipients along with the original (but virus-free) message.
You must buy the Lotus Foundations AntiVirus license for Lotus Foundations
for this feature to be enabled.
• Spam scan: Scans all incoming mail for possible spam. If spam is detected,
it will categorize the email as either probable or definite spam, and allow you
to choose what to do with the email, including marking it, moving it to a
spam folder, or deleting it.
• RBL: Sets the level of RBL (real time blacklist) spam protection that the
server will use. "No RBL" allows all mail into the system without doing any
checks on the sources. "Medium RBL" blocks all mail originating from known
spam sources. "Strong RBL" blocks mail from known spam sources as well
as spam relay servers and dialup accounts.
• Mail logging: This option when enabled, will automatically make a copy of
all incoming and outgoing mail into an archive. A ‘privacy warning’ (which
cannot be edited) is appended to all incoming and outgoing email indicating
that a copy of the email message has been saved by the server. The archive
can be accessed through a shared folder in IMAP or through WebMail.
• SMTP Authentication: Allows remote users to send email through the Lotus
Foundations server, preventing the need for the mail setting to be modified
every time a user changes locations. Lotus Foundations user account
information must be provided within the mail client settings for this feature to
work.
• Smarthosting:
• Attachment filter: Allows Lotus Foundations to filter incoming emails that
contain file attachments. The filtering can be done based on specified
document extension types and specific users can be exempt from individual
extension types.
• Allowed relays: IP addresses or domain names can be added to allow for
email relaying from those specified locations.
Features handled by IBM Lotus Domino
The following features are administered in Lotus Foundations WebConfig, but are actually
being handled by IBM Lotus Domino:
•
•
•
•
•
73
SMTP
POP3
POP3/SSL Server
IMAP
IMAP/SSL Server
Lotus Foundations Start Users Guide
Lotus Foundations Start Users Guide
Servers tab
The Servers tab allows you to control the various mail features in Lotus Foundations. The
options are as follows:
1. SMTP (mail delivery) server
• Enable - Enables the SMTP server and allows any computer on the internal
network or on the Internet to send email using the Lotus
Foundations-powered server as a mail server. Messages from computers on
the Internet are accepted only if their destination is the local domain hosted
by your Lotus Foundations server. (This prevents your server and Internet
bandwidth from being used to send unsolicited emails).
• Only Trusted Hosts - Enables the SMTP server and allows internal users
and users connected to the internal network through a VPN to send email
using the Lotus Foundations-powered server as their mail server.
• Disable - Disables the SMTP server completely.
2. POP-3 (mail reader) server
• Enable - Enables the POP3 server and allows any computer on the internal
network or on the Internet to access the POP3 mailbox. Select Yes only if
you have users who will be accessing their email from outside of the office.
• Only Trusted Hosts - enables the POP3 server and allows internal users to
access the POP3 mailbox.
• Disable - disables the POP3 server.
3. POP-3/SSL (secure mail reader) server
• Enable - allows incoming secure POP-3 connections from anywhere. This
means that your users could download their email from anywhere on the
Internet.
• Only Trusted Hosts - allows incoming secure POP-3 connections only from
the local network, and not from the internet.
• Disable - disables the secure POP-3 server.
4. IMAP (advanced mail reader) server
• Enable - allows incoming IMAP connections from anywhere. This means that your
users could read their email from anywhere on the Internet.
• Only Trusted Hosts - allows incoming IMAP connections only from the local
network, and not from the internet.
• Disable - disables the IMAP server.
• IMAP/SSL (secure advanced mail reader) server
• Enable - allows incoming secure IMAP connections from anywhere. This means that
your users could read their email from anywhere on the Internet.
• Only Trusted Hosts - allows incoming secure IMAP connections only from the local
network, and not from the internet.
• Disable - disables the secure IMAP server.
• WebMail Server
601-0011-01
74
Lotus Foundations Start Users Guide
•
•
•
•
• Enable - enables the WebMail server. Enabling the WebMail server automatically
enables the IMAP and Web servers. If you disable IMAP or the Web servers, the
WebMail server will not be functional.
• Disable - disables the WebMail server completely.
ExchangeIt! Server
• Enable - enables the ExchangeIt! server. Enabling the ExchangeIt! server
automatically enables the MySQL and Web servers. If you disable MySQL or the
Web servers, the ExchangeIt! server will not be functional.
Disable - disables the ExchangeIt! server completely.
LDAP directory server
• Enable - enables the LDAP server (which answers directory queries). The LDAP
directory is automatically populated with the names and email addresses of all users
configured on the Lotus Foundations-powered server.
• Disable - disables the LDAP server completely.
Mail Domain
Allows you to change this field if you want email coming from the server to have a different
domain.
• SMTP Authentication
• Enable - allows the mail server to be used as an SMTP gateway for remote Lotus
Foundations users.
• Disable - disables the SMTP Authentication service.
• Mail Domain
Enter the name of your Lotus Foundations mail domain (e.g. abc.com ).
• In the field for ISP's SMTP Server enter the server name if your ISP forces you to use a
specific SMTP server. This will make Lotus Foundations deliver to that server rather than
directly to the destination servers. This is known as a “ smarthost”. You should leave this
blank whenever possible.
• Reject Unknown Users
• Enable - blocks incoming emails containing users that do not exist on the Lotus
Foundations server.
• Disable - disables the rejection of emails to known users.
• Require TLS for Incoming Connections
• Enable - will allow inbound mail from a cryptic data transmission using the TLS
protocol.
• Disable - disables the inbound cryptic data transmission using the TLS protocol.
• Require TLS for Outgoing Connections
• Enable - allows outbound mail using a cryptic data transmission via the TLS
protocol.
• Disable - disables outbound cryptic data transmission using the TLS protocol.
• Number of Incoming SMTP Connections
Enter the number of incoming SMTP connections that you want to permitted at once.
• Email Size Limit in MB
75
Lotus Foundations Start Users Guide
Lotus Foundations Start Users Guide
Enter the number limit for the size of incoming email messages
• Minutes Between Remote POP Mailbox Checks
Enter the number of minutes that the server will wait until it checks for remote POP email
messages.
• ISP's SMTP Server
If your ISP forces you to use a specific SMTP server, enter that server's name.
• ISP's SMTP Port
Enter a number only in the event that the SMTP port for the ISP is not 25.
• ISP's SMTP Username
Enter your ISP login username if required.
• ISP's SMTP Password
Enter your ISP login password if required.
• Click Save Changes.
Filters tab
The Filters tab allows you to control the mail filter and mail logging features in Lotus
Foundations. The options are as follows:
1. Mail Virus Scanner
• Inbound Only - scans inbound email only.
• All Emails - scans all inbound and outbound email.
• Disabled - disables mail virus sccanning.
• RBL (spam blocker)
• Strong RBL - blocks known spam servers and spam relay servers. Strong RBL
blocks all spam mail, but may also block other mail. Senders receive a message if
their mail is blocked.
• Medium RBL - clocks known spam servers. Medium RBL blocks most spam mail.
• No RBL - disables RBL spam protection.
• Mail Spam Scanner
• Enable - enables email spam scanning. By clicking on "Enable" the box will expand
to include the option to activate whitelists and blacklists as well as the the option to
choose from the options in Definite Spam Categories.
• Disable - disables email spam scanning.
601-0011-01
76
Lotus Foundations Start Users Guide
If you see the "Enable" and "Disable" radio buttons but not the "Configure" link, the content
layer scanner is activated but the network layer scanner is not. For more detailed
information on using the spam scanning features in Lotus Foundations, refer to the user
manual chapter Spam Scanner.
• Attachment filter
• Enable - enables the attachment filter.
• Disable - disables the attachment filter.
The attachments file types that you want filtered as well as the users who you want
excluded from filtering rules, can be defined in the Attachment Extensions section, under
the Advanced Filtering tab.
• Mail Logging
• All local inboxes - enables mail logging on all user account on the server.
• Selected users only - enables mail logging on user accounts specified in the section
Users or teams selected for logging. If this option is selected the Filters section will
expand to include the list of users and teams on the Lotus Foundations server
• Disabled - disables mail logging for all user accounts on the server.
Enabling mail logging will automatically copy all incoming and outgoing mail. Each email
that is sent/received will include a ‘privacy warning’ indicating that the email is being logged
by the server into a mail archive. This warning cannot be edited.
A maillog team is created and will appear under Team Setup. The archived mail can be
accessed through WebMail or IMAP by adding users as members of the maillog team. For
more information please see Chapter 7: User & Team Management.
• Users or teams selected for logging
1. Highlight the users and teams you want to select for mail logging.
2. Click Add >> to move the selected users and teams into the Selected Users box.
• Click Save Changes.
Addressing tab
The Addressing tab allows you to manage virtual mail domains, mailing lists and email
aliases.
77
Lotus Foundations Start Users Guide
Lotus Foundations Start Users Guide
Available mail domains
This section lists the all of the domains hosted on the server and allows you to specify
which users can use the domain for email purposes.
By default, all users on the server will have access to all of the domains. If no users are
added, the server will assume that all users have access.
Should you want to modify user access to a specific domain, proceed with the following:
1. Click on the virtual domain action button.
2. In the Modify Virtual Domain box, highlight the users you want to add for this
domain and click Add >>.
3. Click Save Changes.
Mailing list
The Mailing List section allows you to indicate which virtual domain on the server will
respond to, with respect to team mailing lists.
A team mailing list is first created in the main User Setup section of WebConfig.
In the Mailing List section, you should see that team name with a Responding Domain
which should be the main Lotus Foundations domain.
To allow this mailing list to use a specific virtual domain:
1. Click on the action button for the mailing list team.
2. In the Modify Mailing List Domain box, use the drop down section to select the
virtual domain you want to use.
3. Click Save Changes.
Email DNS configuration
Although email services are functional after the administrator enables the appropriate mail
servers, the mail delivery DNS records must be configured before users can send mail to
and receive mail from outside of the internal network.
In the scenario that an email message is sent to [email protected], the message is
downloaded to the SMTP server, which needs to know the IP address of example.com in
order to deliver the message. The SMTP server consults the root DNS server on the
Internet and through a series of queries is eventually pointed to the DNS server that stores
the names and IP numbers of the hosts in example.com.
601-0011-01
78
Lotus Foundations Start Users Guide
DNS Resolution
It is vital that your DNS server (which maintains information about your domain) is set up
correctly. DNS resolution service can be provided by Lotus Foundations, or it can be
provided by another DNS server maintained by you or by your ISP. If DNS resolution is
provided by your ISP and you want Lotus Foundations to receive all emails for your domain,
then make sure that you request the following from your ISP:
MX records for your domain should be pointed to your Lotus Foundations-powered server’s
public IP address (the address typically assigned to the eth1 interface).
If DNS resolution is provided by Lotus Foundations, make sure that the public IP address is
registered with a proper domain name registrar as your domain DNS host.
Important Note
In order for your Lotus Foundations-powered server to function properly as a
mail server for global email delivery, you must have a static IP address or use
Dynamic DNS.
Configuring Lotus Foundations as a DNS server
To properly configure Lotus Foundations as a DNS server:
1. Click Local in the WebConfig main menu. The Local Network Options screen is
displayed.
2. In the Act as public DNS server field, select "Yes".
3. Click Save Changes.
Email client configuration
Although there are many different email clients available, the configuration of most clients is
very similar. The exact configuration of your email client depends on how you want your
mail delivery to be configured. The two most common configurations are listed below.
Configure your mail client according to the configuration that resembles your email setup.
79
Lotus Foundations Start Users Guide
Lotus Foundations Start Users Guide
General setup
If your mail is hosted on your ISP’s mail server:
All users in your office have their own mail address and mailbox hosted on the ISP’s server.
Your ISP supplies you with the name of the POP3 or IMAP server where your mail has to
be retrieved and with the address for the SMTP mail delivery server. Enter this address into
the appropriate field during the configuration of your mail client.
Using your Lotus Foundations server as an SMTP server (even if your mail is hosted by an
ISP) has its advantages, especially if you often send large messages or if you have a slow
internet connection. Your email client may be tied up for minutes or even hours if you
attempt to send a large email message to an ISP’s SMTP server. If you use your Lotus
Foundations server as an SMTP server, large files are quickly transferred over the
high-speed LAN. Although a file is then slowly transferred over your internet connection,
your email client is free to perform other tasks.
Enter the following information when configuring your email client:
• In the SMTP server field, enter the IP address or host name provided to you by your
ISP. Alternatively, use your Lotus Foundations server as the SMTP server and enter
the IP address or host name of your Lotus Foundations-powered server.
• In the POP3 or IMAP server field, enter the IP address or host name provided to
you by your ISP.
• In the POP3 or IMAP mailbox name field, enter the first part of your email address.
For example, if your email address is [email protected], enter johndoe into
this field.
• In the POP3 or IMAP password field, enter the password provided to you by your
ISP.
If your mail is hosted on your Lotus Foundations server:
Enter the following information when configuring your email client:
• In the SMTP server field, enter the internal IP (Eth0) address or host name of your
Lotus Foundations server. You do not need to enter the domain name.
• In the POP3 or IMAP server field, enter the internal IP (Eth0) address or host name
of your Lotus Foundations server.
• In the POP3 or IMAP mailbox name field, enter your Lotus Foundations username.
• In the POP3 or IMAP password field, enter your Lotus Foundations password.
601-0011-01
80
Lotus Foundations Start Users Guide
LDAP setup
Lotus Foundations has a built-in Lightweight Directory Access Protocol (LDAP) server,
which provides a directory of user names and email addresses. It is automatically populated
with names and email addresses of all Lotus Foundations users. Most email clients support
access to read-only LDAP servers.
Configuring LDAP in Microsoft Outlook
To configure your Outlook client to user the Lotus Foundations LDAP service:
1. Open Microsoft Outlook. From the main menu, select Tools > Accounts. The
Internet Accounts screen is displayed.
2. Select Add > Directory Service. The Internet Connection Wizard will be displayed:
3. In the Internet directory (LDAP) server field, enter the name or IP address of your
Lotus Foundations server.
4. Click Next.
5. Indicate whether or not you want your email client to check addresses using the
LDAP directory. If this option is selected, you can enter partial email addresses
when sending emails. Outlook will automatically find the closest match in the LDAP
directory and enter the correct email address.
6. Click Next.
7. Click Finish. The Internet Accounts screen is displayed again.
8. Click Properties.
9. Select the Advanced tab. The Advanced screen is displayed.
10. In the Search Base field, enter the following, replacing EXAMPLE.COM with the
Internet domain name hosted on the Lotus Foundations server.
o=EXAMPLE.COM
11. Click OK. The Internet Accounts screen will be displayed again. Click Close.
The LDAP server is now set-up, and users can search through the LDAP data directory for
the names and email addresses of Lotus Foundations users.
Using Domino email
Domino Web Access
As soon as Lotus Foundations Start is installed, you can begin using Domino Web Access
(DWA) to view and send email, as well as interact with other available Domino features. In
a Web browser that supports 128 bit encryption, go to the following URL:
81
Lotus Foundations Start Users Guide
Lotus Foundations Start Users Guide
http://DOMAIN_NAME/email
You are asked to provide authentication. Enter a user account and password that has been
created in Lotus Foundations Start. Once you are authenticated, the Domino Web Access
screen is displayed.
For assistance with DWA, use the help feature provided.
Domino workstation clients
In addition to DWA, you can use Windows client software to interact with Lotus Foundations
start mail services. For more information on installing IBM Lotus Notes and Domino Access
for Microsoft Outlook (DAMO), please see the Lotus Foundations Start Getting Started
Guide chapter Installing IBM Lotus Domino Clients.
601-0011-01
82
Lotus Foundations Start Users Guide
Web services
Web server
The high-performance Web server featured in Lotus Foundations is based on the industry
standard Apache Web server and it supports CGI scripts. Perl and PHP are also integral
parts of the Web services of Lotus Foundations.
Lotus Foundations provides Web services on a Master Web Server and on Virtual Web
Servers.
Master Web server
What is the master Web server?
The master Web server is designed to serve your intranet site and the personal web pages
of your Lotus Foundations users. Although it is possible to make these sites available to
outside users, you can choose to keep them private for security reasons.
Master Web services are provided from IP addresses assigned to the internal and external
network interfaces of Lotus Foundations. If the Web server is enabled and access is
granted to outside users, anyone accessing the Lotus Foundations server’s internal or
external IP address from a Web browser can access information on the master server.
Webmaster directory
A webmaster team is created and configured as the master Web server administrator.
When the webmaster team is created, a shared network directory called webmaster is
made available to all members of the webmaster team, and the subdirectory WWW is created
in the webmaster network drive. This is the directory from which Intranet files are served.
Any files saved in this directory are automatically accessible through the master Web site.
The webmaster directory also contains a log subdirectory, where server access and error
logs are maintained, and a cgi-bin directory (where all CGI scripts are stored).
83
Lotus Foundations Start Users Guide
Lotus Foundations Start Users Guide
Configuring your master Web server
1. Select WWW from the main WebConfig menu. The WWW Setup screen is
displayed.
2. Indicate whether or not you want to enable the Web server.
• Selecting Enable enables the server and helps users on the internal network
and users on the internet to access Web pages on this server. If enabled,
the Web server serves pages out of the webmaster's WWW directory. In
addition, Web server logs are written in the webmaster's directory.
• Selecting Only Trusted Hosts enables the server and enables users on the
internal network to access Web pages on this server. If enabled, the Web
server serves pages out of the webmaster's WWW directory. In addition,
Web server logs are written in the webmaster's directory.
• Selecting Disable disables the server. No one can access Web pages on
this server.
• Selecting Dynamic Redirect enables the redirection of Web connections.
Dynamic redirection can be employed to circumvent blocked HTTP (Web)
ports. If this option is chosen, all Web requests directed at Lotus
Foundations are handled by a Dynamic DNS server, which automatically
redirects them to a different port on the Lotus Foundations-powered server.
This is almost transparent for clients, who only notices that the hostname
and port have changed slightly. For Dynamic Redirect to work, you must
enable DynamicDNS (see Domain Name Services).
3. Indicate whether or not you want to enable the secure Web server.
• Selecting Enable enables the secure Web server and enables users on the
internal network and users on the Internet to access secure Web pages on
this server. If enabled, the Web server serves pages out of the webmaster's
WWW directory. In addition, Web server logs are written in the webmaster's
directory.
• Selecting Only Trusted Hosts enables the secure Web server and enables
users on the internal network to access secure Web pages on this server. If
enabled, the Web server serves pages out of the webmaster's WWW
directory. In addition, Web server logs are written in the webmaster's
directory.
• Selecting Disable disables the secure Web server. No one can access
secure Web pages on this server. Selecting Disable also means that you
cannot access WebMail.
4. Indicate whether or not you want to enable the MySQL database server. MySQL is
an advanced feature for users that are familiar with SQL (Structured Query
Language). Refer to MySQL server (Lotus Foundations) for more information.
• Selecting Enable enables the MySQL server and enambes users on the
internal network to access personal databases and the databases of any
teams that they belong to. WebMail uses the MySQL database server to
store user preferences; as such, the server has to be turned on for WebMail
to work.
601-0011-01
84
Lotus Foundations Start Users Guide
5.
6.
7.
8.
9.
• Selecting Disable disables the MySQL server. Users do not have access to
personal or team databases. This is the default setting.
• User and team databases are automatically created when user and team
accounts are set up. MySQL databases can be used to store dynamic Web
page data for services such as on-line catalogues and stores.
Indicate whether or not you want to serve personal home pages from the WWW
subdirectory, located in each user’s personal network directory. You can choose to
serve Web pages to users on your network or to the entire internet.
• Select Enable to enable personal pages to be viewed from anywhere. For
this to work, the master Web server also has to be enabled. The address for
personal home pages is in the following format:
http://server.domain/~username.
• Select Only Trusted Hosts to enable personal pages to be viewed only from
the local network, and not from the Internet. For this to work, the master
Web server also has to be enabled.
• Select Disable to disable personal Web pages.
Although the default webmaster team is created as the administrator of the master
web server, any team can perform server maintenance tasks. If appropriate, select
another team to maintain the server from the drop-down list.
Enter the email address of the webmaster (the person who is in charge of this
website).
Enter the appropriate number in the Megabytes of WWW cache field. Refer to Web
Caching (in this chapter) for more details.
Click Save Changes.
Virtual Web servers
Although virtual Web servers enable you to host a number of websites from the same
server, these sites are displayed to outside users as though they are all hosted by different
servers. To configure virtual Web servers on the outside interface, your ISP has to assign
you multiple IP addresses or you have to use name-based virtual websites (which use
names to distinguish between websites that share a single IP address).
Every virtual website has to be associated with a maintenance team (which can maintain
only one virtual website). This means that for every virtual website that you create, you also
have to create a team that maintains it. If this site is maintained by users on the local
network, they can be made members of the maintenance team. If the site is maintained by
outside users, they have to use FTP to access to the website directory. If they have an
account on the server, they can use their own login name and password. If they do not
have an account on the network, they have to use the team name and password.
Creating a new virtual Web server
85
Lotus Foundations Start Users Guide
Lotus Foundations Start Users Guide
1. Select WWW from the main WebConfig menu. The WWW Setup screen is
displayed.
2. Click Virtual Domains.
3. Click Add Server. The New Virtual Domain screen is displayed.
4. Enter your internet domain name as the virtual domain’s host name. This host name
is used as a DNS entry for domain name resolution.
5. The name of your Lotus Foundations server automatically populates the IP Address
of Virtual Web Server field. If you want to use a different IP address, enter it in this
field.
• Your ISP has to provide you with an extra IP address if you are configuring a
virtual Web server on an outside, untrusted interface.
6. Select a team to perform webmaster duties from the drop-down list.
7. Choose whether or not to make the virtual Web site accessible only by trusted
hosts. This way, you can easily host both an intranet and a public Web site from the
same server.
8. Indicate whether or not you want to serve personal home pages from the WWW
subdirectory, located in each user’s personal network directory.
9. Click Save Changes.
Deleting a virtual Web server
1. Click Virtual Domains on the WWW Setup screen. The Virtual Domains screen is
displayed, showing all existing virtual domains.
2. Click on the appropriate server’s delete Action button.
3. Click OK to confirm the deletion in the window that displays.
• All Web files for that server reside in the team's directory and are not deleted
unless the team maintaining the site is deleted.
Editing a virtual Web server
1. Click Virtual Domains on the WWW Setup screen. The Virtual Domains screen is
displayed, showing all existing virtual domains.
2. Click on the appropriate server’s edit Action button. The Modify Virtual Domain
screen is displayed.
3. Change the appropriate server settings.
4. Click Save Changes.
Hosting multiple Web sites
If your Lotus Foundations server is used as a Web hosting platform for a number of
websites owned by various customers, you should use the following strategy. For example,
if your Lotus Foundations server is used to serve a website for ‘AcmeWidgets’:
601-0011-01
86
Lotus Foundations Start Users Guide
1. Create a team called AcmeWidgets.
2. Create a virtual Web server and choose the AcmeWidgets team as the Webmaster
team. Anyone from AcmeWidgets can access these files using FTP.
Secure Web services
Secure Socket Layer (SSL) encryption
The Lotus Foundations Web server can serve secure Web pages, which are transmitted
over the internet using Secure Socket Layer (SSL) encryption technology. All browsers on
the market support SSL encryption. For SSL to work, the Web server must have a file with
a security certificate. This file is unique to every Web server and, for encryption to properly
work, the certificate has to be issued by a proper Certificate Authority. When the user loads
a secure page, its certificate is compared to the certificate held by the Certificate Authority;
if they match, the site is considered trusted, and encrypted communication can commence.
You can purchase SSL security certificates from a number of internet security companies
like Entrust and VeriSign.
Lotus Foundations security certificates
The security certificates that Lotus Foundations generates can be checked for authenticity
by all Web browsers. The security certificate generated by Lotus Foundations is placed in
the webmaster directory and named certificate.pem.
A user loading the first secure Web page from the server is warned that this security
certificate is valid, but that the company issuing it cannot be considered trusted. The user
has to manually approve the continuation of the transaction. Despite this warning,
information exchanged between the Web browser and the Web server cannot be viewed by
others.
If you purchase a security certificate from a Certificate Authority, delete the file
automatically created by Lotus Foundations and replace it with the one you purchased. See
the SSL Certificate section in this chapter for more information. You might also want to
store a copy of the purchased certificate in a different directory.
SSL certificate
Although a security certificate is automatically generated the first time you power-up your
Lotus Foundations-powered server, you can overwrite this certificate at any time with a 3rd
party certificate purchased from a Certificate Authority.
87
Lotus Foundations Start Users Guide
Lotus Foundations Start Users Guide
Important Note
You can only use X.509-based certificates.
Replace with 3rd party certificate
1. Select WWW from the main WebConfig menu. The WWW Setup screen is
displayed.
2. Click SSL Certificate. The SSL Certificate screen is displayed.
3. Fill in your personal information in the Customize PKCS#10 Certificate Request box.
4. Click Generate Request. A Security Alert window is displayed. Click Yes to proceed.
5. The Notices box at the top of the screen shows that Lotus Foundations is
generating a new certificate request based on the information you provided above,
and a new certificate request is generated in the PKCS#10 Certificate Request box.
6. Copy and paste the new certificate request from the PKCS#10 Certificate Request
box and give it to your Certificate Authority. They use this to generate a new
certificate.
7. Once you have received the new certificate from your Certificate Authority, copy and
paste it into the X.509 Certificate box.
8. Click Replace Certificate.
Web caching
To improve bandwidth, Lotus Foundations can temporarily store Web files accessed by
internal users in a cache. If a user requests any of these stored files, Lotus Foundations
serves them from the cache instead of from the original Web site. Internet bandwidth is
used only to retrieve Web pages that have not previously been viewed, resulting in much
faster access to the internet.
Configuring Web caching
1. Select WWW from the main WebConfig menu. The WWW Setup screen is
displayed.
2. Enter the amount of data to be cached in the Megabytes of WWW cache field.
Specify 5-10 MB for every active user on the internal network.
• Once the cache is full, the oldest files are deleted to make space for new
ones. Configuring the cache size to zero disables the Web cache server.
3. Click Save Changes.
4. For Web caching to run transparently, ensure that your Web browser is NOT
configured to use a proxy server.
601-0011-01
88
Lotus Foundations Start Users Guide
Web filtering
Web and content filtering
Lotus Foundations provides positive web filtering, which is a feature that allows the system
administrator to permit access to specific Internet sites, while blocking access to all others.
Enabling the Web filter
1. Select WWW from the Server Setup menu on the left side of any WebConfig
screen. The WWW Setup screen is displayed.
2. In the Content filtering field, select "Enable".
3. Click Save Changes.
4. Click Configure. The Web Filtering screen is displayed.
If you plan to use web filtering in conjunction with web caching, all proxy server settings
must be removed.
Providing full internet access
To provide a specific workstation with access to all Internet sites:
1. Enter their host name or IP address in the Workstations Exempt from Filtering
section of the screen.
2. Click on the check mark symbol to confirm the entry. The new entry will be
displayed in the list of workstations with full access.
To remove full access for a workstation, click on the X action button located next to
the workstation name or IP address. The exemption list may take up to two minutes
to refresh.
Port exemptions
When enabled, the Lotus Foundations content filter monitors port 80 and all others above
1023 (1024-65535). If an application uses a port between 1024 and 65535, that you need
89
Lotus Foundations Start Users Guide
Lotus Foundations Start Users Guide
to open, follow these steps in order to allow that application to bypass the content filter.
Note that all other applications using this port will also be exempt from Web filtering.
1. Enter the port number you want to exempt in the "Ports Exempt From Filtering"
section.
2. Click on check mark to add the entry.
Adding Permitted Websites
In order for users to access a specific website, the administrator has to add it to the
Permitted Web Sites list. By default, the websites lotus.com and ibm.com are automatically
added.
To add a Web site you want to permit all users access to:
1. Enter the site’s name in the empty Add New Website field. To view the 'Permitted
Web Site' list, click Display Permitted Website List.
2. Click the check mark button to accept the change. The Web site you entered should
now be displayed in the Permitted Web Sites list.
• Wildcards can be used to enable all prefixes of a given domain. For example, to
enable www.example.com, my.home.example.com, and office.example.com, type:
*.example.com
• Wildcards can also be used in the place of any label (dot-separated block) within a
domain name. To do this, replace any label of the domain with an asterisk. For
example, in order to allow both example.com and example.org, type:
example.*
• The two rules above cannot be used at the same time. For example, *.example.* will
allow www.example.com, office.example.org, but not my.home.example.org.
Adding denied Web sites
To manually add a denied website, for the first time:
1.
2.
3.
4.
Go to the Content Filtering section labeled Content Filtering Request Denials.
Enter the website address in the Add New Website text box.
Enter the reason for denial. This section is optional.
Click the check mark action button to add the entry. Once this is done, the Content
Filtering Request Denials box will display a link labeled Display Denied Website List.
You can either click on this link to view the current list and add new entries or add
new entries on the main.
601-0011-01
90
Lotus Foundations Start Users Guide
Accepting access requests
If a user has requested access to a website that has not been authorized, a notice will
display in their browser.
The user can request that this site be authorized by the administrator by clicking the
Request Access button.
The administrator can view the all the pending requests in the main Content Filtering
section of WebConfig by clicking the link Display Pending List.
To accept or deny requests:
1. Click Display Pending List.
2. A list containing the requested sites will appear. Choose to allow the site by clicking
the check mark action button.
Users should now be able to access the permitted web site.
Denying access requests
To deny a requested Web site:
1. Click Display Pending List as you would if you were going to accept a request. The
list of pending requests is displayed.
2. If you want to immediately deny the request, click on the X action button. If you want
to provide a reason, click the edit action button (...) and enter it into the text box
labeled Reason for Denial. When you are done, click Deny Request.
List management
The List Management feature allows you to import and customize content filtering lists from
other Lotus Foundations servers. You can also export and customize the local content
filtering list to share with other Lotus Foundations servers.
Importing a list
To import a content filtering list you must first obtain an exported list from another Lotus
Foundations server. Exporting lists is explained in the section immediately below. Once this
is done, proceed with the following:
91
Lotus Foundations Start Users Guide
Lotus Foundations Start Users Guide
1. Click on List Management in main Content Filtering section. The List Management
screen is displayed:
2. Choose whether or not you want the imported list to include the list of permitted
websites. Click either the "Enable" or "Disable" radio button.
3. Choose whether or not you want the imported list to include the list of denied
websites. Click either the "Enable" or "Disable" radio button.
4. Click on the Browse button in the File To Import section and locate the file you want
to import. The file name and path should now be displayed.
5. Click Import.
Exporting a list
To export a content filtering list:
1. Choose whether or not you want the exported list to include the list of permitted
Web sites. Click either the "Enable" or "Disable" radio button.
2. Choose whether or not you want the exported list to include the list of denied Web
sites. Click either the "Enable" or "Disable" radio button.
3. Click Export List. A text file will be generated that you can save and use to port to
another Lotus Foundations server.
Email reporting
The Lotus Foundations content filter can send instant email notifications every time a
website has been requested, and email a daily report of all requested sites.
To use the email reporting options:
1. From the Content Filtering section, click Report Options. The Reporting screen is
displayed.
2. Enter email address for the administrator in the "Administrator's Email Address" text
box.
3. In the Time of Day for Daily Report field, choose the time of day that the daily report
of pending content filtering requests is to be mailed to the administrator. 0:00
represents midnight.
4. To enable instant notification, set Instant Notification to "Enabled". This feature
requires the internal SMTP server to be enabled.
5. To enable daily reports, set Daily Reports to "Enabled", and choose a time from the
Time of Day for Daily Report drop-down menu. That this feature requires the
internal SMTP server to be enabled.
6. Click Save Changes.
601-0011-01
92
Lotus Foundations Start Users Guide
FTP services
FTP Server
Lotus Foundations uses a File Transfer Protocol (FTP) server that enables users and teams
to access network and Web files. FTP services are automatically enabled for users on the
internal network.
Anonymous FTP Server
The FTP server can be used in anonymous mode to enables uploads and downloads of
files to a specific directory without authentication from the remote user. This anonymous
mode of operation is commonly used for public file distribution on the internet. Although the
file can be downloaded from your Web server, FTP is the preferred method because it
offers superior performance for high volume and large file transfers.
When Anonymous FTP is enabled, Lotus Foundations automatically creates a team called
FTP. Members of this team have access to the FTP directory. All files placed in this
directory by team members are accessible to anyone on the internet. Similarly, when
Anonymous Upload is enabled, anyone on the internet can upload their own files to the
subdirectory in the FTP directory.
Enabling the FTP server
1. Click FTP in the main WebConfig menu. The FTP Server Setup screen is displayed.
2. Indicate whether or not you want to enable the FTP file server.
3. Indicate whether or not you want to enable anonymous FTP.
• If this option is enabled, anyone can download files from the FTP directory
by using anonymous as the FTP login name and their email address as the
password.
4. Indicate whether or not you want to enable anonymous uploads.
• If this option is enabled, anonymous users can upload files to the FTP
directory. Be very careful with this option.
5. Enter the total number of connections at any one time.
• This option is used to prevent the overuse of internet bandwidth. Leave the
default setting but increase the number of anonymous users if the server is
often busy.
93
Lotus Foundations Start Users Guide
Lotus Foundations Start Users Guide
6. Click Save Changes.
Enabling FTP access
1.
2.
3.
4.
Select User Setup from the main menu in WebConfig.
Click the appropriate user or team’s edit Action button.
The Modify Users or Modify Teams screen is displayed.
Indicate whether or not you want this user or team to have FTP access in the Allow
FTP access field.
5. Click Save Changes.
6. Repeat steps 2-5 for any additional users or teams.
User vs. team FTP access
Users can log into the Lotus Foundations FTP server by entering their assigned username
and password to access their own user directory.
To access the directory of any team of which they are a member, users need to use the
team name in place of their usernames, but they can continue to use their individual
passwords rather than a team password.
601-0011-01
94
Lotus Foundations Start Users Guide
Backup & restore
Intelligent disk backup (idb)
Lotus Foundations takes a different approach to backup with idb technology, which is both
cheaper and easier to use than conventional tape backup systems. The capacity of the idb
backup unit varies.
Although the idb system automatically performs backup procedures without input from a
system administrator, you can turn off idb and manually initiate backup procedures. Refer to
Initiating an idb Backup (in this chapter) for more information.
Features of idb
Instead of conventional backup tapes, idb uses a removable high-capacity hard disk, which
provides the following advantages:
• Value - one hard disk costs less than the five backup tapes needed to maintain a
tape backup system.
• High Capacity - the idb backup cartridge can, in most cases, store a month or more
of backup history.
• Speed - idb backup matches and often supersedes the backup speeds achieved by
the most expensive tape systems on the market.
• Instant Access - regular backup tapes, like cassette tapes, are a linear medium,
meaning that you have to fast-forward or rewind to find information. idb technology,
like a compact disc, provides almost instant access to data.
• Backup Intelligence - you do not need a network administrator to figure out which
tapes need to be loaded and when. NetIntelligence determines when a backup
needs to be made, and whether the backup should be full or incremental. This
decision is based on the amount of data on the main hard disk, the amount of
utilized space on the idb system, the compressibility of your data, and the rate at
which new data is added and current data is changed or updated. As a result, your
idb system maximizes the amount of historical data that is backed up.
• Durability - you can backup data on the hard drive continuously without worrying
that the drive will wear out.
• Continuous Backup - you can backup data in any sequence and as often as every
15 minutes.
• Hot Swap - the ability to add and remove idb backup cartridges while the server is
running. This means that you can swap idb disks without turning the server off. Hot
Swap capability is only supported on SCSI and specific IDE system configurations.
95
Lotus Foundations Start Users Guide
Lotus Foundations Start Users Guide
Configuring idb
General configuration
The idb feature of Lotus Foundations automatically backs up your data throughout the
entire day, takes care of all backup tasks for you, and notifies you via email about its
progress. Although most of the idb process is automated, you can adjust several
parameters that determine how and when your backups are completed.
1. Select Backup from the Server Setup menu found on the left side of any WebConfig
screen.
2. Indicate whether or not you want to enable backup compression. As a general rule,
compressed backup runs half as fast as a non-compressed backup but stores twice
as much data.
• If you select "Enable", your backup is slower but takes up less space on the
idb disk.
• If you select "Disable", your backup is faster but uses more space on the idb
disk.
3. Select the Backup Schedule that is better for your setup:
• Optimized for File Backups: With this option, regular backups are run once
an hour with the day beginning at 2300 and Domino backups will be run
once a day with the day beginning at 0300. This results in more file backups,
and without the extra space required by the Domino backup in each.
• Optimized for Domino Backups: With this option, regular backups and
Domino backups are run once an hour with the day beginning at 0100. This
enables a finer history for Domino backups.
• Custom: With this option you are free to customize the backup frequency as
follows.
• Select how often you want the system to perform a backup from the
drop-down list.
• Select when you want the system to perform a final back-up from the
drop-down list. It is recommended that you select a time when
nobody is using the system such as late at night or early in the
morning.
• Select how often you want the system to perform a Domino backup
from the drop-down list.
• Select when you want the system to perform a Domino backup from
the drop-down list.
4. Enter the name of the administrator to whom backup reports should be emailed. If
you have the SMTP server enabled, you can enter any email address in this field.
5. Choose how much information to put in the backup reports with the Email Log Level
drop-down menu. Your options are: Error, Warning and Information.
• Normally, backup reports only include error messages, but you can also
choose to include warnings or non-critical information. All messages are
available from the system logs whether they are included in the backup
reports or not.
601-0011-01
96
Lotus Foundations Start Users Guide
6. Click Save Changes to save your selections. The idb system automatically performs
the backup procedure.
Important Note
The default backup configuration does not include the Lotus Foundations Start
notes team . Because this team's data is constantly in use, it is automatically
copied over to the notesbackup team where it is safely backed up by idb. It is
not recommended that you enable the backup for notes team as this needlessly
increases the time needed to perform backups.
The idb backup team
The backup team account grants all members of the team access to the Backup page in
WebConfig and all associated functions. Users have full control over backups and restores
without giving them access to other administrator functions.
1. Select User Setup from the menu on the left side of any WebConfig screen. The
main User Setup screen is displayed.
2. A team named backup is created automatically.
3. Add any users to the backup team that you want to grant access to the Backup
configuration screens in WebConfig.
idb backup
Initiating an idb backup
Although the idb system automatically performs backup procedures (without input from a
system administrator), you can turn off idb and manually initiate a backup from the Backup
Files page (located under the Server Setup menu). A procedure initiated from the Backup
Files page enables you to configure certain settings on the main Backup Setup screen. To
change the settings, you have to go to the main Backup Setup screen.
This can also be done from the control panel found on the front of Net Integrator servers. A
backup initiated from the control panel begins a procedure with the settings that were last
configured.
Important Note
A copy of the server configuration is made each time a backup is performed.
This configuration file can be used to restore your settings in the event of a
catastrophic system failure.
97
Lotus Foundations Start Users Guide
Lotus Foundations Start Users Guide
Initiating a backup from the WebConfig menu
1. Select Backup from the Server Setup menu found on the left side of any WebConfig
screen. The main Backup Setup screen is displayed.
2. In the Backup Setup section of the screen, enter the appropriate backup
parameters. Refer to Configuring idb for more information on these fields.
3. Click Save Changes.
4. Click Backup Files. A screen that displays all of the directories that can be backed
up is displayed.
5. Indicate which directories you want to backup by selecting Yes for those directories.
6. Click Save Changes. This does not initiate the backup procedure.
7. Click Perform Backup to initiate the backup procedure. When the backup is finished,
Lotus Foundations automatically emails a backup report to the administrator.
Initiating a backup from a Net Integrator control panel
This can only be done with Net Integrator Mark I and Mark II servers. All other hardware
platforms must initiate a backup from the system’s WebConfig menu.
1. Press the Backup button on the front display panel.
2. The display panel shows a 10-second countdown, during which you can stop the
backup process by pressing the Cancel button.
3. After 10 seconds, the backup procedure commences and the display panel/console
shows a progress bar.
4. You can delay backup for up to 24 hours by pressing the Up and Down arrows
during the countdown.
idb restore
There are three restore scenarios:
1. Complete System Restore - Upon total hard disk failure, perform a complete system
restore to restore your system to the state of your most recent backup. After a
complete system restore, all existing files are overwritten with older copies from the
backup disk. However, new files saved to the hard drive after the backup are left
untouched. A complete system restore should generally be initiated only when
recovering from complete hard disk failure.
2. Specific Directory Restore - It is possible to restore a specific user or team network
directory if these files have been lost or mistakenly deleted. A specific directory
restore can only be initiated from the Backup menu. There are two types of specific
directory restore procedures:
• Normal Restore - The contents of a user or team directory get overwritten, as with a
complete system restore.
601-0011-01
98
Lotus Foundations Start Users Guide
• Safe Mode Restore - The contents of a user or team directory get restored into a
new subdirectory called Restore, which is created in the user or team directory.
Users can browse through the contents of the directory from the disk, copy any
needed files, and then delete the Restore sub-directory.
• Specific File Restore - It is possible to restore a specific user's or team's network files if they
have been lost or mistakenly deleted. A specific file restore can only be initiated from the
Backup menu. There are two types of specific directory restore procedures:
• Normal Restore - The file is overwritten, as with a complete system restore.
• Safe Mode Restore - The file is restored into a new subdirectory called Restore,
which is created in the user or team directory. Users can browse through the files
from the disk, copy any needed files, and then delete the Restore sub-directory.
• Configuring Restore - Restores system configuration.
idb restore options
In the Restore Files section, there are a number of action buttons which enable you to
control the way your backups and restored data are handled. The action buttons on the
right side provide you with the ability to mange individual backups.
The Open Backup button enables you to browse the contents of a specific backup.
The Erase Backup button enables you to forcibly delete any backup (and its
children, if any) that is not locked.
The Re-Verify Backup button enables you to manually verify an individual backup.
The Lock Backup button enables the user to lock an individual backup. A locked
backup cannot be deleted and idb will not expire it.
The Unlock Backup button enables the user to unlock an individual backup. If you
have a backup that is autolocked because it has a child which is also locked, you
must first unlock the child backup.
Locking and unlocking backups
A feature of the idb technology in Lotus Foundations is the ability to lock and unlock
individual backups. This enables an administrator to enforce which backups will and will not
expire on the idb disk. Backups might also be automatically locked due to the system's
autonomics. Locking occurs in the following cases:
99
Lotus Foundations Start Users Guide
Lotus Foundations Start Users Guide
An individual backup has been manually locked by the administrator for
preservation.
A series of backups have been automatically locked as they are parental backups
belonging to an incremental backup which has been manually locked.
A backup which is currently in use is locked automatically for a period of 15
minutes after the task has finished. This occurs during a backup or a restore
procedure.
Initiating an idb restore
Initiating a full system restore from the WebConfig menu
A copy of your server configuration is made each time a backup is performed. This
configuration file can be used to restore your entire Lotus Foundations server in the event
of a catastrophic system failure.
To restore the entire Lotus Foundations system including the server configurations and all
of the user data:
1. Select Backup from the Server Setup menu found on the left side of any WebConfig
screen.
2. Click Restore Files, which displays a list of backups and the date that the backup
was performed.
3. Click the Yes radio button for only the Select All section.
4. Click Perform Restore to begin the restore procedure.
Initiating a directory restore from the WebConfig menu
1. Select Backup from the Server Setup menu found on the left side of any WebConfig
screen.
2. Click Restore Files, which displays a list of backups and the date that the backup
was performed.
3. To view the contents of a backup file, click the Open Backup action button.
Important Note
The first entry in the Restore Files section of the screen is for System
Configuration, which is automatically backed up every time any backup
is performed. Restoring system configuration files overwrite the current
system configuration, so be very careful with this setting. It is
recommended that you leave the default setting (No).
601-0011-01
100
Lotus Foundations Start Users Guide
4. Indicate which directories you want included in the restore procedure:
• Select Yes if you want the directory restored in normal mode which overwrites the
existing contents of the directories.
• Select No if you do not want this directory restored.
• Select Safe if you want the directory restored in safe mode. This restores files to a
Restore directory. Selecting all directories is the equivalent of performing a full
system restore.
• Click Perform Restore to begin the restore procedure.
Initiating a file restore from the WebConfig menu
1. Select Backup from the Server Setup menu in WebConfig.
2. Click Restore Files, which displays a list of backups and the date that the backup
was performed.
3. To view the contents of a backup file, click the Open Backup action button. The
following screen displays the date and time the backup was performed and the
directories that can be restored.
Important Note
The first entry in the Restore Files section of the screen is for System
Configuration, which is automatically backed up every time any backup
is performed. Restoring system configuration files overwrites the current
system configuration, so be very careful with this setting. It is
recommended that you leave the default setting (No).
4. Select the appropriate directory in which the data that you want to restore is located
and click the Open Backup action button.
5. Indicate which file(s) you want included in the restore procedure.
• Select "Yes" if you want this file or folder restored in normal mode. The
existing data will be overwritten.
• Select "No" if you do not want this file or folder restored.
• Select "Safe" if you want the files and folders restored in safe mode. The
data is saved in the Restore file in each respective user's share. Selecting
all files is the equivalent of performing a full directory restore.
6. Click Perform Restore to begin the restore procedure.
Initiating a restore from a Net Integrator control panel
This can only be done with Net Integrator Mark I and Mark II servers. All other hardware
platforms must initiate a restore from the system’s WebConfig menu.
Important Note
Initiate a restore procedure from the control panel only if you want to perform a
complete system restore.
101
Lotus Foundations Start Users Guide
Lotus Foundations Start Users Guide
Press the Restore button. The display panel shows a 10-second countdown, during which
time you can stop the restore process by pressing the Cancel button. After 10 seconds, the
restore procedure commences and the display panel/console shows a progress bar.
Domino restore procedures
Restoring idb data from Domino differs somewhat from the standard idb restore process.
Follow the instructions carefully to ensure a successful restoration of your Domino data.
When restoring Domino data, you can choose from data that is automatically saved to the
live notesbackup folder, or from the notesbackup folder from an idb backup.
The following sections discuss each scenario.
Restoring data from idb
1. In WebConfig, click Virtual Server, located in the main menu.
2. Click on the edit button for the domino server.
3. In the Modify A Process section, select the "Disable" radio button, then click Save
Changes.
4. In the WebConfig main menu, click Backup, then Restore Files.
5. Open notesbackup > Files > notesdata, and you should see a directory labelled
backup.
6. Select the "Safe" radio button for the backup directory, then click Perform Restore.
The restore time varies, depending on the amount of data that is contained the the
folder.
7. From a Windows workstation, click Start > Run and in the text box, type:
\\SERVER_IP\notesbackup\RESTORE\Files\notesdata
8. Copy the backup folder, then go to the following locations:
\\SERVER_IP\notes
9. Paste the backup folder in this location.
10. In the notes directory, delete the folder labelled notesdata.
11. Rename the backup folder to notesdata.
12. Go back to WebConfig and re-enable the Domino virtual server and save the
changes.
Restoring live backup data
1. In WebConfig, click Virtual Server, located in the main menu.
601-0011-01
102
Lotus Foundations Start Users Guide
2. Click on the edit button for the domino server.
3. In the Modify A Process section, select the "Disable" radio button then click Save
Changes.
4. From a Windows workstation, click Start, Run and in the text box, type:
\\SERVER_IP\notesbackup
5. Click on the notesdata folder and you should see a folder labelled backup.
6. Copy the backup folder, then go to the following locations:
\\SERVER_IP\notes
7. Paste the backup folder in this location.
8. In the notes directory, delete the folder labelled notesdata.
9. Rename the backup folder to notesdata.
10. Go back to WebConfig and re-enable the Domino virtual server and save the
changes.
Individual Domino data
If you want to restore Domino data for an individual user, please read the KB article
Restoring an individual user's Domino data in the Lotus Foundations knowledgebase.
Modifying ownerships after a restoration
If you are restoring Domino data such as individual .nsf files or entire folders, such as mail
or RELAVIS, you may notice that although the files are copied over, they cannot be read.
This is typically the result of permissions being modified when the data is copied over from
one location to another.
Should you encounter this, the permissions can be modified using the following procedure:
1. Telnet into the Lotus Foundations server and log in as an administrative user.
2. Move to the location where the folder or individual file has been restored. For
example, if you have restored the Relavis folder, type:
cd /home/notes/Files/notesdata
If you are restoring and individual .nsf file, and have already moved it to the live
location, type:
cd /home/notes/Files/notesdata/mail
3. To verify that the ownership has been modified and needs to be changed, type:
ls -al
103
Lotus Foundations Start Users Guide
Lotus Foundations Start Users Guide
4. The following example uses Relavis CRM as an example. If you have renamed the
existing RELAVIS folder to RELAVIS_old and have moved over a backup copy of
RELAVIS, you should see the following files listed:
-rw-r--r-- 1 notes notes 21495808 Apr 9 05:00 NaSsInstall.nsf
-rw-r--r-- 1 notes notes 838656 Apr 9 05:00 NitixDWA.nsf
drwxrws--x 2 _root otheruser 896 Apr 9 15:58 RELAVIS/
drwxrwx--- 2 notes notes 896 Apr 9 14:49 RELAVIS_old/
-rw-r--r-- 1 notes notes 1266688 Apr 9 05:05 activity.ntf
-rw-rw-r-- 1 notes notes 2359296 Apr 9 17:13 admin4.nsf
-rw-r--r-- 1 notes notes 1921536 Apr 9 05:00 admin4.ntf
-rw-rw-r-- 1 notes notes 648 Apr 9 17:09 admindata.xml
Note that the ownership for the copied folder has been modified.
5. If you are restoring an individual file, type:
chown notes:notes filename
If you are restoring an entire folder, type:
chown -R notes:notes directory_name
6. Open the client used to interact with your Domino data, such as Lotus Notes, and
make sure you can view all of your data.
idb hot swap
Hot swap is only supported on SCSI and specific IDE system configurations. The Net
Integrator Mark I and Mark II models support hot swap.
There are four possible hot swap messages that can appear on the display console:
• idb HotSwap:OK - This messages means that hot swap is supported and the idb
disk is inactive, so it can be safely removed and replaced with another idb drive.
• DON'T REMOVE IDB - This message means that hot swap is supported, but the
disk is currently being used for a Backup/Restore. You must wait until you see the
"idb HotSwap:OK" message again before removing the disk.
• NO BACKUP DISK! - This message means that Lotus Foundations does not detect
the presence of an idb disk. You should insert an idb disk and then choose the
Update Disk Status link on the main page of WebConfig. The "No Backup Disk"
message will also display if the server is set up with all RAID disks and no idb
disk(s).
• CAN'T HOTSWAP - This message means that hot swap is not supported on your
server; therefore, you should never remove the idb disk without powering down the
system. If you want hot swap support, please contact your Net Integration
Technologies representative.
601-0011-01
104
Lotus Foundations Start Users Guide
The idb software leaves the idb disk off until it needs to perform a backup or a restore.
During this time, if you remove an idb disk from the Lotus Foundations server, the display
panel continues to show "idb HotSwap:OK" until one of these events occurs:
• You manually start a backup/restore,
• You click the Update Disk Status link in WebConfig, or
• The next scheduled backup begins.
After which, Lotus Foundations detects that there is no idb disk installed and change the
display console message to "No Backup Disk!".
Swapping idb hard disks (with hot swap)
1. Verify that the display console says, “idb HotSwap:OK.” idb hot swapping is only
available on certain hardware platforms.
2. Remove the idb disk from the server.
3. Insert the new idb disk into the drive.
Lotus Foundations detects the new idb disk during either its next scheduled backup, or if
you log in to WebConfig and click the Update Disk Status link.
Swapping idb hard disks (without hot swap)
1. Turn off the main power.
2. Remove the disk from the server.
3. Slide the new hard disk into the drive as far as you can, keeping the handle
horizontal.
4. Insert the new idb disk into the drive.
5. Turn the main power back on.
6. Press the power button.
105
Lotus Foundations Start Users Guide
Lotus Foundations Start Users Guide
Software update
Software Updates
Periodically, Lotus Foundations contacts distribution servers through its internet connection
and requests an updated list of available software releases. A list of available software
releases is found on the Software Update screen.
Upgrading Lotus Foundations
Important Note
If you are running Lotus Foundations from a CD-ROM, you must configure your
disks from the WebConfig menu, shut down the system, remove the Lotus
Foundations CD and restart the system before SoftUpdate can work. For more
information on configuring your hard disks, see Disk management (Lotus
Foundations).
It is best to upgrade your software after-hours because rebooting disconnects all users and
causes all services to stop functioning until the server has restarted.
1. Select Software Update from the menu on the left side of any WebConfig screen.
The Software Update screen is displayed, showing the Lotus Foundations software
version your server is currently running and all versions available for download.
2. Click Check Versions to update the list of available versions.
3. The System Status screen is displayed. The SoftUpdate line displays the progress
of the download.
4. Click on a version’s Release Notes link to access its release notes.
• The release notes outline the version’s new features and provide important
information that you need to know before upgrading your software. Please
read the release notes carefully.
5. The new software has to be downloaded to your server. To do so, click on the
appropriate version’s Download link. The System Status screen is displayed. The
SoftUpdate line displays the progress of the download.
6. When the download is complete, the SoftUpdate line tells you that a software
update has been installed, and prompt you to reboot your system.
7. Click the Reboot link.
8. Click Return when an IP address appears on your Lotus Foundations server’s
display console. The System Status screen is displayed. The SoftUpdate line asks if
you want to keep the new software release:
• Selecting "Yes" permanently installs the new operating system.
• Selecting "No" reboots your Lotus Foundations-powered server and reverts
to the previous operating system.
601-0011-01
106
Lotus Foundations Start Users Guide
9. If the newer version of the Lotus Foundations operating system is not installed
properly, the server uses the old version when it reboots. If the server encounters
any difficulty starting the new operating system, the previous version starts instead.
If you choose not to confirm your download, and a power loss or reboot occurs, the
server reverts back to the last-used operating system.
10. To revert back to the old version, select Software Update from the WebConfig
menu. Click the Activate link in the Versions already installed section of the screen:
Switching languages from English to Japanese
Lotus Foundations currently enables you to view WebConfig in English and Japanese
(Kanji). To switch from English to Japanese, perform the following steps:
1. In the Software Update section, locate the section titled "Language Selection".
2. Using the drop down box, select the Japanese icon as shown below.
3. Click the checkmark to confirm the change.
Switching languages from Japanese to English
If you have changed the language setting to Japanese and need to set it back to English,
perform the following steps:
1. In the Sofware Update section, locate the option that resembles the following:
2. Select "English" from the drop down box.
3. Click the checkmark and WebConfig should now be displayed in English.
107
Lotus Foundations Start Users Guide
Lotus Foundations Start Users Guide
Virtual private networks
Private networks
In the past, private networks were created by using routers to connect different office
locations through dedicated phone lines. This procedure is often called a wide area network
(WAN). Conventional private networks can be illustrated like this:
Virtual private networks
TunnelVision enables you to create a virtual private network (VPN) using the internet
instead of a WAN and dedicated phone lines for server-to-server or network-to-network
connections. A VPN can be illustrated this way:
601-0011-01
108
Lotus Foundations Start Users Guide
Making a virtual network private
In a conventional private network, your company owns all the routers, all the computers,
and all the phone lines involved. Because the only people using the network are
employees, the network is secure, at least in theory.
The internet, on the other hand, is connected to any number of businesses and
organizations. As your private data passes through the internet, it is possible that people
may intercept what you are sending. In order to prevent this from happening, all of the data
that passes through a VPN is encrypted with the strongest encryption technology available:
1024-bit RSA and 128-bit Blowfish algorithms. Such encryption makes it very difficult to
access the data in your transmissions.
VPN network topologies
Topology refers to the shape of a network, or the network's layout. How different nodes in a
network are connected to each other and how they communicate are determined by the
network's topology. A VPN enables organizations to interconnect their offices securely.
Applications and data can be readily shared throughout the VPN network if desired. For
example, you could have the accounts departments of each branch connected to each
other or each department could be connected to a central point.
TunnelVision can work in either a “fully meshed” topology or a “non-meshed” topology.
109
Lotus Foundations Start Users Guide
Lotus Foundations Start Users Guide
Fully meshed topology
In a mesh topology, devices are connected with many redundant interconnections between
network nodes. In a true mesh topology every node has a connection to every other node in
the network. An advantage of such a network would be that no branch is reliant upon a
single connection.
Non-Meshed Topology
In a non-meshed, or “hub-and-spoke,” topology all devices are connected to a central hub,
or headquarters, which dictates the access rules of the VPN to the other branches. Nodes
communicate across the network by passing data through the hub. A typical application
would be to implement a Terminal Services solution using the headquarters as the gateway
for the branch sites.
How TunnelVision works
A VPN enables all of the computers on two networks to communicate with each other. For
this to happen, you have to first configure their subnet addresses.
When you install Lotus Foundations, the IP addresses used on your local network do not
really matter. Internet standards recommend that all IP addresses that are owned by
internal business networks (and not used on the internet itself) begin with 192.168. The
third part of the IP address specifies which private subnet number you are using, and the
fourth part identifies an individual computer on the network. In special circumstances,
however, you can use any subnet number at all (the first three parts of the IP address).
601-0011-01
110
Lotus Foundations Start Users Guide
The important thing is that the Lotus Foundations server and the computers on the local
network have the same subnet number and unique IP addresses.
Network address translation (NAT)
When you communicate with other computers on the internet, Lotus Foundations uses
network address translation (NAT) to give each connection a valid, unique IP address that
does not conflict with other networks.
But for a VPN, we do not want Lotus Foundations to use NAT, because then only two
addresses will be visible: Lotus Foundations server #1 and Lotus Foundations server #2.
Instead, Lotus Foundations should pass addresses on each network through to the other
network unchanged.
For this to happen. you need to assign different subnet numbers to each Ethernet network
involved in the VPN. For example, use 192.168.1 for Network #1 and 192.168.2 for Network
#2. That means each computer on Network #1 has an address starting with 192.168.1, and
each computer on Network #2 has an address starting with 192.168.2.
The steel pipe
To summarize, Network #1 is connected to the internet through Lotus Foundations server
#1 and has the subnet number 192.168.1. Network #2 is connected to the internet through
Lotus Foundations server #2 and has the subnet number 192.168.2.
Gateway settings work like this: a computer on your Ethernet send packets directly to
another computer if its subnet number is the same. That means that 192.168.1.15 will
transmit directly to 192.168.1.46, since they are both on the same subnet. However,
192.168.1.15 cannot send packets directly to 192.168.2.20 - the subnet numbers are
similar, but they are not the same. The station then sends the data through its default
gateway: Lotus Foundations server #1.
Now TunnelVision can work its magic, as long as you have configured the Lotus
Foundations servers to create a VPN (you will do that later in this chapter). When
TunnelVision starts, it creates an encrypted connection between the two Lotus
Foundations-powered servers through the Internet. This connection is sometimes called a
steel pipe because, like a true steel pipe, it is hard to see what is inside or to break through
it. More often it is known as a tunnel.
Lotus Foundations server #1 treats data addressed to Network #2 from its local Ethernet in
a special way. Rather than just passing the data to your ISP, Lotus Foundations encrypts it
and sends it through the tunnel. When Lotus Foundations server #2 receives the encrypted
data, it decrypts the information and forwards it on to Network #2 as if it had arrived directly
111
Lotus Foundations Start Users Guide
Lotus Foundations Start Users Guide
from Network #1. That way, Network #1 can communicate securely with Network #2 without
any need for special changes to individual workstations.
Creating a VPN (server-to-server)
Because your Lotus Foundations-powered server does most of the work for you, creating a
VPN is much easier than it sounds. All you have to do is create the encrypted tunnel.
Using unique subnet numbers
We have already mentioned it once in this chapter, but it is so important that we will say it
again: each Ethernet network in your VPN must use a different subnet number. We
recommend using any of the networks from 192.168.1 to 192.168.255, since these
numbers are specifically reserved for private use.
The master server needs an IP address or FQDN
The only way to find someone on the internet is to know their IP address. This can be
accomplished with either a static IP address (a static IP address is guaranteed never to
change, so people on the Internet can always find you), or through the use of a fully
qualified domain name (FQDN) such as server.domain.com. The DNS system translates
the FQDN into an IP address. This is particular useful for systems that utilize Dynamic
DNS.
The Lotus Foundations Dynamic Domain Name System (DDNS) feature automatically
updates DNS information when a new IP address is assigned to a network, allowing you to
publish DNS entries and provide internet services even if you have a dynamic IP address.
To create a connection between two Lotus Foundations-powered servers, someone needs
to act as the Client and someone as the Master server. Think of it like a phone call to your
ISP: you (the client) need to know their phone number, but they (the server) don't need to
know yours. With TunnelVision, you have a similar situation: the server side (accepting a
connection) needs a static IP address or FQDN, while the client side can have either a
static or dynamic IP address.
Only one Lotus Foundations-powered server (usually the computer with the fastest internet
connection at your head office) needs to act as the server and have a static IP address or
fully qualified domain name. All the others can simply act as clients.
A static IP address is guaranteed never to change, so people on the internet can always
find you. To obtain a static IP address, talk to your ISP. DynamicDNS can be used in place
601-0011-01
112
Lotus Foundations Start Users Guide
of a static IP address. Refer to DynamicDNS in Chapter 23: Domain Name Services for
more information.
Configuring a TunnelVision master server
Ensure that the Lotus Foundations server that you are configuring as the Master server has
a static IP address, or has a fully qualified domain name.
1. Select VPN from the Network Setup menu on the left side of any WebConfig screen.
The VPN Setup screen is displayed.
2. Select "Enable" for the PPTP Server setting.
3. Select "Enable" in the Tunnel Vision section of the screen.
4. In the Tunnel Vision: Use Fully Meshed Mode box, select "Yes" to run Tunnel Vision
in a Fully Meshed mode, and "No" to run it in a Non-Meshed mode.
• If you enable TunnelVision to work in "fully meshed" mode, then your server
can learn about other servers on the VPN by exchanging information
through the Master Server. Then each server will make connections directly
to each of the other VPN-connected servers directly, as needed, without
needing to go through the master. If you disable "fully meshed" mode, then
your server only communicates directly with the master server and the
master's local network. Your server cannot see any of the other
VPN-connected servers or networks.
• In previous versions of the Lotus Foundations software, "fully meshed" mode
was always enabled, and this is still the recommended setting.
5. Leave the Address of Master Server field empty (since the Master server does not
initiate connections).
6. Enter a password that the server and client will use to prove to each other that they
are trusted.
7. Re-enter the password to ensure it was entered correctly.
8. Click Save Changes.
Configuring a TunnelVision client
A Lotus Foundations-powered server does not need a static IP address to act as a
TunnelVision client, but it needs to know the static IP address or fully qualified domain
name of the Master server.
To find this information, select Local from the Network Settings menu on the master server.
On the screen that is displayed, click Advanced.... Then look at the address assigned to
eth1.
1. Select VPN from the Network Setup menu on the left side of any WebConfig screen.
The VPN Setup screen is displayed.
2. Leave the default PPTP Server setting.
113
Lotus Foundations Start Users Guide
Lotus Foundations Start Users Guide
3. Select "Enable" in the Tunnel Vision section of the screen.
4. In the Tunnel Vision: Use Fully Meshed Mode box, select "Yes" if you are running
Tunnel Vision in a Fully Meshed mode, and "No" if you are running it in a
Non-Meshed mode.
• If you enable TunnelVision to work in "fully meshed" mode, then your server
can learn about other servers on the VPN by exchanging information
through the Master Server. Then each server makes connections directly to
each of the other VPN-connected servers directly, as needed, without
needing to go through the master. If you disable "fully meshed" mode, then
your server only communicates directly with the master server and the
master's local network. Your server cannot see any of the other
VPN-connected servers or networks.
• In previous versions of the Lotus Foundations software, "fully meshed" mode
was always enabled, and this is still the recommended setting.
5. Enter the Master server's static IP address or fully qualified domain name.
6. Enter the password that was used in step 6 of Configuring a Master Server.
7. Re-enter the password to ensure it was entered correctly.
8. Click Save Changes.
• TunnelVision immediately begins to create the tunnel between the client and
the master server. If the client and the server are connected to the internet
and everything is configured correctly, this process should only take a few
seconds.
To configure another Lotus Foundations-powered server as a client, simply repeat this
process.
TunnelVision status
The System Status screen always displays the status of active VPNs. You may need to
click your browser’s Refresh button to see the latest information.
The idle time-out
If either end of the tunnel does not receive any data for approximately 20 minutes, it
assumes that one end has disconnected from the Internet or that the tunnel is no longer
needed.
If one end of the tunnel is still on-line, it will try to rebuild the connection automatically.
Since this only takes a few seconds and happens only when the tunnel has been idle for a
long time, this should not affect you. However, this behavior can often cause the VPN
Tunnel's status light to turn yellow or red. This is not a sign of malfunction.
601-0011-01
114
Lotus Foundations Start Users Guide
Licensing
IBM has licensed TunnelVision under the terms of the GNU Lesser General Public License
(LGPL).
115
Lotus Foundations Start Users Guide
Lotus Foundations Start Users Guide
IPsec
Known configurations
The IPSec functionality in Lotus Foundations uses the industry standard ISAKMP/IKE
protocol and has been proven to be compatible with other standard IPSec devices.
For a complete list of tested products and configurations, please the following site:
http://www.nitix.com/downloads/IPSec_Compatibility/
Adding an IPsec route
To create a new IPsec route:
1. Select VPN from the Network Setup WebConfig menu.
2. Select IPsec Setup... and the IPsec Setup screen is displayed.
3. Select Add New Route. The Create IPsec Route screen is displayed.
4. In the Remote Server field, enter the public IP address or the fully qualified domain
name (FQDN) of the remote server.
5. To include a private subnet behind the remote server’s firewall, enter the internal
subnet containing the internal IP address of the remote unit in the Remote Subnet
field. For example, if the unit’s internal IP address is 192.168.10.1 with a subnet
mask of 255.255.255.0, you would enter 192.168.10.0/24.
6. Enter your the remote IKE key. This is a password that should be unique and
entered on both ends of the IPSec connection.
7. Enable the Perfect Forward Secrecy (PFS) feature. The two ends do not negotiate
this automatically, so make sure that the setting is the same on both ends.
8. In the section Enable this connection, click "Yes".
9. Click Save Changes.
601-0011-01
116
Lotus Foundations Start Users Guide
Adding an anonymous incoming connection IPsec route
Creating an anonymous IPsec route enables multiple remote locations, with a dynamic IP
address, to connect to your Lotus Foundations server.
To configure an anonymous connection:
1. Select IPsec Setup... from the VPN Setup screen. The IPsec Setup screen is
displayed:
2. Select Add New Route. The Create IPsec Route screen is displayed.
3. Enter 0.0.0.0 in the Remote Server IP address field. The Lotus
Foundations-powered server must have a static IP address.
4. To include a private subnet behind the remote server’s firewall, enter the internal
subnet containing the internal IP address of the remote unit in the Remote Subnet
field. For example, if the unit’s internal IP address is 192.168.10.1 with a subnet
mask of 255.255.255.0, you would enter 192.168.10.0/24.
5. Enter your the remote IKE key. This is a password that should be unique and
entered on both ends of the IPSec connection.
6. Enable the Perfect Forward Secrecy (PFS) feature. The two ends do not negotiate
this automatically, so make sure that the setting is the same on both ends.
7. In the section Enable this connection, click "Yes".
8. Click Save Changes.
Editing an IPsec route
To edit an existing IPsec route:
1. Select the appropriate IPsec route’s edit action button on the IPsec Setup screen.
2. The Modify IPsec Route screen is displayed.
3. In the Remote server field, enter the fully qualified domain name or IP address of
the remote server that you want to connect to.
4. To include a private subnet behind the remote server’s firewall, enter the internal
subnet containing the internal IP address of the remote unit in the Remote Subnet
field. For example, if the unit’s internal IP address is 192.168.10.1 with a subnet
mask of 255.255.255.0, you would enter 192.168.10.0/24.
5. Enter your the remote IKE key. This is a password that should be unique and
entered on both ends of the IPSec connection.
6. Enable the Perfect Forward Secrecy (PFS) feature. The two ends do not negotiate
this automatically, so make sure that the setting is the same on both ends.
7. Click Save Changes.
117
Lotus Foundations Start Users Guide
Lotus Foundations Start Users Guide
Setting up third party IPsec clients
With the large number of IPsec servers available, we cannot provide configuration
parameters for each device on the market. The following does, however, provide the best
configuration for allowing a Lotus Foundations-powered server to create a virtual private
network (VPN), with third party devices:
Lotus Foundations setup:
• Remote server: Enter the external IP address of the remote unit.
• Remote subnet: Enter the internal IP address of the remote unit as well as the
subnet. For example, if the unit’s internal IP address is 192.168.10.1 with a subnet
mask of 255.255.255.0, you would enter “192.168.10.0/24”.
• Remote IKE key: Enter your shared key that is being used.
• Key Type: Select PSK.
• Perfect Forward Secrecy (PFS): Select Yes.
Third party IPsec client setup:
•
•
•
•
Encryption / Tunnel: 3DES and MD5.
Security Association (SA) Lifetime: set to 3600 seconds.
Mode: If there are different modes available, select Main Mode.
Private Key Secret: Use preshared secret keys (PSK), not RSA keys or other keys
such as PKI, as these are not supported on Lotus Foundations.
• Perfect Forward Secrecy: Perfect Forward Secrecy (PFS) must be enabled on
both ends of the connection. The IPsec protocols do not provide a method for the
two ends to negotiate this, so you must ensure to set it correctly.
601-0011-01
118
Lotus Foundations Start Users Guide
Remote access services
What is RAS?
Remote Access Services (RAS) is a feature that enables you to access an internal network
while at home or on the road. You can take advantage of RAS with:
• A VPN (which requires the Internet and a PPTP client)
• A dial-in connection (which requires a dial-up modem and a phone line)
Windows typically has a Point to Point Tunneling (PPTP) client built-in. You might have to
purchase a separate software package if you are using a Macintosh.
To establish a remote connection, users have to have PPTP or dial-in access. Refer to the
Creating Users section in the user manual chapter User & Team Management for more
information.
PPTP - client-to-server VPN service
Configuring VPN service on Lotus Foundations
1. Select VPN from the Network Setup menu on the left side of any WebConfig screen.
The VPN Setup screen is displayed.
2. Enable the PPTP server by selecting "Enable".
3. Click Save Changes.
Configuring VPN service in Windows
Before you can establish a VPN connection, you have to install VPN service on a Windows
95/98/Me workstation. Windows 2000 and Windows XP workstations already have VPN
services installed.
1. From the Start menu, select Settings > Control Panel. Double-click on the
Add/Remove programs icon.
2. The Add/Remove Programs Properties screen is displayed. Select the Windows
Setup tab.
119
Lotus Foundations Start Users Guide
Lotus Foundations Start Users Guide
3. Select Communications from the Components list and click Details.... A second
Components list is displayed, showing the communications components that are
already installed and those that can be installed.
4. Scroll to Virtual Private Networking in the Components list.
• If it already has a check, then VPN software has already been installed.
Proceed to Establishing a VPN Connection.
• If it does not have a check, you have to install the VPN software. Proceed to
the next step.
5. Place a check in the Virtual Private Networking box and click OK.
6. The Windows Setup screen is re-displayed. Click Apply. The software is installed
automatically.
7. Reboot the computer when the software is finished installing.
You might be asked to insert your Windows 95/98/Me disk for additional software
components to be loaded. Follow the instructions provided, and refer to Microsoft Support
for more information.
Establishing a VPN connection
To establish a VPN connection to a Lotus Foundations server, you need to know your
username and password and the the Lotus Foundations server’s domain name or IP
address.
Windows XP/2000
The following steps help guide you through a successful VPN connection, Windows XP or
2000.
1. In Windows, go to Network Connections.
2. Select New Connection Wizard and click Next.
3. In the Network Connection Type window, select the radio button labeled "Connect
the network at my workplace", then click Next.
4. In the following Window, select the "Virtual Private Network" option then click Next.
5. In the Connection Name windows, enter a name that will distinguish the location you
are connecting to.
6. In the Public Network window, select "Do not dial the initial connection" and click
Next.
7. In the VPN Server Selection window enter the hostname of the Lotus Foundations
server followed by the domain name, or alternatively, the public IP address. Click
Next to proceed.
8. Click Finish.
Now that the VPN connection has been created, you need to configure the settings
before connecting to the remote network.
601-0011-01
120
Lotus Foundations Start Users Guide
9. Open the VPN connection. Before logging in for the first time click on Properties.
10. Click the Networking tab and from the "Type of VPN" drop-down box, select PPTP
VPN and click OK. This only needs to be set once for each connection.
11. Login using the provided Lotus Foundations username and password and click OK.
Various messages display such as "Verifying the connection..." and "Registering the
user..." prior to a complete connection.
Windows 95/98/Me
Follow these steps to establish a VPN connection in Windows 95/98/Me systems:
1. From the Start menu, select Programs > Accessories > Communications > Dial-up
Networking.
2. Double-click on the Make New Connection icon.
3. Enter a name for the VPN connection. Click Next.
4. Enter your Lotus Foundations-powered server’s host name or external IP address:
• Enter a host name (such as www.example.com) if Lotus Foundations
provides DNS resolution for your domain.
• Enter an IP address (such as 192.168.0.1) if Lotus Foundations does not
provide DNS resolution. To find the external IP address, select Local from
the Network Setup menu. On the screen that is displayed, click Advanced....
In the Network Devices section of the screen, look at the IP address of the
un-trusted Ethernet interface (usually Eth1).
5. Click Next.
6. Click Finish. You have created an icon that activates a VPN connection to your
home network through your Lotus Foundations-powered server.
7. Right-click on the icon that you just created and select Properties. In the window
that is displayed, click on the Server Types tab.
8. In the Advanced options section of the screen, ensure that only the following are
checked:
• Enable software compression
• Require encrypted password
• Require data encryption.
9. In the Allowed network protocol section of the screen, ensure that only TCP/IP is
checked. Click OK.
10. Once you are connected to the internet, establish a VPN connection to the internal
network by double-clicking the icon that you created in step 6.
11. Enter your Lotus Foundations login name and password. Click Connect.
12. Click Close to minimize this window.
13. You are now connected to your local network through a secure VPN. Depending on
your internet connection, it may take longer than normal to complete network
requests. An icon showing traffic between your workstation and the Lotus
Foundations-powered server you are connected to is displayed in the bottom right
corner of the screen.
121
Lotus Foundations Start Users Guide
Lotus Foundations Start Users Guide
14. To terminate the VPN connection, double-click the icon. Select Disconnect in the
window that is displayed.
Disconnect a PPTP connection
1. On the System Status page, in the Services Status Snapshot section, the PPTP
Connections line displays the status of all PPTP connections. If there are active
connections, a Details link is displayed.
2. Click on the Details link. The Active PPTP Users screen is displayed.
3. Click on the delete action button of the user whose PPTP connection you want to
disconnect.
4. A window is displayed that asks "Are you sure you want to disconnect ‘username’?"
Click OK to disconnect the PPTP connection.
Dial-in service
Configuring Dial-in Service on Lotus Foundations
1. Select Dial-up from the Networking Setup menu on the left side of any WebConfig
screen. The Dial-up Networking Setup screen is displayed.
2. Click the appropriate modem’s action button.
3. A second Dial-up Networking Setup screen is displayed.
4. In the Allow Dial in connections section, select "Yes".
5. Click Save Changes.
Configuring Dial-in Service in Windows
1. From the Start menu, select Settings > Control Panel. Double-click on the
Add/Remove programs icon.
2. The Add/Remove Programs Properties screen is displayed. Select the Windows
Setup tab.
3. Select Communications from the Components list and click Details.... A second
Components list is displayed, showing the communications components that are
already installed and those that can be installed.
4. Select Dial-Up Networking from the Components list.
• If it already has a check, then dial-in software has already been installed.
Proceed to Establishing a Dial-in Connection.
• If it does not have a check, you have to install the dial-in software. Proceed
to the next step.
5. Place a check in the Dial-Up Networking box and click OK.
601-0011-01
122
Lotus Foundations Start Users Guide
6. The Windows Setup screen will be re-displayed. Click Apply. The software is
installed automatically.
7. Reboot your computer when the software is finished installing.
You might be asked to insert your Windows 95/98/Me disk for additional software
components to be loaded. Follow the instructions given to you.
Establishing a dial-in connection
When a user dials into a Lotus Foundations-powered server, the username is displayed in
the Internet Status field of the System Status screen for the duration of the connection. The
administrator can terminate the connection from this screen.
To establish a dial-in connection to your network, you need to know your Lotus Foundations
username and password and the phone number of a modem that is connected to an
external phone line. Depending on your Internet connection, it might take longer than
normal to complete network requests.
Follow these steps to establish a dial-in connection on Windows 95/98/Me systems:
1. From the Start menu, select Programs > Accessories > Communications > Dial-up
Networking.
2. Double-click on the Make New Connection icon.
3. Enter a name for the dial-in connection. Click Next.
4. Enter your area code, phone number, and country code.
5. Click Next.
6. Click Finish. You have created an icon that activates a dial-in connection to the
internal network.
7. Establish a dial-in connection by double-clicking on the icon that you created in the
previous step.
8. Enter your Lotus Foundations login name and password. Click Connect.
9. A window showing you the progress of the connection will be displayed.
10. An icon showing traffic between your workstation and the Lotus
Foundations-powered server you are connected to is displayed in the bottom right
corner of your screen when you are connected to the local network:
11. To terminate the connection, double-click on the icon. Select Disconnect in the
window that is displayed.
Terminating a connection from WebConfig
When a user dials into the Lotus Foundations-powered server, their username is displayed
in the Internet Status section of WebConfig’s System Status screen for the duration of the
connection. The administrator can choose to terminate the user’s connection from this
screen.
123
Lotus Foundations Start Users Guide
Lotus Foundations Start Users Guide
Firewall services
The firewall subsystem featured in Lotus Foundations is entirely auto-configuring and
automatically reconfigures its parameters to adapt to any Lotus Foundations server
settings. There are no user controls needed. However, you can choose to restrict outgoing
traffic and view a log of all requests to traverse the firewall.
To learn more about just how sophisticated the firewall is, go to:
http://www.nitix.com/products/features_connectivity_firewall.php
ICSA Firewall Security Compliance
Starting with Nitix version 3.71, Nitix incorporates features to be ICSA compliant. The ICSA
Labs test firewall products against a standard and evolving set of criteria. Their Firewall
Certification Criteria are composed of both functional and assurance requirements, and the
criteria requirements define an industry-accepted standard that all products claiming to
have firewalling capabilities must attain.
Traffic denied inbound
The firewall denies all inbound network traffic that is not for:
•
•
•
•
Remote administration
Private network hosts
Service network hosts
The firewall itself
Traffic permitted inbound
The firewall supports access requests for the following services, if enabled (see Chapter 29:
Log Messages for which firewall request information is logged):
•
•
•
•
FTP (Active and Passive Mode)
HTTP
HTTPS
SMTP
601-0011-01
124
Lotus Foundations Start Users Guide
Traffic permitted outbound
Lotus Foundations permits the following protocols through the firewall:
Protocol
Telnet (TCP/23)
FTP (TCP/20-21)
HTTP (TCP/80)
HTTPS (TCP/443)
SMTP (TCP/25)
Purpose
To access resources on a Unix/Linux computer.
To copy files between computers.
To make Web pages available over the Internet.
To make secure Web pages available over the Internet.
To transfer or send email messages between servers.
To navigate the Internet using domain names instead of IP
DNS (TCP and UDP/53)
addresses.
POP3 (TCP/110)
To read email from a single Inbox.
IMAP (TCP/143)
To read email from a remote location.
All other non-Remote Administration traffic from both private, service and public network
clients directed to or through the Lotus Foundations firewall is dropped or denied.
This feature is disabled as the default setting for Lotus Foundations. Once the feature is
enabled, users within your network cannot use programs that do not adhere to the above
protocols, such as ICQ.
To enable the Restrict Outgoing Traffic option:
1. Select Local under Network Setup from the menu on the left side of any WebConfig
screen. The Local Network Options screen is displayed.
2. Enable the Restricts outgoing connections option to configure Lotus Foundations to
only enable the above outbound ports. Disable this option to enable all outgoing
traffic.
3. Click Save Changes.
• Restricting outgoing traffic helps to block applications such as MSN
Messenger, Yahoo Messenger, Kazaa, Morpheus, etc.
Firewall log
Please see Log Messages for information on Firewall logs.
125
Lotus Foundations Start Users Guide
Lotus Foundations Start Users Guide
Domain name services
What is DNS?
DNS is the protocol used to convert internet domain names into IP addresses. If DNS is
configured, users can access information on the local network and the internet using
domain names instead of specific IP addresses.
Configuring DNS services can be complicated because it often requires dealing with
outside organizations called Domain Registrars. If you are uncertain about issues related to
DNS, ask your ISP to help you.
DNS Services
Lotus Foundations runs two different kinds of DNS services:
• DNS Lookup and Caching Server - This server converts domain names (such
www.yahoo.com) into IP addresses and then sends the IP addresses to your
browser. Lotus Foundations runs the DNS lookup and caching server on your local
network and blocks connections to the lookup server from the internet. There are no
special options to configure the DNS lookup and caching server.
• DNS Publishing Server - This server adds names for your own network (such as
www.example.com) into the global DNS system so that people can find your IP
address to access your website or to send you email. The DNS Publishing Server
and how it can be configured is explained in the rest of this chapter.
Configuring Public DNS
1. Select Local from the Network Setup menu on the left side of any WebConfig
screen. The Local Network Options screen is displayed, with the DNS line that
prompts you to Act as a public DNS server.
2. The default DNS server setting is "No", meaning that you are not publishing any
DNS entries.
• This option only controls the DNS publishing server and how people outside
your local network communicate with it. The DNS publishing server is
always active for computers on your local network.
• If you want to provides services, such as email, to the outside world, you
need to enable the DNS server.
601-0011-01
126
Lotus Foundations Start Users Guide
• To do so, select "Yes" or "Dynamic". Your choice depends on some
relatively complex issues involved in domain name registration.
3. Click Save Changes when you have selected the appropriate DNS setting.
How the DNS system works
DNS hierarchy
The internet DNS server network is arranged as a hierarchy in which a single ‘root’ domain,
sometimes called dot (‘.’), links to the set of top-level domains, such as .com and .org. Each
of the top-level domains contains a link to each of the second-level domains (such as
net-itech.com and mydomain.org). Third- and fourth-level domains are less common
and are used in large organizations like universities.
You most likely publish a second-level domain name such as example.com. When you do
that, your DNS server, if enabled, automatically publishes the names inside example.com,
such as www.example.com and mail.example.com .
Domain registrars
However, there is still a part that must be done manually: in this example, you have to
create a link on the .com server to ask your second-level domain to be referred to your
Lotus Foundations-powered server’s IP address. To do this, you need to visit a Domain
Registrar (such as www.easydns.com or www.opensrs.org) to make sure that your
domain name is not already being used by someone else and to give them the outside IP
address of your Lotus Foundations-powered server.
To register a domain name, your Lotus Foundations-powered server must have a static IP
address. Most ISPs provide this service for an additional fee. DDNS can be used in place of
a static IP address. Refer to Dynamic DNS in this chapter for more information.
When you enable your Public DNS Server and register with a Domain Registrar, people
should be able to look up the IP address associated with your domain name. To test this:
1. Click WWW from the Server Setup menu.
2. Select "Yes" in the Enable Web Server field.
3. Ask someone outside the local network if they can view your domain.
127
Lotus Foundations Start Users Guide
Lotus Foundations Start Users Guide
Dynamic DNS
Dynamic DNS is a Lotus Foundations feature that enables you to publish DNS entries and
provide internet services even if you have a dynamic IP address, as opposed to a static IP
address.
When you register your domain with a registrar, you give them the address of the primary
server and backup server owned by Net Integration Technologies, which already have
static IP addresses. When your Lotus Foundations-powered server connects to the internet,
it automatically informs the Net Integration Technologies servers about your current IP
address and asks them to publish your up-to-date DNS information.
You need to provide a Domain Registrar with the following DNS server addresses:
1. dyndns1.ivivanet.com 209.5.34.82
2. dyndns2.ivivanet.com 207.176.197.14
3. dyndns3.ivivanet.com 194.124.152.28
All you need to do then is set your Public DNS Server to "Dynamic". Lotus Foundations
does the rest.
Manually creating DNS entries
Based on the servers you have enabled, Lotus Foundations automatically decides which
DNS names to publish. For example, if your domain name is example.com, and the
Enable Web Server option is set to "Yes" (not "Trusted Hosts Only"), then Lotus
Foundations automatically publishes the DNS name www.example.com as a pointer to
your Web server. Similarly, if you enable the SMTP email delivery server, it publishes the
name mail.example.com.
Although Lotus Foundations publishes names automatically, you might want to occasionally
add extra names to your DNS server. You might also want to add an entry that allows
people to access your site without typing www. before the address.
Changing DNS information at a registrar can often take 24 - 72 hours to replicate through
the DNS backbone.
Types of DNS entries
You can create four kinds of DNS entries:
601-0011-01
128
Lotus Foundations Start Users Guide
• A (address) - Creates an entry for converting a name (such as
www.example.com) to an IP address (such as 111.22.33.44). This is the most
common type of entry.
• NS (copy from nameserver) - Enables you to mirror someone else’s DNS server.
Every DNS server should have a backup server with an additional copy of the data.
When you register a domain name, the registrar generally asks for a primary and a
secondary server. If someone asks you to act as their secondary DNS server, you
can add their domain name and primary server's IP address as an NS entry.
• MX (mail exchanger) - Occasionally, you might want to publish a Web server and a
mail server with the same name but different IP addresses. For example, you might
want people to reach you by email when they send to [email protected], but
you might want the example.com Web server to point to a different address. To do
that, you would add Address records for </tt>example.com</tt> and
www.example.com pointing to your Web server, and then you would add an MX
entry for example.com pointing to your mail server. You do not need to create a
separate MX entry if it points to the same address as the Address record.
• DR (Dynamic Redirect) - Dynamic redirection can be used to circumvent blocked
HTTP (Web) ports. Any Web requests directed to the address entered as "Name"
are automatically redirected by a Dynamic DNS server to port 4201 on the site
entered as "Value". This is almost transparent for clients, who only notice that the
hostname and port have changed slightly.
Creating a DNS entry
1. Select DNS from the Server Setup menu. The DNS List screen is displayed.
• To list, create or edit your private DNS entries, click Private Entries.
• Private DNS entries are available only to the internal network and include
hostnames of all the computers the Lotus Foundations-powered server can
find on the local network.
• Public DNS entries include the mail exchange (MX) record and entries for
the un-trusted (external) network interface. Virtual Web server DNS records
also go on the public DNS list. Most of the listings, both public and private,
are automatically set up by Lotus Foundations.
2. Click Add DNS. The DNS Add screen is displayed.
3. Enter a name for the entry.
4. Select the entry type.
5. Enter the target IP address in the Value field.
6. Click Save Changes.
Editing an existing DNS entry
1. Select DNS from the Server Setup menu. The DNS List screen is displayed.
2. To edit your private DNS entries, click Private Entries.
3. Click on the entry’s edit action button. The DNS Edit screen is displayed.
129
Lotus Foundations Start Users Guide
Lotus Foundations Start Users Guide
4. Make the appropriate changes and click Save Changes.
601-0011-01
130
Lotus Foundations Start Users Guide
Workstation viewer
What is the workstation viewer?
The workstation viewer is a Lotus Foundations subsystem that can list the workstations and
servers that are connected through the local network. The Workstations screen tells you
which computers are on the network, what their names and IP addresses are, and who is
logged on.
If a workstation can be administered remotely using virtual network computing, the remote
administration program can be accessed from WebConfig.
Accessing the workstation viewer
1. Select Workstations from the Network Setup menu on the left side of any
WebConfig screen. The Workstations screen is displayed.
2. Scanning for workstations can waste bandwidth, no workstations are displayed in
the list by default. Click New Scan to view an updated list of workstations.
3. Click Refresh (at the bottom of the screen) after a few seconds to view the updated
list. Workstations are displayed in the list if they are connected to the network.
4. Workstations can be sorted by the IP Address or Workstation Names by clicking on
the appropriate header.
Virtual network computing (VNC)
Using free Windows software called Virtual Network Computing (VNC), you can configure
Windows, Mac, and Unix workstations so they can be controlled remotely from a central
workstation. If users need help or settings need to be changed, an administrator does not
have to physically go and sit in front of the workstation in question.
Computers with a VNC remote administration server installed are displayed with the words
"Remote Admin" next to them on the Workstations screen.
131
Lotus Foundations Start Users Guide
Lotus Foundations Start Users Guide
Configuring VNC
There are two parts to configuring remote administration:
1. VNC Server (which should be installed on every user’s workstation).
2. VNC Viewer (which should be installed on the administrator’s workstation).
Once the servers and viewers are configured, clicking the "Remote Admin" link on the
Workstations screen connects you to the remote VNC server and displays the remote
desktop.
Configuring the VNC server
1. To download VNC, go to one of the following:
• http://www.realvnc.com/download.html
• http://download.cnet.com/ (and search for VNC)
• For the MAC version, go to: http://www.chromatix.uklinux.net/vnc/
2. The file comes in a zipped format. Unzip the file in a temporary location for
installation. Run the Setup program and follow the instructions. Accept all defaults
during the installation process.
3. When installation is finished, reboot the workstation.
4. From the Start menu, select Applications > VNC and start VNC (App mode).
5. The first time you start VNC you have to set up a password, which is needed to
connect to your workstation.
6. When VNC is active, a small VNC icon displays in the bottom right corner of your
screen.
Configuring the VNC viewer (for the administrator’s workstation)
1. Download VNC from the internet and configure the VNC server.
2. Look for vncviewer.exe, and copy it somewhere obvious (such as
C:\windows\).
3. From the Start Menu, select Programs> Windows Explorer.
4. From the Tools menu, select Folder Options. Click on the File Types tab and the
File Types screen is displayed.
5. Click New Type.... The Add New File Type screen is displayed.
6. Enter a description of the file type (such as VNC Viewer Admin) in the Description of
Type field.
7. Enter "vnc" in the Associated extension field.
8. Enter "application/x-vnc" in the Content Type (MIME) field.
9. Click New. The New Action window is displayed.
10. Enter "Open" in the Action field.
11. Enter the following line in the Application used... field. "c:\windows\" refers to the
location where VNC has been installed. The quotations around "%1" are required.
601-0011-01
132
Lotus Foundations Start Users Guide
c:\windows\vncviewer.exe /config "%1"
12. Click OK. VNC Viewer Admin is displayed in the Registered file types list of the File
Types screen.
133
Lotus Foundations Start Users Guide
Lotus Foundations Start Users Guide
FastForward
What is FastForward?
The FastForward technology in Lotus Foundations enables you to forward internet traffic
from a specific address and interface to another address and interface. A subsystem that
performs this function is usually called a proxy server.
When computers on the internet access services on your internal, protected network, they
“talk through” your Lotus Foundations-powered server. FastForward makes sure that these
untrusted computers can only access the information and services that you want them to.
If FastForward is disabled, no-one can see anything on your local network because Lotus
Foundations acts as a firewall. If you enable FastForward, you are making a protected
“hole” in your firewall that enables computers on the outside to access your network. To
decide whether you want to use FastForward, you need to decide whether it is worth the
added security risk.
Important Note
Because you are affecting the firewall security of your network, it is very
important that you understand what you are doing while configuring
FastForward.
FastForward belongs to a class of programs known as Proxy Servers and is the Lotus
Foundations inbound proxy server. Its job is to accept TCP or UDP connections on one
address and port, and forward them off to some other address and port. There are lots of
programs around that do this, but FastForward provides simplified configuration, uses less
memory, and is generally faster than any other solution we know of. It uses zero-forking
technology to keep its resource usage to a minimum while still running faster than most
other proxies.
Introduction to TCP/IP
Entire books have been written on this subject. To save you some time, we will try to
explain everything you need as briefly as possible. As mentioned earlier in this guide, each
computer on the internet must have a unique IP address. Network protocols come in layers
and IP is just one of those layers. The job of IP is to get data, split it into small chunks
called packets, and then transport those packets from one computer to another on the
Internet.
601-0011-01
134
Lotus Foundations Start Users Guide
When it receives an IP packet, the computer needs to figure out what service it belongs to,
and which open connection it is involved in. For that, it uses two higher-level protocols
known as TCP (Transport Control Protocol) and UDP (User Datagram Protocol). TCP and
UDP introduce port numbers which specify where the data is supposed to go and how the
computer is supposed to handle it.
FastForward can handle both TCP and UDP. It processes them differently from each other,
but you do not need to worry about this for configuration purposes.
User Datagram Protocol (UDP)
Using UDP is very much like sending a telegram. You receive a message, and you can
send a reply. The DNS (Domain Name Service) mentioned earlier uses UDP. One
computer sends a message asking to translate a name (say www.example.com) into a
number. The answering DNS server sends a message saying that the IP address of
www.example.com is 192.168.1.1.
Transport Control Protocol (TCP)
Using TCP is very much like making a telephone call. A person calls you, and you answer.
You go through an introductory sequence, you have a conversation, and then you finish the
call (or in TCP terminology, you close the connection). TCP is used for more complicated
network tasks, like Web browsing.
Proxy servers
Lotus Foundations acts as a firewall, meaning that it blocks computers on the internet from
having access to your private servers.
135
Lotus Foundations Start Users Guide
Lotus Foundations Start Users Guide
If you want to make a service available to the outside world, FastForward controls the
connection for you. When someone outside wants to access the service, they send the
request to a port on your Lotus Foundations-powered server. FastForward then connects
them to the service. This process has two connections: one from the client to the Lotus
Foundations server, and another from the Lotus Foundations server to the service. When
either the client or the server transmits information, Lotus Foundations forwards it to the
opposite end of the connection.
As a result, you need to know the addresses and port numbers of both the source of the
information and the destination of the information. Lotus Foundations receives connection
requests from the source address and forwards them to the destination.
If you want to use FastForward, you probably already have a clear idea of what your
destination address will be. The source, however, might be more difficult to determine and
ultimately depends on how your IP address is configured.
Static and Dynamic IP Addresses
A person trying to access FastForward services through your Lotus Foundations-powered
server must know your assigned IP address to locate you on the internet. Each time you
connect to the internet, your ISP assigns you a IP address. Dynamic IP addresses are
inconvenient for use with FastForward because your address changes each time you
connect (making it difficult for your clients to find you).
If you specifically ask for one, your ISP can give you a static IP address (which never
changes). Once you have a working static IP address, you can add it to a DNS server
(which will convert your domain’s readable name into its IP address).
Configuring FastForward
You can configure FastForward once you know your source and destination addresses. If
you still are not sure where the addresses come from, a few examples are displayed in later
sections.
Important Note
Remember that you decrease firewall security when you enable FastForward.
1. Login to WebConfig with your administrator username and password. WebConfig’s
System Status page is displayed.
2. Select Fast Forward from the Network Setup menu. The Fast Forward screen is
displayed, showing the list of addresses being forwarded. This list might be empty if
no addresses are being forwarded.
601-0011-01
136
Lotus Foundations Start Users Guide
Creating a new forward
1. Click Add New Forward and the Add Forward screen is displayed.
2. Enter the source address and port number in the From Address and From Port
fields.
• If you enter "NetIntegrator" (with no space) as the source address, Lotus
Foundations automatically uses your assigned address (whether it is static
or dynamic).
• You can only attach one forward connection to any given source address
and port.
3. Enter the destination address and port number in the To Address and To Port fields.
Ensure that you have entered the destination information correctly. If you forward
connections to a server that is not answering, Fast Forward drops the connection.
4. Enter a description of the Fast Forward to keep track of its purpose or destination.
5. Click Save Changes.
Editing a forward
1. On the Fast Forward screen, click on the appropriate forward’s edit action button.
The Modify Forward screen is displayed.
2. Change the appropriate source or destination information.
3. Click Save Changes.
Deleting a forward
1. On the Fast Forward screen, click on the appropriate forward’s delete action button.
2. To confirm the deletion, click OK in the window that is displayed.
Forwarding scenarios
Here are a few common examples:
1. Your internal network has an email server called Fred running Windows NT. The
address of the server is 192.168.1.5. Set the source to hostname/port 25 (which is
the SMTP port) and the destination to 192.168.1.5/port 25 . Now people can send
email to your Lotus Foundations-powered server's static IP address, and it is
forwarded to your mail server.
2. If Fred has a DNS server on port 53, you can forward hostname/port 53 to
192.168.1.5/port 53. That way, people on the internet can look up hostnames that
belong to your local network.
137
Lotus Foundations Start Users Guide
Lotus Foundations Start Users Guide
3. You can make WebConfig accessible from the outside world (so that, for example,
Net Integration Technologies technical support can access your Lotus
Foundations-powered server and help you resolve problems). Port 80 on Lotus
Foundations is already in use for the company Web server, so use port 81 as the
source. WebConfig uses Port 8043 and if the destination IP is 192.168.1.1, the
complete destination address is 192.168.1.1/port 8043 . To access WebConfig from
the outside, we would need to use a special address:
http://www.yournetwork.com:81/
Multiple static IP addresses
In certain cases, you want FastForward to treat connections differently depending on their
target. For example, you might want email from mail1.yournetwork.com to be sent to
Fred (your NT server) and email from mail2.yournetwork.com to be sent to Barney
(your Unix server). To do this, your ISP needs to assign you multiple static IP addresses.
Some ISPs may not offer this service.
If you have two static IP addresses (207.6.60.1 and 207.6.60.2 ), and you want the setup
we just described, you can:
• create one forwarding entry with source 207.6.60.1 / port 25 and destination
192.168.1.5 / port 25.
• create another forwarding entry with the source 207.6.60.2 / port 25 and destination
192.168.1.6 / port 25.
Common port numbers
Here are a few common port numbers that you can use with FastForward.
Port Use
22 SSH (Secure Shell)
23 Telnet
25 SMTP (Simple Mail Transfer Protocol)
79 Finger
80 HTTP (Hypertext Transfer Protocol) - Web server
110 POP (Post Office Protocol)
5631PCAnywhere
Web server secure port (HTTPS) Some ports cannot be used with FastForward. For
443 example, port 21 (FTP) does not work because it uses multiple connections that
include both ports 20 and 21.
Troubleshooting FastForward
The WebConfig screen in Lotus Foundations might display the following message:
601-0011-01
138
Lotus Foundations Start Users Guide
An error occurred while Fast Forward tried to bind to one or more of the addresse
This message might be displayed if:
• you are trying to forward to ports that are already being used by your Lotus
Foundations-powered server (port 80, for example).
• FastForward has more than one entry trying to use the same source port and
address. You cannot have more than one FastForward entry attached to the same
source.
If you see this message, turn off the server that is already using the port. For example, to
forward port 80 (the port used for Web services) to another address, you would first have to
shut off the Web server on Lotus Foundations. The log message viewer,Log messages,
shows which FastForward entries did and did not work.
139
Lotus Foundations Start Users Guide
Lotus Foundations Start Users Guide
Disk management
Important Note
Some Lotus Foundations services are not enabled unless hard disks are
configured through the WebConfig menu. See the section on “Configuring you
disks” for more information.
Important Note
For first time disk configuration, do not use the "Disk Install" option on the
Console menu.
Disk configuration (idb and RAID)
To take advantage of RAID, you must have Lotus Foundations Software RAID Technology.
Software RAID Technology comes standard with the Lotus Foundations Premium Edition.
RAID (Redundant Array of Inexpensive Disks) is a system of backing up information that
reduces risk by saving data on two or more drives. If one drive fails, your data is still safely
stored on another drive. Although you do not need to know much about RAID to configure it
on your Lotus Foundations-powered server.
Intelligent Disk Backup (idb) is a system that automatically performs backup procedures as
often as every fifteen minutes without input from a system administrator. See Intelligent
Disk Backup (idb) in Backup & Restore for more information.
If your Lotus Foundations-powered server has one disk, then you cannot take advantage of
idb or RAID. If your Lotus Foundations-powered server has exactly two disks, you can have
idb backup or a two-disk RAID array (but not both). If you have three or more disks, you can
have a two (or more) disk RAID array and idb backup or a RAID array with all available
disks and no idb backup.
Configuring your disks:
1. The Disk Status section in the Services Status Snapshot table on the System Status
page in WebConfig has a link telling you that disk(s) have not been configured.
2. Click the appropriate link to configure your disks.
• For example, if you have three disks, the Disk Status section states, “Your
main disk is not configured. You can configure disks #1 and #2 all in a RAID
or disk #1 as a standalone disk with disk #2 as an idb backup disk”.
601-0011-01
140
Lotus Foundations Start Users Guide
• For a RAID configuration you would click on the “all in a RAID” link; if you
want to enable idb backup, you would click on “disk #2 as an idb backup
disk”.
• If you select a RAID configuration, then the RAID array will begin to rebuild.
This process (which can take up to two hours) does not noticeably affect the
performance of Lotus Foundations.
Reconfiguring your disks
You are able to reconfigure your disk at any time. The Disk Status section of WebConfig’s
System Status screen displays your disk status and provides you with disk reconfiguration
options.
Converting an idb disk to RAID
You can only convert an idb disk to part of a RAID array if your Lotus Foundations-powered
server has exactly two disks. If you have 3 or more disks, you cannot convert an idb disk to
RAID.
Important Note
Converting your idb disk to part of a RAID array means that you will lose idb
backup capabilities. In addition, the backup information that is stored on the idb
disk is permanently deleted.
1. The Disk Status section of the System Status screen has a link telling you that you
can configure your last disk to your RAID array to improve redundancy. Click this
link.
2. The RAID array then begins to rebuild. This process, which can take up to two
hours, will not noticeably affect the performance of Lotus Foundations. Click on your
browser’s Refresh button to view an updated status of your RAID array.
3. When the array has finished building, the a message is displayed in the Disk Status
section of the screen.
Converting a RAID disk to idb
If your RAID array is working correctly, you can convert a RAID disk to idb.
Important Note
Converting your last RAID disk to idb reduces disk redundancy, regardless of
how many disks your Lotus Foundations-powered server has.
141
Lotus Foundations Start Users Guide
Lotus Foundations Start Users Guide
1. The Disk Status section of the System Status screen has a link telling you that you
can configure your last disk as idb. Click this link.
2. The Disk Status section of the screen displays your new disk configuration.
Disk status messages
Depending on your disk configuration, one or more of the following messages are displayed
in the Disk Status section of WebConfig’s System Status screen:
Message
Reason for Display
A RAID array needs to build itself the first time it is used, and rebuild
The RAID array is
when a new disk is added or when the power is turned off suddenly.
rebuilding. Please do Always click Shutdown (at the bottom of the System Status screen)
not add or remove any before turning off your Lotus Foundations-powered server; failure to
disks until this process do so means that your RAID array will need to rebuild when you turn
is finished. (%
the server back on. Although this process does not noticeably affect
complete)
the performance of Lotus Foundations, it can take up to two hours to
complete.
Your disk array is
This message is displayed after a RAID array is finished building.
working correctly.
This message is displayed when your drives are not fully inserted
and properly locked or when all available drives have crashed. If
No disks detected! Are
your drives are not locked, insert the hard disk key into the lock and
your drives inserted or
turn it clockwise until it snaps back into the locked position. If your
locked?
disks have crashed, refer to Recovering from Disk Failure (in this
chapter) for information on how to replace failed disks.
The RAID array is in
degraded mode. If you This message is displayed if you are missing one configured drive in
remove a disk, you will a RAID array. You can create a proper RAID array by configuring a
lose access to your
second disk.
files.
The primary disk is in
standalone mode. If
This message is displayed if have a single disk drive, if you are not
you remove the disk,
using RAID, or if your two-disk RAID array is in degraded mode.
you lose access to
your files.
There is no disk
This message is displayed when all available disks are configured in
available for idb
a RAID array.
backup.
Disk #_ is being used
This message is displayed when the last disk is used for idb instead
for Intelligent Disk
of as part of a RAID array.
Backup (idb).
You can add disk #_ to This message is displayed when you have at least one
your RAID array to
un-configured disk or if your last disk is being used for idb. Click the
improve redundancy. link to add the disk to the RAID array.
601-0011-01
142
Lotus Foundations Start Users Guide
The following messages are displayed in addition.
Message
You can configure disk
#_ for use in idb
backups.
Reason for Display
This message is displayed if the last disk drive is un-configured.
The previous message also displays, but you can only choose
one of the options.
This message is displayed for any extra disks in the system that
There is no reason to
can not be used. This occurs when the RAID array is complete,
use disk #_.
and there is already an idb disk.
This message is displayed for any unconfigured disks that are too
Disk #_ is too small to be
small to fit into the RAID. To solve this problem, turn the machine
added to the RAID array.
off and replace the disk with a larger disk.
This message is displayed when a system has three or more
Disk #_ cannot be used
disks installed, but the system does not have a RAID license. To
until a RAID license is
solve this problem, either remove the disk or purchase a RAID
purchased.
license for the system.
Recovering from disk failure
If one of the disks in your RAID array fails:
1. Turn off the main power.
2. Remove the hard disk and replace it with a new one as soon as possible. See
Installing a New Hard Drive (in this chapter) for more information.
3. Turn the main power switch back on.
4. Press the power button.
5. Connect to WebConfig and login. The System Status page is displayed.
6. The Disk Status section of the screen presents you with two options:
• To configure the new disk as part of the existing RAID array, click on add
disk #_ to your RAID array.
• To configure the new disk as idb, click on configure disk #_ for use in idb
backups.
7. Depending on your choice, Lotus Foundations configures the new disk as idb or as
part of your RAID array.
Disk recovery (SystemER)
SystemER (Emergency Recovery), a unique Lotus Foundations feature that is not available
from any other manufacturer, is an advanced set of features and procedures that:
• enables rapid data recovery in case of complete hard disk failure.
• enables Lotus Foundations to run in emergency mode after a hard disk failure.
Lotus Foundations is designed in such a way that the operating system, along with simple
backup and restore procedures, enables quick recovery in case of system failure.
143
Lotus Foundations Start Users Guide
Lotus Foundations Start Users Guide
Hard disk failure
If your problem is a hard disk failure, you need the following to restore your Lotus
Foundations-powered server:
• Last Backup - from which you can recover data from your last backup. All changes
to system configuration, user files, and new files created by users since the last
backup are not recoverable
• New hard disk
Installing a new hard drive
1.
2.
3.
4.
5.
6.
7.
8.
Turn off the main power.
Remove the disk from the unit.
Insert a new hard disk into the drive.
Insert your idb cartridge. Skip this step if your idb disk is already in.
Turn the main power back on.
Press the power button.
Initiate a Restore from WebConfig. See Backup & Restore.
The length of the restore process depends on the size of your hard disk and the
amount of data that has to be restored. The entire process can take up to several
hours.
Disk install from Lotus Foundations CD
If you are running Lotus Foundations from a CD on third-party hardware you can use the
"Disk Install" option on the Console menu to force Lotus Foundations to mirror the current
Lotus Foundations image booted from CD across all disks that have been previously
configured (in 4.0 or later).
Mirroring the image across disks allows for additional redundancy as Lotus Foundations
can be booted off of any drive. The boot order can be specified in the system's BIOS
settings. This enables Lotus Foundations to run without a CD and allows SoftUpdate
capabilities.
Once you have booted from disk, downloading new images via SoftUpdate also causes the
system to mirror them across configured disks -- again, only for disks configured under Nitix
4.0 or later. When Nitix 4.0 or later configures disks it automatically mirrors the currently
running Lotus Foundations image to that drive, regardless of whether or not the system was
booted from CD. If the system was not booted from a CD then the "Disk Install" option is
still available, but has no effect. Similarly, attempting to perform a "Disk Install" on
unconfigured disks has no effect. Disks configured in versions of Nitix prior to 4.0 will not
have a sufficiently large partition available for Lotus Foundations images. This means that
systems using disks configured under Nitix 3.76 will have to continue to boot from CD.
601-0011-01
144
Lotus Foundations Start Users Guide
To install Lotus Foundations to disks:
Important Note
Your disks must be configured before you install Lotus Foundations to disks. If
your disks have not been configured, please make sure that you first configure
them via WebConfig, shutdown the system, remove the CD, and reboot. For
first time disk configuration, see Configuring your Disks earlier in this chapter.
1. Telnet into the Lotus Foundations server and log in as an admin user.
2. Type in the following command:
setup
3. The main Configuration screen is displayed.
4. A red warning box might be displayed advising you to set up your server using the
Web-based configuration screen in Lotus Foundations. Press Enter to continue.
5. From the Main Menu select Disk Install.
6. Press the Y key to install the currently running version across disks.
145
Lotus Foundations Start Users Guide
Lotus Foundations Start Users Guide
MySQL server
What is the MySQL Server?
MySQL is an advanced database administration tool that can be used to store dynamic
Web page data for services such as on-line catalogues and stores, create accounting
databases, and create address books. MySQL is an advanced feature for users that are
familiar with databases and SQL (Structured Query Language). For more information, go to
http://www.mysql.com.
If the MySQL server is enabled, users on the internal network can access personal
databases and the databases of any teams to which they belong. Because WebMail uses
the MySQL server to store user preference information, the MySQL server has to be
enabled for WebMail to work properly. User and team databases are automatically created
when user and team accounts are set up.
Setting up Windows for MySQL Access
You can use Microsoft Access to access and manage database tables.
1. You first have to download MySQL ODBC (Open Database Connectivity). Go to
http://www.mysql.com/downloads/api-myodbc.html.
2. On the screen that is displayed, click the link for the most recent stable release.
Always download the most recent stable release. For this example, we downloaded
MyODBC 2.50.
3. From the Windows downloads section of the screen that displays, click the
Download link for Windows 95/98/Me systems.
4. On the screen that is displayed, select the nearest server to download from.
5. In the window that is displayed, select Save (to save MyODBC to your desktop).
6. Double-click the icon on your desktop. Extract the zip file to a directory called
myodbc.
7. Double-click on the myodbc folder that you created in the previous step.
Double-click on Setup.exe.
8. The Microsoft ODBC Setup screen is displayed. Click Continue.
9. Select MySQL from the Available ODBC Drivers list. Click OK.
10. From the Windows Start menu, select Settings > Control Panel > ODBC Data
Source. The ODBC Data Source Administrator screen is displayed:
601-0011-01
146
Lotus Foundations Start Users Guide
11. Click Add.... The Create New Data Source screen is displayed.
12. Select MySQL from the list. Click Finish.
13. Provide the following information:
• a Windows DSN Name (such as MySQL Address Book)
• your Lotus Foundations-powered server’s host name or IP address
• your MySQL database name, user name, and password.
14. Click OK on this screen and then on the ODBC Data Source Administrator screen.
15. Open Microsoft Access.
16. Create a database named address book.
17. Anywhere in this window, right-click your mouse. Select "Link Tables".
18. In the Files of Type section of the screen that is displayed, select "ODBC
Databases". The Select Data Source screen is displayed.
19. Select the Machine Data Source tab and select MySQL Address Book. The Link
Tables screen is displayed.
20. Select the appropriate table and click OK.
21. Make sure that the appropriate table is highlighted and click OK. The table opens in
Microsoft Access.
What is a dynamic Web site?
Dynamic web sites, such as online stores or catalogues, use databases to store information
and PHP or Perl script to produce the Web page based on the data stored in the database.
This enables the changing information to be reflected on the site as it changes. Dynamic
Web sites require advanced knowledge of PHP or Perl script, and it is advisable that you
seek the help of a qualified programmer to create your own.
Generating dynamic Web sites
The following PHP script is used to render the example address book into a dynamic Web
site.
1. Enter the following script into a text file and save it as addressbook.php:
<?php
mysql_connect("localhost", "john", "password");
mysql_select_db("john");
$result = mysql_query("SELECT * FROM AddressBook");
while ($line = mysql_fetch_array($result))
list ($name[],$phone[]) = $line;
for ($i = 0; $i < sizeof($name); $i++)
echo "<tr><td>$name[$i]</td><td>$phone[$i]</td></tr>\n";
?>
2. In the Windows Network Neighborhood, copy the script in John’s WWW folder (on
the local server).
147
Lotus Foundations Start Users Guide
Lotus Foundations Start Users Guide
3. Open an Web browser on your workstation. In the address bar of the browser,
enter:
http://SERVER_NAME/~john/addressbook.php
4. The address book opens in the browser.
601-0011-01
148
Lotus Foundations Start Users Guide
Hardware components reporting
Hardware components reporting
Lotus Foundations has the capability to report on hardware that is detected in the server -including processors, memory, Ethernet and hard drives -- and verify whether or not that
hardware is currently supported by the version of Lotus Foundations being run.
The Hardware Status screen displays the details of all the hardware on the system, and
information pertaining to the compatibility/support of the hardware within the current version
of Lotus Foundations.
To view the Hardware Status list, select Hardware Status from the menu on the left side of
any WebConfig screen. The main Hardware Status screen is displayed. The information
displayed varies according to the specific hardware in your server.
• The Type column displays the type of hardware being reported, for example, CPU
and memory.
• The Description column displays the brand of hardware.
• The Device ID column displays information on where the hardware is located in your
server.
• The Status column displays whether the hardware is Supported, Unsupported, or
Support Unknown.
• A "Supported" device has its required drivers installed in the Lotus
Foundations OS.
• An "Unsupported" device does not have its driver installed.
• Devices are deemed as "Support Unknown" when the Lotus Foundations
OS cannot determine its required driver.
149
Lotus Foundations Start Users Guide
Lotus Foundations Start Users Guide
Log messages
Accessing log messages
Lotus Foundations keeps a log that displays the messages from all of the Lotus
Foundations subsystems. To view the log from the firewall subsystem, please refer to the
firewall log section below. To access this log:
1. Select Logs/Reports from the menu on the left side of any WebConfig screen. The
Log Messages screen is displayed.
Informational messages have a black background. Warning messages have a yellow
background. Error messages have a red background.
Customizing message display
The Highlight drop-down menu enables you to highlight messages coming from a specific
Nitix subsystem (such as Disk manager and Fast Forward), making them much easier to
see. To customize your message log display:
1. Select a subsystem from the Highlight drop-down menu.
2. Select an option from the Priority drop-down list.
• The Priority list customizes what kind of message is highlighted.
• By default, only messages that show a change in the system display.
However, you can make error messages and debug messages display.
3. Click Apply. The appropriate messages are highlighted.
Firewall log
For ICSA firewall compliance, Lotus Foundations logs requests to send traffic through the
firewall. Please see Chapter 22: Firewall services for more information on the Lotus
Foundations firewall. The following firewall information is logged:
• All permitted inbound access requests from public network clients that use a service
identified in the security policy hosted on the Lotus Foundations-powered server
itself or on a private or service network server.
• All permitted outbound access requests from private and service network clients
that use a service identified in the security policy on a public network server.
• All access requests from private, service and public network clients to traverse the
Lotus Foundations firewall that violate the security policy.
601-0011-01
150
Lotus Foundations Start Users Guide
• All access requests from private, service and public network clients to send traffic to
the Lotus Foundations-powered server itself that violate the security policy.
• All attempts to authenticate at an Administrative Interface on the Lotus
Foundations-powered server itself.
• All access requests from private, service and public network clients to send traffic to
the Lotus Foundations-powered server itself on the port or ports used for Remote
Administration.
• Each Startup.
The logs contain the following information:
•
•
•
•
•
Date and Time - when the event occurred with an accurate Date/Timestamp.
Protocol - TCP, UDP, ICMP, other; Source IP Address.
Destination IP Address.
Destination Port, either TCP and UDP, or Message Type, for example, ICMP.
Disposition of the event, for example Blocked or allowed.
To view the firewall log, you must be a member of the Log team. The firewall log file is
displayed in the team folder on Lotus Foundations. This team is automatically created by
Lotus Foundations.
To add a user to the Log team:
1. Select User Setup from the menu on the left side of any WebConfig screen. The
main User Setup screen is displayed:
2. Click on the appropriate user’s edit action button. The Modify User screen is
displayed.
3. Choose the Log team in the Available Teams field. Click Join >>. The team is
displayed in the Member of Teams field.
4. Click Save Changes.
5. Access the team folder on Lotus Foundations.
151
Lotus Foundations Start Users Guide
Lotus Foundations Start Users Guide
Network file system
What is NFS?
NFS (Network File System) is a protocol invented by Sun Microsystems that enables clients
using UNIX and similar operating systems to mount file systems from remote servers. This
chapter is for advanced users that are familiar with UNIX and similar operating systems.
Refer to http://en.tldp.org/HOWTO/NFS-HOWTO/ for more information on NFS.
Installing and configuring ugidd
If your user ID on the local system is different than your user ID on the Lotus Foundations
server, you cannot access mounted directories. To avoid this problem:
1. Install ugidd, which is an application that provides user name and ID information to
NFS on your local system.
2. Select File from the Server Setup menu on the left side of any WebConfig screen.
The File Server Setup screen is displayed.
3. In the Mapping scheme for NFS field, select "ugidd".
4. Click Save Changes.
If you are using NIS (Network Information Server) or a similar application that provides
usernames and IDs to the network, you generally do not need ugidd.
Mounting an NFS directory
To mount a directory, you must have superuser privileges. Follow these steps to mount an
NFS directory:
1. If necessary, install ugidd on your workstation.
2. This step is optional. If you already know what directories you are able to mount,
proceed to step 3. From a shell prompt, type:
showmount -e SERVER_HOSTNAME
Where SERVER_HOSTNAME is the hostname of the Lotus Foundations server.
3. At the prompt, type:
601-0011-01
152
Lotus Foundations Start Users Guide
mount NFS_DIR LOCAL_DIR
• LOCAL_DIR is the path to an existing directory on the local network
• NFS_DIR is specified as hostname:/path/directory
• For example, to mount the home directory of the user josefk under the local
directory /mnt/josefk, enter the following information: mount
hostname:/export/home/josefk /mnt/josefk
Unmounting an NFS directory
You should unmount when you are done with a mounted directory or when you are going to
logout. From a shell prompt, type (using /mnt/josefk for an example):
umount /mnt/josefk
153
Lotus Foundations Start Users Guide
Lotus Foundations Start Users Guide
rsync
What is rsync?
Rsync is a Unix based utility that enables incremental files and directory synchronization
from one location to another. This can be used to copy data files from the Lotus
Foundations server, to another system which must also support rsync. An advantage to
using this file transfer method is that only the changed portions of the files are transferred,
rather than the entire new version of the files and directories.
Important Note
In order to use rsync, commands must be run within a telnet session.
Therefore, basic knowledge and understanding of the Linux command line is
strongly recommended.
For a more detailed explanation of rsync, please visit the following Web site:
http://samba.anu.edu.au/rsync/
Enabling rsync
1. Log into WebConfig as an administrative user.
2. In the Network Setup menu in WebConfig, click Local. You should now see the
Rsync Server section.
3. Click the "Enable" radio button in the Rsync Server field.
4. Click Save Changes.
Rsync From a Telnet session
Pushing data to another location
rsync -zav --progress /home/LOCAL_USER/Files REMOTE_USER@REMOTE_SERVER::R
Item
Explanation
rsync
This of course is the executable command.
601-0011-01
154
Lotus Foundations Start Users Guide
With this option, rsync compresses any data from the files
that it sends to the destination computer. This option is
-z
useful on slow connections. The compression method
used is the same method that the classic UNIX gzip
compression utility uses.
A quick way of saying you want recursion and want to
-a
preserve almost everything during the synchronization.
This option increases the amount of information you are
given during the transfer. By default, rsync works silently.
A single -v gives you information about what files are
-v
being transferred and a brief summary at the end. Two -v
flags will give you information on what files are being
skipped and slightly more information at the end.
--progress
Displays the progress of individual files.
/home/LOCAL_USER/*
The local directory to push out to the remote location.
REMOTE_USER is the team name at the remote
location. REMOTE_SERVER can be either the remote
REMOTE_USER@REMOTE_SERVERservers IP address or the fully-qualified domain name.
The password prompt following the rsync line is for this
account.
A double colon in the destination field tells rsync to copy
from the local server to the remote server. The double
::
colon also separates the host name from the path that
follows.
REMOTE/PATH
The destination folder or path.
The “/” appended to the trailing directory eliminates
confusion rsync might have with the command. Without
this, the path might be interpreted with
/
/remote_user/dir/dir/ or something similar.
You are then prompted to provide the password for the REMOTE_USER account entered
into the syntax.
Pulling data from another location
rsync -zav --progress remote_admin@REMOTE_SERVER::remote_user/* /home/local_user/
• The transfer is initiated by the local server, but the files are pulled from the remote
server.
• The double colon indicates where the files will be copied from.
• /home/local_user/Files represents the path to the destination folder on the
local system.
155
Lotus Foundations Start Users Guide
Lotus Foundations Start Users Guide
As with the push method, you are prompted to provide a password for the remote_admin
account.
Using rsync for email
Along with files and folders, rsync can also be used to synchronize email from one location
to another. The following is an example of how to send email from one location to another,
using a telnet session.
rsync -zav /home/local_user/Maildir/ admin_user@REMOTE_SERVER::email-remo
• rsync: This is the executable command.
• -z: With this option, rsync compresses any data from the files that it sends to the
destination machine. This option is useful on slow connections. The compression
method used is the same method that the classic UNIX gzip compression utility
uses.
• -a: A quick way of saying you want recursion and want to preserve almost
everything during the synchronization.
• -v: This option increases the amount of information you are given during the
transfer. By default, rsync works silently. A single -v will give you information about
what files are being transferred and a brief summary at the end. Two -v flags will
give you information on what files are being skipped and slightly more information at
the end.
• /home/local_user/Maildir/: The local mail account from where the mail is
being copied.
• remote_admin@REMOTE_IP: remote_user is the team name at the remote
location. The fully-qualified domain name might alternatively be used. The password
prompt following the rsync line is for this account.
• :: - A double colon in the destination field tells rsync to copy from the local server
to the remote server. The double colon also separates the host name from the path
that follows.
• email-remote_user: The destination folder or path. The email- prefix ensures
the data gets synchronized to the user's email directory.
601-0011-01
156
Lotus Foundations Start Users Guide
Spam scanner
Spam scanner
The spam scanner is an add-on software module. You must have a valid Spam Scanner
license to use this feature.
The spam scanner filters all incoming emails received via SMTP before the messages are
delivered to the user's mailbox. Once filtered, incoming emails are categorized into one of
the following three categories:
• Not Spam: An email that is identified as not being spam is sent to the recipient.
• Probably Spam: An email that is identified as probably spam is sent to the recipient
and have its subject header flagged as [Spam?] for easy identification.
• Definitely Spam: An email that is identified as definitely spam has its subject header
flagged as ***SPAM***.
Depending on the rules set by each user, the spam scanner does the following with a spam
message:
• Do nothing: The message is not modified and the email will be delivered to the
recipient as normal.
• Mark: Send the email to the recipient with its subject header flagged as
***SPAM*** or [Spam?] This is the default setting.
• Delete: Delete the message without ever being sent to the recipient.
To set up rules, see Configuring Users' Spam Filters later in this chapter.
You can also configure a whitelist or blacklist for each user, enabling you to specify specific
email addresses or domains to allow or disallow.
To set up whitelists or blacklists, see the Configuring Whitelists and Blacklists section later
in this chapter.
To activate your spam scanner license:
1. Select Email from the main WebConfig menu.
2. On the Email Setup page, select "Enable" in the Mail Spam Scanner field.
3. Click Save Changes.
157
Lotus Foundations Start Users Guide
Lotus Foundations Start Users Guide
Configuring users' spam filters:
1. Select User Setup in the main WebConfig menu. The User Setup screen is
displayed.
2. Click on the user’s edit action button. The Modify User screen is displayed.
3. Click E-mail... at the bottom of the screen. The Email Setup screen is displayed.
4. Under Treatment of definite / probable spam choose amongst: "Do Nothing", "Mark
subject", or "Delete".
5. If you would like to configure a whitelist or blacklist for this user, click Configure
beside Spam Scanner Whitelist / Blacklist.
6. Click Save Changes.
Users might change their own treatment of spam setting by logging into the WebConfig with
their user account and changing the setting shown above.
Configuring whitelists and blacklists
Lotus Foundations is now equipped to handle whitelists and blacklists on a per-user basis,
and globally. Whitelists are domains or email addresses that you want to allow through the
spam filter without any checks. One example of this is for your own internal email
addresses. Blacklists are domains or email addresses you want to block out entirely, which
might be offers from specific companies or mailing houses. You can also add IP addresses
to the lists if a particular SMTP server is known to deliver spam.
Configuring a global whitelist / blacklist
1.
2.
3.
•
•
•
•
•
•
•
Click Email in the main WebConfig menu.
Enable the Mail Spam Scanner, and click Configure.
Select the type of entry to add to the list.
Select "Domain" to allow or disallow a particular domain’s emails
Select "Email" to allow or disallow a particular email address’s emails
Select "IP Address or Range" to allow or disallow a particular IP address or range of
addresses from delivering email to the server
Enter the domain, email or IP address range into the given text boxes.
Select "Whitelist" to allow the provided entry into Lotus Foundations mailboxes, or Blacklist
to block them.
Click Save Changes to add the entry to the list.
Lotus Foundations now checks its Whitelist and allow all entries through, then perform a
check of the Blacklist to block any matches. The Whitelist always is applied first.
601-0011-01
158
Lotus Foundations Start Users Guide
Virus scanner
Virus scanner
Lotus Foundations AntiVirus is an add-on software module. You must have a valid Lotus
Foundations AntiVirus virus scanner license to use this feature. The AntiVirus software in
Lotus Foundations is provided by a company called Kaspersky, who supplies OEMs (like
Net Integration Technologies) with Anti-virus solutions. They have won numerous awards
for their anti-virus technology. You can find out more at the Kaspersky website.
Lotus Foundations AntiVirus virus scanner gives you complete antiviral protection for your
Lotus Foundations-powered server with both file- and mail-level virus scanning. Lotus
Foundations AntiVirus scans for viruses on the local filesystem and incoming and outgoing
email messages including mail collected from external mailboxes. Lotus Foundations
AntiVirus will detect infected, suspicious, corrupted and password-protected files, as well as
files that fail to be scanned because of an error. All infected, suspicious and corrupted
objects that can not be automatically repaired are quarantined.
File virus scanner
Lotus Foundations AntiVirus file virus scanner is not a real-time scanner, which means that
it does not scan for viruses as data is transmitted/copied/moved to the Lotus Foundations
server. Instead, the Lotus Foundations server runs a scheduled file scan once every 12
hours by default. This provides maximum stability and available resources to the daily
operations of the Lotus Foundations server, which is especially important if you are using
several features of the server at the same time. When a virus is encountered, it will be
cleaned up if possible. Otherwise it will be renamed to "filename-INFECTED" and the user
in whose directory the file was found will be informed via email of the virus.
Mail virus scanner
Lotus Foundations AntiVirus mail virus scanner scans all incoming and outgoing email
messages, including attachments, for viruses. When mail messages that contain infected,
suspicious, and other objects are detected, the virus is immediately removed and a warning
is sent to the sender and recipient along with the original, but virus-free, mail message.
159
Lotus Foundations Start Users Guide
Lotus Foundations Start Users Guide
Activating your file virus scanner license
1. Select File from the menu on the left side of any WebConfig screen. The File Server
Setup screen is displayed.
2. In the File Virus Scanner field, select "Enable".
3. Click Save Changes.
Activating your mail virus scanner license
1. Select Email from the menu on the left side of any WebConfig screen. The Email
Setup screen is displayed.
2. In the Mail Virus Scanner field, select "Enable".
3. Click Save Changes.
601-0011-01
160
Lotus Foundations Start Users Guide
Glossary
Asymmetric Digital Subscriber Line ADSL uses standard phone lines to
deliver high-speed data communications. ADSL uses the portion of a
ADSL
phone line’s bandwidth not utilized by voice, allowing for simultaneous
voice and data transmission.
This term describes information-carrying capacity of telephone or network
Bandwidth
wiring. Bandwidth is usually measured in bits per second.
Binary Digit The smallest unit of computerized data. A bit is represented as
Bit
either 1 or 0.
Cable modems provide Internet access over cable TV networks (which use
Cable Modem fiber-optic or coaxial cables). They are generally much faster than modems
that use phone lines.
A copy of a program or data that is used for faster access. See also Web
Cache
Cache.
Certificate
An issuer of Security Certificates used in SSL connections. See also SSL.
Authority
A computer system or process that requests a service from another
Client
computer system or process.
Encrypting data is accomplished by applying a scrambling code that
Data
makes the data unreadable to anyone who does not have a decryption
Encryption
key. Authorized personnel with access to this key can unscramble it. Data
encryption is a useful tool against malicious users.
Dynamic Host Configuration Protocol This is an industry-standard protocol
DHCP
that assigns IP information to computers.
Disk Quota defines the maximum amount of hard disk space allowed for a
Disk Quota
user's files.
Domain Name System A set of guidelines and rules that allows you to
DNS
navigate the Internet using domain names instead of IP addresses.
DDNS or
Dynamic Domain Name System A system that automatically updates DNS
DynamicDNS information when a new IP address is assigned to a network.
A computer or server that matches an IP addresses to a domain name.
DNS Server
Some ISPs provide a specific DNS address.
DSL
Digital Subscriber Line
A LAN that connects devices like computers, printers, and terminals.
Ethernet
Ethernet transmits data over twisted-pair or coaxial cables at 10 or 100
Mbps.
Networking protocol used by Apple equipment connected directly to
EtherTalk
Ethernet.
The ability to create a passage (or open a port) through your firewall to a
FastForward
service or a server hosting a service. See also Port Number.
A device that provides secure Internet access and protects internal
Firewall
networks from intruders.
161
Lotus Foundations Start Users Guide
Lotus Foundations Start Users Guide
FTP
Gateway
HTML
HTTP
Hub
Internet
Gateway
IMAP
IMAP Server
IP Address
IP Address
(Dynamic)
IP Address
(Static)
IPsec
ISDN
ISP
Java
JavaScript
601-0011-01
File Transfer Protocol An Internet based protocol used to copy files
between computers (usually a client and a server) using Unix-based
command parameters. You can download shareware or freeware
applications that remove all the complexities of Unix and allow you to
connect to FTP sites using a web browser.
A computer or server that is connected to multiple networks and is capable
of routing or delivering packets between them.
Hypertext Markup Language A set of tags and instructions used to create
web pages. HTML tags create page layouts, format text, insert graphics
and multimedia, and more.
Hypertext Transfer Protocol A protocol that makes hypertext information
such as web pages available over the Internet.
A a piece of hardware that connects computers together in a LAN, allowing
information to travel between them.
A gateway for accessing the Internet, which is loosely defined as points of
entrance to and exit from a communications network. A gateway is the
node that translates between two otherwise incompatible networks or
network segments. Gateways perform code and protocol conversion to
facilitate traffic between data highways of differing architecture. A gateway
can be thought of as a function within a system that enables
communications with the outside world.
Internet Message Access Protocol A popular protocol that allows a client to
access email without downloading it to a local computer. Used mainly to
read email from a remote location.
A server that uses IMAP to provide access to multiple server-side folders.
Internet Protocol Address The numeric address used to identify and locate
a server, computer, or website on the Internet.
A temporary IP address that is assigned to a computer by a DHCP server
each time it goes online.
A permanent IP address that is assigned to a computer in a TCP/IP
network. Network devices that serve multiple users (such as servers,
routers, and printers) are usually assigned static IP addresses.
Internet Protocol Secure A type of secure connection between computers
at different locations, creating Virtual Private Networks. See also VPN
(Virtual Private Network).
Integrated Services Digital Networking A digital-communication networking
system used for high-speed communication with the Internet. ISDN is
available through most telephone companies.
Internet Service Provider An organization that maintains a server directly
connected to the Internet. Users who are not directly connected to the
Internet typically connect through an ISP.
Designed by Sun Microsystems, Java is a programming language for
adding animation and other action to web sites. In order to view web sites
created with Java, your browser has to have Java enabled.
Designed by Sun Microsystems and Netscape as an easy-to-use
supplement to Java, JavaScript code can be added to standard HTML
pages to create interactive documents. Most modern browsers support
JavaScript.
162
Lotus Foundations Start Users Guide
Kilobits per Second (thousands of bits per second) This is a measure of
bandwidth (the amount of data that can flow in a given time) on a data
transmission medium.
Lightweight Directory Access Protocol The LDAP server provides a
LDAP
directory of users' names and email addresses.
Local Area Network A LAN links together computers that are in the same
LAN
building. 10BaseT Ethernet is the most common LAN. See also Hub.
Megabits per Second (millions of bits per second) This is a measure of
Mbps
bandwidth (the amount of data that can flow in a given time) on a data
transmission medium.
Mail Exchange Record A DNS resource record type that indicates which
MX Record
host can handle mail for a particular domain.
Network Basic Input Output System. A protocol for networking on IBM PC
NetBIOS
and compatible systems.
Network Address Translation NAT allows one publicly visible IP address to
NAT
refer to many IP addresses internally on a LAN, making it look like all traffic
was generated by a single external IP address.
Network File System A protocol developed by Sun Microsystems which
NFS
allows a computer to access files over a network as if they were on its local
drive.
Network Interface Card An adapter card that physically connects a
NIC
computer to a network cable.
Network Time Protocol An Internet standard protocol (built on top of
TCP/IP) that assures accurate synchronization to the millisecond of
computer clock times in a network of computers. Running as a continuous
NTP
background client program on a computer, the NTP client sends periodic
time requests to external time servers, obtaining server time stamps and
using them to adjust the client's clock.
A unit of data transmitted over a network. Large chunks of information are
Packet
broken up into packets before they are sent across the Internet.
A filter that blocks traffic based on a specific IP address or type of
Packet Filter
application (email, FTP, web, etc.), which is specified by port number.
A network where there is no dedicated server. Computers with access
Peer-to-Peer
privileges can share files and peripherals with all other computers on the
Network
network.
PHP MySQL Administration A program used to administer MySQL
PhpMyAdmin
databases, and provides a user interface.
Packet InterNet Groper A program used to determine if a server is
PING
functional. It sends small packets to the server, which replies with similar
packets.
Post Office Protocol 3 A popular protocol used most often by ISPs for
receiving email messages. POP3 servers allow access to a single Inbox
POP3
(as opposed to IMAP servers, which provide access to multiple server-side
folders.
A number assigned to an application program running on a computer in a
TCP/IP-based network such as the Internet. The number is used to link the
Port Number
incoming data to the correct service. There are several standard port
numbers. For example, port 80 is used for web traffic.
kbps
163
Lotus Foundations Start Users Guide
Lotus Foundations Start Users Guide
Point-to-Point Protocol A method of transmitting protocols (such as IP)
over a serial link. PPP is most often used in dial-up modem connections
from a home computer to an ISP.
Point-to-Point Protocol over Ethernet PPPoE is often used to connect DSL
PPPoE
providers. Because it is based on two common standards (PPP and
Ethernet), it is easy to integrate into existing networks.
Point-to-Point Tunneling Protocol PPTP ensures secure communications
PPTP
over Virtual Private Networks that use public phone lines.
Protocol
A set of rules that govern network exchanges.
A server that acts as a barrier between an internal network and the
Internet. Proxy servers can work with firewalls, which help keep outside
Proxy Server
users from gaining access to confidential information. A proxy server also
allows the caching of web pages for quicker retrieval.
Realtime Blackhole List A ‘spam’ blocker that has different levels of spam
RBL
protection (such as Strong or Medium).
Router
A device that handles the connection between two or more networks.
Routing
The act of directing packets between networks.
A list of destinations known to the router (server) that allows user traffic to
Routing Table
get to and from its destinations.
Rivest Shamir Adleman An Internet encryption and authentication system
RSA
that uses an algorithm developed by Rivest, Shamir, and Adleman.
Information used by the SSL protocol to establish a secure connection.
Security
Contains information about who a certificate belongs to, who issued it, its
Certificate
unique serial number, its valid dates, and its encrypted ‘fingerprint’ that is
used to verify the contents of the certificate. See also SSL.
A computer or software package that provides specific services to a client.
The term can refer to a particular piece of software (such as a web server)
Server
or to the machine on which the software is running. A single server can run
several different server software packages.
Simple Network Management Protocol A protocol used to collect statistical
SNMP
information from a host about parameters such as central processing unit
(CPU) utilization.
Simple Mail Transfer Protocol A protocol used for transferring or sending
SMTP
email messages between servers. Another protocol (such as POP3) is
used to retrieve the messages.
Structured Query Language A language used to create advanced
SQL
databases.
Secure Sockets Layer A protocol that allows encrypted, authenticated
communications to travel across the Internet. SSL is used mostly in
communications between web browsers and web servers. URLs that begin
with "https" indicate that an SSL connection is being used. Each side of an
SSL
SSL connection must send a valid Security Certificate to the other. Each
side then encrypts what it sends using both certificates, thereby ensuring
that only the intended recipient can de-crypt it, that the other side can be
sure of the data’s origin, and that the message has not been tampered
with.
PPP
601-0011-01
164
Lotus Foundations Start Users Guide
A portion of a network (which may be a physically independent network
segment) that shares a network address with other portions of a network.
A subnet is distinguished by its own subnet number.
Transmission Control Protocol/Internet Protocol A popular suite of
TCP/IP
protocols that allow computers to communicate on the Internet.
An application that lets you access resources on a Unix or Linux computer.
Telnet
In order to use Telnet, you need to be familiar with Unix-based programs.
User Datagram Protocol A protocol used throughout the Internet for
UDP
services such as DNS.
Uniform Resource Locator The standard method to give an address of any
URL
resource on the Internet. A URL looks like this: http://www.nitix.com.
Virtual Private Network VPNs allow communication between users in
different offices. To prevent people on the Internet from intercepting
VPN
transmissions, all information that passes through a VPN is protected with
128-bit encryption, the strongest encryption technology available.
WAN
Wide Area Network A network that connects different LANs using routers.
An interface that lets you view material on the Internet. The most popular
Web Browser
web browsers are from Microsoft and Netscape.
An area on your hard disk that is reserved for storing images, text, and
Web Cache
other files that have been viewed on the Internet.
Nitix has a web-based configuration system. To connect to WebConfig,
enter http://hostname:8043 in the address bar of a web browser. For
WebConfig
example, if your Nitix-powered server’s host name is thunder, enter
http://thunder:8043 in the address bar. See Chapter 3: Connecting to
WebConfig for more information.
WebMail
A system that allows users to access their email account using any
Server
standard web browser.
Subnet
165
Lotus Foundations Start Users Guide
Lotus Foundations Start Users Guide
Copyright
Copyright statement
(c) Copyright IBM Corporation 1997, 2008. All Rights Reserved. Licensed Materials Property of IBM. IBM, the IBM logo, and ibm.com are trademarks or registered trademarks
of International Business Machines Corporation, in the United States, other countries, or
both. A complete and current list of other IBM trademarks is available on the Web at
www.ibm.com/legal/copytrade.shtml. Java and all Java-based trademarks are trademarks
of Sun Microsystems Corp. in the United States, other countries, or both. Linux is a
registered trademark of Linus Torvalds in the United States, other countries, or both.
Microsoft and Windows are trademarks of Microsoft Corporation in the United States, other
countries, or both. Other product or service names may be trademarks or service marks of
others.
601-0011-01
166
Lotus Foundations Start Users Guide
167
Lotus Foundations Start Users Guide


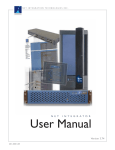


![Final Report - [Almost] Daily Photos](http://vs1.manualzilla.com/store/data/005658230_1-ad9be13b69bd4f2e15f58148160b0f22-150x150.png)