1
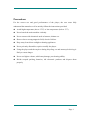
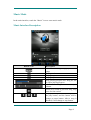
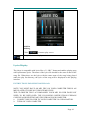
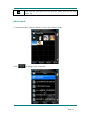
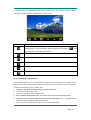
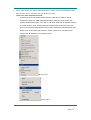
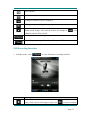
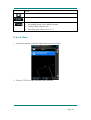
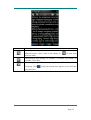
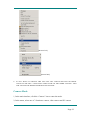
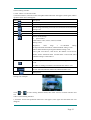
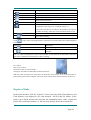
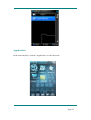
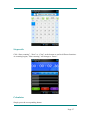
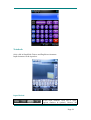
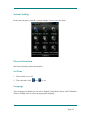
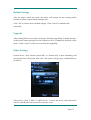
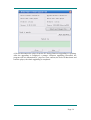
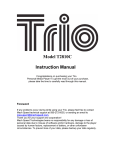
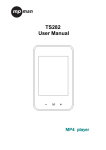
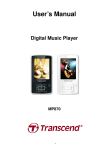
NMV-155/DIGITAL AUDIO AND VIDEO PLAYER WITH TOUCH PANEL & CAMERA User Manual Precautions For the correct use and good performance of the player, the user must fully understand the manual as well as strictly follow the instructions provided. Avoid high temperature (above 35°C) or low temperature (below -5°C). Never knock the main machine violently. Never contact with chemicals such as benzene, thinner etc. Do not close to strong magnetic field, electric field etc. Keep away from direct sunlight or heating appliances. Never privately dissemble, repair or modify the player. Using the player and the earpiece during bicycling, car and motorcycle driving is likely to cause danger. Never use higher volume, which may damage your hearing ability. Divide scraped packing, batteries, old electronic products and dispose them properly Page 1 Basic Features Brand new touch screen OS for direct and convenient operation 240*320, 260,000 color high speed TFT screen Music player: compatible with MP3,WMA and WAV formats Recorder: for FM and MIC recording and compatible with MP3 and WAV formats Picture browser: for JPEG, BMP, GIF, PNG and TIF formats Video player: for playing video of AVI, MTV and FLV format Support FM Radio EBook browser Game player Compatible with SD/MMC Settings: for setting and activating various features ADFU restoration and USB upgrading mode enabled USB2.0 high speed transmission Page 2 Basic Operation System Configuration OS: Windows XP/2K/ME/98 (driver installation needed) /Linux9 and above /Mac OS 10 CPU: Pentium-133MHz at least Memory: 512MB----8GB Power On Slide the switch to “On” and hold, the player will be powered on in 3 seconds. The player will prompt "Welcome" and then enter the main interface. Power Off When the player is on, slide the switch to “Off” and hold, the player will be powered off in 3 seconds. Lock / Unlock In Video, Music or Radio mode, move the power switch to the lock position to lock the player so as to avoid careless button operation. Unlock: move the power switch back to the original position and touch operation will be enabled again. Volume Adjustment Under Music, FM radio or Video mode, press +, – button to adjust volume. Press + to increase volume, and press – to decrease volume. Reset If the player encounters dead halt during use, press RESET button to restart the player. Page 3 Connection to PC and Data Exchange Connect the player to PC with the USB cable, and the player will enter “U disk” mode. Press MENU button or safely remove U disk, and the player will be under USB charging mode. In USB charging mode, touch the screen or press MENU to enter the main applications interface. Charging This player has high capacity lithium battery. For charging, connect the player to the USB port of the PC. Low Power When battery power is low, the player will prompt and power off and enter Standby mode automatically. Do not power on and charge the player instead. Charger current specification recommended: 400-500mA. File Storage Files of different types should be stored under different directories. For example, music file should be stored under MUSIC dir. Record file stored under RECORD dir. Page 4 Picture files under PICTURE dir. Video files VIDEO dir. Text files TXT dir. the corresponding application unable to find the file If it is not saved in this way, How to use MICRO SD card When this player is connected to PC, two movable disks will be found. The first one is the internal memory, and the second one is MICRO SD card. If no card inserted, the second disk can not be opened. This player is compatible with maximum 4GB MICRO SD card. How to insert and pull out MICRO SD card How to insert: with the front (the side with characters) of the MICRO SD card up (towards the screen of the player), slightly push to insert into the card holder of the player to connect. After the card is inserted, the player can play the files in the MICRO SD card. How to pull out: slightly push the MICRO SD card and the MICRO SD card will partly come out, and then pull the card out. Note: please insert or pull out the card when the player is off, or the internal files of the player will be lost or damaged. General Button /Icon Description Button /Icon Description Return to upper directory Return to main menu Delete file or folder Return to previous operation interface Page 5 Know your player Page 6 Main Menu Interface This player provides a touch screen OS for direct operation. The main menu interface is shown in the picture below: 1.The system date and time is shown on the upper left corner of the main menu interface menu interface . The battery is shown on the upper right corner of the main . 2.Under the main menu interface, touch an icon on the screen, and the player will enter the selected mode. 3.After the player enters a mode, touch the icon on the bottom right corner or press and hold the MENU button to return to the main menu interface. Page 7 Music Mode In the main interface, touch the “Music” icon to enter music mode. Music Interface Description Button /icon Description Number of the song being played / Total songs Playing mode Playing sequence Playing style Song playing progress bar. Drag the bar to adjust playing progress. Volume bar. Drag the bar to adjust volume. Touch it to switch to previous song, long press for fast rewind Play /pause /stop the current song. Click the play button, and the button will be change to pause button. After a song is finished, it will change to stop button. Page 8 Touch it to switch to the next song, press and long press for fast forward Music Setting Interface Click one of the 4 buttons at the bottom of the interface to enable an appropriate function. Icon Description Click Browser to enter different song lists - main directory, card directory, all songs, ID3 list, play list, and tag list. Click Settings to choose SRS setting: WOW, WOWHD, USER Click USER to enter user setting interface. Drag the bar or chick the options to set the functions. Click OK to confirm the settings. EQ setting: click to enter User EQ setting interface, move up or down the bar to select sound effect, and click OK to confirm. Page 9 Add list Add tag Click return to play screen. Song information display. Lyrics Display The player is compatible with lyrics files of “*.LRC” format and enables playing song with synchronous lyrics. The name of the lyrics file should be the same as that of the song file. When there are the lyrics with the same name of the song being played under the play list directory, the lyrics of the song will be displayed on the playing interface. INSTRUCTIONS FOR MUSIC DOWNLOAD NOTE: YOU MUST HAVE AN MP3 FILE ON YOUR COMPUTER.THIS IS AN MP3 PLAYER. IT DOES NOT CREATE MP3 FILES. THE CD DRIVER THAT ACCOMPANIED YOUR MP3 PLAYER DOES NOT NEED TO BE INSTALLED. THE FOLLOWING INSTRUCTIONS EXPLAIN COPYING AND DELETING MP3 FILES FROM YOUR COMPUTER. 1. CONNECT MP3 PLAYER TO YOUR COMPUTER VIA USB ADAPTOR. 2. TURN ON YOUR COMPUTER. Page 10 3. 4. 5. 6. 7. 8. 9. DOUBLE CLICK ON “MY COMPUTER” DRIVE NAMED”REMOVABLE DISK” OR “MP3 PLAYER”-THIS IS YOUR MP3 PLAYER DOUBLE CLICK THE REMOVABLE DISK/MP3 PLAYER-THIS OPENS THE FOLDER.IT WILL SHOW ALL FILES CURRENTLY ON YOUR PLAYER. NEXT LOCATE YOUR MP3 FILES ON YOUR COMPUTER. MOST PEOPLE STORE THEM IN THEIR”MY MUSIC”FOLDER ONCE YOUR MUSIC FOLDER/MP3 FILE FOLDER IS OPEN,CLICK ONCE TO HIGHLIGHT THE SONG YOU WANT TO SEND TO YOUR MP3 PLAYER.ONE OF THE FOLLOWING STEPS WILL COPY THE MP3 FILE. A. RIGHT CLICK ON THE HIGHLIGHTED SONG,A BOX WILL COME UP,MOVE CURSOR TO “SEND TO “ANOTHER BOX WILL COME UP. IF YOU HAVE THE OPTION”REMOVABLE DISK”CLICK ON IT . THIS WILL SEND COPY OF MP3 FILE TO MP3 PLAYER. B. IF YOU DO NOT HAVE”REMOVABLE DISK”LISTED,THEN CLICK ON “COPY”.GO BACK AND REPEAT STEPS 3,4&5.RIGHT CLICK IN THE MIDDLE OF THE WINDOW. A BOX WILL OPEN. SELECT “PASTE”. THIS WILL COPY MP3 TO PLAYER. TO DELETE FILES-REPEAT STEPS 3,4&5.ALL FILES ON THE MP3 PLAYER WILL BE LISTED.CLICK ONCE AND HIGHLIGHT THE FILE YOU WANT TO DELETE. HIT”DELETE”BUTTON OR RIGHT CLICK ON THE FILE.A BOX WILL OPEN.CLICK ON THE WORD “DELETE”. IT WILL REMOVE THE MP3 FILE FROM YOUR PLAYER. IF YOU NEED TO LEARN HOW TO CREATE AN MP3 FILE OR DOWNLOAD MP3 FILES, THERE ARE MANY RESOURCES ON THE INTERNET. Video Mode In main interface, click the “video” icon to enter Video mode. Directly click the video file on the screen to start playing the selected video. When play a video file, the up/down buttons and the progress bar will appear automatically by touching the screen. Page 11 Button Description Browse: local directory, card directory, tag list Tag: directly click the icon and a box pops out and prompts “tag saved”. Play: click and it will change to pause button , and click again to continue playing. Touch it and the Volume bar will pop out at the bottom. Drag the bar to adjust volume. Return to main menu Fast rewind: long press for fast rewind. Short press for the previous video file. Page 12 Fast forward: long press for fast forward. Short press for the next video file. photo mode 1. In main interface, click the “Picture” icon to enter Picture mode. Click to change to the List mode. Page 13 2. Directly click the thumbnail to browse pictures. Click the picture, and the buttons will appear automatically at the bottom of the screen. Button Description Manual play: click the button, and the button will change to , and click again to enter auto play mode. Main dir and card dir. return to upper directory to browse picture list. Slide interval: 1 -5 seconds Previous picture Next picture Return to the main menu HOW TO DOWNLOAD PHOTOS: THE CD DRIVER THAT ACCOMPANIED YOUR MP3 PLAYER DOES NOT NEED TO BE INSTALLED. THE FOLLOWING INSTRUCTIONS EXPLAIN COPYING AND” DELETING PHOTO FILES FROM YOUR COMPUTER. 1. 2. 3. 4. 5. CONNECT USB CABLE BETWEEN THE UNIT AND COMPUTER TURN ON YOUR COMPUTER. DOUBLE CLICK ON “MY COMPUTER” DRIVE NAMED”REMOVABLE DISK” OR “MP3 PLAYER”-‐THIS IS YOUR MP3 PLAYER. DOUBLE CLICK THE REMOVABLE DISK/MP3 PLAYER-‐THIS OPENS THE FOLDER.IT WILL SHOW ALL FILES CURRENTLY ON YOUR PLAYER 6. NEXT LOCATE YOUR PHOTO FILES ON YOUR COMPUTER. Page 14 7. ONCE YOU HAVE FOUND YOUR PHOTO FILE, CLICK ONCE TO HIGHLIGHT THE PHOTO YOU WANT TO SEND TO YOUR MP3 PLAYER. HOW TO COPY THE PHOTO FILE: A. RIGHT CLICK ON THE HIGHLIGHTED PHOTO. A BOX WILL COME UP. MOVE CURSOR TO “SEND TO” AND ANOTHER BOX WILL COME UP. IF YOU HAVE THE OPTION “REMOVABLE DISK”, CLICK ON IT. THIS WILL SEND PHOTO TO MP3 PLAYER. B. IF YOU DO NOT HAVE “REMOVABLE DISK”LISTED,THEN CLICK ON “COPY”(See Picture”01”).GO BACK AND REPEAT STEPS 3,4&5. HIGHLIGHT THE IMAGE FILE AND RIGHT CLICK. A BOX WILL OPEN. SELECT “PASTE” (see Picture “02”)AND YOUR PHOTO WILL BE COPIED TO YOUR MP3 PLAYER. (Picture “01”) (Picture”02”) Page 15 8. IF YOU WANT TO DELETE THE PHOTO, HIT “DELETE” BUTTON OR RIGHT CLICK ON THE PHOTO. A BOX WILL OPEN.CLICK ON THE WORD “DELETE” AND THE PHOTO WILL BE REMOVED FROM YOUR MP3 PLAYER. Radio Mode 1. In the main interface, click the “Radio” icon to enter radio Mode. 2. If no headphone, the player will prompt the user to insert a headphone. Button /Icon Description Radio channel list, click to show radio channel list. Manual search: click to enter manual search mode; short press or button to manually search up /down for radio channels, and the player is mute where no channel being found. Auto search: click to enter auto search mode. All channels can be automatically searched and saved. After search is completed, the player will play radio at the preset channel 1. During channel search, click or button to stop auto search. Page 16 Save channel Delete channel Change to channel of lower frequency Change to channel of higher frequency Radio mode change: click and the button will change to , and channel search will be paused. Enter FM station recording interface Select frequency range: China, Japan, Europe and US. FM Recording Interface 1. In Radio mode, click to enter FM station recording interface. Button /Icon Description Stop, click it and it will change to play icon to enter recording Page 17 mode Save the recorded file. View recorded file. Record settings 1. Recording format: WAV &MP3 formats. 2. Quality: high, medium, low. 3. Recoding gain volume: level 1, 2, 3. E-book Mode 1. In the main interface, click the Ebook icon to enter the mode. 2. Select a TXT file to enter Ebook browser interface. Page 18 Button /Icon Description Manual browse: click it and it will change to to enter auto browser mode. Auto browser time setting: 10 seconds, 15 seconds, 20 seconds, 25 seconds, 30 seconds. Save and pick tag, click to show the tag list, and then click to save or select tag. Click or the part outside Save tag box to exit from the tag setting box. Page 19 Skip to: click to show “Skip to” dialogue box, and click or to select the skip percentage. Click outside part of the “Skip to” box to exit. TXT file browser: local directory, card directory. Previous page Page 20 Next page HOW TO DOWNLOAD TXT FILE TO PLAYER: THE CD DRIVER THAT ACCOMPANIED YOUR MP3 PLAYER DOES NOT NEED TO BE INSTALLED. THE FOLLOWING INSTRUCTIONS EXPLAIN COPYING AND DELETING VIDEO FILES FROM YOUR COMPUTER. 1. CONNECT USB CABLE BETWEEN THE UNIT AND COMPUTER 2. TURN ON YOUR COMPUTER. 3. DOUBLE CLICK ON “MY COMPUTER” 4. DRIVE NAMED”REMOVABLE DISK” OR “MP3 PLAYER”-‐THIS IS YOUR MP3 PLAYER. 5. DOUBLE CLICK THE REMOVABLE DISK/MP3 PLAYER-‐THIS OPENS THE FOLDER.IT WILL SHOW ALL FILES CURRENTLY ON YOUR PLAYER 6. NEXT LOCATE YOUR TXT FILES ON YOUR COMPUTER. 7. ONCE YOU HAVE FOUND YOUR TXT FILE, CLICK ONCE TO HIGHLIGHT THE TEXT YOU WANT TO SEND TO YOUR MP3 PLAYER: A. RIGHT CLICK ON THE HIGHLIGHTED TXT FILEA BOX WILL COME UP. MOVE CURSOR TO “SEND TO” AMD ANOTHER BOX WILL COME UP. IF YOU HAVE THE OPTION “REMOVABLE DISK”, CLICK ON IT. THIS WILL SEND TXT FILE TO MP3 PLAYER. B. IF YOU DO NOT HAVE “REMOVABLE DISK”LISTED,THEN RIGHT CLICK ON “COPY”(see Picture “01”).GO BACK AND REPEAT STEPS 3,4&5. RIGHT CLICK, SELECT “PASTE” (see Picture “02”) AND YOUR TXT FILE WILL BE COPIED TO YOUR MP3 PLAYER. Page 21 (Picture “01”) (Picture”02”) 8. IF YOU WANT TO DELETE THE TXT FILE. HIT “DELETE”BUTTON OR RIGHT CLICK ON THE FILE. A BOX WILL OPEN.CLICK ON THE WORD “DELETE” AND THE TXT WILL BE REMOVED FROM YOUR PLAYER. Camera Mode 1, In the main interface, click the “Camera” icon to enter the mode. 2, In the menu, select one of 3 functions: camera, video camera and PC camera Page 22 Camera Setting interface 1,Click :camera “to enter the mode 2,in frame interface, touch the screen and top& bottom button bar will appear ,touch again ,and the up/down button bar will disappear. Button/Icon Description Switch to video camera mode Number of pictures that can be taken Self,shooting,timesetting:5seconds,15seconds,20seconds,off,Default setting is off Return to the main menu View the pictures Picture mode settings 1. special effect white balance: auto, indoor, outdoor, Default Setting is auto Brightness: value range 3 to+3.Default setting is0.Exposuremode:auto/indoor,/outdoor/Default setting is auto Effect/:off/back/white/sepia/negative/Default setting is off 2,save path: local device, card device ,the default is local device shutter sound: off/sound effect 1/sound effect 2 and sound effect 3;default setting is sound effect 1 3,date stamp: off/date stamp or date and time stamp, default setting is off To make no settings, touch the screen outside the menu to exit Resolution switch :320x240,640x480,1024x768,1280x960,2048*1536 Take picture Take white balance Setting as an example: Click or to select among different mode, then click screen to confirm selection and exit Video Camera Setting Interface 1,Touch the screen and top/bottom button bar will appear ,touch again and the button bar will disappear Page 23 Button/Icon description Change to camera mode 3.exposure.modes:Auto(default),indoor(lamp)and outdoor(sun) 4.type.of.special.effects:black&white,negative,sepia,off(default) Return to the main menu View video file Video camera mode setting 1,brightness:value range-3 to +3,Default setting is 0 2,save path: local device, card device ,the default is local device To make no settings, touch the screen outside the menu to exit Resolution switch :176x144,224x176,320x240 Start video recording Video Camera Interface Click to enter video recording interface, touch the screen and a button bar will be displayed at the bottom Button/Icon description Video recording: click to pause video recording Save video file, and return to video setting interface Note :the video recording time is shown in the middle, on the left is the recorded time ,and on the right is the available time remaining for video recording PC Camera Select “PC Camera” Function to enter PC camera mode, The player will detect if USB cable has been connected With the video conversion tool, this player can be used as a PC camera on PC to produce video or picture files, please refer to Chapter video conversion tool for more details on how to us the tool Explorer Mode In the main interface, click the “Explorer” icon to enter the mode: Flash Memory and Card Memory (not displayed if no card inserted). All files and file folders in the player can be listed, and the user may play the compatible music, video, e-book and picture files under this interface; or, the user may directly delete the selected files. Page 24 Application In the main interface, click the “Application” to enter the mode. Page 25 Recorder Click recorder to enter internal MIC recorder interface. The operation is the same as that of FM recorder. Calendar Click or button to select month and year. Select date by directly clicking the number on the screen and the number will become blue color. Page 26 Stopwatch Click “Start counting”, “Next” or “Clear” at the bottom to realize different functions. As counting begins, “Start counting” will change to “Pause”. Calculator Simply press the corresponding button. Page 27 Notebook Only valid in Simplified Chinese and English environment. Input characters in the input box. Input Method Switch input methods, from left to right: English, numbers & symbols, Chinese, all Page 28 input methods (can be used to recognize three types of characters). 1. Click “Chinese” button to use Chinese input mode, as shown above. After input, choose the appropriate Chinese character on the keyboard. From left to right: delete the character before cursor, space and enter. 2. Click button to enter numbers & symbols input mode, and the keyboard is as follows: Delete all characters Delete the previous character 1. Click “return” to return to Chinese input interface, or click to enter English input interface. 4. After input, click button at the left bottom to save, and the player will automatically jump to notebook file list interface. Click to return to the input interface. Page 29 System Setting In the main interface, click the “system settings” icon to enter the mode. Player Information Relevant read-only product information Set Time 1. Time format: on or off. 2. Time and date: click and to set. Language Three languages available for selection: English, Simplified Chinese and Traditional Chinese. Simply click to select the appropriate language. Page 30 Display 1. Backlight time Click and to set. There are 9 options: 0 second, 5 seconds, 10 seconds, 15 seconds, 30 seconds, 1 minute, 5 minutes, 15 minutes and 30 minutes. 2. Brightness adjustment There are 5 options: 1, 2, 3, 4, 5. The higher the level is, the brighter the LCD is. Click the corresponding to icon to set. Calibrate When the touch screen position is not accurate, recalibrate with this function. After the player enters this mode, touch the center of calibration sign + to calibrate. Power Off Setting Sleep time: click and to set. There are 6 options: off, 10 minutes, 15 minutes, 30 minutes, 60 minutes and 120 minutes. The setting will change to the default value “Off” if re-start the player. Page 31 Default Settings After the player enters this mode, the player will prompt an auto warning about whether to restore system default setting or not. Click “Ok” to restore factory default settings. Click “Cancel” to abandon this restoration. Upgrade After clicking this icon, the player will enter “hardware upgrading” warning interface. At this point, connect the player to the USB port of a PC to update the firmware of the player. Touch “cancel” on the screen to abort this upgrading. Other Settings Format device: click “format system disk” or “format card” to start formatting, and the selected item will become blue color. The system will pop up a confirmation box as follows: Select device: click “U disk” or “MTP device” to select the device connection mode with PC, and the selected item will become blue color. Page 32 Software Installation Automatic Installation Start PC, enter Windows system, place the tool installation CD into the CD-Rom, and the installation will be automatically run. Please follow instructions to click “next step” button, and click “off” button when installation is completed successfully. Manual Installation If automatic run is not set up in the PC, then the installation needs to be started manually: First, double click the Setup.exe file under the root directory of the CD to start the installation guide; follow instructions to click “next step” button, and click “off” button when installation is completed successfully. Firmware Upgrade This player provides with firmware upgrading tool to upgrade or repair the firmware in the player. 1. Down load the latest firmware. 2. Connect the player to PC’s USB port correctly; make sure no other movable disks are connected to the PC at the same time. 3. Run this tool. If the firmware in the player is in good condition, the tool will shift to firmware upgrading mode; it displays the information of the player’s firmware such as version etc in the box on the upper left corner of the tool interface. Click button “Select new version firmware file” to select the firmware file to be upgraded. After the firmware file detected to be correct by the tool, it displays the information of the selected firmware such as version etc in the box on the upper right corner of the tool interface. Now click button “Start upgrading” to upgrade the firmware. If the internal firmware of the player has been damaged, the tool will change to firmware restoration mode. The version information of the player’s internal firmware now will not be displayed in the box on the upper left corner of the software interface. It requires the user to select a correct firmware file to repair the damaged one. At the same time, the information such version etc of the firmware file to be repaired is displayed in the box on the upper right corner of the interface; click button “Start upgrading” to upgrade the firmware. Page 33 4. Do not disconnect the player from the PC during firmware upgrading or repairing. After the upgrading is completed, a prompt “firmware upgrading succeeded, the program will exit automatically!” pops out. Now confirm, the tool will shut down and reset the player, the whole upgrading is completed. Page 34