1
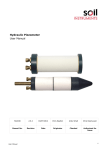
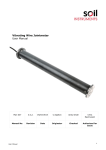
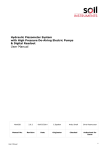
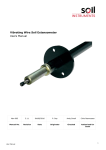
Hydraulic Overflow Settlement Cell
User Manual
Man051
2.0.2
04/07/2014
C.Spalton
Andy Small
Chris
Rasmussen
Manual No.
Revision
Date
Originator
Checked
Authorised for
Issue
User Manual
1
Contents
Section 1 :
General Information ................................................................................................................. 3
Section 2 :
Installation of Cell and Tubes ............................................................................................... 4
Section 3 :
Monitoring Equipment.............................................................................................................. 5
3.01
3.01.1.1
3.01.1.2
3.01.1.3
3.02
3.02.1.1
3.02.1.2
3.02.1.3
Two Cylinder De-Airing Panel ..................................................................................................... 5
Filling the Panel ............................................................................................................................. 5
Operation......................................................................................................................................... 5
Recharging the Panel .................................................................................................................... 5
Standpipe Recording Panel .......................................................................................................... 6
Purging excess water from installed tubing ............................................................................. 6
Circulating water in overflow tube and priming standpipes ................................................. 6
Taking Readings ............................................................................................................................ 6
Section 4 :
Water Back Pressure ................................................................................................................ 7
4.01
4.02
4.03
4.04
Filling ................................................................................................................................................ 7
Charging the Back Pressure Unit................................................................................................ 7
Operating Procedure ..................................................................................................................... 7
Taking Readings ............................................................................................................................ 8
Figure 1: Typical Arrangement For Hydraulic Overflow Settlement Cell ....................................... 9
Figure 2: Typical Arrangement For Hydraulic Overflow Settlement Cell With Back Pressure
Unit .......................................................................................................................................................................... 10
User Manual
2
Section 1 : General Information
The cell operates on a U-tube and overflow principle. It is similar in design to the system
developed by the Building Research Station, England. The cell, a sealed container, is cast into a
concrete block in the structure to be monitored and is connected by a nylon 'water' tube to a
graduated standpipe in the instrument house. A second 'drain' tube allows surplus water to
flow from the cell, and a third 'air' tube maintains the interior of the cell at atmospheric
pressure. Before taking readings compressed air is used to remove water from the air tube and
cell. The water tube is then filled with de-aired water by pumping a quantity sufficient to fill the
tube and to remove any air bubbles that may have formed since the previous set of readings
were taken. The graduated standpipe, which has also been filled, is then connected direct to the
water tube using a three-way valve on the reading panel. The level of water in the standpipe
falls until it reaches equilibrium with the level of an overflow weir in the cell. Small differences
in level resulting from surface tension effects are practically constant from one reading to the
next; thus settlement of the cell is reflected by an equal drop in water level at the standpipe.
User Manual
3
Section 2 : Installation of Cell and Tubes
A trench 0.5 to 1 metre deep is excavated to accommodate the tubes and cell. if possible the
base of the trench should have a uniform gradient away from the cell in order to assist drainage
to avoid the formation of air or water pockets in the tubing, though this is not essential.
The location is carefully marked out and the cell placed in position. Water, air and drain tubes
are connected to the cell allowing lengths equal to the distance between cell and measuring
panel plus at least 5% to accommodate movement of the structure being monitored.
The water tube comprises 8mm o/diameter nylon coated with 1mm thick polythene sheath.
Approximately 25mm length of the polythene should be removed from the nylon and the
connection to the cell fitting made directly on the nylon. Care should be taken not to damage
the nylon tube when stripping the polythene coating.
The air drain tube comprises 9.5mm o/diameter plain nylon tube.
After fitting the tubes to the cell by tightening the brass compression fittings it is good practice
to unscrew the nut and check that the brass sleeve is correctly positioned on the tubing.
The correct function of the cell connected to its readout equipment is checked. The cell is then
placed upright in suitable formwork on a concrete base, adjustment of the concrete thickness is
made until the required initial reading at the instrument house is obtained. Care is taken to
avoid kinks or sudden bends in the tubing. The formwork is then backfilled with concrete.
The tubing is marked with coloured tapes for identification. The tube, bunched together and
snaked in the trench to allow for ground movement, should be protected from mechanical
damage by at least 150mm, of stone-free sand or clay above and below. The trench is
backfilled, if possible, with excavated material, free from large stones and at natural water
content. If the installation is in rockfill the tubes should be protected from damage by using an
appropriately graded backfill.
User Manual
4
Section 3 : Monitoring Equipment
3.01 Two Cylinder De-Airing Panel
Figure 1 shows the two cylinder de-airing unit with its connections to the standpipe panel.
Mount the panel vertically and level on the instrument house wall. Connect the busbar of the
standpipe panel to the elbow fitting at the base of the cylinder B using a suitable length of nylon
tubing. Connect the de-aired water supply to valve P.
3.01.1.1
Filling the Panel
Initially all valves should be in the closed position. Attach a vacuum pump to valve E. Open
valves E, G and N. Apply a vacuum to evacuate the bladder in cylinder B. Close valves E, G
and N.
Attach a suitable length of rubber hose to valve J with its other end in a container of clean
water. By operating the vacuum pump and opening valves E and J, draw the clean water into
cylinder A until it is seven-eighths full. First close valve J then valve E. Remove the vacuum
pump and open valve E to release the vacuum from cylinder A.
Attach the vacuum pump to valve G and with the de-aired water supply connected to valve P
open both these valves. By applying a vacuum to cylinder B draw in the de-aired water until B
is seven-eighths full. Close valves G and P. Remove the vacuum pump and open valve G.
Attach the foot pressure pump to valve K. Open valve K and pressurise cylinder A. Open valve
N inflating the bladder to expel the air remaining in cylinder B. Air bubbles clinging to the
cylinder walls should be dislodged by vigorous slapping. Close valve G. air should also be bled
from the busbar connection to the standpipes by loosening the stop end fitting at the end of the
busbar and retightening.
Close valve K. Attach the vacuum pump to E. open valves E, N and P and by applying a
vacuum to cylinder A draw de-aired water into cylinder B. Close valves E, N and P. Remove the
vacuum pump and open valve E to release the vacuum. Close valve N.
The panel is now charged and ready for operation.
3.01.1.2
Operation
To fill standpipes and tubing with de-aired water, open valve K and apply a pressure to cylinder
A, as measured on the gauge. Open valve N thereby pressurising the bladder and the de-aired
water in cylinder B. this de-aired water may be fed to standpipes and overflow tubes by opening
valves (1), (2) and (3) on the standpipe panel.
3.01.1.3
Recharging the Panel
Ensuring that valve K and valves (1) on the standpipe are closed, attach a vacuum pump to E.
Open valves E, N and P and by applying a vacuum to cylinder A, draw de-aired water into
cylinder B.
User Manual
5
3.02 Standpipe Recording Panel
Figure 1 shows a typical terminal arrangement for the most common reading arrangement.
This method is suitable for installations where the crest of the overflow weir in the installed cell
is at an elevation which lies within the vertical bounds of the calibrated standpipes of the
recording panel and remains so throughout the monitoring period. The general operating
procedure is as follows:-
3.02.1.1
Purging excess water from installed tubing
Close valves (3) on each of the standpipe valve blocks. Set regulator on compressor to
approximately 50 PSI (3.8 Bar) and connect to the AIR VALVE. Alternatively connect a foot
pump to the AIR VALVE. Connect the AIR TUBE of each cell to the AIR VALVE in turn and allow
air flow to continue for a minimum of 5 minutes or until all evidence of water returning via the
related drain tube ceases. When no further flow in drain tubes is apparent close off compressed
air supply and vent the air tube to atmosphere. Wait at least 5 minutes before proceeding
further.
3.02.1.2
Circulating water in overflow tube and priming standpipes
Prepare source of de-aired water in sufficient quantity to replace water in the length of overflow
tube from measuring point to installed instrument plus 25% excess. Pressurise de-airing unit
and open valves (1) and (2) in turn on each of the standpipes to be used and allow water to fill
to within 50mm of the top of each unit. Reclose valves (2) in turn. Note water level in delivery
cylinder of de-airing unit and record scale reading. When a quantity sufficient to replace existing
water in this tube, plus 25% excess has been delivered (as indicated by the scale on the
delivery cylinder of the de-airing unit) close off valve (1) on the related standpipe. Wait at least
15 minutes before proceeding to reading phase on purged cell. Repeat above procedure for
other cells.
3.02.1.3
Taking Readings
Ensure at least 15 minutes has elapsed, since overflow tube filling was completed. This delay is
necessary to ensure that increased air pressure resulting from water flow into the installed
tubing and cell has had time to dissipate to atmosphere via the air tube. Open valve (2) of the
related standpipe whereupon the water level will start to fall to a reading level. Depending on
the length of installed tubing, the time taken for the reading to stabilise as levels balance could
vary from a few minutes to tens of minutes. Where falling standpipe water level is slow it is
advisable to take readings at regular intervals (say 1 minute) after the time at which valve (2)
was opened to determine when the level has stabilised.
Record reading.
User Manual
6
Section 4 : Water Back Pressure
Figure 2 shows the backpressure and standpipe panel arrangement. This method is suitable for
installation where the crest of the overflow weir in the installed cell is higher than the standpipe
recording panel. The general operating procedure is as follows –
Figure 2 shows the backpressure unit with its connections to the standpipe panel.
Mount the panel in a vertical position to the instrument house wall. Using a suitable length of
nylon tube connect the top of standpipe 3, to Valve W back pressure unit. Repeat procedure
with all Standpipe/Back Pressure connections.
4.01 Filling
Remove both tube connections from the top of the lower pot Z. Fill with
100ml of clean water, refit connections.
approximately
4.02 Charging the Back Pressure Unit
With all valves in the off position, connect the foot pump to valve connection Y. open valve,
operate foot pump until water column in sight tube rises to approximately 1.5 metre. Close
valve Y, disconnect foot pump.
4.03 Operating Procedure
a)
With the de-airing unit fully charged as per procedure 3.1 open valve N.
b)
Open valves 1 and 2 on standpipe 3; allow the water level in the sight tube to rise to
approximately 1.5 metres, close valve 1.
c)
Open valve W.
balance.
d)
Open valve 1. Allow water level in standpipe to rise to approximately 2.45 metres. It will
be noted that the backpressure water level should increase by the same amount.
Allow a few minutes for standpipe and backpressure water columns to
It is important to prevent the overspill of water into the standpipe backpressure air tube
connections. During this operation the 2.45 metre level should not be exceeded. If however this
should occur it will be necessary to remove all water via valve 3 and re-pressurise as per procedure
4.02.
User Manual
7
4.04 Taking Readings
Ensure at least 15 minutes has elapsed since the overflow tube filling procedure was completed.
Open valve 3 on the related standpipe, whereupon the water level will start to fall to its reading
level. The time taken to stabilise will depend on the installed tube length. When stable add
together standpipe and back pressure reading and record.
Bell Lane, Uckfield, East Sussex
t: +44 (0) 1825 765044
e: [email protected]
TN22 1QL United Kingdom
f: +44 (0) 1825 744398
w: www.itmsoil.com
Soil Instruments Ltd. Registered in England. Number: 07960087. Registered Office: 5th Floor, 24 Old Bond Street, London, W1S 4AW
User Manual
8
HYDRAULIC OVERFLOW SETTLEMENT CELL
Figure 1: Typical Arrangement For Hydraulic Overflow Settlement Cell
S ta nd pi pe P an el
T ypi c al Ove rfl ow
S ettl em e nt C el l
Fo ot P um p
F
G
A
Dra in Tube
K
A ir Tub e
E
Overfl ow Tub e
T wo C yl in der De -A i ri ng U ni t
B
2
3
1
P
J
L
H
C om pres s or Or
Fo ot P um p
User Manual
A ir Va lve
9
HYDRAULIC OVERFLOW SETTLEMENT CELL
Figure 2: Typical Arrangement For Hydraulic Overflow Settlement Cell With Back
Pressure Unit
B ack P ressure Uni t
S tand pi pe P anel
W
X
Typical Overfl ow
S ettl ement Cell
Two Cyl inder De-A iri ng Unit
E
F
F
Y
J
K
3
1
3
L
N
Drain Tube
2
A ir Tube
P
2
3
1
1
Overflow Tube
2
Z
Foot P ump
Compressor Or
A ir V alve
Foot P ump
User Manual
10