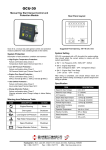
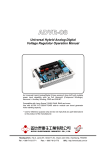
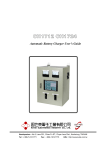
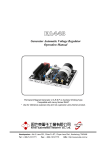
1
KCU Communication
PC Software Installation and User’s Guide
For KCU-30 / KCU-40 / KCU-50 modules
System requirement: Windows XP or above
KCU Communication PC Software User Guide
TABLE OF CONTENTS
SECTION 1 : SOFTWARE INSTALLATION INSTRUCTIONS ............................................ 3
SECTION 2 : KUTAI SOFTWARE ACCOUNT REGISTRATION ........................................ 7
SECTION 3: GETTING STARTED ...................................................................................... 8
3.1 Quick Check ............................................................................................................... 8
3.1.1 Main Window Overview ................................................................................ 9
3.1.2 Main Menu .................................................................................................... 9
3.2 Connection Address Book ........................................................................................ 10
3.2.1 Adding New Connections............................................................................ 10
3.2.2 Editing Connections .................................................................................... 11
3.2.3 Removing Connections............................................................................... 12
SECTION 4: USING AND CONFIGURING ....................................................................... 13
4.1 Items and Function Icons in Main Window ............................................................... 13
4.2 Connecting to a Controller........................................................................................ 14
4.3 Disconnect a Controller ............................................................................................ 15
4.4 KCU Module Configuration ....................................................................................... 15
4.4.1 Change Connection Password ................................................................... 15
4.4.2 Connection Password Privileges ................................................................ 16
4.5 Configuration Parameter .......................................................................................... 16
4.6 ATS-22A Operation Panel ........................................................................................ 18
4.7 ATS-33 Operation Panel .......................................................................................... 19
4.8 ATS-34 Operation Panel .......................................................................................... 20
4.9 ATS-PLC Operation Panel ....................................................................................... 21
4.9.1 OFF Mode .................................................................................................. 21
4.9.2 AUTO Mode ................................................................................................ 21
4.9.3 MANU Mode ............................................................................................... 22
4.9.4 TEST Mode................................................................................................. 23
4.9.5 PROG Mode ............................................................................................... 23
4.9.6 EVENT LOG ............................................................................................... 24
4.9.7 Passcode Protection of System Parameter ................................................ 24
4.10 GCU-100 Operation Panel ..................................................................................... 26
4.11 GCU-3000 Operation Panel.................................................................................... 27
4.12 AMF-10 Operation Panel ....................................................................................... 28
______________________________________________________________________________________
2
KCU Modules Software User Guide
SECTION 1 : Software Installation Instructions
To download the software, follow these steps:
1. Go to Download Page:http://www.kutai.com.tw/en/download.html
Click on the download link named:"KCU Communication Software" (ZIP file)
Or go to Remote Monitoring, Control page for KCU-30/40/50’ Download Tab Page
Click
2.
Your browser will begin to download the ZIP file
3.
When the file is done downloading, unzip it and double-click on the "setup.exe" to
run the installer.
Note: If you have previous version of “KCU Communication” software installed,
please remove it before installing the new version.
______________________________________________________________________________________
3
KCU Modules Software User Guide
How to uninstall previous version?
1. Click the Start button , and then click Control Panel.
2.
Click Programs, and then click Programs and Features.
3.
Double-click the program “KCU Communication” to uninstall.
To install the software, follow the steps below:
1.
After you double-click the “setup.exe”, wait for the installer to initiate.
2.
Choose the location where you want to install. Click Next
______________________________________________________________________________________
4
KCU Modules Software User Guide
3.
Read the license agreement and select “I accept the agreement”.
Click Next to start installing
Note: If you select “I do not accept the License Agreement”, you will not be able
to continue with the installation.
4.
The Installing panel will appear, showing the progress of your installation.
______________________________________________________________________________________
5
KCU Modules Software User Guide
5.
The installation is completed. Click Finish to exit the setup.
6.
Click Restart to complete the setup process.
______________________________________________________________________________________
6
KCU Modules Software User Guide
SECTION 2 : KUTAI Software Account Registration
The server connection service is required for using KCU-30, KCU-40, and KCU-50
modules with KCU Communication Software (PC or iOS and Android App),
To use the server connection service you will need a valid email address to register for a
software account and create a password.
Note: Communication modules model KCU-01, KCU-02, and KCU-03 does not
require server connection service to operate.
How to register for a software account?
Go to KUTAI official website;
Find the main page for Remote Monitoring, Control and Annunciator System
Click this button
Or copy and paste below URL to your web browser.
URL: http://kcu.kutai.com.tw:8080/KutaiWebMonitorSystem/register/StepOne
After register, you’ll receive an email titled “Kutai Electronics Software Account
Verification” which has a verification link.
Click the link to verify your account.
Note: The verification link is only valid for 24 hours. If you didn't click the
verification link within 24 hours of registration, you'll have to re-register.
Example of verification email
______________________________________________________________________________________
7
KCU Modules Software User Guide
SECTION 3: Getting Started
3.1 Quick Check
Quick check before using software
Check if the“Remote control by KCU-XX module” function in controller is enabled.
(Refer to the Line By Line Programming Table in controller's user manual.)
If this function is disabled, the software can only monitor the controller but incapable to
control it remotely.
When you use the software for the first time, you will need to login with your registered
software account and password. (See Figure 3-1)
Figure 3-1 Software Account Login
______________________________________________________________________________________
8
KCU Modules Software User Guide
Note: KCU-30, KCU-40, and KCU-50 modules can all be connected to the software at
the same time. (Up to 10 units)
If you wish to connect more than 10 units of controller simultaneously,
please contact KUTAI.
3.1.1 Main Window Overview
Main Manu
Toolbar
Connection Status
(Connect up to 10 units)
Controller Event Window
Photo display area
Controller parameters
display area
3.1.2 Main Menu
Most commands and features of KCU Communication can be accessed through the
main menu. By clicking an item from the menu, you can perform the corresponding
command.
Connect Via:Shows available KCU module connection methods.
System:Shows system commands and features.
______________________________________________________________________________________
9
KCU Modules Software User Guide
Help:Access to login information and software version.
3.2 Connection Address Book
You can use Connection Address Book (Figure 3-3.1) to quickly connect to a controller.
Click System in the main menu and click Address Book.
Figure 3-3.1 Address Book
3.2.1 Adding New Connections
Click
to edit the connection detail then click
to save it.
Name:
:You can creat a custom name for the controller. For example, ATS-22A at
Building F
KCU Serial Number:
:The serial number (mark on module) of KCU module that
installed on the controller.
Password:
:You can connect the controller as an Administrator or a Viewer.
Factory Setting Connection Passwords (4-digit):
Administrator (0000), Viewer (9999)
Attention: We strongly recommend that you change the connection passwords
right after the first successful connection. (See Section 4.4)
______________________________________________________________________________________
10
KCU Modules Software User Guide
Security Notice and Liability Disclaimer
You are responsible for keeping your connection passwords
(Administrator/Viewer) safe and confidential because they are the key to access your
equipments.
There will be potentially serious security issues if your passwords are
compromised. Some of the risks of compromised security include the equipment being
remotely controlled by third parties, who may have criminal intent and malicious
damage to your equipments.
We are entitled to rely on any use of our connection services using that password
as being use by you and authorized by you. If you know or believe that there is any
unauthorized, fraudulent or unlawful use of your password, you must reset it in the
controller. (Refer to controllers user manual for connection password reset)
3.2.2 Editing Connections
To edit an existing connection:
1. Click the connection that you wish to edit then click
2.
Edit the connection detail and click
to save changes.
______________________________________________________________________________________
11
KCU Modules Software User Guide
3.2.3 Removing Connections
To remove a connection:
1.
2.
Click the connection that you wish to delete and click
A confirm dialogue will popup. Click
to remove the connection.
______________________________________________________________________________________
12
KCU Modules Software User Guide
SECTION 4: Using and Configuring
4.1 Items and Function Icons in Main Window
(A)
(B)
(C)
(D)
(E)
(F)
Figure 4-1 Main Window
Item
A
B
C
D
E
F
Description
Photo
Photo of the connected controller.
Device Name
The custom name of the controller
KCU Module
The KCU module that used to connect the controller
Shows KCU module serial number (S/N) and connection type
Connection Information
(Administrator or Viewer)
Online Time
Connection date and time
Update
Connection data stream code
Icon
Description
Icon
Description
Disconnect
Disconnect a controller
Operation Panel.
To monitor and control a controller
Network Configuration
Change connection passwords
Configuration Parameter.
Change controller settings
______________________________________________________________________________________
13
KCU Modules Software User Guide
4.2 Connecting to a Controller
Click "Connect via" and select “Internet (KCU-30/40/50)” to enter the connection list.
KCU Module Serial Number
Connection Password
(Administrator/Viewer)
Connection Address Book
Figure 4-2 Connection List
The connection list shows all the connections that saved in the Address Book.
You can either select a connection in the list or type in the KCU Module serial number and
the password. Then click
to connect the controller.
Note: If you type in the serial number and password in the connection list, it won’t
be saved in the Address Book. It’s recommended to add the connection in the
Address Book for quick access in the future.
Figure 4-3 Connecting to a controller
______________________________________________________________________________________
14
KCU Modules Software User Guide
4.3 Disconnect a Controller
To disconnect from a controller:
1. Select a controller that you wish to disconnect
2.
Click Disconnect icon.
4.4 KCU Module Configuration
You can:
■ Edit connection passwords.
■ Check MAC Address of the KCU module
■ Check the maximum number of connections
Note: If you connect a controller as an Viewer, KCU Config funciton is diabled.
4.4.1 Change Connection Password
If you connect a controller as an Administrator, you are allowed to change connection
passwords.
1.
After you connect a controller successfully, click
Configuration. (See Figure 4-4)
2.
Change the password and click
to save the new password.
The controller will disconnect automatically after you click
.
You'll need to connect again with the new password.
If you do not wish to change password, click
to access Network
to exit.
The controller will stay connected.
Figure 4-4 KCU Module Configuration
______________________________________________________________________________________
15
KCU Modules Software User Guide
4.4.2 Connection Password Privileges
Connection Type
Administrator
Viewer
Privileges
Monitor and control remotely.
Change connection passwords
Configure Settings
Edit Address Book
Monitor only, unable to control remotely
*KCU-40 WI-FI module can only monitor, unable to control remotely.
Note: If you forgot the current Administrator password, you will need to perform a
password reset on the controller. Refer to the Line By Line Programming Table in
controller's user manual for KCU Remote Connection Passwords Recovery.
4.5 Configuration Parameter
All the controllers configuration must be done in OFF mode.
If you are not in OFF mode, the
button will not display.
How to access controller settings?
1. Click
in Main Window to access operation panel.
2. Click OFF button to switch the controller to OFF mode.
3. Click
4. Click
at the upper left corner in operation panel
to change the setting. (See Figure 4-5 and 4-6)
5. After you finish all the editing, click
Or Click
to save the changes and exit.
to exit without saving any changes.
Parameter settings
______________________________________________________________________________________
16
KCU Modules Software User Guide
Types of parameter Settings
Drop-Down List
Click
to select an item in the drop-down list
Current setting
Save changes
Exit without change
Figure 4-5 Drop-Down List
Slider bar
Drag slider button to change values.
Or type in a value in the input box directly.
Slider button
Value input box
Save changes
Exit without change
Figure 4-6 Slider bar
______________________________________________________________________________________
17
KCU Modules Software User Guide
4.6 ATS-22A Operation Panel
KCU module used for connection
Configuration Parameter
Connection status
Operating Status
Event Window
Standby Source
Readings
Normal Source
Readings
Glows red for Alarm
Standby Source transfer failed
Mode Selection Button
Operating Mode Selection Buttons
AUTO mode
OFF mode
Bypass mode
Note: For the detail settings of the controller, please refer to ATS-22A user manual.
______________________________________________________________________________________
18
KCU Modules Software User Guide
4.7 ATS-33 Operation Panel
KCU module used for connection
Connection status
Configuration Parameter
Operating Status
Event Window
Genset-2
Readings
Genset-1
Readings
Remaining run time of current generator
(minutes)
Current operating genset
Duty Cycle of current operating genset
Glows red for Alarm
Genset-2 Connected
Mode Selection Button
Operating Mode Selection Buttons
AUTO mode
OFF mode
Bypass mode
Note: For the detail settings of the controller, please refer to ATS-33 user manual.
______________________________________________________________________________________
19
KCU Modules Software User Guide
4.8 ATS-34 Operation Panel
KCU module used for connection
Configuration Parameter
Event Window
Operating Status
Genset-2
Readings
Genset-1
Readings
Remaining run time of current generator
(minutes)
Duty Cycle of current operating genset
Current operating genset
Glows red for Alarm
Genset-2 Connected
Mode Selection Button
Operating Mode Selection Buttons
AUTO mode
OFF mode
Bypass mode
Note: For the detail settings of the controller, please refer to ATS-34 user manual.
______________________________________________________________________________________
20
KCU Modules Software User Guide
4.9 ATS-PLC Operation Panel
ATS-PLC software interface is synchronized with the actual ATS-PLC controller. Therefore
the operation on communication software or directly on ATS-PLC is almost the same
except for some parameter settings.
4.9.1 OFF Mode
KCU module used for connection
Configuration Parameter
Connection status
Move your mouse here
to show the Connection
Information
Current Date and time
Warning Message
Display
Clock
Mode Selection Button
4.9.2 AUTO Mode
Normal source connected
Warning Message
Or Current Date and
Time display
Gauge display
Normal Source
Readings
Standby Source
Readings
______________________________________________________________________________________
21
KCU Modules Software User Guide
How to change the settings in Gauge display.
Normal source value in green box
Standby source value in blue box
Click to change between different phases.
(Remark)
Normal range area (Green)
Caution range area (Red)
Click to change the display sequence
Volt
Current
Frequency
Remark
3 Phase 3 Wire
3 Phase 4 Wire
電流
4.9.3 MANU Mode
Engine Start / Stop Button
Normal Source
Manually Start button
Normal Source
Readings
Standby Source
Manually Start button
Standby Source
Readings
______________________________________________________________________________________
22
KCU Modules Software User Guide
4.9.4 TEST Mode
Test with or without load selection
Test with Load
button
Test without Load
button
4.9.5 PROG Mode
To configure the system parameter, you must switch to OFF Mode before entering
Program Mode (PROG). Fail to do so the
button will not display and you won’t be
able to change the settings.
______________________________________________________________________________________
23
KCU Modules Software User Guide
4.9.6 EVENT LOG
When you click
button in OFF mode, it’ll popup a history of events
The most recent event
will be at the top
ATS-PLC is able to store
up to 40 events
4.9.7 Passcode Protection of System Parameter
Switch to OFF Mode and then click
butoon to enter Program Mode.
ATS-PLC provides the passcode protection to prevent unauthorized people to change
system parameters. It will not affect the operation of the controller.
If you enable the passcode protection function, you’re required to enter the passcode every
time you wish to enter Program Mode to system parameters.
.
ATTENTION!
If you enter incorrect passcode 3 times, the Program Mode will be locked and
you’ll have to contact KUTAI for an unloack code.
______________________________________________________________________________________
24
KCU Modules Software User Guide
How do I know the PROG Mode is already locked?
1.
Click
in ATS-PLC Operation Panel or click
to enter Program Mode.
2.
Click “Others”. If it’s locked, the Passcode field will show “PROG mode locked”.
How to unlock PROG mode?
When the PROG mode is locked, it’ll display an error message with a 4-digit Lock Code.
Contact KUTAI about this lock code to get an unlock code.
Click this button to enter
Unlock code
Note: For the detail settings of the controller, please refer to ATS-PLC user manual.
______________________________________________________________________________________
25
KCU Modules Software User Guide
4.10 GCU-100 Operation Panel Emergency Stop Button
KCU module used for connection
Configuration Parameter
Connection status
Event Window
Genset Status
AC Frequency
Controller Alarm status
Mode Selection Button
(Top) Maintenance Interval
(Middle) Run Time
(Bottom) Battery Voltage
Voltmeter
Ammeter
Operating Mode Selection Buttons
AUTO mode
OFF mode
Manual mode
:
Alarm Status LED Indicator:
High Temperature shutdown
(LED remains illuminated)
LED remains illuminated:Alarm active and engine shutdown
LED blinking: Warning ONLY. Engine will not shutdown
Note: For the detail settings of the controller, please refer to GCU-100 user manual.
______________________________________________________________________________________
26
KCU Modules Software User Guide
4.11 GCU-3000 Operation Panel
Emergency Stop Button
KCU module used for connection
Configuration Parameter
Connection status
Controller Status
Event Window
Run Time
Maintenance Interval
Battery Voltage
Genset Status
Coolant Temperature
Meter
AC Frequency
Oil Pressure Gauge
KVA Meter
Phase Voltage Meter
Line Voltage Meter
Ammeter
Operating Mode Selection Buttons
AUTO Mode
Engine Coolant Temperature ºC or °F
OFF Mode
Manual Mode
Alarm Status LCD Indicator
LCD remain illuminated:Alarm active and
engine shutdown
LCD blinking: Warning ONLY. Engine will not
shutdown
Oil pressure Reading psi or bar
Sensor Failed
(LCD illuminates)
Note: For the detail settings of the controller,
please refer to GCU-3000 user manual.
______________________________________________________________________________________
27
KCU Modules Software User Guide
4.12 AMF-10 Operation Panel
Emergency Stop Button
KCU module used for connection
Configuration Parameter
Connection status
Mode Button
Event Window
Run Time
Service Time
Battery Voltage
Genset Status
Source Selection button
and LED indicator
Controller Status
Mains Source Voltage Frequency Meter
Gen Source Ammeter
Gen Source Voltage Frequency Meter
Operating Mode Selection Buttons
AUTO mode
OFF mode
Manual mode
In TEST mode
Engine Start
Engine Stop
Connection Buttons and Status LEDs
Mains Source available
Mains Over Voltage
Mains Under Voltage
Mains Source Connection Status LED
(Illuminates: connected)
Mains Source Connect button
Gen Source Connection Status LED
(Not illuminated: Not connected)
Gen Source Connect button
______________________________________________________________________________________
28
KCU Modules Software User Guide
Controller Status LEDs
Emergency Stop Shutdown
(LED remains illuminated)
LED remains illuminated:Alarm active and engine shutdown
LED blinking: Warning ONLY. Engine will not shutdown
Note: For the detail settings of the controller, please refer to AMF-10 user manual.
______________________________________________________________________________________
29