1
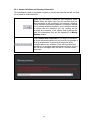
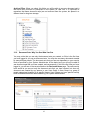
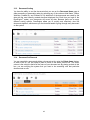
Thomson Reuters AccuDraft
DocsEngine©
End User Manual
Copyright 2012 Thomson Reuters
Table of Contents
Chapter I - System Overview ................................................................................................... 1
1.1
1.2
1.3
General System Overview ....................................................................................................................... 2
System Administrator .............................................................................................................................. 2
Getting Started ......................................................................................................................................... 2
1.3.1
1.3.2
1.3.3
System Access .......................................................................................................................... 2
Logon Procedure ...................................................................................................................... 2
Main Menu Overview................................................................................................................. 3
Chapter II - New Document Creation ...................................................................................... 7
2.1
2.2
2.3
2.4
2.5
2.6
Document Groups .................................................................................................................................... 8
Document Types ...................................................................................................................................... 9
Client and Document Association .......................................................................................................... 9
Document Method.................................................................................................................................. 10
Document Name ..................................................................................................................................... 12
The Interview .......................................................................................................................................... 13
2.6.1
2.6.2
2.6.3
2.6.4
Dynamic Interview Overview ................................................................................................. 13
Interview Navigation............................................................................................................... 14
Answer Preservation .............................................................................................................. 14
Answer Validation and Document Generation .................................................................... 15
Chapter III - Document Viewing ............................................................................................. 17
3.1
Document Home Page ........................................................................................................................... 18
3.1.1
3.1.2
3.1.3
3.1.4
3.2
3.3
Navigation ................................................................................................................................ 18
Document Sets: Why You See What You See ..................................................................... 19
Document Sorting ................................................................................................................... 20
Document Set Removal .......................................................................................................... 20
Document Search .................................................................................................................................. 21
Viewing Completed Documents ........................................................................................................... 23
Chapter IV - Document Management .................................................................................... 25
4.1
4.2
Home Page Details ................................................................................................................................. 26
Documents in the Set ............................................................................................................................ 26
4.2.1
4.2.2
4.2.3
4.2.4
4.3
Edit Document in the Set ....................................................................................................... 27
Changing Workflow Status.................................................................................................... 28
Moving Files on Document Set Page ................................................................................... 29
Deleting Documents on Document Set Page ...................................................................... 29
Details for This Set ................................................................................................................................ 29
4.3.1
4.3.2
4.3.3
4.3.4
4.3.5
4.3.6
Document Set ID ..................................................................................................................... 30
Ancillary Files.......................................................................................................................... 30
Document History and Notes ................................................................................................ 31
Download Answer File ........................................................................................................... 32
Answer Summary ................................................................................................................... 32
Notify User ............................................................................................................................... 33
Chapter V - Advanced Document Creation .......................................................................... 35
5.1
5.2
5.3
5.4
5.5
Creating Patterns ................................................................................................................................... 36
Creating Documents from a Pattern .................................................................................................... 37
Creating Documents from an Existing Answer Set ........................................................................... 37
Editing Patterns ..................................................................................................................................... 38
Modifying Existing Document Sets ..................................................................................................... 39
Thomson Reuters
AccuDraft
DocsEngine©
1
System Overview
1.1
General System Overview
Welcome to the DocsEngine system, the industry’s leading online document creation and
management tool. This User Guide will show you everything DocsEngine has to offer and
explain how it relates to your day-to-day operations. DocsEngine gives you the flexibility to
effectively create and manage documents from anywhere, at anytime. All you need is
access to the Internet. Because DocsEngine is a completely internet based system, there is
never any software to install on your computer. This means that there is nothing for you to
maintain or update. Documents are generated in either Microsoft Word (.doc) or Adobe
Acrobat (.pdf) format, which are the two most widely used document formats. This means
compatibility issues are eliminated. DocsEngine is the answer “When the Words Matter.”
1.2
System Administrator
Each account should have at least one DocsEngine© System Administrator who has
received additional training on the system. Support is always available from Thomson
Reuters AccuDraft by emailing [email protected].
1.3
Getting Started
1.3.1 System Access
To get started, open your Internet Explorer web browser and go to www.docsengine.com
and you will arrive at the system login page where you will be asked for your login
information.
1.3.2 Logon Procedure
You log on via a secure logon process. Your User ID is an email address and your
password will be assigned to you by your System Administrator. After specifying your email
address and assigned password, the system will verify your identity and take you directly to
the Document Home page. It is recommended that you do not allow Microsoft Windows to
remember your login information as this could allow another individual unauthorized access
to your DocsEngine account. It is also important to periodically change your password and
2
deactivate the accounts of terminated employees or employees who no longer need
access to the document system.
1.3.3 Main Menu Overview
After your login information is verified you will be taken to the Document Home page. This
is the central navigation panel that you will use to navigate through the DocsEngine
system.
Document Home: This icon in the upper left hand corner of the
webpage will take you to the Document Home page from any other
location in DocsEngine©.
Caution: If you are in the middle of entering data for a document and
select the Document Home icon, you will lose any data since the last
time you completed a save operation.
3
Across the center of the page you will see several icons. Below is a list of the icons and
their functions.
This icon navigates you to the Create Document screen. Select
this icon to create a new document.
This icon navigates you to the New Folder window. Select this
icon to create a new folder. Creating folders allows you to
organize documents based on client, type of document or other
naming conventions. You can create as many folders and
subfolders as you need.
This icon navigates you to the Edit Folder window. Select this
icon to change the name of a folder or to edit user permissions
(which defines what individuals can have access to a specific
folder).
This icon navigates you to the Delete window. Select this icon to
delete a folder or a document.
This icon navigates you to the Move window. Select this icon to
move documents into and out of different folders.
This icon navigates you to the Upload Ancillary File window.
Select this icon to upload outside documentation associated with
a document created within DocsEngine. Using this feature allows
you to use DocsEngine as a document management system.
The Resources dropdown menu allows you to link directly to
the Thomson Reuters AccuDraft website in order to retrieve
copies of IRS Opinion and Advisory Letters, Document
Checklists, and Base Plan Documents. You can also obtain
our support contact information as well as link directly to your
Thomson Reuters Checkpoint account.
4
This icon will navigate you to the Setup page. Your firm’s Thomson
Reuters AccuDraft products, user information and credit card
information (if applicable) are managed in this area. In addition, System
Messages alerting you to important information will be posted there.
This icon will navigate you to the Reports page. This is an advanced
option used if you have purchased report writing capabilities. For a
detailed explanation of the functionality of this feature please contact
Thomson Reuters AccuDraft Technical Support.
This icon will log you out of the system. Once you click this link, the
logout command will immediately be executed.
IMPORTANT: You will lose any data since the last time you completed
a save operation. Once logged out of the system, the only way to
regain access is to log back in. A detailed explanation of regaining
system access can be found in the "Logon Procedure" section of this
manual.
5
Thomson Reuters
AccuDraft
DocsEngine©
6
New Document Creation
2.1
Document Group(s)
Once you log into DocsEngine© using your personal log on information, you will see the
main Document Home screen.
To create a new document, select the New Document Icon. At the New Document screen,
you will be asked if you are creating a pattern. A pattern is a template in which you will preanswer certain questions that will be answered the same way for more than one document.
Creating a pattern will save time when you are completing subsequent interviews.
You will also be asked to choose a Document Group. A Document Group contains a logical
set of document types.
7
2.2 Document Type(s)
Once you have selected a Document Group you will be asked to select a Document Type
from a list of plan types. The plan types include the type of plan you wish to create (i.e.
defined benefit or defined contribution) as well as document formats (i.e. volume submitter
or prototype plan).
2.3 Client and Document Association
After you have selected the Document Type, you will assign a Client Identifier. You have two
options:
•
Create New – this will be selected if you are entering in a new Client Identifier.
•
Existing – this will be selected if you will be assigning a Client Identifier that is
already stored in DocsEngine©.
Create New. To create a new document for a client name not already stored in
DocsEngine©, select the Create New link and then type the name of the client in the Client
Name field.
8
Existing. If the document is being assigned to a client name that is already stored in the
DocsEngine© system, select the client name from the list that will populate to the right of the
field. You can use the Filter field to enter in all or part of the client’s name. You can limit
the number of returned names by selecting a quantity from the Quantity drop-down menu.
If you do not see any entries in the Existing Client dialog box to the right, then you must
select Create New.
2.4 Document Method
The next step is to select a Document Creation Method. You have four options:
•
From scratch
•
From a pattern
•
From an existing answer set
•
Upload answers from another answer file
Select one of the four links across the top of the screen. If you are creating the document from
scratch, you will be prompted to enter in a document name.
9
If you are creating this document from a pattern, you will be prompted to select a pattern from
the list that populates to the right.
If you are creating this document from an existing answer set, you will be prompted to select
an answer file from the list that populates to the right.
10
When you select the Upload tab and then select the Select icon, a window will open and
you can select the file you wish to upload there.
2.5 Document Name
After the Document Group, Document Type and Client Association have been specified,
you will name the document. You will see that the default name is a combination of the client
name–document type. You may change all or a part of the document name if you wish. The
identifying name does not need to be the same as the actual name of the document.
Now that the document has a name, you are ready to begin the interview. Select the blue
Start Interview button and the document interview will load so that you may begin answering
the questions.
11
2.6 The Interview
2.6.1 Dynamic Interview Overview
The questions that you will answer in order to assemble a document are arranged in what is
called a dynamic interview. This means that there is a very real possibility that each time you
create a document, the questions you are asked may be slightly different, or appear in a
different order. This is because questions are added to or removed from the interview based
on your answers to previous interview questions. This is what makes DocsEngine such a
versatile system, and also serves as an important validation. The language of a document
changes by just changing one answer in the interview. For a more detailed explanation on this
concept please consult your System Administrator.
12
2.6.2 Interview Navigation
There are several different navigation tools contained within the document interview. Each
navigation tool is explained in detail below:
Returns you to the first page of the interview
Returns you to the previous dialog screen in the interview.
Advances you to the next dialog screen in the interview.
Advances you to the last page of the interview.
2.6.3 Answer Preservation
There are two answer preservation options built into the DocsEngine system:
•
Save
•
Save Exit
If selected, all responses are saved in the DocsEngine© system and you
are returned to the point you were in the interview dialog. This
preservation option does not take you out of the interview. This is similar to
the save function in a Microsoft Windows based application.
If selected, all responses are saved and you are returned to the
Document Home page. This is similar to closing a document and
answering "yes you want to save your work" when exiting a Microsoft
Windows based application.
13
2.6.4 Answer Validation and Document Generation
The DocsEngine system incorporates a system of checks and balances that will not allow
you to create an invalid document.
When you are ready to create the final document, select
Finish. Select this option only if you are confident that you
have answered all the questions in the interview. Selecting
Finish executes a document validation. DocsEngine will then
run numerous validation checks on your submitted interview
to ensure that the document you are creating will be
accurate and complete. If the system finds questions that
were left unanswered, they will be displayed in a Missing
Answers window.
Select Submit with Unanswered if you have not answered
all of the interview questions but you would like to generate a
draft of the document. If selected, the document will be
compiled without any validation. There will be unanswered
questions in a prototype adoption agreement format, and you
will find error messages within the text of a contract format
document.
14
Thomson Reuters
AccuDraft
DocsEngine©
III
15
Document Viewing
3.1
Document Home Page
3.1.1
Navigation
In addition to the features discussed in "Main Menu Overview" section of this manual, there
are other navigation options that will assist in document management within the
DocsEngine© system. A description of the navigation options are described below.
Manage Files: Located on the left of the Document Home page you will see a Manage box.
These folders are where the names of document sets will appear after they are drafted and
the tab that they will remain under so long as you wish to have these documents editable. If
you have created subfolders, you will see those here as well.
16
Archived Files: When you select this folder you will be able to see any document set(s)
that have been archived or preserved on the system for later use. It is important to
remember that these document set(s) are not removed from the system, but placed in a
different view for long term storage.
3.1.2
Document Sets: Why You See What You See
You may notice that you see only the document sets you created, or if this is the first time
you have logged in you see no document sets. You may also see many documents created
by many different people. The document sets that you see are dependent on your security
level as specified by your System Administrator. At the basic level you will only be able to
see document sets that you have created, and consequently, if this is the first time you have
logged in, you will see no documents listed on the Document Home page. The next security
level would let you see not only the document sets that you have created, but also any
document sets created by any person in your User Group. A User Group is a group of
people categorized together for a specific reason. User Groups and your specific security
level will be determined and administered by your System Administrator.
17
3.1.3
Document Sorting
You have the ability to sort the documents that you see on the Document Home page in
either ascending or descending order by selecting any of the columns titled Name, Status,
Workflow, Created By, and Created On. By default all of the documents are sorted by the
date with the most recently created document displayed first. Each time you login to the
DocsEngine© system, your documents will re-sort by date. Because there are so many
different sorting options, DocsEngine allows you to quickly and effectively view like
documents together, which saves you the time and hassle of going through every document
on the system.
3.1.4
Document Set Removal
You can completely remove and delete a document set by using the Delete Items feature.
In order to do so, you first need to place a check in the action column box. The action
column is the column to the left of the name of your document set. By placing a check in this
box, you are notifying the system that you want to do something with that particular
document set or sets.
18
Once you have checked the box, then you need to click on the Delete Items icon. A Delete
box will then appear to verify your action and if you are sure that you want to delete the
selected documents, select Delete. Otherwise, select Cancel.
Once you select Delete, the checked document sets will be removed from the system. If you
need access to that particular document in the future, please contact Thomson Reuters
AccuDraft.
3.2 Document Search
The DocsEngine© system has a Search feature that gives you the ability to search by
keywords in your document sets. You may not need to use this feature if you have a small
number of document sets on the system. However, if you have a large number of document
sets, you can quickly see how useful this feature is. To complete a document search, click
on the Search icon below the Home icon on the Document Home page and then enter
your search data.
19
Upon completion of the search the system will automatically close the document search
window and display the results on the Search Results page. If your document search does
not return any results, the system will display No Items Found in the Document Search
window. To close this window and start another search, select the X in the top right hand
corner of the window and repeat the three-step process outlined above.
20
3.3 Viewing Completed Documents
Under Documents in the Set, you will see a link or set of links for each document in your
document set. Based on your Security Level as specified by your System Administrator, you
will either see a link to access the Microsoft Word (.doc) version of the document and a link
to access the Adobe Acrobat (.pdf) version of the document, or you will only see a link to
access the Adobe Acrobat (.pdf) version.
When you select the link for the desired document format, a new window will appear that will
allow you to either open the assembled document or save a copy of the assembled
document to your computer. Repeat this process for each document in your document set
and/or for each document in another document set.
21
Thomson Reuters
AccuDraft
DocsEngine©
22
Document Management
4.1
Home Page Details
On the Document Home page, the document set names in the Name column are
hyperlinks. When you click on the link, you will be taken to the document set and Details
page.
4.2 Documents in the Set
When you open a document set, you will see a heading Documents in the Set. Here you
will see all of the documents created by your interview. This may include:
•
a plan document
•
summary plan description
•
ancillary forms
•
amendments
23
There is a link to each document where you can view the document in its original format or
create a pdf document.
4.2.1
Edit Document in the Set
Select this icon to change the document name, add a description, select a different client
name or update the Workflow Status. (See more on the Workflow Status in Section 4.2.2).
Changing the name of the document or any other information DOES NOT affect the content
of the assembled document(s) or answer file.
Once you make your changes, save the changes by clicking the blue Save button.
24
4.2.2
Changing Workflow Status
As discussed in Edit Document in the Set, you can change the Workflow Status by clicking
on the Edit icon. The Workflow Status dropdown menu contains a list that identifies the
different phases in which a Document Set could currently be—
•
Drafted
•
Sent to Client
•
Signed by Client
•
Submitted to IRS
•
Received Determination
After you click on the Edit icon, the Edit window will appear and you can make your
selection under the Workflow Status dropdown menu. Once you make your selection,
save the change by clicking on the blue Save button.
The Edit window will close after you save your changes. The Workflow column on the
Document Home page will now reflect the current Workflow Status of a particular
document set. If no Workflow Status has been specified for that document set, nothing
will appear in the Workflow column. Keep in mind that it is up to you to change the
status throughout the life of the document. The system will NOT change the status
automatically each time you modify the document.
25
4.2.3
Moving Files on Document Set Page
As discussed in Main Menu Overview, you can select the Move icon to move a document in
and out of folders, and you can do so from the Document Home page or the Document Set
Page.
4.2.4
Deleting Documents on Document Set Page
Select the Delete icon to delete a document set from DocsEngine.
4.3 Details for This Set
Under the Documents in Set, you will see three tabs, Details, Ancillary Files and History.
26
4.3.1
Document Set ID
Under the Details for This Set, you will see the Document Set ID. The Document Set ID is a
unique ID that is assigned to each document set when it is created on the DocsEngine
system. This ID can be helpful should you ever need to contact Thomson Reuters AccuDraft
Technical Support. By supplying your Technical Support Representative with the Document
Set ID, it will greatly assist him or her in isolating your technical issue and increase the
speed at which your issue is resolved.
4.3.2
Ancillary Files
You have the ability to upload ancillary documents from the Documents in Set page. As
discussed in Chapter II, select this feature to upload outside documentation associated with
a document created within DocsEngine.
27
4.3.3
Document History and Notes
DocsEngine automatically records events as they happen with respect to a particular
document set. This feature is called the History for This Document Set. The history for a
particular document set is broken down into the Activity, User, Date, and Note columns.
Some of the different activities that you may see listed are: Interview Started, Interview
Edited, Interview Completed, or Note. All of the previously listed activities are system
generated with the exception of the Note activity.
The Note activity is a brief message that is entered into the system by the user for
communication with other users about this document set.
To enter a note into the system, select Add and type your message in the Note window
that appears. Once you have completed your note, select Save and your note will be added
to the Document History. The system will automatically capture the time and the user who
entered the note and display that in the table as well.
28
4.3.4
Download Answer File
You can download your DocsEngine answer file to your own computer. This is an
advanced option and will only be used in the event that you have a version of HotDocs
offline or another form of software that is compatible with XML files. To download an
answer file, click on the Download Answer File icon and you will be prompted to Open or
Save the answer file.
4.3.5
Answer Summary
Once you have completed the interview and the documents have been generated, you can
create an Answer Summary. The Answer Summary consists of a list of the questions in the
interview and your answers to those questions. You can elect to have the list include only
the questions in the interview that you answered and are specific to your plan, or you can
specify that the list include all questions in the interview as well as the answers to the
questions that you did answer. To generate an Answer Summary, click on the Answer
Summary icon which is located just under the Details for This Set. Two links will appear:
Show only answered questions and Show all.
29
4.3.6
Notify User
Next to the Answer Summary icon, you will see a Notify User icon. This feature can be
used to notify another user via e-mail of the status or other information about this specific
document. To use this feature, click on the Notify User icon, select a Recipient from the
dropdown, and then enter your comments in the box.
30
Thomson Reuters
AccuDraft
DocsEngine©
31
Advanced Document Creation
5.1
Creating Patterns
A pattern is usually created with the intention of answering certain questions in a document
interview that will remain constant for a long period of time. You might create a pattern file if
you have 100 documents to create and many of the provisions in the documents are
common. With a pattern, you can input the common information one time and create your
100 unique documents based off the one single pattern. Each time you choose to create a
document using a pattern, any elections that you pre-specified will automatically be merged
into the document interview.
Creation of a pattern is very similar to creating a new document. From the Document Home
page, select New Document. On arriving at Step 1, you will be asked to select a Document
Group just as if you were creating a new document. Above the document groups, you will
see a box with the words "I want to create a pattern" next to it. After checking this box, you
will complete the interview process just as you would if you were creating a new document.
The biggest difference between creating a pattern and creating a new document set is
that there is NO validation in the pattern interview. When creating a new document set,
unless you Submit with Unanswered questions, the system will not allow you to
assemble if there are questions that have been left unanswered. In a pattern interview,
the system will allow you to Finish with as many or as few answers specified as you wish.
32
5.2 Creating Documents from a Pattern
The patterns you create will display on the Document Home page along with your
document set files, but in the Status column, instead of seeing the status of your documents
in set, you will see the word Pattern. To create a document using a pattern, select New
Document and begin supplying the appropriate information as described in the "New
Document Creation" chapter of this manual. When you get to Step 4, you will select “From a
Pattern”, select a pattern from the list to the right, and then complete the interview process just
as described in “New Document Creation”.
5.3 Creating Documents from an Existing Answer Set
Creating documents from an existing answer set is very similar to the concept of creating
documents from a pattern. The difference is that creating documents from an existing
answer set means that you are creating this document based on a previously created
document instead of a pattern. You might use this feature if you are creating multiple
documents for the same client. All of the company information for that client may be the
same and you will not have to re-enter that information for subsequent documents. The
primary difference between using an existing answer file rather than a pattern is that ALL of
the answers in the existing answer file will appear in the interview and only the preanswered questions in the pattern would appear when using that method.
To create a document using an existing answer set, select New Document and begin
supplying the appropriate information as described in the "New Document Creation" chapter
of this manual. When you get to Step 4, you will select “From an Existing Answer Set”,
select an answer file from the list to the right, and then complete the interview process just as
described in “New Document Creation”.
33
5.4 Editing Patterns
If you need to change an answer or add more information to an existing pattern, you can do
so by first clicking on the name of your pattern, which is a link in the Name column of the
list of your files on the Document Home page.
34
When the next window opens, you will see the Edit Pattern button. When you click on the
Edit Pattern button, the system will load the pattern interview and allow you to make any
changes or additions that you deem necessary. Once you are satisfied with the
modifications you have made to your pattern, select Finish and your changes will be saved.
The next time you create a document using this pattern, any modification you made will be
reflected in the new document.
5.5 Modifying Existing Document Set(s)
If you need to change an answer or add more information to an existing document, you can
do so by first clicking on the name of your document set, which is a link in the Name
column of the list of your files on the Document Home page. Below the document set
name you will see either a Redraft Document button or a Continue Interview button. If the
document set has been completed and you have accessed the assembled document(s), the
button will say Redraft. If the document set is not complete, the button will say Continue
Interview. In either case, to modify the document set, select the button that is directly below
the document set name. The system will load the interview and allow you to make any
changes or additions that you deem necessary. Once you are satisfied with the
modifications you have made, select Finish, your changes will be saved, and the assembled
document will reflect all of the changes.
35
36