1
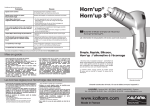
Operational problems
Problem
Cause
Continuous audible signal
Internal temperature higher than 60°C (140 °F)
Heating wire (Item 1) not mounted or badly mounted
Continuous audible signal and indicator light
(Item 6) glows red
Empty battery or Ambient (surrounding) temperature is too low.
Indicator light (Item 6) blinks green, battery
just charged
• If your device is new, this is normal and should disappear after
green, battery just 2 battery charge / discharge cycles.
• Your battery is at the end of its service life and you should
return the device to be repaired
There is no audible signal and no indicator
light comes on when the ON button (Item 5)
is depressed
• Your battery is completely discharged; recharge it for 16 hours
• You have not disconnected your charger or removed the
safety pin ( Item 11 )
Warning light Rep 6 is red
The device is on safety mode and wait until the red light turns
off.
The head heats permanently, even when the
ON button (Item 5) is not depressed
The device is faulty; wait for the battery to discharge ( about 20
minutes ), placing the device in an area where there is no fire
hazard, then return it to After Sales
The indicator light (Item 7) glows red
The ambient temperature is outside the limits < 0 or > 25°C
(< 32° F or > 77° F) or the battery is faulty
The indicator light (Item 7) does not light up
Your charger is not correctly connected or faulty
Horn’up®
Horn’up S®
GB Horn’up et Horn’up S Dehorners
Guarantee and Instruction Manual
PLEASE READ THIS ENTIRE MANUAL CAREFULLY BEFORE USING THE DEVICE.
Should you have any questions, please contact us on our website www.kalfarm.com
Warning
• Keep the device out of the reach of children.
• Do not immerse the device in water.
• Do not put the device in the fire or place it on a hot
surface above 40°C (104 °F).
•Do not place the head of the device against skin, even
when it is charging.
• Do not place the device in the mouth, even when it is
charging.
• Do not hold the device by its head, even when it is
charging.
•Improper use or misuse or abuse may lead to severe
burns [Temperature at the end of the device >700°C
(> 1292 °F)].
•Failure to follow the instructions will invalidate the
guarantee.
•Do not throw the device in the dustbin. It contains
batteries that must be discarded in compliance with
the rules in force.
•This device is neither a toy nor a tool that can be di
verted from the use for which it is made. It must
be used exclusively for the dehorning of cattle. Our
company cannot be held liable for any other use of the
device.
•This appliance is not intended for use by persons (inclu
ding children) with reduced physical, sensory or mental
capabilities, or lack of experience and knowledge,
unless they have been given supervision or instruction
concerning use of the appliance by an adult res
ponsible for their safety. Children should be supervised
to ensure that they do not play with the appliance.
How to dehorn animals correctly
• The purpose of this device is to stop the growth of the
horn bud by cauterization the blood vessels around it. It
is imperative to cauterize before any growth of the
horn's bud, consequently between 5 and 20 days.
• Head has to be well restrained. Head moving will not
allow a uniform cauterization around the horn bud. Depending of the legislation of your country, general
and/or local anesthetics could be used.
• Shear around the horn bud before dehorning :
- to see it clearly,
- to avoid getting hairs in the wound that may cause
infection,
- to avoid having areas that are not sufficiently burnt due
to too many hairs,
- to clearly see the quality of the cauterization.
• Make a regular circle around the bud to cauterize blood
vessels that feed the bud.
• Do not try to remove the horn bud.
• A even circle of cauterization will ensure the Horn bud
to stop growing. You must check the quality of the
cauterization: you need to check if there is a white
membrane (whit tissue) called Periost 4 to 5 mm (0.16"
to 0.19") deep all detached from the horn bud. We
strongly suggest to go to our demonstration video at
www.kalfarm.com
•Immediately after the operation, apply a disinfectant spray.
The spray has two effects:
- It cools the wound.
- It prevents subsequent infection.
• Make sure that the spray penetrates right into the
wound.
Simple, Quick, Efficient,
Horn’up : the alternative to dehorning
This disbuding device is handy, the temperature
and the cycle are being managed automaticly. This
management guarantees a disbuding by cauterization
of the blood vessels without any danger for the animals
and maximum success.
The battery fully charged will allow you to cauterize up
to 80 calves for the Horn'up and up to 10 calves for the
Horn'up S.
• Serial number
24 months warranty / In the event of a fault, please return the unit to :
KALFARM - Service SAV - BP 70062 - 86300 CHAUVIGNY - France
Tel. +33 (0)5 49 30 43 05 - Fax : +33 (0)5 49 30 43 09 - [email protected]
Use
11
Before dehorning (disbudding) in cold temperature, always keep (store) your unit in a room where the temperature is above 10°C (50°F)
Charging the battery
9
1
4
2
10
3
9
8
5
The indicator light glows steady green.
Your battery is being charged
The indicator light blinks green
Your battery has finished charging
The indicator light glows red
The ambient temperature is outside the limits < 0°C or
> 25°C ( < 32° F or > 77° F) or the battery is faulty
The indicator light does not light up
Your charger is not correctly connected or faulty
Before the first use, you must charged the Horn'up without any
interruption until the green light is blinking. To ensure optimum
battery longevity, you must discharged (empty) and charge
up the battery several times.
6
To charge the battery :
• Make sure you are in a cool, dry place, away from inflammable products.
• Remove the rubber cap, Item 9.
• If using the device for the first time, remove Item 11 by
inserting the hex key in the hole and then pulling ( Keep Item
11 in case you need to return the device ).
• Connect the charger plug into Item 8.
• Power up the charger.
• Once the battery is charged, remove the charger and put
cap ( Item 9 ) back in place.
7
The table shows the colour of the battery state-of-charge
indicator light ( Item 7 ), according to the battery charge status.
This Device is patented. The model and the brand have been registered
Description of the device ( See Drawing 1 ) :
• Item 1 : Heating wire
• Item 2 : Fixing screw for heating wire
• Item 3 : Ceramic head
• Item 4 : Ventilation inlet
• Item 5 : ON Button
• Item 6 : Operation and battery charge indicator light
• Item 7 : Battery state-of-charge indicator light
• Item 8 : Battery charge jack
• Item 9 : Protective cap
• Item 10 : Connection clamp for heating wire
• Item 11 : Safety pin for transport
Safety - Storage
To ensure user safety, as well as the optimal service life and
operation of the equipment, the following rules must be
respected :
•Before using the device, please read the instruction manual.
•Before using the device, recharge it as described in the chapter
on Using/Charging the battery.
•The battery must be stored and charged in an environment
where the temperature is between 0° and 25°C (32° and 77°F).
•Keep the device away from any sources of heat.
•The battery must be stored and charged in a dry environment,
away from any flammable material. When connecting, make
sure that the device and the plug are dry.
•The device must be kept dry and protected from impacts and
liquid splashes.
•Do not melt anything on the heating head. Before use, check
that the head is not obstructed by any obstacle.
•The device must be kept out of the reach of children or adults
who will not be using the device.
•The device must be used exclusively for dehorning cattle
under the conditions prescribed by the standards, guidelines or
recommendations in this area.
Contents :
• 1 Dehorner.
• 1 Battery charger - 6.0 V / 1 A.
• 1 User manual.
• 1 Hex key (for removing the head).
For a complete charge of the battery before using the device for the first time, you must charge up the battery without any interruption until the green light is blinking, Rep 7.
It is possible the light-Rep 6 is blinking after the battery has
been discharged (empty) and recharged after several times.
This is normal.
Dehorning operation
Before carrying out this operation, make sure you have
respected all the rules in force. To ensure the quality of your
operation and best protect the animal, we advise you to
respect the rules given in the paragraph « How to dehorn
animals correctly ».
Failure to follow these rules will
invalidate the guarantee.
•Improper use or misuse or abuse may lead to severe burns
[ Temperature > 700°C (1292 °F )].
•Never place the heating part on a metal part.
•Never place the heating part on a flammable part.
•Never place the heating part on skin or hold it in your hand or
place it in your mouth.
• If the device has been used, the heating head remains hot, even
when it is turned off, and can cause severe burns.
•Do not use the device if the heating wire is damaged, in
particular if it has been crushed or cut.
•Worn parts must only be replaced by genuine parts.
•Never open the device; give it to a licensed repair shop.
• Never fully discharge the battery. In case of prolonged storage
without use, recharge the battery every 6 months.
•Do not throw the device in the dustbin. It contains batteries that
must be discarded in compliance with the rules in force.
Procedure :
• Place the heating part ( Item 1 ) on the base of the horn bud.
• Press the ON button ( Item 5 ) and hold the button down
throughout the entire operation.
• An audible signal of severals short beeps and the Indicator
light (Item 6) indicate that the cycle has started.
• After 2 to 3 seconds, rotate the device 45° two or three times
to obtain a regular cauterization circle.
• An audible signal of continuous short beeps indicates that
the operation has finished after about 7 seconds for the
Horn'up and about 10 seconds for the Horn'up S.
• Release the ON button (Item 5).
• The audible signal stops and the indicator light switches off.
Never place the heating part on a metal part.
Rules for use and malfunctioning
By design, this device is protected against misuse.It is limited
if the number of cycles are too close to each other. It is also
protected against untimely depressions on the ON button
(Item 5). If it is depressed too often, it goes into safety mode
and starts up again after several minutes.
If the heating wire is damaged or badly connected, a continuous
beep is emitted when the ON button is depressed. Check the
condition of the wire and change it if necessary. Check that the
connecting screws ( item 2 ) are correctly tightened. Check that
the part in contact with the heating wire is not oxidized.
In case of overheating inside the device, it switches to safety
mode and the cycle cannot be run. Wait until the internal
temperature is normal again before using the device.
Important: If the device repeatedly overheats, stop using
it and send it to be repaired.
The indicator light ( Item 6 ) shows the battery charge:
• Glows steady green, the battery is fully charged.
• Blinks green, the battery is a quarter charged.
• Glows red, the battery is discharged and you must not use
the device.
Maintenance
Important: never use liquid to clean the device. It must be
protected against any liquid splashes. Never place the heating
part on a metal part.
Battery
To optimise the service life of your battery, it is essential to
respect the following rules :
• Never fully discharge the battery.
• Never store your device with the battery discharged.
• In case of prolonged storage without use, recharge the
battery every 6 months.
• If possible, store your device in an environment between 10°
and 20°C. (50°F and 68°F)
The head
Before storage, you are advised to remove the dirt
accumulated in
the head ( Item 3 ) with a small brush once the head is cold.
If the heating wire (Item 1) and/or the ceramic head ( Item 3 )
are damaged, they must be changed. To do this :
• Put the safety piece ( Item 11 ).
• Remove the 2 screws ( Item 2 ) with the key provided for that
purpose.
• Remove the heating wire ( Item 1 ) (You may also use flat
nose pliers to pull it out but never use an object that may
damage the wire or the ceramic head).
• Remove the ceramic head ( Item 3 ).
• Clean the 2 clamps ( Item 10 ) carefully with a brush and if
necessary with extra fine sandpaper.
• Install a new ceramic head ( Item 3 ).
• Install a new heating wire ( Item 1 ) without using any tools.
• Put the 2 screws ( Item 2 ) back in place with the special key
( do not use screws that do not comply with the original
screws (Stainless steel A2 socket head cap screw, M2.5 x 6 )).
• Remove the safety piece (Item 11).