1
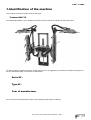
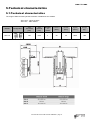
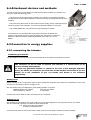
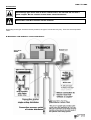
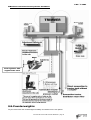
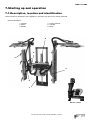
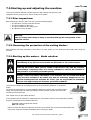
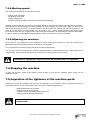
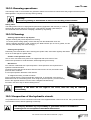
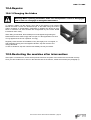
User and Maintenance Manual
HM 170
Trimmers
Purpose of the instruction manual
Utility of the manual
This instruction manual contains all the information required to operate, handle, adjust and maintain your machine
correctly and safely.
Read it carefully and follow all the instructions and advice concerning your safety.
The time you spend reading this manual will be time saved when you first use the machine. If, however, you are still
in doubt, contact our technical support department.
Warning symbols
This warning symbol appears for messages that are important for your personal
safety. When you see this symbol, beware of the potential risks of injury, read the
message carefully and inform other users.
This warning symbol appears for messages that are important for ensuring your
equipment functions properly and avoiding damage to it. When you see this symbol,
read the advice carefully.
Safekeeping
• Keep the instruction manual within reach at all times in your place of work or in the place where the
equipment is being used.
• Give to it anyone who uses the machinery, including when you resell or lend it.
• Keep the instruction manual in a place where you can find it easily.
Useful address
For all information or explanations regarding these instructions, please contact or write to:
Kverneland Group France S.A.S
Division VITI-GREGOIRE,
Chateaubernard
16111 Cognac Cedex
Tél. +33 5 45 82 23 49 – Fax +33 5 45 82 94 43
User manual Trimmer HM170 BL071GBG0206 – page 2
Contents
1
Identification of the machine
1.1
Declaration of EC conformity
p5
p.6
2
Intented conditions of use
2.1
Qualification of the operator
2.2
Definition of workstations
2.3
Surrounding conditions
2.4
Responsibilities of the manufacturer and the user
p.7
p.7
p.7
p.7
p.8
3
Safety rules
3.1
General
3.2
Personal protective equipment
3.3
Driving on public roads
3.4
Warnings / pictograms
3.5
Blocking and jamming
3.6
Linkage attachment
3.7
Maintenance and repairs
3.8
Spare parts and accessories
3.9
Warranty procedure
p. 9
p. 9
p. 9
p. 9
p.10
p.10
p.11
p.11
p 11
p 11
4
Environmental protection
4.1
Storage and removal of waste (pollutants)
p.12
p.12
5
Technical characteristics
5.1
Technical characteristics
5.2
Hydraulic characteristics
5.3
Sound level at the workstation
5.4
Vibration levels at the workstation
p.14
p.14
p.15
p.15
p.15
6
Assembly and installation
6.1
Taking delivery of the machine
6.2
Qualification of the operator
6.3
Surrounding conditions
6.4
Attachment devices and methods
6.5
Connection to energy supplies
6.6
Counterweights
p.16
p.16
p.16
p.16
p.17
p.17
p.19
7
Starting up operation
7.1
Description, location and identification
7.2
Settings
7.3
Starting up and adjusting the machine
7.4
Stopping the machine
7.5
Inspection of the tightness of the machine parts
p.20
p.20
p.22
p.23
p.24
p.24
8
Transport and movement
8.1
Transport position
8.2
Driving on public roads
8.3
Operating position after transport
p.25
p.25
p.25
p.25
User manual Trimmer HM170 BL071GBG0206 – page 3
9
Handling
9.1
Lifting
p.26
p.26
10 Maintenance and repairs
10.1
Qualification of the operator
10.2
Maintenance guidelines
10.3
Types of maintenance operations
10.4
Repairs
10.5
Restarting the machine after intervention
p.26
p.26
p.26
p.26
p.28
p.28
11 Cleaning
11.1
Where to clean the machine
11.2
Wearing of individual protective equipment
11.3
Cleaning method
11.4
Type of cleaning products
11.5
Inspecting the machine after cleaning
p.29
p.29
p.29
p.29
p.29
p.29
12 Removal and long-term storage
12.1
Prior maintenance
12.2
Removal and storage conditions
12.3
Periodic checks during storage
12.4
Restarting the machine after storage
p.30
p.30
p.30
p.30
p.30
13 Dismantling and disposal
p.30
14 Alphabetical Index
p.31
User manual Trimmer HM170 BL071GBG0206 – page 4
1.Identification of the machine
The machine to which this guide refers is of the type:
Trimmer HM 170
The identification plate for your equipment is located on the machine as indicated on the photo below:
To make it easier to obtain information or after-sales service, we suggest that you write the indications engraved on
the EC identification plate in the space provided below:
Serial N°:
Type N°:
Year of manufacture:
Do not remove the manufacturer's plate or CE markings riveted onto the machine.
User manual Trimmer HM170 BL071GBG0206 – page 5
1.1. Declaration of EC conformity
In accordance with the EC directive 89/392/EC and later modifications:
We the undersigned: Kverneland Group Bordeaux;
Declare under our responsibility that the machine described hereunder:
Type N°:
Serial N°:
Conforms with the safety and security and health requirements, including EC directive 89/392 and later
modifications of the EC directives:
NF
NF
NF
NF
EN 1553
NF EN 292-1
EN 294
FD ISO 11684
P98-792 (as a recommendation)
EN 745
NF P98/794
NF EN 292-2
NF EN 982
NF P98-780
Made in Saint-Loubès, on:
The Technical Director:
User manual Trimmer HM170 BL071GBG0206 – page 6
2.Intended conditions of use
2.1.Qualification of the operator:
The machine may only be used, maintained and repaired by persons who know its particular characteristics well and
who know the corresponding safe operating modes.
Before using your trimmer, familiarize yourself with all the operations and settings you may have to perform in your
work.
As the ability to drive a tractor is subject to work regulations, the user of the machine must first ensure that he/she has
the required qualification.
2.2.Definition of workstations
During operation, the user is positioned in the driver's cab of the tractor, and must always keep to the following
guidelines:
Never leave the driver's cab when the tractor is in operation.
No person other than the user may position themselves on or near the tractor or the machine coupled to the tractor.
The indications LEFT-HAND SIDE and RIGHT-HAND SIDE are to be understood with the user seated in the driver’s
cab, tractor moving forwards.
2.3.Surrounding conditions:
2.3.1.Work on sloping or bumpy ground:
In such conditions, keep to the following guidelines:
• If the tractor or trimmer lacks stability, do not use the equipment.
• Adapt your speed and driving style to the terrain and to the state of roads or tracks. Be vigilant and careful.
• Always drive slowly, particularly on sloping or bumpy ground and especially on bends, and avoid sharp changes
in direction.
• Do not stop or start suddenly when going up or down slopes.
2.3.2.Lights, night-time work:
Your equipment is to be used on tracks or public roads, and must therefore be fitted with adequate signalling devices
(rotating light, flashing light) in accordance with the Highway Code regulations. For all information regarding this point,
contact your dealer.
Your equipment should be used in daylight or with good artificial lighting. It may not be used in conditions of
insufficient light, particularly where obstacles cannot be seen.
User manual Trimmer HM170 BL071GBG0206 – page 7
2.4.Responsibilities of the manufacturer and the user
2.4.1.Manufacturer:
As the manufacturer, we are committed to delivering machinery that corresponds to the purpose for which it is
designed and presents good working safety. We are also bound to the guarantee conditions as described at the
end of this manual.
2.4.2.Dealer:
For the assembly, installation, electrical connections and commissioning, we rely on our network of dealerships or
agents, all of whom have been chosen for their professionalism and competence. As professionals, our dealers are
obliged to mount our machinery in compliance with the state of the art and the safety regulations.
2.4.3.User:
The use and operation of the machinery is subject to legislation and may only be performed by persons legally
authorised to do so (age, training, etc.….).
The user must follow the following recommendations:
Comply with all the installation, operation, setting, maintenance and repair instructions in this manual.
Use only the spare parts and accessories that conform to our recommendations.
Do not modify or have someone else modify your machine and its accessories (mechanical, electric and hydraulic
characteristics) without first requesting our written agreement.
Non-compliance with these rules may make your machine dangerous. We may not be held responsible in the event
of damage or injury.
User manual Trimmer HM170 BL071GBG0206 – page 8
3.Safety rules
The machine is a rotating tool and as such is dangerous. Be careful at all times.
3.1.General
The other chapters in this instruction manual give further safety indications that you should also keep to in your own
interest. Remember that vigilance and prudence are the watchwords of safety.
At all times you must observe the safety and accident-prevention rules and regulations, as well as those concerning
occupational medicine, environmental protection and road traffic.
When starting up the machine and during operation, make sure that no person, animal or obstacle is near the
machine.
Never come within the trajectory of the machine.
Never attempt tests on the cylinders when the machine is turning.
Do not introduce branches or other objects by hand when the machine is turning.
Always keep children away from the machine.
Never transport passengers on the machine.
Before any maintenance or repair, ensure the machine is off and cannot be switched on accidentally.
All remote controls (electric cables, hoses, etc.) must be put in the correct places to ensure they do not accidentally
trigger a dangerous manoeuvre.
Before use, check the tightness of screws, bolts and connections. Tighten if necessary.
Before use after each adjustment or maintenance, ensure all protective devices are in place and in good condition,
and that their locks are on.
Make sure the plot of land does not contain debris (stone, wood, metal, plastic, fencing, etc.) or holes that may cause
damage to the machine.
Never put your hands, arms or feet near parts in movement, even when they are moving slowly. Keep your distance.
Whenever you hear a noise or feel an unusual vibration, switch off the machine, look for and remove the cause of the
incident before restarting work. Call your agent if necessary.
3.2.Personal protective equipment
It is imperative to wear protective headphones during work and to remove them when driving along roads.
3.3.Driving on public roads
Before taking the machine on public roads:
• The use and operation of the machinery is subject to legislation and may only be performed by persons legally
authorised to do so (age, training, etc.….).
• Place the machine in transport position in accordance with the manufacturer's indications
• Check the braking devices of the tractor are in good working order.
• Check the signalling and lighting devices (lights, reflectors, etc.) are clean, correctly in place and in good
working order
• If the machine hides the tractor’s lights or signalling devices, make them visible again either by displacing them
or adding equivalent devices to the machine (lighting ramp, additional registration plate, etc.).
• On public roads, comply with the highway code.
• Respect the maximum allowable dimensions (width, height, length). If these dimensions are exceeded, comply
with the regulations in force regarding wide or dangerous loads.
• Respect the maximum axle load and the total authorised travelling weight. Make sure the load on the front axle
is never lower than 20% of the empty tractor weight. If necessary, put in place front weights.
• Keep to the authorised speed limit.
User manual Trimmer HM170 BL071GBG0206 – page 9
3.4.Warnings / pictograms
The stickers affixed to the machine give indications of the security measures to be strictly observed, and are there
to help prevent accidents.
Keep these stickers permanently clean and visible. If they suffer from wear and tear, ask your manufacturer (or
dealer) for new ones.
When undertaking repairs, make sure the spare parts bear the same stickers as the original parts.
Ejection or projection of objects: entire body
exposed.
Keep a safe distance away from the
machine.
Wait for all the elements of the machine to
come to a complete stop before touching them.
Consult the technical manual to find out about
maintenance procedures.
Risk of fingers or hands being cut.
3.5.Blocking and jamming:
If you use your machine in vegetation that is too thick or too wet or if you drive too fast, the machine may jam. This
leads to the tractor engine losing power and to the shredding being of poor quality at the output. The discs must never
lose speed.
3.5.1.As soon as it jams:
• Reduce the driving speed of the tractor.
3.5.2.If the jamming persists:
• Stop the machine
• Wait for all the moving parts to come to a complete stop
• Stop the tractor
• If the jamming is caused by vegetation, unblock by reversing the rotation direction using the electric control.
• It the jamming is caused by metal objects (wire, fencing, etc.), take the machine to a washing area, put on
protective gloves (the objects are usually very sharp), and unblock it using pliers or other tools to cut the objects
from the rotor.
User manual Trimmer HM170 BL071GBG0206 – page 10
Warning:
Never leave the machine raised or pass underneath it to unblock it
After a full clean, check the condition of the cutting parts and protective devices. Repair if necessary, and then you can
restart your machine.
3.6.Linkage attachment:
Do not position yourself between the tractor and the machine before first putting on the tractor's parking brake. The
machine may only be coupled onto the linkage points intended for this purpose on the tractor.
Ensure that coupling the machine does not cause an overload or a disproportionate distribution of weight likely to
compromise stability:
Do not exceed the maximum allowable load on the linkage points.
If necessary, put counterweights on the supports designed for this purpose, in accordance with the recommendations
of the tractor manufacturer.
3.7.Maintenance and repairs:
Maintenance and repair operations may only be carried out by qualified persons.
• Always keep the machine and its accessories in perfect working order.
• Stick to the maintenance frequency cycle.
• Use original parts.
Before any intervention:
• Put the machine start-up control in neutral
• Wait for all moving parts to come to a complete stop
• Place the machine on the ground
• Put on the handbrake / parking brake
• Disengage the drive mechanism of the machine
• Switch off the engine
• Open the drain tap on the opening unit
3.7.1.Welding operations:
Welding to strengthen the machine or to add metal parts is prohibited without our prior written authorisation.
During authorised welding operations, disconnect the electric control power supply and the tractor battery.
3.7.2.Hydraulic interventions:
For the correct working of the machine, it is essential for all interventions on the hydraulic circuit to be conducted in
perfect conditions of cleanliness.
Before interventions on the hydraulic circuit, switch off the tractor PTO.
Ensure the installation is not under pressure. Release the pressure before disconnecting the hydraulic hoses, using the
thumbwheel on the machine (drain tap).
Do not attempt to find a hydraulic oil leak (under pressure) with your fingers.
Before re-establishing pressure in the hydraulic circuit, ensure all the connections are correctly tightened.
User manual Trimmer HM170 BL071GBG0206 – page 11
3.7.3.Repairs:
You must use original parts.
You must remove any problem likely to compromise safety.
Have any leak or incident in the hydraulic circuit repaired.
Defective or damaged protectors must be replaced immediately. Never remove or modify an original protector fixed
onto the machine.
Ensure that hoses do not come from hosing that has already been used in a circuit. Rigid tubes must never be
welded. When a hose or a rigid pipe is damaged, it must be replaced immediately
3.8.Spare parts and accessories
It is important to use original spare parts. Dealers supply these parts and can advise you on how to mount and use
them. These original parts are designed for your machine. Spare parts of any other origin may have negative effects
on the machine and affect your safety. Only original parts are covered by your warranty.
NB: Kverneland Group France SA declines all responsibility in case of damage caused by the use of nonoriginal spare parts or accessories and reserves the right to suspend the warranty.
When making any request for information, ordering parts or requesting intervention, please specify the type and serial
number of the machine.
3.9.Warranty procedure
Your machine is protected by the contractual warranty with your dealer or importer and by the legal rights in force. The
warranty only applies of the parts are defective and the machine is used under normal conditions and maintained in
accordance with the instructions in this manual.
Correct commissioning on the user’s premises and regular maintenance will contribute to preventing breakdowns. If,
however, there are operating problems during the warranty period, proceed as follows:
- Immediately inform your dealer, indicating the type and serial number of the machine.
It is important not to wait, even of the defect is covered by the warranty. The warranty may not be valid if the repair
is not performed immediately.
- Give the dealer as much information as possible: hours of service done by the machine, working conditions,
symptoms.
User manual Trimmer HM170 BL071GBG0206 – page 12
4.Environmental protection
4.1.Storage and removal of waste (pollutants):
Waste grease and oil drained from the multiplier or the hydraulic circuit must not be spread on the ground or thrown
into drains.
After replacing hydraulic filters, leave them to drain then store them in a container designed for this purpose.
Collect drained liquids in watertight, clean containers set aside for this purpose. Avoid using food containers or drink
bottles.
Store waste oils in containers set aside for this purpose. Use a company specialised in the collection and recycling of
liquids, or dispose of the liquids in the containers set aside for this purpose.
User manual Trimmer HM170 BL071GBG0206 – page 13
5.Technical characteristics
5.1.Technical characteristics
The range of HM170 series hydraulic trimmers is divided into two models:
- HM 170 E : narrow chassis
- HM 170 L : wide chassis
Models
HM 170
Configuration
Trim
Horizontal
(mm)
Trim
vertivcal
(mm)
Number
of
motors
Pressure
(bars)
Oil flow
(l/mn)
Speed
(tr/mn)
Weight
(kg)
750
1450
4
80
30
2500
280
User manual Trimmer HM170 BL071GBG0206 – page 14
5.2.Hydraulic characteristics:
Information about the workings of Gregoire hydraulic trimmers:
The pressurised oil from the pump of your tractor goes through the control distributor then successively supplies the
various motors of the machine. Each of these motors absorbs part of the available pressure.
For normal operation, the tractor must have the following hydraulic characteristics:
- Min pressure : 120 to 150 bar (machine with 4 motors) 160 to 190 bar (machine with 6 motors)
- Max pressure: 200 bar
- Min / Max flow rate: (without electro-hydraulic distributor) 35 to 45 litres for a blade rotation speed of 2400
rpm, which is the maximum allowable motor speed. In order not to damage the motors, the machine has a flow
regulator which eliminates surplus flow if it exceeds 30 litres/min).
- Min / Max flow rate: (with electro-hydraulic distributor) 35 to 45 litres for a blade rotation speed of 2400 rpm,
which is the maximum allowable motor speed. In order not to damage the motors the electro-hydraulic distributors
has a flow regulator that supply a 30 litres maximum oil flow to the motor hydraulic circuit and the flow surplus to the
cylinder circuit.
5.3.Sound level at the workstation:
The sound level is not dissociable from the sound levels of the tractor.
5.4.Vibration levels at the workstation:
Equipment vibration cannot be recorded (non dissociable from tractor vibrations).
User manual Trimmer HM170 BL071GBG0206 – page 15
6.Assembly and installation
Your dealer is responsible for advising you on the assembly, adjustment, installation and initial start-up of your
machine
6.1.Taking delivery of the machine:
Your machine is unloaded using a lifting machine equipped with a hook (crane,
hoist, etc.) as shown on the photo.
When unloading your machine, make sure no one is in the unloading zone.
Ensure all the accessories of the machine are present.
Ensure your machine has suffered no damage
6.2.Qualification of the operator:
If installation is not carried out by your dealer, it may only be performed by competent persons equipped with the tools
required to carry out this operation.
6.3.Surrounding conditions:
Your machine must be assembled on flat, horizontal, hard ground.
User manual Trimmer HM170 BL071GBG0206 – page 16
6.4.Attachment devices and methods:
The HM170 trimmers are mounted on the attachment parts provided by your dealer. It is
up to you check the following points:
- The trimmer must be rigid enough in relation to the tractor (or harvesting machine);
the attachment must be able to absorb the stress caused by the weight and inertia of the
machine.
- The presence of the trimmer on the tractor must not modify greatly or dangerously the
centre of gravity of the assembly. You must pay particular attention to this point.
- The rotating blades turn very fast and are of great danger to people.
In the absence of a protective device preventing access to the blades, the
position of the machine on the tractor should be such that there is a minimum
distance of 850 mm between a defined theoretical zone and one or more
blades.
6.5.Connection to energy supplies:
6.5.1.connecting the trimmer:
Preliminary precautions:
The operating life of the trimmer’s gear motors depends on the quality and quantity of oil used.
The cleanness of the oil used to operate your trimmer is a crucial factor in its
correct working and longevity.
To avoid any guarantee dispute or refusal in the vent of the damaged hydraulic
motor, we advise you to place a pressure filter at the machine circuit inlet if you are
unsure as to the cleanness of your oil (consult your dealer or our technical
department).
Quality of oil:
Before carrying out any connections, make sure the quality and cleanness of the tractor oil is satisfactory. If this is not
the case, it is necessary to filter or change the oil.
We recommend using a multipurpose, good quality hydraulic oil such as:
Mobiland Super XHP 10W40
Esso Farm’s 10W40
Shell Harvella TX 10W40
or equivalent
Contact your tractor dealer to make sure these oils are compliant.
Quantity of oil:
The quantity of oil required for the good working of your trimmer depends on the pump flow rate of your tractor.
We recommended a quantity of oil equal to twice the flow rate.
E.g.: tractor pump flow rate 25 litres
oil reserve required 50 litres
You should check the oil level on the tractor under frame and, if necessary, add the necessary quantity.
User manual Trimmer HM170 BL071GBG0206 – page 17
Connection:
The drainage pipe must have a direct return flow to the oil tank. Do not use a
quick coupler. Do not connect to the motor return flow hoses.
Check the P and R connection on the trimmer.
Depending on the type of trimmer and its positions, the type of connection may vary. There are several possible
cases:
A/ Machines sold without a control distributor:
User manual Trimmer HM170 BL071GBG0206 – page 18
B/Machines sold with electro-hydraulic distributor:
Flow regulator with
engine brake valve
6.6.Counterweights:
Fit your tractor with rear counterweights if stability and adherence are not optimal.
User manual Trimmer HM170 BL071GBG0206 – page 19
7.Starting up and operation
7.1.Description, location and identification
HM170 trimmer is designed to trim vegetation in vineyard. Any other use is strictly prohibited.
General description:
1. Chassis
2. Beam
3. Blades
4. Cutting element
5. Cylinder
6. Motor
5
2
3
4
6
1
Electric control
User manual Trimmer HM170 BL071GBG0206 – page 20
7.1.1.Optional equipment:
Additional right-hand or tilted
cut (for trimming the lower
parts of the vine)
Automatic
linkage
Anti deposit blades
User manual Trimmer HM170 BL071GBG0206 – page 21
7.2.Settings:
For optimum output and a good finish, your trimmer should be properly adjusted.
7.2.1.Adjustment:
Check the P and R connection on the trimmer.
During adjustment operations, it may be necessary to remove the protective housings of the cutting blades. Be
careful, as the blades are particularly sharp.
Mechanical adjustment:
- Top trim adjustment:
HM models have their top trim adjusted vertically, independently of the side trim. This is
designed for users who have both low and high vines.
The vertical adjustment is carried out by loosening the pressure screw then releasing the pin
from the tube and positioning the cut to the desired height. Put pressure screw.
- Anti-tilt adjustment:
Release the pin, adjust the tilt and replace the pin.
Adjusting prior to use:
Before going into the vine rows, you must first adjust the cutting height and spacing of the machine.
- Cutting height:
Once the machine has been placed in front of the row with the hydraulic motor switched off and the user seated in
the driver’s cab, use the hydraulic or electric distributor to activate the vertical cylinder of the machine. Lift or lower
the machine to the required cutting height.
- Spacing:
This operation is performed with the user sitting in the driver’s cab and with the hydraulic motors switched off, by
moving the right-hand or left-hand lever of the hydraulic distributor or electric control that commands the spacing
cylinders.
User manual Trimmer HM170 BL071GBG0206 – page 22
7.3.Starting up and adjusting the machine
The use of a trimmer requires a certain amount of skill, caution and respect for the
equipment. When you first use it, choose a clear, even terrain.
7.3.1.Prior inspections:
Before using your trimmer, make sure you check the following points:
• The presence of all the protective devices
• The good condition of the tyres
• The good condition of the cutting tools
• The absence of any oil leaks
Warning:
The use of any other rating is likely to seriously damage the components of the
hydraulic circuit.
7.3.2. Removing the protection of the cutting blades :
After removing the blade protections, store them in a place where you can easily find them again after using the
machine.
7.3.3.Starting up the motors - blade rotation:
Owing to its function, the trimmer is a dangerous tool. Switch off the motors
immediately if any person comes within the perimeter of use of the trimmer.
Start up the motors when you are seated in the driver’s cab, with the machine
surroundings completely clear. It is strictly forbidden to start up the machine in
the presence or proximity of another person.
Danger: when in operation, the blades of our trimmers turn at around 2500 RPM.
They are thus invisible to the naked eye and are extremely dangerous for any
person standing near the machine. As a user, you are responsible for forbidding
anyone from approaching the machine, particularly children.
The motors are started up by engaging the lever of the hydraulic distributor or the electric
button.
To protect the motor parts, it is recommended to start up the motors with a medium engine
rating of the tractor and to increase it gradually until the hydraulic pump of the tractor has
reached its normal flow rate.
N.B.: Visual check on the rotation direction
At low speed it easy to detect the rotation direction of the blades. Users must check that the rotation
direction corresponds to the following direction:
Top trim: rotation towards the outside
Side cut: upwards
If this is not the case then the hydraulic connection has not been done correctly and the blades may
come loose. Stop the machine immediately and consult your dealer.
User manual Trimmer HM170 BL071GBG0206 – page 23
7.3.4.Working speed:
The working speed depends on a number of criteria:
-
Density of the vegetation
Morphology of the land
Stability of the tractor
Rotation speed of the blades (dependent on the flow rate supplied)
Working speed ranges from 2 to 6 Km/h. On sloping, bumpy or stony ground, reduce your speed to the minimum.
Particular care is required bearing in mind the height and centre of gravity of the assembly. When you leave a row
and before entering a new one, it is recommended to stop the motors from rotating and open the machine. In the
event of a violent shock or incident (stake, tree, wire winding, etc…), switch off the hydraulic power supply, open
the machine, leave the row, stop the tractor and assess the consequence of the damage on operation and safety.
In case of vibrations, twisted blades, damaged safety system or broken hose, consult your dealer.
7.3.5.Adjusting the machine:
At any moment, it is possible to use the hydraulic or electric levers of the machine to control the cylinders and
adjust the position of the cutting elements in relation to the vegetation.
It is recommend to proceed by carrying out small successive adjustments.
The use of the oil for the control of the machine’s cylinders leads to a slight reduction in the rotation speed of the
cutting blades. This momentary reduction has no effect on the cutting quality of the machine.
Reminder: no adjustments may be made on the machine when it is operation.
7.4.Stopping the machine
To stop your trimmer, switch off the electric control (if there is one) and the hydraulic power supply via the
distributor control.
7.5.Inspection of the tightness of the machine parts:
Despite all the care and attention that goes into the assembly of our machines, gaps can appear between the
transmission parts or on the chassis after a few hours of use. Inspect the tightness of:
-
Machine attachment to the tractor
Attachment of the chassis parts
Hydraulic motors and cutting blades attachment
Cutting protective housing attachments
Very important: the guarantee ay be invalid if these instructions are not
complied with.
User manual Trimmer HM170 BL071GBG0206 – page 24
8.Transport and movement
8.1.Transport position:
To put the machine into transport position, proceed as follows:
Retract the trimmer as much as possible to ensure its size does not exceed that of the tractor or harvesting machine,
or keep it within a size under 2.5m. use the spacing cylinders, or, if the machine does not have any, slide in the tubes
to bring in the cutting panels after first unscrewing the pressure screws. Retighten the screws after this operation.
8.2.Driving on public roads:
Before taking the machine on public roads:
• Place the machine in transport position in accordance with the manufacturer's indications
• Check the braking devices of the tractor are in good working order.
• Check the signalling and lighting devices (lights, reflectors, registration place, etc.) are clean, correctly in
place and in good working order
• On public roads, comply with the Highway Code.
• Respect the maximum allowable dimensions (width, height). If these dimensions are exceeded, comply with
the regulations in force regarding wide or dangerous loads.
• Respect the maximum axle load and the total authorised travelling weight. If necessary, put in place front
weights.
• Keep to the authorised speed limit.
8.3. Operating position after transport:
After transport, follow the procedure of paragraph 8.1 “Transport position” in reverse.
User manual Trimmer HM170 BL071GBG0206 – page 25
9.Handling
9.1.Lifting:
The machine should be handled via the brackets supplied with the machine, using a forklift truck as indicated in
chapter 6.1.
When lifting your trimmer, keep it away from any other person. Never go beneath
the machine when it is raised.
10. Maintenance and repairs
10.1.Qualification of the operator:
As a user, you can carry out everyday maintenance operations such as greasing
and changing worn parts (blades and belts) for more important operations, you
must contact your dealer.
• Only use original parts
• Do not attempt any intervention or repair unless you are trained to do so or unless you have the required
competence and tools.
10.2.Maintenance guidelines:
When designing the range of trimmer, our company has ensured that the machines require as little maintenance as
possible.
Nevertheless, the following operations are indispensable for the good working of the machine.
10.3.Types of maintenance operations:
Wait for the tool to stop completely before any operation. Check the hydraulic
control cannot be engaged accidentally by another person during the intervention.
User manual Trimmer HM170 BL071GBG0206 – page 26
10.3.1.Greasing operations:
The bearings used on our trimmers are greased to take account of the low stress levels they support and their perfect
water tightness. They do not need any further greasing.
Warning:
Excessive greasing is detrimental to the correct working of the machine.
Sliding tubes :
The sliding tubes need to be kept greased permanently (application with a brush). In order to
eliminate the dust that gathers in the grease, a full cleaning operation (with diesel) is
recommended at the end of each campaign, followed by re-greasing.
10.3.2.Cleaning:
Cleaning required due to sap deposit:
Regular cleaning will prevent deposit from forming.
To ensure perfect cutting quality, remove the sap from the blades after each use.
During cleaning operations, avoid scratching the blade surface (do not use a grinder, as this
will only make the sap stick more strongly).
Cleaning the cylinders:
Particularly care must be taken when cleaning the cylinder rods; clean them regularly with diesel
so as not to damage the cylinder seals.
Checks on the hydraulic circuit:
One or more connections may have to be retightened after a few hours of use.
Perform this operation to avoid fluid leaks, without tightening excessively.
Belt tension:
Your trimmer is delivered with a special spanner. These spanners are required for the
operations described below.
Tensioning of the belts should be done after the first 20 hours of use, then before each
period of use if needs be.
It is a simple operation that lasts a few minutes.
To retighten the belts, proceed as follows:
Going upwards from the motor towards the cutting side, or downwards, unscrew the 3
attachment nuts on each bearing block, then using the special spanner, pivot the bearing
block in the opposite direction from the motor. Retighten simultaneously.
Proceed in the same way for all the bearing blocks.
Warning : if the belts are too tight to too loose, their life may be reduced
considerably
10.3.3.Inspection of the hydraulic circuit:
It is possible that one or more connections will need to be retightened after a few hours of use. Carry out this operation
to avoid leaks of fluid, without tightening excessively.
Our company declines any responsibility or guarantee claims for breakdowns
resulting from non-compliance with these instructions.
User manual Trimmer HM170 BL071GBG0206 – page 27
10.4.Repairs:
10.4.1.Changing the blades
Warning: When replacing the blades, make sure the hydraulic control is disengaged
and no-one can re-engage it during the intervention.
To replace a blade, use the wrench, along with a flat spanner to be inserted
behind the blade. Loosen the attachment pin of the blade using the wrench
(either clockwise or anticlockwise, depending on whether the thread is righthand or left-hand. Left hand threads are recognisable by the circular thread
inscribed on their collar).
When fitting a new blade, the threaded pin must be tightened (pinching the
blade between the 2 elastic rings) with a torque of 7 daN (equivalent to a force
of 7 kg applied at the end of a spanner 1m long).
Regularly check the wear of the blades; if they are largely worn or irregular, or
with breakage causing even the slightest vibration, stop the machine and
change the blade.
In case of vibrations, stop the machine immediately consult your dealer.
10.5.Restarting the machine after intervention:
After repair or maintenance, ensure all the protective devices and parts of the trimmer are remounted correctly.
Once you have made sure no-one is in the field of action of the trimmer, restart the machine (see paragraph 7)
User manual Trimmer HM170 BL071GBG0206 – page 28
11.Cleaning
Before cleaning, remove the pressure from the hydraulic pipes.
11.1.Where to clean the trimmer:
Clean the machine in an area set aside for this purpose.
11.2. Wearing of individual protective equipment:
To clean your machine you should wear protective gloves and glasses to prevent injuries caused by projections from
the water pressure.
11.3.Cleaning method:
Cover all openings requiring protection from water, vapour or cleaning products.
In case of use of a high-pressure water jet, do not hold it too close to the machine and avoid directing the jet onto
electric accessories (distributor, link box, calculator), hydraulic hoses, seals, filling plugs, cylinders (joints and rods),
ball bearings, etc.
Warning: the use of a high-pressure cleaner is recommended to remove traces of
sap from the bodywork. However, it is inadvisable to use such a cleaner on the
hydraulic motors, bearings wheel bearings and the gaps between the bodywork
parts. If used on the sliding beams, they should be re-greased afterwards.
11.4.Type of cleaning products:
Do not use aggressive cleaning products (chlorine-based).
Use flexible brushes.
11.5. Inspecting the machine after cleaning:
Once cleaning is finished, inspect the hoses and check they have no leaks, that the connections are not loose and
are not damaged.
Remedy any damage immediately.
Grease your trimmer completely.
User manual Trimmer HM170 BL071GBG0206 – page 29
12.Removal and long-term storage
12.1. Prior maintenance:
Before removing your trimmer and grease it completely.
Loosen the belts during long-term storage to prevent damage to them.
12.2.Removal and storage conditions:
Removal is to be performed using a trolley delivered with the machine and according to the way it has been
attached to the holder.
The machine should be stored away from exposure to the weather and out of reach of children.
The machine should be stored away on flat, hard, horizontal ground.
12.3. Periodic checks during storage:
During storage, make regular checks to ensure that all the safety elements are in their place (protective casings,
etc.).
12.4.Restarting the machine after storage:
When restarting your trimmer the following points:
• Retighten the belts
• Presence of all safety devices
• Condition of the working tools
• Absence of hydraulic leaks
13. Dismantling and disposal
When your trimmer reaches the end of its career, you will have to dispose of it.
Before dismantling, put the hydraulic oil into a container (never throw it out directly into the environment).
You can now dismantle the machine and eliminate all metal scrap.
User manual Trimmer HM170 BL071GBG0206 – page 30
14.Alphabetical index
A
Adjustments
Assembly of accessories
24
19
Blocking (jamming)
10
Certificate of conformity
Characteristics
Cleaning
6
14
32
Description
Disposal
Driving
20
33
9
Electrics (connections)
Electrics (fuses)
Environmental protection
16
16
13
Greasing
28
Handling
Hydraulics (diagram)
27
23
Maintenance
27
Removal
Repairs
30
29
Starting up
Stopping the machine
Storage
24
25
33
Tools (replacement)
Transmission shaft
Transport (movement)
Troubleshooting
30
11
26
31
Welding
12
B
C
D
E
G
H
M
R
S
T
W
User manual Trimmer HM170 BL071GBG0206 – page 31