1
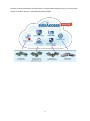
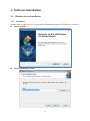
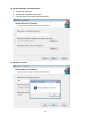
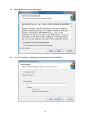
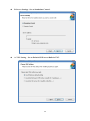
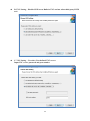
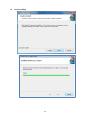
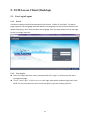
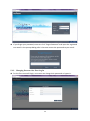
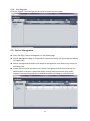
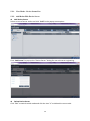
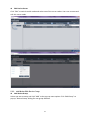
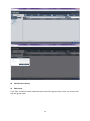
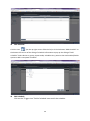
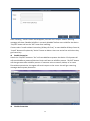
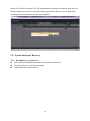
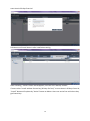
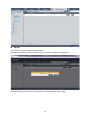
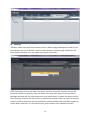
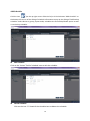
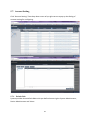
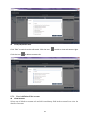
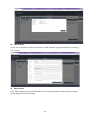
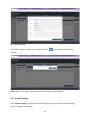
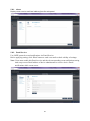
SUSIAccess 3.0 User Manual 1 The document is provided to you for references and is subject to change. Please always get latest version from Advantech to sync. Table of Content 1. SOLUTION OVERVIEW ............................................................................................... 5 2. SOFTWARE STRUCTURE ............................................................................................. 7 3. SOFTWARE INSTALLATION ......................................................................................... 8 3.1. Windows Server Installation .............................................................................. 8 3.1.1. Installation .......................................................................................................... 8 3.1.2. Uninstallation .....................................................................................................14 3.1.3. System Backup ....................................................................................................18 3.1.4. System Restore ...................................................................................................20 3.2. Windows Standalone Agent Installation .......................................................... 22 3.2.1. Installation .........................................................................................................22 3.2.2. Uninstallation .....................................................................................................28 3.3. Linux Standalone Agent Installation ................................................................. 31 4. SUSIACCESS SERVER ................................................................................................ 32 5. SUSIACCESS CLIENT (DESKTOP) ................................................................................ 33 5.1. User Login/Logout ........................................................................................... 33 5.1.1. Portal..................................................................................................................33 5.1.2. User Log In ..........................................................................................................33 5.1.3. Changing Password for First Log In .....................................................................34 5.1.4. User Log Out .......................................................................................................35 5.2. Device Management ........................................................................................ 35 5.2.1. View Mode – Device Status List ...........................................................................36 5.2.2. Add/Delete/Edit Device Server ............................................................................36 5.2.3. Add/Delete/Edit Device Group ............................................................................37 5.2.4. Add/Delete/Edit Device ......................................................................................40 5.2.5. Remote Control – KVM Viewer ............................................................................44 5.2.6. Remote Control – Terminal ..................................................................................45 5.2.7. Remote Control – Screen Shot .............................................................................45 5.2.8. Hardware Monitoring Status ..............................................................................46 5.2.9. Hardware Monitoring Rules ................................................................................46 5.2.10. Software Monitoring Status ................................................................................48 5.2.11. Software Monitoring Rules .................................................................................49 5.2.12. Maintenance Status ............................................................................................50 2 5.2.13. Devices Administrator .........................................................................................51 5.2.14. View Mode - Group Status List ............................................................................51 5.2.15. Group Hardware Monitoring Rules .....................................................................52 5.2.16. Group Software Monitor Rules ............................................................................54 5.2.17. View Mode - Device Map View............................................................................56 5.2.18. Add/Delete/Edit Map Location ...........................................................................57 5.2.19. Add/Delete/Edit Map Layout ..............................................................................60 5.2.20. Add/Delete/Edit Map Device ..............................................................................62 5.3. Power Management ........................................................................................ 65 5.3.1. Power Status List ................................................................................................65 5.3.2. Power Control (WoL) ..........................................................................................65 5.3.3. Power Control (Intel AMT) ..................................................................................66 Power Off State...................................................................................................................................................... 67 5.3.4. 5.4. Add/Delete/Edit Power Schedule ........................................................................67 System Protection ............................................................................................ 69 5.4.1. Protection Status List ..........................................................................................69 5.4.2. Protection Control ...............................................................................................70 5.5. System Backup & Recovery .............................................................................. 72 5.5.1. Backup/Recovery Status List ...............................................................................72 5.5.2. Backup/Recovery Control ....................................................................................73 5.5.3. Add/Delete/Edit Backup Schedule .......................................................................78 Add Schedule ......................................................................................................................................................... 79 5.6. 5.6.1. Device Event List .................................................................................................80 5.6.2. Export CSV ..........................................................................................................80 5.7. Account Setting................................................................................................ 81 5.7.1. Default Role ........................................................................................................81 5.7.2. View/Add/Delete/Edit Custom Role ....................................................................82 5.7.3. View/Add/Delete/Edit Account ...........................................................................83 5.8. 6. Event Log ......................................................................................................... 80 System Setting ................................................................................................. 85 5.8.1. About .................................................................................................................87 5.8.2. Email Service ......................................................................................................87 5.8.3. SMS Service ........................................................................................................88 5.8.4. Map Setting ........................................................................................................88 5.8.5. Notification Setting .............................................................................................89 5.8.6. Event Log ............................................................................................................89 5.8.7. Upgrade Setting..................................................................................................91 SUSIACCESS CLIENT (MOBILE) .................................................................................. 93 3 6.1. 6.1.1. Browsing Mode ..................................................................................................93 6.1.2. Log In..................................................................................................................93 6.1.3. Log Out ...............................................................................................................94 6.2. View Mode Switch ..............................................................................................95 6.2.2. Share Account Switch ..........................................................................................96 6.2.3. Device Search .....................................................................................................96 6.2.4. Group Control .....................................................................................................97 6.2.5. Device Control ....................................................................................................99 Notifications management ............................................................................ 117 6.3.1. Notification Sorting: .........................................................................................117 6.3.2. Account Switch: ................................................................................................118 6.4. Settings Management .................................................................................... 118 6.4.1. Change Account Password: ...............................................................................119 6.4.2. Account Details: ................................................................................................119 6.4.3. Account Log Out: ..............................................................................................120 6.4.4. Server Version: ..................................................................................................121 6.4.5. Language Switch:..............................................................................................121 WINDOWS STANDALONE AGENT ........................................................................... 122 7.1. 7.2. 7.3. 7.4. 7.5. 7.6. 8. Devices Management ...................................................................................... 94 6.2.1. 6.3. 7. User Login/Logout ........................................................................................... 93 Agent Console................................................................................................ 122 Connect to Server .......................................................................................... 122 Hardware Monitor ......................................................................................... 124 System Protection .......................................................................................... 126 System Backup / Recovery ............................................................................. 127 Custom Setting .............................................................................................. 130 LINUX STANDALONE AGENT .................................................................................. 132 4 1. Solution Overview SUSIAccess®- Remote Maintenance for Your Intelligent Systems The number of embedded intelligent systems creates a potential future prototype for the intelligent city. Intelligent systems perform mission-critical roles in high-value applications across multiple industries such as in power plant automation or digital signage in airports, and because they are often deployed in remote locations, intelligent systems must be reliable and highly available. Advantech has been watching the prevailing trend and understands the essence of the embedded intelligent systems. However, the lack of remote monitoring and maintenance for embedded intelligent applications has been noticed by device vendors. This is where Advantech SUSIAccess comes in. By providing a ready-to-use remote access solution, system integrators can focus more on their own applications and let SUSIAccess take care of the protection, maintenance and power-saving of their systems. SUSIAccess: Built-in Intelligence for Embedded Computing Advantech positions itself as the embedded platform and intelligent systems facilitator, and now announces the newest version of SUSIAccess, an innovative remote device management software preloaded into all Advantech embedded products, and used to build intelligence into your embedded application. By integrating Intel’s Active Management Technology (AMT) and Clickatell’s SMS gateway service, SUSIAccess 3.0 permits efficient remote management, and monitoring and maintenance to reduce your total cost of ownership. The launch of SUSIAccess 3.0 provides system integrators with more flexible options for creating intelligent and interconnected embedded computing solutions. SUSIAccess is designed to build intelligence into embedded computing applications, not only ensuring continuous system uptimes, but also reducing maintenance costs. It can constantly monitor the health of multiple devices and send out alarm notifications via e-mails and SMS messages if abnormal situations prevail. SUSIAccess 3.0 also provides other powerful utilities such as System Recovery (powered by Acronis), System Protection (powered by McAfee) and Remote KVM to protect and recover faulty systems. Monitor Your Devices' Health Even When They're Off By integrating Intel AMT in SUSIAccess 3.0, administrators are able to access their systems when they are powered-off or even if the OS has crashed, allowing recovery capabilities that pure software solutions cannot offer. SUSIAccess 3.0 also integrates Clickatell, a global SMS gateway service covering over 220 countries that can send instant SMS alarms to mobile 5 phones via internet without 3G connections. It helps administrators to stay in sync with the health of all their devices—automatically and promptly. 6 2. Software Structure SUSIAccess is a 3-Tier system architecture: User Client, Backend Server and Device Agent. Below is the communication structure: SUSIAccess Client: The Web-based Application supports both PC-based and Mobile edition cross browsers include IE, Chrome, Firefox and Safari. SUSIAccess Server: The main program to manage all connected agent devices — a software service that can auto-run after system boots up. The console program stays in sync with all devices status and users can configure all settings and manage the devices in the intuitive user interfaces. SUSIAccess Agent: This is the device-side program to send device status data to the console and to execute the commands dispatched from the console as well. This is a light-weight program that can auto-run after system boots up. On the device system, Acronis and McAfee software programs can be also installed for the purpose of System Protection and Backup /Recovery, and both programs can be manipulated remotely from the console. 7 3. Software Installation 3.1. Windows Server Installation 3.1.1. Installation Double click “SA30Server.exe” to execute the installation program of SUSIAccess 3.0 Server. Start Program Choose Installation Folder 8 Tomcat Server Attributes Select installation folder for Tomcat web server and set the “HTTP Port Number” PostgreSQL Server Setting Set access Password for Server Database (PostgreSQL) 9 A. Restore SUSIAccess Database – Create a new database. B. Restore SUSIAccess Database – Restore to an old backup database. 10 Login Information Set the password for the initial System Administrator (First Login) Start Installing. 11 Installation Completed. 12 Double click the “SUSIAccess 3.0” shortcut to start up the SUSIAccess Client (Browser link). 13 3.1.2. Uninstallation Double click “SA30Server.exe” to execute the installation program of SUSIAccess 3.0 Server. Start Program Choose Setup Type Click “Remove” to uninstall SUSIAccess System 14 Backup SUSIAccess Database and Configuration – Remove all database and configuration – Enter database password to backup 15 Confirm Uninstalling Confirm the removal of “Tomcat” server and start uninstalling 16 Confirm the removal of “PostgreSQL” server and start installing 17 3.1.3. System Backup Double click “SA30Server.exe” to execute installation program of SUSIAccess 3.0 Server. Start Program Choose Setup Type Click “Backup” to backup system database and configuration 18 Backup Database and Configuration a. PostgreSQL password b. PostgreSQL installation root folder c. The path where you want to put backup files Backup successful 19 3.1.4. System Restore Double click “SA30Server.exe” to execute the installation program of SUSIAccess 3.0 Server. Start Program Choose Setup Type Click “Restore” to restore system database and configuration 20 Restore Database and Configuration d. PostgreSQL password e. PostgreSQL installation root folder f. The path where you want to put backup files Restore successful 21 3.2. Windows Standalone Agent Installation 3.2.1. Installation Double click : “SA30Agent.exe” to install SUSIAccess 3.0 Standalone Agent program. Start Installation Select Installation Folder 22 Read End User License Agreement A. Server Settings - Set Remote Management Server URL/IP. 23 B. Server Settings - Set as Standalone Control. A. VNC Setting – Set as Default SUSIAccess Built-in VNC. 24 B. VNC Setting – Disable SUSIAccess Built-in VNC and use other third party KVM tool. C. VNC Setting – Use other User-defined VNC server. Input VNC server password and port number 25 Start Installing. 26 Installation Completed. Click to start standalone agent. 27 3.2.2. Uninstallation Start to uninstall “SUSIAccess Agent” Click “Remove”. 28 Confirm to uninstall “SUSIAccess 3.0 agent” Uninstall progress 29 Uninstalling completed. 30 3.3. Linux Standalone Agent Installation TBD 31 4. SUSIAccess Server TBD 32 5. SUSIAccess Client (Desktop) 5.1. User Login/Logout 5.1.1. Portal SUSIAccess supports mainstream browsers like Chrome, Firefox, IE and Safari. The portal page supports multi-language and auto-detects the language currently used by browsers for default displaying. Users also can select the language from the drop-down menu at top-right corner to change manually. 5.1.2. User Log In Users can input valid User name, Password and click “Login” to verify and enter main management page. Check “Auto Login” to allow users to cache login information and auto login each time. NOTE: For security concerns, don’t check this option if you are using a public PC. 33 If you forget your password, users can click “Forgot Password” and input the registered user email in the prompt dialog after it has auto resent the password to your email. 5.1.3. Changing Password for First Log In For the first successful login, new users can change their password or bypass it. 34 5.1.4. User Log Out Click the “Logout” from the right corner menu to check out the system. 5.2. Device Management After user login, Device Management is the default page. Device Management page is composed of a system hierarchy tree (Left-side) and device list (Right-side). Device management provides three levels of management view: Device List, Group List and Map View. System hierarchy tree includes server, account and group node for Device/Group List Mode as well as location, layout and device node for Map View mode. Each node supports corresponding operations (Add/Delete/Edit) according to node attributes. 35 5.2.1. View Mode – Device Status List 5.2.2. Add/Delete/Edit Device Server Add Device Server Select on one of server nodes and click “Add” to the popup menu option. Click “Add Server” to pop up the “Device Server” dialog for new sub-server registering. Delete Device Server Click “Edit” to switch to edit mode and click the icon “X” to delete this server node. 36 Edit Device Server Click “Edit” to switch to edit mode and select one of the server nodes. Users can remove and edit this server node. 5.2.3. Add/Delete/Edit Device Group Add Device Group Select one user account and click “Add” to the pop up menu option. Click “Add Group” to pop up “Device Group” dialog for new group addition. 37 Delete Device Group Edit Group Click “Edit” to switch to edit mode and select one of the group nodes. Users can remove and edit this group node. 38 39 5.2.4. Add/Delete/Edit Device Add Device Select one of the user accounts or groups and click “Add” to the pop up menu option. Click “Add Device” to the pop up dialog for new device addition. Manual Add Click “Add Device” to pop up the Add Device dialog to manually add a device. Users can input known Device ID or MAC Addresses that have already registered to the server and assign a current account or group. If the device doesn’t exist, users can also add a device directly. 40 Search Device Click “Search Device” to pop up the Device dialog for advanced device smart search. The system will auto-discover both connected and unassigned devices located at the same local area network as the client user. Delete Device Click “Edit” to switch to Edit Mode. Users can remove and edit devices on the device list in this mode. Click the “X” icon for the selected device row and confirm the device warning removal. 41 Edit Device Click “Edit” to switch to edit mode. Users can remove and edit devices of the device list in this mode. Click selected device name to pop up the “Device” dialog for editing. 42 43 5.2.5. Remote Control – KVM Viewer When a device has been connected, the Remote Control icon shows on the right side of the device name. Click on the icon for advanced controls including KVM Viewer, Terminal and Screen shot. KVM Viewer Click on the icon from the Remote Control menu to connect to the device for KVM control. Note: Users can select KVM connection method on the device agent side. System default is SUSIAccess KVM (Ultra VNC), users can select other already-installed VNC, or disable this function for security concerns. 44 5.2.6. Remote Control – Terminal Click on the icon from the Remote Control menu to connect to the device for Terminal command-line control. 5.2.7. Remote Control – Screen Shot Click on the icon from the Remote Control menu to snapshot the desktop screen of the remote device and save it on the local client side. 45 5.2.8. Hardware Monitoring Status Real-time Monitoring Chart Click on the field “Hardware Status” of the device list item to graphically display hardware real-time parameters (memory, CPU usage, temperature, fan speed, and HD health status). Click on the parameter name to disable/enable displaying of the parameter curve. 5.2.9. Hardware Monitoring Rules Click on the button “Hardware Monitoring Rule” to pop up the Hardware Monitoring dialog. The dialog lists current monitoring rules for hardware parameters includes CPU, voltage, fan speed, HDD, etc. 46 Add Rules Click on the button “Add Rule” button to add a new rule for hardware monitoring. Users can select the type of monitoring hardware from the drop-down menu, input threshold values for the corresponding parameter, the last time in seconds for reaching that threshold and a notice interval for 2 contiguous events. Before clicking “OK”, users can check the option “Enable Monitor Rule” to enable/disable this new rule. Edit Rules Click on a row in the Hardware Monitoring Rule box to pop up the “Hardware Monitoring Setting” dialog box. 47 Delete Rules Click on the “X” icon on the left side of the schedule item to delete the schedule. Enable/Disable Schedule Check the enable check box in the schedule row to enable/disable the schedule. 5.2.10. Software Monitoring Status Real-time Process List Click on the “Software Status” field in the device list to display the status list for active real-time software (Name, Status, CPU usage and Memory). Click on the process name to pop up the confirm dialog for killing a specified process, after confirming, users can kill and force the process to terminate. 48 5.2.11. Software Monitoring Rules Click on the button “Software Monitoring Rule” to pop up the dialog for Set Software Monitoring Rule. The dialog lists current monitoring rules for software processes. Add Rules Click on the button “Add Rule” to add a new rule for software monitoring. Users can input the process name that they want to monitor, the threshold values of the CPU and memory, the last time in seconds for reaching the threshold, and the notice interval for 2 contiguous events and corresponding action. Before clicking the “OK” button to add the rule, users can check the option “Enable Monitor Rule” to enable/disable this new added rule. Note: Currently, Software monitoring can only monitor and execute actions for the user process. 49 Edit Rules Click on one of the fields to pop up the “Software Monitoring Setting” dialog for editing. Delete Rules Click on the icon “X” on the left side of the schedule item to delete the schedule. Enable/Disable Schedule Check the enable check box in the schedule row to enable/disable the schedule. 5.2.12. Maintenance Status Users can change the maintenance status (None, To be maintained, Maintaining, Finished) from the dropdown menu for each device - See below. 50 5.2.13. Devices Administrator Users with device management permissions can click the "admin" field to pop up the selection dialog for Administrator to reassign device administrator status to another account. 5.2.14. View Mode - Group Status List Click the “Group” tab to list groups under the selected account or group node. The group List shows all group names, group hardware status and group software status. 51 Group Hardware Status This field shows the number of all registered devices and abnormal hardware devices under this group. Group Software Status This field shows the number of all registered devices and abnormal software devices under this group. 5.2.15. Group Hardware Monitoring Rules Click on the icon on the right to pop up the dialog "Set Hardware Monitoring Rule". The dialog lists current monitoring rules and parameters of each group's devices including CPU, voltage, fan speed, HDD, etc. 52 Add Group Rules Click on the “Add Rule” button to add a new rule for hardware monitoring. Users can select the type of monitoring hardware from the drop-down menu, input threshold values of corresponding parameter, last time in seconds of reaching the threshold, and notice interval for 2 contiguous events. Before clicking “OK” to add the rule, users can check the option “Enable Monitor Rule” to enable/disable this new rule. Edit Group Rules Click on the rule field to pop up the “Hardware Monitoring Setting” dialog for editing. 53 Delete Rules Click on the “X” icon on the left side of the scheduled item row to delete the schedule. Enable/Disable Schedule Click the enable check box in the row item to enable/disable the schedule. 5.2.16. Group Software Monitor Rules Click on the icon in the field of group hardware status to pop up the Set Software Monitoring Rule dialog box. The dialog lists current monitoring rules for software processes of group devices. 54 Add Group Rules Click on the button “Add Rule” to add a new rule for software monitoring. Users can input the process name that want to monitor, the threshold values of CPU and Memory, the last time of reaching threshold, notice interval of 2 contiguous events and corresponding action when hit the monitoring rule. Before click the button “OK” to add rule, users can check the option “Enable Monitor Rule” to enable/disable this new added rule. Note: Currently, Software monitoring only can monitor and execute action for the user process. Edit Group Rules Click on one of the fields of which rule items to pop up the dialog of “Hardware Monitoring Setting” for editing. 55 Delete Rules Click on the icon “X” next to the scheduled item to delete the schedule. Enable/Disable Schedule Check the box next to the scheduled item to enable/disable the schedule. 5.2.17. View Mode - Device Map View Device Map View visualizes each physical device's location, separate user interface as left-side map hierarchy tree includes account, location, layout and device node and right-side geography view includes online map and static image map. Different tree node support corresponding add, delete and edit operations and intuitive drag and drop device nodes as well. 56 5.2.18. Add/Delete/Edit Map Location Add Location Select on one of account node and click “Add” button to add a new location. Input location name, address or coordination (latitude and longitude), upload image for location displaying and click “OK” to add the new location. 57 Note: Map view supports Both Google and Baidu online map. This two map adopts different coordination-system, users must input correct coordination according to online map selection (users can configure in the System Settings). If users doesn’t specify either address field or coordination, system will auto location this new added location at the center of current map view. Delete Location Click “Edit” button to switch to edit mode, click “X” icon ahead of selected location node to delete this location. Note: If there are layouts or devices under selected location node, users must remove these nodes first before removing location node. 58 Edit Location Click “Edit” button to switch to edit mode, click the location node/name to pop up the dialog of “Edit Location” to edit the content. Under this mode, users also can drag and drop the location icon on the right-side map view to relocate location. 59 5.2.19. Add/Delete/Edit Map Layout Add Layout Select on one of location node and click “Add” button to add a new layout. Input layout name and description, upload image for location displaying and click “OK” to add the new layout. Delete Layout Click “Edit” button to switch to edit mode, click “X” icon ahead of selected layout node to delete this layout. Note: If there are devices under selected layout node, users must remove these nodes 60 first before removing layout node. Edit Layout Click “Edit” button to switch to edit mode, click the location node/name to pop up the dialog of “Edit Location” to edit the content. 61 5.2.20. Add/Delete/Edit Map Device Add Device Select on one of account, location or layout node and click “Add” button to add a new device. New added devices will be default located at the center of online or static image map. 62 Delete device Click “Edit” to switch to edit mode and click “X” icon ahead of selected layout node to delete this device. 63 Edit Device Click “Edit” button to switch to edit mode, drag and drop the device icon on the right-side map view to relocate device. Under this mode, users also can drag and drop the device icon from the right-side map view to left-side account or location or layout node to change its belonged level. 64 5.3. Power Management 5.3.1. Power Status List Select All/Connected/Disconnected to quickly filter out devices. Click Group/Device to switch view mode. Input keyword to search devices. 5.3.2. Power Control (WoL) Power On State Select the action from drop-down menu of each device/group list item to power off, reboot and hibernate device. 65 Power Off State Select the action from drop-down menu of each device/group list item to power on device. 5.3.3. Power Control (Intel AMT) If device supports Intel AMT, click on the icon of each device/group list item to pop up the dialog of Intel AMT for advanced operations. Power On State Select action from drop-down menu to power down, power cycle or power reset device/group. 66 Power Off State Select action from drop-down menu to power up device/group. 5.3.4. Add/Delete/Edit Power Schedule Click on device/group name to pop up the dialog of schedule management. Note: In Group view, the schedule information of group only list group schedules. In Device view, the schedule information of device will list both device schedules and group schedule that device belong to, but group schedule cannot be edited in this view mode. 67 Add Schedule Click the icon (on the up-right corner of device list) or click the button “Add schedule” on the bottom-left corner of the dialog of schedule information to pop up the dialog of “Add schedule”. Select device or group, repeat mode, schedule time, power action and enable/disable option to add a new power schedule. Edit Schedule Click on the “Trigger time” field of schedule item to edit the schedule. 68 Delete Schedule Click on the icon “X” ahead of the schedule item to delete the schedule. Enable/Disable Schedule Check the box ahead of the schedule item to enable/disable the schedule. 5.4. System Protection 5.4.1. Protection Status List Click Group/Device to switch view mode. Input keyword to search devices. 69 5.4.2. Protection Control Install McAfee If System Protection is not installed on device, users need to install it and will see screen as below, click “Install” button to install System Protection (McAfee). After confirming, enter “Name” and ”Serial” (or check “Trial Version” without serial number) to start downloading and installing. 70 After installing, “Install” button will disappear, users will see “On/Off” button. Warning message will show “McAfee Solidifier is currently disabled” before users solidifier the device. “On/Off” button will on the “Off” state after installing. If users select “Install without license key (30 days for free)” to start McAfee 30 days free trial, “Install” button will replace by “Active” button as below. Users can active free trial when they get license key. Enable Protection Switch the “On/Off” button to “On” will start McAfee to protect the device. Click protect all will start McAfee to protect all devices. Device will start to solidifier process. “On/Off” button will change status after solidifier process. If someone tries to execute, delete, or re-name files without permission, the agent will send a report to the server. You will get a warning message about system protection. Disable Protection 71 Switch the “On/Off” button to “Of” will stop McAfee to unprotect the device. After turn off McAfee protection, users can install the modify application in device. Turn on again after installing, device will under the protection of McAfee. 5.5. System Backup & Recovery 5.5.1. Backup/Recovery Status List Select All/Connected/Disconnected to quickly filter out devices. Click Group/Device to switch view mode. Input keyword to search devices. 72 5.5.2. Backup/Recovery Control Install Acronis If System Recovery is not installed on device, users need to install it and will see screen as below, click “Install” button to install System Recovery (Acronis). Please enter your Name, Serial number to active Acronis and default size of ASZ (Acronis Security Zone, The range is between used disk and free disk, theoretically, the used disk space will larger than 0%). Users can select “Install without license key (30 days for free)” to 73 start Acronis 30 days free trial. SUSIAccess will install Acronis after installation setting. After installing, “Install” button will disappear, users will see “Backup” button. If users select “Install without license key (30 days for free)” to start Acronis 30 days free trial, “Install” button will replace by “Active” button as below. Users can active free trial when they get license key. 74 Backup Click “Backup” button to start backup device. SUSIAccess will show confirm window, users can make sure backup information. After confirming, Acronis will start to backup and show backup percentage. 75 Recovery “Restore” button can work after backup success in Restore page. Message will show the last time backup time. Click “Restore” button to start Restore in Restore page. SUSIAccess will show confirm window, users can make sure restore information. After confirming, Acronis will restart the device and start to restore. “Restore” button will gray when device on restoring. “Restore” button can work after device restoring success, Message will show the last time backup time (not restore time). If restore fail, device cannot boot normally, so device will not connect to SUSIAccess console. Users can try to use one key recovery function of Acronis (F11) by SUSIAccess Remotely KVM (need Intel AMT support) or locally when restore fail. If it still cannot work, please contact your Advantech partner. 76 Devices will run Acronis restore interface on restoring. 77 5.5.3. Add/Delete/Edit Backup Schedule Click on Device/Group name to open the dialog of device/group schedule information. Note: In Group view, the schedule information of group only list group schedules. In Device view, the schedule information of device will list both device schedules and group schedule that device belong to, but group schedule cannot be edited in this view mode. 78 Add Schedule Click the icon (on the up-right corner of device list) or click the button “Add schedule” on the bottom-left corner of the dialog of schedule information to pop up the dialog of “Add backup schedule”. Select device or group, repeat mode, schedule time and enable/disable option to add a new backup schedule. Edit Schedule Click on the “Action” field of schedule item to edit the schedule. Delete Schedule Click on the icon “X” ahead of the schedule item to delete the schedule. 79 Enable/Disable Schedule Check the box ahead of the schedule item to enable/disable the schedule. 5.6. Event Log 5.6.1. Device Event List Select user account or group to decide event range and select event log type (All/Error/Warning/Information) to browse related device events. 5.6.2. Export CSV Select device and data/time rage to export event log as CSV format to local side. 80 5.7. Account Setting Click “Account Setting” from drop down menu of up-right corner to pop up the dialog of account setting for configuring. 5.7.1. Default Role System provides three default Roles with pre-defined access rights: System Administrator, Device Administrator and Visitor. 81 The access rights of Pre-defined role cannot be edited or deleted but only can be browsed. 5.7.2. View/Add/Delete/Edit Custom Role In addition to default role, user can add role with user-defined access rights. Add Role Click “Add Role” to pop up the dialog of Role. Input role name and corresponding access rights to create a new role. 82 View/Edit/Delete Role Click “Edit” to switch to role edit mode. Click the icon Click the icon to edit or view role access rights. to delete custom role. 5.7.3. View/Add/Delete/Edit Account View Account Select one of default or custom role and click on arbitrary field in the account list to view the details of account. 83 Add Account Select one of default or custom role and click “Add” button to pop up the dialog for creating a new account. Edit Account Click “Edit” button to switch to edit mode. Click on arbitrary field in the account list to pop up the dialog for account editing. 84 Delete Account Click “Edit” button to switch to edit mode. Click on in the account list to delete account. Note: “admin” is a supper system administrator that cannot be deleted. 5.8. System Setting Click “System Setting” from drop down menu of up-right corner to pop up the dialog of system setting for configuring. 85 86 5.8.1. About Display server version and local address/port for web portal. 5.8.2. Email Service Use SMTP protocol to send notifications via Email Service. Before applying setting, click “Test” button to send a test mail to check validity of settings. Note: Users must enable this Email service and check corresponding event notification setting. And setup correct Email address of device administrator to receive device Email notifications while events occur. 87 5.8.3. SMS Service Use Clickatell SMS gateway service to send SMS automatically. Before applying settings, click “Test” button to send a test SMS to check validity of settings. Note : SMS Service must be enabled and check corresponding event notification setting. And setup correct cell phone number of device administrator to receive device SMS messages while events occur. 5.8.4. Map Setting On-line map supports Google, Baidu. Select map for client default map display. 88 5.8.5. Notification Setting Click tab “Device/Operation/System” to catalog related notification setting. Set event notify by Email or SMS on each item to enable receiving. Advanced settings Click “Advanced settings” for message language of Email and SMS, cycle days of system automatically sends inspection report, system warning of low hard disk space and external SYSLOG event server setting. 5.8.6. Event Log Select event log type (All/Operation/System) to browse related events. 89 Export CSV Select data/time rage to export event log as CSV format to local side. Clearance Manually or set up automatic period to clean event logs. 90 5.8.7. Upgrade Setting Use “ValidationCode_Generator.exe” tool to generate MD5 check code of uploading agent upgrade package. Input “Check Code” and select “Upgrade Program” to upload Agent upgrade package to server. After uploading, system will auto check all connected agent devices and give hint tag of upgrading on corresponding device list when the users client logs in. 91 92 6. SUSIAccess Client (Mobile) 6.1. User Login/Logout 6.1.1. Browsing Mode SUSIAccess index page will auto-detect default browsing mode for mobile device. “Mobile mode” provides simple user interface for low-resolution mobile devices. “PC mode” can be clicked to switch for large-resolution PC mode portal. 6.1.2. Log In Fill in valid “User Name” and “Password” and then click “Log in”. 93 After successful log in, if server contains sub-server, it will show all sub-servers for users to select, or enter to devices page directly. 6.1.3. Log Out Please refer to section 6.. 6.2. Devices Management Click the icon to switch to Devices Management page. 94 6.2.1. View Mode Switch Devices mode: Click “Devices Tab” to switch to devices mode. It shows all devices information that managed by account. Groups mode: Click “Groups Tab” to switch to groups mode. It shows all groups information that managed by account. 95 6.2.2. Share Account Switch Switch share account: Click “select menu” to select account. 6.2.3. Device Search Search device by keyword: Click “search text bar” to enter keyword for device searching. 96 6.2.4. Group Control Group detailed information: Click “Groups Tab” to select targeted group. It shows group information, devices and support group commands. Restart group devices: Click “Restart” item and confirm the pop up warning. System will restart all devices in group. 97 Power off group devices: Click “Power Off” item and confirm the pop up warning. System will power all devices off in the group. Hibernate all devices of the group: Click “Hibernate” item and confirm the pop up warning. System will hibernate all devices in the group. 98 Wakeup group devices: Click “Wakeup” item and confirm the pop up warning. System will wake up all devices in the group. 6.2.5. Device Control Device detailed information: Click target device. 99 CPU usage: Click target device and click “CPU usage” to view curve chart of CPU usage. Memory usage: Click target device and click “Memory usage” to view the memory curve chart. 100 Map: Click target device and click “Device Location” to view the location of your device on Google Maps. Notifications: Click target device and click “Device Notifications” to view the notifications of your device. 101 Sort notifications of device by severity: Click target device and click “Device Notifications” and click “Sort by Severity”. Sort notifications of device by date: Click target device and click “Device Notifications” and click “Sort by Date” Tab. 102 View one of device notification: Click target device click “Device Notifications”click one of notifications. Hardware monitor: Click target device click “Hardware Details” to view the hardware information. 103 Software monitor: Click target device click “Software Processes” to view all running processes. Sort processes by name: Click target device click “Software Processes” click “Name Tab”. 104 Sort processes by CPU: Click target device click “Software Processes” click “%CPU Tab”. Sort processes by memory: Click target device click “Software Processes” click “Memory Tab”. 105 Kill one of process: Click target device click “Software Processes” click one of process that you want to kill click “Kill”. McAfee: Click target device click “McAfee” to view McAfee status. 106 Install McAfee evaluation version: Click target device click “McAfee” “Install””Evaluation””Install”. Install McAfee official version: Click target device click “McAfee” “Install””Enter serial number”enter the legal serial numberclick “Save” click “Official version” “Install”. 107 Activate McAfee: Click target device click “McAfee” “Activate”enter the legal serial numberclick “Save”. 108 Update McAfee: Click target device click “McAfee” “Update”. Enable McAfee: Click target device click “McAfee” “Protect”. 109 Acronis: Click target device click “Acronis” to view Acronis status. Set Acronis ASZ size: Click target device click “Acronis” “Install””Select Acronis Secure Zone size”set ASZ sizeclick “Save”. 110 Install Acronis evaluation version: Click target device click “Acronis” “Install””Evaluation””Install”. Install Acronis official version: Click target device click “Acronis” “Install””Enter serial number”enter the legal serial numberclick “Save click “Official version” “Install”. 111 Activate Acronis: Click target device click “Acronis” “Activate”enter the legal serial numberclick “Save”. 112 Update Acronis: Click target device click “Acronis” “Update”. Backup: Click target device click “Acronis” “Backup”. 113 Restore: Click target device click “Acronis” “Restore”. Terminal: Click target device click “Terminal” to view and enter the command line. 114 Restart the device: Click target device “Restart””Restart” to reboot the device. Shut the device down: Click target device “Power Off””Power Off” to shut the device down. 115 Hibernate the device: Click target device “Hibernate””Hibernate” to hibernate the device. Wakeup the device: Click target device “Wakeup”” Wakeup” to wake up the device. 116 6.3. Notifications management Click the icon to switch to “Notifications” page to view all notifications. 6.3.1. Notification Sorting: Click “Sort by Severity” or “Sort by Date”. 117 6.3.2. Account Switch: Click “select menu” to select account. 6.4. Settings Management Click the icon to switch to “Settings” page to view all setting options. 118 6.4.1. Change Account Password: Click “Your account” Enter new password and click “Save” to change password. 6.4.2. Account Details: Click “Details” to view account detail information. 119 6.4.3. Account Log Out: Click “Log Out” to log out. 120 6.4.4. Server Version: 6.4.5. Language Switch: Click “Language” and select one of supported languages to switch to. 121 7. Windows Standalone Agent 7.1. Agent Console To use SUSIAccess3.0, users must install the Agent software on the monitored device. After installing the agent software, users can launch the agent program from the System Tray. Click right mouse button on the System Tray above, to start the SUSIAccess3.0 agent initial configuration. 7.2. Connect to Server Click “Server Setting” in the pop-up menu to connect agent to server. For security concerns, password protection is necessary for editing the configurations. Enter the password twice and it will be used for future editing tasks. 122 In the following window, enter the server IP address or server name and the device name, and then click “Save & Connect” button to establish the connection to server. If the device’s motherboard supports Intel AMT, users can also enter AMT’s account ID and password here, then after connecting to the server, the administrator can use Remote KVM to connect to the device via Intel AMT even when the device is powered off. Note: The device’s BIOS must be pre-configured to enable Intel AMT so that SUSIAccess can use it. 123 7.3. Hardware Monitor Click “Hardware Monitor” in the pop-up menu to open the monitoring window for the local device. If the color of the icon in front of the menu item is red, an abnormal situation has occurred. In the Hardware Monitor window, users can get in sync with device’s temperature, voltage 124 and fan speeds, as well as the hardware/SQFlash status. If some values exceed the threshold settings, the color of the monitored item will turn red. The threshold values can be configured in the remote server software. 125 7.4. System Protection Click “System Protection” in the pop-up menu to enter the System Protection function of the agent software. The administration password is also required to enter the function. The System Protection function relies on the add-on software powered by McAfee. If it has not been installed, users can click the “Install” button and the agent will check if the add-on installer exists and try to install it. If it doesn’t exist in the local hard drive, the agent will download the installer via Internet. 126 To enable the McAfee add-on, you need to enter a separate license key. Users can choose to ignore it and use this add-on for 30 days. After installing the add-on, enter the “System Protection” again and users can click “ON” to turn on the system protection which leverages the “white listing” technology to prevent the device from any potential threats. 7.5. System Backup / Recovery Click “System Backup / Recovery” in the pop-up menu to enter the “Backup/Recovery” function of the agent software. The administration password is required to enter the function. 127 The “System Backup / Recovery” function relies on the add-on software powered by Acronis. If it has not been installed, users can click the “Install” button and the agent will check if the add-on installer exists and try to install it. If it doesn’t exist in the local hard drive, the agent will download the installer via Internet. To enable the Acronis add-on, you need to enter a separate license key. Users can choose to ignore it and use this add-on for 30 days. After installing the add-on, you need to create ASZ (Acronis Security Zone) before using Backup/Recovery functions. 128 After creating the ASZ, enter the “System Backup / Recovery” function again and users can click “Backup” to backup the system immediately, or click “Recovery” to recover the system from previous backup. Users can click the “Settings” icon in the above window to set up the auto-backup schedule. Users can setup the weekly or monthly System back schedule in the following dialog. 129 7.6. Custom Setting Click “Custom Setting” in the pop-up menu to enter the “VNC Setting” function of the agent software. VNC is a kind of excellent remote control software which allows the server to control agent devices remotely. An administration password is required to enter the function. There are three kinds of VNC setting mode to choose from. If “Default” mode is chosen, VNC password and VNC port can use default setting values. If “Custom” mode is chosen, users can set the values of VNC password and port. If “Close” mode is chosen, VNC function is then disabled. 130 131 8. Linux Standalone Agent TBD 132