1
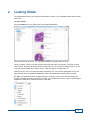
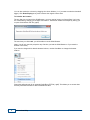
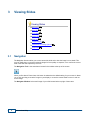
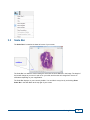
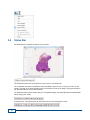
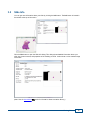
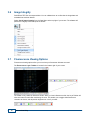
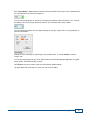
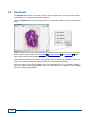
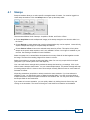
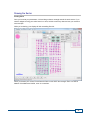
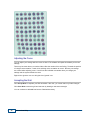
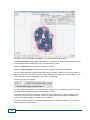
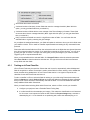
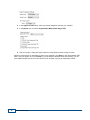
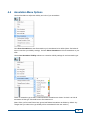
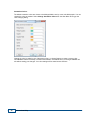
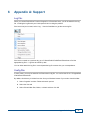
Phenochart™
Whole Slide Contextual Viewer
for Annotation & Review
User's Manual
© 2015, PerkinElmer, Inc. All rights reserved.
Notice
The information in this document is subject to change without notice and should not be construed as a commitment by
PerkinElmer, Inc. PerkinElmer assumes no responsibility for any errors that may appear in this document. This manual is
believed to be complete and accurate at the time of publication. In no event shall PerkinElmer be liable for incidental or
consequential damages in connection with or arising from the use of this manual.
This manual describes how to use Phenochart version 1.0.0 software.
For more information contact:
PerkinElmer, Inc.
68 Elm Street, Hopkinton, MA, 01748, USA
Phone: 800-762-4000 or +1 203-925-4602
Fax: +1 203-944-4904
Email: [email protected]
Web site: http://www.perkinelmer.com
Table of Contents
1
Overview.............................................................................................................. 4
2
5
Loading ..............................................................................................................
Slides
3
.............................................................................................................. 8
Viewing Slides
4
3.1
Navigation
........................................................................................................................................ 8
3.2
Magnifier
........................................................................................................................................ 10
3.3
Scale........................................................................................................................................
Bar
11
3.4
Status........................................................................................................................................
Bar
12
3.5
Slide ........................................................................................................................................
Info
13
3.6
Image........................................................................................................................................
Integrity
14
3.7
Fluorescence
........................................................................................................................................
Viewing Options
14
3.8
Snapshots
........................................................................................................................................ 16
.............................................................................................................. 17
Annotations
4.1
Stamps
........................................................................................................................................ 19
4.2
TMA ........................................................................................................................................ 20
4.3
Automatically
........................................................................................................................................
Generated
23
4.4
4.3.1
Training
an inForm Classifier
................................................................................................................................
25
Annotation
........................................................................................................................................
Menu Options
27
4.5
Review
........................................................................................................................................ 29
5
..............................................................................................................
30
Contacting
PerkinElmer
6
..............................................................................................................
31
Appendix
A: Support
7
..............................................................................................................
33
Appendix
B: PerkinElmer TIFF Specification
8
..............................................................................................................
38
Appendix
C: EULA
Index
........................................................................................................................ 42
Contents
3
Overview
1
Phenochart is a slide viewer for scans created by the Vectra 3 Quantitative Pathology Imaging System.
Phenochart allows you to:
View and navigate around whole slide images
Select areas of interest for further review and multispectral imaging
Identify TMA cores for imaging
Phenochart is freely available and can be installed on multiple machines at your site.
4
Phenochart Help
2
Loading Slides
The Slide Browser allows you to select and load slides. It shows a list of available studies and the slides
within them.
To select a slide:
Click the Load button in the upper left to bring up the Slide Browser.
The list of studies is on the left. You can browse deeper to see slides within a study.
When you select a study on the left, the right side shows the scans in that study. If you select a slide
within a study, the right side will show scans of that slide only. Click a column header to sort by it. This
may help you find a slide with a specific name, a slide acquired on a certain date, etc.
Double click any scan on the right hand side to load that scan. You can also highlight the scan on the
right hand side and click Load. Click Cancel to close the Slide Browser without loading anything.
By default, the browser will show the slide thumbnail, a summary column, and columns showing the
number of annotations pending acquisition or review. You can add other columns. Use the View Columns
dropdown to select which columns are shown in the table:
Loading Slides
5
You can also resize the columns by dragging the column dividers, (i.e. if you want to make the thumbnail
bigger). Click Reset Display at any time to restore the original column sizes.
To initialize the browser:
The very first time you launch the Slide Browser, you may need to locate your Vectra Data. You locate
the Vectra Data by selecting an example scan within it. Phenochart obtains the example by asking you
to open a PerkinElmer TIFF file (.qptiff).
The next time you click Load, you will be able to use the Slide Browser.
(Note: You will only see this prompt the very first time you load the Slide Browser or if you reset the
browser in the menu.)
If you need to change which data the browser looks at, use the Gear Menu to change the browser
location:
Phenochart will again ask for an example PerkinElmer TIFF file (.qptiff). This allows you to access data
that may have been archived or data in a different location.
6
Phenochart Help
Vectra Data:
Vectra 3 stores scan data by ‘study.’
A study is a group of slides that belong together; this could be an actual study (like Ki67 markers in
breast cancer), all slides from one customer, etc.
Each study will contain one or more slides. Each slide can be scanned more than once (if needed). Any
acquired Multispectral fields from a slide scan will be stored within the scan folder.
Loading Slides
7
Viewing Slides
3
Viewing Slides
Navigation
Magnifier
8
10
Scale Bar
11
Status Bar
Slide Info
12
13
Image Integrity
14
Fluorescence Viewing Options
Snapshots
3.1
14
16
Navigation
The Navigation functions allow you to move around the slide and to view the image in more detail. This
may be useful when you need to review the image for focus quality or exposure, or to confirm the correct
area of the slide was captured by the scan.
The Navigation Tool is the arrow button located in the toolbar at the top of the screen:
When you first launch Phenochart, this button is selected as the default setting for your mouse. It allows
you to click and drag to move the image on your display or to use the mouse wheel to zoom in and out
on the image.
The Navigator Window is the small image of your slide located at the top right of the screen.
8
Phenochart Help
The Navigator Window contains a small image of the entire slide and a red box within that image. The red
box shows you what part of the slide is being displayed on the main image on your screen. You can
click and drag the red box in the Navigator Window to change which area of the slide to display. (Note:
The main image will not update until you release the mouse once you have moved the box to your
desired location). Or, click on any area of the image in the Navigator Window, and the red box (and the
main image on the screen) will move to that section of the slide.
The Navigator Window is displayed on your screen by default.However, you can hide this window at any
time by unchecking Show Navigator in the Gear Menu at the top right of your screen:
To redisplay the Navigator Window, check Show Navigator again in the Gear Menu. This Navigator
preference (show vs. hide) is saved across sessions.
You can zoom in and out on the slide. As you zoom in and out, the red box in the Navigator Window will
change in size to continually identify which portion of the slide is being displayed.
There are three ways to zoom in and out on the slide:
1. Select from the pre-defined resolutions (1.25x, 4x, 10x, 20x, and 40x), listed on the Navigation Toolbar
at the lower left of your screen:
Viewing Slides
9
2. Use the +/- buttons on the Navigation Toolbar.
3. Use your mouse wheel to zoom in and out on the slide, as mentioned above. When you use the
Navigation Toolbar to zoom, the zoom is centered on your field of view. When you use the mouse
wheel, the zoom is centered on your mouse cursor. At all times the text to the right of the 40x button
will update to show the current resolution.
At any time, you can select Fit (also located on the Navigation Toolbar), which will fit the entire scanned
image to the application window. (Note: In general, the Vectra 3 scanning software will scan at either 4x
or 10x. However, whenever you load a slide, it is shown ‘fit’ to your screen).
3.2
Magnifier
The Magnifier is the window in the upper left corner of your screen:
The Magnifier shows a magnified (zoomed in) view of the slide centered on your cursor. This lets you
quickly inspect individual regions in more detail without changing the overall zoom.
The Magnifier window is displayed on your screen by default. You can hide this window at any time by
unchecking Show Magnifier in the Gear Menu at the top right of your screen:
10
Phenochart Help
3.3
Scale Bar
The Scale Bar is located at the lower left corner of your screen:
The Scale Bar is a reference scale showing the actual size of tissue features in the image. The length of
the bar will change as you zoom in and out on your slide, and the units will change from microns to
millimeters depending on your magnification.
The Scale Bar displays on your screen by default. You can hide it at any time by unchecking Show
Scale Bar in the Gear Menu at the top right of your screen:
Viewing Slides
11
3.4
Status Bar
The Status Bar is located at the bottom of your screen.
The Status Bar shows the current position of your cursor on the slide scan.
The coordinates are shown in millimeters and are updated in real time as you move your cursor on the
screen. The origin is the upper left hand corner of the slide as it sits on the stage. This physical location
will differ depending on your Vectra hardware.
The Status Bar also shows intensity values. For brightfield images, the Status Bar shows standard RGB
values ranging from 0-255:
In fluorescence, one intensity value for each filter is shown, also ranging from 0-255:
12
Phenochart Help
3.5
Slide Info
You can get more information about your slide by clicking the Info button. The Info button is located in
the toolbar at the top of the screen:
Click the Info button to open the Slide Info dialog. This dialog shows detailed information about your
slide, how it was scanned, and properties of the resulting scan file. It also shows a color overview image
of the slide.
(Note: See the Annotations
17
section for information about Annotation History.)
Viewing Slides
13
3.6
Image Integrity
PerkinElmer TIFF files are tamper-evident. You can validate them to confirm that the image data and
metadata have not been altered.
Select Check Image Integrity from the Gear Menu at the top right of your screen. The software will
perform the integrity check and report the results.
3.7
Fluorescence Viewing Options
Fluorescence viewing options allow you to see how your fluorescent slide was scanned.
The Fluorescence Layer Toolbar is located in the bottom right of your screen:
The toolbar is only visible for fluorescent slides. When you load a fluorescent slide, the Layer Toolbar will
show one button for each filter used during the scan. This enable you to toggle what fluorescence
channels are shown, and adjust their brightness or color if you want.
14
Phenochart Help
Each Layer Button is labeled with the common name for that filter. Each layer’s color is determined by
the color selected in the Vectra scan protocol.
You can turn the signal layer on and off by clicking the Layer Button. When the button is ‘on,’ it shows
the display color on your image. When the button is ‘off,’ it is drawn with a ‘hatch’ pattern.
You can change the display color and signal intensity for any layer. Right click on any Layer Button to
open the Layer Editor:
Change the color of the layer by selecting any of the preset colors, or choose Custom to create a
custom color.
You can also change the intensity, which will increase or decrease the apparent brightness for signals
from that filter. The default intensity is 100%.
Click Reset at any time to return to the color and intensity default settings.
The Layer Editor will close when you move your mouse off the editor.
Viewing Slides
15
3.8
Snapshots
The Snapshot button allows you to save a picture of the main display area. You can use these images
in publications or to share screenshots with colleagues.
Click the Snapshot button in the lower right corner of your application window. It will show the Snapshot
Editor.
Adjust the location and zoom for your slide using the navigation tools. Use the options in the Snapshot
Editor to add or remove overlays of the Scale Bar 11 , Navigator Window 8 , or Annotations 17 . These
options affect only the saved Snapshot, not the main window settings.
(Note: When you first launch Phenochart, the Scale Bar overlay is turned on for snapshots. During your
session, the software will retain the overlay selections from the last saved snapshot.)
When your image is ready, click the Save button in the Snapshot Editor. You can navigate to different
parts of the slide to take multiple snapshots. When you have saved all your snapshots, click the Cancel
button to close the Snapshot Editor.
16
Phenochart Help
4
Annotations
An annotation is created when you mark an area of interest on a slide for further multispectral imaging.
There are several types of annotations: stamped fields 19 , TMA cores 20 , and inForm automatically
generated fields 23 .
There are different states within each type of annotation.
Pending Acquisition: This annotation has been identified for multispectral imaging, but has not yet
been acquired.
Pending Review: A reviewer must accept this annotation before it can be imaged.
Acquired: Multispectral imagery was taken for this annotation.
Acquisition Failed: This annotation was slated for multispectral imaging, but the acquisition failed to
complete correctly.
Rejected: A reviewer rejected this annotation; it will not be acquired.
Ignored: This annotation was ignored. It will not be considered for multispectral imaging.
Deleted: A user deleted this annotation. If there was multispectral imagery associated with this
annotation, it was also deleted.
Sent to inForm: This annotation was sent to inForm for rudimentary analysis or inForm classifier
training.
Annotations are color coded according to their state. See Annotation Colors 28 for how to change the
colors, and see Annotation Visibility 27 for how to show or hide types of annotations.
To create or review annotations, you must log in. Click Login and enter a username. When you have
completed your work, click the same button to Logout.
When you are logged in, you can right-click on any annotation to ignore or delete it.
When Vectra is acquiring MSI fields for a slide, the annotations for the slide are locked. You will not be
able to add or change the annotations until Vectra finishes acquiring fields.
You can see the history of a scan's annotations in the Slide Info dialog. Click the Info button and select
the Annotation History tab to view the log of annotations and actions. The log records each annotation
action and the associated user name. The annotation ID groups actions for each annotation together.
The annotation log includes a tamper-evident hash code. If a log file is altered, Phenochart will give an
error and refuse to open the file.
Annotations
17
You can sort the columns by annotation, date, or user to see the actions taken for each annotation.
18
Phenochart Help
4.1
Stamps
Stamp annotations allow you to select specific rectangular areas of interest. You must be logged in to
create stamp annotations. Click the Stamp button to open up the stamp editor:
There are three different kinds of stamps: Acquisition, Review, and Push to inForm:
Choose Acquisition to take multispectral imagery of the stamp area(s) the next time this slide is on
the Vectra.
Choose Review to create stamps that must be reviewed before they can be acquired. Vectra will only
acquire multispectral imagery of accepted stamp annotations.
Choose Push to inForm to launch the selected stamp area into inForm. This option will only allow
stamps at the scan's native resolution, and is only available if inForm 2.2 or higher is installed on your
machine. See Training a Classifier for more information.
Select the stamp size in camera fields; this determines how many fields will be tiled together to make
the image. The size of the resulting image will be shown in microns.
Select the resolution to use when acquiring the fields. (Note: You can only acquire 0.25 micron/pixel
(40x) fields if your Vectra system has a 40x objective.)
Your cursor will show a rectangle which previews the stamp size based on your settings. Click on the
slide to create a stamp at that location. You can create multiple stamps. The preview rectangle will snap
to existing stamps when it is close to them. Zoom and pan normally with the mouse or zoom buttons to
find areas of interest.
All pending annotations (acquisition or review) must be the same resolution. If you have selected a
resolution in error, you will need to ignore or delete the pending fields. If you wish to acquire fields at
multiple resolutions, stamp and acquire the fields at one resolution first. You may then return to stamp
and acquire fields at other resolutions.
If you create an incorrect annotation, you can quickly delete it by holding down the Control key and
clicking on the annotation. The cursor will change to a red X when an annotation can be deleted.
Annotations
19
4.2
TMA
Tissue Micro-Array (TMA) annotations let you locate TMA cores within whole-slide images and acquire
multispectral imagery of each TMA core. You can use sector labels to identify different sections of cores,
as appropriate, and use the row and column labels to match the TMA’s numbering scheme. Correct
labeling will make it possible to match downstream analysis with the original core information.
TMA Editor
Click the TMA button on the toolbar to open the TMA editor.
For best results, select the core finding parameters in the editor before drawing your sector.
Row and Column Labels
Select the Sector number for your TMA sector. Then choose the appropriate labels for your sector's
rows and columns. Row and column labels can be either numbers or letters and can go in increasing or
decreasing order. The grid will show you the labels of the sector’s four corners.
Phenochart displays labels as row,column, where rows go across and columns go up and down in the
slide view. Check the Switch rows and cols checkbox if you have columns that go across and rows
that go up and down.
Core Settings
Once the labels are correct, select the desired core finding parameters to the right of the labels.
Identify if the TMA cores are for acquisition or review. If you select cores for review, only the accepted
cores will be acquired.
Choose the size of your TMA cores. If the exact core size isn’t listed, choose the next larger one.
Choose the resolution to use when imaging your cores. If you plan to image multiple sectors at the same
time, the resolution must be the same for all sectors. To choose another resolution, you must first
acquire, delete, or ignore your pending cores.
Choose an imaging size for your cores:
Core will take a square image of exactly Core Size x Core Size microns.
Core + 10% and Core +20% will give you square images with a margin to account for slight variations
in core size.
NxN fields are rectangular fields as described. This option will enable you to take imagery consistent
with early versions of Vectra. Note that these fields may take significant extra area around the core,
and may include neighboring cores.
20
Phenochart Help
Drawing the Sector
Finding Cores
Once you have set your parameters, click and drag to draw a rectangle around the entire sector. If you
need to navigate to bring your entire sector in to view, hold the control key down and use your mouse to
zoom and pan.
While you’re drawing, your display will look something like this:
When you release your mouse, Phenochart will find the cores within the rectangle. Each core will be
labeled. If the labels aren't visible, zoom in to see them.
Annotations
21
Adjusting the Cores
You can adjust your settings after the cores are found. The software will update immediately to the new
settings.
There may be cases where you need to further refine the results of the core finding. To tweak the position
of a single core annotation, control+click and drag on the annotation to move it. Be sure your settings
are correct before adjusting cores. You will lose the individual core tweaks when you change your
settings and the system refinds the cores.
Right-click to ignore a core or to bring back an ‘ignored’ core.
Accepting the Grid
Click Accept Grid to complete your TMA annotation. After this, you cannot make any further changes.
Click Clear Grid to reset the grid and start over by drawing a new sector rectangle.
You can continue to add additional sectors if desired/necessary.
22
Phenochart Help
Common Issues and Resolutions
Numbering
If the software finds more or fewer cores than you’ve drawn, you will see a warning in red. You may need
to change your row and column labels so the number of cores found matches the number you selected.
If the sector, row and column label of a new core is the same as that of another pending core, or if the
software finds more or fewer cores than you have selected, you will see a warning in red. Change the
sector, row or column labels to correct the conflict.
Core Size
If the core finder provides drastically incorrect results, it usually means the core size is not set correctly.
Try adjusting the Core Size so the size of the circles matches the size of your cores.
Fluorescence Layers
In Fluorescence, only visible layers will be used to find the cores. Turn off any layers that seem to be
preventing the core finder from identifying the cores.
4.3
Automatically Generated
Phenochart allows you to automatically select fields of interest using a trained inForm classifier. This will
only be available on computers with an activated version of inForm Tissue Finder, version 2.2 or higher.
You can use inForm to add fields for acquisition or review, or to preview how inForm will select fields on
your slide during a fully automated Vectra slide scan.
Click the Auto button to open the editor.
Click the Browse... button to load an inForm algorithm or project that you’ve trained for this type of slide.
If you haven’t created an algorithm yet, please see the section Training an inForm Classifier 25 .
Phenochart will confirm that the algorithm is valid for your slide. This takes a few seconds.
Click Classify to classify the slide once the algorithm is validated. Depending on your algorithm settings
and the size of your slide, this can take anywhere from a few to upwards of ten minutes.
Adjust the selection settings when the slide has been classified to see which fields will be chosen.
Annotations
23
The fields on the screen update immediately as you change the selection settings.
Use Selection Type to identify whether the fields are for Acquisition or Review. Fields marked for review
must be reviewed and accepted before they can be acquired by Vectra.
Choose the Resolution to be used when acquiring your fields.
Select the Tissue Category of interest from the Tissue Classifier in your inForm algorithm.
You will need to determine an MSI (multispectral imaging) Strategy to determine 1) how many fields you
will take, and 2) how strong they are in the category of interest. This allows you to get the fields you are
most interested in, with the most efficient use of time and disk space.
There are two types of strategies:
You can choose the top fields in your Tissue Category of interest. If you choose this, inForm will select
the fields with the greatest coverage of your Category of Interest.
You can also choose from any fields that have at least some coverage of your Tissue Category. If you
choose this, inForm will limit its selection of fields. Only fields that cover the required percentage (or
greater) of the Tissue Category of interest will be considered.
If you choose the second option (‘Fields with selected category coverage of at least X%’), you will also
need to choose if you want to take:
24
Phenochart Help
All the fields that meet the threshold
A selected number of randomly chosen fields that meet the coverage threshold. (Note: With this
option, you may get fewer fields than you asked for.)
A selected number of fields with the most coverage of the Tissue Category of Interest. These fields
must meet the minimum coverage threshold. (Note: Again with this option, you may get fewer fields
than you asked for.)
Using a minimum threshold can result in a significant number of fields. You can further limit the
selected fields to a grid by selecting the grid coverage.
As you adjust the settings listed above, your fields will update in real time to show you which fields meet
your selection criteria. This is useful for classifier experimentation and testing for fully automated Vectra
protocols.
Phenochart will show the fields that inForm has selected as well as the fields that were ignored (because
they did not meet the selection criteria). If you would like to override the inForm decision, you can do so
by using the right click menu. The right click menu gives you the percentage of your class of interest.
Toggle to ignore or acquire/review that field.
When you are satisfied with the selected fields, click Accept Fields to make the selection permanent.
Click Clear Fields to clear the selection and start over. The right click menu will also have entries to
accept fields and clear fields.
4.3.1
Training an inForm Classifier
inForm Tissue Finder may be used from Phenochart and Vectra 3 to automatically select Multispectral
fields for acquisition or review. Phenochart is used to select fields for inForm training, and to validate the
tissue classifier during development. inForm Tissue Finder version 2.2 or higher is required to train
classifiers for use with Phenochart and Vectra 3.
To train a classifier in inForm, select the fields for training on your slide using Phenochart’s stamp tool.
Within the Stamp tool, select Push to inForm, and select the fields that represent all tissue categories
that you need. inForm will launch automatically and load the fields. You can load additional slides and
stamp additional fields within Phenochart.
When you have finished selecting fields within Phenochart, switch to inForm to train your classifier:
1. Configure your project to have a Trainable Tissue Finding Step.
2. It is often beneficial to downsample your imagery. This makes the classification much faster and
for 10x scans it can improve the results as well. Within the Prepare Images step, start with a
downsampling of 4:1. If the classifier is not performing well, reduce the downsampling to 2:1.
Annotations
25
3. In the Segment Tissue step, select your tissue categories and train your classifier.
4. In the Export step, check the Segmentation Maps (multi-image TIFF).
5. Save your project. Saving the project within the study folder will make it easy to locate.
Return to Phenochart if you would like to test out your classifier. Click Auto to open the automatic field
editor, load your project, and click Classify. If you feel that the classifier needs more training, you can
push additional fields into inForm and continue to train and test until you get satisfactory results.
26
Phenochart Help
4.4
Annotation Menu Options
Use the Gear Menu to adjust the visibility and color of your annotations:
Click Show Annotations to see all annotations you have selected to be visible. (Note: See below for
how to customize your visibility settings). Uncheck Show Annotations to hide all annotations on your
slide.
Use the Set Annotation Visibility submenu to customize visibility settings for each annotation type:
Check an annotation type to make it visible whenever annotations are shown. Uncheck it to hide all
annotations of that type. Check All to turn all annotations on.
(Note: When you first start Phenochart, Ignored and Deleted annotations are hidden by default. Any
changes that you make to the type visibility will be remembered for the next session.)
Annotations
27
Annotation Colors:
The default annotation colors are chosen to be distinguishable, even by most color-blind people. You can
change the colors as needed. Select Change Annotation Colors from the Gear Menu to bring up the
color changing dialog:
Change the color by selecting any of the preset colors, or choose Custom to create a custom color.
Click Reset to restore the factory color-blind-safe defaults. Click OK to save your changes. Cancel will
exit without saving your changes. Your color settings will be saved across sessions.
28
Phenochart Help
4.5
Review
Annotations that have been selected for Review must be accepted before they will be acquired by Vectra.
Click the Review button to open the review editor.
Choose Accept to accept annotated fields or cores. When you move your mouse over an annotation
awaiting review, the cursor will change to a checkmark.
Click the annotation to accept it. The annotation is now ready for acquisition.
Choose Reject to reject annotations. When you move your mouse over an annotation awaiting review,
the cursor will change to an x.
Click the field to reject it. It will not be acquired.
Click Accept Remaining to accept all remaining unreviewed fields. You will get a confirmation dialog
telling you how many fields you are about to accept.
You can use the right-click menu to Accept or Reject fields and to Accept Remaining. You can also
use the right-click menu to un-review a field or change your review of a field.
Annotations
29
Contacting PerkinElmer
5
For more information, contact PerkinElmer or your local authorized PerkinElmer distributor:
PerkinElmer, Inc.
68 Elm Street
Hopkinton, MA, 01748, USA
Technical Support:
Phone: 800-762-4000 or +1 203-925-4602
Fax: +1 203-944-4904
PerkinElmer Web Site:
http://www.perkinelmer.com
Technical Support Email:
[email protected]
30
Phenochart Help
6
Appendix A: Support
Log File:
When you contact PerkinElmer Technical Support for a Phenochart issue, you will be asked for the log
file. Including the log file with your initial report will aid in solving the problem.
If the issue has just occurred, select ‘Log…’ from the Gear Menu to get the current log file.
If the issue occurred on a previous day, go to C:\Users\Public\PerkinElmer\Phenochart to find the
appropriate log file in. Log files are named by date.
You can either attach the log file or cut and paste the log file contents into your correspondence.
Config File:
In some cases, you may be asked for the Phenochart.config file. You can find this file in C:\ProgramData
\PerkinElmer\Phenochart\.
By default, this directory is hidden from view. Use your Windows browser if you need to view this folder:
1. Select ‘Organize’ and then ‘Folder and search options’
2. Select the View tab
3. Select ‘Show hidden files, folders, or drives’ and then click OK
Appendix A: Support
31
32
Phenochart Help
7
Appendix B: PerkinElmer TIFF
Specification
Background
This describes a TIFF format that PerkinElmer uses for its tissue images. The imagery may be a simple
RGB image, a set of unmixed multispectral image (MSI) components, or a whole-slide scan. In the latter
case, it may be a brightfield (BF) color RGB image or a multiband fluorescence (FL) image.
The goal is to use the same syntax and metadata for all these kinds of images, and minimize the
semantic distinctions where possible. Specifically, the unmixed MSI images can be considered to be an
idealized multiband FL image where signal corresponds to the presence of a stain or fluorescent dye in
the sample.
Data format
The files are TIFF or BigTIFF images, depending on image size, with multiple images per file.
For images larger than about 2K x 2K pixels, tiled format is used, and the image is provided in several
resolutions (pyramidal tiled images). Tile size is 512 x 512 pixels. Images smaller than 2K x 2K use
stripped format.
The highest resolution (baseline) image(s) appear first in the file. For each resolution there are N baseline
images where N depends on the contents. For BF images, N=1 and each image is an RGB image. For
FL images or unmixed component images, N = number of bands, which is usually > 1, and each image
is a grayscale image.
A thumbnail RGB image is provided, and this is a good image to use as an icon in graphical image lists.
This comes after the baseline images, meaning it is the second image in BF (RGB) images, and the (N
+1)st image for FL images or unmixed component images.
Next come the reduced-resolution images (if present). The pyramid contains enough levels that the
image size is no larger than 2K x 2K at the coarsest resolution.
For whole-slide scans, there are two more non-tiled images after these: an optional RGB image of the
label, and a macro (low-resolution) RGB image of the whole slide.
Overall, the arrangement is:
Table 1. Images
Description
RGB /
mono
Tile /
Strip
Resolution
Notes
Baseline image
Varies
Varies
Full
Tiled if > 2K x 2K
RGB for BF, else mono
More full-resolution
images
Mono
Varies
Full
If N > 1
Thumbnail
RGB
Stripped ~500 x 500
Half-resolution images
Varies
Varies
Half
Only if baseline is tiled
Quarter, eighth, etc.
Varies
Varies
Quarter,
eighth, etc.
Continues until 2K x 2K or smaller
Appendix B: PerkinElmer TIFF Specification
33
Description
RGB /
mono
Tile /
Strip
Resolution
Notes
Macro (overview) image RGB
of whole slide
Stripped ~2000 x 4000 Required for whole-slide scans
Label image
Stripped ~500 x 500
Optional for simple RGB and MSI
components
RGB
Optional, whole-slide scans
Detection
Readers can recognize PerkinElmer tissue images via the contents of the “Software” TIFF tag (see
below). The file suffix is .qptiff for whole slide scans.
Metadata
Metadata is contained in two locations: within standard TIFF tags as listed in the table below, and within
the ImageDescription string, using a set of XML tags described below. These are provided for each image
(IFD) in the file, and describe that image rather than the baseline image or the scan as a whole. The
ScanProfile tag is only provided on the first, baseline image as it may be large.
Table 2. TIFF tags
TIFF Tag
34
Optional Description of contents
Software
Starts with “PerkinElmer-QPI”
ImageDescription
Further metadata in XML format (see next section)
ImageWidth
Width of the image in pixels
ImageLength
Height of the image in pixels
ResolutionUnit
Unit used for resolution and position (see below)
XResolution
Pixel X resolution (see below)
YResolution
Pixel Y resolution (see below)
XPosition
Y
Sample X location in ResolutionUnits. This is ULHC location except
for Macro image which reports its image center.
YPosition
Y
Sample Y location in ResolutionUnits. This is ULHC location
except for Macro image which reports its image center.
SampleFormat
Integer (1) for BF, FL; or float (3) for unmixed MSI images
SMinSampleValue
Minimum signal value in the image
SMaxSampleValue
Maximum signal value in the image
BitsPerSample
8 (FL); 8, 8, 8 (RGB); or 32 (unmixed component)
Phenochart Help
TIFF Tag
Optional Description of contents
SamplesPerPixel
1 (FL or unmixed component) or 3 (RGB)
NewSubfileType
0 for full-resolution images, 1 for reduced res images
TileWidth
Y
Tile width (512) if tiled format is used
TileLength
Y
Tile height (512) if tiled format is used
TileOffsets
Y
List of tile offsets, if tiled format is used
TileByteCounts
Y
Size of each (compressed) tile, if tiled format is used
StripOffsets
Y
List of strip offsets, if tiled format is not used
RowsPerStrip
Y
Number of rows per strip, if tiled format is not used
StripByteCounts
Y
Size of each (compressed) strip, if tiled format is not used
PlanarConfiguration
1 (chunky) for RGB images, 2 (planar) otherwise
PhotometricInterpretation
2 (RGB) for RGB images, 1 (BlackIsZero) otherwise
DateTime
Acquisition time
Compression
May be None, CCITT Group 3, PackBits, LZW, or JPEG
JPEG fields
Y
JPEG fields are defined when JPEG compression is used
ResolutionUnit, XResolution and YResolution are required fields in a valid TIFF file. When the true
resolution of the image is known, ResolutionUnit will be 3 (cm) and XResolution and YResolution will be
pixels/cm. When the true resolution is not known, ResolutionUnit will be 2 (inch) and XResolution and
YResolution will be 96 (pixels/inch). PKI TIFF pixels are always square so XResolution and YResolution
will always have the same value.
The TIFF spec is not explicit about the data type and value for SMinSampleValue and
SMaxSampleValue; the PerkinElmer writer uses the same data type as the image pixels (byte or float).
Image Description contents
The ImageDescription tag contains a string in XML format. The string contains a top-level < PerkinElmerQPI-ImageDescription> element. Nested within this element are child elements with the tag names and
values as listed in the table below. Elements appear in the order listed. Values are stored as text content
of the element. Elements are required unless otherwise specified. See the example below.
Table 3. Image Description tags
Tag
Optional
Contents
DescriptionVersion
Version of the image description field itself, a single number. This
document describes version 2 of the field.
AcquisitionSoftware
Software used to acquire the image
Appendix B: PerkinElmer TIFF Specification
35
Tag
Optional
Identifier
Contents
GUID in string format. This is an identifier for the image file itself.
SlideID
Y
ID of the slide that this image was taken from.
Barcode
Y
Barcode text of the slide this image was taken from.
ComputerName
Y
Name of the computer on which the slide was scanned.
ImageType
A string identifying the type of image within the file (Table 1), with
the following values:
- FullResolution
- ReducedResolution
- Thumbnail
- Overview
- Label
IsUnmixedComponent
“True” for unmixed multispectral images, otherwise “False”.
ExposureTime
Exposure time as an integer number of microseconds.
For unmixed images, this is the exposure time for the dominant
wavelength band for the component (FL); or the brightest
wavelength in the cube (BF).
SignalUnits
36
A byte wwww tttt where the tttt nibble indicates the signal unit
type from the following:
0 – raw counts
1 – normalized (counts/second/gain/full-scale/binning)
4 – OD (optical density)
5 – dark-corrected counts
and the wwww nibble indicates how the signal is weighted across
the spectral bands (or colors):
0 – average across all bands
2 – total summed signal across all bands
4 – peak signal in highest-valued band
Thus, for example, a value of 68 (hex 44) encodes OD units with
peak-signal weighting.
Name
Y
Band (component) name for FL or unmixed MSI images, not
present for RGB images
Color
Y
Color to use when rendering this band, as decimal r,g,b byte
triplet, r FL or unmixed MSI images. Not present for RGB images.
Objective
Y
Objective name, if known, otherwise not present
ScanProfile
Y
Element containing scan and/or and unmix parameters. It is valid
XML whose contents are opaque to most readers. It is only
provided on the first (baseline) image, and is omitted from all other
IFDs.
Phenochart Help
Tag
ValidationCode
Optional
Contents
Used for internal data integrity checks – readers can ignore this.
For whole slide images (BF and FL), SignalUnits will be 64 (hex 40) (raw counts, peak signal). For
unmixed images, SignalUnits will reflect the unmix settings.
Sample ImageDescription for the DAPI band of a FL image:
<?xml version="1.0" encoding="utf-8"?>
< PerkinElmer-QPI-ImageDescription >
<DescriptionVersion>1</DescriptionVersion>
<AcquisitionSoftware>VectraScan 1.0.0</AcquisitionSoftware>
<ImageType>FullResolution</ImageType>
<Identifier>AABED946-BB58-44FB-95B3-48E177E3BB83</Identifier>
<IsUnmixedComponent>False</IsUnmixedComponent>
<ExposureTime>50</ExposureTime>
<SignalUnits>64</SignalUnits>
<Name>DAPI</Name>
<Color>0,0,255</Color>
<Objective>4x</Objective>
<ScanProfile><!-- this will be a serialized scan protocol. It is valid
XML but otherwise opaque -->
</ScanProfile>
<ValidationCode>4281ff86778db65892c05151d5de738d</ValidationCode>
</ PerkinElmer-QPI-ImageDescription >
Appendix B: PerkinElmer TIFF Specification
37
Appendix C: EULA
8
The follow ing is an agreement (the "Agreement") betw een you and Cambridge Research & Instrumentation Inc., 68 Elm St.,
Hopkinton, MA 01748 ("CRI") for softw are know n as Research Use Only Phenochart and its accompanying documentation
(collectively, the "Softw are"). By installing and/or using the Softw are, you agree to the follow ing terms and conditions. If you
do not agree to all of the terms and conditions in this Agreement, you may not install or use the Softw are.
1. Single Use License. The Softw are is licensed to you and not sold. Subject to the terms and conditions of this
Agreement, CRI hereby grants to you a restricted, non-exclusive, non-transferable, non-assignable, non-sublicensable and
revocable single-use license to use, for your internal purposes only, the executable code version of the Softw are and the
accompanying documentation in hard copy or electronic format. CRI grants no other licenses hereunder, except for the
Research Use Only Phenochart Softw are set forth above. Nothing in this Agreement shall be construed as a general
internal use license. For the avoidance of doubt, no right to use Phenochart in Diagnostic Applications is granted under this
Agreement. CRI RESERVES ALL RIGHTS NOT EXPRESSLY GRANTED BY THIS AGREEMENT.
2. Specific Restrictions. You may use the Softw are only on a single computer. You may make only one (1) copy of the
Softw are, solely for backup purposes. You agree that, except as expressly permitted by applicable law , neither you nor a
third party acting on your behalf, directly or indirectly, shall: (i) decompile, disassemble or reverse engineer the Softw are;
(ii) modify or create derivative w orks of the Softw are; (iii) use the Softw are in any manner to provide service bureau,
commercial time-sharing or other computer services to third parties; (iv) transmit the Softw are or provide its functionality, in
w hole or in part, over the Internet or other netw ork (except as expressly permitted); (v) use the Softw are for any purpose
other than solely for your internal research except as may be otherw ise agreed in w riting by CRI; (vi) use the Softw are to
provide any analytics or diagnostics or otherw ise for the benefit of any third party except as may be otherw ise agreed in
w riting by CRI; or (vii) sell, distribute, rent, lease, sublicense or otherw ise transfer the Softw are to a third party; (viii)
create any computer softw are program or documentation w hich is similar to or competitive w ith the Softw are; (ix)
encumber, disclose or otherw ise make available to any third-party the Softw are; (x) remove or obliterate any copyright,
trademark, or other proprietary rights notice in or on the Softw are. You may not transfer the Softw are to a third party. This
Agreement may not be assigned in w hole or in part, except that either party may assign this Agreement w ithout the other
party’s prior w ritten consent in the event of a merger w ith an Affiliate or other reorganization w ith an Affiliate. Any
attempted assignment contrary to the terms of this Agreement shall be void.
Except w here expressly provided, you are prohibited, directly or indirectly, in w hole or in part, to: (a) lease, rent, loan or
commercially share (including time-share or electronically transmitting over a netw ork to a third party) or otherw ise use the
Softw are for purposes of providing a service bureau; (b) transfer or assign possession or allow use of any copy of
Softw are to another party other than as specifically permitted, and (c) modify, translate, reverse engineer, decrypt,
decompile, disassemble, create Derivative Works based on, or otherw ise attempt to discover the Softw are Source Code or
underlying ideas, techniques or algorithms, including the review of data structures or similar materials produced by the
Softw are. Except as expressly permitted under this Agreement, all usage of the Softw are shall be limited to the legal entity,
and its Affiliate(s) through this End User License Agreement.
3. Ow nership of Softw are. CRI and/or its suppliers ow n all right, title and interest, including all copyrights, trademarks,
tools, know -how , and processes in and to the Softw are. You shall have no title or ow nership in the Softw are. CRI shall
retain all rights to market, license and/or sell the Softw are in markets outside of the Research Markets. The Softw are
contains confidential information and trade secrets of CRI. You (i) acknow ledge, and agree not to contest, CRI's rights in
the Softw are; and (ii) agree not to disclose any confidential information of CRI regarding the Softw are or that is otherw ise
disclosed to you in connection w ith this Agreement. You recognize that the covenants contained in this License are
reasonable and necessary to protect the legitimate interests of CRI, that CRI w ould not have entered into this Agreement in
the absence of such covenants, and that your breach or threatened breach of such covenants shall cause CRI irreparable
harm and significant injury, the amount of w hich shall be extremely difficult to estimate and ascertain, thus, making any
remedy at law or in damages inadequate. Therefore, you agree that CRI shall be entitled, w ithout the necessity of posting
of any bond or security, to the issuance of injunctive relief by any court of competent jurisdiction enjoining any breach or
threatened breach of such covenants and for any other relief such court deems appropriate. This right shall be in addition
to any other remedy available to CRI at law or in equity.
4. Term ination. The license granted in Section 1 above is effective until terminated. This Agreement is conditioned upon
your continued compliance w ith the terms and conditions hereof and w ill terminate automatically w ithout notice from CRI if
you fail to comply w ith any term or condition of the Agreement. Furthermore, CRI may terminate this Agreement at any time
upon thirty (30) days’ notice. Upon termination of this Agreement, you shall immediately destroy all copies of the Softw are
(including all accompanying documentation) and any other confidential and proprietary information you have received
during or in connection w ith this Agreement.
38
Phenochart Help
5. Lim ited Warranty. CRI w arrants that the media on w hich the Softw are is provided w ill be free from defects in materials
and faulty w orkmanship under normal use for a period of ninety (90) days from the date of delivery. Your exclusive
remedy under this Section 6 shall be, at CRI's option, a refund of the price paid for the Softw are or replacement of the
media on w hich the Softw are w as provided so long as that media has been returned to CRI under a CRI-issued return
authorization. CRI shall have no responsibility to replace media damaged by accident, abuse or misapplication.
6. No Other Warranties. EXCEPT FOR THE LIMITED WARRANTY STATED IMMEDIATELY ABOVE, THE SOFTWARE IS
PROVIDED "AS IS" WITHOUT WARRANTY OF ANY KIND, AND CRI EXPRESSLY DISCLAIMS ANY AND ALL IMPLIED
WARRANTIES, INCLUDING WITHOUT LIMITATION ANY WARRANTY OF MERCHANTABILITY, FITNESS FOR A PARTICULAR
PURPOSE OR NON-INFRINGEMENT OF THIRD PARTY RIGHTS. CRI DOES NOT REPRESENT OR WARRANT THAT THE
RESULTS OR THE USE OF THE SOFTWARE WILL BE CORRECT, ACCURATE OR RELIABLE, OR THAT THE SOFTWARE
WILL OPERATE UNINTERRUPTED OR ERROR-FREE, OR THAT DEFECTS IN THE SOFTWARE WILL BE CORRECTED. YOU
ASSUME ALL RISK ASSOCIATED WITH THE USE, RESULTS AND PERFORMANCE OF THE SOFTWARE.
7. Lim itation of Liability. IN NO EVENT SHALL CRI, ITS AFFILIATES OR SUPPLIERS, OR THEIR RESPECTIVE EMPLOYEES,
OFFICERS OR AGENTS, BE LIABLE FOR ANY DAMAGES ARISING OUT OF THE USE OR INABILITY TO USE THE
SOFTWARE, INCLUDING WITHOUT LIMITATION INCIDENTAL, SPECIAL, CONSEQUENTIAL, PUNITIVE, EXEMPLARY, INDIRECT
OR DIRECT DAMAGES (INCLUDING WITHOUT LIMITATION DAMAGES FOR LOSS OF PROFITS, LOSS OF DATA, RE-RUN
TIME, INACCURATE INPUT, WORK DELAYS, BUSINESS INTERRUPTION OR ANY OTHER COMMERCIAL DAMAGES OR
LOSSES), WHETHER IN AN ACTION IN CONTRACT, TORT (INCLUDING NEGLIGENCE AND STRICT LIABILITY) OR
OTHERWISE, AND EVEN IF CRI HAS BEEN ADVISED OF THE POSSIBILITY OF SUCH DAMAGES, AND REGARDLESS OF
WHETHER ANY REMEDY FAILS OF ITS ESSENTIAL PURPOSE. CRI’s AGGREGATE LIABILITY ARISING OUT OF OR
RELATING TO THIS AGREEMENT, FOR ANY AND ALL DAMAGES THAT YOU MIGHT INCUR (REGARDLESS OF THE FORM
OF ACTION GIVING RISE TO SUCH LIABILITY, WHETHER IN CONTRACT, TORT OR OTHERWISE) SHALL NOT EXCEED [ONE
HUNDRED DOLLARS ($100)]. Some jurisdictions do not allow the exclusion or limitation of liability for consequential or
incidental damages. In such jurisdictions, our liability is limited to the greatest extent permitted by law , or the amount you
paid for your purchase, w hichever is less.
8. U.S. Governm ent End Users. The Softw are qualifies as commercial computer softw are for purposes of the Federal
Acquisition Regulations (FAR) §52.227-19 and the Department of Defense Supplement to the FAR (DFARS) §52.227.7013.
If the Softw are is acquired by a civilian government agency, it is furnished w ith only the minimum Restricted Rights
provided by FAR 52.227-19. If the Softw are is acquired by a military agency, it is furnished w ith only the minimum
Restricted Rights provided by DFARS 52.227-7013(c)(1)(ii).
9. Miscellaneous. This Agreement contains the entire agreement of the parties w ith respect to the subject matter hereof
and supersedes any proposal or prior agreement, w ritten or oral, and any other communications betw een the parties
relating to the subject matter hereof. No modification or w aiver of any provision of this Agreement shall be effective unless
in w riting and signed by the parties. No delay or failure on the part of any party in exercising any right under this
Agreement shall impair any such right or any remedy of such party, nor shall it be construed to be a w aiver of any
continuing breach or default under this Agreement. In the event any provision of this Agreement is held to be
unenforceable, the remaining provisions of this Agreement w ill remain in full force and effect. This Agreement shall be
governed by the law s of the State of New York w ithout regard to principles of conflicts of law s. Any disputes relating
hereto shall be adjudicated only in the state or federal courts in New York County, New York State, and you hereby
consent to the exclusive jurisdiction of those courts. This Agreement shall not be governed by the United Nations
Convention on Contracts for the International Sale of Goods, the application of w hich is expressly excluded. You may not
assign or otherw ise transfer this Agreement or any of your rights or obligations therein w ithout the prior w ritten consent
of CRI. You may not use the Softw are for any unlaw ful purpose nor export or re-export the Softw are except as
authorized by law .
10.TIFF m odule: This softw are uses the LibTIFF 4.0.3 library (http://rem otesensing.org/libtiff/)
The TIFF module used is Copyright © 1988-1997 Sam Leffler Copyright © 1991-1997 Silicon Graphics, Inc.
Permission to use, copy, modify, distribute, and sell this softw are and its documentation for any purpose is hereby granted
w ithout fee, provided that (i) the above copyright notices and this permission notice appear in all copies of the softw are and
related documentation, and (ii) the names of Sam Leffler and Silicon Graphics may not be used in any advertising or publicity
relating to the softw are w ithout the specific, prior w ritten permission of Sam Leffler and Silicon Graphics.
THE SOFTWARE IS PROVIDED “AS-IS” AND WITHOUT WARRANTY OF ANY KIND, EXPRESS, IMPLIED OR OTHERWISE,
INCLUDING WITHOUT LIMITATION, ANY WARRANTY OF MERCHANTABILITY OR FITNESS FOR A PARTICULAR PURPOSE.
Appendix C: EULA
39
IN NO EVENT SHALL SAM LEFFLER OR SILICON GRAPHICS BE LIABLE FOR ANY SPECIAL, INCIDENTAL, INDIRECT OR
CONSEQUENTIAL DAMAGES OF ANY KIND, OR ANY DAMAGES WHATSOEVER RESULTING FROM LOSS OF USE, DATA OR
PROFITS, WHETHER OR NOT ADVISED OF THE POSSIBILITY OF DAMAGE, AND ON ANY THEORY OF LIABILITY, ARISING
OUT OF OR IN CONNECTION WITH THE USE OR PERFORMANCE OF THIS SOFTWARE.
11.This softw are uses the Vigra 1.6.0 library (http://hci.iw r.uni-heidelberg.de/vigra/)
This softw are includes machine-executable object code generated by a source language processor from the Vigra libraries
covered by the VIGRA license. These libraries have not been modified by CRI and all rights are reserved by the copyright
holder. This softw are is provided "as is" w ithout express or implied w arranty, and w ith no claim as to its suitability for any
purpose.
The Vigra library is Copyright © 2008, Ulrich Kothe, Heidelberg Collaboratory for Image Processing
The VIGRA License
=================
(identical to the MIT X11 License)
Permission is hereby granted, free of charge, to any person obtaining a copy of this softw are and associated documentation
files (the "Softw are"), to deal in the Softw are w ithout restriction, including w ithout limitation the rights to use, copy, modify,
merge, publish, distribute, sublicense, and/or sell copies of the Softw are, and to permit persons to w hom the Softw are is
furnished to do so, subject to the follow ing conditions:
The above copyright notice and this permission notice shall be included in all copies or substantial portions of the Softw are.
THE SOFTWARE IS PROVIDED "AS IS", WITHOUT WARRANTY OF ANY KIND EXPRESS OR IMPLIED, INCLUDING BUT NOT
LIMITED TO THE WARRANTIES OF MERCHANTABILITY, FITNESS FOR A PARTICULAR PURPOSE AND NONINFRINGEMENT. IN
NO EVENT SHALL THE AUTHORS OR COPYRIGHT HOLDERS BE LIABLE FOR ANY CLAIM, DAMAGES OR OTHER LIABILITY,
WHETHER IN AN ACTION OF CONTRACT, TORT OR OTHERWISE, ARISING FROM, OUT OF OR IN CONNECTION WITH THE
SOFTWARE OR THE USE OR OTHER DEALINGS IN THE SOFTWARE.
12.This softw are uses the libjpeg-turbo 1.5.13 library (http://libjpeg-turbo.virtualgl.org)
This softw are makes use of the libjpeg-turbo library. This library has not been modified by CRI and all rights are reserved by
the copyright holder. This softw are is provided "as is" w ithout express or implied w arranty, and w ith no claim as to its
suitability for any purpose. The library is covered by the libjpeg-turbo License. Additionally libjpeg-turbo incorporates parts of
libjpeg w hich is covered by the BSD license.
The libjpeg-turbo license is reproduced below :
Redistribution and use in source and binary forms, w ith or w ithout modification, are permitted provided that the follow ing
conditions are met:
- Redistributions of source code must retain the above copyright notice, this list of conditions and the follow ing disclaimer.
- Redistributions in binary form must reproduce the above copyright notice, this list of conditions and the follow ing disclaimer
in the documentation and/or other materials provided w ith the distribution.
- Neither the name of the libjpeg-turbo Project nor the names of its contributors may be used to endorse or promote products
derived from this softw are w ithout specific prior w ritten permission.
THIS SOFTWARE IS PROVIDED BY THE COPYRIGHT HOLDERS AND CONTRIBUTORS "AS IS", AND ANY EXPRESS OR
IMPLIED WARRANTIES, INCLUDING, BUT NOT LIMITED TO, THE IMPLIED WARRANTIES OF MERCHANTABILITY AND FITNESS
FOR A PARTICULAR PURPOSE ARE DISCLAIMED. IN NO EVENT SHALL THE COPYRIGHT HOLDERS OR CONTRIBUTORS BE
LIABLE FOR ANY DIRECT, INDIRECT, INCIDENTAL, SPECIAL, EXEMPLARY, OR CONSEQUENTIAL DAMAGES (INCLUDING, BUT
NOT LIMITED TO, PROCUREMENT OF SUBSTITUTE GOODS OR SERVICES; LOSS OF USE, DATA, OR PROFITS; OR BUSINESS
INTERRUPTION) HOWEVER CAUSED AND ON ANY THEORY OF LIABILITY, WHETHER IN CONTRACT, STRICT LIABILITY, OR
TORT (INCLUDING NEGLIGENCE OR OTHERWISE) ARISING IN ANY WAY OUT OF THE USE OF THIS SOFTWARE, EVEN IF
ADVISED OF THE POSSIBILITY OF SUCH DAMAGE.
The BSD for libjpeg license is reproduced below :
40
Phenochart Help
The authors make NO WARRANTY or representation, either express or implied, w ith respect to this softw are, its quality,
accuracy, merchantability, or fitness for a particular purpose. This softw are is provided "AS IS", and you, its user, assume
the entire risk as to its quality and accuracy.
This softw are is copyright (C) 1991-2010, Thomas G. Lane, Guido Vollbeding.
All Rights Reserved except as specified below .
Permission is hereby granted to use, copy, modify, and distribute this softw are (or portions thereof) for any purpose, w ithout
fee, subject to these conditions:
(1) If any part of the source code for this softw are is distributed, then this README file must be included, w ith this copyright
and no-w arranty notice unaltered; and any additions, deletions, or changes to the original files must be clearly indicated in
accompanying documentation.
(2) If only executable code is distributed, then the accompanying documentation must state that "this softw are is based in
part on the w ork of the Independent JPEG Group".
(3) Permission for use of this softw are is granted only if the user accepts full responsibility for any undesirable
consequences; the authors accept NO LIABILITY for damages of any kind.
These conditions apply to any softw are derived from or based on the IJG code, not just to the unmodified library. If you use
our w ork, you ought to acknow ledge us.
Permission is NOT granted for the use of any IJG author's name or company name in advertising or publicity relating to this
softw are or products derived from it. This softw are may be referred to only as "the Independent JPEG Group's softw are".
We specifically permit and encourage the use of this softw are as the basis of commercial products, provided that all
w arranty or liability claims are assumed by the product vendor.
13.This softw are uses the zlib1 1.2.7 library (http://w w w .zlib.net)
This softw are makes use of the zlib1 library. This library has not been modified by CRI and all rights are reserved by the
copyright holder. This softw are is provided "as is" w ithout express or implied w arranty, and w ith no claim as to its suitability
for any purpose. The library is covered by the zlib1 License.
The zlib 1 license is reproduced below :
(C) 1995-2012 Jean-loup Gailly and Mark Adler
This softw are is provided 'as-is', w ithout any express or implied w arranty. In no event w ill the authors be held liable for any
damages arising from the use of this softw are.
Permission is granted to anyone to use this softw are for any purpose, including commercial applications, and to alter it and
redistribute it freely, subject to the follow ing restrictions:
1. The origin of this softw are must not be misrepresented; you must not claim that you w rote the original softw are. If you use
this softw are in a product, an acknow ledgment in the product documentation w ould be appreciated but is not required.
2. Altered source versions must be plainly marked as such, and must not be misrepresented as being the original softw are.
3. This notice may not be removed or altered from any source distribution.
Should you have any question concerning this Agreement, you may contact CRI by w riting to CRI, 68 Elm St., Hopkinton, MA
01748. You may also call +1-508-435-9500.
Appendix C: EULA
41
Navigation Toolbar
Navigator Window
Index
8
8
-P-AAlgorithm training
25
Annotated fields or cores
Annotation
17
Annotation Colors
27
Annotation file
17
Annotation Visibility
27
PerkinElmer Technical Support
Phenochart
4
29
-RResolution
-S-
-CConfig File
31
Contact PerkinElmer
30
-FFluorescence Layer Toolbar
-GGear Menu
Image Integrity
14
-L-
Technical Support
30
Tissue Category
23
TMA button
20
TMA editor
20
-V-
Layer Button
14
Layer Editor
14
Log File
31
Login
17
-M10
-NNavigation Tool
42
14
Selection Type
23
Slide Browser
5
Snapshot button
16
Snapshot Editor
16
Software EULA
38
Stamp Annotations
19
Status Bar
12
Study
5
Support, Technical
30
-T-
8
-I-
Magnifier
23
8
Phenochart Help
Vectra Data
5
30
For more information, contact PerkinElmer or your local authorized PerkinElmer distributor:
PerkinElmer, Inc.
68 Elm Street
Hopkinton, MA, 01748, USA
Phone: 800-762-4000 or +1 203-925-4602
Fax: +1 203-944-4904
Email: [email protected]
Web site: http://www.perkinelmer.com
Phenochart is a trademark of PerkinElmer, Incorporated.
Microsoft and Excel are trademarks of Microsoft Corporation in the United States and other countries.
All other trademarks or registered trademarks are the property of their respective owners.
© 2015, PerkinElmer, Inc. All rights reserved.