1
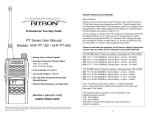
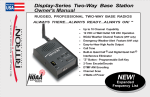
Quick Start Up Guide for GateGuard Kit
Congratulations on your purchase of Ritron’s “RGG1” GateGuard Kit. This short
quick start guide will help simplify your installation.
Ritron’s GateGuard Kit enables you to wirelessly and remotely activate any gate,
door, or any other piece of equipment that has a motorized operator.
Kit Contents:
Make sure your package includes all of these items:
1)
RQX-XT Callbox
1)
RPS-EXPO Power Supply for the Callbox
1)
JBS Base Station Radio
1)
JBS-MMK Base Station Mounting Bracket
1)
JMX Handheld Radio
1)
BCJS-AD Drop-In Charger for the Handheld Radio
RPS-EXPO
RQX Callbox
JBS-MMK
JBS Base Station
BCJS-AD
JMX Handheld
Steps to Ensure Ease of Installation:
•
Unpack all of the items.
•
Charge the Handheld Radio using your drop-in charger for 16 hours to
ensure full charge of the battery.
•
Unscrew the fasteners of the Callbox faceplate and open the internal box
to install NI-Cad rechargeable D-Cell batteries. Once the rechargeable
batteries are installed, change the battery charge jumper switch to the
“ON” position. See Page 16 in the Callbox Manual.
•
Drill hole in the bottom or the back of the callbox to run the power wires
and switch closure wires into the Callbox.
Installing Your System:
Installing your Base Station
1) Plug your Base Station’s power supply (RPS-1A) transformer into a
standard 120VAC outlet and plug the male end of the power supply
into the back of your Base Station.
For Questions or Comments Contact Ritron at 800-872-1872.
2) Turn your Base Station on and turn to Channel 1 to communicate to
your callbox and handheld radio.
3) If you choose to mount the Base Station to a wall, you should first
install the mounting bracket (JBS-MMK) on the wall and then connect it
to the Base Station using the existing screws on the side of the Base
Station.
Installing your Callbox
1) Mount your callbox to a wall, gooseneck pedestal, or post using either
the included mounting flanges or optional Callbox mounting plate
(contact Ritron for details)
2) Connect the red and black wires from the callbox to your power supply
(RPS-EXPO). Red wire to (+) of power supply and black wire to (-) of
power supply. The RPS-EXPO power supply is included with your
GateGuard Kit
3) Connect the blue and green wires from the callbox to your Gate
Operator’s auxiliary output wires.
4) After wiring your callbox to your existing Gate Operator, be sure to seal
the hole to ensure its weather resistance.
Using your New GateGuard System:
•
To communicate from one radio to another simply press the push-to-talk
(PTT) button on the Handheld, Base Station, or Callbox radio. Release the
PTT button to listen.
•
To activate the gate from Handheld Radio press and hold the channel
button until the activation tone is complete. To use the Base Station to
activate the gate simply press and release the Z-Button. (See button
locations below)
•
To turn off the handheld radio and base station radio, push and hold the
“OFF” button.
¾
VHF handheld radios can be programmed to receive your local NOAA weather
radio broadcasts or National Weather Service alerts for threatening weather
conditions. See the JMX User Manual Pages 7-10 for details or contact Ritron for
assistance.
For Questions or Comments Contact Ritron at 800-872-1872.