1
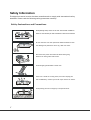
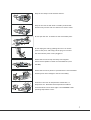
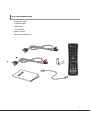
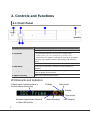
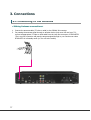
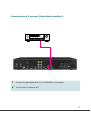
TABLE OF CONTENTS Notice 3 1. Before You Begin 6 1.1 Features ...................................................................................... 6 1.2 Accessories ................................................................................. 7 2. Controls and Functions 8 2.1 Front Panel.................................................................................. 8 2.2 Rear Panel................................................................................... 9 2.3 Remote Control Unit ................................................................. 10 2.4 Extending the Range of the RCU............................................... 11 3. Connections 12 3.1 Connecting to the Antenna ....................................................... 12 3.2 Connecting to TV....................................................................... 13 4. Menu Overview 16 4.1 Menu Instruction ...................................................................... 16 4.2 Menu Help ................................................................................. 16 4.3 Menu Structure ......................................................................... 17 5. Menu Operation 18 5.1 First Installation ....................................................................... 18 5.2 Installation ............................................................................... 18 5.3 Option ....................................................................................... 20 5.4 Channel ..................................................................................... 22 5.5 Advanced .................................................................................. 23 5.6 Status........................................................................................ 25 5.7 PVR ........................................................................................... 25 6. Viewing General Information 27 1 6.1 Banner Information .................................................................. 27 6.2 Changing between TV & Radio ................................................. 28 6.3 TV or Radio Channel Lists ......................................................... 28 6.4 Option ....................................................................................... 31 6.5 A/V+ ......................................................................................... 32 6.6 Fav ............................................................................................ 33 6.7 A-Z............................................................................................. 33 6.8 MHEG-5 EPG (Freeview Guide) ................................................. 34 7. PVR 36 7.1 PVR Information bar ................................................................. 36 7.2 Time Shift Operation................................................................. 37 7.3 OTR (One Touch Recording) ..................................................... 37 7.4 Schedule Recording .................................................................. 38 7.5 Record List ................................................................................ 40 7.6 Playback List ............................................................................. 41 7.7 Playback Operations ................................................................. 43 Additional Information 47 A.1 Troubleshooting........................................................................ 47 A.2 Technical Specifications............................................................ 49 2 Notice For your safety, please check the result of each action. Warnings, Cautions and Notes Throughout the whole manual, please pay special attention to the following marks that indicate hazardous situations. Caution Indicates a situation which, if not avoided, could damage the equipment or apparatus. Warnings Indicates a hazardous situation which, if not avoided, could result in serious injury. Note Indicates additional information to the user to make the user aware of possible problems and information of any importance to help the user to understand, to use and to maintain the installation. 3 Safety Information This digital terrestrial receiver has been manufactured to comply with international safety standards. Please read the following safety precautions carefully. Safety Instructions and Precautions Avoid placing heavy items on the unit. Ensure that ventilation holes are not blocked, as this constitutes a serious fire hazard. Do not clean the unit with petroleum-based cleansers as this can damage the paintwork. Use a dry, dust-free cloth. Disconnect the power and antenna cables during long absences or during electrical storms. Avoid dropping the Remote Control Unit. If there is a smoke or burning smell, turn off & unplug the unit immediately. Contact your local repair centre for advice. Avoid placing the unit on slippery or sloped surfaces. 4 Keep the unit away from all moisture sources. Keep the unit free of dust. Dust or metallic particles that find their way into the unit can cause fire or electric shock. Do not open the unit. It contains no user-serviceable parts. Do not unplug the unit by grabbing the cord. Turn off the power at the point, and firmly pull the plug. Do not move the unit while the power cord is plugged in. Ensure that the unit is kept well away from magnetic sources such as speakers. These can cause data loss (from the HDD). Ensure that the unit is placed in a position that is well-ventilated and away from direct sunlight or sources of humidity. Avoid use if the room air temperature exceeds 30 C, or drops below 5 C. Remember that temperatures inside an enclosed cabinet can be much higher. The HT9200DTR’s max. operating temperature is 45 C. 5 1. Before You Begin 1.1 Features Two Tuners Two recording and playback simultaneously Brilliant On Screen Graphic MPEG-2 Video(MP@ML), MPEG-1 Audio Layer1, Layer2, H.264/AVC, AC3(Dolby Digital), MPEG2/4 AAC Digital Tuner with Loop-through Wide Symbol Rate 7Mbps & Frequency Input 470~860MHz User friendly OSD menu with full function Vector Font and 256 color GUI(Graphic User Interface) VFD (Vacuum Fluorescent Display) Variable aspect ratio(4:3, 16:9) with Pan Vector or Letter Box Teletext and Subtitle supported(VBI & OSD) Installation by Easy Setup Guide Favorite Channel and Parental Lock Function OTA supported USB2.0 port or RS232C port for upgrading system software HDMI (High Definition Multimedia Interface) supported USB 2.0 Host & Slave supported LAN port(RJ-45) for future feature 500GB HDD Bookmarking & jump function MHEG-5: Access to a free 8-days Freeview EPG and ability to access interactive TV contents 6 1.2 Accessories Component cable Composite cable HDMI cable User’s Manual Remote Control AAA dry cell batteries x 2 7 2. Controls and Functions 2.1 Front Panel ① ② ⑤ ⑥ ③④ Item Description 1. Power Button Turns the receiver On/Off (Standby mode). 2. Jog Shuttle ① Increases/ decreases the volume levels in viewing mode. ② Pushing this to go to the channel list in viewing mode. ③ Moves the cursor up/down or left/right in menu mode. To transfer moving the cursor between up/down and left/right, push the Menu button. 3. Menu Button Shows the Main menu in viewing mode. 4. EXIT Button Exit from the current menu or cancels the current operation, if applicable. 5. Display (VFD module) Shows channel information and indicate operating status. In STAND BY mode, the display shows local time. 6. USB 2.0 Connector USB 2.0 Host is behind the panel door VFD Elements and Indicators Channel name, operating status or the time date is shown here TV/Radio Dolby Audio Standby Time Activity Animated rings indicate Timeshift or Other HDD activity 8 Active Recording HDD Capacity 2.2 Rear Panel 1 2 3 4 5 6 7 8 9 10 11 12 13 14 15 8 9 10 11 12 13 14 15 Item Description 1. SIGNAL IN Connect the Antenna In Cable. 2. LOOP OUT Loop Out is pass-through connector for your antenna signal. Connect other equipment needing an antenna connection to this connector. 3. LAN PORT Network Interface 4. CVBS OUT Use this to connect a composite video cable (CVBS- Yellow). Standard definition only (576i resolution). 5. YPbPr OUT Use these jacks to connect Y/Pb/Pr(Green, Blue, Red) component cables to a component video input on your TV. (576p and 576i resolution only supported due to copy protection specification) 6. Electric Inlet Lead 90~240V AC(Auto-selectable), 50~60Hz. 7. Power Switch Turn Power to the units On/Off 8. 9. USB2.0 USB2.0 Connector. 8- Slave (to computer) 9. Host ports *A third Host port is behind the panel door at the right front of unit. 10. HDMI OUT Connect to an HDMI input of TV or PC monitor. 1080i, 720p, 576p resolutions supported 11. S-VIDEO Connect to an S-VIDEO jack on you TV. Standard definition only(576i resolution). 12. Audio OUT Connect L/R (White/Red) analog audio cables to your TV or amplifier. 13. RS-232C Connects to another HT9200DTR or a PC serial port. 14. S/PDIF Digital audio output for connection to an amplifier(or TV). 15. IR SENSOR Connect the Infrared Ray sensor to extend Remote Control range. 9 2.3 Remote Control Unit All receiver features can be controlled with the remote controller. Button Description POWER Turns the receiver On/Off. TV/Rad Switches between TV and Radio. TEXT Operates MHEG5 functions when Service is available NUMERIC Buttons Select channels or can use as an ( ~ ) alphabetic search key in the sorted channel lists. LIST Display the channel list MUTE Turns the sound on/off. Moves in MHEG5 EPG Menu, REC list and Playing List MENU Display/ Exit the main menu. Exit to main menu from the sub-menu EPG Shows MHEG5 Electronic Program Guide (EPG) - The Freeview Guide. Info Shows the Channel information bar and extended program information ◀/▶ ( / ) Moves left/right in menu mode and change the settings in menu mode. ▲/▼ ( / ) Moves up/down in menu mode and change the settings in menu mode. OK( ) Confirms the choices and/or selections the highlighted menu item. V+/- Changes the volume level in viewing mode. 10 Button Description EXIT Go back step one menu level, cancel an operation, or exit from menu. P+/- Changes channels in viewing mode. Selects sub-pages in main menu. PAUSE Pauses and resume playback, recording and time shift buffer. PLAY Plays the recorded file. REW Rewind playback(recording or time-shift). Repeated presses accelerate rewind speed. STOP Stop playback, recording and clears time shift buffer. FF Fast forward playback (and time-shift). Repeated presses accelerate FFWD speed. REC Records the channel being viewed. SLOW Playback in slow mode. Repeated presses change the speed. PLAY LIST Displays the File list of recorded contents or being recorded ones REC LIST Displays the File list of the programmes or series booked for recording (reservation). MARK Sets a bookmark. JUMP Jump to a bookmark. Opt Selects options such as Audio Language, Teletext Language, Subtitle Language and Multifeed. A/V+ Select video mode (4:3, 4:3 Letter Box, 16:9) and audio mode (Left, Right, Stereo and Joint). Fav Selects from groups of favorite channels. A-Z Sorts Channel list, REC List, Play List alphabetically or numerically A-B Set the block to repeat, copy and cut. SLEEP Put units in Standby mode. Press repeatedly to adjust in 30 minutes increments. 2.4 Extending the Range of the RCU Your HT9200DTR is shipped with a small half-dome IR Sensor, on the end of a 2 meter cable. This allows you to house the HT9200DTR inside a (well ventilated) cabinet, without compromising on the unit responsiveness to remote commands. 11 3. Connections 3.1 Connecting to the Antenna <Making Antenna connections> 1. 2. 12 Connect the antenna cable (75 ohm co-axial) to the SIGNAL IN connector. For passing the antenna signal through to another device (such as a VCR and your TV), connect an appropriate 75 ohm co-axial cable from the Loop Out connector of HT9200DTR (The Loop Out connection will pass the antenna signal through to your Device even when HT9200DTR is in Standby mode (or Turn off at the switch) 3.2 Connecting to TV <Connecting to PC monitor or digital TV that has an HDMI input port> 1. 2. Connect the HDMI output on HT9200DTR to the HDMI input on your monitor or TV. Set the video output mode to 1080i or 720p or 576p by using ‘Resolution’ in A/V+ on RCU For the best access to HD programming at the highest available resolution, use this connection method. 13 <Connecting to digital TV that supports HD resolution (1080i, 720p, 576p) using the YPbPr port> 1. 2. Connect the YPbPr output on HT9200DTR to a set of matching YPbPr input on your TV. The Audio L/R out jacks can also be connected to matching jacks on your TV or you can use the digital audio Out (See Connecting to A/V receiver (Dolby Digital Amplifier) next page.) Set the video output mode to 1080i or 720p or 576p by using ‘Video Fromat’ in A/V+ on RCU For the contents copy protection, YPbPr can support 576p and 576i video output only. 14 <Connecting to A/V receiver (Dolby digital amplifier)> 1. Connect the optical digital audio out on HT9200DTR to A/V receiver. 2. Set the audio out mode as ‘AC3’. 15 4. Menu Overview 4.1 Menu Instruction Press the MENU button to display the menu. You can select the sub menu using ▲/▼/◀/▶ button. The selected sub menu becomes highlighted. When you have selected the sub menu you want, press button. If you want to return to the previous menu, press button. If you want to return to the live screen, press the Menu button. 4.2 Menu Help In the menu, short information is displayed at the bottom of the screen. : Using ▲/▼ button. : Using ◀/▶button. : Using button. : Moves in MHEG5 EPG Menu : Using button : Numerical button 16 4.3 Menu Structure In the menu, the short information is displayed at the bottom of the screen. Installation Antenna : Select the Antenna power settings. Auto Scan : Search the all channels automatically without specifying parameters. Manual Scan : Search the channels manually by specifying parameters. Region Scan: Search the channels by specifying the transmitter to which the user’s antenna is pointed. Option TV Output : Select the video or audio output. Language : Select the display language, audio language, and subtitle language. Parental Control : Change the password and select the censorship classification OSD Display : Setting OSD display time and transparency. Channel Recording List : The list of programs or series that have been booked for recording but not yet been recorded. Delete : Delete channels by “mode” (channel / favourite) and by “option” (TV, Radio etc.). Advanced Reset Factory Default : Restore the receiver to the default values. S/W Upload : Transfer the software from receiver to receiver or PC. USB Transfer : Transfer the system software between receiver and USB drive. Status Information : Check the version of HT9200DTR. PVR Record Setting : Set Time shift function and record time HDD Information : Check the capacity of HDD Format HDD : Format HDD 17 5. Menu Operation 5.1 First Installation You can install the receiver using First Installation for your convenience. ‘First Installation' allow you to set your receiver using simple procedure. 1. Select the desired language using the ▲/▼ 2. button. Press the scanning. button to confirm and begin 5.2 Installation 1. Press the Menu button to display the main menu. 5.2.1 Antenna 1. Select Antenna Power type using the ◀/▶ button. You can select Antenna Power value as Off normally or if the antenna needs power supplied from receiver, you can select Antenna Power value as On. Off is the default value in this option. If you have a masthead amplifier or distribution amplifier, you should not enable this option. 18 5.2.2 Auto Scan 1. The left window shows TV channels and the right window shows Radio channels during the scanning process. White channel names are new channels downloaded to your receiver. Gray channel names are already existing channels. 1. Choose Auto Scan menu and press button to begin scanning 2. You can press Exit at any time to stop scanning. A pop-up menu appears. 3. If you allow the complete scan, the same pop-up menu appears. 5.2.3 Manual Scan 1. Set the desired values ( see the below) to scan. Use the numeric keys (0-9) and ◀/▶ ▲/▼ 2. buttons. Press the Channel button to start the manual scan. : The target channel number for the manual scan. Frequency : The transmitter frequency of the channel Transmitter frequencies and other channel details for your area can be found on-line, or phoning your TV station. 19 5.2.4 Region Scan 1. Select the region where user’s are now living by using ◀/▶ ▲/▼ buttons. 2. Press the button to start the region scan. 5.3 Option 5.3.1 TV Output Setup 1. Select the desired TV output options with the ▲/ ▼/◀/▶ button. 2. Press the button to save your chosen settings and exit the dialog. TV Screen : Select the screen format of your TV (Full screen, LetterBox, Centre Cut) Dolby Digital(DD) : If you set it to the enable mode, you can listen Dolby-Digital audio in preference to other audio formats when the broadcasting contents are encrypted with Dolby-Digital audio format. Digital audio : If you set it to the enable mode, you can listen Dolby-digital audio through AC-3 decoder connecting with RCA output. HDMI Dolby Digital : If you set it to the enable mode, you can listen Dolby-digital audio through AC-3 decoder connecting with HDMI output. 5.3.2 Language 1. Select the language options using the ▲/▼/◀/ ▶ button. 2. Press the language. 20 button to save your chosen Display : Change the language used for the OSD and Menus. Audio 1-2 : Choose the preferred audio language for broadcast. Subtitle 1-2 : Choose the preferred subtitle language. 5.3.3 Parental Control You can block access to particular channels by age level. The users need to enter a password in order to watch blocked channel. 1. To change the password, press the ◀/▶ button, a dialog will open. 2. Use the numeric buttons(0-9) to type in the new password. 3. You will be prompted to reconfirm your password. Type it in a second time. 1. Set the desired rating level with ◀/▶ buttons. 2. Press the OK button to save and exit. Understanding Parental Rating Undefined G (to 9 years) PGR (to 11 years) AO (to 15 years) You have to enter password to watch the channels which is blocked by the age level. 21 5.3.4 OSD Display 1. Choose the desired options with the ▲/▼/◀/▶ button. 2. Press the button to save your setting and exit the dialog. Banner display time : Banner will remain onscreen for the selected time.(1~9 secs). Screen Saver : The Screen Saver function protects when listening to a Radio channel. The following options can be selected. (Disable, 5, 10, 20, 30, 60 and 120 Minutes) Radio Screen Saver : The Radio Screen Saver function protects when listening to a Radio channel. The following options can be selected. (Disable, 10 seconds to 120 Minutes) OSD Mixweight : Select the OSD transparency level. (Low, Middle, High). Teletext Mixweight : Select the Teletext transparency level. (Low, Middle, High). VFD Display : Select VFD display mode (Channel number + Name or Channel Name) 5.4 Channel 5.4.1 Record List Please see section, 7.5 Recording List. 5.4.2 Delete 1. You can delete channels by “mode” (channel / favourite) and by “option” (TV, Radio etc.). Select the delete mode or option with the ▲/▼/◀/▶ buttons. 2. Press the OK button to make the deletion, and exit the dialog. 22 5.5 Advanced OTA You can upgrade the latest software. The receiver checks whether the new S/W is released when you view channels. If the new version is detected, the receiver will be rebooted automatically and the download screen will appear. 5.5.1 Reset Factory Default 1. To perform a full factory reset to default value, simply press OK button. The confirmation window shown in the image will appear. 2. If you select 'Yes', the HT9200DTR will be reset to default factory values. 5.5.2 S/W Upload 1. Connect the receiver to another receiver or PC through RS-232 cable. 2. Turn the power off, and then on, for the target unit. 3. The SW transfer status is shown in real-time. 5.5.3 USB Transfer You can transfer the system software (firmware) between HT9200DTR and a USB drive (“memory stick” or HDD.) 1. Connect the USB device to a rectangular Host port on the front ( underneath the front panel at the right-handed side) of HT9200DTR. 2. Select the source and target (USB to STB or STB to USB) with the ▲/▼/◀/▶ button. 23 3. Select “Yes” to begin data transfer. The warning dialog shown below will remain onscreen during the update. 4. HT9200DTR will reboot automatically once the firmware has been updated. 5. When you next open this menu, new firmware detail should be shown in the lower section of screen. DO NOT DISCONNECT THE USB CABLE / DEVICE UNTIL THE TRANSFER IS COMPLETED! 24 5.6 Status 5.6.1 Information You can check system information such as; Model ID, Hardware version and Software version in this dialog. 5.7 PVR 5.7.1 Record Setting You can enable or disable the Time shift function in this window. You can also set a Default record time which is used for both the time shift buffer and recording file lengths. 1. Select the desired options with the ▲/▲/▲/▲ buttons. 2. Press the OK button to confirm your choice, and exit the dialog. Hard Drive : If this option is “on”, the hard disk is always “spun up” (i.e. operating). If the option is “off”, the hard disk goes into sleep mode. Whenever you perform a diskbased operation (i.e. recording or playback), the disk is spun-up. This saves minimal power, but it takes time for the drive to “wake from sleep”. Time shift : If selected “on”, the HT9200DTR will automatically record the channel being watched (to a temporary buffer – not a file). You can pause, rewind etc. “live TV” in this mode. If selected “off”, press the PAUSE button to activate the temporary record buffer. Start buffer time : You can set a default Start buffer time for recordings with this option. End buffer time: You can set a default End buffer time for recordings with this option. 25 5.7.2 HDD Information 1. This window allows you to see the following HDD details: Total size, Free size, Used size and the HDD model name. 5.7.3 Format HDD 1. If you press the OK button in this dialog all files on the HDD will be erased. TAKE EXTREME CARE WITH THIS OPTION AS THERE IS NO WAY TO RECOVER YOUR RECORDINGS! 26 6. Viewing General Information 6.1 Banner Information Show the signal quality SD or HD transmission Channel place and name Show the signal strength Event name Time table for actual event Date / Time Resolution Teletext Subtitle Audio Lock Scrambled Dolby Parental protection 1. Press the INFO button to display the channel Information bar for a few seconds. The display duration is set in the OSD Display MENU. * The output resolution is also shown on the top left corner of the screen. To view the extend program information : 1. Press the INFO button (while channel information bar is visible) to display the extended program information. The information bar remains onscreen when extend information bar is shown. 2. Press the ◀/▶ button to view further program information page. 3. Press the EXIT or INFO button, information to hide the information bar and extended program information.. 27 6.2 Changing between TV & Radio Press the TV/Rad button to switch between TV and Radio channels 6.3 TV or Radio Channel Lists TV Type (TV or Radio) Group Delete Lock Rename View Provider Name 28 TV Type (TV or Radio) Group Status 6.3.1Displaying and Using the channel list 1. Press the OK button or Channel list button to show the channel list. 2. Press the ▲/▼ button to move the selection cursor up and down the channel list. 3. Press the OK button to choose / watch the highlighted channel. 4. Press the EXIT button to close the channel list window. 1. To choose a channel with the numeric buttons 2. Somply press the ‘3’ button to watch channel 3, or ‘1’ and ‘0’ (in quick succession ) to select channel 10. 6.3.2 Understanding and Using Mode Commands The icons shown at the bottom of the channel list provide access to a number of “modes”. Modes are used to perform particular types of operations in the open window. 1. Press ◀/▶ button to select the desired mode. 2. The selected mode icon is highlighted, and the active mode name is shown on the label to the right of the icons. 3. View mode is automatically selected when you open the channel list. 29 6.3.2.1 Delete Mode 1. Select the Delete mode(Trash) icon with the ◀/ ▶ button. 2. Select channel you want to delete with the ▲/▼ button. 3. Press the OK button, and a tick will be shown to the right of the channel name. 4. Press the EXIT button to delete the channel, and exit the dialog. 6.3.2.2 Rename Mode 1. Select the Rename mode (R) icon with the the ◀ /▶ button. 2. Select the channel you want to rename with the ▲/▼ button, and press the OK button. And small name editing window will be displayed. 3. Choose each letter of the new channel name with the ▲/▼/◀/▶ buttons. 4. Press the OK button to enter each letter. 5. After renaming, press the “Done” icon(see below) 6. Press the EXIT button to leave the dialog. 6.3.2.3 Lock Mode 1. Select Lock mode(Padlock) icon with the the ◀/ ▶ button. 2. Select the channel that you want to lock with ▲/ ▼ buttons, and press the OK button. 3. Set the password. A Lock icon will appear on the left of the Channel name. This can be cancelled by pressing the OK button. 4. Press the EXIT button to save and exit. 30 6.3.2.4 Favorite Mode (Creating Favorites) 1. Select the Favorite mode (Two people) icon with the ◀/▶ button. 2. Press the OK button, and a small Favorite Window will appear to the right of the channel list. 3. Choose the group number with the ▲/▼ buttons, and confirm by pressing the OK button. To cancel the confirmation, press the OK button again. 4. Use the ▲/▼ buttons to choose, and press the OK button to add them to the Favorite group.. Press OK again if you accidentally ass a channel to a group. 5. Press the EXIT button (twice) to save and exit. 6.4 Option While watching TV or listening to Radio, press the Opt button. You can watch small pop-up window. You can select a option.(Audio Language, Teletext Language, Subtitle Language) If you want to change the option mode, press the ◀/▶ button. 6.4.1 Audio Language 1. Select the 'Audio' using the ◀/▶ button. 2. Press the ▲/▼ button to select a desired audio language. 3. Press the button to change the audio language. 6.4.2 Teletext Language 1. Select the 'Teletext' using the ◀/▶ button or press “Text” button on RCU. 2. Press the ▲/▼ button to select a language. 3. Press the button. 4. You can watch the Teletext contents in the language if it is available. 31 6.4.3 Subtitle Language 1. Select the 'Subtitle' using the ◀/▶ button. 2. Press the ▲/▼ button to select a language. 3. Press the button. 4. If the selected language is different from what is available, you can't watch the subtitle. 6.5 A/V+ While watching TV or listening to Radio, press the A/V+ button to open a small pop-up window. You can select an option.(Audio Mode, Video Mode) If you want to change the option mode, press the ◀/▶ button. 6.5.1 Audio Mode 1. Select the 'Audio Mode' using the ◀/▶ button. 2. Press the ▲/▼ button to set the output direction for speakers. (STEREO, LEFT, RIGHT, JOINT) 3. Press the button to save and exit. 6.5.2 Video Mode 1. Select the 'Video Mode' using the ◀/▶ button. 2. Press the ▲/▼ button to set screen format of your TV. 3. Press the 32 button to save and exit. 6.5.3 Video Format 1. Select the 'Video Mode' using the ◀/▶ button. 2. Press the ▲/▼ button to set Video format of the HT9200 DTR. 3. Press the button to save and exit. 6.6 Fav While watching TV or listening to Radio, press the Fav button. You can watch small pop-up window. You can select a Favorite group. 1. Select the 'Favorite' using the ◀/▶ button. 2. Press the ▲/▼ button to select a group. 3. Press the button, then you can watch the channel list of selected group. 6.7 A-Z While watching TV or listening to Radio, press the A-Z button. You can watch the sorted channel list. 33 6.8 MHEG-5 EPG (Freeview Guide) Press the EPG button to access Electronic Programme Guide (EPG) - The Freeview Guide. The Freeview Guide is very simple to use and enables you to view 8 days of programme listings on all Freeview channels. It also contains a Now/Next screen that shows what is on now and next for each channel. When new channels are added to the Freeview service they will automatically appear on the Freeview Guide. Time intervals are arranged in a row and Channel lists are shown in a column. 6.8.1 Navigating MHEG-5 EPG (Freeview Guide) 1. Press the EPG button to access EPG 'Loading...' is shown on the screen while Freeview Guide is being downloaded. 1. The current day’s programmes for the channel you are watching is displayed. The programme you are watching appears in the top right corner along with a description, parental rating and captioning information for the highlighted programme (on the lower right below the ¼ screen video window). 2. Press the ▲/▼ button to navigate the channel’s programme listing for the current day. As scrolling, a synopsis of highlighted programme, parental rating and captioning information are displayed. After scrolling down to past midnight, the next day’s listing is displayed and after scrolling up to past midnight, the previous day’s listing is displayed 34 1. Press the ◀/▶ button to navigate between Freeview channels. The current channel listing is displayed next ‘Chnl’. Press the numeric button of desired channel number to move directly to that channel. Press button to go to the previous day’s listing or press day’s listing for the current channel. button to go to the next Press the OK button to view a highlighted programme. Press EXIT button to exit Freeview Guide and return to normal TV viewing. 6.8.2 What’s On Now/Next page 1. Press the EPG button again on Freeview Guide (the current day’s programme) to view ‘What’s On Now/Next’ that displays what’s on now and next on all Freeview channels. 2. Press the ▲/▼ button navigate through channel or press the numeric button of desired channel number to move directly to that channel. 3. Press the OK button to view a highlighted programme. 4. Press the EXIT button to exit EPG and return to the programme that you were watching. 5. Press the EPG button again to return to the current day’s listing page for the highlighted channel. The RED button will launch any available MHEG-5 interactive application when available. The TEXT button will launch the MHEG-5 Digitext application when available. 35 7. PVR This chapter covers the time-shifting, recording, playback, bookmarking and editing functions. 7.1 PVR Information bar To access the PVR Information Bar, press the ▲/▼/◀/▶ buttons or any of the “trick play” buttons: PLAY(▶), FF(▶▶), REW(◀◀), SLOW(▶). Current Channel Name Current Position Record Time PVR Status Progress Bar Control Position Time Gap The description of icons : Time Shift status : Recording status : Playback and trick status :Time Shift playback and trick status : Playback the program being recorded 36 7.2 Time Shift Operation The Time Shift function automatically records the channel being viewed into a temporary buffer.. 1. If ‘Time Shift’ is enabled in the PVR menu (see section 5.7.1 Recording Settings), the HT9200DTR continuously streams the channel being watched (into a temporary recording buffer file). You can then pause, rewind, fast forward & play through the “live” program 1. If ‘Time Shift’ is disabled in the PVR menu, you need to press the PAUSE button to time shift the program you’re watching. As above, you can then rewind, fast forward & play through the “live” program. 7.3 OTR (One Touch Recording) 1. Press the Record( ● ) button to record the channel you're watching. And PVR information bar indicating that the current service is being recorded is displayed for a few seconds. 2. To stop a Recording, press the the STOP( ■ ) button or it will automatically stop at the end of the current recording program. 3. When two scheduled recordings already exist at the same schedule time, the warning message “You cannot record this program as you have too many scheduled recordings at this time. Please check your record list.” is displayed. 37 Max duration time for recording is set to the default record time which set in Menu. If you want to change the duration, press the ◀/▶ button. (Minimum: 5Minutes / Maximum: 10Hours) 7.4 Schedule Recording 7.4.1 Program Recording 1. In the EPG, select the programs you want to book for recording and press the Record button. 2. If you press “No”, A successful program recording booking is made to show the icon [R] against that program listing. 3. If unsuccessful, press the Record button again. 1. To cancel the program recording, press the Cancel button and confirm ‘Yes” in the window ‘Are you sure want to cancel this program booking?. 1. A successful program recording booking is listed in the Recording list with the icon [R] until the time at which the program has started recording. 2. At the time of starting recording, booked program moves to Playback list and shows in RED. 38 7.4.2 Series Recording 1. In the EPG, select the program that is part of Series you want to book for recording and press the Record button. 2. A successful series recording booking is made showing the icon [S] against that program listing. 3. If unsuccessful, press the Record button again. 1. To cancel the series recording, press the Cancel button and confirm ‘Yes” in the window ‘Are you sure want to cancel this series booking?. 1. A successful series recording booking is listed in the Recording list with the icon [S]. Once a part of series is recorded, the next part is automatically listed on the Recording list. 2. At the time of starting recording, booked program moves to Playback list and shows in RED. 39 7.4.3 Split Event Recording Split Event is a program that may consists of mutilple events (for example, a movie divided into two parts by another program). 1. In the EPG, select any part of the Split Event that you want to book for recording and press the Record button. 2. A successful Split Event recording booking is made to show the icon [R] against that program listing. 3. If unsuccessful, press the Record button again. 4. To cancel the Split event recording, press the Cancel button and confirm ‘Yes” in the window ‘Are you sure want to cancel this program booking?. 7.5 Record List Recording List shows the programs or series that are being recorded now and that have been booked for recording but have not yet been recorded. 1. Press the REC List button on RCU to display the Recording List or Use the ▲/▼/◀/▶ buttons to browse the Channel -> Recording List Menu item. 2. Use the ▲/▼buttons to navigate through the fields. 3. Press the RED button to delete the selected recording. 4. Press the Green button to clear all lists. 5. Press the Blue button to sort the list by Date, Start time, Channel name (If you press the Blue button repeatedly, it will change from Default, Date, Start time, Channel name, and cycle back to Default, Date, Start time, Channel name.) 6. Press Play List button to access to Playback list. The programs in the process of being recorded are displayed in red color. 40 7.6 Playback List Playback List is the list of contents that has already been recorded or is in the process of being recorded. Press the PLAY List button on RCU to display Playback List. You can view detail file information for selected file by pressing the INFO Button. Press the EXIT button to hide the information. Press REC List button to access to Record list. The list of contents in the process of being recorded is displayed in rec color and the list of contents already played is displayed in green color. ‘PartRec’ displays the program never viewed ‘Viewed’ displays the program viewed at least one time. ‘Recording’ displays the program in the process of being recorded. 7.6.1 Playback Mode 1. 2. 3. 4. Select Playback mode with the ◀/▶ buttons. Select the desired file with the ▲/▼ buttons. Press the OK button and the chosen file will be played. Once file play is done, Playback list will apprear. 41 7.6.2 Delete Mode 1. Select Delete mode with the ▲/▲ buttons. 2. Select the file that you want to delete with the ▲/▲ buttons. 3. Press OK to confirm. 4. To complete the file deletion, press 'Yes' in the pop-up window. 5. Press the EXIT button to exit. 6. To delete several files at once, press MARK button to select the files you want to delete and press OK button. 7. Press RED button to delete a file without changing modes. 7.6.3 Rename Mode 1. Select Rename mode with the ▲/▲ buttons. 2. Select the file that you want to rename and press the OK button. A small name editing window will be displayed. 3. You can type each letter of the file name with the ▲/▲/▲/▲ and (0-9) buttons and the OK button. 4. After renaming, press the icon, . 5. Press the EXIT button to leave the dialog. 6. Press GREEN button to directly move to Rename mode without selecting the ▲/▲ buttons. 7.6.4 Lock Mode 1. Select Lock mode with the ▲/▲ buttons. 2. Press the OK button. The password entry dialog will appear. 3. Input your password (the default is '0000'). The highlighted file will be locked. 4. To lock another file, select it with the ▲/▲ buttons, and press the OK button. 5. Press the EXIT button to close the File List window. 6. Press YELLOW button to directly move to Lock mode without selecting the ▲/▲ buttons. 42 7.7 Playback Operations 7.7.1 Playback of an Existing Recording 1. Press the PLAY LIST button to open the file list. 2. Select the desired file with the ▲/▼ buttons and press the OK or Play button. Once file play is done, Playback list will apprear. 3. Press the EXIT button to close the Playback list. 4. Press the ▲/▼/◀/▶ buttons or “trick play” buttons such as REW, FF, etc., to check playback status. 7.7.2 Jump by Percentage in Playback Mode 1. Press a numeric button (0-9) while playing back a recording. - Press the ‘3’ button to move the play position indicator to a spot which is 30% into the overall file length. - Press ‘5’ to move the play position indicator to the halfway point (50%) of the file. 7.7.3 Jump by Seconds in Playback Mode This function is available in Playback and Time Shift mode. 1. Your move the play position indicator back or forwards by “x” seconds with a quick press of the ▲/▲ buttons. • • • • At the default 2 hour record time setting, the jumps are approximately 30 seconds. In a 90 (to 120) minute recording, the jumps are approximately 25 seconds. In a 60 (to 90) minute recording, the jumps are approximately 20 seconds. In a 30 (to 60) minute recording, the jumps are approximately 15 seconds. 43 7.7.4 Fast “Shuttle” in Playback Mode This function is available in Playback and Time Shift mode. 1. You can rapidly “shuttle” the play position indicator backwards or forwards by holding down the ▲/▲ buttons. - Release the held button to resume playback. - Avoid use of the ▲/▲ buttons when “chaseplaying” as this will reduce / increase the recording length. 7.7.5 Using the FF/REW/SLOW Functions These functions are available in Playback and Time Shift mode. : Fast forward icon : Rewind icon : Slow Motion icon Fast Forward / Speed : x2, x3, x4, x8, x16 1. Press the FF button. If you press the FF button repeatedly, the forwarding speed will increase from 2x-3x-4x, and cycle back to 2x-3x-4x and so on. 2. Press PLAY to resume playback. The 2x, 3x, 4x speeds roughly translate to 12x, 28x, 45x actual playback speed. This also applies to the Rewind speeds. Rewind / Speed : x2, x3, x4, x8, x16 1. Press the REW button. If you press the REW button repeatedly, the rewind speed will increase from 2x-3x-4x, and cycle back to 2x-3x-4x and so on. 2. Press PLAY to resume playback. Slow Motion Playback 1. Press the SLOW button. If you press the SLOW button repeatedly, the playback speed will toggle between one half or one quarter of normal playback speed. 2. Press PLAY to resume normal playback. 44 7.7.6 Using Bookmark Functions The bookmark function enables you to set bookmarks within a media file. These make it easy to target particular positions in the file, which you can “jump” to with a single button press. To Create a Bookmark 1. Play the file you want to bookmark. 2. Move the play position indicator to the desired location with the ▲/▲ buttons, and press the MARK button. A small white bar (a bookmark) will be placed at this position. To “Jump” to a Bookmark 1. Press the JUMP button and the play position indicator will jump to the next bookmarked position. Playback starts from this point. To Delete a Bookmark 1. Move the play position indicator to a point just before the desired bookmark with the ▲/▲ buttons. The play position indicator will turn black as it passes the bookmark indicator. 2. Press the MARK button when the colour changes. A maximum of 20 bookmarks can be created for each file. The first bookmark is automatically created at the start point of the file. 45 7.7.7 Repeating, Copying and Cutting Recordings You can perform repeat, copy and cut operations on selected portions of recorded files. 1. Press the PLAY LIST button. 2. Select, and start playing, the desired file. 3. Move the play position indicator to the desired position with the ▲/▲ buttons. 4. Press the A-B button to set the start point for your operation. 5. Move the play position indicator to the desired end point with the ▲/▲ buttons. 6. Pre the A-B button again, and a pop-up window is displayed. 7. Select the desired operation: Repeat block, Copy block, Cut block with the ▲/▲ buttons. 8. Press the OK button to perform the Repeat, Copy, or Cut block operation. • Press the EXIT or A-B button to cancel the operation. 46 Additional Information A.1 Troubleshooting There are many factors that can cause receiver problems. Please take a look at the troubleshooting table below. Do not open the unit as this may cause damage to the HT9200DTR, your property or yourself. Problem Cause Solution The front panel doesn’t display any message. The power cord is not plugged in or the unit is turned off. Check that the power cable is plugged in to the socket and that the power switch is on. Also check the power switch on the back of the HT9200DTR. No picture or sound. Poor (or Wrong) connection of the HT9200DTR Audio/Video outputs to the TV. Ensure that appropriate connectors are used, and are correctly connected. Incorrect antenna connection. Connect the antenna cable correctly. No or Bad signal message is displayed. Check other devices connected between antenna and HT9200DTR, or adjust the antenna position. Audio muting. Press the MUTE button to unmute the sound. Also check amp or TV volume (and input) settings – if applicable. TV Power is off. Turn on the TV. Wrong TV input. Select the correct TV input. HT9200DTR can’t receive a signal. Check antenna cable to ensure firm connection. Replace if necessary. Incorrect values for some tuner parameters. Set the correct tuner values. Refer to the installation menu section of this manual. Antenna is inappropriate for digital TV reception. Replace the antenna. Antenna is underpowered. Turn on the Antenna Power setting in the HT9200DTR menu. Add an antenna power booster. Antenna is receiving non-TV signals from wireless devices etc. Reduce the power being supplied to the antenna. Adjust (or replace) the antenna. No or bad signal. 47 Antenna is damaged. Replace the antenna. The remote controller doesn’t work. The batteries of the remote controller are not inserted correctly, or are exhausted. Check if batteries are correctly inserted. Replace batteries, if necessary. Poor picture or audio quality. Low antenna power or signal loss in cabling. Add an antenna booster or turn on Antenna Power in HT9200DTR menus. Check video cables, and replace if necessary. Broadcasting fault. Wait until the broadcaster remedies the fault, or electrical storm etc. has passed. Low antenna power or signal Add an antenna booster or turn on loss in cabling. Antenna Power in HT9200DTR menus. Some channels may require a Replace antenna. Some channels are not found when scanning. different type of antenna (UHF/VHF) 48 A.2 Technical Specifications 1. Tuner & Demodulator Parameter Specifications Input Connector 1 X IEC169-2, female Loop through Connector 1 X IEC169-2, male Input Signal Frequency VHF 174~230 Mhz, UHF 470~860MHz Input Signal Level -90~-20dBm Input impedance 75 Ohms nominal IF Center Frequency 36.167 Mhz IF Bandwidth 6.66 Mhz, 7.61MHz Waveform OFDM Transmission mode 2K FFT, 8K FFT Constellations QPSK, 16QAM, 64QAM Code rate 1/2, 2/3, 3/4, 5/6, 7/8 Guards intervals 1/4, 1/8, 1/16, 1/32 FEC decoder Reed-solomon Viterbi Decoder, for 16 parity bytes Block lengths 204 byte MCPC and SCPC Supported 2. MPEG Paramenter Specifications Transport Stream MPEG-2 ISO/IEC 13818 Transport Stream Specification Video MPEG-2 MP@ML, H.264/AVC Audio MPEG-1/2 Audio Layer 1,2, AC3 (Dolby Digital) Video bit rate 1.5`15 Mbps Active pixel 1920x1080i, 1280x720p, 720x576p, 720x576i Aspect ratio 4:3 or 16:9 Audio Mode Stereo, Dual channel, Joint stereo, Mono Audio Sampling frequency 32 kHz, 44.1 kHz, 48 kHz 49 3. Connector Port Video Specifications S-Video RCA (VIDEO) Component (YPbPr) HDMI Audio RCA (Audio L,R) SPDIF Serial Port RS232C D-sub male type USB2.0 Front : Host x 1ea Rear : Host x 2ea / Slave x 1ea LAN Port RJ45 4. Power Supply Parameter Specifications Input Voltage 90~260VAC (SMPS type) Power consumption Operation : 28W Standby : 8W Protection Separate internal fuse Lighting protection Lighting protection 5. Environmental Parameter Specifications Operating temperature 0 ~ 45 C Storage -10 C ~ +50 C Storage humidity range 5 ~ 90% Rh Non condensing Operating humidity range 10 ~ 85% Rh Non condensing Weight 3.4Kg Dimension(H x W x D) 60mm x 400mm x 270mm 50 WARRANTY INFORMATION DTV Solutions ACT AS THE WARRANTY AND SERVICE AGENTS FOR THIS HOMECAST PRODUCT. DO NOT RETURN THIS CARD TO DTV Solutions IMPORTANT PLEASE KEEP WARRANTY CARD, PROOF OF PURCHASE AND USER MANUAL IN A SAFE PLACE AS YOU WILL REQUIRE THESE WHEN MAKING A WARRANTY CLAIM. Ensure that the following conditions are followed when operating the equipment. Failure to do so may result in warranty being void. Power requirements: Ensure main power supply is 240v AC +/- 10%, 40W Max, 50Hz +/- 5%. Do not place the unit in a confined cabinet or cupboard without proper ventilation. To prevent shock or hazard risk Do not place liquids or fluids near the appliance. Do not place appliance in a dusty or wet location. Full warranty conditions are listed in the rear of the users manual. Prior to making a claim you should read through the troubleshooting section in the manual and consult the DTV Solutions web site http://www.dtvs.co.nz For further Warranty information or to make a claim please contact DTV Solutions on 644 232 2957 or 0800 388765 51 WARRANTY CONDITIONS 1. Where required by HOMECAST / DTV Solutions only the original invoice/receipt issued by the dealer will be accepted as proof of purchase. 2. HOMECAST / DTV Solutions may reject warranty claims on equipment which it believes to be illegally acquired or when the “owner” is unable to provide proof of purchase or where security labels or serial numbers have been tampered with or removed. 3. The warranty covers only defects in the material and workmanship of the product for a period of 12 months from the date of original purchase. 4. This warranty is on “Return to Base” basis. The owner is responsible for the delivery of the equipment to the point of purchase and for collecting the repaired or replaced equipment from the same location. 5. The warranty is void if failures arise as a result of any of the following. i) Abuse, misuse, physical impact, normal wear and tear. ii) Alteration or repairs carried out with out written authorization from HOMECAST / DTV Solutions. iii) Upgrade that are not registered by HOMECAST / DTV Solutions. iv) Operating or maintained other than in accordance with the manual supplied. 6. This equipment will not be considered defective as a result to incompatibility with other equipment or accessories other than the ones supplied with the unit at the time of purchase. 7. This unit should be returned in its original carton and protective packaging or alternatively in a packing suitable to prevent damage. HOMECAST / DTV Solutions will not accept any responsibility for goods damaged whilst the goods are in transit. 8. Repair or replacement under the terms of this warranty does not give the right to extension or a beginning of a new warranty period. Repairs or replacements may be carried out with functionally equivalent reconditioned parts or equivalent part. Parts that have been replaced become the property of HOMECAST / DTV Solutions. 9. The customer acknowledges that no promise representation or undertaking has been given by HOMECAST / DTV Solutions or its dealer in relation to equipment other than as contained in this warranty. 10. A service charge will apply if the fault is not covered within the conditions of this warranty or if there is no fault found. The charge will be based on the current market rate. 11. HOMECAST / DTV Solutions is not liable for any other loss other than the unit itself. 12. Nothing contained in this warranty shall be read or applied so as to affect the right of the consumer in relation to the provisions of the trade practices act or other statutory rights provided by legislation of the state or territory. In the absence of applicable legislation this warranty will be purchases sole and exclusive remedy and neither HOMECAST / DTV Solutions nor its distributors or agents shall be liable for any incidental or consequential damages for breach of any express or implied warranty of this equipment. For further Warranty information or to make a claim please contact DTV Solutions on 644 232 2957 or 0800 388765. 52