1
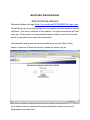
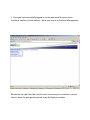
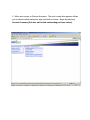
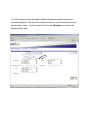
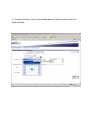
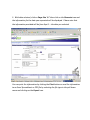
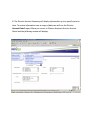
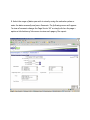
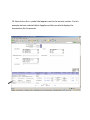
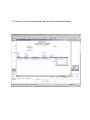
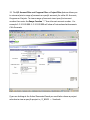
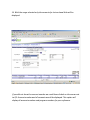
North East School Division
Web Portal User Manual
Updated: December 7, 2011
North East School Division
Web Portal User Manual
Web portal address for login https://nav.nesd.local/ODTWEBPORTAL/Login.aspx.
This will bring up a screen indicating there is a problem with this websites security
certificate. Just click on continue to this website. The login screen below will now
come up. At this point it is recommended that you create a short cut to the web
portal on your desk top or your internet favorites.
Your username and passwords were provided to you via email from Tanya
Spence, Supervisor of Financial Services; please use them to log on.
If you need assistance accessing the web portal please contact your school’s
designated Accounting Clerk.
1. Once you have successfully logged on to the web portal the next screen
includes a number of menu options. Move your cursor to Financial Management.
Review the top right hand part of the screen to ensure your username is correct.
You can leave the web portal anytime using the Explorer window.
2. Move your cursor to Division Accounts. The next screen that appears allows
you to choose which statement type you wish to review. Begin by selecting
Account Summary (this does not include outstanding purchase orders).
3. Check to ensure that the proper school or budget manager name(s) are
correctly displayed. The account summary allows you to view information at a
specific date in time. For this example click on the Calendar icon next to the
Summary Date field.
4. To select the date, click on the calendar date you wish to view or enter the
date manually.
5. With date selected, click on Page Size ‘All’ then click on the Generate icon and
the information for the date you requested will be displayed. Please note that
the information provided will be from Sept 1 – the date you selected.
You can print the information by clicking the Print button or send the information
to an Excel Spreadsheet or PDF file by selecting the file type in the pull down
menu and clicking on the Export Icon.
6. To view transactions for each account line, click on any column where the
number is blue and the following screen will appear displaying transaction
information by account and posting date.
7. To view the Purchase Invoice which was posted to the account click on any
Document Number highlighted in blue and the following screen will display the
Invoice Information.
8. The Division Account Summary will display information up to a specific point in
time. To review information over a range of dates we will use the Division
Account Detail report. Move you cursor to Division Accounts then to Account
Detail and the following screen will display.
9. Select the range of dates you wish to view by using the calendar option or
enter the dates manually and press Generate. The following screen will appear.
To view all accounts change the Page Size to ‘All’ or simply click on the page >
option at the bottom of the screen to view each page of the report.
10. Now click on the + symbol that appears next to the account number. For this
example we have selected Admin Supplies and Services which displays the
transactions for this account.
11. Now click on the Invoice Number and the actual invoice will display.
12. We will now explore the filter options for displaying information. Begin by
moving your cursor to Division Accounts then Account Summary (All Posting
Types) and the following screen will appear.
13. The G/L Account Filter and Program Filter or Project Filter feature allows you
to view and print a range of accounts or specific accounts for either GL Accounts,
Programs or Projects. To view a range of accounts insert your first account
number then enter the Range Function “..” then the next account number. For
example 1-2-12-130-000..1-2-12-130-999 will show all instructional aid accounts.
Click Generate.
If you are looking at the School Generated Funds you could also choose a project
selection to view a specific project i.e.) Y_BOOK — Yearbook
14. With the range selected only the accounts for Instructional Aids will be
displayed.
If you did not know the account number we could have clicked on the arrow next
to G/L Account number and all accounts would be displayed. This option will
display all account numbers and program numbers for your reference.
15. You can view the detailed transactions for any account by clicking on the
account displayed. The Program Filter function operates in the same way as the
G/L Account Filter and allows you to view any range of programs you wish.
16. To look at specific account numbers we will use the Pipe Function. The Pipe
symbol | allows you to choose a specific account. You can use ranges (..) and
specific accounts (|) or any combination you wish within the filter option. In the
following example we will view Textbooks and all accounts under Student Related
Expense. We do this by entering in the following string to make our selection: 12-12-130-300|1-2-12-170-000..1-2-12-170-999 and pressing Generate.
17. Congratulations you have completed the Web Portal tutorial for Budget
Manager Access. All statement types displayed may be accessed using the basic
steps outlined above.