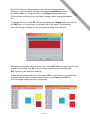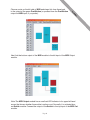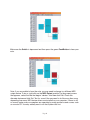
1
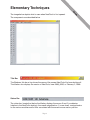
are
ftw s
So dit ce
C r e fe r e n n s
Re so ion ts
Les oduct nten
r o
Int of C
le
Ta b
neat t ools
a visual-programming
environment for
human-computer
i n t e r fa c i n g
center for really
w
w
w .
p
u
l
s
a
r .
o
r g
neat
research
l
Ta b
eo
fC
one
nts
I. Tabl e o f C o n t e n t s
II. Int ro d u c t i o n
• What is NeatTools
• Where to get NeatTools
• System Requirements
III. Le s s o n s
• Elementary Techniques
• Module Properties
• Analog vs. Digital
• Arithmetic Calculations
• Slider & Mouse
• Introduction to MIDI
• Sound & Light
• TNG-3B Interface
• JoyMouse
IV. Re fe r e n c e
• Listing of Modules
V. Cre d i t s
We gratefully acknowledge generous support for this NeatTools documentation
project and related activities from grants provided by
Microsoft Corporation,
NEC Foundation of America,
and the Institute for Interventional Informatics.
Page 1
What is NeatTools?
tr
o
d
u
programs by direct manipulation of graphical objects called modules. NeatTools
In
NeatTools is a visual-programming environment, in which users can create
c
ti
o
n
can accept input data from devices connected to the PC, such as a keyboard,
mouse, joystick and TNG (pronounced “Thing”), a palm-sized serial interface box that
accommodates various sensors for human-computer interface applications (see TNG-3B
Interface lesson). In creating visual programs, users do not need to know the C++ language
that was used to create NeatTools (to the extent of about 54,000 lines of code).
The visual programmer “writes” programs by dragging and dropping modules onto the active desktop
area of NeatTools and connecting them to establish a “dataflow network.” NeatTools accommodates
various data types, including integers, real numbers, and alphanumeric strings, Musical Instrument
Digital Interface (MIDI) events, and wave streams.
NeatTools can be used for many applications: such as using a joystick to control the cursor, entering
data through an onscreen keyboard and Web-based communications. Additionally, with suitable
electronic devices, NeatTools can be used to control objects in the physical world such as remotecontrolled cars, games, lamps and appliances.
NeatTools has been developed in part to serve the needs of people with severe physical disabilities.
However, in keeping with modern principles of universal design, features designed for the individuals
with disabilities are often of considerable benefit to general users in special situations, where for
example, dependence on keyboard and mouse are undesirable. With the advent and spread of wearable
computers, the need for this type of design will increase.
For more information on NeatTools, TNG interface devices, custom sensors, and various applications of
these technologies, please visit www.pulsar.org. Specifically, click on the NeatTools link. From there
you can download the latest version of NeatTools and various collections of (and some individual)
program files. In the Documentation section of the NeatTools page, you will find several types of
documentation, some of which are animated. NeatTools and the various support resources are freeware.
We hope you enjoy using them for worthwhile purposes and hope that you will spread the word so that
others can participate and benefit.
System Requirements for NeatTools:
• Pentium PC 133MHz or higher
• Windows 95/98/NT
• 64 MB of RAM (Recommended)
• 800 x 600 monitor resolution
Page 2
So
ftw
ar
Elementary Techniques
e
Le
ss
on
s
The image below depicts what is seen when NeatTools is first opened.
The components are described below.
Title Bar
The Windows title bar at top shows the name of the current NeatTools file, here desktop.ntl.
The title bar also displays the version of NeatTools, here 2000_0202, or February 2, 2000.
Status Bar
The status bar, located just below the title bar displays the mouse X and Y coordinates
(relative to the NeatTools desktop), the overall magnification (% zoom level), and particulars
on the various modules and/or links associated with the current mouse cursor position.
Page 3
Tool Bars
Two vertical toolbars are on the left side of the window. The DT (Desktop) toolbar, at left,
contains buttons that directly affect what is happening on the NeatTools desktop. The ED
(Edit) button, for example, turns edit mode on and off (when it is off, a file is protected from
accidental change). Other buttons control the presentation of the NeatTools desktop by
manipulating the Scale (SC) and Grid (GD), and specifying whether or not Rulers (RU) or
Links (LK) are visible. This toolbar also features Zoom controls: /2, -, +, x2, 1.
The most important buttons on the DT toolbar are those for the seven toolboxes: Digital Logic
(DL), Math (MA), Keyboard (KB), Multimedia (MM), Display (DS), Input/Output (IO), and
Miscellaneous (MI). Depressing any of these buttons will open a toolbox from which you can
select various NeatTools modules. You can either click on a module to place it at the current
position of the NeatTools cursor (different from the Windows mouse cursor) or, as is more
commonly done, you can drag the module onto a desired spot on the desktop.
The Tool (TL) toolbar contains buttons for common tasks usually found on pull-down menus in
other programs. These include opening and saving files; cut, copy, and paste; and grouping
and ungrouping sets of objects. For a complete listing, please refer to the reference section of
this manual.
NOTE: These toolbars may be floated by depressing the DT or TL buttons, and then dragging.
We recommend keeping the DT on the left, when re-docking these toolbars. Indeed, we further
recommend simply leaving them docked all the time.
NeatTools programs are created by linking modules. These modules can be found in the
various toolboxes on the Desktop (DT) toolbar, and can be selected by clicking and dragging
them to the desktop. Then links between modules are established by clicking and dragging
from the output of one module to the input of another, or vice versa. The links are represented
by lines connecting the various modules, and can be removed by clicking on them. Take care
not to do that inadvertently! Note that NeatTools will prevent you from making an “illegal”
connection.
Page 4
Try this simple exercise
Le
ss
on
s
On the DT toolbar click the DS button. A toolbox of various modules will appear. Drag
a Switch and an LED onto the desktop. Then you may close the DS toolbox, or leave it
open as you wish.
Note: You can click and drag a module to any location on the desktop. You can also resize
a module by dragging any of its eight sizing handles (use corners if you want to
maintain aspect ratio; use sides to stretch or shrink in one dimension).
Page 5
As you move the mouse over each module the status bar will display the name
of the module and list its X and Y coordinates. Drag the mouse around the four
sides of the object and you will notice that small rectangles appear inside each edge.
These are the module's various input, output, and control ports. Although there are
many exceptions, inputs are normally on the left, outputs on the right, and control inputs
are on the top; sometimes there are special outputs on the bottom. Some modules have
multiple input and/or output ports. Sometimes a single input port can accept more then
one link. It is common for one output port to link to several other modules.
Connect the two modules on the desktop by clicking on the output port of the Switch
module and dragging it to the input port of the LED module.
Page 6
Le
ss
on
s
This is how all modules are connected in NeatTools. Clicking on the Switch
will light the LED, demonstrating the effectiveness of the simple connection. To
eliminate the connection, simply click on the link that connects the two pieces.
As you explore the contents of the toolboxes, you will discover that many of the modules
look similar except for color or other attributes. For example, in the DS toolbox there are
four switches/buttons that are graphically identical (beveled edges), except for their
colors. The red module is a toggle Switch (push on; push off; here, of course, push really
means click). The blue and green modules are respectively momentary and
autorepeating Buttons (i.e.pushbuttons). The yellow Button pertains to whether the
NeatTools window is in focus (i.e. is the active window) or not; it is for more advanced
NeatTools programmers.
There are several special key combinations in NeatTools. Ctrl-F4 is a toggle feature that
forces a NeatTools program window to remain always on top of any other
window, whether it is the active one or not (a subsidiary feature is that clicking on the
NeatTools desktop, for example to press buttons or drag sliders, will not force the
window into focus; to do so, you should click on the title bar). Ctrl-F7 allows a user to
toggle the NeatTools program in and out of Protected mode, which hides the
toolbars and status bar (to save a program this way, click the X button (close window
button) at the right end of the title bar and click 'Yes' when prompted about saving).
Ctrl-F9 will shrink the size of the NeatTools desktop area so that it encompasses a
selected set of modules on the desktop (selected, for example, by dragging a marquee
rectangle around the desired modules). A common key sequence to close a finished
program is: a) select a rectangular area of modules that are to remain visible, b) Ctrl-F9,
and c) Ctrl-F7. To return to editing mode, select Ctrl-F7 again.
As a final note, modules are grayed out within their toolboxes when the computer running
NeatTools does not support the particular functions of those modules.
Page 7
Module Properties
When working in the NeatTools environment, you will often need to change the
properties of various modules. The starting point is to right click on the module.
Alternatively, you can left click to select the module, and then left click again on the small
red square that appears at the lower right corner of the module. Normally, we
recommend simply right clicking.
Drag a Switch and two LEDs from the DS toolbox to the desktop. Connect the Switch to
both LEDs. Notice that clicking the Switch activates both LEDs.
Right click on one of the LEDs and a properties menu will appear.
Page 8
Le
Note: The contents of the properties menus will vary among modules.
However, for most modules, the menu will include moduleColor (usually
left alone), color (i.e. foreground color), and bkgnd (background color).
Other modules will allow you to add labels, change values, change parameters,
etc.
ss
on
s
To change the color of the LED, click on the background (bkgnd) option and click on
the Edit button or, more simply, just double click on the option. The properties
menu will change to display a color rectangle with three sliders below it.
Manipulating the sliders will change the color of the LED. When you have found a color
combination you like, click Ok to return to the properties menu, and then click
Exit to return to the NeatTools desktop.
Notice that the background color of the upper LED (i.e. color when it is off) has been
changed, here to yellow. However when you turn on the Switch, the LED will
show its original foreground color of bright red.
Page 9
To change its “on” color you will again need to access the properties
menu and this time edit the color function. Try this yourself. In the future, you
can change the background and foreground colors with the same invocation of the
properties menu. Typical slider settings are 255 for one or more foreground color(s)
and 180 for background color(s).
Right clicking on the Switch module will bring up a different set of options, among which
you will notice the option “label=”.
Experiment with this property. It will allow you to add words or numbers to your module.
Changing Properties of Several Modules at Once
A time saving trick, when you need to change common properties of several related
modules, select the modules in question and then right click on any of them. This
will invoke a properties menu that shows only those properties that are shared among
the modules, such as color. Often you can select the desired modules by dragging a
marquee rectangle around them. When this does not work or does not suffice, you can
always add one more module to the selection group by holding down the Shift key,
and then left clicking on that module.
Page 10
Le
Analog vs. Digital
ss
on
s
Many NeatTools programs, particularly those concerned with human computer
interfacing, accept signals from external input devices, process these signals, and
then produce an output, which may be confined to the computer or may instead
control devices in the user’s environment.
In such situations, you have a device that provides input (e.g. a mouse, a keyboard, or
a TNG with sensors and switches), and you program NeatTools to process that input
and produce the output to perform a desired action.
In this lesson, the mouse is used as a representative input device that sends
information to the NeatTools program. The mouse motions produce specific results that
can be viewed on the monitor.
A digital signal (or variable) is one with discrete states, often just two of them; for
example, a light switch can be on or off. In computers, the two common digital states
are represented by 0 and 1 (or false and true). In contrast, an analog signal varies
continuously, for example the speed of an automobile or the brightness of a light
source. Often, analog signals are digitized, and thereby become discrete. For
example, an analog voltage accepted by a TNG interface, is converted electronically to
a number between 0 and 255 by a process known as analog-to-digital conversion.
In the following example, the mouse will provide two representative analog signals,
namely its X and Y coordinates. Strictly speaking they are represented here by
discrete values in the range of 0 to 65535 (16-bit digital representation). It is
appropriate, nevertheless, to consider them as analog rather than digital, for they are
representing, with fine resolution, the analog X and Y positions of the physical mouse.
Open the I/O toolbox and drag the MsX (MouseX) and MsY (MouseY) modules,
to the desktop. [Note, for future reference, that the Ms (Mouse) module, which is a
combination of the MsX and MsY modules, could be used here equally well, but for
clarity we are using the two separate modules.]
Next drag the 2DMeter module from the DS toolbox to the desktop.
Page 11
Connect the modules by clicking on the output (right side) of the MsX and dragging the
connection to the input (left side) of the 2DMeter.
Similarly, connect the MsY and the 2DMeter modules. Note the respective locations of
the X and Y input ports of the 2Dmeter module.
As you move the mouse, the 2Dmeter will reflect that movement. You will notice however
that the Y coordinate on the 2DMeter moves opposite to the mouse
movement that you are performing (mouse goes down; 2DMeter indicator goes up). This
anomaly results from the standard convention by which computer screens use
the top left corner as origin (because that is where text typing begins).
Page 12
Le
ss
on
s
To fix this, you can use the Not module from the DL (Digital Logic)
toolbox to effect the necessary inversion. Remove the link between the
MsY and the 2DMeter by clicking on it, and then connect the MsY to the Not
module and the Not module to the 2DMeter as shown. [Alternatively, you can
move rather than destroy the original link, by dragging the right end from the
2DMeter to the Not]. The mouse and the module should now appear to move
consistently, i.e. up or down together.
Now, let’s add a digital component, a binary one that is on or off depending on the
value of an analog signal.
From the DS toolbox, select the LED module and drag it to the desktop. Connect the
output of the 2DMeter to the LED and observe the effect of moving the mouse.
Page 13
The LED illuminates whenever the yellow indicator in the 2DMeter
(representing the mouse Y position) is above the output link that connects to the
LED. The link at the 2DMeter output can be placed at any desired vertical position.
Try yourself to drag it to another vertical position. This is an example of an adjustable
threshold, a topic that will be explored in more depth in later lessons.
Next drag a Switch module from the DS toolbox and connect that switch directly to the
LED.
The LED can now be turned on either by moving the mouse above the threshold or by
depressing the Switch. The LED represents a binary (two-state) digital signal. [Note:
Later we will need to use the OR module from the DL (digital logic) toolbox, but its
logical function is incorporated here implicitly in the LED input, so it is not needed here.
You may wish to try, at this point, connecting the 2DMeter and the Switch to the input of
an OR module and the output of that to the LED. Verify then that the operation of the
program remains unchanged.]
Page 14
Le
Arithmetic Calculations
ss
on
s
As with other programming languages, NeatTools can perform arithmetic
operations (addition, subtraction, multiplication and division) on integers and real
numbers. NeatTools also includes a number of other mathematical operations.
We will sometimes use the standard mathematical term “operator” to denote any of
these mathematical modules. Actually, many other modules in NeatTools qualify for
this designation too. The essential idea is that such a module operates on one or more
input values to produce an output value or result. Thus, for example, a Multiply
module operates on two or more input values to produce a result, the product.
The modules that operate on integers are blue and are found in the Digital Logic (DL)
toolbox. Those that operate on real numbers (i.e. having a decimal point, unlike
integers) are in the MA (Math) toolbox, and are colored green. In the MA toolbox, there
are also gray modules that operate on complex numbers (which have both real and
“imaginary” parts); these are beyond the scope of the present lesson and are relevant
for more advanced applications such as digital signal processing that are of particular
interest to engineers and scientists.
Open the file Math.ntl. This program begins with three Integer modules, the values of
which were arbitrarily chosen for this example. These values can be set or changed
by right clicking on the module and entering the value in the “label” property.
The value of an Integer module can also be changed by inputting, at the left, an
integer value obtained from some other module’s output; a common use of Integer (or
Real) modules. In general, they can be used to display the numerical result of other
operations or they can serve as an input to another module—or both! Many
NeatTools modules have this dual feature that, in a given application, they can accept
inputs and/or provide outputs.
Page 15
Each integer involved in this calculation has a connection from the Integer module
output to the Add module input.
The Add module adds the integers 1, 5, and 2.
Its output, as displayed in the Integer module
on the right is the sum, 8.
The result of 8 and the value 2
(used again) are provided as
inputs to the Multiply module,
thereby producing the result, 16.
The third calculation uses the
result of 16 from the Multiply
module and, using the Subtract
module, subtracts the value 7,
producing the output 9.
The final calculation uses the
Divide module to divide the
result, 9, from the previous step,
by 3, yielding the final result,
which is also 3.
Page 16
Le
The Add module can accept multiple values at its one input on the left
side (so you can add several numbers at once); the same holds for the
Multiply module. However, the Subtract and Divide modules have two input
locations, one (#1) to the left and the other (#2) at the top, each of which can
accept only a single value. For subtraction, the order is #1 minus #2 (left minus
top), and for division it is #1 divided by #2. Verify that this is the case for the example
calculations shown above, and then try this yourself with a new program, using your
own choices of numbers.
ss
on
s
Similar calculations can be performed using real numbers or, through the use of the
RtoI (Real to Integer) or ItoR (Integer to Real) converter modules, these calculations
can be performed with a mixture of integer and real numbers.
Using the file we just finished studying, drag an ItoR module from the MI
(Miscellaneous) toolbox onto the desktop, as well as a Real module, distinguished in
the DI (Display) toolbox by its default display value of 0.0. The Real module, whatever
its numerical value, will always display a decimal point.
Connect the result of the previous calculation, 3, to the ItoR module, the output of
which should go into the Real module.
Notice how the answer is now displayed as a real number, with decimal point. In this
sort of way, you can perform calculations with a combination of integers and real
numbers.
Experiment with some of the other mathematical operators in the DL and MA
toolboxes. For example, try raising a number to a power (using the Pow (^) module),
and try converting real numbers back into integers. Remember that, depending on the
type of numbers you are working with, you will need to use either or both of the groups
of mathematical modules in the DL and MA toolboxes.
Page 17
Slider & Mouse
Open the “SliderAndMouse.ntl” file by pressing the Open File (OF) button on the TL
toolbar (or by pressing "Ctrl-O") and selecting the file name. Your screen will
display several programs, which we will describe briefly before teaching you to modify
them.
Mouse Threshold
This simple network connects three modules: MsX (Mouse X; from the IO toolbox); and
1DViewer and LED (both from DS toolbox). The program displays mouse position on the
viewer and turns on the LED, when the viewer signal display crosses the threshold.
Thus, the LED turns on whenever the yellow display signal is to the right of where the
link connects to the bottom edge of the 1DViewer module. The same type of direct
thresholding is available in the other 1DViewer, which has a horizontal axis, as well as in
the two 1Dmeter modules and the 2DMeter module (see below).
Page 18
Le
A problem with this direct thresholding is that one can change the
threshold level only by adjusting the link position while in Edit mode.
Although this offers the advantage of rapid programming, it can become a
disadvantage if one needs later to adjust the threshold level, especially if the
program has been saved in Protected Mode. An alternative method, which avoids
this problem, is to use a 1DSlider to set the threshold, and a GreaterThan module
(from DL toolbox) to do the comparison.
ss
on
s
In this example, as you move the mouse to the right (X direction), the 1DViewer
display signal shifts to the right, while it also progresses continuously downward as a
function of time (and periodically returns to the top after it reaches the bottom). The
display here depends only on the mouse X position, and is unaffected by its vertical
Y position.
As you move the mouse to the right, note that the LED turns on once the 1DViewer
signal crosses the threshold value. You can turn the LED on and off by crossing this
threshold back and forth.
Practice changing the threshold value by dragging the existing link to a new
position along the edge of the 1DViewer module. You should depress the Edit
(ED) button on the DT toolbar to be able to make these changes, or else type
Ctrl-E (this key combination toggles Edit mode on and off).
Now try connecting different colored LEDs. Remember that, in order to change the
color of a module, you have to access its property menu by right clicking that module.
You will normally want to change the background (dim) and foreground (bright) colors.
Notice the default settings before making your changes.
As an exercise, construct a similar program, using the other 1DViewer module (with
horizontal axis) in the IO toolbox, the module that displays mouse Y movement
instead of X.
Switch & LED
Page 19
This simple program involves a Switch and an LED, both from the DS
toolbar. When the Switch is depressed, the LED turns on. Pressing the Switch
again turns off both the Switch and the LED. This is among the simplest
NeatTools programs one can write, and is thus a good one to show first when
demonstrating NeatTools.
1D Slider and Meter
This program employs the modules for the 1DSlider (top) and the 1DMeter (bottom),
both from the DS Toolbox.
Note that you cannot directly adjust the position of the yellow bar on the 1DMeter by
dragging, whereas you can freely drag the bar of the 1DSlider. The 1DMeter is
for display purposes only. The same distinction applies between the 2DMeter and
2DSlider.
When you drag the 1Dslider bar, the 1DMeter bar moves identically. Note that the
editing mode (ED) should first be disabled; otherwise, clicking on the slider bar will
select the Slider and cause it to drag around the desktop when you move the mouse. Try
this yourself both ways, so you will be prepared to avoid this problem in the future.
2D Slider and Meter
This program connects the modules for the 2DSlider and the 2DMeter (both from the
DS toolbox). When you alter the position of the Slider with the mouse, the
Meter moves identically. Note how the X (upper) and Y (lower) connections are made.
Page 20
Mouse XY Display
Le
ss
on
s
This program combines a variety of modules from previous programs (Ms, LED, NOT,
and 2DMeter). Note that the position of the mouse cursor is indicated by the 2DMeter,
and that left-clicking the mouse turns on the LED. The action of the NOT module is to
invert the Y direction, because the conventional origin of a computer display screen is
the top left corner rather than the bottom left (as it would be in a conventional XY
graph), Y increases downward. After the NOT inversion, Y increases upward as
desired. An explanation of why the logical NOT operator takes care of this inversion is
beyond the present scope. Suffice it to say that it works, and that it is the simplest way
to accomplish this action; another way is to use the Subtract module from the DL
toolbox and set up a subtraction of the Y output of Ms from the maximum value of
65535 (provided the Ms module’s “N bit(s)” property is set at the default of 16 bits). You
might want to try this both ways, and see that the two methods give the same result.
Page 21
Introduction to MIDI
MIDI is short for Musical Instrument Digital Interface. It is commonly incorporated, for
example, into electronic keyboards, guitars, and drum machines so they can be
interfaced to computers. For more information, visit www.midi.org. NeatTools has a
substantial set of MIDI and other modules in the MM (Multimedia) toolbox.
Drag a green PushButton and a red Switch from the DS toolbox to the desktop. Then
from the MM toolbox, drag a MIDI module and a MIDI Output module.
When creating MIDI events, the particular note that will be produced depends upon
where the input is connected to the MIDI module. Because there are many such
inputs on the left side, it is appropriate to elongate the MIDI module as shown below.
Drag the mouse along the inside of the left edge of the MIDI module and watch the
status bar to see where on the module the ports for the desired individual notes are
located.
Page 22
Le
ss
on
Choose a note on the left side of MIDI and drag a link from there back
to the output of the green PushButton (or proceed from the PushButton
output the MIDI input, if you prefer).
s
Next, link the bottom output of the MIDI module to the left input of the MIDI Output
module.
Note: The MIDI Output module has a small red LED indicator in its upper left-hand
corner that shows whether the module is active or not. Normally, it is activated by a
red Switch module. Connect the output of the Switch to the top input of the MIDI Out
module.
Page 23
Make sure the Switch is depressed and then press the green PushButton to hear your
note.
Note: If you are unable to hear the note, you may need to change to a different MIDI
output device. To do so, right click on the MIDI Output module. On the property menu
that appears, select the line that begins “device=” and then click Edit. Chose the
alternate device and click Exit. Test for sound. You may need to do this more than once,
depending how many MIDI device drivers are installed on your computer. If there is still
no sound, make sure your speakers are operating by using another sound source, such
as a music CD. You may actually want to do that system test first.
Page 24
Le
Sound & Light
ss
on
s
This program demonstrates mouse control of a) Musical Instrument Digital
Interface (MIDI)-generated sound and b) color changes on three different LEDs.
Modules featured in this program include MIDI, 2Dmeter, And and Not logic
operators, and DelaySustain.
Open the file soundandlight.ntl. The NeatTools window will display the program
shown below.
Make sure Edit mode (ED button on DT toolbar) is off, in order to avoid inadvertent
alterations of the program. Then, place the mouse cursor over each module (without
clicking) and read its name from the Status Bar.
Slowly move the mouse cursor from the left to the right side of the screen. Note that
your speakers will produce three successive tones of increasing pitch. The sound can
be disabled by turning off the red Switch attached to MIDI Out. If you fail to obtain
sound, consult the MIDI lesson for troubleshooting tips.
Slowly move the mouse cursor from the bottom to the top of the screen. Note that the
three LEDs sequentially illuminate.
How the Program Works
Examine the overall flow of information (connections of modules) to understand in
general how this program functions. Note that the modules for sound are near the
bottom,and the modules for light are near the top. The modules with the black dots are
Node modules that are used here simply for fanout, i.e. to allow one link expand into
two (or more), without having to make multiple connections at the special edge of the
2DMeter, where the specific link position matters.
Page 25
Optional: Temporarily turn off the LK (Link) button on the DT (Desktop) toolbar, so the
links among icons disappear. Now move the cursor over each module to see which
other modules it is connected to.
The green LED (connected to NOT) illuminates, if the yellow indicator on the 2DMeter
remain within the lowest zone (defined by where, along the right edge of the
2DViewer, the output links are connected). The yellow LED (connected to AND and
NOT) illuminates, if the yellow indicator is in the middle zone. The red LED
illuminates, if the cursor is in the upper zone.
The 2DMeter connects to three Pulse modules (one for each note), each of which
connects in turn to a D/S (Delay/Sustain) module. The D/S modules connect to the MIDI
module and the Timer module.
Try the following exercises:
1. Make the frequency of the three tones decrease as the cursor moves from left to right.
2. Make all three tones sound off for a shorter period time.
3. Add a fourth note of higher pitch than the others.
4. Make the three tones sound off as the cursor moves up, instead of to the right.
5. Make the green LED stay on as the cursor moves up.
6. Change the thresholds of the LEDs.
7. Add a switch to enable input to the Timer and observe the effect.
Page 26
Le
TNG-3B Interface
ss
on
s
TNG-3B
TNG-3B is a general purpose interface device that accepts 8 analog and 8 digital
inputs and streams data to the PC through a DB9 serial-port connector. Together with
appropriate sensors, transducers, and switches, it provides a flexible system for
human-computer interface applications, notably for persons with severe disabilities.
8 Analog Inputs
8 Digital Inputs
The illustration below demonstrates how to develop a network using the TNG-3B
serial interface. It shows the use of a calibrator, and displays one analog and two
digital outputs.
Page 27
Turning on the Switch modules labeled COM and CAL illuminates the
LED indicator at the top left corner of the COM and Calibrate modules
respectively.
Both the COM and Calibrate modules
are enabled at the top left port.
Note: The COM port number of this module and the computer COM port number that the
TNG-3B interface is plugged into should match. If the COM port does not work, check
whether the port is being used by another device, such as a modem, or by another
program.
The TNG3 module has 9 output ports. Channels 1-8 correspond to the eight analog
inputs on the TNG-3B Interface. Channel 9 carries all 8 digital inputs.
Analog channel connection to calibrator. When an analog sensor is used, depending on
the channel the sensor is plugged into, the output is linked from that channel to the input
of the Calibrate module; i.e., if the sensor is in Analog channel 1, the output from
channel 1 on the TNG3 module is linked to the input of the Calibrate module.
Page 28
Le
Note: The TNG3 module is set here for 8 bits, as is the Decoder,
Calibrate, and GreaterThan module. The default for all of these modules
is 16 bits. These properties can be changed by right clicking on the module.
The eight digital inputs are transmitted together as one byte (as are each of the
analog channels) from the TNG3 module. The Decoder extracts the individual bits,
informing of the current state of the eight digital inputs.
ss
on
s
When Digital sensors are plugged into Digital Inputs 1 and 2 on the TNG3B Interface,
the Decoder module is linked from channel 0 to the input of an LED module and from
channel 1 to the input of another LED module. The LED modules become illuminated
when the sensor is activated in the TNG-3B Interface.
Note: Channel numbers on the Decoder module are numbered 0-7 instead of 1-8 as
on the TNG3 module (to correspond with numbering on the TNG-3B device).
The output from the Calibrator module links into three other modules. The 1D Meter,
and 1D Viewer modules record the signals from the sensor. When the sensor's signal
shown on the 1D Meter exceeds the limit set on the 1D Slider, the green LED
threshold is illuminated showing that the signal is greater than the set threshold.
The level of the 1D Slider
can be changed.
The 1D Viewer module
displays signals from
the sensor with respect
to time.
Page 29
JoyMouse
A complex set of module connections, joymouse provides the user with a relatively userfriendly interface and allows for the use of a custom made joystick and switches to
replace traditional joystick and mouse. Given the complexity of the program, this lesson
will focus specifically on running and using the joymouse program.
Page 30
Le
ss
on
Used in conjunction with LatinSounds.ntl, a signal received by the
joymouse.ntl program is assigned audio feedback for each switch
mounted.
s
Use of the jm123sh.ntl program with joymouse will allow the third digital switch to
choose the second digital switch’s function on the fly from a list of pre-programmed
functions. Both of these additional modules will be discussed in this lesson.
Hardware Setup
Connect a serial cable to the top of the TNG interface box. Connect the opposite end
to the com port on the CPU. When a NeatTools program is running, TNG can be
tested by depressing the yellow button to the right of the serial cable connection. A
red light on the face of the box will illuminate if the proper connections have been
made and the box is working.
Page 31
Running the Program
1. From the center left hand side of the joymouse program, select the com port on the
CPU that TNG is plugged into.
2. Below the Com Port selection, identify the type of joystick that will be used; custom
made joystick, or standard unaltered computer joystick
3. In the upper right hand corner of the joymouse program note a section titled
Channels 2 &3. The existence of this function is relevant to another application that will
be discussed in a later lesson. For now simply choose Select mode.
Page 32
Joystick Setup & Calibration
Le
ss
on
What are we going to do about profiles? Create a generic?
s
Plug the analog and digital sensors into TNG reserving analog 1 & 2 inputs for the
joystick X and Y plugs.
1. Move the joystick in a circular motion. With the appropriate com port having been
selected, the motion should be visible on the 2DMeter at the center of the program.
2. Move the joystick in a vertical motion. If the motion in the 2DMeter is opposite that
of the actual joystick motion, click on the vertical bar to the left of the 2DMeter to invert
the on-screen vertical motion.
3. Similarly, move the joystick in a horizontal motion. If the motion on the 2Dmeter is
opposite of the actual joystick motion, click on the horizontal bar at the bottom of the
2DMeter to invert the on-screen horizontal motion.
For the first session in which a joystick is used with the joymouse program, it must be
calibrated. Saving the joymouse program after calibration will save the settings and
will therefore not require recalibration each time the joystick is used. Calibrating the
joystick teaches the program the user’s range of motion.
4. To calibrate the joystick click XY Cal button to the right of the 2DMeter. Move the
joystick vertically and horizontally a few times, then move it in a wide circular motion to
establish the extent of the joystick’s range. Click the XY button again to turn off the
range of motion test.
The second step in calibration is to establish the center point of the joystick, or the
position at which the cursor on the screen is at rest.
Page 33
5. Remove your hands from the joystick to allow it to return to its rest position. Click the
SAMPLE button to the right of the 2DMeter.
6. To use the joystick click the ENABLE button to the right of the 2DMeter.
Adjustments
The sensitivity of the joystick refers to the speed with which the cursor will move across
the screen. To determine the level, set it near the center of the range and test the
speed.
To increase or decrease the sensitivity of the joystick move the 1Dslider located to the
right of the 2DMeter, and below the calibration buttons.
Similarly, the joymouse program allows the user to set the free play of the joystick, or a
“dead zone”. Free play refers to a range around the joystick in which movement of the
joystick will not result in movement of the cursor.
The benefit of this feature is that a user who is not able to hold the joystick still at its rest
position will not inadvertently move the cursor. In addition, a user with less dexterity in
releasing the joystick will have better command of where the cursor stops on the screen.
It is recommended that free play be set at or near zero and increased as needed.
Page 34
Le
ss
on
s
To this point, this lesson has dealt only with using the joymouse
program to move the cursor around within the X and Y axis. The
remainder of this program will address adding switches to the TNG interface
box and the joymouse program to perform mouse clicking functions.
Sensors & Peripheral Programs
Frequently users use the left mouse button function to select items, drag and drop, and
launch programs.
TNG and joymouse accept both analog and digital switches. Where each is inserted
into the TNG box depends on what its function will be. For example, the switch
intended for the left mouse click should always be plugged into the digital input 1.
1.
Within the joymouse program, and in the section labeled Sensors, indicate
whether the switch in each input is analog or digital.
Since the joystick X and Y axis are plugged into the number one and two inputs in the
analog section of TNG, the number one and two slots for sensors will always be digital
with the option for either an analog or digital switch as the third sensor.
Page 35
Latin Sounds
Sound can be added to switches and other modules used with NeatTools. To link
joymouse to the latin sounds program open both programs. A connection is established
by clicking on the socket button labeled Sounds. This button can be found in the bottom
right hand corner of the joymouse program. Additionally, click the button above the MIDI
Output module in the Latin Sounds program. Verify the connection is made by observing
the illuminated red button in the upper left hand corner of the sounds socket module and
the MIDI Output module. Broken connections are depicted as a yellow light.
Page 36
Le
ss
on
Test each sound by clicking the blue buttons to the right of the names.
To select a sound, click the yellow button corresponding with the channel
in the joymouse program.
s
Troubleshooting
If you are unable to hear the sound by clicking the blue buttons, perform the following
steps.
1.
On the keyboard hit Ctrl+F7
2.
Right click the MIDI Output module
3.
Click Devices
4.
Click Edit
5.
Choose the alternate device
6.
Click Exit
7.
Hit Ctrl+F7
8.
Test for sound by clicking the blue buttons.
Page 37
So
The Title Bar:
ftw
are
Re
fe r
Name of current NeatTools file
enc
Version of NeatTools in use
e
The Status Bar:
X and Y coordinates of mouse
Current zoom factor
Description of currently selected module
The Tool Bars:
Desktop Toolbar Toggle
Tool Toolbar Toggle
Detaches or anchors the Desktop toolbar
Detaches or anchors the Tool toolbar
New File
Edit Mode Toggle
Starts a new NeatTools application file
Enables or disables the ability to edit a program
Guide Toggle
Open File
Enables or disables the ability to snap to grid
Opens a NeatTools application file
Link Toggle
Save File
Displays or hides the links (connection lines)
Saves the NeatTools application
Hidden Line Toggle
Save File As
Displays or hides links hidden behind modules
Saves the NeatTools file as a specific filename
Import Component
Ruler Toggle
Imports a module file into this NeatTools application
Displays or hides the ruler toolbar
Scaler Toggle
Export Component
Displays zoom slider on left side of screen
Exports a grouped module to a NeatTools file
Grid Toggle
Cut
Displays or hides the grid lines
Cuts selected items to the NeatTools clipboard
Digital Logic Toolbox Toggle
Copy
Displays or hides the Digital Logic toolbox
Copy selected items to the NeatTools clipboard
Math Toolbox Toggle
Paste
Displays or hides the Math toolbox
Pastes a highlighted group from NeatTools clipboard
Keyboard Toolbox Toggle
To Front
Displays or hides the Keyboard toolbox
Brings the module to the front
Multimedia Toolbox Toggle
To Back
Displays or hides the Multimedia toolbox
Sends the object to the back
Display Toolbox Toggle
Group
Displays or hides the Keyboard toolbox
Groups a highlighted section together
Ungroup
Input/Output Toolbox Toggle
Ungroups a highlighted section
Displays or hides the I/O toolbox
Load External Module
Miscellaneous Toolbox Toggle
Loads an External Module for use in current application
Displays or hides the Miscellaneous toolbox
About NeatTools
External Toolbox Toggle
Displays the NeatTools splash screen
Displays or hides an External (Module) toolbox
Exit NeatTools
Zoom-Out by 2
Exit the NeatTools application
Zooms out by 2
Zoom-Out
Zooms out
Original Scale
Returns the display to the original size
Zoom-In
Zooms in
Zoom-In by 2
Zooms in by 2
Page 38
So
ftw
are
Re
fe r
e
Not
enc
The Digital Logic Toolbox:
And
Logical Negate (bitwise)
Logical And
Exclusive Or
Integer Greater Than
Or
Logical Or
Integer Greater Than or Equal
Logic Xor
Greater than (for use with
integers)
Greater than or equal (for use
with integers)
Integer Equal
Integer Not Equal
Integer Add
Equal (for use with integers)
Not Equal (for use with
integers)
Integer Multiply
Integer Subtract
Integer Divide
Subtract (for use with
integers)
Divide (for use with integers)
Integer Power
Integer Maximum
Multiplication (for use with
integers)
Integer Absolute Value
Calculates absolute value
Integer Minimum
Raise integer to a power
Integer Percent
Outputs minimum integer
value
Calculates remainder (for
use with integers)
Control
Sample
Opens and closes a switch
in series
Addition (for use with integers)
Outputs the maximum integer value
Integer Random
Generates a random integer value
Pulse
Sample input values on
demand
Event production shaped pulse
Accumulator
Multiplexer
Counts events
Selects one input to be current
output
DeMultiplexer
Encoder
Decoder
Sends single input to selected
output
Converts bytes to integers
Decodes the byte values of
integers
Exclusive
Clock Divider
Time
(For radio buttons)
Cycling clock
Provides current time (use with
date module)
High Performance Counter
Calibrate
Average Filter
(For fast timing)
Accommodates signal range
(min to max)
Running average
Delay Sustain
State Object
(As in music)
State machine element
(advanced)
Delay
Delays sending current value
until next event is received
Timers
Activates at regular specified time intervals
Page 39
The Math Toolbox:
Re
fe r
enc
e
Complex Equal
Complex Not Equal
Equal (for use with complex
numbers)
Complex Subtract
Complex Addition
Not equal (for use with
complex numbers)
Addition (for use with complex
numbers)
Complex Multiplication
Complex Division
Subtract (for use with
complex numbers)
Multiplication (for use with
complex numbers)
Complex to Real
Real to Complex
Complex to Polar
Converts complex numbers
to real numbers
Converts real numbers to
complex numbers
Converts complex numbers to
polar coordinates
Polar to Complex
Complex Sine
Complex Hyperbolic Sine
Converts polar coordinates to
complex numbers
Complex Cosine
Division (for use with complex
numbers)
Calculates the sine of
complex numbers
Calculates the hyperbolic sine
of complex numbers
Complex Hyperbolic Cosine
Complex Tangent
Calculates the cosine of complex
numbers
Calculates hyperbolic
cosine of complex numbers
Complex Hyperbolic Tangent
Complex Natural Antilog
Complex Conjugate
Calculates the hyperbolic
tangent of complex numbers
Calculates natural antilog
of complex numbers e 2
Outputs the conjugate of
complex numbers
Real Greater Than
Real Greater than or Equal
Real Equal
Greater than (for use with real
numbers)
Greater than or equal (for use
with real numbers)
Equal to (for use with real
numbers)
Real Not Equal
Real Addition
Real Multiplication
Not equal to (for use with real
numbers)
Addition (for use with real
numbers)
Multiplication (for use with real
numbers)
Real Subtract
Real Division
Real Absolute Value
Subtract (for use with real
numbers)
Division (for use with real
numbers)
Calculates the absolute value
of real numbers
Real Power
Real Maximum
Real Minimum
Raises a real number to a power
Outputs the maximum real value
Outputs the minimum real value
Real Sine
Real Cosine
Real Tangent
Calculates the sine of real
numbers
Calculates the cosine of real
numbers
Calculates the tangent of real
numbers
Real Arc Tangent
Natural Antilog ex
Real Logarithm
Calculates the arc tangent
of real numbers
Calculates the antilog of
real numbers
Calculates the logarithm of real
numbers
Real Square Root
Real Round
Real Ceiling
Calculates the square root of
real numbers
Rounds real numbers
Calculates ceiling value of
real numbers
Floor
Modulus
Arc Tangent 2
Calculates remainder of a
real number
Determines the four-quadrant
arc tangent
Natural number e
Real Random
Calculates floor value of
real numbers
(PI)
3.14...
2.71828...
Real Calibrate
Calibrates real numbers
Page 40
Calculates the tangent of
complex numbers
Generates random real numbers
So
ftw
are
Re
fe r
Key
Generates string events from keyboard input
Page 41
e
These modules are relatively self explanatory and function in the same way that they do when found on a traditional keyboard.
enc
The Keyboard Toolbox:
So
ftw
are
Re
fe r
enc
The Multimedia Toolbox:
e
Master Output Volume
Master Output Mute
Master volume control
Master toggle of output mute
CD Output Mute
WAV Output Volume
Toggles mute on and off
for CD volume
Controls WAV volume
MIDI Output Mute
MIDI Output Volume
Toggles mute on and off
for MIDI volume
Controls volume of
MIDI output
CD Output Volume
Controls CD volume
WAV Output Mute
Toggles mute on and off
for WAV volume
Auxiliary Output Volume
Controls volume of auxiliary output
Microphone Output Volume
Microphone Output Mute
Toggles mute on and off for
mixer
Controls volume of
microphone
Toggles mute on and off
for microphone volume
Record Input Volume
Record Input Mute
Auxiliary Output Mute
Controls input volume for
recording
Toggles mute on and off
for recording
Microphone Input Volume
Auxiliary Input Volume
Controls microphone volume
Controls mixer volume
CD Input Volume
MIDI Output
Controls volume of CD input
Outputs MIDI events
Page 42
Record Input Select
Selects input type to be recorded
MIDI Input Volume
Controls volume of MIDI input
MIDI
Produces MIDI sound by adjusting
MIDI channel
So
ftw
are
Re
fe r
Outputs color values to other
modules
Real
e
Color
enc
The Display Toolbox:
Label
Integer
Displays labels
Displays integers
Real Complex
Date
Displays real numbers
Displays complex numbers
in floating point (real)
Bytes
Button (Blue)
Push Button (Green)
Displays bytes
Momentary
Momentary and auto repeating
Switch (Red)
Focus (Yellow)
LED
Push on, push off
Turns on if program is in
the active window
(Light Emitting Diode)
Illuminates
1DViewer
1DViewer
1DMeter
Displays 1D signal over time
Displays 1D signal over time
Displays 1D movement
1DMeter
1DSlider
1DSlider
Displays 1D signal level
Adjusts 1D signal level
Adjusts 1D signal level
2DMeter
2DSlider
Displays 2D signal level
Adjusts 2D signal level
Page 43
Displays date
So
ftw
are
Re
fe r
Container for reusable data
flow networks
Executable
Node
Pass through and fan out
(event detector on bottom)
e
Complex Object
enc
The Input/Output Toolbox:
NeatTools Program Executable
NeatTools program executable
Complete Mouse
Opens an EXE file
Data Base Module
Receives full mouse I/O
Mouse X
Mouse Y
Left Mouse Button
Receives and transmits i/o
for mouse x motion
Receives and transmits i/o
for mouse y motion
Right Mouse Button
Middle Mouse Button
I/O for right mouse button
I/O for middle mouse button
Converts data types to block data
and vise versa
Client Socket
Server Socket Connection
Record Block
Records and plays back block
type data (use with converter
module)
Provides client socket
connection
I/O for left mouse button
Converter
Provides server socket connection
Line Printer 0x378
Joymouse 1
Joymouse 2
Joystick I/O on port 1
Joystick I/O on port 2
LPT I/O for 0x378 print port
Line Printer 0x278
Line Printer 0x3BC
TNG-2
LPT I/O for 0x278 print port
LPT I/O for 0x3BC print port
Receives input from TNG-2
serial interface
TNG-3
Receives input from TNG-3
serial interface
TNG-4
Receives input from TNG-4
serial interface
Oxford Pulse Oximeter
Instrument interface
Davicon EMG
Com Port / Serial Port
Instrument interface
Serial port I/O for ports 1-4
Page 44
So
ftw
are
Re
Converts integers to real
numbers
Integer to Byte
WAV to integer
e
Integer to Real Object
Converts real numbers to
integers
enc
Real to Integer Object
fe r
The Miscellaneous Toolbox:
Byte to Integer
Converts bytes to integers
Integer to WAV
Converts integers to bytes
Converts WAVs to integers
String to Integer
Integer to String
String to Byte
Converts strings to integers
Converts integers to strings
Converts strings to bytes
Byte to String
Date to Real
Real to Date
Converts bytes to strings
Converts dates to real
Converts real to date
Date Greater Than
Date Greater Than or Equal
Greater than (for use
with dates)
Greater than or equal to (for
use with dates)
Date Not Equal
String Greater Than
Not equal to (for use
with dates)
Greater than (for use with
strings)
Greater than or equal to (for use
with strings)
String Equal
String Not Equal
String Addition
Equal (for use with strings)
Not equal (for use with strings)
Addition (for use with strings)
String Subtract
String Delete
String Insert
Subtract (for use with strings)
Delete (for use with strings)
Insert (for use with strings)
String Length
String Position
String Upper Case
Length of string
Position (for use with strings)
Upper case (for use with strings)
String Lower Case
Byte Addition
Byte Subtract
Addition (for use with bytes)
Subtract (for use with bytes)
Byte Delete
Byte Insert
Byte Length
Delete (for use with bytes)
Insert (for use with bytes)
Length (for use with bytes)
Lower case (for use with
strings)
Byte Position
Position (for use with bytes)
Page 45
Converts Integers to WAV
Date Equal
Equal (for use with dates)
String Greater Than or Equal
Cre
dits
Credits
The following individuals (in alphabetic order) have contributed to the NeatTools
documentation project:
Matthew Carbone, Owner IDeations and Manager of the Center for Really Neat Research
Peter Ensminger, Ph.D., free-lance science writer based in Syracuse, NY
Taviare Hawkins, doctoral student in Physics at Syracuse University
Sarah Leadbeater, undergraduate student in Industrial Design at Syracuse University
Edward Lipson, Professor of Physics at Syracuse University. and CEO, Mindtel LLC
Jill Rajunas, doctoral student in Information Studies at Syracuse University
NeatTools Historical Credits
Dave Warner and Joh Johannsen developed the first generation versions of Neat software,
with Joh doing the actual programming, based on design concepts and specifications by
Dave. Similarly Dave and Yuh-Jye Chang codeveloped NeatTools, with Yuh-Jye doing the
detailed architecture and coding. This work was the basis of his Ph.D. work in Computer
Science at Syracuse University. Yuh-Jye is now employed by Lucent Bell Laboratories in
New Jersey. Joh is a principal of Trapezium Development in Southern California. Dave is
director of the Institute for Interventional Informatics and CIO of Mindtel, LLC. Joh remains
active on the project; specifically, he is among those developing external modules (loadable
at runtime) for NeatTools.
Page 46
So
ftw
are
neat
t
o
o
l
s
f o r
u p d a t e s
www.pulsar.org/neattools
beta version