1
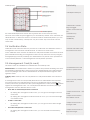
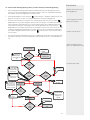
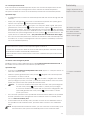
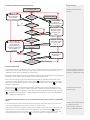
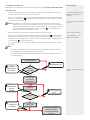
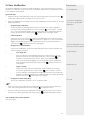
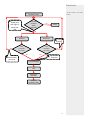
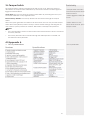
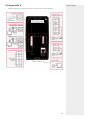
User Manual
Version 1.2
Date: July 2011
Table of Contents
1 Instructions
3
1.1 Fingerprint Placement. . . . . . . . . . . . .3
1.2 Instruction for Card Swipe. . . . . . . . . . . 3
1.3 Precautions. . . . . . . . . . . . . . . . . 3
2 Introduction of device
4
2.1 Overview of Device Functions . . . . . . . . . 4
2.2 Product Appearance . . . . . . . . . . . . .4
2.3 Use of External USB Keyboard . . . . . . . . . 5
2.4 Verification State . . . . . . . . . . . . . . 6
2.5 Management Card (M-card) . . . . . . . . . 6
2.6 System Password. . . . . . . . . . . . . . . 7
2.7 Operation Timeout. . . . . . . . . . . . . . 7
3 Device Operations
7
3.1 Management Card. . . . . . . . . . . . . . 7
3.1.1 Enrol a Management Card. . . . . . . . . 7
3.1.2 Enrol an Ordinary User . . . . . . . . . . . 8
3.1.3 Enrol Card & Fingerprint(add users). . . . . 10
3.1.4 Delete a Single User . . . . . . . . . . . 11
3.2 USB Keyboard Operation. . . . . . . . . . . 12
3.2.1 Set Keyboard Password. . . . . . . . . . 13
3.2.2 Enrol a User Through Keyboard . . . . . . . 13
3.2.3 Delete a Specific User . . . . . . . . . . 15
3.2.4 Delete All Users . . . . . . . . . . . . . 16
3.2.5 Restore Factory Defaults . . . . . . . . . 16
3.3 Access Control Function. . . . . . . . . . . 16
3.3.1 Access Control Functions. . . . . . . . . 17
3.4 User Verification . . . . . . . . . . . . . . . 18
3.5 U-disk. . . . . . . . . . . . . . . . . . . 20
3.6 Tamper Switch. . . . . . . . . . . . . . . 21
4 Appendix
Appendix A . . . . . . . . . . . . . . . . . .
List of parameters . . . . . . . . . . . . . . Appendix B . . . . . . . . . . . . . . . . . .
Wiring diagram : power & comms . . . . . . . .
Appendix C . . . . . . . . . . . . . . . . . .
Wiring diagram : Normal Open & Close . . . . . 21
21
21
22
22
23
23
2
1. Intructions
Summary
Recommended fingers: The index finger, middle finger or the ring finger; the thumb and
little finger are not recommended (because they are usually clumsy on the fingerprint
collection screen).
* Please ensure a correct
placement of finger on
reader.
1.1 Fingerprint Placement
Please enrol and verify your fingerprint by using the proper finger placement mode. We
shall not be held accountable for any consequences arising out of the degradation in
verification performance due to improper user operations. We shall reserve the right of
final interpretation and revision of this document.
1.2 Instruction for Card Swipe
This device is supplied with an integrated non-contact RFID (125 MHz) card reader module. By offering multiple verification modes such as fingerprint, RF card and fingerprint +
RF card verification, this device can accommodate diversified user needs.
Swipe your card across the sensor area after the voice prompt and remove your card
after the device has sensed it. For the swipe area, please see 2.2 Product Appearance.
* RFID Card
* Don’t install in direct
sunlight
* Bright light
1.3 Precautions
Protect the device from direct sunlight or bright light, this greatly affects the fingerprint
collection and leads to a fingerprint verification failure.
It is recommended to use the device under a temperature of 0–50°C so as to achieve
the optimal performance. In the event of exposure of the device to the outdoors for
long periods of time, it is recommended to adopt sunshade and heat dissipation facilities because excessively high or low temperature may slow down the device operation
and result in high false rejection rate (FRR).
When installing the device, please connect the power cable after connecting other
cables. If the device does not operate properly, be sure to shut down the power supply
before performing necessary inspections. Note that any live-line working may cause
damage to the device and the device damage arising out of live-line working falls beyond the scope of our normal warranty.
For matters that are not covered in this document, please refer to related materials
including the installation guide, access control software user manual.
3
* Temp 0 - 50°C
* Connect all cables before connecting the power
cable.
* Power down unit when
doing maintenance
2. Introduction of Device
Summary
2.1 Overview of Device Functions
As an integrated fingerprint & access control device, our product can be connected
with either an electronic lock or an access controller. This device features simple and
flexible operations and supports the use of management cards. With a management
card, you can perform such functions as offline enrolment, deletion and U-disk management. The voice prompts will guide you through all the operations without screen display. This device allows you to connect an external keyboard and offers multiple operation modes. It supports access control function for a security management. It supports
multiple communication modes. The U-disk features simple and convenient operations.
Featuring a compact and simple design, this device allows users to connect several
devices through a PC and perform real-time monitoring.
* Can be connected to
electronic lock or access
controller
* Use management card to
enroll / delete users
* U-disk compatible for up
& download of users
* Diagram for connection
possibilities
2.2 Product Appearance
Front view:
* Important areas on the
ZK 54.
•
•
•
LED indicator: The LED indicator is used to display device operation results and exceptional statuses which are defined as follows:
Common rules: If an operation succeeds, the green indicator will illuminate solid for one second; otherwise, the red indicator will illuminate for one second.
Enrolment state: The green LED blinks three times, every three seconds.
•
Single user deletion: The red LED blinks three times every three seconds.
•
Verification state: The green LED blinks once every two seconds.
•
Card Swipe area: Refers to the area in the red dashed-line box shown in the figure
above.
•
FP sensor: Used to collect and match fingerprints and delete users.
4
* Take note of LED indicator
dislays, for ease of use.
* Take note of card swipe
area
Summary
Bottom view:
* Take note of USB port &
reset switch
•
USB interface: Used to connect with a U-disk or a keyboard.
•
Reset button: Used to restart the device.
•
Speaker: Used to play the BEEP sound and voice prompts. If a user passes the verification, the speaker beeps once; if the user fails to pass the verification, the speaker
beeps twice. The default prompts during operation: beep + voice prompts.
Rear View:
* Diagram for wiring & DIP
switch
•
Wiring terminal: Connects with locks and power supply through cables.
* DIP switch setting:
•
TCP/IP: The TCP/IP interface connects with a PC through a network cable (for detailed connection, please see the installation guide.)
** Four pins 1,2,3 & 4
•
Tamper Switch: Used to generate a tamper alarm. For details, please see 3.6 Tamper switch)
•
DIP Switch: The DIP switch has four pins numbered 1, 2, 3 and 4. In the RS485 communication mode, the first 1, 2 and 3 pins are used to set hardware device number
and the fourth pin is used to select the status of terminal resistance. For detailed
settings, please see the installation guide.
*** Pins 1,2 & 3 - set hardware device number
*** Pin 4 - Select the status
of terminal resistance.
2.3 Use of an External USB Keyboard
To facilitate device operations, you can connect the device with an external USB
keyboard (purchased by users) and conveniently perform such operations as user
enrolment, deletion and restoring factory defaults, especially when specifying user ID’s
during user enrolment and deletion.
5
* USB keyboard can also
be used to enrol / delete
users.
Summary
USB Keyboard:
* USB Keyboard layout
/ESC
* NUMLOCK is numeric
keypad toggle.
* When connected only
use :
An external USB keyboard is shown above (please refer to the actual product):
**Numeric keys
NumLock is a numeric keypad toggle key. It is activated by default. If it is activated, the
LED indicator is on. When the device is connected with an external keyboard, you can
only use the numerical keys, “Backspace” key and “Enter” key in the NumLock activated state.
**Backspace
**ENTER key
2.4 Verification State
Verification state: After the device is powered on, it will enter the verification state if a
management card has been enrolled before, or returns from other states.
* Default state after enrolment have been done.
In the verification state, all users are allowed to verify their identities and unlock the door
(the administrator bearing a management card can only unlock the door by using his/
her fingerprint(s) previously enrolled); the administrator can perform such operations as
user enrolment/deletion, U-disk management and keyboard operation.
2.5 Management Card (M-card)
The device users are classified into administrators and ordinary users.
Administrators: An administrator is allowed to perform all operations including user enrolment/deletion (deleting all the other users except himself/herself) and U-disk management. The privileges of the device administrators are implemented through the management cards.
Ordinary users: Ordinary users are only allowed to verify their identities and unlock thedoor.
A management card is a card specially allocated for an administrator. Each device
must at least enrol one management card. If no management card is enrolled, you
cannot perform any operation and the system will generate a voice prompt “ : Please
register the management card”. You can implement different functions by swiping a
management card for different times in a row:
•
No U-disk or external keyboard is connected:
•
By swiping the management card once, you can go into the single user enrol
ment state.
•
By swiping the management card five times in a row, you can enter the single user deletion state.
•
U-disk is connected:
•
•
An external keyboard is connected:
•
By swiping the management card once, you can go into the U-disk manage
ment state.
By swiping the management card once, you can activate the external key
board.
* Administartor have full
access to system menu
* Users can only verify ID
and unlock
* Swipe M-card once - user
enroll.
* Swipe M-card 5 times user deletion mode.
* Swipe M-card once to
manage U-disk
* Swipe M-card once for
keyboard usage.
6
Consecutive swipes: Consecutive swipes means the interval between two swipes in a
row is less than 5 seconds.
Summary
The management cards can be deleted through the “Clear All” function of the keyboard, or have their administrative privileges cleared through software before they are
deleted as ordinary ID Cards. For details, please see the access control software user
manual.
* Less than 5 seconds between consecutive swipes.
The FP of administrator (the one who possesses management card) can be enrolled
through software or keyboard enrolment.
* M-card can be deleted
via “Clear All” function or
through software.
A device without a management card: if you have the keyboard password, you can
activate the external keyboard and enrol/delete users.
Note: Users who bear management cards can only verify their identity and unlock using their finger prints previously enrolled.
2.6 System Password
The system password is a password used to enhance the security of device data in TCP/
IP or RS485 communications.
* System password set up
through access control
software.
Note: The system password can be modified through the access control software. For details, please see the access control software user manual.
2.7 Operation Timeout
There are 30 seconds before operation times out. The voice will notify you every 10
seconds for 3 times if there is no appropriate operation. After this 30 seconds, the system
will return to verification state with voice prompt “ : Operation timeout. The system
returns to verification state”. * Default time out 30 seconds
* 3 voice prompts to warnining
Note: You can set the timeout time through the access control software.
3. Device Operations
3.1 Management Card
3.1.1 Enrol a Management Card
To enrol a management card, please proceed as follows:
* Take note of steps on how
to enrol a M-card.
1. The device can automatically detects whether a management card exists.
2. If the device fails to detect the presence of the management card, it will enter the
management card enrolment state. Then proceed with step 3; otherwise the system
generates the voice prompt “ : Verify users. Please press your finger or punch your
card”.
** System auto detects
3. After the system generates the voice prompt “
: Please register the management
card”, you can swipe your card across the sensor area.
** Swipe card
4. If enrolment fails, the system generates the voice prompt “ : The card number
is repeated” and returns to step 3; if enrolment succeeds, the system generates
the voice prompt “ : Registration is successful. The system returns to verification
state”.
Note: The system returns to the verification state if any operation in step 3 times out and only prompts you to enrol the management card after you restart the device again.
7
** Failure of detect: system
enters M-card management state
** Registration complete
Summary
Management card enrolment flow chart as shown below:
System Power-on
Please register
the management
card
Does
M –card
exist ?
Verify users.
Please press your
finger or punch
your card.
YES
Verification State
The card
number is
repeated.
NO
Swipe
card
* Please follow the steps
and voice prompts as
shown on the left for MCard enrolment
NO
YES
Enrol a M-card
Registration is
successful. The system
returns to the
verification state.
Return to verification
state
3.1.2 Enrol an Ordinary User
The mode for you to enter the enrolment state by using the management card is called
the management card enrolment mode. In this mode, you can only enrol one user.
When you enrol a new user, the system automatically assigns a minimum idle ID to the
user. Furthermore, you can also use the external keyboard enrolment mode (For details,
please see 3.2.2 Enrol a User with Keyboard) to implement user enrolment of specific ID.
* Management card enrolment mode
* 10x fingerprints per user
and 1 RFID card
In both these two enrolment modes, you can enrol new users. Each user is allowed to
enrol 10 fingerprints and one ID card at most.
To enrol a user, proceed as follows:
1. In the verification state, the system goes into the ordinary user enrolment state after
you swipe a management card once (In the enrolment state, swiping a management card once will return the device to the verification state).
2. After the system generates the voice prompt “ : Register users. Please press your
finger or punch your card”, you can start user enrolment. There are the following
three cases:
8
* Verification state - M-card
swiped once - enrol user
* Enrolment state - M-card
swiped once - return to
verification mode
* Follow voice prompts
Summary
1. Swipe ID card first
•
When you swipe your new ID card and succeed in enrolling a user, the device will
generate a voice prompt “ : User number **. Registration is successful!” (** refers
to the ID that is automatically assigned to the user by the system; same below)
and you can proceed to the next step; if you swipe an enrolled ID card, the system
generates the voice prompt “ : User number **, Register. Please press your finger!”
and enter the specified user enrolment state.
* Please follow the steps
and voice prompts as
shown on the left.
•
After the device generates the voice prompt “ : Register. Please press your finger”, the system enters the specific fingerprint enrolment state. Press the same finger
on the sensor three times following the voice prompts.
* Press finger three times follow the prompts.
•
If fingerprint enrolment succeeds, the system generates the voice prompt “ : Registration is successful. Register. Please press your finger” and directly enters the next
fingerprint enrolment state; if fingerprint enrolment fails, the system generates the
voice prompt “ : The fingerprint is repeated” and repeats previous step.
* If registration fails, it will
return to registeation mode
to proceed again.
•
The system automatically returns to the verification state when all 10 fingers and ID
card are enrolled, or the management card is swiped once or operation times out.
2.
Press finger first
•
Press the same finger over the sensor three times following the voice prompts by
adopting the proper fingerprint placement. If fingerprint enrolment succeeds, the
system generates the voice prompt “ : User number **. Registration is successful”
and you can proceed to step b; if the fingerprint has enrolled before, the system
generates the voice prompt “ : User number **, Register, Please press your finger
or punch your card” and enter the specified user enrolment state.
•
After generating the voice prompt “ : Register. Please press your finger or punch
your card”, the system enters the specified user information enrolment state, waiting
for you to swipe your new ID card or press your finger.
•
If the ID card enrolment succeeds, the system generates the voice prompt “ :
Registration is successful. Please press your finger” and enters the fingerprint enrolment state directly; if you press a finger that is not enrolled before and succeeds in
enrolment of this finger, the system generates the voice prompt: “ : Registration
is successful. Please press your finger or punch your card” and you can continue
enrolling new fingerprints and card. After you enrol 10 fingerprints, the system will
generate the voice prompt “ : Please punch your card” to enrol your ID card if
your ID card is not enrolled.
•
The system automatically returns to the verification state when both 10 fingers and
ID card are enrolled, or the management card is swiped once or operation times
out.
3.
If you are already assigned with a user number:
•
Enrol fingerprint(s) when you have already enrolled card
•
After you swipe the enroled card, the system will generate the voice prompt “ : User number **. Register. Please press your finger” (** refers to the ID as
signed to you; same below) and enter the fingerprint enrolment state.
•
Press the same finger over the sensor three times following the voice prompts by adopting the proper fingerprint placement. If fingerprint enrolment succeeds, the system generates the voice prompt “ : User number **. Registration is suc
cessful” and gets ready for enrolment of next fingerprint.
•
The system automatically returns to the verification state when both 10 fingers and ID card are enrolled, or the management card is swiped once or opera
tion times out.
* System will return to verification state, when 10 fingers and card are enroled,
or M-card is swiped.
* Press same finger three
times to enrol.
* User can enrol 10 fingers,
and then card.
* M-card can stop the process by swiping the card.
* Follow the steps for how
to enrol a fingerprint after
a card.
Note: The fingerprint of administrator can not be enrolled by this mode
* If user re-enrols a finger,
it will overwrite previous
finger.
9
Summary
3.1.3 Enroll Card and Fingerprint(s) when you have already enrolled fingerprint(s)
•
Press the finger with fingerprint already enrolled three times following the voice
prompts. If you are identified as the same person in each of verification attempts,
the system enters the fingerprint enrolment state.
•
After generating the voice prompt “ : User number **. Register. Please press your
finger or punch your card”, the system will start to enroll your fingerprint.
•
If the ID card enrolment succeeds, the system generates the voice prompt “ :
Registration is successful. Register. Please press your finger” and will enter the ingerprint enrolment state directly; if you press a finger that is not enrolled before and
succeeds in enrolment of this finger, the system generates the voice prompt: “ :
Registration is successful. Please press your finger or punch your card” and you can
continue enrolling new fingerprints or card. After you have enrolled 10 fingerprints,
the system will generate the voice prompt “ : Please punch your card” to enrol
your ID card.
•
* Bearer of M-card can’t
enrol fingerprint.
* Press finger three times follow the prompts.
* Follow voie prompts.
The system will automatically return to the verification state when all 10 fingers and
ID card are enrolled, or the management card is swiped once or operation times
out.
* After 10 fingers system
returns to verification state
Enrolment state
Number
of user is
full
Register users.
Please press your
finger or punch your
card
The card number
is repeated.
YES
Return to the
verification state
NO
NO
User number
**. Register. Please
press your finger.
Press
finger or
swipe
card
* Process flow chart
Please
punch
Please punch
your card again
your
card again
YES
New
fingerprint
or card?
Register. Please
press your finger or
punch your card.
YES
Is new user
enrolment
successful?
NO
The number of
The number of
enrolled
enrolledusers
usersisisfull./
full.
/The
Thecard
cardhas
hasbeen
been
registered/
thecard
card
registered/ the
number is repeated
number is repeated
NO
Registration
Registration is
successful
is successful
YES
Swipe card
Press finger
Card
enrolment
successful
?
Is finger
enrolment
successful?
NO
Are 10
fingers
and card
enrolled?
The system returns
to verification state
YES
User registration
successful
NO
YES
Enrolment is
successful
NO
The number enrolled
fingerprints is full /
The fingerprint is
repeated
Return to verification
state
10
3.1.4 Delete a Single User
Summary
Deleting a user by using a management card is called the simple single-user deletion
mode. Deleting a user by using an external keyboard is called the specified user deletion mode. (See 3.2.3 Delete a Specified User).
* Delete user with card single mode
The operation steps for simple single-user deletion:
•
In verification state, swipe your management card for five consecutive times to
enter the simple single-user deletion state (swipe your card one more time to return
to the verification state).
* Delete user with keyboard
- spicified mode
* Swipe card 5 times.
•
The system will generate the voice prompt “
ger or punch your card.”
•
Press your finger onto the fingerprint sensor or swipe your card over the card reader.
•
•
•
•
•
If you swipe your management card one more time or your operation times out, the
system will return to the verification state.
: Delete users. Please press your fin-
Press your finger onto the sensor to delete a user.
Press one of your enrolled fingers properly onto the sensor. If the verifi
cation succeeds, the system will generate the voice prompt “ : User number **. Deletion is successful. Delete users. Please press your finger or punch your card.” (**indicates the ID number of the user) and automatically return to the deletion state. If the verification fails, the system will generate the voice prompt “ : Please press your again.”
* Process
Swipe your card over the reader to delete a user.
Swipe a registered card over the reader. If the verification succeeds, the system will generate the voice prompt “ : User number **. De
letion is successful. Delete users. Please press your finger or punch your card.” and automatically return to the deletion state. If the verifica
tion fails, the system will generate the voice prompt “ : Please punch your card again.”
Note: In simple single-user deletion mode, management cards cannot be deleted because swiping the management card will return the system to the verifica
tion state.
11
* Single delete mode, management can’t be deleted
Summary
Delete a Single User flow chart
Verification state
* Single user delete process
Enter the deletion
state after swiping
the M-card 5 times
in a row
Delete users. Press
your finger or punch
your card.
Card
verification
Fingerprint
verification
Is card
verification
successful?
Is
fingerprint
verification
successful?
Please punch
your card again.
NO
YES
NO
YES
Please
press your
finger again
Please
try again
User number
**. Delete
successful.
Delete User
Return to the
verification state
after M-card is
swiped once or
operation is timed
out
3.2 USB Keyboard Operation
Keyboard operation flow chart
* Keyboard operation
Process
Verification state
Password + Enter
1 + Enter
2 + Enter
3 + Enter + 3 + Enter
9 + Enter + 9 Enter
8 + Enter + 8 + Enter
Enrolment state
Single user deletion
Restore factory
defaults
Delete all
Enter Password
Return to verification
state NO
Return to verification
state
Return to verification
state
Return to verification
state
Return to verification
state
12
Summary
3.2.1 Set Keyboard Password
If the user needs an external keyboard, he/she can connect the keyboard to the device and then swipe the management card to activate the external keyboard.
The system enables the user to set a dedicated password for the external keyboard.
* Plug in keyboard and
swipe M-card to activate
Operation steps:
•
In verification state, connect an external keyboard with the device through the USB
interface.
•
Swipe your management card once to activate the keyboard. The system generates the voice prompt “ : Please press the keyboard.”
•
Type in “8” and press “Enter”. Then type in “8” and press “Enter” again. The system
generates the voice prompt “ : Please set password.” Type in your desired password and press “Enter”. The system generates the voice prompt “ : The operation
is successful. The system returns to verification state.” If there are no keystrokes within
30 seconds, the system will generate the voice prompt “ : Operation timeout. The
system returns to verification state.” (The password must be between 4 and 6 digits)
•
The user can enter this password to activate the functions of the external keyboard
for further use, or swipe a management card once (which is mandatory for the first
use of the external keyboard).
1. If you enter a wrong password for six consecutive times, the keyboard will be locked
and you will have to power on the keyboard again to unlock it.
* 8 + Enter + 8 + Enter
* Timeout after 30 seconds
if no action is taken.
* Password must be between 4 and 6 digits
* Please take note !!
2. If there are no keystrokes within 30 seconds after the keyboard is activated, the keyboard functions will be automatically deactivated.
3. The keyboard can be inserted before 15 seconds; otherwise the system cannot identify its state.
3.2.2 Enrol a User Through Keyboard
Enrolling a user by using a USB keyboard is called keyboard based enrolment mode. In
this mode, the user can enrol a user with the specific user ID.
Operation steps:
•
As shown in 3.2 USB Keyboard Operations flow chart, type in “1” and press “Enter” to
enter the enrolment state.
•
When the system generates the voice prompt “
user number.” or enter a user ID.
•
The system generates the voice prompt “ : User number **. Register users. Please
press your finger or punch your card.” (** indicates the ID number of the user; same
below) The system enters the specific ID enrolment state.
•
•
•
The user enrol operation in the specified ID enrolment state is similar to the specified
ID enrol operation in the management card enrolment mode. For details, please
see 3.1.2 Enrol an Ordinary User.
•
In the enrolled user ID standby state, press ESC to return to the verification state. In
the specified user ID enrolment state, press ESC twice to return to the verification
state.
: Register users. Please input the
Note: If a user has enrolled in the system with a ID card, the system will gener
ate the voice prompt: “ :User number **, please press your finger”.
If a user has enrolled in the system with a user ID and 10 fingerprints, the system will generate the voice prompt “ : User number **. Please punch your card.”
Note: In keyboard based enrolment mode, you can enrol users consecutively. Upon successful enrol, the system automatically returns to the enrolment state.
13
* 1 + Enter = Enrolment
state
Summary
The keyboard based enrolment flow chart:
Enrolment state
Register user.
Please input the
user number.
Press
ESC
* Keyboard enrolment
process
YES
Password + Enter
The system
returns to
verification state
NO
NO
Enter ID
User number **.
Register. Please
press our finger
or punch your
card.
YES
Valid
ID?
NO
YES
YES
The number of
records is full/ the
card number is
repeated/ the card
has been registered/
the fingerprint is
repeated.
NO
Press
Backspace
Register. Please
press your finger
or punch your
card.
NO
User enrolment
operation
Enrolment
successful?
Registration is
successful.
YES
NO
Are 10
fingerprints and
card enrolled
YES
Important Statement:
1. In keyboard based enrolment mode, if any operation times out, the system automatically prompts you of this operation once every other 10 seconds and returns to the
verification state after prompting you three times.
* System prompts every 10
seconds 3 times, before returning to verification state
2. Newly enrolled fingerprints will overwrite the original ones in management card based
enrolment mode, and keyboard based enrolment mode likewise.
3. A user can only enrol one card. When the user with an enrolled card enrols in the
system, the system generates the voice prompt “ : Register. Please press your finger.”
When the user swipes the card, the system generates the voice prompt “ : The card
has been registered.”
4. One card cannot be enrolled repetitively, otherwise the system will generate the
voice prompt “ : The card number is repeated.” during card swiping. Different users
cannot enrol the same fingerprint, otherwise the system will generate the voice prompt
“ : The fingerprint is repeated.” during fingerprint enrolment. A user’s new fingerprints
will overwrite the existing ones.
The difference between these two user enrolment modes is how to returns to verification
state.:
1. In management card based enrolment mode with a specific user ID, the system returns to the verification state after you swipe your card once.
2. In keyboard based enrolment mode with a specific user ID, when you press ESC, the
system returns to the enrolment state and generates the voice prompt “ : Register
users. Please input the user number.” You can enrol a user ID and press ESC. Then the
system generates the voice prompt “ : The system returns to verification state.”
14
* System can’t enrol repeated cards.
* Swipe once system returns
to verification state
* ESC 2 times, system returns to verification state.
3.2.3 Delete a Specific User
Deleting a user by using an external keyboard is called the specific user deletion mode.
Summary
Operation steps:
•
Connect a USB keyboard to the device, and swipe your management card once
or enter your password to activate the keyboard.
•
Press “2” and “Enter”; to enter the specific user deletion mode, the system will generate the voice prompt “ : Delete users. Please input the user number.” and you
may proceed to the step3.
* Connect USB keyboard,
swipe M-card once to
activate
* 2 + Enter to enter deletion
mode
Notice: Special case: If there are no users (include management card user) en
rolled, and you have the keyboard password, you can use the password to activate the keyboard and press “2” and “Enter” to enter the user deletion state, the system will generate the voice prompt “ : No registered user. The system returns to verification state.”
•
Enter a user ID and the system checks whether the user ID is valid.
* Enter user ID number
•
If the user ID is valid, the system will generate the voice prompt “ : User number **.
Deletion is successful. Delete users. Please input the user number.” and automatically return to the deletion state. If the user ID is invalid, the system will generate the
voice prompt “ : User number error.”
* System check - user
delted successfully.
•
If you press “ESC” or your operation times out, the system will return to the verification state.
Note:
•
In specific user deletion mode, user IDs and management card user IDs that are enrolled in the system are all deemed invalid.
•
In keyboard based deletion mode, the system disables the fingerprint sensor and card reader.
Verification state
Password
confirmation
successful.
Password error
Activate
Keyboard
NO
* Delete specific user flow
chart
YES
Press 2 + Enter
to enter the
deletion state
Delete users.
Please input
the user
number
Enter ID?
User number
error.
Valid ID?
User number
**. Deletion is
successful
NO
YES
Delete user
Return to verification
state if backspace is
pressed or operation
times out
15
Summary
3.2.4 Delete All Users
Operation steps:
•
Connect a USB keyboard to the device, and swipe your management card once
or enter your password to activate the keyboard.
•
Press “9” and “Enter”. Then press “9” and “Enter” again. The system deletes all the
users.
•
If the operation succeeds, the system will generate the voice prompt “ : Delete
all users. The operation is successful. The system returns to verification state. Please
register the management card.”
* Connect USB keyboard,
swipe M-card once to
activate
* 9 + Enter + 9 + Enter system will delete all users
Note:
•
You can delete a management card using the Delete All function.
•
You can use the Delete All function to delete all enrolled users, fingerprints and
records.
•
Extreme caution should be exercised while performing this operation, as once deleted, the data cannot be recovered.
* NB! Take caution, once
deleted, can’t be restored.
3.2.5 Restore Factory Defaults
Operation steps:
•
Connect a USB keyboard to the device, and swipe your management card once
or enter your password to activate the keyboard.
•
Press “3” and “Enter”. Then press “3” and “Enter” again. The system restores the factory defaults.
•
After the operation succeeds, the system generates the voice prompt “ : Restore
to default settings. The operation is successful. The system returns to verification
state.” You can also restore the factory defaults by resetting the tamper switch.
Please see 3.6 Tamper Switch. After the device is restored to factory defaults, the
device information is restored to factory defaults, including the device number,
system password, IP address, 485 address, and keyboard password.
Note: The user information stored on device will not be cleared after the device is
restored to factory defaults.
* 3 + Enter + 3 + Enter - will
restore system defaults
* Reset to factory defaults
will not delete users.
3.3 Access Control Function
Access control setting is to set user’s unlock door time zone, control lock and related
device’s parameters.
To unlock, the enrolled user must comply with the following conditions:
•
The current unlock time should be in the valid time of user time zone or group zone.
•
The group in which the user is must be in access control (or in the same access
control with other group, to open the door together). The system default the new
enrolled user in the first group, default group time zone as 1. The group in which the
user is must be is access control/unlock combination group(User can modify the
related setting of access control, through access control software).
Notice: The device access control function need to set and modify through the access control software, for detail, please refer to the software user manual.
16
* Double check time zones
that it’s according to user
time zones.
* System default is group
time zone 1.
* User can modify, through
software.
3.3.1 Access Control Functions
Summary
Access control setting is to set user’s open door time zone, control lock and related
device’s parameters.
To unlock, the enrolled user must comply with the following conditions:
•
The current unlock time should be in the effective time of user time zone or group
zone.
•
The group where user is must be in access control (or in the same access control
with other group, to open the door together). The system default the new enrolled
user as the first group, default group time zone as 1, access control as the first
group, and the new enrolled user is in unlock (User can modify the related setting of
access control, through access control software).
* System default is group
time zone 1.
* User can modify, through
software.
Notice: The device access control function need to set and modify through the access control software, for detail, please refer to the software manual
1. Access Control Time Zone:
A time zone is the minimum unit of access control option. The whole system can define
50 time zones. Every time zone defines seven time sections i.e. (a week). Every time section is the effective time zone within 24 hours every day. Every user can have 3 personal
time zones “or” use the group time zone to which he/she belongs to.
2. Access Holiday Setting:
Special access control time may be needed during holiday. It is difficult to modify everybody’s access control time. So a holiday access control time can be setted, which is
applicable for all users.
3. Access Group Time Zone:
Grouping is to manage users in groups. Employee in groups use group time zone by default. Group members can also set user time zone. Every group can hold their own time
zones. The new enrolled user belongs to Group 1 by default and can also be allocated
to other groups.
* 50 time zones on unit
* each user can belong
to 3
* Holiday time zone setup
are applicable for all users.
* Users can belong to
groups, and groups have
their own time zones.
4. Unlock Combination Setting:
For improving the security level, you can use this function. To unlock the door, 5 different
people from 5 different groups is needed at most, which means the door can not be
opened unless all 5 of these people passed the verification process.
5. Access Control Parameters:
Lock Control Delay: Apply to determine unlock time, the minimum measured unit is 20ms, in the normal condition it’s 100-200ms.
Anti-Pass Mode: Can be set to “None”, “Out “, “In”, “InOut”.
Master’s record state: Can be set to “None”, “Out”, “In”.
* Lock control mode
Sensor Mode: Set Door Sensor Mode. It can be set into “None”, “Normal Open (NOpen)”, “Normal Close (NClose)” state.
* Anti-pass
Sensor Delay: Set the sensor delay time after the door is opened. if the door is not closed within the sensor delay time, the alarm will be triggered. Black and white screen device range is 0-254. Colour screen device range is 0-99.
* Sensor Alarm
Sensor Alarm: Set the alarm time delay after the alarm (external) is triggered. Range is 0-999 seconds.
Error times to alarm: Define the max error times to trigger alarm. When the verifi
cation is not passed, and exceeds the defined times, the alarm signal will be triggered automatically.
6. Anti-Pass back setting:
Anti-Pass back function; please refer to 4.2 Anti-Pass back.
7. Disable alarm: (alarm types: door sensor alarm and tamper alarm)
When the device is in alarm state, user’s verification can disable the alarm, and the
device will return to normal state, if not, it will sound untill rectified. 17
* Sensor Mode
* Error times to alarm
3.4 User Verification
Summary
The default verification of device is FP/RF verification, user can use the access control
software to modify the verify mode to RF, FP or RF&FP verification. For detail please refer
to the software user manual.
* FP = fingerprint
Operation steps:
•
When the device is in verification state, the system generates the voice prompt “
Verify users. Please press your finger or punch your card.”
•
Start user verification. The device supports four verifications modes: FP/RF, FP, RF and
FP&RF verification.
•
•
Fingerprint + Card verification
Set the user verification mode to FP & RF through access control software, the verify operation as follows:
•
•
** FP / RF, FP, RF & FP&RF
verification
Card verification
Swipe your card over the card reader. If the verification succeeds, the system generates the voice prompt “ : User number **. Thank you.” and concurrently triggers an unlocking signal. If the verification fails, the system generates the voice prompt “ : Please punch your card again.”
•
Fingerprint (FP) verification
* 4 modes of verification
Press your finger on the fingerprint sensor in a proper way. If the verification succeeds, the system generates the voice prompt “ : User number **. Thank you.” and concurrently triggers an unlocking signal. If the verification fails, the system generates the voice prompt “ : Please press your finger again.”
•
:
Press finger first:
Press your finger on the fingerprint sensor in a proper way. If the veri
fication succeeds, the system generates the voice prompt “ : User number **, Please punch your card.” after card verification succ
eed, and concurrently triggers an unlocking signal. If the verification fails, the system generates the voice prompt “ : Please punch your card again.”
* Set the verification mode
via access control software
* FP first then RF
* RF first then FP
Swipe card first:
Swipe your card over the card reader. If the verification succeeds, the system generates the voice prompt “ : User number **, Please press your finger.” After fingerprint verification succeed, it concurrently triggers an unlocking signal. If the verification fails, the system generates the voice prompt “ : Please press your again.”
Fingerprint or Card verification
* FP or RF
That is, the verification operation of (1) or (2) both valid.
Tip:
•
If the user is not in the valid access control time zone, he/she can not unlock the
door, the system generates the voice prompt “ : Invalid Time Zone.”
•
If the user has not used the set verification mode to verify, he/she can not unlock
the door, the system generates the voice prompt “ : Invalid Verification Mode.”
User verification flow chart operation :
(see next page)
18
Summary
* Flow chart for user verification
Verification state
Verify users.
Please press
your finger or
punch your
card.
Is the door
or tamper
switch
triggered?
YES
YES
Alarm
NO
NO
Enter ID?
Delete user
Card
verification
successful?
Card
verification
successful?
YES
YES
Please punch
your card.
Please
try again
NO
User number
**, Thank you.
Unlock and delay
Lock
Door status
detection
Return to
verification state
19
3.5 U-disk
Summary
The user can perform record download, user download, user upload, and firmware
upgrade through a U-disk.
•
Record download: Download the attendance records of all users from the device
to a U-disk.
•
User download: Download all user information such as fingerprints and card numbers from the device to a U-disk.
•
User upload: Upload the user information from a U-disk to the device.
•
Firmware upgrade: Upgrade the device firmware through a U-disk.
* Record download
* User download
* User upload
* Firmware updates
The configuration files in the U-disk can be created and modified by using the access
control software. The operation; please refer to the software user manual.
Notice: Please do not upgrade the firmware at your discretion because it may bring problems and affect the normal use of the device. Contact our
distributors for technical support or upgrade notification.
U-disk operations include the following two cases:
•
If you connect a U-disk without configuration file to the device, the system will automatically prompt you of the operations in sequence.
•
After connecting a U-disk to the device, you can swipe your card once to enter the U-disk management state.
•
The system generates the voice prompt “ : ****. Please punch your manage
ment card for confirmation.” (**** indicates the four operation items from a to d in sequence; same below)
•
If you want to perform U-disk management, swipe your card for confirmation. If your operation succeeds, the system will generate the voice prompt “ : The operation is successful.” and prompt you to proceed to the next step. After you finish the four items, the system generates the voice prompt “ : The system re
turns to verification state.” If your operation fails, the system will generate the voice prompt “ : The operation fails. The system returns to verification state.”
•
If you do not swipe your management card, the system will automatically skip over this step upon 5 seconds and prompt you of the next step. After you finish the four items, the system returns to the verification state automatically.
•
If you connect a U-disk with configuration file to the device, the system will carry out
operations based on the settings of the configuration file.
•
After connecting a U-disk to the device, you can swipe your card once to enter the U-disk management state.
•
The system obtains operation commands by reading the configuration file on the U-disk and generates the voice prompt “ : Run configuration files in the U-
disk. Please swipe your management card for confirmation.”
•
After you swipe your card and perform all operations successfully, the system will generate the voice prompt “ : ****. The operation is successful.” in se
quence for every operation step. If any of the operations fails, the system will generate the voice prompt “ : ****. The operation fails.”
•
After you finished all the operations, the system generates the voice prompt “
: The system returns to verification state.”
* Connect U-disk and swipe
M-card once to activate
* If no action within 5 seconds, system skip process
and proceed.
* If config file exists, system
will prompt for action.
Notice: Please wait 8 seconds after you insert the U-disk into the device, otherwise, the system can’t detect the U-disk properly.
20
3.6 Tamper Switch
Summary
The tamper switch is pressed and held down with a rear cover. When the device is
dismantled, the tamper switch will be lifted up and then it will send an alarm signal to
trigger an external alarm.
Clear alarm: The user can clear the tamper switch alarm by unlocking the door upon
successful verification of any registered users.
Restore factory defaults: The factory defaults can be restored through the tamper
switch.
When the system generates an alarm for 30–60 seconds, the user can press the tamper
switch three times (till the speaker sounds) to restore default settings, including the device number, system password, IP address, 485 address, and keyboard password.
* Tamper switch mounted
on back and pressed down
when mounted.
* When triggered, alarm will
sound.
* When alarm is on, between 30-60 seconds, press
tamper 3 times.
Note:
•
The user information stored on device will not be cleared after the device is restored
to factory defaults.
•
The factory defaults can be restored through the USB keyboard. For details, see
3.2.5 Restore Factory Defaults.
4.0 Appendix A
• List of parameters
Features
* List of parameters
Specifications
21
4.0 Appendix B
•
Summary
Wiring diagram for connection points for power and communication.
22
6.0 Appendix C
•
Summary
Wiring diagram for NO (normal open) & NC (normal close) door lock system
23
Appendix A:
ZK54 Pinout
+ 12V
GND
}
Power In
Wiegand In
485 485 +
Door Sensor
}
GND
BUT
}
}
RS 485
Output
Button
SEN
NO
COM 1
NC
AL AL +
Wiegand Out
}
Lock
}
Alarm
+ 12
Power Out
}
}
IWD 0
}
WD 0
IWD 1
RLED
GLED
BEEP
GND
WD 1


![[ENG] CE60-3 GSM Software ComCE v4-2](http://vs1.manualzilla.com/store/data/005829621_1-1503a18c5b086c34f94e34b38a52b968-150x150.png)