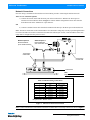
1
Strand Lighting Offices
Philips Strand Lighting - Dallas
10911 Petal Street
Dallas, TX 75238
Tel: 214-647-7880
Fax: 214-647-8031
Philips Strand Lighting - Auckland
19-21 Kawana Street
Northcote, Auckland 0627
New Zealand
Tel: +64 9 481 0100
Fax: +64 9 481 0101
Philips Strand Lighting - New York
267 5th Ave, 4th Floor
New York, NY 10016
Tel: 212-213-8219
Fax: 212-532-2593
Philips Strand Lighting - Europe
Marssteden 152
Enschede 7547 TD
The Netherlands
Tel: +31 53 4500424
Fax: +31 53 4500425
Philips Strand Lighting - Asia Limited
Room 6-10, 20/F Delta House 3 On Yiu Street
Shatin, N.T. Hong Kong
Tel: + 852 2757 3033
Fax: + 852 2757 1767
Website:
www.strandlighting.com
The material in this manual is for information purposes only and is subject to change without notice. Philips Strand
Lighting assumes no responsibility for any errors or omissions which may appear in this manual. For comments and
suggestions regarding corrections and/or updates to this manual, please visit the Philips Strand Lighting web site at
www.strandlighting.com or contact your nearest Philips Strand Lighting office.
El contenido de este manual es solamente para información y está sujeto a cambios sin previo aviso. Philips Strand
Lighting no asume responsabilidad por errores o omisiones que puedan aparecer. Cualquier comentario, sugerencia
o corrección con respecto a este manual, favor de dirijirlo a la oficina de Philips Strand Lighting más cercana.
Der Inhalt dieses Handbuches ist nur für Informationszwecke gedacht, Aenderungen sind vorbehalten. Philips
Strand Lighting uebernimmt keine Verantwortung für Fehler oder Irrtuemer, die in diesem Handbuch auftreten. Für
Bemerkungen und Verbesserungsvorschlaege oder Vorschlaege in Bezug auf Korrekturen und/oder
Aktualisierungen in diesem Handbuch, moechten wir Sie bitten, Kontakt mit der naechsten Philips Strand LightingNiederlassung aufzunehmen.
Le matériel décrit dans ce manuel est pour information seulement et est sujet à changements sans préavis. La
compagnie Philips Strand Lighting n'assume aucune responsibilité sur toute erreur ou ommission inscrite dans ce
manuel. Pour tous commentaires ou suggestions concernant des corrections et/ou les mises à jour de ce manuel,
veuillez s'il vous plait contacter le bureau de Philips Strand Lighting le plus proche.
Note: Information contained in this document may not be duplicated in full or in part by any person without prior written
approval of Philips Strand Lighting. Its sole purpose is to provide the user with conceptual information on the equipment
mentioned. The use of this document for all other purposes is specifically prohibited.
Document Number: 2-450201-010
Version as of: 25 February 2011
Vision.net Touchscreen Stations Installation & User’s Manual
©2011 Philips Group. All rights reserved.
Vision.net Touchscreens
Installation & User’s Manual
IMPORTANT INFORMATION
Warnings and Notices
When using electrical equipment, basic safety precautions should always be followed including the following:
a. READ AND FOLLOW ALL SAFETY INSTRUCTIONS.
b. For indoor, dry locations use only. Do not use outdoors.
c. Do not mount near gas or electric heaters.
d. Equipment should be mounted in locations and at heights where it will not readily be subjected to
tampering by unauthorized personnel.
e. The use of accessory equipment not recommended by the manufacturer may cause an unsafe
condition.
f. Not for residential use. Do not use this equipment for other than intended use.
g. Refer service to qualified personnel.
SAVE THESE INSTRUCTIONS.
WARNING: You must have access to a main circuit breaker or other power disconnect device
before installing any wiring. Be sure that power is disconnected by removing fuses or turning the
main circuit breaker off before installation. Installing the device with power on may expose you to
dangerous voltages and damage the device. A qualified electrician must perform this installation.
WARNING: Refer to National Electrical Code® and local codes for cable specifications. Failure to
use proper cable can result in damage to equipment or danger to personnel.
WARNING: This equipment is intended for installation in accordance with the National Electric
Code® and local regulations. It is also intended for installation in indoor applications only. Before
any electrical work is performed, disconnect power at the circuit breaker or remove the fuse to avoid
shock or damage to the control. It is recommended that a qualified electrician perform this
installation.
Philips Strand Lighting Limited Two-Year Warranty
Philips Strand Lighting offers a two-year limited warranty of its products against defects in materials or
workmanship from the date of delivery. A copy of Philips Strand Lighting two-year limited warranty containing
specific terms and conditions can be obtained from the Philips Strand Lighting web site at www.strandlighting.com
or by contacting your local Philips Strand Lighting office.
1
Installation & User’s Manual
Vision.net Touchscreens
TABLE OF CONTENTS
Strand Lighting Offices ....................................................................................................... Inside Front Cover
IMPORTANT INFORMATION
Warnings and Notices...................................................................................................................................... 1
Philips Strand Lighting Limited Two-Year Warranty..................................................................................... 1
TABLE OF CONTENTS
PREFACE
About this Manual ..................................................................................................................................................
Product Descriptions...............................................................................................................................................
Vision.net Touchscreens Overview.................................................................................................................
Wall Touchscreens ..........................................................................................................................................
Rack Mounted Touchscreen ............................................................................................................................
Portable Touchscreens.....................................................................................................................................
Vision.net EU (European) Touchscreens ........................................................................................................
3
3
3
3
3
3
4
VISION.NET TOUCHSCREEN OVERVIEW
Vision.net Touchscreen Components...................................................................................................................... 5
Overview ......................................................................................................................................................... 5
Touchscreen Connections................................................................................................................................ 5
INSTALLATION AND SET UP
Power Requirements...............................................................................................................................................
Mounting / Installation ...........................................................................................................................................
Wiring and Connections .........................................................................................................................................
Connecting Power - Using an External Power Supply....................................................................................
Network Connections ......................................................................................................................................
6
6
6
6
9
OPERATION
Creating a Vision.net Touchscreen .......................................................................................................................
Vision.net Designer software installation on a Strand Lighting Vision.net touchscreen:.....................................
Testing a Vision.Net Touchscreen ........................................................................................................................
Configuring a Vision.net Touchscreen .................................................................................................................
Cleaning and Care Instructions.............................................................................................................................
10
12
12
12
13
TECHNICAL SPECIFICATIONS
Vision.net Touchscreen Common Specifications ................................................................................................. 14
2
TABLE OF CONTENTS
Vision.net Touchscreens
Installation & User’s Manual
PREFACE
1. About this Manual
The document provides installation and operation instructions for the following products:
• Vision.net Touchscreens: (catalog numbers: 95242A, 95242B, 95242P-A, 95242P-B, 95242SE, 95242RM,
95240RM, and 95241)
• Vision.net EU Touchscreens: (catalog numbers: 96355, 96356, and 96357)
Please read all instructions before installing or using this product. Retain this manual for future reference. Additional
product information and descriptions may be downloaded at www.strandlighting.com.
2. Product Descriptions
Vision.net Touchscreens Overview
Touchscreens are top level control components that provide a highly customizable interface to the Vision.net
network. These stations are very flexible and provide a highly intuitive and easy way of working with the Vision.net
system.
There are several types of touchscreens and many applications for them.
Wall Touchscreens
This is a Vision.net touchscreen that is permanently mounted in a wall. The 7 inch model is available in either
Almond or Black. All other sizes are Charcoal Grey.
Figure 1: Standard Vision.net 7 Inch Touchscreen in Black
Rack Mounted Touchscreen
This is a Vision.net touchscreen that is permanently mounted in an equipment rack. In addition to the 7 inch
touchscreens, there is a 15 inch model available.
Portable Touchscreens
A portable touchscreens is a wired Vision.net touchscreen that is available for remote operation. It is mounted in an
enclosure and tethered for connection into a Vision.net system. The tethered connection can be temporary or
permanent.
About this Manual
3
Vision.net Touchscreens
Installation & User’s Manual
Vision.net EU (European) Touchscreens
Vision.net EU touchscreens are available in a wired 7 inch touchscreen with an attached 8 button station that is
permanently mounted in a wall or in an equipment rack. There is also a 15 inch model available.
Figure 2: European 7 Inch Vision.net Touchscreen in Black with 8 Buttons
Note: Additional product information and descriptions may be downloaded at www.strandlighting.com.
4
PREFACE
Vision.net Touchscreens
Installation & User’s Manual
VISION.NET TOUCHSCREEN OVERVIEW
1. Vision.net Touchscreen Components
Overview
LED Power Indicator
Bezel
LED Power Indicator
Integrated 8-Button
Station
Bezel
Standard 7 Inch Vision.net Touchscreen
European 7 Inch Vision.net
Touchscreen with 8 Buttons
Touchscreen Connections
USB Ports (2)
Touchscreen
Reset Button
Bezel
27VDC Input
ON / OFF Power Switch
Touchscreen Front
Local Area Network (LAN) - Optional
COM Port (connection to Vision.net Touchscreen Control PCB)
Note: Illustration for reference only. For complete connection requirements, see "Wiring and Connections" on page
6.
Vision.net Touchscreen Components
5
Vision.net Touchscreens
Installation & User’s Manual
INSTALLATION AND SET UP
1. Power Requirements
The Vision.net Touchscreen operates on 27VDC. It is powered through the Touchscreen Control PCB (pre- installed
on the back of the touchscreen) via an external AC to DC power supply.
2. Mounting / Installation
Note: The Vision.net Touchscreen Control PCB is a card that connects to the touchscreen to allow VN/485 and RS232 communications. This card is mandatory for a Vision.net system that is communicating SVN/485 only. The
Touchscreen Control PCB is pre-installed in on the back of the touchscreen.
To install wall-mounted touchsreens:
Step 1. If conduit is required by local code, provide conduit to the back box where the Touchscreen Control PCB is
installed.
Step 2. Install the back box at the desired location.
Step 3. Refer to next section for touchscreen wiring and connections.
3. Wiring and Connections
Connecting Power - Using an External Power Supply
To connect an external power supply (not powering from Vision.net network):
WARNING! Make sure power is disconnected (removed) before connecting power to touchscreen.
Step 1. As shown in Figure 3, at Touchscreen Control PCB make sure jumper at JP1 is on Pins 1 and 2.
Vision.net LAN
Touchscreen Control PCB
(located on back of touchscreen)
Power Input
(see Detail B)
Detail A
Detail B
From External
Power Supply
Jumper
(across Pin 1 and 2)
Wiring to
Touchscreen
(factory wired)
Black (Common)
Red (+24VDC)
Jumper JP1
(see Detail A)
Figure 3: Touchscreen Control PCB Jumper Setting and Power Connections
Step 2. Using two (2), #14 AWG (.75 mm2) wires, connect external power supply as illustrated in Figure 3.
6
INSTALLATION AND SET UP
Vision.net Touchscreens
Installation & User’s Manual
Note: The external power supply must be mounted within 500 feet (150 meters) of the touchscreen. Two #14 AWG
conductors must be used.
Step 3. Connect power cable from 27VDC input connector on touchscreen to 3 pin connector on Touchscreen
Control PCB.
Note:
Exploded view shown for clarity.
Touchscreen Control PCB
+27VDC Output
(to touchscreen - factory wired)
27VDC Power Input
Power Cable
(Black with White Stripe)
Touchscreen
Figure 4: Touchscreen Power Connection
To connect power supply (powering from Vision.net network):
WARNING! Make sure power is disconnected (removed) before connecting to touchscreen.
Step 4. As shown in Figure 5, at Touchscreen Control PCB make sure jumper - at JP1- is on Pins 1 and 2.
Vision.net LAN
Touchscreen Control PCB
(located on back of touchscreen)
Power Input
Detail A
Jumper
(across Pin 1 and 2)
Wiring to Touchscreen
(factory wired)
Jumper JP1
(see Detail A)
Figure 5: Touchscreen Control PCB Jumper Setting and Power Connections
Step 5. Connect SVN/485 network using Belden 1583A cable according to wiring diagram in Figure 6.
Wiring and Connections
7
Vision.net Touchscreens
Installation & User’s Manual
Note:
Exploded view shown for clarity.
Vision.net Network
(see connection chart)
Touchscreen Control PCB
27VDC
Power
Input
+27VDC Output
(to touchscreen)
Power Cable
(Black [Pin2] and
Black with White
Stripe [Pin 1])
Touchscreen
Table 1: Vision.net Wiring Connections*
Pin
Signal
Color
1
RX +
White / Orange
2
RX -
Orange
3
Not Used
Not Used
4
+ NET V
White / Green
5
- NET V
Green
6
+ NET V
White / Blue
7
- NET V
Blue
8
+ NET V
White / Brown
9
- NET V
Brown
* Required cable - Belden 1538A
Figure 6: Touchscreen Connections - Power and VIsion.net
Step 6. Connect power cable from Touchscreen Control PCB to Touchscreen.
8
INSTALLATION AND SET UP
Vision.net Touchscreens
Installation & User’s Manual
Network Connections
Once the wiring is terminated to the Touchscreen Control PCB, proceed to connecting the touchscreen itself.
There are two connection options:
1) Connect the network cable from the RJ-45 port on the touchscreen to “Ethernet out” RJ-45 port on
Touchscreen Control PCB as shown in Figure 7. Connect Ethernet using Belden 1583A cable from the
SNV/IP network on the “Ethernet In” 8-pin connector.
OR
2) Connect a standard CAT5e cable from the SVN/IP network directly to the RJ-45 port on the touchscreen.
Note: The RJ-45 connections on the Control PCB are for convenience wiring only. It is only a pass through and does
not convert SVN/IP to SVN/485 or SVN/485 to SVN/IP. If the ethernet jack is used, a static IP address in the same
range must be configured for the jack to be active.
Network Option 2
Ethernet Network
(from SVN/IP network)
Network Option 1
Ethernet Network
(see connection chart)
OR
Touchscreen
COM Cable
Touchscreen
Control PCB
Touchscreen
Note:
Exploded view shown for clarity.
Table 2: Ethernet Wiring Connections*
Pin
Signal
Color
1
RX +
White / Orange
2
RX -
Orange
3
TX +
White / Green
4
Not Used
Not Used
5
Not Used
Not Used
6
TX -
Green
7
Not Used
Not Used
8
Not Used
Not Used
* Required cable - Belden 1538A
Figure 7: Touchscreen Network Connection
Note: Connect Touchscreen Control PCB to Touchscreen COM Cable if not already connected as shown in Figure 7.
Wiring and Connections
9
Installation & User’s Manual
Vision.net Touchscreens
OPERATION
1. Creating a Vision.net Touchscreen
Note: Follow these instructions ONLY if the touchscreen arrives without any setup information. Before beginning
the process of adding Vision.Net functionality to a touchscreen, be sure to inspect the screen to ensure that it is free of
all manufacturer defects.
To create a Vision.net Touchscreen:
Note: Before proceeding, contact Strand Lighting technical support via phone at 1.214.647.7880 or
1.800.4.STRAND or via e-mail at [email protected] for system files.
Step 1. Load system files obtained from Strand Lighting technical support onto a USB key.
Step 2. Power touchscreen.
Step 3. When booting is complete, insert programming USB key into screen.
Step 4. Open MYDEVICE/HARDDISK2.
Step 5. Copy STARTUP FOR SHASTA.
Step 6. Navigate to MYDEVICE/HARDDISK.
Step 7. Paste STARTUP FOR SHASTA into touchscreen.
Step 8. Close all windows.
Step 9. Open the START menu.
Step 10. Select SETTINGS/CONTROL PANEL.
Step 11. Double tap on AUTOLAUNCH. This will open a configuration window.
a. Select BROWSE.
b. Navigate to MYDEVICE/HARDDISK.
c. Double tap on STARTUP FOR SHASTA.
Note: Old-style touchscreens used a file called START FOR TOUCHSCREEN. Delete this file and replace it
with STARTUP FOR SHASTA if using new Shasta firmware.
d. Verify that STARTUP FOR SHASTA now appears in the window.
e. Tap Save.
f. Tap OK. Note, if X is pressed all changes will be lost.
Step 12. From the open CONTROL PANEL window select SYSTEM. This will open the device configuration
window. CONTROL PANEL > SYSTEM > DEVICE NAME.
a. Select DEVICE NAME.
b. Set DEVICE NAME from Table 3, “Touchscreen Device Names,” on page 11.
Note: You must add the last 3 digits of the IP address if touchscreens are networked.
10
OPERATION
Vision.net Touchscreens
Installation & User’s Manual
Touchscreen Type
Device Name
Portable
TS-P-xxx
7 (non-Aaeon) & 10 Inch
TS-I-xxx
3.5 Inch
TS-D-xxx
15 Inch (iEi only)
TS-C-xxx
15 Inch (Aaeon only)
TS-B*-xxx
7 Inch (Aaeon only)
TS-A*-xxx
Table 3: Touchscreen Device Names
Note: "-xxx" is the last three digits of the unit’s IP address. * = Old hardware. Old Hardware designations are
included for service and support issues. These must not be used in new installations.
c. Tap X to close window.
Step 13. Close all open windows.
Step 14. Open the START menu.
Step 15. Select SETTINGS/NETWORK AND DIALUP CONNECTIONS. This will open the Network
settings window.
a. Tap and hold on any wireless connection for 3 seconds.
b. From menu select DISABLE.
c. Tap X to close window.
Step 16. Open the START menu.
Step 17. Select SETTINGS/TASKBAR AND START MENU. This will open the Taskbar settings window.
a. Check the box to AUTOHIDE.
b. Uncheck the box for ALWAYS ON TOP.
c. Tap X to close window.
Step 18. Close all windows.
Step 19. Open MYDEVICE/HARDDISK.
Step 20. Double tap on STARTUP FOR SHASTA. This will launch the Shasta environment.
Note: The USB key must be in place.
Step 21. Select UPDATE FIRMWARE AND LAUNCH APPLICATION. At this point, the touchscreen will
copy all necessary files from the USB key.
WARNING! Do not remove the USB key until the transfer is complete.
The Touchscreen is now ready for use.
Note: Depending on what ActiveScreen.ntc2 file was present in the UPDATE folder on the USB key the screen
may display incorrectly. Please be sure that the file on the USB key is for the desired screen.
Creating a Vision.net Touchscreen
11
Installation & User’s Manual
Vision.net Touchscreens
2. Vision.net Designer software installation on a Strand Lighting
Vision.net touchscreen:
Note: For this procedure, you will need the latest Vision.net Designer software. The latest version of this software
can be downloaded from the Strand website at www.strandlighting.com. Also, you will need to have an empty USB
key in order to move the required files from a Windows-based computer to the Strand Lighting Vision.net
touchscreen.
To install Vision.net Designer software:
Step 1. UNZIP (un-compress) downloaded Vision.net Designer software to find a zipped file titled Shasta CE
for Update.zip file.
Step 2. On an empty USB Key:
a. Create a folder titled Update.
b. Move all files from Shasta CE for Update.zip file on computer to Update folder on USB key.
c. Unplug USB key from computer.
Step 3. Turn Off or remove power from touchscreen.
Step 4. Turn On or power up touchscreen.
Step 5. Touchscreen will begin boot process.
Step 6. After a portion of boot process has occurred (see note), plug USB key (with updated software) into
touchscreen's USB port.
Note: When Windows CE splash screen appears, connect USB key with the touchscreen software unzipped in the
Update folder.
Step 7. The touchscreen will boot and provide a Touch Screen Startup Control interface.
Step 8. Select the following option labeled Update Firmware and Start Application.
Step 9. Confirm selection and action.
Step 10. When upgrade process is complete, remove USB key.
Step 11. Repeat process, as desired, on additional touchscreens.
3. Testing a Vision.Net Touchscreen
Ensure that the touchscreen has been properly setup and configured before attempting the test procedure. If not, then
go to "Creating a Vision.net Touchscreen" on page 10.
To test a Vision.net Touchscreen:
Step 1. Attach computer running Vision.net Designer to Vision.net LAN using Vision.net RS-232 port (Part number
63025).
Step 2. Attach touchscreen control PCB to Vision.net LAN (If touchscreen is not powered, power it now).
Step 3. Verify that pressing buttons or moving sliders on the touchscreen causes Designer for Vision.net 3 to show
these commands on the status line.
4. Configuring a Vision.net Touchscreen
A Vision.net Touchscreen can be configured using Vision.net Designer. Go to www.strandlighting.com to download
the current version of Vision.net Designer.
12
OPERATION
Vision.net Touchscreens
Installation & User’s Manual
5. Cleaning and Care Instructions
WARNING! All cleaning should be performed with power completely removed from the console. Never attempt to
open unit. There are no user-serviceable parts. Under no circumstances should ammonia-based cleaners, acetone, or
other harsh solvents be used on or near the Vision.net Touchscreen Stations or power supply. These types of cleaners
or solvents can permanently damage the unit.
Being a solid-state device, the Vision.net Touchscreen Stations requires very little routine maintenance by the user.
Should the unit become dirty, disconnect from power supply, and clean unit using a lint-free cleaning cloth.
If you have any questions regarding the use or care of your Vision.net Touchscreen Stations, please contact Philips
Strand Lighting technical support or your local Authorized Dealer.
Cleaning and Care Instructions
13
Vision.net Touchscreens
Installation & User’s Manual
TECHNICAL SPECIFICATIONS
1. Vision.net Touchscreen Common Specifications
Supply Voltage:
Power Consumption:
Ambient Temperature:
Humidity:
Compliance:
27VDC (either via external power supply or via the Vision.net network)
7 Inch Models: 20 Watts (approx.)
0 to 50 degrees C (32 to 95 degrees F)
0%-90% Non condensing
Safety / EMI: UL, FCC, CB, CCC, CE (per OEM)
Note: For specific and complete model specifications, features, etc., refer to the product specification sheet or visit
the Philips Strand Lighting web site at www.strandlighting.com for more details.
Standard 7 Inch Vision.net Touchscreen
European 7 Inch Vision.net
Touchscreen with 8 Buttons
14
TECHNICAL SPECIFICATIONS
Vision.net Touchscreens
Installation & User’s Manual
NOTES
Vision.net Touchscreen Common Specifications
15