1
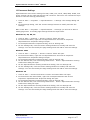
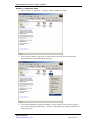
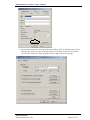
PaperlessPrinter Version 2.0 User’s Manual
PaperlessPrinter®
Version 3.0
User’s Manual
The User’s Manual is Copyright © 2003
RAREFIND ENGINEERING INNOVATIONS
All Rights Reserved.
PaperlessPrinter
www.paperlessprinter.com
Page
1 of 77
PaperlessPrinter Version 2.0 User’s Manual
Table of Contents
1.
2.
3.
4.
5.
Overview ......................................................................................................................3
Introduction ..................................................................................................................3
Installation....................................................................................................................4
Un-Installation..............................................................................................................4
Using PaperlessPrinter ..................................................................................................5
5.1.
How to Create Documents?...................................................................................5
5.2.
Formats Supported ................................................................................................7
6. PDF Format ..................................................................................................................8
6.1.
Feature Highlights.................................................................................................8
6.2.
User Interface .......................................................................................................9
7. HTML Format ............................................................................................................ 21
7.1.
Feature Highlights............................................................................................... 21
7.2.
User Interface ..................................................................................................... 22
8. Doc Format................................................................................................................. 32
8.1.
Feature Highlights............................................................................................... 32
8.2.
User Interface ..................................................................................................... 33
9. Excel Format .............................................................................................................. 40
9.1.
Feature Highlights............................................................................................... 40
9.2.
User Interface ..................................................................................................... 41
10.
JPEG Format .......................................................................................................... 48
10.1.
Feature Highlights........................................................................................... 48
10.2.
User Interface.................................................................................................. 49
11.
BMP Format ........................................................................................................... 54
11.1.
Feature Highlights........................................................................................... 54
11.2.
User Interface.................................................................................................. 55
12.
Permanent Settings ................................................................................................. 61
13.
E-Mail Documents.................................................................................................. 64
13.1.
How to E-Mail Documents? ............................................................................ 64
13.2.
Feature Highlights........................................................................................... 64
13.3.
User Interface.................................................................................................. 65
14.
File Transfer Protocol (FTP) ................................................................................... 70
14.1.
How to transfer files using FTP? ..................................................................... 70
14.2.
Feature Highlights........................................................................................... 70
14.3.
User Interface.................................................................................................. 71
15.
Non commercial use ............................................................................................... 73
16.
How to buy the product? ......................................................................................... 74
17.
Limitations ............................................................................................................. 77
PaperlessPrinter
www.paperlessprinter.com
Page
2 of 77
PaperlessPrinter Version 2.0 User’s Manual
1. Overview
Digital document business is interestingly evolving as companies are forced to reexamine output business processes, exposing inefficiencies from outdated thinking and
products. Every organization and every individual realize the high cost of printers, huge
volumes of wasted paper and recurring cost of printing ink. Yet we see mounting stacks
of wasted paper around every printer in every office. Electronic publishing tools are
becoming available to more people than ever before. People can now create digital
documents quickly and easily.
People need ways to share information without having to print it on paper. Publishing
electronic documents on a network can achieve this objective. However, not all
electronic documents can be published easily. Some electronic documents need special
software on the client computer to decipher the information stored inside it. Installing
necessary software on every client computer becomes economically unviable. However,
Adobe’s Acrobat Reader software and Web Browser software are freely available. People
can easily share information among client computers if the information is in PDF or
HTML format. Portable Document Format (PDF) is a universal file format that preserves
all of the fonts, formatting, colors, and graphics of any source document. The Hypertext
Markup Language (HTML) is a simple markup language used to create hypertext
documents that are platform independent and can be viewed using any Web Browser.
Microsoft Word and Excel are very popular word processing and spreadsheet
applications. Sharing information in Word Format (Doc) allows content authoring and
editing. Excel Sheets (XLS) are useful while performing mathematical calculations.
T h e o t h e r p o p u l a r a l t e r n a t i v e t o p u b l i s h i n g e l e c t r o n i c d o c u m e n t s i s t o E -Mail the
information. Even in this case, we must make sure the documents are readable by client
computers. You cannot assume that the recipient of an E-Mail will be able to view the
attached document. To be sure, we must share information in friendly formats like PDF
or HTML. Friendly image formats are JPEG or BMP as they can be viewed from almost
every computer today.
Employees in an organization are often blamed for uncontrolled and irresponsible
printing. When the truth is - anyone who has ever used a printer has at some point
printed irresponsibly! People are often found printing a same document over and over
again to get it right. A preview feature provided by software applications eliminates such
worries. Unfortunately, preview feature is not found on all applications resulting in
people printing and shredding paper! Users will benefit greatly if they could verify their
prints before they are actually printed.
The information age has seen an explosion of information. People need intelligent tools
to assimilate, represent and share this information and to move one step closer to a
paperless world.
2. Introduction
PaperlessPrinter® is a universal document exchange utility. You can use
PaperlessPrinter to publish virtually any document in Adobe Portable Document Format
(PDF), Hypertext Markup Language (HTML), Microsoft Word Format (Doc), Microsoft
Excel Format (XLS), JPEG or BMP, preserving the exact look and content of the original
document, complete with fonts and graphics. You can distribute your PDF and HTML
documents by E-Mail or store them on the World Wide Web, on intranet, a file system,
or a CD. Other users can view your work on Microsoft® Windows, Mac® OS, LINUX, and
UNIX® platforms. PaperlessPrinter also works as a preview tool. Users can print from
PaperlessPrinter
www.paperlessprinter.com
Page
3 of 77
PaperlessPrinter Version 2.0 User’s Manual
almost any Windows® application to this printer and visualize the output on JPEG or
BMP, without actually having to print on paper.
Adobe Portable Document Format (PDF) is a universal file format that preserves all the
text, fonts, formatting, colors, and graphics of any source document, regardless of the
computer system and application used to create it. PDF files are compact and can be
shared, viewed, and printed exactly as the author intended. PDF files can be opened
with free Adobe Acrobat Reader. You can convert any document to PDF using
PaperlessPrinter. PDF documents can contain multiple languages, such as Chinese and
English, on the same page. PDF documents can be printed predictably with proper
margins and page breaks. PDF files can be secured with passwords to lock against
undesired changes or printing, or to restrict access to confidential documents. PDF files
can be magnified without losing visual accuracy using controls provided by Adobe
Acrobat Reader. This feature can be especially useful for zooming in on images or
diagrams containing intricate details.
The Hypertext Markup Language (HTML) i s a m a r k u p l a n g u a g e file format that
preserves all the formatting, colors, and graphics of any source document, regardless of
the application used to create it. HTML files can be shared, viewed, navigated by anyone
with a Web Browser. You can convert any document to HTML using PaperlessPrinter.
The HTML files created by PaperlessPrinter preserve the exact layout, fonts, and text
formatting of electronic documents, regardless of the computer system or platform used
to view these documents.
PaperlessPrinter can convert almost any application data to PDF, HTML, Doc, Excel,
J P E G o r B M P i n c l u d i n g t h o s e c r e a t e d w i t h d r a w i n g , p a g e -layout, or image-editing
programs. Using the application’s Print command, you can create files directly from
Microsoft Office applications, database applications, word processing applications or
common authoring applications.
3. Installation
IMPORTANT - before you proceed with this installation:
1. Download the latest version of PaperlessPrinter from www.paperlessprinter.com.
2. Un-Install any previous version of PaperlessPrinter.
3. Close all applications before installing PaperlessPrinter.
After you have downloaded the executable file,
Invoke the Setup program. The Setup program automatically installs PaperlessPrinter on
your system.
4. Un-Installation
Follow the steps below to un-install PaperlessPrinter from your System.
1.
2.
3.
4.
5.
Close all Applications.
Go to C o n t r o l P a n e l from the S t a r t menu.
Open 'Add/Remove Programs'.
Select ‘PaperlessPrinter’ and click ‘Remove’.
This shall completely remove PaperlessPrinter from your system.
PaperlessPrinter
www.paperlessprinter.com
Page
4 of 77
PaperlessPrinter Version 2.0 User’s Manual
5. Using PaperlessPrinter
PaperlessPrinter is a 100% software product. It has no hardware parts. PaperlessPrinter
appears like a normal printer on a Windows PC. You can actually see the
PaperlessPrinter object in the Printers folder [Start -> Settings -> Printers]. Using an
application’s Print command you can print anything to this printer. Instead of printing on
paper, PaperlessPrinter creates content in PDF, HTML, Doc, Excel, JPEG or BMP files.
5.1.
How to Create Documents?
PaperlessPrinter provides an easy way to create, save and publish documents
electronically. The following example helps you to save your documents to any of the
supported formats.
1. Open any Windows program and choose File -> Print menu option to print contents.
PaperlessPrinter
www.paperlessprinter.com
Page
5 of 77
PaperlessPrinter Version 2.0 User’s Manual
2. In the Print dialog, Select PaperlessPrinter from the list of printers and click Print.
3. In the Format selection Dialog, Select the output format from the list and click OK.
PaperlessPrinter
www.paperlessprinter.com
Page
6 of 77
PaperlessPrinter Version 2.0 User’s Manual
4. In the Properties Dialog, provide the Filename and path information. Edit other
properties of the format and click OK to create the document to the format selected.
5.2.
Formats Supported
PaperlessPrinter supports popular Document and Image formats. You can now print
from any Windows application to any of the formats given below.
Document Formats:
1. P D F : Generate WYSIWYG PDF documents from any Windows application capable
of printing. For more details see topic “PDF Format”.
2. H T M L : Generate WYSIWYG HTML documents from any Windows application
capable of printing. For more details see topic “HTML Format”.
3. DOC: Generate WYSIWYG Word documents from any Windows application
capable of printing. For more details see topic “Doc Format”.
4. Excel: Generate good quality Excel documents from any Windows application
capable of printing. For more details see topic “Excel Format”.
Image Formats:
1. J P E G : Generate optimized JPEG images of each page of your document. For
more information see topic “JPEG Format”.
2. B M P : Generate good quality Bitmap Images of each page of your document. For
more information see topic “BMP format”.
PaperlessPrinter
www.paperlessprinter.com
Page
7 of 77
PaperlessPrinter Version 2.0 User’s Manual
6. PDF Format
PaperlessPrinter supports PDF format. You can now print any Windows application to
PDF format.
6.1.
Feature Highlights
Save
Using PaperlessPrinter you can now print from any Windows application to PDF format.
You have the option of viewing the PDF file as soon as it is created. You also have the
option of opening the folder where the generated PDF files are stored.
E-M a i l
PaperlessPrinter provides an option to E-Mail the generated PDF Document. Use the EMail After Generate option to E-Mail the PDF document.
FTP
PaperlessPrinter provides option to transfer the generated PDF document to remote site
using File Transfer Protocol. Use the FTP After Generate option to transfer the files to
the remote site.
Document Properties
PaperlessPrinter provides option to include various document properties in the
generated PDF document. The Document Properties include Title, Subject, Author, and
Keywords.
Images & Shapes
PaperlessPrinter provides option to include Images and Shapes in the generated PDF
document. Use Include Shapes option to specify whether shapes are to be displayed in
the generated PDF document. Use Include Images option to specify whether images are
to be displayed in the generated PDF document. Images can either be saved as Bitmap
or JPEG Images. You also have the option to change the quality of images by specifying
JPEG Quality and Image Pixel Format. Image quality can also be enhanced using the
Enhance Image Quality and Image DPI options. Normally higher the value of Image
DPI, better the quality of images. Higher Image DPI value results in bigger file size.
Compression
PaperlessPrinte r p r o v i d e s o p t i o n t o c o m p r e s s T e x t a n d G r a p h i c c o n t e n t s o f t h e
generated PDF document. Compression helps in reducing the size of the PDF document.
Use Compression Level to specify the level of compression to be used.
Font Embedding
PaperlessPrinter can embed TrueType fonts into the PDF document. When fonts are
embedded into a PDF document, the PDF viewers shall be able to display and print the
PDF document even if the fonts are not installed in the computer where the PDF is being
viewed. Not embedding the fonts shall keep the PDF documents relatively small, but the
characters might not look exactly like the original. By default fonts with non-ANSI
character sets are embedded into the PDF document. PaperlessPrinter provides option
to embed all the fonts used in the original document. You can also control which fonts to
be embedded into the PDF document.
Document Security
PaperlessPrinter can produce secure PDF documents. The PDF documents can be
e n c r y p t e d t o p r o t e c t i t s c o n t e n t s f r o m u n -authorized access. Wh e n c r e a t i n g P D F
documents, you can add restrictions using passwords that can prevent the document
from being opened, printed, or edited. You can specify a low (40 bit) encryption or a
high (128 bit) encryption.
PaperlessPrinter
www.paperlessprinter.com
Page
8 of 77
PaperlessPrinter Version 2.0 User’s Manual
Viewer Preferences
PaperlessPrinter provides option to set basic viewer preferences to be used when the
PDF document is opened. By default viewers behave in accordance with any current
u s e r p r e f e r e n c e s . V i e w e r p r e f e r e n c e s r e p r e s e n t a s e t o f v i e w e r -level options for
displaying the PDF document. A given viewer implementation may or may not support
these options.
Slide Show
PaperlessPrinter can generate PDF documents in the form of presentations or slide
shows. The generated PDF document is displayed in the form of a presentation or slide
show advancing from one page to the next under user control. Using Transition Effects
and Effects Duration you can specify the style and duration of the visual transition to
use when moving from one page to another during a presentation.
6.2.
6.2.1
User Interface
Save:
Folder Name
Use Folder Name option to specify the folder in which the PDF document should be
stored. Click on Browse to select the folder name.
File Name
Use File Name option to specify the name of the PDF document.
View created file
Use View Created File option to view the PDF document after it is created.
PaperlessPrinter
www.paperlessprinter.com
Page
9 of 77
PaperlessPrinter Version 2.0 User’s Manual
Open Folder
Use Open Folder option to open the folder in which the generated PDF document is
stored.
6.2.2
E-Mail:
E -M a i l A f t e r G e n e r a t e
Use E-Mail After Generate option to E-Mail the generated document. The files are sent
as attachments. For more information see E-Mail Documents.
PaperlessPrinter
www.paperlessprinter.com
Page
10 of 77
PaperlessPrinter Version 2.0 User’s Manual
6.2.3
FTP:
FTP After Generate
Use FTP After Generate option to transfer the generated files to a remote site using File
Transfer Protocol. For more information see section on File Transfer Protocol (FTP).
PaperlessPrinter
www.paperlessprinter.com
Page
11 of 77
PaperlessPrinter Version 2.0 User’s Manual
6.2.4
Document Properties:
Title
Use Title to specify the Title of the document.
Subject
Use Subject to specify the subject of the document. This shall be encoded as the
Subject Meta content.
Author
Use Author to specify the author of the document. This shall be encoded as the Author
Meta content.
Keywords
Use Keywords to specify a list of keywords for the document. This shall be encoded as
the Keywords Meta content.
PaperlessPrinter
www.paperlessprinter.com
Page
12 of 77
PaperlessPrinter Version 2.0 User’s Manual
6.2.5
Images & Shapes:
Include Shapes
Use Include Shapes to specify whether shapes are to be displayed in the generated PDF
document.
Include Images
Use Include Images to specify whether images are to be displayed in the generated PDF
document.
Export Image Format
Use Export Image Format to specify the format of the linked images. Images can either
be saved as Bitmaps or JPEG images.
JPEG Quality
Use JPEG Quality to specify the quality of the images when saved in JPEG image format.
Setting a larger value improves image quality but also increases file size; a smaller
value decreases image quality and also reduces file size.
Image Pixel Format
Use Image Pixel Format to specify the pixel format of the image. Setting Image Pixel
Format will change the internal image and color depth of the image. Image Pixel Format
can be 1 bit, 4 bit, 8 bit, 15 bit, 16 bit, 24 bit or 32 bit.
Enhance Image Quality
Use Enhance Image Quality to specify whether quality of the images should be
enhanced. If Enhance Image Quality is checked then the image quality is enhanced
depending on the value of Image DPI.
PaperlessPrinter
www.paperlessprinter.com
Page
13 of 77
PaperlessPrinter Version 2.0 User’s Manual
Image DPI
Use Image DPI to specify the DPI value to be used while encoding images. Normally
higher the value of Image DPI, better the quality of images. Higher Image DPI value
results in bigger file size. A value of around 300 shall give good results. Image DPI
value is used only when Enhance Image Quality option is selected.
6.2.6
Compression:
Compress Document
Use Compress document option to compress Text and Graphic contents of the
generated PDF document. Compression helps in reducing the size of the PDF document.
Compression Level
Use Compression Level to specify the level of compression to be used. “Maximum”
compression level provided highest, but slowest compression, “Minimum” compresses
poorly but is fast.
PaperlessPrinter
www.paperlessprinter.com
Page
14 of 77
PaperlessPrinter Version 2.0 User’s Manual
6.2.7
Font Embedding:
Font Encoding
Use Font Encoding option to indicate the type of font encoding to be used to display
font. Font encoding can be WinAnsiEncoding, MacRomanEncoding, MacExpertEncoding,
StandardEncoding or PDFDocEncoding. If a wrong Font encoding value is selected then
some characters may not be displayed properly in the PDF document.
Embed All Used Fonts
PaperlessPrinter can embed TrueType fonts into the PDF document. By default fonts
with non-ANSI character sets are embedded into the PDF document. Use Embed All
used Fonts option to embed all TrueType fonts used in the original document.
Available Fonts
This list shows the available TrueType fonts in the computer. You can embed only these
fonts during the generation of the PDF document.
Always Embed Fonts
Use this option to specify the list of fonts that is to be embedded always in the PDF
document. These fonts are embedded even if they are not used in the original
document.
Never Embed Fonts
Use this option to specify the list of fonts that should not be embedded in the PDF
document. Fonts with non-ANSI character sets are always embedded into the PDF
document.
PaperlessPrinter
www.paperlessprinter.com
Page
15 of 77
PaperlessPrinter Version 2.0 User’s Manual
6.2.8
Document Security:
Encrypt Document
Use this option to encrypt the PDF document. The PDF documents can be encrypted to
protect its contents from un-authorized access.
User Password
Use this option to provide a user level access to the PDF document. If the PDF
document is opened with User password then only limited access is available. The user
might not be able to Print, Copy or Edit the document.
Master Password
Use this option to provide an owner level access to the PDF document. If the PDF
document is opened with Master password then complete access is available. The Owner
can then Print, Copy or Edit the document.
Encryption Level
Use this option to specify the level of encryption of the PDF document. You can specify
either a low (40 bit) or High (128 bit) level of encryption.
Allow Printing, Copying and Modifying
Use this option to specify which access permission should be granted when the PDF
document is opened with User Password.
PaperlessPrinter
www.paperlessprinter.com
Page
16 of 77
PaperlessPrinter Version 2.0 User’s Manual
6.2.9
Viewer Preferences:
Hide Toolbar
Use this option to specify whether to hide the viewer application's toolbars when the
document is active. If Hide Toolbar is checked then the viewer application’s toolbars are
hidden.
Hide Menubar
Use this option to specify whether to hide the viewer application's menu bar when the
document is active. If Hide Menubar is checked then the viewer application’s menu bar
is hidden.
Hide Windows User Interface
Use this option to specify whether to hide the user interface elements in the document’s
window (such as scroll bars and navigation controls) leaving only the document’s
contents displayed. If Hide Windows User Interface is checked then document’s user
interface elements are hidden.
Fit Window
Use this option to specify whether to resize the document's window to fit the size of the
first displayed page. If Fit Window is checked then the first page displayed is resized to
fit the document's window.
Center Window
Use this option to specify whether to position the document's window in the center of
the screen. If Center Window is checked then the document’s window is positioned in
the center of the screen.
PaperlessPrinter
www.paperlessprinter.com
Page
17 of 77
PaperlessPrinter Version 2.0 User’s Manual
Page Layout
Use PageLayout to specify the page layout to be used when the PDF document is
opened. If the value is Single Page then one page is displayed at a time. If the value is
One Column then pages are displayed in one column. If the value is Two Column Left
then pages are displayed in two columns with odd numbered pages on the left. If the
value is Two Column Right then pages are displayed in two columns with odd numbered
pages on the right
Page Mode
Use PageMode to specify how the document should be displayed when opened. If the
value is Use None then neither document outlines nor thumbnail images are visible. If
the value is Use Outlines then document outline is visible. If the value is Use Thumbs
then thumbnail images are visible. If the value is Full Screen then document is opened
in Full Screen mode with no menu-bar, window controls or other window visible.
6.2.10
Slide Show:
Transition Effects
Using Transition Effects you can specify the style of the visual transition to use when
moving from one page to another during a presentation. Some viewer applications allow
a document to be displayed in the form of a presentation or "slide show," advancing
from one page to the next under user control. The various TransitionEffects are as
follows:
Split Horizontal Inward: Two lines sweep across the screen, revealing the new page.
The lines are horizontal and move inward from the edges of the page.
PaperlessPrinter
www.paperlessprinter.com
Page
18 of 77
PaperlessPrinter Version 2.0 User’s Manual
Split Horizontal Outward: Two lines sweep across the screen, revealing the new page.
The lines are horizontal and move outward from the center of the page.
Split Vertical Inward: Two lines sweep across the screen, revealing the new page. The
lines are vertical and move inward from the edges of the page.
Split Vertical Outward: Two lines sweep across the screen, revealing the new page. The
lines are vertical and move outward from the center of the page.
Blinds Horizontal: Multiple lines, evenly spaced across the screen, synchronously sweep
in the same direction to reveal the new page. The lines are horizontal and move
downward.
Blinds Vertical: Multiple lines, evenly spaced across the screen, synchronously sweep in
the same direction to reveal the new page. The lines are vertical and move to the right.
Box Inward: A rectangular box sweeps inward from the edges of the page revealing the
new page.
Box Outward: A rectangular box sweeps outward from the center of the page revealing
the new page.
Wipe Left To Right: A single line sweeps across the screen from Left to Right edge of the
page
Wipe Bottom To Top: A single line sweeps across the screen from Bottom to the Top
edge of the page
Wipe Right To Left: A single line sweeps across the screen from Right to the Left edge of
the page
Wipe Top To Bottom: A single line sweeps across the screen from Top to Bottom edge of
the page
Dissolve: The old page "dissolves" gradually to reveal the new one.
Glitter Left To Right: Similar to Dissolve, except that the effect sweeps across the page
in a wide band moving from Left side of the screen to the Right side.
Glitter Top To Bottom: Similar to Dissolve, except that the effect sweeps across the
page in a wide band moving from Top side of the screen to the Bottom side.
Glitter Top Left To Bottom Right: Similar to Dissolve, except that the effect sweeps
across the page in a wide band moving from Top Left corner of the screen to the Bottom
Right corner.
None: The new page simply replaces the old one with no special transition effect.
Effects Duration
Use this option to duration of the page transition effects in seconds.
PaperlessPrinter
www.paperlessprinter.com
Page
19 of 77
PaperlessPrinter Version 2.0 User’s Manual
6.2.11
Error Information:
Create Error Information
Contact PaperlessPrinter support in case you have any trouble using this product. In
some cases Technical support might ask for Error Information. Use this option to
generate Error Information. The Error Information is created for the specified pages and
stored in the output folder.
PaperlessPrinter
www.paperlessprinter.com
Page
20 of 77
PaperlessPrinter Version 2.0 User’s Manual
7. HTML Format
PaperlessPrinter supports HTML format. You can now print any Windows application to
HTML format.
7.1.
Feature Highlights
Save
Using PaperlessPrinter you can now print from any Windows application to HTML format.
Each page of the application can be stored as separate HTML file or can be stored in a
single HTML file. You have the option of viewing the HTML file as soon as it is created.
You also have the option of opening the folder where the generated HTML files are
stored.
E-M a i l
PaperlessPrinter provides an option to E-Mail the generated HTML files along with any
additional image, CSS or JavaScript files. Use the E-Mail After Generate option to E-Mail
the files.
FTP
PaperlessPrinter provides option to transfer the generated HTML files along with any
additional image, CSS or JavaScript files to remote site using File Transfer Protocol. Use
the FTP After Generate option to transfer the files to the remote site.
Document Properties
PaperlessPrinter provides option to include various document properti e s i n t h e
generated HTML file. The Document Properties include Title, Subject, Author, and
Keywords.
Images and Shapes
PaperlessPrinter provides option to include Images and Shapes in the generated HTML
file. Use Include Shapes option to specify whether shapes are to be displayed in the
generated HTML file. Use Include Images option to specify whether images are to be
displayed in the generated HTML file. Images can either be saved as Bitmap or JPEG
Images. You also have the option to change the quality of images by specifying JPEG
Quality and Image Pixel Format. Image quality can also be enhanced using the Enhance
Image Quality and Image DPI options. Normally higher the value of Image DPI, better
the quality of images. Higher Image DPI value results in bigger file size. You also have
the option to separate the HTML files and the Image files by specifying a separate
Image Folder.
Pages
PaperlessPrinter provides option to store all the pages in a single HTML file or generate
separate HTML files for each page. Choose “All pages in single file” option to save all the
pages of the document in a single HTML file. You can also include a line at the end of
each page when all the pages are exported into a single HTML file by using the Page End
Lines option. Choose “ E a c h p a g e i n s e p a r a t e f i l e ” o p t i o n t o s a v e e a c h p a g e o f t h e
document in a separate HTML file.
Page Navigation
PaperlessPrinter provides option to include Page Navigator in each HTML file. The
Navigator can have either Text or a Graphic Links. Navigator shall have links to the
First, Previous, Next and Last pages. You can set the Navigator Background, Hover
Background and Hover Foreground colors of the Navigator links. The Navigator can be
either Fixed to Screen or Fixed to Page. The Navigator can be a Vertical Navigator or a
Horizontal Navigator. You also have an option of choosing the position of the Navigator.
PaperlessPrinter
www.paperlessprinter.com
Page
21 of 77
PaperlessPrinter Version 2.0 User’s Manual
Cascading Style Sheets (CSS)
PaperlessPrinter provides option to save style tags in a separate Cascading Style Sheet
(CSS). This reduces the size of the HTML files by separating the style of the document
from the content of the document. PaperlessPrinter also provides option to optimize the
HTML file to work with Internet Explorer. You can also specify a Default Font to reduce
the size of the HTML file.
Java Script
PaperlessPrinter provides option to save java scripts in a separate Java Script file. This
reduces the size of the HTML file by separating the scripts from the document contents.
7.2.
7.2.1
User Interface
Save:
Folder Name
Use Folder Name option to specify the folder in which the HTML files should be stored.
Click on Browse to select the folder name.
File Name
Use File Name option to specify the name of the HTML file. If more than one file is
created then files shall be named as “Page.htm”, “Page0002.htm”, “Page0003.htm”
where “Page.htm” is initial file name.
View created file
Use View Created File option to view the HTML file after it is created. If more than one
file is created then the file corresponding to the first page is opened.
PaperlessPrinter
www.paperlessprinter.com
Page
22 of 77
PaperlessPrinter Version 2.0 User’s Manual
Open Folder
Use Open Folder option to open the folder in which the generated HTML files are stored.
7.2.2
E-Mail:
E -M a i l A f t e r G e n e r a t e
Use E-Mail After Generate option to E-Mail the generated files. The files are sent as
attachments. For more information see E-Mail Documents.
PaperlessPrinter
www.paperlessprinter.com
Page
23 of 77
PaperlessPrinter Version 2.0 User’s Manual
7.2.3
FTP:
FTP After Generate
Use FTP After Generate option to transfer the generated files to a remote site using File
Transfer Protocol. For more information see section on File Transfer Protocol (FTP).
PaperlessPrinter
www.paperlessprinter.com
Page
24 of 77
PaperlessPrinter Version 2.0 User’s Manual
7.2.4
Document Properties:
Title
Use Title to specify the Title of the document.
Subject
Use Subject to specify the subject of the document. This shall be encoded as the
Subject Meta content.
Author
Use Author to specify the author of the document. This shall be encoded as the Author
Meta content.
Keywords
Use Keywords to specify a list of keywords for the document. This shall be encoded as
the Keywords Meta content.
PaperlessPrinter
www.paperlessprinter.com
Page
25 of 77
PaperlessPrinter Version 2.0 User’s Manual
7.2.5
Images & Shapes:
Include Shapes
Use Include Shapes to specify whether shapes are to be displayed in the generated
HTML document.
Include Images
Use Include Images to specify whether images are to be displayed in the generated
HTML file.
Export Image Format
Use Export Image Format to specify the format of the linked images. Images can either
be saved as Bitmaps or JPEG images.
JPEG Quality
Use JPEG Quality to specify the quality of the images when saved in JPEG image format.
Setting a larger value improves image quality but also increases file size; a smaller
value decreases image quality and also reduces file size.
Image Pixel Format
Use Image Pixel Format to specify the pixel format of the image. Setting Image Pixel
Format will change the internal image and color depth of the image. Image Pixel Format
can be 1 bit, 4 bit, 8 bit, 15 bit, 16 bit, 24 bit or 32 bit.
Enhance Image Quality
Use Enhance Image Quality to specify whether quality of the images should be
enhanced. If Enhance Image Quality is checked then the image quality is enhanced
depending on the value of Image DPI.
PaperlessPrinter
www.paperlessprinter.com
Page
26 of 77
PaperlessPrinter Version 2.0 User’s Manual
Image DPI
Use Image DPI to specify the DPI value to be used while encoding images. Normally
higher the value of Image DPI, better the quality of images. Higher Image DPI value
results in bigger file size. A value of around 300 shall give good results. Image DPI
value is used only when Enhance Image Quality option is selected.
Image Folder
Use Image Folder to specify the name of the folder, in which image files are created.
The default folder for image files is the folder in which the main HTML file was saved.
Setting Image Folder is a convenient way of separating the HTML from the linked files.
Specifying Image Folder will not cause any loss of HTML content, when the HTML and
the image folder are copied to another location, as the images are encoded with relative
path information (relative to the location of the HTML). If the path name specified in
Image Folder does not exist, an attempt is made to create the folder(s). If the string
specified is not a valid path name, images are created in the same folder as the HTML.
7.2.6
Pages:
All pages in single file
Use “All pages in single file” option to save all the pages of the document in single HTML
file. Option of having a line at the end of page is provided in this case.
Each page in separate file
Use “Each page in separate file” option to save each page of the document in a separate
HTML file. Option of Page Navigation is provided in this case.
Page End Lines
Use Page End Lines option to include a line at the end of each page. This option is
available only when “All pages in single file” option is selected.
PaperlessPrinter
www.paperlessprinter.com
Page
27 of 77
PaperlessPrinter Version 2.0 User’s Manual
7.2.7
Page Navigation:
Show Navigator
Use Show Navigator to display page navigator in the generated HTML file. Navigator is
included when the document contains more than one page. This option is available only
when “Each page in separate file” optio n is selected.
Navigator Background Color
Use Navigator Background Color to specify the background color of the navigator.
Navigator Hover Background Color
Use Navigator Hover Background Color to specify the background color of the navigator
when mouse is hovered over it.
Navigator Hover Foreground Color
Use Navigator Hover Foreground Color to specify the foreground color of the navigator
when mouse is hovered over it.
U s e T e x t L i n k s and U s e G r a p h i c L i n k s
Use this option to specify the type of the navigator links that should be included in a
multi-file HTML output. Selecting Use Text Links uses the text provided in Link Captions
- First, Previous, Next and Last as the hyperlink's caption. Selecting Use Graphic Links
uses Images specified by Image Source - First, Previous, Next and Last.
PaperlessPrinter
www.paperlessprinter.com
Page
28 of 77
PaperlessPrinter Version 2.0 User’s Manual
Navigator Type
Use Navigator Type to specify the type of the navigator to be included in the generated
HTML files. Navigator Type can be either Fixed to Screen or Fixed to Page. In the Fixed
to Screen type of navigators, the position of the navigator is with respect to the screen.
When the page is scrolled the navigator adjusts its position relative to screen. This type
of navigator is always visible. In the Fixed to page type of navigators, the position of the
navigator is with respect to the page. When the page is scrolled the navigator appears
or disappears depending on its position in the page.
Navigator Orientation
Use Navigator Orientation to specify the orientation of the navigator. Navigator can
either be vertical or horizontal.
Navigator Position
Use Navigator Position to specify the position of the navigator. Navigator position may
b e T o p -Left, Top-Center, Top-Right, Center-Left, Center, Center-Right, Bottom-Left,
Bottom-Center, Bottom-Right
7.2.8
CSS:
Optimize for Internet Explorer
Use Optimize for Internet Explorer option to specify whether the HTML files should be
optimized for Internet Explorer. The optimization is done using Cascading Style Sheets.
Save Styles in CSS file
Use Save Styles in CSS file option to save style tags in a separate Cascading Style
Sheet (CSS) file. This reduces the size of the HTML documents by separating the style
of documents from the content of the documents. In case this option is not checked
styles are saved internally in each HTML document.
PaperlessPrinter
www.paperlessprinter.com
Page
29 of 77
PaperlessPrinter Version 2.0 User’s Manual
CSS file
Use CSS file option to specify the name if the Cascading Style Sheet (CSS) file. The
default name of CSS file is name of the main HTML file. Having an external CSS file will
help in reducing the size of HTML files.
Default Font
Use Default Font to specify font that is used the maximum number of times in the
document. Specifying the default font helps in reducing the size of the HTML file.
7.2.9
Java Script:
Output Scripts to Java Script File
Use Output Scripts to Java Script file to save scripts in a separate Java Script (js) file.
This reduces the size of the HTML documents by separating the scripts from the
document contents. In case this option is not checked scripts are saved internally in
each HTML document.
Java Script File
Use Java Script file to specify the name if the Java Script (js) file. The default name of
Java Script file is name of the main HTML file. Having an external Java Script file will
help in reducing the size of HTML files.
PaperlessPrinter
www.paperlessprinter.com
Page
30 of 77
PaperlessPrinter Version 2.0 User’s Manual
7.2.10
Error Information:
Create Error I n f o r m a t i o n
Contact PaperlessPrinter support in case you have any trouble using this product. In
some cases Technical support might ask for Error Information. Use this option to
generate Error Information. The Error Information is created for the specified pages and
stored in the output folder.
PaperlessPrinter
www.paperlessprinter.com
Page
31 of 77
PaperlessPrinter Version 2.0 User’s Manual
8. Doc Format
PaperlessPrinter supports Doc format (Doc). You can now print from any Windows
application to Word document.
8.1.
Feature Highlights
Save
U s i n g P a p e r l e s s P r i n t e r y o u c a n n o w p r i n t f r o m a n y W i n d o w s a p p l i c a t i o n to Word
document. You have the option of viewing the Word document as soon as it is created.
You also have the option of opening the folder where the generated Word document is
stored.
E-M a i l
PaperlessPrinter provides an option to E-Mail the generated Word document. Use the EMail After Generate option to E-Mail the files.
FTP
PaperlessPrinter provides an option to transfer the generated Word document to remote
site using File Transfer Protocol. Use the FTP After Generate option to transfer the files
to the remote site.
Document Properties
PaperlessPrinter provides option to include various document properties in the
generated Word document. The Document Properties include Title, Subject, Author, and
Keywords.
Images and Shapes
PaperlessPrinter provides option to include Images and Shapes in the generated Word
document. Use Include Shapes option to specify whether shapes are to be displayed in
the generated Word document. Use Include Images option to specify whether images
are to be displayed in the generated Word document. Images can either be saved as
Bitmap or JPEG Images. You also have the option to change the quality of images by
specifying JPEG Quality and Image Pixel Format. Image quality can also be enhanced
using the Enhance Image Quality and Image DPI options. Normally higher the value of
Image DPI, better the quality of images. Higher Image DPI value results in bigger file
size. You also have the option to save Images in Binary or Hexadecimal format.
Output Accuracy
PaperlessPrinter provides an option to create documents that are visually accurate and
easy to edit. In the Ease of editing mode documents are optimized for editing and may
not be visually identical to the original. In the Visual accuracy mode documents are
optimized for visual accuracy, but may not be easy to edit.
PaperlessPrinter
www.paperlessprinter.com
Page
32 of 77
PaperlessPrinter Version 2.0 User’s Manual
8.2.
8.2.1
User Interface
Save:
Folder Name
Use Folder Name option to specify the folder in which the Word document should be
stored. Click on Browse to select the folder name.
File Name
Use File Name option to specify the name of the Word document.
View Created File
Use View Created File option to view the Word document after it is created.
Open Folder
Use Open Folder option to open the folder in which the generated Word documents are
stored.
PaperlessPrinter
www.paperlessprinter.com
Page
33 of 77
PaperlessPrinter Version 2.0 User’s Manual
8.2.2
E-Mail:
E -M a i l A f t e r G e n e r a t e
Use E-Mail After Generate option to E-Mail the generated files. The files are sent as
attachments. For more information see E-Mail Documents.
PaperlessPrinter
www.paperlessprinter.com
Page
34 of 77
PaperlessPrinter Version 2.0 User’s Manual
8.2.3
FTP:
FTP After Generate
Use FTP After Generate option to transfer the generated files to a remote site using File
Transfer Protocol. For more information see section on File Transfer Protocol (FTP).
PaperlessPrinter
www.paperlessprinter.com
Page
35 of 77
PaperlessPrinter Version 2.0 User’s Manual
8.2.4
Document Properties:
Title
Use Title to specify the Title of the document.
Subject
Use Subject to specify the subject of the document. This shall be encoded as the
Subject Meta content.
Author
Use Author to specify the author of the document. This shall be encoded as the Author
Meta content.
Keywords
Use Keywords to specify a list of keywords for the document. This shall be encoded as
the Keywords Meta content.
PaperlessPrinter
www.paperlessprinter.com
Page
36 of 77
PaperlessPrinter Version 2.0 User’s Manual
8.2.5
Images & Shapes:
Include Shapes
Use Include Shapes to specify whether shapes are to be displayed in the generated
Word document.
Include Images
Use Include Images to specify whether images are to be displayed in the generated
Word document.
Export Image Format
Use Export Image Format to specify the format of the linked images. Images can either
be saved as Bitmaps or JPEG images.
JPEG Quality
Use JPEG Quality to specify the quality of the images when saved in JPEG image format.
Setting a larger value improves image quality but also increases file size; a smaller
value decreases image quality and also reduces file size.
Image Pixel Format
Use Image Pixel Format to specify the pixel format of the image. Setting Image Pixel
Format will change the internal image and color depth of the image. Image Pixel Format
can be 1 bit, 4 bit, 8 bit, 15 bit, 16 bit, 24 bit or 32 bit.
Enhance Image Quality
Use Enhance Image Quality to specify whether quality of the images should be
enhanced. If Enhance Image Quality is checked then the image quality is enhanced
depending on the value of Image DPI.
PaperlessPrinter
www.paperlessprinter.com
Page
37 of 77
PaperlessPrinter Version 2.0 User’s Manual
Image DPI
Use Image DPI to specify the DPI value to be used while encoding images. Normally
higher the value of Image DPI, better the quality of images. Higher Image DPI value
results in bigger file size. A value of around 300 shall give good results. Image DPI
value is used only when Enhance Image Quality option is selected.
Graphic Data In Binary
Use this option to save graphic data either in binary format or in hexadecimal format. If
this option is checked then graphic data is stored in binary format else it is stored in
hexadecimal format.
8.2.6
Output Accuracy:
Output Accuracy
Use this option to create documents that are visually accurate and easy to edit. In the
Ease of editing mode documents are optimized for editing and may not be visually
identical to the original. In the Visual accuracy mode documents are optimized for visual
accuracy, but may not be easy to edit.
PaperlessPrinter
www.paperlessprinter.com
Page
38 of 77
PaperlessPrinter Version 2.0 User’s Manual
8.2.7
Error Information:
Create Error Information
Contact PaperlessPrinter support in case you have any trouble using this product. In
some cases Technical support might ask for Error Information. Use this option to
generate Error Information. The Error Information is created for the specified pages and
stored in the output folder.
PaperlessPrinter
www.paperlessprinter.com
Page
39 of 77
PaperlessPrinter Version 2.0 User’s Manual
9. Excel Format
PaperlessPrinter supports Excel format. You can now print from any Windows application
to Excel document. The current version of PaperlessPrinter includes only text contents in
the Excel document
9.1.
Feature Highlights
Save
Using PaperlessPrinter you can now print from any Windows application to Excel
document. You have the option of viewing the Excel document as soon as it is created.
You also have the option of opening the folder where the generated Excel document is
stored.
E-M a i l
PaperlessPrinter provides an option to E-Mail the generated Excel document. Use the EMail After Generate option to E-Mail the files.
FTP
PaperlessPrinter provides an option to transfer the generated Excel document to remote
site using File Transfer Protocol. Use the FTP After Generate option to transfer the files
to the remote site.
Show Preview
PaperlessPrinter provides an option to view the preview of the pages just before
converting to Excel document. In the current version, PaperlessPrinter includes only text
contents in the Excel document. Therefore the Preview shows only text contents. In the
Preview, the user is provided with the ability to manually set columns for any page in
that print job. These columns are then used to position the text in Excel cells.
Sheets
PaperlessPrinter provides an option to specify how the pages should be stored in the
Excel document. You can now store each page in a separate Worksheet in the Excel
Document or store all the pages in a single Worksheet. You also have an option to store
each page in separate Excel Document.
Cell Options
PaperlessPrinter provides an option to include cell data types in the generated Excel
document. Setting cell data type helps Excel to determine the type of the cell contents.
This shall help you to add formulae in the Excel document.
PaperlessPrinter
www.paperlessprinter.com
Page
40 of 77
PaperlessPrinter Version 2.0 User’s Manual
9.2.
9.2.1
User Interface
Save:
Folder Name
Use Folder Name option to specify the folder in which the Excel document should be
stored. Click on Browse to select the folder name.
File Name
Use File Name option to specify the name of the Excel document.
View Created File
Use View Created File option to view the Excel document after it is created.
Open Folder
Use Open Folder option to open the folder in which the generated Excel document is
stored.
PaperlessPrinter
www.paperlessprinter.com
Page
41 of 77
PaperlessPrinter Version 2.0 User’s Manual
9.2.2
E-Mail:
E -M a i l A f t e r G e n e r a t e
Use E-Mail After Generate option to E-Mail the generated files. The files are sent as
attachments. For more information see E-Mail Documents.
PaperlessPrinter
www.paperlessprinter.com
Page
42 of 77
PaperlessPrinter Version 2.0 User’s Manual
9.2.3
FTP:
FTP After Generate
Use FTP After Generate option to transfer the generated files to a remote site using File
Transfer Protocol. For more information see section on File Transfer Protocol (FTP).
PaperlessPrinter
www.paperlessprinter.com
Page
43 of 77
PaperlessPrinter Version 2.0 User’s Manual
9.2.4
Preview:
Show Preview
Use this option to view the preview of the print job before generating the Excel
document. This version of PaperlessPrinter includes only text contents into the Excel
document. Therefore only the text contents shall be visible in the Preview. In the
Preview you have the option to provide columns, similar to that in Excel. By setting
columns you can specify exactly in which cell the text need to be placed in the
generated Excel document. The resulting Excel document shall contain text arranged
according to the number of column breaks.
PaperlessPrinter
www.paperlessprinter.com
Page
44 of 77
PaperlessPrinter Version 2.0 User’s Manual
9.2.5
Sheets:
Each page in separate sheet
Use this option to store each page contents in separate Excel Worksheet. The Excel
Document shall contain as many Worksheets as the number of pages printed.
All pages in one sheet
Use this option to store all the pages in a single Excel Worksheet. The Excel Document
shall contain only one Worksheet.
Each page in separate file
Use this option to store each page contents in separate Excel documents. There shall be
as many documents as the number of pages printed.
PaperlessPrinter
www.paperlessprinter.com
Page
45 of 77
PaperlessPrinter Version 2.0 User’s Manual
9.2.6
Cell Options:
Remove Leading and Trailing spaces
Use this option to remove any unnecessary leading and trailing spaces in each cell of
the Excel document.
Cell type
Excel allows each cell to have separate data type to be associated with it. Cell formats
may be General, Number, Currency and many more. PaperlessPrinter provides an option
to automatically determine and encode the cell format or to have a common General
format for all the cells. Select ‘General’ to associate all the cells to general data type.
Choose ‘Auto’ to automatically determine and encode the datatype based on the cell
contents. If data types are encoded in the Excel document then you can add formulae
and do other operations on the cell.
PaperlessPrinter
www.paperlessprinter.com
Page
46 of 77
PaperlessPrinter Version 2.0 User’s Manual
9.2.7
Error Information:
Create Error Information
Contact PaperlessPrinter support in case you have any trouble using this product. In
some cases Technical support might ask for Error Information. Use this option to
generate Error Information. The Error Information is created for the specified pages and
stored in the output folder.
PaperlessPrinter
www.paperlessprinter.com
Page
47 of 77
PaperlessPrinter Version 2.0 User’s Manual
10. JPEG Format
PaperlessPrinter supports JPEG Image format. You can now print from any Windows
application to JPEG image format.
10.1.
Feature Highlights
Save
Using PaperlessPrinter you can now print from any Windows application to JPEG image
format. Each page of the application is saved as separate JPEG image. You have the
option of viewing the JPEG image as soon as it is created. You also have the option of
opening the folder where the generated JPEG images are stored.
E-M a i l
PaperlessPrinter provides an option to E-Mail the generated JPEG images. Use the E-Mail
After Generate option to E-Mail the files.
FTP
PaperlessPrinter provides an option to transfer the generated JPEG images to remote
site using File Transfer Protocol. Use the FTP After Generate option to transfer the files
to the remote site.
Quality
PaperlessPrinter provides an option to alter the quality of the generated JPEG images.
Use Grayscale to generate color or grayscale JPEG images. You can also change the
internal color depth of the JPEG images by altering the Pixel format of the image. Modify
the quality and in turn the size of the generated JPEG images using Quality and
Progressive Encoding options.
Scaling
PaperlessPrinter provides an option to scale the generated JPEG images. Use ScaleX to
scale the width and ScaleY to scale the height of the JPEG image.
PaperlessPrinter
www.paperlessprinter.com
Page
48 of 77
PaperlessPrinter Version 2.0 User’s Manual
10.2.
10.2.1
User Interface
Save:
Folder Name
Use Folder Name option to specify the folder in which the JPEG image files should be
stored. Click on Browse to select the folder name.
File Name
Use File Name option to specify the name of the JPEG image file. If more than one file is
created then files shall be named as “Page.jpg”, “Page0002.jpg”, “Page0003.jpg” where
“Page.jpg” is initial file name.
View Created File
Use View Created File option to view the JPEG image file after it is created. If more than
one file is created then the file corresponding to the first page is opened.
Open Folder
Use Open Folder option to open the folder in which the generated JPEG images are
stored.
PaperlessPrinter
www.paperlessprinter.com
Page
49 of 77
PaperlessPrinter Version 2.0 User’s Manual
10.2.2
E-Mail:
E -M a i l A f t e r G e n e r a t e
Use E-Mail After Generate option to E-Mail the generated files. The files are sent as
attachments. For more information see E-Mail Documents.
PaperlessPrinter
www.paperlessprinter.com
Page
50 of 77
PaperlessPrinter Version 2.0 User’s Manual
10.2.3
FTP:
FTP After Generate
Use FTP After Generate option to transfer the generated files to a remote site using File
Transfer Protocol. For more information see section on File Transfer Protocol (FTP).
PaperlessPrinter
www.paperlessprinter.com
Page
51 of 77
PaperlessPrinter Version 2.0 User’s Manual
10.2.4
Quality:
Grayscale
Use Grayscale for decompressing and compressing, a JPEG image. This option affects
how the image is displayed. Grayscale is used for speed in output optimization. When
Grayscale option is checked, the color is separated from luminosity. Color takes the
most time to decompress, so for previewing the image, Grayscale can be checked for
speed. The output then contains 255 shades of gray.
Progressive Encoding
Use Progressive Encoding to specify whether the JPEG image should be encoded in a
manner such that it can be decompressed and displayed progressively. It is particularly
useful to use Progressive Encoding for large files, so the user won't be shown a blank
screen while waiting for the whole image to decompress.
Pixel Format
Use Pixel Format to indicate the pixel format of the image. Setting Pixel Format will
change the internal image and color depth. The valid values of Pixel Format are: pf1bit,
pf4bit, pf8bit, pf15bit, pf16bit, pf24bit, pf32bit.
Quality
Quality determines the closeness of the saved JPEG image to the original. Setting a
larger value improves image quality but also increases file size; a smaller value
decreases image quality and also reduces file size. Alter it according to the need.
PaperlessPrinter
www.paperlessprinter.com
Page
52 of 77
PaperlessPrinter Version 2.0 User’s Manual
10.2.5
Scaling:
ScaleX
Use ScaleX to specify the scaling factor for the width of each page (X-Axis)
ScaleY
Use ScaleY to specify the scaling factor for the height of each page (Y-Axis)
PaperlessPrinter
www.paperlessprinter.com
Page
53 of 77
PaperlessPrinter Version 2.0 User’s Manual
10.2.6
Error Information:
Create Error Information
Contact PaperlessPrinter support in case you have any trouble using this product. In
some cases Technical support might ask for Error Information. Use this option to
generate Error Information. The Error Information is created for the specified pages and
stored in the output folder.
11. BMP Format
PaperlessPrinter supports Bitmap format. You can now print from any Windows
application to Bitmap image format.
11.1.
Feature Highlights
Save
Using PaperlessPrinter you can now print from any Windows application to Bitmap
image format. Each page of the application is saved as separate Bitmap image. You
have the option of viewing the bitmap image as soon as it is created. You also have the
option of opening the folder where the generated bitmap images are stored.
E-M a i l
PaperlessPrinter provides an option to E-Mail the generated bitmap images. Use the EMail After Generate option to E-Mail the files.
FTP
PaperlessPrinter
www.paperlessprinter.com
Page
54 of 77
PaperlessPrinter Version 2.0 User’s Manual
PaperlessPrinter provides an option to transfer the generated bitmap images to remote
site using File Transfer Protocol. Use the FTP After Generate option to transfer the files
to the remote site.
Quality
PaperlessPrinter provides an option to alter the quality of the bitmap images. Use
Monochrome to generate color or monochrome bitmaps. You can also change the
internal color depth of bitmaps images by altering the Pixel format of the image.
Scaling
PaperlessPrinter provides an option to scale the bitmap images. Use ScaleX to scale the
width and ScaleY to scale the height of the bitmap.
11.2.
11.2.1
User Interface
Save:
Folder Name
Use Folder Name option to specify the folder in which the Bitmap image files should be
stored. Click on Browse to select the folder name.
File Name
Use File Name option to specify the name of the Bitmap image file. If more than one file
is created then files shall be named as “Page.bmp”, “Page0002.bmp”, “Page0003.bmp”
where “Page.bmp” is initial file name.
View Created File
Use View Created File option to view the bitmap image file after it is created. If more
than one file is created then the file corresponding to the first page is opened.
PaperlessPrinter
www.paperlessprinter.com
Page
55 of 77
PaperlessPrinter Version 2.0 User’s Manual
Open Folder
Use Open Folder option to open the folder in which the generated Bitmaps are stored.
11.2.2
E-Mail:
E -M a i l A f t e r G e n e r a t e
Use E-Mail After Generate option to E-Mail the generated files. The files are sent as
attachments. For more information see E-Mail Documents.
PaperlessPrinter
www.paperlessprinter.com
Page
56 of 77
PaperlessPrinter Version 2.0 User’s Manual
11.2.3
FTP:
FTP After Generate
Use FTP After Generate option to transfer the generated files to a remote site using File
Transfer Protocol. For more information see File Transfer Protocol (FTP).
PaperlessPrinter
www.paperlessprinter.com
Page
57 of 77
PaperlessPrinter Version 2.0 User’s Manual
11.2.4
Quality:
Monochrome Image
Use Monochrome option to specify whether the bitmap produced are color or
monochrome bitmaps. Check the Monochrome check box to produce monochrome
bitmaps.
Pixel Format
Use this option to indicate the pixel format of the Bitmap image. Setting Pixel Format
will change the internal image and color depth of the bitmap. Pixel Format can have any
of the following values: pf1bit, pf4bit, pf8bit, pf15bit, pf16bit, pf24bit, pf32bit.
PaperlessPrinter
www.paperlessprinter.com
Page
58 of 77
PaperlessPrinter Version 2.0 User’s Manual
11.2.5
Scaling:
ScaleX
Use ScaleX to specify the scaling factor for the width of each page (X-Axis)
ScaleY
Use ScaleY to specify the scaling factor for the height of each page (Y-Axis)
PaperlessPrinter
www.paperlessprinter.com
Page
59 of 77
PaperlessPrinter Version 2.0 User’s Manual
11.2.6
Error Information:
Create Error Information
Contact PaperlessPrinter support in case you have any trouble using this product. In
some cases Technical support might ask for Error Information. Use this option to
generate Error Information. The Error Information is created for the specified pages and
stored in the output folder.
PaperlessPrinter
www.paperlessprinter.com
Page
60 of 77
PaperlessPrinter Version 2.0 User’s Manual
12. Permanent Settings
PaperlessPrinter has various settings for PDF, HTML, Doc, Excel, JPEG, BMP, E-Mail, FTP.
These settings can be made permanent and reused for each Print Job. Follow the steps
below to store the settings permanently.
1. Click on Start -> Programs -> PaperlessPrinter -> Settings. The Settings dialog will
open.
2. In the Settings dialog, click the various settings buttons to modify and save the
settings.
Note: From Start -> Programs -> PaperlessPrinter -> Settings you will not be able to
modify page sizes. To modify page settings follow the steps below.
Windows 95, 98, ME, NT
1. Click on Start -> Settings -> Printers. Printers’ folder will open.
2. In the Printers folder, right click on PaperlessPrinter and click on Properties.
PaperlessPrinter Properties dialog will open.
3. In the PaperlessPrinter Properties dialog, click on Settings tab.
4. On the Settings tab, click the various settings buttons to modify and save the
settings. You can also modify the page settings and click OK to save the settings.
Windows 2000
1. Click on Start -> Settings -> Printers. Printers’ folder will open.
2. In the Printers folder, right click on PaperlessPrinter and click on Properties.
PaperlessPrinter Properties dialog will open.
3. In the PaperlessPrinter Properties dialog, click on General Tab.
4. On the General tab, click on Printing Preferences... button. PaperlessPrinter Printing
Preferences dialog will open.
5. On the PaperlessPrinter Printing Preferences dialog, click on Settings tab.
6. On the Settings tab, click the various settings buttons to modify and save the
settings. You can also modify the Page settings and click OK to save the settings.
Windows XP
1. Click on Start -> Printers and Faxes. Printers and Faxes folder will open.
2. In the Printers and Faxes folder, right click on PaperlessPrinter and click on
Properties. PaperlessPrinter Properties dialog will open.
3. In the PaperlessPrinter Properties dialog, click on General Tab.
4. On the General tab, click on Printing Preferences... button. PaperlessPrinter Printing
Preferences dialog will open.
5. On the PaperlessPrinter Printing Preferences dialog, click on Settings tab.
6. On the Settings tab, click the various settings buttons to modify and save the
settings. You can also modify the Page settings and click OK to save the settings.
PaperlessPrinter
www.paperlessprinter.com
Page
61 of 77
PaperlessPrinter Version 2.0 User’s Manual
Example on Windows 2000
1. Click on Start -> Settings -> Printers. Printers’ folder will open.
2. In the Printers folder, right click on PaperlessPrinter and click on Properties.
PaperlessPrinter Properties dialog will open.
3. In the PaperlessPrinter Properties dialog, click on General Tab. On the General
tab, click on Printing Preferences... button. PaperlessPrinter Printing Preferences
dialog will open.
PaperlessPrinter
www.paperlessprinter.com
Page
62 of 77
PaperlessPrinter Version 2.0 User’s Manual
4. On the PaperlessPrinter Printing Preferences dialog, click on Settings tab. On the
Settings tab, click the various settings buttons to modify and save the settings.
You can also modify the Page settings and click OK to save the settings.
PaperlessPrinter
www.paperlessprinter.com
Page
63 of 77
PaperlessPrinter Version 2.0 User’s Manual
13. E-Mail Documents
You can now use the built-in E-Mail feature of PaperlessPrinter to E-Mail the generated
files as attachment immediately after the files are created.
13.1.
How to E-Mail Documents?
Use your default Mail Client or the built-in Mail client of PaperlessPrinter to send E-Mails.
The following example helps you to E-Mail the generated document.
1. Open your document and Print using PaperlessPrinter.
2. In the Format selection Dialog, Select any output format from the list and click OK.
3. In the Properties Dialog, provide the Filename and path information. Check the E M a i l A f t e r G e n e r a t e checkbox in the E-Mail category. Edit other properties of the
format and click OK to print the document to the format selected.
4. After the document is saved to the format selected, E-Mail dialog is shown. You can
then send the saved documents as attachments by using your default Mail Client or
PaperlessPrinter’s built-in Mail client.
13.2.
Feature Highlights
E -M a i l D o c u m e n t s ( C u r r e n t J o b ) :
Using PaperlessPrinter you can now save your documents to any of the formats
supported and then e-mail these documents as attachments. You have the option to zip
the files before they are attached.
E -M a i l a n y F i l e
Using PaperlessPrinter you can e-mail any file from your system as attachment. You
have the option to zip these files before they are attached.
E-Mail Zipped files:
Using PaperlessPrinter you have the option to zip the files before attaching to the mail.
PaperlessPrinter
www.paperlessprinter.com
Page
64 of 77
PaperlessPrinter Version 2.0 User’s Manual
13.3.
13.3.1
User Interface
E-Mail Settings:
Mail Account:
Use Mail Account to set an account to send the mail through SMTP mail server. Provide
the necessary User Information.
Name:
Use Name to specify the name associated with your e-mail account. This name appears
in the “From” header of the outgoing mails.
Organization:
Use Organization to specify the name of your group or organization.
E -M a i l A d d r e s s :
Use E-Mail Address to specify the e-mail address that people should use when sending
e-mail to the account.
Reply Address:
Use Reply Address to specify an e-mail address, if you want any replies to your outgoing
messages to be sent to a different e-mail address. If Reply Address is blank then replies
are sent to the e-mail account from which the mails are sent.
PaperlessPrinter
www.paperlessprinter.com
Page
65 of 77
PaperlessPrinter Version 2.0 User’s Manual
Server Information:
Use Server Information to specify the outgoing mail server information. If the server
requires authentication then provide the Account Name and Password
Outgoing Mail:
Use Outgoing Mail to provide the Simple Mail Transfer Protocol (SMTP) mail server for
outgoing mails.
Server Authentication:
Use this option to specify if the outgoing mail server needs authentication. If this option
is selected, you should provide Account Name and Password to log on to your outgoing
e-mail server.
Account Name:
Use Account Name to specify the user name to log on to the outgoing mail server. This
option is used only if outgoing mail server requires authentication.
Password:
Use Password to specify the password to log on to the outgoing mail server. This option
is used only if outgoing mail server requires authentication.
Remember Password:
Use “Remember Password” option to encrypt and save the password for future use. If
this option is not selected then password is not stored.
Port:
Use Port to specify the port number required to connect to your outgoing mail server.
Connection Settings:
Click on Connection Settings to specify the proxy-server settings for your connection.
PaperlessPrinter
www.paperlessprinter.com
Page
66 of 77
PaperlessPrinter Version 2.0 User’s Manual
13.3.2
E-Mail:
Default Mail Client:
Select this option to use your default Mail Client to send e-mail.
PaperlessPrinter Mail Client:
Select this option to use PaperlessPrinter Mail Client to send e-mail.
Zip files and Send:
Use this option to zip the files before sending mail. The files are sent as attachments.
File Name:
Use this option to provide the file name of the Zip file.
Add Files:
Click this button to add more files to the list of files to be e-mailed. If Zip files and Send
option is selected then all the files from the list are zipped into a single file and then emailed.
Remove Files:
Use this button to remove all the selected files from the list.
PaperlessPrinter
www.paperlessprinter.com
Page
67 of 77
PaperlessPrinter Version 2.0 User’s Manual
13.3.3
P a p e r l e s s P r i n t e r E -Mail Client:
Mail Server:
Use Mail server to provide the Simple Mail Transfer Protocol (SMTP) mail server for
outgoing mails. You need to specify a valid Mail Server name to send mail.
Account Name:
Use Account Name to specify the user name to log on to the outgoing mail server. This
option is used only if outgoing mail server requires authentication.
Password:
Use Password to specify the password to log on to the outgoing mail server. This option
is used only if outgoing mail server requires authentication.
From:
Use this option to specify the E-Mail address that should appear in the From header of
the outgoing mails. You need to specify a valid From address to send mail.
To:
Use this option to specify the E-Mail address of the recipient of the message. You need
to specify a valid To address to send mail.
CC:
Use this option to specify list of e-mail address of recipients who should receive a
carbon copy of the message.
PaperlessPrinter
www.paperlessprinter.com
Page
68 of 77
PaperlessPrinter Version 2.0 User’s Manual
BCC:
Use this option to specify list of e-mail address of recipients who should receive a blind
carbon copy of the message. These e-mail addresses does not appear in the “To”
headers of the original message.
Subject:
Use this option to provide the Subject of the outgoing mail.
Message:
Use this option to specify the body of the outgoing message.
Attachments:
Attachments contain the list of files that should be sent as attachments with the
outgoing mail.
Send:
Click on Send to send the message to the recipient.
PaperlessPrinter
www.paperlessprinter.com
Page
69 of 77
PaperlessPrinter Version 2.0 User’s Manual
14. File Transfer Protocol (FTP)
You can now use the built-in FTP feature of PaperlessPrinter to transfer the generated
files to any remote site using File Transfer Protocol (FTP), immediately after files are
created. PaperlessPrinter also provides option to both upload and download any
documents.
14.1.
How to transfer files using FTP?
PaperlessPrinter has a built-in FTP client using which you can transfer the generated
documents and any other documents to any remote FTP site. The following example
illustrates the use of this FTP feature.
1.
2.
3.
4.
Open your document and choose Print to print the document.
In the Print dialog, Select PaperlessPrinter from the list of printers and click OK.
In the Format selection Dialog, Select the output format from the list and click OK.
In the Properties Dialog, provide the Filename and path information. Check the F T P
A f t e r G e n e r a t e checkbox in the FTP category. Edit other properties of the format
and click OK to print the document to the format selected.
5. After the document is saved to the format selected, FTP dialog is shown. You can
then connect to any FTP site and transfer the documents.
14.2.
Feature Highlights
Upload Documents (Current Job):
Using PaperlessPrinter you c a n n o w s a v e y o u r d o c u m e n t s t o a n y o f t h e f o r m a t s
supported and then transfer these files to remote sites using File Transfer Protocol.
Upload Folders and Files
Using PaperlessPrinter you can upload entire Folder or individual files to remote sites. If
a folder is selected, then the entire contents of the folder including sub-folders are
transferred to the remote site.
Download Folders and Files
Using PaperlessPrinter you can download entire Folder or individual files from remote
sites to your hard disks. If a folder is selected, then the entire contents of the folder
including sub-folders are downloaded from the remote site to the selected location in
your hard disk.
Drag and Drop:
You can upload or download files using the drag and drop feature of PaperlessPrinter
FTP Client.
PaperlessPrinter
www.paperlessprinter.com
Page
70 of 77
PaperlessPrinter Version 2.0 User’s Manual
14.3.
11.3.1
User Interface
FTP Settings:
FTP Server Name:
Use FTP Server Name to provide the Name or IP address of the remote FTP site.
User Name:
Use User Name to provide the server login name
Password:
Use Password to provide the password that enables access to the remote site.
Connection Port:
Use Connection Port to specify the port number required for the FTP Control channel.
Save Password:
Use “Save Password” option to encrypt and save the password for future use. If this
option is not selected then password is not stored.
Connection Settings:
Click on Connection Settings to specify the proxy-server settings for your connection.
PaperlessPrinter
www.paperlessprinter.com
Page
71 of 77
PaperlessPrinter Version 2.0 User’s Manual
11.3.2
FTP Client:
Current Job:
Select Current Job to see all the generated files during the current Job. You can then
upload any files or folders from this list just by dragging and dropping it onto the
Remote FTP Site.
Local System:
Select Local System to see files on your system. You can upload any files or folders
from this list just by dragging and dropping it onto the Remote FTP Site. You can also
download files or folders just by dragging any files or folders from the Remote FTP site
and dropping it onto the Local System.
Remote FTP Site:
Remote FTP Site shows the list of files and folders of the remote site when connected.
You can download any files or folders from this list just by dragging and dropping them
onto the Local System.
Connect:
Click on Connect… to show the FTP Settings dialog. You can then provide FTP Server
Name and other information required for connecting to the FTP site.
Disconnect:
Click on Disconnect to disconnect from the FTP site. This button appears only after
connection is established.
PaperlessPrinter
www.paperlessprinter.com
Page
72 of 77
PaperlessPrinter Version 2.0 User’s Manual
15. Non commercial use
This product is free for non commercial use or benefit only. You m a y n o t u s e t h e
software for any commercial, business, governmental or institutional purpose of any
kind. If you desire to use the product for commercial purposes you need to buy and
register the product.
Please read the End User License Agreement for more information.
PaperlessPrinter
www.paperlessprinter.com
Page
73 of 77
PaperlessPrinter Version 2.0 User’s Manual
16. How to buy the product?
The free version of paperless printer is only for non commercial use. For the use of any
commercial purpose you need to buy and register the product.
1. Click on Start -> Programs -> PaperlessPrinter -> Buy & Register menu to run the
Buy & Registration wizard.
2. B u y O n l i n e
3. Receive Product L i c e n s e K e y via E -M a i l .
PaperlessPrinter
www.paperlessprinter.com
Page
74 of 77
PaperlessPrinter Version 2.0 User’s Manual
4. Enter the Product L i c e n s e K e y and click Finish to complete R e g i s t r a t i o n .
PaperlessPrinter
www.paperlessprinter.com
Page
75 of 77
PaperlessPrinter Version 2.0 User’s Manual
5. You have successfully “R e g i s t e r e d ” the product.
PaperlessPrinter
www.paperlessprinter.com
Page
76 of 77
PaperlessPrinter Version 2.0 User’s Manual
17. Limitations
PaperlessPrinter currently has the following known limitations.
1. PaperlessPrinter does not support the following applications.
a. Adobe Acrobat
b. Adobe Photoshop
c. PhotoEditor
d. PowerPoint in Windows 95, 98 and ME
2. Hyperlinks are not supported. Hyperlinks are included as plain text in the generated
HTML documents.
3. Images and Shapes are not supported in Excel document.
4. Excel documents support only English (ANSI) characters. Multi-byte and Unicode
characters are not supported.
5. PaperlessPrinter shall not work as a Shared Printer (Network Printer).
6. PaperlessPrinter does not currently recommend, and does not support, automation
from any unattended, non-interactive client application or component (including
A S P , D C O M , a n d N T Services), because PaperlessPrinter may exhibit unstable
behavior and/or deadlock when run in this environment.
PaperlessPrinter
www.paperlessprinter.com
Page
77 of 77