1
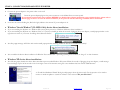
KS810-P Imaging-Keyboard Quick Installation Guide KeyScan KS810-P must be connected only to USB2 PC port. KS810-P will not operate with USB1.1 computer or USB1.1 hub. KeyScan Ltd. All rights reserved. www.keyscan.com E-mail: [email protected] Notice: The data contained in this document has been submitted in confidence and contains trade secrets and/or privileged confidential technical, commercial or financial information. Such data should be used only for evaluation purposes and should not be copied or distributed without written permission of KeyScan Ltd. IntroductionThe following installation process instructs how to install KeyScan KS810-P device its software applications and drivers. Please do not connect the power adapter until instructed by this quick installation guide. THE HARDWARE The KeyScan KS810-P is an Imaging-Keyboard, a Multi Function Peripheral (MFP) which integrates 3 different devices 1. A USB PC keyboard 2. A fast USB2 color sheet-feed scanner 3. A high-speed USB2 HUB with two free downstream ports which the user can use for WEB CAM memory stick smart-card reader mouse etc. The keyboard is activated automatically when connected to the PC (using the USB cable supplied by KeyScan). No external power adapter is required for the keyboard to be fully functional. The built-in document scanner and the built-in USB2 hub with its 2 free downstream ports become operational only when the power adapter is connected. THE SOFTWARE The KeyScan Imaging software includes the following components Drivers for the KS810-P scanner; there is no need for drivers for the USB2 HUB and the keyboard, they use the built-in Windows drivers. KeyScan Imaging scanning application. KeyScan Imaging TWAIN driver. KeyScan AutoScan application. ReadIRIS OCR technology by IRIS SA integrated within KeyScan Imaging software. INSTALLATION PROCESS KeyScan installation is composed of 5 stages, for detailed explanation see the following pages: Stage 1. 2. 3. 4. 5. Action Check the content of the KeyScan box; check if the PC complies with KeyScan minimum requirements. Connect and test the KS810-P keyboard only (do not connect the scanner power and do not test the scanner). Install the KeyScan Imaging software (including the drivers the imaging application and the IRIS OCR engine). Connect the KS810-P scanner device power adapter and setup its software driver. Scanner calibration & restart the KeyScan Imaging software. KeyScan Ltd. www.keyscan.com Page 2 of 9 STAGE 1 - CHECK THE BOX CONTENT AND PC MINIMUM REQUIREMENTS The KS810-P package contains the following items: KeyScan KS810-P integrated keyboard-scanner device The KeyScan wall-mount power adapter The KeyScan USB2 communication cable White calibration sheet (any clean A4 size printer paper can be used for calibration). Software CD & this installation instructions card The minimum PC configuration requirements: PC Pentium 4 or higher with CD/DVD reader and at least 1GB of internal memory (RAM). 1 free USB2.0 (high speed) port to connect the KeyScan, you must connect the KS810-P scanner directly to your PC USB2 connector, on the back of your PC, do not connect it through a USB hub or front panel port of your PC computer. Free disk space (at least 1GB) for installation, recommended at least 2G byte free space for runtime. Operating system - Microsoft Windows XP SP2 or higher, Vista, Window7, support both 32 and 64 bit versions. Microsoft .NET software – make sure you have .NET version 2.0 SP1 or higher. You can download .NET from Microsoft free of charge. WARNINGS Use only the original KeyScan power-adapter, never attempt to use other power adapter which may cause permanent damage to the KS810-P. Use only KS810-P supplied hi-quality USB2 cable. The KeyScan is a high speed device. Low quality USB cables may cause random errors and unexpected problems. Connect the KS810-P scanner directly to you PC USB2 connector. Do not connect the scanner to desktop USB hub. If your PC USB ports are of USB2 type as required but you have an external desktop USB hub (most likely of USB1.1 type) and you connect the scanner to the hub, then the whole connection behaves as a USB1.1 connection and not as a USB2 connection. Connecting the KS810-P scanner to a non USB2 port will result random installation and scanning problems. KeyScan Ltd. www.keyscan.com Page 3 of 9 STAGE 2 - CONNECT AND TEST THE KS810-P KEYBOARD Connect the KeyScan USB2 high speed cable to a USB2 port on the PC (do not connect to external USB1.1 hub). Connect the other side of the USB2 cable to the middle connector (up steam USB port) on the KS810-P rear connector panel. Do not connect the power adapter yet! If you already connected the power please refer to the trouble shooting or call KeyScan support before you proceed with the installation! The Windows system should recognize the new connected keyboard and USB2 HUB and install their drivers automatically. The green LED on the connector panel should be blinking; it is located between the power connector and the USB upstream connector. The blinking light indicates that the PC recognized the USB2 hub of the KS810-P and both the hub and the keyboard are functional. WARNING Make sure you are using only the original KeyScan supplied USB2 cable and connect it directly to the PC USB2 port, no extension USB cable or external USB hub are allowed. If the scanner is connected to USB1.1 port or to external desktop USB hub you may experience unpredicted behavior and errors. KeyScan Ltd. www.keyscan.com Page 4 of 9 STAGE 3 - INSTALL KEYSCAN IMAGING SOFTWARE Activate the KeyScan installation according to the installation media you have, you must activate the installation as an “Administrator”: If you downloaded the KeyScan software from KeyScan web site simply run the downloaded executable file by right click on the filename and select “Run as Administrator” option. Do not try to run the installation directly from KeyScan web site, first download it to you local drive as explained above! If you have a KeyScan installation CD which contain only the KeyScan application it will activate automatically the KeyScan installation and you will get the first installation menu- If you have the KeyScan Documentation and Installation CD you will get a selection dialog letting you browse KeyScan documents, KeyScan short demo videos, installation of Irfan imaging software and installation of KeyScan software, Click on the KeyScan software installation label or icon to start the software installation. Follow the installation instructions displayed by the installation software.. It is recommended to make a full installation of all software options. Microsoft-Windows may popup warning message that the software is not tested by Microsoft, confirm and continue. It is only a notification from Microsoft not error message. During the installation process you will be prompted to insert the software serial number, the number is printed on a label inside the product box, please keep this number for future installations When installation is finished - restart the PC. The installation process should place 2 shortcuts on the desktop Shortcut for the KeyScan Imaging application (the KeyScan Blue V shape icon) Shortcut (the Orange icon with the KeyScan keyboard) for the automatic scanning application- KeyScan NoTouch-AutoScan Remove installation media (CD or DVD). KeyScan Ltd. www.keyscan.com Page 5 of 9 STAGE 4 - CONNECT SCANNER AND SETUP ITS DRIVER Turn on the PC, make sure the KeyScan USB2 cable is connected and the KS810-P keyboard is functional. as a keyboard Connect the power adapter to the power outlet on the wall. Insert the power adapter plug into the power connector on the KS810-P rear connector panel. If you already connected the power adapter BEFORE you finished the software installation stages explained above, please refer to the last page on how to recover the driver installation, do not proceed with the following “standard” driver installation. Look into the scanner feeding slot, Red color light, indicates the scanner 5V power adapter is ok. Windows Vista & Window7 (32 AND 64 bit) device driver installation: If you are installing the KeyScan on a Windows XP system, please proceed to “Windows XP device driver installation”. If you are installing the KeyScan on a Windows Vista or 7 system you should get within 30 seconds of plugging the power adapter, a small popup window on the right bottom corner of you screen “Installing device Driver Software” The first popup message will follow with another small popup window declaring “KS810-P usb2 device installed successfully”. This concludes the device driver installation for Window Vista and Window 7 operating systems, please continue to “Stage 5” on this document. Windows XP device driver installation: The following steps describe the device driver installation process under Windows XP system. Within 30 seconds of plugging the power adapter, a small message box should pop up for 20-30 seconds on the lower right corner of the monitor stating that a new hardware has been found “USB2 Scanner” A “Found New Hardware Wizard” dialog should popup in about 30 -60 seconds. For the question “Can window connect to windows update to search for software” select answer “No, not this time”. KeyScan Ltd. www.keyscan.com Page 6 of 9 Install the software automatically A new wizard dialog pops-up, please select “Install the software automatically”. Windows should locate the KeyScan_KS810-P.inf driver installation file and proceed automatically with the driver installation. In case Windows failed to detect the KeyScan driver please continue with “install the software from a list of specified locations” below. Window may display “Hardware installation” warning message during the installation process. Click “Continue anyway”. This is a notification from Microsoft and not an error message. Installation is completed with this message, press “Finish” to get out of installation process. KeyScan Ltd. www.keyscan.com Page 7 of 9 Install the software from a list of specified locations You can change your selection from “Install the software automatically” to “install the software from a list of specified locations”. Window let you specify the location of the driver software, enter the location of “<KeyScan installation directory>\Backup\Driver\<32bit or 64bit>” and click [Next] button. You should select 32 or 64 bit according to the type of Windows operating system you have, it can be checked under “Control-panel” and “System”. Window may display hardware installation warning message, select “Continue”, this is only a notification from Microsoft not an error message. After installation is finished a small message-window should popup on the lower right corner of the monitor stating- “Your new hardware is installed and ready to use”. WARNINGS Use only the original KeyScan power adapter, usage of other power adapter may cause permanent damage to the KS810-P and revoke any warranty for the product KeyScan Ltd. www.keyscan.com Page 8 of 9 STAGE 5 - SCANNER CALIBRATION After installation, the KeyScan KS810-P scanner must be calibrated. Activate the KeyScan imaging software by double clicking on the “KeyScan Imaging” shortcut icon (The KeyScan Imaging application is Sg.exe). From the Main MENU select <File><Calibrate Scanner> Place a white calibration paper (printer A4 White clean paper) in the scanner feeding slot, the paper must be adjusted to the right-side of the feeding slot (to the mark on the scanner door). The scanner will start feeding the calibration-paper; the calibration process may take 30-40 seconds and the scanner may pull in and eject only 1-2 incheches. After calibration you should restart the KeyScan Imaging application (no need to restart the PC). In case you have any installation problems please consult the “Installation troubleshooting” on the user manual installed on your system. Or call KeyScan support line Most common installation issues and how to recover: 1. Power adapter has been connected to the KeyScan before the installation of the software driver. In such case the scanner is not operational and you will get error message that the scanner is not detected. The reason is that the operating system attached another driver or defined the device as not operational. Solution: Leave the power still connected. Go to Windows “Control Panel” select “System” and “Device Manager”, The KS810-P should be marked as unknown device If you didn’t install yet the KeyScan software: Right click on the KeyScan KS810-P entry on the “Device Manager” devices list and select uninstall, then disconnect the power adapter and proceed with regular KeyScan installation process as instructed on this document. If you already installed the KeyScan KS810-P software, right click on the KS810-P entry and select “Update Driver Software”, windows should come with a message that the driver has been updated and place the identified KeyScan device under imaging devices section Do not forget to activate Imaging-Software and calibrate the scanner using white and clean printer paper (A4 or Letter size). 2. If you installed the KeyScan without having Administrator account privileges or under Vista or Window7 didn’t right click on the installation file to select “Run as Administrator”, this will result that you do not have read/write permission to the KeyScan installation folder as well as to the KeyScan registry keys you will get error indicating that the keyscan can’t calibrate or can’t find the driver. Solution: You will have to remove the current installation. Disconnect the power adapter. Login as administrator and repeat the installation process. 3. Under Windows-XP, sometimes Windows-XP will not detect automatically the scanner driver location during installation process and Windows will prompt you for the location of the driver. You will have to direct it to the “backup/driver” sub-folder under the folder where the KeyScan software is installed. 4. If you do not have Microsoft .NET 2.0 SP2 or higher installed Windows will not go through all the installation process and fail to install some of the libraries, most common results will be that the scanner will not be able to calibrate and will not prompt you for the software serial number therefore will not unlock the software to be used. You will have to uninstall KeyScan, Install first Windows .NET2.0 SP2 or higher and reinstall the KeyScan software. Correct disposal of Waste Electrical and Electronic Equipment (Instructions applicable in European Union Member States) The device is labelled in accordance with European Directive 2002/96/EC on Waste Electrical and Electronic Equipment (WEEE). This symbol on the product or on its packing or documentation indicates that it may not be treated as household or commercial waste at the end of its life utility. Correct disposal avoids negative effects to environment and human health and ensures recycling of useful raw materials. For more information on how to dispose of this product correctly or about the penalties in the event of illegal handling, contact the local authority responsible for waste disposal or the distributor from whom the product has been originally purchased. KeyScan Ltd. www.keyscan.com Page 9 of 9