1
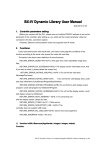
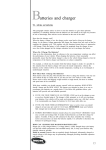
Shanghai Onbon software technology Co.,Ltd
The user manual for cascade function of BX-5Q1/5Q2
1.
Connection drawing
1.1 Width cascade:
1.2 Height cascade:
1
www.onbonbx.com | [email protected]
Shanghai Onbon software technology Co.,Ltd
2.
Preparation before set cascade parameters
2.1 Prepare a set of switchboard or router, the interfaces should be
enough for computer and controllers;
2.2 Distribute the IP address , subnet mask and gateway;
2.3 Confirm the scan mode which already has in the software, or you
need to get the right scan mode by smart scan configuration.
3.
Software setting
3.1 Open LedshowTW 2013, click “ setup” -- choose “ set parameter
“-- enter passwords “ 888 “;
2
www.onbonbx.com | [email protected]
Shanghai Onbon software technology Co.,Ltd
3.2 Select “ controller “ and “ controller model “ (like BX-5Q2), choose
“ cascade mode “, enter the corresponding data in “ screen width “,
“ screen height “, “ module width “, “ module height “, then click
“ controller cascade configuration”
3
www.onbonbx.com | [email protected]
Shanghai Onbon software technology Co.,Ltd
3.3 Cascade configuration
3.3.1 Add “ cascade number “ (after you enter the number, the
software will distribute the screen height and width automatically);
3.3.2 Choose “ cascade mode “, enter the corresponding IP address
“ sub-controller “, “ main controller “; Example: There are three
controllers for cascade, then, there will be two sub-controllers and one
main controllers. The prepared IP: 192.168.88.151 192.168.88.152
192.168.88.153 , click sub controller 1, enter the IP address
192.168.88.151 , click sub controller 2, enter the IP address
192.168.88.152, click main controller, enter the IP address
192.168.88.153, then, click “ next “.
4
www.onbonbx.com | [email protected]
Shanghai Onbon software technology Co.,Ltd
4.
Write the cascade list and IP address to the controller
4.1 Connect a controller with the router or switchboard which your
computer is using, click next. The configuration window for sub
controller 1, note: you could modify the subnet mask and defaulted
gateway there.
5
www.onbonbx.com | [email protected]
Shanghai Onbon software technology Co.,Ltd
Click “ next “
4.2 check the prompt, and click “ ok “
4.3 Then promt the the configuration for sub controller 2, and the
last step “ send setup screen IP command successed !” Means the
sub controller 1 get configuration successed, and next, connect the
second sub controller. Then click “next”.
4.4 Check and click “ ok “
4.5 Then, the main controller configuration, and also prompt that
“ sending setup screen IP command successed !” Click “next”.
4.6 Check and click “ok”.
6
www.onbonbx.com | [email protected]
Shanghai Onbon software technology Co.,Ltd
4.7 Prompt the main controller and sub controllers’ IP/cascade
configuration successed, and connect the sub controllers which get
configured to router or swichboard, click “ ok “.
4.8 Write parameters.
“prompt write parameters successed!” Then, you could edit and send
programs.
7
www.onbonbx.com | [email protected]