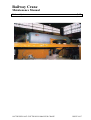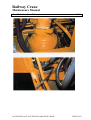
1
Railway Crane
Maintenance Manual
Electrical System
5.1
( P-1/1)
5.1
5.1.1
5.1.2
5.1.3
5.1.4
5.1.5
5.1.6
5.1.7
5.1.8
Electrical system
Switch Cabinets
Junction Boxes and cableways
Batteries
Three- Phase generator
Three- Phase generator on the Emergency Diesel Engine
Hoist and Lowering limit switches
Safe Load Indicator
Lighting and sockets
1997 DESIGN 140T GOTTWALD/JAMALPUR CRANE
ISSUE 1997
Railway Crane
Maintenance Manual
Switch Cabinets
5.1.1
(P-1/2)
Description
The superstructure switch cabinets serve to house the essential electrical and
electric components which are required to control monitor and supply the crane
with power. They are located in the cab rear wall.
Safety Instructions
Before maintenance work is performed, it must be ensured that the crane cannot
be switched on and is secured against rolling.
In addition, a “Maintenance Work” warning sign must be visibly posted both in
and outside the cab. Remove the ignition key and battery main switch and
secure against any unauthorised start.
The crane must not be in the way of other vehicles.
Ensure that no one is near hot and moving parts - danger of getting burnt,
crushed or drawn into the equipment!
Maintenance Instructions:
1. Visual check:
• Check the switch cabinets for any external damage. In particular, check the
doors as to whether they close properly. Any faulty seals must be replaced
immediately.
• Check cabin connections for firm seating and damage.
2. To clean:
• Clean the switch cabinet interior with a suitable cleaning aid. Remove any
water which has penetrated into the cabinet. Establish the cause and
eliminate.
3. To clean, to grease:
• Clean the hinges and locks on the switch cabinet door and grease slightly.
1997 DESIGN 140T GOTTWALD/JAMALPUR CRANE
ISSUE 1997
Railway Crane
Maintenance Manual
Switch Cabinets
5.1.1
(P-2/2)
1997 DESIGN 140T GOTTWALD/JAMALPUR CRANE
ISSUE 1997
Railway Crane
Maintenance Manual
Junction Boxes and Cableways
5.1.2
(P-1/2)
Description
The cableways and junction boxes serve to protect, distribute and fan in the
cable looms. To provide a better overview and to protect the individual cables,
the cables are concentrated in cableways.
Safety Instructions
Before maintenance work is performed, it must be ensured that the crane cannot
be switched on and is secured against rolling.
In addition, a “Maintenance Work” warning sign must be visibly posted both in
and outside the cab. Remove the ignition key and battery main switch and
secure against any unauthorised start.
The cane must not be in the way of other vehicles.
Ensure that no one is near hot or moving parts – danger of getting burnt,
crushed or drawn into the equipment!
Maintenance Instructions
1. Visual check:
• Check the junction boxes for external damage. Ensure, in particular, that the
cover is seated properly and tightly. If a cover is not seal properly, electrical
equipment can be severely damaged through water and dirt penetrating.
• Check the cables for external damage, bends or sheering points and check
whether the cables are firmly seated in the cable looms.
2. To clean:
• Clean the junction box interior with a suitable aid (e.g. vacuum cleaner).
Eliminate any water, which may have penetrated into the boxes. Establish
the cause and eliminate.
1997 DESIGN 140T GOTTWALD/JAMALPUR CRANE
ISSUE 1997
Railway Crane
Maintenance Manual
Junction Boxes and Cableways
5.1.2
(P-2/2)
1997 DESIGN 140T GOTTWALD/JAMALPUR CRANE
ISSUE 1997
Railway Crane
Maintenance Manual
Batteries
5.1.3
(P-1/2)
Description
The batteries are fed by the 3-phase generator of the diesel engine system or the
emergency diesel engine. The batteries supply the electrical system of the crane with
power. The batteries for the diesel engine are located a drawer behind the cab to protect
them from external influences.
Safety Instruction
Before maintenance work is performed, it must be ensured that the crane cannot be
switched on and is secured against rolling.
In addition, a “Maintenance Work” warning sign must be visibly posted both in and
outside the cab. Remove the ignition key and battery main switch and secure against
any unauthorised start.
The crane must not be in the way of other vehicles.
Ensure that no one is near hot or moving parts – danger of getting burnt, crushed or
drawn into the equipment!
Never place objects or tools on the batteries. Keep the batteries clean and dry – Danger
of short-circuiting!
Use caution when handling battery acid. Observe the respective safety regulations.
Avoid contact with skin and do not drink - Danger of causticization!
Do not drink the purified water – Danger of poisoning!
No smoking, no naked flame or light, sparks or glowing ashes near the batteries –
Danger of explosion and fire!
Caution near the overhead lines! Do not climb up onto crane superstructure!
Mortal danger!
Maintenance Instructions
1. Visual Check:
• Pull out the battery drawer.
• Check the batteries and the cable-connecting terminal for external damage.
• Check whether the batteries are firmly seated on the battery carrier; if
required, tighten the mounting bolts on the retainer bar.
2. To check the electrolyte level:
Screw out the filler plugs and check the electrolyte level; if required, top up the
distilled water to the marking.
3. To clean and dry battery covers:
Clean battery covers with a suitable aid according to regulations and then dry to
avoid leakage current. If moisture has penetrated in to the batteries, find the
cause and eliminate it.
4. To clean the terminal:
Clean the cable connecting terminals, grease with pole grease and check for
firm seating. Then close the battery drawer.
1997 DESIGN 140T GOTTWALD/JAMALPUR CRANE
ISSUE 1997
Railway Crane
Maintenance Manual
Batteries
5.1.3
(P-2/2)
1997 DESIGN 140T GOTTWALD/JAMALPUR CRANE
ISSUE 1997
Railway Crane
Maintenance Manual
Three – Phase Generator
5.1.4
(P-1/2)
Description
The generator (item 1) converts the mechanical power of the flange-mounted hydraulic
motor into electric power.
Safety Instructions
Before maintenance work is performed, it must be ensured that the crane cannot be
switched on and is secured against rolling.
In addition, a “Maintenance Work” warning sign must be visibly posted both in and
outside the cab. Remove the ignition key and battery main switch and secure against
any unauthorised start.
The crane must not be in the way of other vehicles.
Ensure that no one in near hot or moving parts – danger of getting burnt, crushed or
drawn into the equipment!
Maintenance Instruction
1. Visual check:
• Check the generator and its connections for firm seating and external damage.
2. Fan belt and fan belt tensioning:
The fan belt and its tensioning are dealt with in the section on maintenance work
for the diesel engine.
Note:
When the engine is running:
• do not switch off the battery main switch
• do not release battery terminals, pole terminals or lines in the mains
• and when the battery charged status control lamp illuminates, switch off the
engine immediately.
• do not allow the generator to run without being connected to the battery.
• It is not permissible to short–circuit (or tap) the connections on the generator
and the controller among one other or by earthing.
1997 DESIGN 140T GOTTWALD/JAMALPUR CRANE
ISSUE 1997
Railway Crane
Maintenance Manual
Three – Phase Generator
5.1.4
(P-2/2)
1997 DESIGN 140T GOTTWALD/JAMALPUR CRANE
ISSUE 1997
Railway Crane
Maintenance Manual
Three-Phase Generator on the Emergency Diesel Engine
5.1.5
(P-1/2)
Description
The 3-phase generator on the emergency diesel engine feeds the batteries
during emergency operation and thus supplies the electric equipment of the
crane with power.
Safety Instructions
Before maintenance work is performed, it must be ensured that the crane cannot
be switched on and is secured against rolling.
In addition, a “Maintenance Work” warning sign must be visibly posted both in
and out side the cab. Remove the ignition key and battery main switch and
secure against any unauthorised start.
The crane must not be in the way of other vehicles.
Ensure that no one is near hot and moving parts - danger of getting burnt,
crushed or drawn into the equipment!
Maintenance Instructions
1. Visual check:
• Check the generator and its connections for firm seating and external
damage.
2. Fan belt and fan belt tensioning:
The fan belt and tensioning are dealt with in the section on maintenance
work for the emergency diesel engine.
Note:
When the engine is running:
• do not switch off the battery main switch.
• do not release battery terminals, pole terminals or lines in the mains.
• and when the battery charged status control lamp illuminates, switch off
the engine immediately.
• do not allow the generator to run without being connected to the battery.
• it is not permissible to short-circuit (or tap) the connections on the
generator and the controller among one other or by earthing.
1997 DESIGN 140T GOTTWALD/JAMALPUR CRANE
ISSUE 1997
Railway Crane
Maintenance Manual
Switch Cabinets
5.1.5
(P-2/2)
1997 DESIGN 140T GOTTWALD/JAMALPUR CRANE
ISSUE 1997
Railway Crane
Maintenance Manual
Hoist and Lowering Limit Switches
5.1.6
(P-1/2)
Description
The crane has limit switches for the main and auxiliary hoists as well as for the
derricking gear.
Derricking gear:
The limit switches for the derricking gear are mounted directly on the rope drum. In
working range, the limit switches switch off in the steepest or lowest boom working
positions. In addition, when the bridging switch is activated, the derricking motion is
switched off in the lowest boom position for transport purposes or in the steepest
position for raising/lowering the counterweight.
Main and auxiliary hoists:
Both hoists are fitted with a hoist and lowering limit switch, which are located on their
respective hoist drums. The hoist limit switches switch off the hook in the highest hook
position and thus prevent the hook gear from being pulled into the boom head. The
lowering limit switches switch off the hoist in the lowest hook position and thus
prevent the rope from uncoiling beyond the required remaining safety windings.
Safety Instructions
Before maintenance work is performed, it must be ensured that the crane cannot be
switched on and is secured against rolling.
In addition, a “Maintenance Work” warning sign must be visibly posted both in and
outside the cab. Remove the ignition key and battery main switch and secure against
any unauthorised start.
The crane must not be in the way of other vehicles.
Caution near the overhead lines! Do not climb up onto the crane superstructure! Mortal
danger!
Ensure that no one in near hot or moving parts – danger of getting burnt, crushed or
drawn into the equipment!
Maintenance Instructions
1. Visual check:
Check the limit switches (see figure) and their mountings and connections for
external damage and firm seating.
2. To Clean:
Open the limit switches and their mountings and connections for external damage
and firm seating.
3. Functional test:
The functional test must be carried out without load. Approach all the switching
points slowly as described under “Function” and check for proper functioning.
1997 DESIGN 140T GOTTWALD/JAMALPUR CRANE
ISSUE 1997
Railway Crane
Maintenance Manual
Hoist and Lowering Limit Switches
5.1.6
(P-2/2)
1997 DESIGN 140T GOTTWALD/JAMALPUR CRANE
ISSUE 1997
Railway Crane
Maintenance Manual
Safe Load Indicator
5.1.7
(P-1/2)
Description
The safe load indicator ensures that crane elements are not subject to overload
in all working positions and to ensure that the crane does not tip over because
the load lifted exceeds the lifting capacity in the particular configuration.
The safe load indicator functions based on:
• the limit switches near the rotary lead-through to sense the superstructure
position
• the selected outrigger base
• the load cells on the load sensor locate the fixed point between hoist ropes
and the hook
• the angle sensor on the boom ( see figure)
The respective data is shown on the control and display panel in the cab.
Safety Instructions
Before maintenance work is performed, it must be ensured that the crane cannot
be switched on and is secured against rolling.
In addition, a “Maintenance Work” warning sign must be visibly posted both in
and outside the cab. Remove the ignition key and battery main switch and
secure against any unauthorised start.
The crane must not be in the way of other vehicles.
Caution near the overhead lines! Do not climb up onto the crane superstructure!
Mortal danger!
Ensure that no one in near hot or moving parts – danger of getting burnt,
crushed or drawn into the equipment!
Maintenance Instructions
1. Visual check:
• Check the limit switches, the load cells and the angle sensor for damage
and firm seating.
2. Functional test:
• When the functional test is carried out, all the limit switch switch-off
points must be approached with care. Check as to whether the controls on
the panel show the proper indication. In addition, check as to whether the
limit switches switch off properly.
1997 DESIGN 140T GOTTWALD/JAMALPUR CRANE
ISSUE 1997
Railway Crane
Maintenance Manual
Safe Load Indicator
5.1.7
(P-2/2)
1997 DESIGN 140T GOTTWALD/JAMALPUR CRANE
ISSUE 1997
Railway Crane
Maintenance Manual
Lighting and Sockets
5.1.8
(P-1/2)
Description
The crane lighting consists of:
• Control panel lighting
• Cab lighting
• Machinery house lighting
• two swivelable halogen spotlights for crane operation, one each to the left
and right of the cab from side (see left hand figure)
• a swivelable halogen spotlight for crane operation located up behind the
superstructure.
• a spotlight located behind the cab for checking the hoist and derricking
gears,
• the outrigger lighting on the superstructure near each superstructure corner.
• two (red) travel lights at the front of the superstructure and at the rear of the
counterweight.
• two adjustable spotlights on the boom head.
In addition, the crane is fitted with five 24 V sockets (see figure to the right) of
which one is located in the cab and one each is located at the front and rear of
each crane side.
Safety Instructions
Before maintenance work is performed, it must be ensured that the crane cannot
be switched on and is secured against rolling. In addition, a “Maintenance
Work” warning sign must be visibly posted both in and outside the cab.
Remove the ignition key and battery main switch and secure against any
unauthorised start.
The crane must not be in the way of other vehicles.
Caution near the overhead lines! Do not climb up onto the crane superstructure!
Mortal Danger!
Ensure that no one is near hot or moving parts – danger of getting burnt,
crushed or drawn into the equipment!
Maintenance Instructions:
1. Visual check:
Check all the lighting elements of the crane, their mountings and cable
connections for damage, firm seating and moisture. Damaged or moist
lighting fixtures must be replaced. Any damaged or faulty sockets must also
be replaced.
2. To Clean:
Clean the lighting fixtures with a suitable aid.
3. Functional Control:
Check the lighting elements for proper functioning. Any faulty lamps or
lighting element with broken glass must be replaced. Any faulty lamps or
lighting element with broken lamps must be replaced immediately.
1997 DESIGN 140T GOTTWALD/JAMALPUR CRANE
ISSUE 1997
Railway Crane
Maintenance Manual
Lighting and Sockets
5.1.8
(P-2/2)
1997 DESIGN 140T GOTTWALD/JAMALPUR CRANE
ISSUE 1997
Railway Crane
Maintenance Manual
Hydraulic System
5.2
(P-1/1)
5.2.1
5.2.2
5.2.3
5.2.4
5.2.5
5.2.6
5.2.7
5.2.8
5.2.9
5.2.10
5.2.11
5.2.12
Main Pumps
Secondary Pumps
Hydraulic Oil Tank
Slewing Gear Pump Filter
Rotary Lead-Through
Suspension Blocking Cylinders
Undercarriage Control Blocks
Outrigger Cylinders
Hoist, Derricking Gear, Slewing Gear and Travel Gear Motors
Superstructure Control Blocks
Counterweight Cylinders
Boom Root Point Cylinder
1997 DESIGN 140T GOTTWALD/JAMALPUR CRANE
ISSUE 1997
Railway Crane
Maintenance Manual
Main Pumps
5.2.1
(P-1/2)
Description
The Crane has a main pump assembly which is located directly downstream of the pump
distributor gearbox on the diesel engine.
Safety Instructions
Before maintenance work is performed, it must be ensured that the crane cannot be switched on
and is secured against rolling.
In addition, a “Maintenance Work” warning sign must be visibly posted both in and outside the
cab. Remove the ignition key and battery main switch and secure against any unauthorised
start.
The crane must not be in the way of other vehicles.
Ensure that no one is near hot or moving parts – danger of getting burnt, crushed or drawn into
the equipment!
Use caution when dealing with oil danger of being burnt or scalded!
Caution – Hydraulic system! Work may only be performed on the hydraulic system when
there is no pressure in the system and the diesel engine is stationary. This also applies to the
tightening of hydraulic connections.
Use caution when releasing connections that higher mounted components could drain dry. In
these cases, ensure an adequately sized drip pan is available. Observe disposal regulations!
Caution! - sections of the hydraulic and air pressure systems are still under pressure even when
the crane is at standstill.
Maintenance Instructions
1. Visual check:
Check the pumps (see figure at the top) and their connections for external damage and
leakages.
2. Running Noises:
The running noises of the pumps must be checked. An increase in the running noises
coupled with an increase in pressure indicate pump damage. In this case, the crane must
not be operated and the pump must be replaced.
3. Pressure Indicators:
During operation, the operating pressure can be checked by means of pressure gases
mounted behind the cab (see figure at the bottom). Faulty pressure gauges must be
replaced:
Item No: 1
Control Oil
Operating Pressure: max: 30 bar
Item No: 2
Slewing Gear
Operating Pressure: max: 250 bar
Item No: 3
Pump 1
Operating Pressure: max: 400 bar
Item No: 4
Pump 2
Operating Pressure: max: 400 bar
Note: After work has been completed on the hydraulic system, during which oil has been
lost out of the hydraulic circuit, top up the hydraulic oil in the housings of the hydraulic
pumps and hydraulic motors via their respective leakage oil connections.
Otherwise, the hydraulic system could suffer severe damage. To replace or top up oil, an
external oil filter with a minimum retaining rate 10 µm must be used.
Caution! - If the oil stop cocks below the hydraulic oil tank are closed for work being
performed on the hydraulic system, check as to whether the stop cocks have been reopened prior to re-starting as otherwise the hydraulic system could suffer serve damage.
1997 DESIGN 140T GOTTWALD/JAMALPUR CRANE
ISSUE 1997
Railway Crane
Maintenance Manual
Main Pumps
5.2.1
(P-2/2)
1997 DESIGN 140T GOTTWALD/JAMALPUR CRANE
ISSUE 1997
Railway Crane
Maintenance Manual
Secondary pumps
5.2.2
(P-1/2)
Description
The secondary pump for emergency operation is located on the emergency diesel
engine.
Safety Instructions
Before maintenance work is performed, it must be ensured that the crane cannot be
switched on and is secured against rolling.
In addition, a “Maintenance Work” warning sign must be visibly posted both in and
outside the cab. Remove the ignition key and battery main switch and secure against
any unauthorised start.
The crane must not be in the way of other vehicles.
Ensure that no one in near hot or moving parts – danger of getting burnt, crushed or
drawn into the equipment!
Use caution when dealing with oil danger of being burnt or scalded!
Caution- Hydraulic system! Work may only be performed on the hydraulic system
when there is no pressure in the system and the diesel engine is stationary. This also
applies to the tightening of hydraulic connections.
Use caution when releasing connections those higher mounted components could drain
dry. In these cases, ensure an adequately sized drip pan is available. Observe disposal
regulations!
Caution!- sections of the hydraulic and air pressure systems are still under pressure
even when the crane is at a standstill.
Maintenance Instructions:
1. Trial run:
As the secondary pumps on the emergency diesel engine do not run in normal
operation, it is necessary to carry out a trial run. The trial run must last at least 5
minutes against a minimum pressure of 5 bar to a maximum pressure of 200 bar.
2. Visual Check:
Check the pumps and their connections for external damage and leakages.
3. Running noises:
The running noises of the pumps must be checked. An increase in the running
noises coupled with an increase in pressure indicate pump damage. In this case, the
crane must not be operated and the pump must be replaced.
Note: After work has been completed on the hydraulic system, during which oil has
been lost out of the hydraulic circuit, top up the hydraulic oil in the housings of the
hydraulic pumps and hydraulic motors via their respective leakage oil connections.
Otherwise, the hydraulic system could suffer severe damage. To replace or top up oil,
an external oil filter with a minimum retaining rate of 10 µm must be used.
Caution! If the oil stop cocks below the hydraulic oil tank are closed for work being
performed on the hydraulic system, check as to whether the stop cocks have been reopened prior to re-starting as otherwise the hydraulic system could suffer severe
damage.
1997 DESIGN 140T GOTTWALD/JAMALPUR CRANE
ISSUE 1997
Railway Crane
Maintenance Manual
Secondary pumps
5.2.2
(P-2/2)
1997 DESIGN 140T GOTTWALD/JAMALPUR CRANE
ISSUE 1997
Railway Crane
Maintenance Manual
Hydraulic Oil Tank
5.2.3
(P-1/3)
Description
The hydraulic oil tank serves to store the hydraulic oil for the hydraulic system. The hydraulic
oil is added, topped up and drained via the tank. The built-in filter filters the return hydraulic
oil flow. The tank capacity is approx. 1130 l.
Safety Instructions
Before maintenance work is performed, it must be ensured that the crane can not be switched
on and is secured against rolling.
In addition, a “maintenance Work” warning sign must be visibly posted both in and outside the
cab. Remove the ignition key and battery main switch and secure against any unauthorised
start.
The crane must not be in the way of other vehicles.
Ensure that no one is near hot or moving parts – danger of getting burnt, crushed or drawn into
the equipment!
Use caution when dealing with oil danger of being burnt or scaled!
Caution! - Hydraulic System! Work may only be performed on the hydraulic system when
there is no pressure in the system and the diesel engine is stationary. This also applies to the
tightening of hydraulic connections.
Use caution when releasing connections that higher mounted components could drain dry. In
these cases, ensure an adequately sized drip pan is available.
Observe disposal regulations!
Caution! - Sections of the hydraulic and air pressure systems are still under pressure even when
the crane is at a standstill.
Maintenance Instructions
1. Visual check:
Check the hydraulic oil tank and its connections for external damage and leakages.
2. To check the oil level:
The oil level can be read off by means of the oil level glasses (See Figure on the right) on
the tank side. The oil level must be checked at operating temperature. The maximum oil
level has been reached when all the cylinders are retracted. The oil must not fall below a
minimum level when all the cylinders are completely extended.
The oil temperature is sensed via a temperature sensor. A oil temperature of more than
700C is indicated in the cab by means of a control lamp. In this case, operation must be
stopped until the oil temperature drops below 700C.
3. To add oil:
When oil is added, it must be poured through a guilt-in oil filter or an external mounted
filter assembly with a filter absolute fineness of 10 µm. Caution - Only use oil of the same
brand for topping up!
1997 DESIGN 140T GOTTWALD/JAMALPUR CRANE
ISSUE 1997
Railway Crane
Maintenance Manual
Hydraulic Oil Tank
5.2.3
(P-2/3)
4. To change oil:
•
To drain the oil:
The oil tank unit consists of two connected tanks. As the connection between the tanks is
higher than that of the oil drain, a drain piece must be mounted on each tank section. The
oil is drained via the oil drain plug below the hydraulic tank. Caution – oil quantity approx.
1,130 l! Then add oil as described under 3.
5. To check the breather filters:
The breather filters are installed on the tank upper side (see figure at the top and bottom
right). Whenever hydraulic oil is topped up, the filter cartridges of the breather filter must
be checked and if required, replaced. To do so, unscrew the filter cover, change the
cartridges and screw on the cover again tightly.
6. To check the oil filter and if required, change:
- To carry out a visual check on the impact pressure indicator:
The oil filter has a visual impact pressure indicator (See Figure at the bottom). When the
oil is at operating temperature, the indicator must be in the green zone. If the indicator is
already in the yellow zone, it is advisable to change the filter insert. If the filter is clogged,
the indicator is in the red zone. In this case, the filter insert must be replaced.
Note: Only replacement filter element with the corresponding purchase number on their
rating plate must be installed. The filter inserts cannot be simply cleaned.
- To change the filter inserts:
• To change the filter element, unscrew the screws on the filter cover.
• Then turn the cover 450 and lift off.
• Then remove the filter insert and the dirt pan.
• Then clean the dirt pan with a suitable cleaning agent and insert onto the new filter
insert.
• Before the filter element is re-installed, ensure that the seal is in proper order; if required,
replace.
• Once the element has been installed, check for tight sealing.
Note: After work has been completed on the hydraulic system, during which oil has been lost
out of the hydraulic circuit, top up the hydraulic oil in the housings of the hydraulic pumps and
hydraulic motors via their respective leakage oil connections.
Otherwise, the hydraulic system could suffer severe damage. To replace or top up oil, an external
oil filter with a minimum retaining rate of 10 µm must be used.
Caution! If the oil stop cocks below the hydraulic oil tank are closed for work being performed
on the hydraulic system, check as to whether the stop cocks have been re-opened prior to restarting as other wise the hydraulic system could suffer severe damage.
1997 DESIGN 140T GOTTWALD/JAMALPUR CRANE
ISSUE 1997
Railway Crane
Maintenance Manual
Hydraulic Oil Tank
5.2.3
(P-3/3)
1997 DESIGN 140T GOTTWALD/JAMALPUR CRANE
ISSUE 1997
Railway Crane
Maintenance Manual
Slewing Gear Pump Filter
5.2.4
(P-1/3)
Description
The hydraulic oil flow of the slewing gear pump is cleaned via line filter.
Safety Instructions
Before maintenance work is performed, it must be ensured that the crane cannot be
switched on and is secured against rolling.
In addition, a “Maintenance Work” warning sign must be visibly posted both in and
outside the cab. Remove the ignition key and battery main switch and secure against
any unauthorised start.
The crane must not be in the way of other vehicles.
Ensure that no one is near to or moving parts- danger of getting burnt, crushed or
drawn into the equipment!
Use caution when dealing with oil danger of being burnt or scalded!
Caution- Hydraulic system! Work may only be performed on the hydraulic system
when there is no pressure in the system and the diesel engine is stationary. This also
applies to the tightening of hydraulic connections.
Use caution when releasing connections that higher mounted components could drain
dry. In these cases, ensue an adequately sized drip pan is available. Observe disposal;
regulations!
Caution! – Sections of the hydraulic and air pressure systems are still under pressure
even when the crane is at a standstill.
Maintenance Instructions
1. Visual check:
Check the filter and its connections and mountings for external damage, leakages or
firm seating.
2. Pollution indicator:
The filter is fitted with a visual pollution indicator. When the oil is at operating
temperature, the red indicator on the filter must not be visible.
3. To change the filter;
• It is not possible to clean the filter insert. It must be replaced when clogged.
• Prior to changing the filter insert, first release the pressure via the pressure
drain plug on the under side of the filter body.
• Then unscrew the filter body, remove the filter insert, empty the filter body and
clean thoroughly. Check the thread and the seals as to whether they are in good
condition and then wet with hydraulic oil.
• Prior to inserting the new filter element, screw the pressure drain plug tightly
on.
• Screw in the filter body by hand until the mechanical stop. Then it must be
loosed by ¼ rotation. The sealing effect is not better as a result of increased
tightening.
• On completion of maintenance, check filter for proper sealing.
1997 DESIGN 140T GOTTWALD/JAMALPUR CRANE
ISSUE 1997
Railway Crane
Maintenance Manual
Slewing Gear Pump Filter
5.2.4
(P-2/3)
Note: After work has been completed on the hydraulic system, during which oil has
been lost out of the hydraulic circuit, top up the hydraulic oil in the housings of the
hydraulic pumps and hydraulic motors via their respective leakage oil connections.
Otherwise, the hydraulic system could suffer severe damage. To replace or top up oil,
an external oil filter with a minimum retaining rate of 10 µm must be used.
Caution! If the oil stop cocks below the hydraulic oil tank are closed for work being
performed on the hydraulic system, check as to whether the stopcocks have been reopened prior to re-starting as otherwise the hydraulic system could suffer severe
damage.
1997 DESIGN 140T GOTTWALD/JAMALPUR CRANE
ISSUE 1997
Railway Crane
Maintenance Manual
Slewing Gear Pump Filter
5.2.4
(P-3/3)
1997 DESIGN 140T GOTTWALD/JAMALPUR CRANE
ISSUE 1997
Railway Crane
Maintenance Manual
Rotary Lead- Through
5.2.5
(P-1/2)
Description
The rotary lead-through is a rotary hydraulic connection between the undercarriage and the
superstructure. In addition, it houses the ducts for the air pressure supply.
Safety Instructions
Before maintenance work is performed, it must be ensured that the crane cannot be switched on
and is secured against rolling.
In addition, a “Maintenance Work” warning sign must be visibly posted both in and outside the
cab. Remove the ignition key and battery main switch and secure against any unauthorised
start.
The crane must not be in the way of other vehicles.
Ensure that no one is near hot or moving parts- danger of getting burnt, crushed or drawn into
the equipment!
Use caution when dealing with oil danger of being burnt or scalded!
Caution- Hydraulic system! Work may only be performed on the hydraulic system when there
is no pressure in the system and the diesel engine is stationary. This also applies to the
tightening of hydraulic connections.
Use caution when releasing connections that higher mounted components could drain dry. In
these cases, ensure an adequately sized drip pan is available.
Observe disposal regulations!
Caution- Sections of the hydraulic and air pressure systems are still under pressure even when
the crane is at a standstill.
Maintenance Instructions
1. Visual Check:
Check the hoses, their connections and attachments for external damage, firm seating and
proper sealing.
• Replace any damaged components immediately. Any loose or leady connections must
be tightened or if required, replaced.
• Check the carrier for the rotary lead- through for correcting seating and damage.
Caution- The rotary lead- through must not be twisted, as otherwise the built-in seals will
be damaged.
Note: After work has been completed on the hydraulic system, during which oil has been lost
out of the hydraulic circuit, top up the hydraulic oil in the housings of the hydraulic pumps and
hydraulic motors via their respective leakage oil connections.
Otherwise, the hydraulic system could suffer severe damage. To replace or top up oil, an
external oil filter with a minimum retaining rate of 10 µm must be used.
Caution!- If the oil stop cocks below the hydraulic oil tank are closed for work being
performed on the hydraulic system, check as to whether the stop cocks have been re-opened
prior to re-starting as otherwise the hydraulic system could suffer severe damage.
1997 DESIGN 140T GOTTWALD/JAMALPUR CRANE
ISSUE 1997
Railway Crane
Maintenance Manual
Rotary Lead- Through
5.2.5
(P-2/2)
1997 DESIGN 140T GOTTWALD/JAMALPUR CRANE
ISSUE 1997
Railway Crane
Maintenance Manual
Suspension Blocking Cylinders
5.2.6
(P-1/2)
Description
The suspension blocking cylinders serve to lock the suspension spring deflection to the wheel
set springs during crane operation. The suspension blocking cylinders are single-acting
plunger-type cylinders with spring-return mechanism. The undercarriage hydraulics must be
switched on via the respective selector switch in the cab.
Safety Instructions
Before maintenance work is performed, it must be ensured that the crane cannot be switched on
and is secured against rolling.
In addition, a “Maintenance Work” warning sign must be visibly posted both in and outside the
cab. Remove the ignition key and battery main switch and secure against any unauthorised
start.
The crane must not be in the way of other vehicles.
Ensure that no one is near hot or moving parts - danger of getting burnt, crushed or drawn into
the equipment!
Use caution when dealing with oil danger of being burnt or scalded!
Caution- Hydraulic system! Work may only be performed on the hydraulic system when there
is no pressure in the system and the diesel engine is stationary. This also applies to the
tightening of hydraulic connections.
Use caution when releasing connections that higher mounted components could drain dry. In
these cases, ensure an adequately sized drip pan is available.
Observe disposal regulations!
Caution! – Sections of the hydraulic and air pressure systems are still under pressure even
when the crane is at a standstill!
Use caution when opening the suspension blocking cylinders! The pistons are spring-loadedDanger of accidents! Mortal danger!
Maintenance Instructions
1. Visual check:
Check the blocking cylinders and their connections for external damage, proper sealing and
firm seating.
2. Functional test:
Retract and extend the cylinders. In particular, check for proper retraction and at the same
time carry out an inspection of the piston rods.
Note: After work has been completed on the hydraulic system, during which oil has been
lost out of the hydraulic circuit, top up the hydraulic oil in the housings of the hydraulic
pumps and hydraulic motors via their respective leakage oil connections.
Otherwise, the hydraulic system could suffer severe damage. To replace or top up oil, an
external oil filter with a minimum retaining rate of 10 µm must be used.
Caution! If the oil stop cocks below the hydraulic oil tank are closed for work being
performed on the hydraulic system, check as to whether the stop cocks have been reopened prior to re-starting as otherwise the hydraulic system could suffer severe damage.
1997 DESIGN 140T GOTTWALD/JAMALPUR CRANE
ISSUE 1997
Railway Crane
Maintenance Manual
Suspension Blocking Cylinders
5.2.6
(P-2/2)
1997 DESIGN 140T GOTTWALD/JAMALPUR CRANE
ISSUE 1997
Railway Crane
Maintenance Manual
Undercarriage Control Blocks
5.2.7
(P-1/2)
Description
The control blocks in the undercarriage serve to retract and extend, raise and lower the
outriggers, operate the suspension blocking and to disengage the travel gear pinion. The
undercarriage hydraulics must be switched on via the selector switch in the cab.
Safety Instructions
Before maintenance work is performed, it must be ensured that the crane cannot be switched on
and is secured against rolling.
In addition, a “Maintenance Work” warning sign must be visibly posted both in and outside the
cab. Remove the ignition key and battery main switch and secure against any unauthorised
start.
The crane must not be in the way of other vehicles.
Ensure that no one is near hot or moving parts- danger of getting burnt, crushed or drawn into
the equipment!
Use caution when dealing with oil danger of being burnt or scalded!
Caution- Hydraulic system! Work may only be performed on the hydraulic system when there
is no pressure in the system and the diesel engine is stationary. This also applies to the
tightening of hydraulic connections.
Use caution when releasing connections that higher mounted components could drain dry. In
these cases, ensure an adequately sized drip pan is available.
Observe disposal regulations!
Caution! – Sections of the hydraulic and air pressure systems are still under pressure even
when the crane is at a standstill!
Maintenance Instructions
1. Visual check:
Check the valve blocks and their connections for external damage and leakages.
• Tighten the fittings, if required, but only when they are not under pressure. Then carry
out a sealing test under pressure.
2. Functional Test:
• Check each of the jack and extension cylinders directly by means of the hand levers.
• The suspension blocking and travel gear pinion disengagement device are operated by
means of one hand lever.
Note: After work has been completed on the hydraulic system, during which oil has been
lost out of the hydraulic circuit, top up the hydraulic oil in the housings of the hydraulic
pumps and hydraulic motors via their respective leakage oil connections.
Otherwise, the hydraulic system could suffer severe damage. To replace or top up oil, an
external oil filter with a minimum retaining rate of 10µm must be used.
Caution! If the oil stop cocks below the hydraulic oil tank are closed for work being
performed on the hydraulic system, check as to whether the stop cocks have been reopened prior to re-starting as otherwise the hydraulic system could suffer severe damage.
1997 DESIGN 140T GOTTWALD/JAMALPUR CRANE
ISSUE 1997
Railway Crane
Maintenance Manual
Undercarriage Control Blocks
5.2.7
(P-2/2)
1997 DESIGN 140T GOTTWALD/JAMALPUR CRANE
ISSUE 1997
Railway Crane
Maintenance Manual
Outrigger Beam Cylinders
5.2.8
( P-1/2)
Description
The crane is fitted with four outrigger beams. Each outrigger beam has a swing-out cylinder
(see right hand figure) and a jack cylinder (see left hand figure) with spring-stop and check
valve.
Safety Instructions
Before maintenance work is performed, it must be ensured that the crane cannot be switched on
is secured against rolling.
In addition, a “Maintenance Work” warning sign must be visibly posted both in and outside the
cab. Remove the ignition key and battery main switch and secure against any unauthorised
start.
The crane must not be in the way of other vehicles.
Ensure that no one is near hot or moving parts - danger of getting burnt, crushed or drawn into
the equipment!
Use caution when dealing with oil danger of being burnt or scalded!
Caution- Hydraulic system! Work may only be performed on the hydraulic system when there
is no pressure in the system and the diesel engine is stationary. This also applies to the
tightening of hydraulic connections.
Use caution when releasing connections that higher mounted components could drain dry. In
these cases, ensue an adequately sized drip pan is available. Observe disposal; regulations!
Caution! – Sections of the hydraulic and air pressure systems are still under pressure even
when the crane is at a standstill.
Maintenance Instructions
1. Visual Check:
• Check the cylinders and their connections for external damage, firm seating and proper
sealing.
• Tighten or replace loose or leaky connections when the system is not under pressure.
• On completion of maintenance work, carry out a sealing test under pressure.
• The piston rods of the cylinders are automatically lubricated when the cylinders are
retracted.
• The piston rods of the jack cylinder latch into retracted position automatically.
Note: After work has been completed on the hydraulic system, during which oil has been lost
out of the hydraulic circuit, top up the hydraulic oil in the housings of the hydraulic pumps and
hydraulic motors via their respective leakage oil connections.
Otherwise, the hydraulic system could suffer severe damage. To replace or top up oil, an
external oil filter with a minimum retaining rate of 10 µm must be used.
Caution! If the oil stop cocks below the hydraulic oil tank are closed for work being performed
on the hydraulic system, check as to whether the stop cocks have been re-opened prior to restarting as otherwise the hydraulic system could suffer severe damage.
1997 DESIGN 140T GOTTWALD/JAMALPUR CRANE
ISSUE 1997
Railway Crane
Maintenance Manual
Outrigger Cylinders
5.2.8
( P-2/2 )
1997 DESIGN 140T GOTTWALD/JAMALPUR CRANE
ISSUE 1997
Railway Crane
Maintenance Manual
Hoist, Derricking, Slew and Travel Gear Motors
5.2.9
(P-1/2)
Description
Both hoists (item 1 and 2), the derricking gear (item 4), the slew gear (item 3), the two
travel gears (item 5) and the recovery winch (not illustrated) are driven by the same type
of axial piston constant motor. The motors are lubricated by means of the hydraulic oil
system and are thus more or less maintenance-free.
Safety Instructions
Before maintenance work is performed, it must be ensured that the crane cannot be
switched on and is secured against rolling.
In addition, a “Maintenance Work” warning sign must be visibly posted both in and out
side the cab. Remove the ignition key and battery main switch and secure against any
unauthorised start.
The crane must not be in the way of other vehicles.
Ensure that no one is near hot or moving parts - danger of getting burnt, crushed or
drawn into the equipment!
Use caution when dealing with oil danger of being burnt or scalded!
Caution- Hydraulic system! Work may only be performed on the hydraulic system when
there is no pressure in the system and the diesel engine is stationary. This also applies to
the tightening of hydraulic connections.
Use caution when releasing connections that higher mounted components could drain
dry. In these cases, ensure an adequately sized drip pan is available.
Observe disposal regulations!
Caution!- sections of the hydraulic and air pressure systems are still under pressure even
when the crane is at a standstill.
Maintenance Instructions
1. Visual check:
Check the motors and their connections for firm seating, external damage and proper
sealing.
Note: Motors are lubricated by means of leakage oil - this is why no oil change is
required!
2. Running Noises:
Check the running noises of the motors; if the level of the running noise has
increased in connection with an increase in pressure, the motors could be damaged.
• The maximum permissible leakage oil quantity of the hydraulic motor is 15 l/min
at operating pressure. The leakage oil connection must not be closed under any
circumstances as the hydraulic motors could be destroyed as a result.
Note: After work has been completed on the hydraulic system, during which oil has
been lost out of the hydraulic circuit, top up the hydraulic oil in the housings of the
hydraulic pumps and hydraulic motors via their respective leakage oil connections.
Otherwise, the hydraulic system could suffer severe damage. To replace or top up oil,
an external oil filter with a minimum retaining rate of 10 micrometer must be used.
Caution! If the oil stop cocks below the hydraulic oil tank are closed for work being
performed on the hydraulic system, check as to whether the stop cocks have been reopened prior to re-starting as otherwise the hydraulic system could suffer severe
damage.
1997 DESIGN 140T GOTTWALD/JAMALPUR CRANE
ISSUE 1997
Railway Crane
Maintenance Manual
Hoist, Derricking, Slew and Travel Gear Motors
5.2.9
(P-2/2)
1997 DESIGN 140T GOTTWALD/JAMALPUR CRANE
ISSUE 1997
Railway Crane
Maintenance Manual
Superstructure Control Blocks
5.2.10
(P-1/2)
Description
The superstructure control blocks control the crane and travel motions. The
individual control levers (gate valves) are operated via pilot control valves from
within the cab.
Safety Instructions
Before maintenance work is performed, it must be ensured that the crane cannot
be switched on and is secured against rolling.
In addition, a “Maintenance Work” warning sign must be visibly posted both in
and outside the cab. Remove the ignition key and battery main switch and
secure against any unauthorised start.
The crane must not be in the way of other vehicles.
Ensure that no one is near hot or moving parts - danger of getting burnt, crushed or
drawn into the equipment!
Use caution when dealing with oil danger of being burnt or scalded!
Caution - Hydraulic system! Work may only be performed on the hydraulic
system when there is no pressure in the system and the diesel engine is
stationary. This also applies to the tightening of hydraulic connections.
Use caution when releasing connections that higher mounted components could
drain dry. In these cases, ensure an adequately sized drip pan is available.
Observe disposal regulations!
Caution!- sections of the hydraulic and air pressure systems are still under
pressure even when the crane is at a standstill.
Maintenance Instructions
1. Visual check:
• Check the control blocks and their connections for external damage
and leakages.
• Tighten the fittings; if required, but when the system is not under
pressure. Then carry out a sealing test under pressure.
Note: After work has been completed on the hydraulic system, during which oil
has been lost out of the hydraulic circuit, top up the hydraulic oil in the
housings of the hydraulic pumps and hydraulic motors via their respective
leakage oil connections. Otherwise, the hydraulic system could suffer severe
damage. To replace or top up oil, an external oil filter with a minimum
retaining rate of 10µm must be used.
Caution! If the oil stop cocks below the hydraulic oil tank are closed for work
being performed on the hydraulic system, check as to whether the stop cocks
have been re-opened prior to re-starting as otherwise the hydraulic system could
suffer severe damage.
1997 DESIGN 140T GOTTWALD/JAMALPUR CRANE
ISSUE 1997
Railway Crane
Maintenance Manual
Superstructure Control Blocks
5.2.10
(P-2/2)
1997 DESIGN 140T GOTTWALD/JAMALPUR CRANE
ISSUE 1997
Railway Crane
Maintenance Manual
Counterweight Cylinders
5.2.11
(P-1/2)
Description
The counterweight is fitted with five hydraulic cylinders. Two counterweight cylinders
lower sections of the counterweight for transport purposes onto the undercarriage. Two
other cylinders allow the counterweight to be extended and retracted. One hydraulic
cylinder folds the counterweight gallows, which can be swivelled on the superstructure
to the rear.
Safety Instructions
Before maintenance work is performed, it must be ensured that the crane can not be
switched on and is secured against rolling.
In addition, a “Maintenance work” warning sign must be visibly posted both in and out
side the cab. Remove the ignition key and battery main switch and secure against any
unauthorised start.
The crane must not be in the way of other vehicles.
Ensure that no one is near hot or moving parts - danger of getting burnt, crushed or
drawn into the equipment!
Use caution when dealing with oil danger of being burnt or scalded!
Caution- Hydraulic system! Work may only be performed on the hydraulic system
when there is no pressure in the system and the diesel engine is stationery. This also
applies to the tightening of hydraulic connections.
Use caution when releasing connections that higher mounted components could drain
dry. In these cases, ensure an adequately sized drip pan is available. Observe disposal
regulations!
Caution! Sections of the hydraulic and air pressure systems are still under pressure
even when the crane is at a standstill.
Maintenance Instructions
1. Visual check:
• Check the cylinders and their connections for external damage, firm seating
and proper sealing.
• Tighten or replace loose or leaky connections when the system is not under
pressure.
• On completion of maintenance work, carry out a sealing test under pressure.
2. To clean, grease, lubricate:
The piston rods are lubricated on retraction automatically. Clean the bolt
connections of the components and grease with a suitable lubricants.
Lubricate the cylinders by means of the lubrication ripples.
3. Carry out a functional test:
Note: After work has been completed on the hydraulic system, during which oil has
been lost out of the hydraulic circuit, top up the hydraulic oil in the housings of the
hydraulic pumps and hydraulic motors via their respective leakage oil connections.
Otherwise, the hydraulic system could suffer severe damage. To replace or top up oil,
an external oil filter with a minimum retaining rate of 10 µm must be used.
Caution! - If the oil stop cocks below the hydraulic oil tank are closed for work being
performed on the hydraulic system, check as to whether the stop cocks have been reopened prior to re-starting as otherwise the hydraulic system could suffer severe
damage.
1997 DESIGN 140T GOTTWALD/JAMALPUR CRANE
ISSUE 1997
Railway Crane
Maintenance Manual
Counterweight Cylinders
5.2.11
(P-2/2)
1997 DESIGN 140T GOTTWALD/JAMALPUR CRANE
ISSUE 1997
Railway Crane
Maintenance Manual
Boom Root Point Cylinders
5.2.12
(P-1/2)
Description
In order to lower the boom according to regulations, the boom must be pushed out of
the boom root point via the two boom root point cylinders.
Safety Instructions
Before maintenance work is performed, it must be ensured that the crane can not be
switched on and is secured against rolling.
In addition, a “Maintenance work” warning sign must be visibly posted both in and out
side the cab. Remove the ignition key and battery main switch and secure against any
unauthorised start.
The crane must not be in the way of other vehicles.
Ensure that no one is near hot or moving parts - danger of getting burnt, crushed or
drawn into the equipment!
Use caution when dealing with oil danger of being burnt or scalded!
Caution- Hydraulic system! Work may only be performed on the hydraulic system
when there is no pressure in the system and the diesel engine is stationery. This also
applies to the tightening of hydraulic connections.
Use caution when releasing connections that higher mounted components could drain
dry. In these cases, ensure an adequately sized drip pan is available. Observe disposal
regulations!
Caution! Sections of the hydraulic and air pressure systems are still under pressure
even when the crane is at a standstill.
Caution near the overhead lines! Do not climb up onto the crane superstructure!
Mortal danger!
Maintenance Instructions
2. Visual check:
• Check the cylinders and their connections for external damage, firm seating and
proper sealing.
• Tighten or replace loose or leaky connections when the system is not under
pressure.
• On completion of maintenance work, carry out a sealing test under pressure.
2. To clean, grease, lubricate:
• The piston rods are lubricated on retraction automatically. Clean the bolt
connections of the components and grease with a suitable lubricants.
• Lubricate the cylinders by means of the lubrication ripples.
3. Carry out a functional test:
Note: After work has been completed on the hydraulic system, during which oil has
been lost out of the hydraulic circuit, top up the hydraulic oil in the housings of the
hydraulic pumps and hydraulic motors via their respective leakage oil connections.
Otherwise, the hydraulic system could suffer severe damage. To replace or top up oil,
an external oil filter with a minimum retaining rate of 10 µm must be used.
Caution! - If the oil stop cocks below the hydraulic oil tank are closed for work being
performed on the hydraulic system, check as to whether the stop cocks have been reopened prior to re-starting as otherwise the hydraulic system could suffer severe
damage.
1997 DESIGN 140T GOTTWALD/JAMALPUR CRANE
ISSUE 1997
Railway Crane
Maintenance Manual
Boom Root Point Cylinders
5.2.12
(P-2/2)
1997 DESIGN 140T GOTTWALD/JAMALPUR CRANE
ISSUE 1997
Railway Crane
Maintenance Manual
Air pressure System
5.3
(P-1/1)
5.3.1
5.3.2
5.3.3
5.3.4
5.3.5
5.3.6
5.3.7
5.3.8
Air pressure Tank
Brake Cylinder
Brake couplings
Air pressure Fine Filter
Brake Pedal
Signal Horns
Undercarriage Air Pressure Compressor
Pressure Regulator
1997 DESIGN 140T GOTTWALD/JAMALPUR CRANE
ISSUE 1997
Railway Crane
Maintenance Manual
Air Pressure Tank
5.3.1
(P-1/2)
Description
The crane has three 50 litre air pressure tanks, two 25 litres air pressure tanks,
three 14 litres air pressure tanks, one 5 litre air pressure tank and two 9 litre air
pressure tanks in the superstructure.
Safety Instructions
Before maintenance work is performed, it must be ensured that the crane cannot
be switched on and is secured against rolling.
In addition, a “Maintenance Work” warning sign must be visibly posted both in
and out side the cab. Remove the ignition key and battery main switch and
secure against any unauthorised start.
The crane must not be in the way of other vehicles.
Ensure that no one is near hot or moving parts - danger of getting burnt, crushed or
drawn into the equipment!
Caution! - Some sections of the system are not pressure less until the accumulators
have been emptied!
Before work is carried out on the air pressure system, ensure the system is without
pressure.
Caution! Observe air pressure tank regulations!
Use caution when dealing with the air pressure system! Work may only be
carried out on when the system is without pressure and the diesel engine is at a
standstill! This also applicable when air pressure connections are being
tightened.
Maintenance Instructions
1. Visual check:
Check the air pressure tanks and their components for external
damage, firm seating and proper sealing. Tighten fittings, if required,
when the system is not under pressure.
2. To drain off:
Loosen the drainage plugs until no more moisture emerges. A high degree of
moisture can damage the air pressure system. In this case, the air pressure fine
filter must also be checked; if required, the filter element must be changed in
between normal intervals and/or the air pressure filter must be drained more
frequently.
1997 DESIGN 140T GOTTWALD/JAMALPUR CRANE
ISSUE 1997
Railway Crane
Maintenance Manual
Air Pressure Tank
5.3.1
(P-2/2)
1997 DESIGN 140T GOTTWALD/JAMALPUR CRANE
ISSUE 1997
Railway Crane
Maintenance Manual
Brake Cylinders
5.3.2
(P-1/2)
Description
The twelve brake cylinders are single-acting air pressure cylinders with automatic
brake expander cups and spring–return mechanism. Six brake cylinders are fitted with
a spring-loaded assembly which can be activated by means of a mechanical emergency
release device connected to Bowden cables on the axles.
Safety Instructions
Before maintenance work is performed, it must be ensured that the crane cannot be
switched on and is secured against rolling.
In addition, a “Maintenance Work” warning sign must be visibly posted both in and
out side the cab. Remove the ignition key and battery main switch and secure against
any unauthorised start.
The crane must not be in the way of other vehicles.
Ensure that no one is near hot or moving parts - danger of getting burnt, crushed or
drawn into the equipment!
Caution! - Some sections of the system are not pressure less until the accumulators
have been emptied!
Before work is carried out on the air pressure system, ensure the system is without
pressure.
Caution!- Observe air pressure tank regulations!
Use caution when dealing with the air pressure system! Work may only be carried out
on when the system is without pressure and the diesel engine is at a standstill! This
also applicable when air pressure connections are being tightened
Caution!- In this case, braking cannot be carried out until the brake system is repressurised with air pressure.
Use caution when the brake cylinders are opened! The brake cylinders are under
spring-loaded tension! Danger of accidents! Mortal Danger!
Maintenance Instructions
1. Visual check:
Check the brake cylinders and their components for external damage, firm seating
and proper sealing. Tighten fittings, if required, when the system is not under
pressure.
2. Functional test:
Carry out a brake test and inspection when the crane is at a standstill! Check
whether all cylinders are extended properly.
1997 DESIGN 140T GOTTWALD/JAMALPUR CRANE
ISSUE 1997
Railway Crane
Maintenance Manual
Brake Cylinders
5.3.2
(P-2/2)
1997 DESIGN 140T GOTTWALD/JAMALPUR CRANE
ISSUE 1997
Railway Crane
Maintenance Manual
Brake Couplings
5.3.3
(P-1/2)
Description
The three brake couplings on each face side together with the stop cocks serve in train
formation to couple the crane to the customary train air pressure brake system. The air
pressure brake system consists of a main air line, the main air tank line and the vacuum
line.
Safety Instructions
Before maintenance work is performed, it must be ensured that the crane cannot be
witched on and is secured against rolling.
In addition, a “Maintenance Work” warning sign must be visibly posted both in and
out side the cab. Remove the ignition key and battery main switch and secure against
any unauthorised start.
The crane must not be in the way of other vehicles.
Ensure that no one is near hot or moving parts - danger of getting burnt, crushed or
drawn into the equipment!
Caution! - Some sections of the system are not pressure less until the accumulators
have been emptied!
Before work is carried out on the air pressure system, ensure the system is without
pressure.
Caution!- Observe air pressure tank regulations!
Use caution when dealing with the air pressure system! Work may only be carried out
on when the system is without pressure and the diesel engine is at a standstill! This
also applicable when air pressure connections are being tightened.
Maintenance Instructions
1. Visual check:
Check the brake couplings, their connections and pertaining cock stops and
dummy couplings for external damage, proper sealing and firm seating.
1997 DESIGN 140T GOTTWALD/JAMALPUR CRANE
ISSUE 1997
Railway Crane
Maintenance Manual
Brake Couplings
5.3.3
(P-2/2)
1997 DESIGN 140T GOTTWALD/JAMALPUR CRANE
ISSUE 1997
Railway Crane
Maintenance Manual
Air Pressure Fine filter
5.3.4
(P-1/2)
Description
The air pressure system is fitted with an air pressure fine filter. The fine filter has a
drainage option and a filter element.
Safety Instructions
Before maintenance work is performed, it must be ensured that the crane cannot be
switched on and is secured against rolling.
In addition, a “Maintenance Work” warning sign must be visibly posted both in and
out side the cab. Remove the ignition key and battery main switch and secure against
any unauthorised start.
The crane must not be in the way of other vehicles.
Ensure that no one is near hot or moving parts - danger of getting burnt, crushed or
drawn into the equipment!
Caution! - Some sections of the system are not pressure less until the accumulators
have been emptied!
Before work is carried out on the air pressure system, ensure the system is without
pressure.
Caution! - Observe air pressure tank regulations!
Use caution when dealing with the air pressure system! Work may only be carried out
on when the system is without pressure and the diesel engine is at a standstill! This
also applicable when air pressure connections are being tightened.
Maintenance Instructions
1 Visual check:
Check the air pressure fine filter, its mountings and connections for external damage,
firm seating and proper sealing. In addition, clean the cooling spiral.
2. Check the filter element:
Unscrew the air pressure fine filter and check the fine filter element for its degree of
pollution or damage; if required, replace.
1997 DESIGN 140T GOTTWALD/JAMALPUR CRANE
ISSUE 1997
Railway Crane
Maintenance Manual
Air Pressure Fine filter
5.3.4
(P-2/2)
1997 DESIGN 140T GOTTWALD/JAMALPUR CRANE
ISSUE 1997
Railway Crane
Maintenance Manual
Brake Pedal
5.3.5
(P-1/2)
Description
The brake pedal in the cab serve to smoothly and directly brake the travel motion.
Safety Instructions
Before maintenance work is performed, it must be ensured that the crane cannot be
switched on and is secured against rolling.
In addition, a “Maintenance Work” warning sign must be visibly posted both in and
outside the cab. Remove the ignition key and battery main switch and secure against
any unauthorised start.
The crane must not be in the way of other vehicles.
Ensure that no one is near hot or moving parts - danger of getting burnt, crushed or
drawn into the equipment!
Caution! - Some sections of the system are not pressure less until the accumulators
have been emptied!
Before work is carried out on the air pressure system, ensure the system is without
pressure.
Caution!- Observe air pressure tank regulations!
Use caution when dealing with the air pressure system! Work may only be carried out
on when the system is without pressure and the diesel engine is at a stand still! This
also applicable when air pressure connections are being tightened.
Maintenance Instructions
1. Visual check:
Check the brake pedal and its mountings for external damage and firm seating.
2. To Clean:
Clean the brake pedal with a suitable aid.
Dirty or oily pedals can endanger safety!
1997 DESIGN 140T GOTTWALD/JAMALPUR CRANE
ISSUE 1997
Railway Crane
Maintenance Manual
Brake Pedal
5.3.5
(P-2/2)
1997 DESIGN 140T GOTTWALD/JAMALPUR CRANE
ISSUE 1997
Railway Crane
Maintenance Manual
Signal Horns
5.3.6
(P-1/2)
Description
The two signal horns serve as an audible warning during travel and crane operations.
They are located on the crane at the front and the rear.
Safety Instructions
Before maintenance work is performed, it must be ensured that the crane cannot be
switched on and is secured against rolling.
In addition, a “Maintenance Work” warning sign must be visibly posted both in and
outside the cab. Remove the ignition key and battery main switch and secure against
any unauthorised start.
The crane must not be in the way of other vehicles.
Ensure that no one is near hot or moving parts - danger of getting burnt, crushed or
drawn into the equipment!
Caution! Some sections of the system are not pressure less until the accumulators have
been emptied!
Before work is carried out on the air pressure system, ensure the system is without
pressure.
Caution!- Observe air pressure tank regulations!
Use caution when dealing with the air pressure system! Work may only be carried out
on when the system is without pressure and the diesel engine is at a standstill! This
also applicable when air pressure connections are being tightened.
Maintenance Instructions
1. Visual check:
Check the signal horns and their connections for external damage, firm seating and
proper sealing.
2. Functional Test:
Clean the horn elements and test the signal horns.
1997 DESIGN 140T GOTTWALD/JAMALPUR CRANE
ISSUE 1997
Railway Crane
Maintenance Manual
Signal Horns
5.3.6
(P-2/2)
1997 DESIGN 140T GOTTWALD/JAMALPUR CRANE
ISSUE 1997
Railway Crane
Maintenance Manual
Undercarriage Air Pressure Compressor
5.3.7
(P-1/2)
Description
The two air pressure compressors in the undercarriage supply the required air pressure during
the operation in train formation to the air pressure brake system. The compressors are driven
via a coupling. When the required air pressure has been reached, the line is opened and the air
pressure compressors continue to run but without pressure. The compressors are fitted with an
air cooling and a bath lubrication system.
Safety Instructions
Before maintenance work is performed, it must be ensured that the crane cannot be switched on
and is secured against rolling.
In addition, a “Maintenance Work” warning sign must be visibly posted both in and out side
the cab. Remove the ignition key and battery main switch and secure against any unauthorised
start.
The crane must not be in the way of other vehicles.
Ensure that no one is near hot or moving parts - danger of getting burnt, crushed or drawn into
the equipment!
Caution! Some sections of the system are not pressure less until the accumulators have been
emptied!
Before work is carried out on the air pressure system, ensure the system is without pressure.
Caution!- Observe air pressure tank regulations!
Use caution when dealing with the air pressure system! Work may only be carried out on when
the system is without pressure and the diesel engine is at a standstill! This also applicable when
air pressure connections are being tightened.
Maintenance Instructions
1. Visual check:
Check the air pressure compressors, their attachments and all connections for external
damage and leakage. Check all connections and lines for firm seating.
2. To check the oil level:
Note: The crane must be in horizontal position to check the oil.
• Check the oil level via a dipstick (item 1); if required, top up the oil until it reaches
the upper marking of the dipstick using the brand as classified in the chart in section
6 of this manual.
3
To change the oil:
Note: The crane must be in horizontal position to change the oil.
• Screw out the oil drain plug and drain oil.
• Screw in the oil drain plug again and add oil as described in the section “ To check
the oil level”
• After a short trail run, check the oil level again.
4. Check the air filter (See left hand figure): if required, clean or replace a filter element.
5. Lubricate the lubrication nipple on the compressor shaft (see figure in the bottom
centre and right.)
1997 DESIGN 140T GOTTWALD/JAMALPUR CRANE
ISSUE 1997
Railway Crane
Maintenance Manual
Undercarriage Air Pressure Compressor
5.3.7
(P-2/2)
1997 DESIGN 140T GOTTWALD/JAMALPUR CRANE
ISSUE 1997
Railway Crane
Maintenance Manual
Pressure Regulator
5.3.8
(P-1/2)
Description
The pressure regulator maintains the operating pressure of the air pressure system at a constant
pressure. It switches off at a pressure of 8.0 bar and switches on at 7.2 bar.
Safety Instructions
Before commencing with maintenance work, remove the battery main switch.
In addition, a “Maintenance Work” warning sign must be securely affixed here and in the cab.
If the diesel engine must be started for test purposes, ensure that no one is near moving or hot
components - Danger of being crushed! Danger of being burnt!
Caution – ensure without fail that a “Maintenance Work” sign is posted in the cab during the
test phase.
On completion of the test, shut off the crane without fail and secure accordingly. Use caution
when dealing with the air pressure system! Work may only be carried out on when the system
is without pressure and the diesel engine is at a standstill! This also applicable when air
pressure connections are being tightened.
Caution- some sections of the system are not pressureless until the accumulators have been
emptied.
Maintenance Instructions
1. Visual check:
Check the pressure regulators and its pipe connections for external damage, firm seating
and proper sealing.
2. Functional test:
The switch-off pressure is attained when the pressure regulators can be heard to let off
pressure; the switch-on pressure is attained when the indicator on the pressure gauge for
the air reservoir begins to climb.
1997 DESIGN 140T GOTTWALD/JAMALPUR CRANE
ISSUE 1997
Railway Crane
Maintenance Manual
Pressure Regulator
5.3.8
(P-2/2)
1997 DESIGN 140T GOTTWALD/JAMALPUR CRANE
ISSUE 1997
Railway Crane
Maintenance Manual
Diesel Engine System
5.4
(P-1/1)
5.4.1
5.4.2
5.4.3
5.4.4
5.4.5
Diesel Engine
Exhaust System
Fuel System
Diesel Engine Accelerator
Pump Distributor Gearbox
1997 DESIGN 140T GOTTWALD/JAMALPUR CRANE
ISSUE 1997
Railway Crane
Maintenance Manual
Diesel Engine
5.4.1
(P-1/4)
Refer to Cummins Manual for Engine
Description
The diesel engine drives the hydraulic pumps for travel and crane operations via the pump
distributor gearbox.
The diesel engine supply the air pressure via the attached air compressor to the air pressure
system, the batteries with power via the attached 3 phase generator and thus also the electrical
equipment with power.
The diesel engine is an air cooler 6 cylinder, 4-stroke diesel engine with direct fuel injection,
exhaust turbo charger and charged cooling.
Safety Instructions
Before maintenance work is performed, it must be ensured that the crane cannot be switched on
and is secured against rolling.
In addition, a “Maintenance Work” warning sign must be visibly affixed to both in and outside
the cab.
Remove ignition key and battery main switch and secure against any unauthorised stat.
The crane must not be in the way of other vehicles.
Ensure that no one is near hot or moving parts - danger of getting burnt, crushed or squashed!
Observe safety and disposal regulations for the respective product when dealing with oil and
fuel.
No smoking, no naked flame or light, sparks or glowing ashes near the fuel or diesel engine
system - Danger of explosion and fire!
Use caution when dealing with oil - danger of being burnt or scalded!
Caution - Hydraulic system work may only be performed on the hydraulic system when there
is no pressure and the diesel engine is stationary, This also applies to the tightening of
hydraulic connections.
Use caution when releasing connections because higher mounted components could drain dry.
In these cases, ensure an adequately sized drip pan is available.
Caution- air pressure system! Work may only be performed on the air pressure system when
the diesel engine is not running and the entire air pressure system is without pressure. This is
also applicable for the tightening of the air pressure connections.
Caution - sections of the hydraulic and air pressure systems are still under pressure even when
the crane is at a standstill!
Ensure that no one is in the danger zone.
Observe the safety instructions provided in the Cummins User’s Manual.
Maintenance Instructions
The following maintenance work on the diesel engine system is to be carried out according to
the information in the Cummins User’s Manual:
Please note: All the maintenance work listed in the interval beforehand must be carried out as
well.
To carry out daily checks:
• Carry out a visual check.
• Check the oil level (See figure on the bottom left; if required top up oil using the brand as
classified in the chart in section 6 of this manual.
1997 DESIGN 140T GOTTWALD/JAMALPUR CRANE
ISSUE 1997
Railway Crane
Maintenance Manual
Diesel Engine
5.4.1
(P-2/4)
• Check the coolant level. If required, top up coolant using the brand as classified in the chart
in section 6 of this manual. In this case, the coolant concentration must be checked.
• Check the fan belt condition and tension; if required, re-adjust tension.
Weekly Checks:
• Check the pollution indicator on the air filter; if required, clean or replace filter element.
• Check the air intake hoses, pipes and clamps.
Monthly or every 125 hours: Change oil.
Note: The interval for changing the oil must be determined based on the Cummins User’s
Manual and the operating data recorded, i.e. average fuel and oil consumption or after
an oil analysis.
See figure on the right for oil drain plug.
• Change fuel filter elements.
• Clean or change crank house ventilation.
• Change DCA coolant filter.
Semi-yearly or every 750 hours: Change oil filter elements.
Note: The interval for changing the oil must be determined based on the Cummins User’s
Manual and the operating data recorded, i.e., average fuel and oil consumption or after
an oil analysis.
See figure on the right for oil drain plug.
• Change air compressor filter elements.
Yearly or every 1,500 hours:
• Check, clean and set the injection jets.
• Adjust piston cross heads.
• Adjust valves.
• Check hoses and lines; if required, change.
• Clean engine:
• Check cold start equipment.
• Check and tighten engine counting elements.
• Check crank shaft axial clearance.
• Check turbo charger mounting elements and screw conditions:
Every 2 years or every 3,000 hours:
• Clean and adjust fuel pump.
• Clean cooling system and change coolant.
• Check vent hub.
1997 DESIGN 140T GOTTWALD/JAMALPUR CRANE
ISSUE 1997
Railway Crane
Maintenance Manual
Diesel Engine
• Check idler pulleys.
5.4.1
(P-3/4)
• Check water pump.
• Check turbo charger.
• Check air compressor.
• Check the vibration damper.
Seasonal maintenance work (partial already mentioned above):
-Spring:
• Check hoses; if required, change.
• Clean engine
• Check mounting elements and screw conditions.
• Check turbo charger mounting elements on the fan and pulleys
• Check crank shaft clearance.
-Autumn:
• Check thermostats and seals.
1997 DESIGN 140T GOTTWALD/JAMALPUR CRANE
ISSUE 1997
Railway Crane
Maintenance Manual
Diesel Engine
5.4.1
(P-4/4)
1997 DESIGN 140T GOTTWALD/JAMALPUR CRANE
ISSUE 1997
Railway Crane
Maintenance Manual
Exhaust System
5.4.2
(P-1/2)
Description
The exhaust system emits the exhaust fumes into air, reduces the emission speed of the exhaust
and silence the noise level of the diesel engine. The system consists of manifold, compensator
and silencer.
Safety Instructions
Before maintenance work is performed, it must be ensured that the crane cannot be switched on
and is secured against rolling.
In addition, a “Maintenance Work” warning sign must be visibly affixed to both in and outside
the cab.
Remove ignition key and battery main switch and secure against any unauthorised start.
The crane must not be in the way of other vehicles.
Ensure that no one is near hot or moving parts - danger of getting burnt, crushed drawn in to
the equipment! Observe safety and disposal regulations for the respective product when dealing
with oil and fuel.
No smoking, no naked flame or light, sparks or glowing ashes near the fuel or diesel engine
system - Danger of explosion and fire!
Ensure that no one is in the danger zone.
Maintenance Instructions
1. Visual check:
Check the exhaust system, its connections and mountings elements for external damage and
firm seating.
1997 DESIGN 140T GOTTWALD/JAMALPUR CRANE
ISSUE 1997
Railway Crane
Maintenance Manual
Exhaust System
5.4.2
(P-2/2)
1997 DESIGN 140T GOTTWALD/JAMALPUR CRANE
ISSUE 1997
Railway Crane
Maintenance Manual
Fuel System
5.4.3
(P-1/2)
Description
The fuel system supply the fuel required to operate the diesel engine. The fuel capacity is 900
litres. The system is fitted with an electric indicator.
Safety Instructions
Before maintenance work is performed, it must be ensured that the crane cannot be switched on
and is secured against rolling.
In addition, a “Maintenance Work” warning sign must be visibly affixed to both in and outside
the cab.
Remove ignition key and battery main switch and secure against any unauthorised start.
The crane must not be in the way of other vehicles.
Ensure that no one is near hot or moving parts - danger of getting burnt, crushed or drawn into
the equipment!
Observe safety and disposal regulations for the respective product when dealing with oil and
fuel.
No smoking, no naked flame or light, sparks or glowing ashes near the fuel or diesel engine
system - Danger of explosion and fire!
Use caution when releasing connections because higher mounted components could drain dry.
In these cases, ensure an adequately sized drip pan is available.
Ensure that no one is in the danger zone.
Maintenance Instructions
1. Visual check:
Check the fuel system, its pipe and hoses connections for external damage, firm seating and
leakages. Any damaged fuel lines must be replaced immediately. Also check the
connections on the electric indicator for firm seating.
2. Tank Cover:
The tank has a filler neck on the superstructure. Check the tank cover for proper
functioning. A faulty tank cover must be replaced.
3. Condensation drain:
To avoid corrosion damage, drain the condensation via the drain plug on the tank under
side. To do so, open the plug until clean diesel fuel emerges. When re-closing, ensure the
seal is seated properly!
Caution- Observe your country’s disposal regulations!
1997 DESIGN 140T GOTTWALD/JAMALPUR CRANE
ISSUE 1997
Railway Crane
Maintenance Manual
Fuel System
5.4.3
(P-2/2)
1997 DESIGN 140T GOTTWALD/JAMALPUR CRANE
ISSUE 1997
Railway Crane
Maintenance Manual
Diesel Engine Accelerator
5.4.4
(P-1/2)
Description
The accelerator controls the injection pump of the engine. The accelerator is operated
via a Bowden cable by means of a pedal in the cab.
Safety Instructions
Before maintenance work is performed, it must be ensured that the crane cannot be
switched on and is secured against rolling.
In addition, a “Maintenance Work” warning sign must be visibly affixed to both in and
outside the cab.
Remove ignition key and battery main switch and secure against any unauthorised
start.
The crane must not be in the way of other vehicles.
Ensure that no one is near hot or moving parts- danger of getting burnt, crushed or
drawn into the equipment!
Observe safety and disposal regulations for the respective product when dealing with
oil and fuel.
No smoking, no naked flame or light, sparks or glowing ashes near the fuel or diesel
engine system - Danger of explosion and fire!
Use caution when releasing connections because higher mounted components could
drain dry. In these cases, ensure an adequately sized drip pan is available.
Ensure that no one is in the danger zone.
Observe the safety instructions provided in the Cummins User’s Manual.
Maintenance Instructions
1. Visual check:
Check the accelerator and the pertaining linkage including Bowden cable for
external damage and firm seating.
2. Functional Test:
Start the diesel engine for the functional test and operate the gas pedal in the cab.
Check whether the diesel engine runs evenly in the various speed ranges.
1997 DESIGN 140T GOTTWALD/JAMALPUR CRANE
ISSUE 1997
Railway Crane
Maintenance Manual
Diesel Engine Accelerator
5.4.4
(P-2/2)
1997 DESIGN 140T GOTTWALD/JAMALPUR CRANE
ISSUE 1997
Railway Crane
Maintenance Manual
Pump Distributor Gearbox
5.4.5
(P-1/3)
Description
The pump distributor gearbox is flanged-mounted on the diesel engine and transfers the drive
output of the diesel engine to the pump distributor gearbox flanged-mounted on the hydraulic
pump. The pump distributor gearbox is a spur gear seated on a roller bearing and fitted with an
oil bath lubrication system.
Safety Instructions
Before maintenance work is performed, it must be ensured that the crane cannot be switched on
and is secured against rolling.
In addition, a “Maintenance Work” warning sign must be visibly affixed to both in and outside
the cab.
Remove ignition key and battery main switch and secure against any unauthorised stat.
The crane must not be in the way of other vehicles.
Ensure that no one is near hot or moving parts - danger of getting burnt, crushed or drawn into
the equipment!
Observe safety and disposal regulations for the respective product when dealing with oil and
fuel.
No smoking, no naked flame or light, sparks or glowing ashes near the fuel or diesel engine
system - Danger of explosion and fire!
Use caution when dealing with hot oil - danger of being burnt or scalded!
Maintenance Instructions
The following maintenance work on the diesel engine system must be carried out according to
the information in the Lohmann and Stolterfoht User’s Manual.
1. Visual check:
Check the pump distributor gearbox, in particular, near the flange connections for external
damage, leakages and firm seating.
2. Check the running noises:
3. Check the oil level:
Note: To check the oil level of the distributor box, the railway crane must be in horizontal
position. Switch off the engine when it has reached operating temperature and wait approx
10 minutes to check the oil level.
• Pull out the oil dipstick (item 2) of the pump distributor gearbox.
• The oil level must be between the upper and lower markings of the dipstick; if required
top up oil using the brand as classified in the chart in section 6 of this manual.
Note: Add or top up oil via the filler opening (item 1), the plug of which is screwed out for
this purpose. The screw in the plug and tighten.
4. Carry out an oil analysis:
An oil analysis should be carried out every 750 operating hours to test the oil quality. If
required, adjust the oil changing intervals.
1997 DESIGN 140T GOTTWALD/JAMALPUR CRANE
ISSUE 1997
Railway Crane
Maintenance Manual
Pump Distributor Gearbox
5.4.5
(P-2/3)
5. To change the oil:
Note: To change the oil of the distributor gearbox, the crane must be in horizontal position.
Switch off the engine when it has reached operating temperature and wait approx 10
minutes to check the oil level.
• To drain the oil, screw out the oil drain plug on the gearbox under side and collect the
waste oil in a suitable and sufficiently large enough pan.
• Flush the gearbox with flushing oil.
• Clean the magnet plug on the oil drain plug, screw in and tighten according to
regulations.
• To carry out an oil analysis: if there is considerable metal abrasion in the oil or the drain
plug, this means that there is high degree of wear or considerable gearbox damage. If
required, consider a gearbox inspection.
• Top up oil as per the classification in the chart until the upper marking on the dipstick is
reached.
• To add or top up on, observe the information in the section on the oil level check.
6. Check the vent filter on the housing upper side; if required, clean or replace.
7. Check the screw-on connection for firm seating, taking into account the torque on the
installation drawing.
1997 DESIGN 140T GOTTWALD/JAMALPUR CRANE
ISSUE 1997
Railway Crane
Maintenance Manual
Pump Distributor Gearbox
5.4.5
(P-3/3)
1997 DESIGN 140T GOTTWALD/JAMALPUR CRANE
ISSUE 1997
Railway Crane
Maintenance Manual
Emergency Diesel Engine System
5.5
(P-1/1)
5.5.1 Emergency Diesel Engine
1997 DESIGN 140T GOTTWALD/JAMALPUR CRANE
ISSUE 1997
Railway Crane
Maintenance Manual
Emergency Diesel Engine
5.5.1
(P-1/3)
Description
The emergency diesel engine drives a hydraulic pump and a 3-phase generator in
emergency operation. It can be started electrically and manually. The 2-cylinder, 4stroke diesel engine has a capacity of 1884 cm3 and an output of 16.9 kW at 1,800 rpm.
Safety Instructions
Caution - fuel is inflammable! When working near fuel related parts, fire, naked light
and smoking are prohibited!
Caution - Lubrication oil, etc. are drained at operating temperature - danger of
scalding!
Caution - Hydraulic system! Work may only be performed on the hydraulic system
when there is no pressure and the diesel engine is stationary. This also applies to the
tightening of hydraulic connections.
Use caution when releasing connections because higher mounted components could
drain dry. In these cases, ensure an adequately sized drip pan is available.
Observe disposal regulations!
Caution - air pressure system! Work may only be performed on the air pressure system
when the diesel engine is not running and the entire air pressure system is without
pressure. This is also applicable for the tightening of the air pressure connections.
Caution! sections of the air pressure systems are under pressure until the accumulators
have been emptied.
Prior to commencing work, remove the battery main switch. In addition, a
“Maintenance Work” warning sign must be affixed here and in the cab. When work is
being performed in the cab, ensure that the switches and levers are not operated by
accident or unknowingly.
Ensure that no one is in the danger zone.
Observe the safety regulations in the Kirloskar User’s Manual:
Maintenance Instructions
The following maintenance work on the diesel engine must be carried out according to
the information provided in the Kirloskar User’s Manual.
1. Visual check:
Check the emergency diesel engine, its attachments and connections for external
damage and leakages. Check all connections and lines for firm seating.
2. To check the oil level:
Note: To check the oil level the crane must be in horizontal position.
• Switch off the engine when it has reached operating temperature and wait until
the oil has run back into the oil tray.
• To check the oil level, pull out the oil dipstick and wipe off with a clean, lintfree rag. Then insert the oil dipstick and pull out again. The oil level must
between upper and lower markings of the dipstick (see figure at the bottom). If
required, top up with oil using the brand as classified in the chart in section 6
of this manual.
1997 DESIGN 140T GOTTWALD/JAMALPUR CRANE
ISSUE 1997
Railway Crane
Maintenance Manual
Emergency Diesel Engine
5.5.1
(P-2/3)
3. To change the oil:
Note: To change the oil, the crane must be in horizontal position. The oil should be
changed when the oil is at operating temperature.
• Switch off engine.
• Screw out the oil drain plug on the bath and drain the waste oil into a sufficiently large
enough collection tray (approx. 4.5 l). Then screw in the drain plug with a new seal
tightly.
• Then top up oil via oil filler neck using the brand as classified in the chart in section 6
of this manual until the oil level is between the upper and lower markings on the
dipstick.
4. Replace the lubrication oil filter.
5. Clean fuel screen.
6. Check the oil level of the fuel pump.
7. Air filter:
- Clean or replace preliminary filter
- Clean or replace oil bath-type air filter and re-fill.
8. Check the exhaust system and clean.
9. Check the fan belt tensioning: if required, re-adjust.
10. Replace the fuel preliminary filter element.
11. Replace fine filter element.
12. Check mounting elements.
13. Check starter and generator.
14. Check valve clearance: if required: Re-adjust.
15. Check injection jets.
16. Carry out a functional test.
1997 DESIGN 140T GOTTWALD/JAMALPUR CRANE
ISSUE 1997
Railway Crane
Maintenance Manual
Emergency Diesel Engine
5.5.1
(P-3/3)
1997 DESIGN 140T GOTTWALD/JAMALPUR CRANE
ISSUE 1997
Railway Crane
Maintenance Manual
Travel and Running Gear
5.6
((P-1/1))
5.6.1
5.6.2
5.6.3
5.6.4
5.6.5
5.6.6
5.6.7
5.6.8
5.6.9
Travel Reduction Gear Unit
Pinion and Gearwheel
Disengaging Devices
Wheel Sets
Wheel Set Bearings
Spring Suspension
Expander-Operated Brake Disks
Brake Cylinder Adjuster Units
Brake System
1997 DESIGN 140T GOTTWALD/JAMALPUR CRANE
ISSUE 1997
Railway Crane
Maintenance Manual
Travel Reduction Gear Unit
5.6.1
(P-1/3)
Description
The travel gear reduction unit reduces the drive speed of the hydraulic motor is the required
pinion speed. The crane has a total of two travel drives and thus two travel gear reduction units.
Safety Instructions
Before maintenance work is performed, it must be ensured that the crane cannot be switched on
and is secured against rolling.
In addition, a “Maintenance Work” warning sign must be visibly affixed to both in and outside
the cab.
Remove the ignition key and battery main switch and secure against any unauthorised start.
The crane must not be in the way of together vehicles.
Ensure that no one is near hot or moving parts - danger of getting burnt, crushed or drawn into
the equipment.
Caution - When dealing with hot oil- Danger of being burnt or scalded!
Caution - Hydraulic system! Work may only be performed on the hydraulic system when there
is no pressure and the diesel engine is stationary. This also applies to the tightening of
hydraulic connections. Use caution when releasing connections because higher mounted
components could drain dry. In these cases, ensure an adequately sized drip pan is available.
Observe disposal regulations!
Caution! - Some sections of the hydraulic and air pressure systems are still under pressure even
when the crane is at a standstill.
Maintenance Instructions
1. Visual check:
Check the travel gear reduction units for external damage, leakages and firm seating.
2. To check the oil level:
Note: To check the oil level, bring the railway crane into horizontal position and switch off
the engine at operating temperature.
• The oil level is checked via an overflow gauge.
• To do so, clean the exterior of the oil filter plug (see figure on the bottom left) and
screw out.
• If required, add oil until the oil level remains constant.
• Screw in the oil filter plug and tighten.
3. To change the oil:
To change the oil, the railway crane must be in a horizontal position and switch off the
engine at operating temperature.
• The oil must be changed at operating temperature.
• Screw out the oil filter plug and the oil drain plug (see figure at the top, item 1) and
drain the oil completely.
• Check drained oil for metallic pollution and excessive abrasion.
• In the event of considerable oil pollution, the gear unit must be fitted with preheated
oil.
1997 DESIGN 140T GOTTWALD/JAMALPUR CRANE
ISSUE 1997
Railway Crane
Maintenance Manual
Travel Reduction Gear Unit
5.6.1
(P-2/3)
• Then tighten the oil drain plug using a new sealing ring.
• Add oil until the oil level remains constant.
• Screw in the oil filter plug and tighten
2. Clean the gear unit exterior.
3. To check the vent:
• If the vent is seriously clogged, screw out the vent (figure on the bottom right, item 2)
from the gear unit, wash in a suitable solution and dry with compressed air.
1997 DESIGN 140T GOTTWALD/JAMALPUR CRANE
ISSUE 1997
Railway Crane
Maintenance Manual
Travel Reduction Gear Unit
5.6.1
(P-3/3)
1997 DESIGN 140T GOTTWALD/JAMALPUR CRANE
ISSUE 1997
Railway Crane
Maintenance Manual
Pinion and Gear Wheel
5.6.2
(P-1/2)
Description
The pinion and gear wheel on the wheel shafts forms the last stage of the disengageable travel
gear drive. The crane has a total of two travel drives and thus two pinion and gear wheels.
Safety Instructions
Before maintenance work is performed, it must be ensured that the crane cannot be switched on
and is secured against rolling.
In addition, a “Maintenance Work” warning sign must be visibly affixed both in and outside
the cab.
Remove the ignition key and battery main switch and secure against any unauthorised start.
The crane must not be in the way of together vehicles.
Ensure that no one is near hot or moving parts- danger of getting burnt, crushed or drawn into
the equipment.
Caution - When dealing with hot oil- Danger of being burnt or scalded!
Observe disposal regulations!
Maintenance Instructions
1. Visual Check:
Check the pinions and gear wheels for external damage.
2. To clean:
Clean the pinion and gear wheels with a suitable aid.
3. To grease:
Caution - Grease using the lubrication brand as per the chart in the section 6 of this
manual.
1997 DESIGN 140T GOTTWALD/JAMALPUR CRANE
ISSUE 1997
Railway Crane
Maintenance Manual
Pinion and Gear Wheel
5.6.2
(P-2/2)
1997 DESIGN 140T GOTTWALD/JAMALPUR CRANE
ISSUE 1997
Railway Crane
Maintenance Manual
Disengaging Devices
5.6.3
(P-1/2)
Description
By means of the disengaging device, the pinion and the gear wheel of the travel drive are
disengaged prior to transport. The disengaging device is actuated via an air pressure cylinder.
The crane has a total of two travel drives and thus two disengaging devices.
Safety Instructions
Before maintenance work is performed, it must be ensured that the crane cannot be switched on
and is secured against rolling.
In addition, a “Maintenance Work” warning sign must be visibly affixed both in and outside
the cab.
Remove the ignition key and battery main switch and secure against any unauthorised start.
The crane must not be in the way of together vehicles.
Ensure that no one is near hot or moving parts - danger of getting burnt, crushed or drawn into
the equipment.
Caution - When dealing with hot oil - Danger of being burnt or scalded!
Observe disposal regulations!
Caution - Some sections of the system are under pressure until the accumulators have been
emptied.
Prior to commencing work on the air pressure system, ensure the system is completely without
pressure!
Use caution when dealing with air pressure system! Work may only be performed on the air
pressure is without pressure. This is also applicable for the tightening of the air pressure
connections.
Maintenance Instructions
1. Visual check:
Check the disengaging devices, their connections and mountings for external damage and
firm seating.
2. Air pressure cylinders:
• Check the air pressure cylinders, their connections and mountings for external damage,
firm seating and proper sealing.
• Tighten and replace loose and leaky connections when the system is not under pressure.
• On completion of the maintenance work, a seating test under pressure must be carried
out.
3. To check the spline shaft teething.
Check the spline shaft teething for dirt; if required, clean. Then grease.
4 Functional Test:
Check the disengaging devices for proper functioning.
1997 DESIGN 140T GOTTWALD/JAMALPUR CRANE
ISSUE 1997
Railway Crane
Maintenance Manual
Disengaging Devices
5.6.3
(P-2/2)
1997 DESIGN 140T GOTTWALD/JAMALPUR CRANE
ISSUE 1997
Railway Crane
Maintenance Manual
Wheel Sets
5.6.4
(P-1/2)
Description
The six wheel sets are specially manufactured sets, which are suited to absorbing all the forces
and stresses which occur during crane and travel operation.
Safety Instructions
Before maintenance work is performed, it must be ensured that the crane cannot be switched on
and is secured against rolling.
In addition, a “Maintenance Work” warning sign must be visibly affixed both in and outside
the cab.
Remove the ignition key and battery main switch and secure against any unauthorised start.
The crane must not be in the way of together vehicles.
Ensure that no one is near hot or moving parts - danger of getting burnt, crushed or drawn into
the equipment.
Caution - when dealing with hot oil- Danger of being burnt or scalded!
Observe disposal regulations!
Maintenance Instruction
The following maintenance work on the wheel sets must be carried out according to the
information in the Gutehoffnungshutte Radsatz GmbH User’s Manual.
1. Visual check:
Check the wheel sets for cracks, fractures and damage. Watch for the following features. If
required, repair or replace:
• Cracks in the hub or disk of the solid wheels
• Indicating groove on the solid wheels are no longer visible on the circumference.
• Shape and location of the wheel contours.
• Surface finish of wheel treads
• Broken or cracked wheel rims on the solid wheels
• Wheel flats on the wheel tread
• Heat cracks in the disk wheels
• Clamping nicks on the solid wheels
• Spalling on the wheel treads
• Wheel shift
• Cracks in the wheel axles
• Deformed wheel axles
• Heavy rusting on axles and disk wheels
2. Mountings:
Check the mountings of the brake disks for proper and firm seating.
3. Wheel brake-to back distance:
The wheel back-to-back distance (crane unloaded):
1596mm-2mm
4. Diameter difference between the rolling circle diameters:
The difference between the rolling circle diameters of the finished wheels of a wheel set
must be within a tolerance range of 0.3 mm.
5. Wear test / Operating limit size:
Rolling circle diameter, new 920mm + 1 mm
Rolling circle diameter, min: 840 mm
1997 DESIGN 140T GOTTWALD/JAMALPUR CRANE
ISSUE 1997
Railway Crane
Maintenance Manual
Wheel Sets
5.6.4
(P-2/2)
1997 DESIGN 140T GOTTWALD/JAMALPUR CRANE
ISSUE 1997
Railway Crane
Maintenance Manual
Wheel Set Bearings
5.6.5
(P-1/2)
Description
The wheel set bearings are anti-friction bearings with a grease filling.
Safety Instructions
Before maintenance work is performed, it must be ensured that the crane cannot be switched on
and is secured against rolling.
In addition, a “Maintenance Work” warning sign must be visibly affixed both in and outside
the cab.
Remove the ignition key and battery main switch and secure against any unauthorised start.
The crane must not be in the way of together vehicles.
Ensure that no one is near hot or moving parts- danger of getting burnt, crushed or drawn into
the equipment.
Caution - When dealing with hot oil- Danger of being burnt or scalded!
Observe disposal regulations!
Maintenance Instructions
1. Visual check:
Check the wheel set bearings and their guides for external damage.
2. Grease Filling:
The bearings have grease filling. To replace the filling, open the bearing and remove the
bearing housing. Then clean the entire anti-friction bearing and the housing and filled with
fresh grease. Re-assembly in reverse order.
Note: The inner bearings should not be opened.
1997 DESIGN 140T GOTTWALD/JAMALPUR CRANE
ISSUE 1997
Railway Crane
Maintenance Manual
Wheel Set bearings
5.6.5
(P-2/2)
1997 DESIGN 140T GOTTWALD/JAMALPUR CRANE
ISSUE 1997
Railway Crane
Maintenance Manual
Spring Suspension
5.6.6
(P-1/2)
Description
To provide optimal suspension, the crane is fitted with a spring system. The system consists of
a combination of cup springs (see right hand figure) and the helical springs (see left hand
figure). In crane operation, the spring suspension clearance is blocked during crane operation
by means of hydraulic cylinders.
Safety Instructions
Before maintenance work is performed, it must be ensured that the crane cannot be switched on
and is secured against rolling.
In addition, a “Maintenance Work” warning sign must be visibly affixed both in and outside
the cab.
Remove ignition key and battery main switch and secure against any unauthorised start.
The crane must not be in the way of together vehicles.
Ensure that no one is near hot or moving parts - danger of getting burnt, crushed or drawn into
the equipment.
Caution - When dealing with hot oil- Danger of being burnt or scalded!
Observe disposal regulations!
Maintenance Instructions
1. Visual check:
Check the components of the spring assembly for external damage as well as for cracks
and fractures. Any damaged spring elements must be replaced immediately.
2. To clean:
If required, clean spring suspension with a suitable aid.
1997 DESIGN 140T GOTTWALD/JAMALPUR CRANE
ISSUE 1997
Railway Crane
Maintenance Manual
Spring Suspension
5.6.6
(P-2/2)
1997 DESIGN 140T GOTTWALD/JAMALPUR CRANE
ISSUE 1997
Railway Crane
Maintenance Manual
Brake Disks
5.6.7
(P-1/2)
Description
The brake disks in connections the brake cylinder adjuster unit and the brake cylinders form
the wheel disk brakes. These wheel brake disks are used as the service brakes. The brake disks
are mounted on the wheels of the wheel set axles.
Safety Instructions
Before maintenance work is performed, it must be ensured that the crane cannot be switched on
and is secured against rolling.
In addition, a “Maintenance Work” warning sign must be visibly affixed both in and outside
the cab.
Remove ignition key and battery main switch and secure against any unauthorised start.
The crane must not be in the way of together vehicles.
Caution - The brake disks must be cooled down - Danger of injury through burns as a result of
contact with the brake disks!
When the following work is performed on the brake disks, observe the safety instructions in the
BSI Verkehrstechnik User’s Manual.
The brake disks may first be used again when all the criteria in the BSI-Verkehrstechnik User’s
Manual have been met.
Ensure that no one is near hot or moving parts - danger of getting burnt, crushed or drawn into
the equipment!
Maintenance Instructions
The following maintenance work on the brake disk must be carried out in accordance with the
instructions in the BSI- Verkehrstechnik User’s Manual:
1. Visual Check (Inspection A)
• Check the brake disks for external damage, cracks, (great thermal shock cracks) and
fractures:
• In addition, when the wear markings on the disks have been reached (see figure at the
top) check the pads (see figure at the bottom) and the clearance:
Wear markings:
Disk wear limit :
max. 7.0 mm
Hollow wear :
max. 2.5 mm
Grooves
:
max. 1 mm
2. Carry out a functional test (brake test) (Inspection A)
3. Inspection B
4. Inspection C
5. Inspection D
1997 DESIGN 140T GOTTWALD/JAMALPUR CRANE
ISSUE 1997
Railway Crane
Maintenance Manual
Brake Disks
5.6.7
(P-2/2)
1997 DESIGN 140T GOTTWALD/JAMALPUR CRANE
ISSUE 1997
Railway Crane
Maintenance Manual
Brake Cylinder Adjuster Units
5.6.8
(P-1/2)
Description
The brake cylinder adjuster unit, together with the built-in brake cylinder, forms in connection
with the wheel-mounted brake disk, the wheel disk brake of the railway crane. This brake is
used as the service brake.
Safety Instructions
Before maintenance work is performed, it must be ensured that the crane cannot be switched on
and is secured against rolling.
In addition, a “Maintenance Work” warning sign must be visibly affixed both in and outside
the cab.
Remove the ignition key and battery main switch and secure against any unauthorised start.
The crane must not be in the way of together vehicles.
Caution! The brake disks must be cooled down - Danger of injury through burns as a result of
contact with the brake disks!
When the following work is performed on the brake disks, observe the safety instructions in the
BSI Verkehrstechnik User’s Manual.
The brake cylinder adjuster unit may first be used again when all the criteria in the BSIVerkehrstechnik User’s Manual have been met.
Ensure that no one is near hot or moving parts - danger of getting burnt, crushed or drawn into
the equipment!
Maintenance Instructions
The following maintenance work on the brake disk must be carried out in accordance with the
instructions in the BSI- Verkehrstechnik User’s Manual.
1. Visual Check (Inspection A):
• Check the brake cylinder, adjust units for external damage.
• In addition, check the clearance when the wear markings on the pads have been
reached:
- Wear markings (Brake Pads):
New Condition
:
24 mm
Wear limit :
6 mm
- Longitudinal clearance of the pad holder:
max: 2 mm
- Clearance for the brake pads and brake disks
- Pads on the expander unit:
max. 2 mm
- Pads on the other side:
max. 4 mm
2. Carry out a functional test (Brake test) (Inspection A)
3. Inspection B
4. Inspection C
5. Inspection D
1997 DESIGN 140T GOTTWALD/JAMALPUR CRANE
ISSUE 1997
Railway Crane
Maintenance Manual
Brake Cylinder Adjuster Units
5.6.8
(P-2/2)
1997 DESIGN 140T GOTTWALD/JAMALPUR CRANE
ISSUE 1997
Railway Crane
Maintenance Manual
Brake System
5.6.9
(P-1/2)
Description
The crane can either be operated by means of an air pressure brake system or a vacuum brake
system. The brake system can be changed from the air pressure system to the vacuum system
and vice versa means of two levers which can be operated on both sides of the crane.
The status of the brakes can be read off the respective indicators (red and green).
If required, the spring-loaded cylinders of the brakes can be relieved of pressure by means of
the cables on the axles.
Caution! In this case, braking cannot be carried out again until the brake system has been repressurised with air pressure.
Safety Instructions
Before maintenance work is performed, it must be ensured that the crane cannot be switched on
and is secured against rolling.
In addition, a “Maintenance Work” warning sign must be visibly affixed both in and outside
the cab.
Remove the ignition key and battery main switch and secure against any unauthorised start.
The crane must not be in the way of together vehicles.
Caution - The brake disks must be cooled down - Danger of injury through burns as a result of
contact with the brake disks!
When the following work is performed on the brake disks, observe the safety instructions in the
BSI Verkehrstechnik User’s Manual.
Ensure that no one is near hot or moving parts- danger of getting burnt, crushed or drawn into
the equipment!
Caution! On activation of the Bowden cables, braking cannot be carried out again until the
brake system has been re-pressurised with air pressure.
Maintenance Instructions
1. Visual check:
Check all the components of the brake system, in particular the change- over devices and
the Bowden cables as well as their pertaining mountings for external damage and firm
seating. Also check the indicators for firm seating.
2. To clean:
Clean the change- over devices and the Bowden cables.
3. To check the emergency release device;
Check the six pull cables of the emergency release device for proper functioning.
4. Functional test:
Carry out a functional test on the entire brake system. The brakes must be operated and
then released. Observe the indicators during this procedure
1997 DESIGN 140T GOTTWALD/JAMALPUR CRANE
ISSUE 1997
Railway Crane
Maintenance Manual
Brake System
5.6.9
(P-2/2)
1997 DESIGN 140T GOTTWALD/JAMALPUR CRANE
ISSUE 1997
Railway Crane
Maintenance Manual
Cab
5.7
(P-1/1)
5.71
5.7.2
5.7.3
5.7.4
5.7.5
5.7.6
Cab
Control Panels
Screen Wash / Wiper System
Fan
Seat
Additional Equipment
1997 DESIGN 140T GOTTWALD/JAMALPUR CRANE
ISSUE 1997
Railway Crane
Maintenance Manual
Cab
5.7.1
(P-1/2)
Description
The cab protects the operating personnel and the sensitive controls against the influences of
weather.
Safety Instructions
Before maintenance work is performed, it must be ensured that the crane cannot be switched on
and is secured against rolling.
In addition, a “Maintenance work” warning sign must be visibly affixed to both in and outside
the cab.
Remove ignition key and battery main switch and secure against any unauthorised start.
The crane must not be in the way of other vehicles.
Ensure that no one is near hot or moving parts - danger of getting burnt, crushed or drawn into
the equipment!
When working with paint and solvents, ensure to observe without fail the respective safety
instructions on the packages.
When dressing with a flame - use caution- danger of explosion near fuel and oil related
components!
When work is being performed on the crane, ensure that the switches and levers cannot be
operated by accident or unknowingly.
Ensure that no one is in the danger zone.
Maintenance instructions
1. Visual check:
• Check the entire cab for external damage and deformations. Caution: Check material
before commencing with straightening work! In some cases, the cab has aluminium
profile which must not be heated by flame.
• Check the glass for damage. Any damaged panels must be replaced immediately.
2. To clean:
Clean the cab with a suitable aid. This applies, in particular to the walkways and stair
areas; oily and greasy components increase the danger of slipping!
3. Doors:
Clean, grease and check the hinges and door lock for proper functioning.
4. Paintwork damage:
• Clean the paintwork damage immediately and protect against corrosion with primer and
paint.
• Priming: epoxyd resin 2- component priming
• Top coat: 2- component polyurethane high- solid material
1997 DESIGN 140T GOTTWALD/JAMALPUR CRANE
ISSUE 1997
Railway Crane
Maintenance Manual
Cab
5.7.1
(P-2/2)
1997 DESIGN 140T GOTTWALD/JAMALPUR CRANE
ISSUE 1997
Railway Crane
Maintenance Manual
Control Panels
5.7.2
(P-1/2)
Description
By means of the control panels, all crane and travel motions can be affected and most functions
can be monitored.
Safety Instructions
Before maintenance work is performed, it must be ensured that the crane cannot be switched on
and is secured against rolling.
In addition, a “Maintenance work” warning sign must be visibly affixed to both in and outside
the cab.
Remove ignition key and battery main switch and secure against any unauthorised start.
The crane must not be in the way of other vehicles.
Ensure that no one is near hot or moving parts - danger of getting burnt, crushed or drawn into
the equipment!
When work is being performed on the crane, ensure that the switches and levers cannot be
operated by accident or unknowingly.
Ensure that no one is in the danger zone.
Maintenance instructions
1. Visual check:
Check the control panels for external damage and firm seating. Damaged components must
be replaced immediately.
2. To clean:
Clean the control panels with a suitable aid. Ensure that water and other wet - cleaning
agents cannot damage the sensitive electrical components.
1997 DESIGN 140T GOTTWALD/JAMALPUR CRANE
ISSUE 1997
Railway Crane
Maintenance Manual
Control Panels
5.7.2
(P-2/2)
1997 DESIGN 140T GOTTWALD/JAMALPUR CRANE
ISSUE 1997
Railway Crane
Maintenance Manual
Screen Wiper/ Wash system
5.7.3
(P-1/2)
Description
The crane has an electrically operated wiper system with wash water system on its front (see
figure at the top) and roof windscreens. The wash system is likewise operated by means of an
electric pump.
Safety Instructions
Before maintenance work is performed, it must be ensured that the crane cannot be switched on
and is secured against rolling.
In addition, a “Maintenance work” warning sign must be visibly affixed to both in and outside
the cab.
Remove ignition key and battery main switch and secure against any unauthorised start.
The crane must not be in the way of other vehicles.
Ensure that no one is near hot or moving parts - danger of getting burnt, crushed or drawn into
the equipment!
When work is being performed on the crane, ensure that the switches and levers cannot be
operated by accident or unknowingly.
Ensure that no one is in the danger zone.
Maintenance instructions
1. Visual check:
Check the entire system for external damage and firm seating. In addition, check the hoses
of the wash system and their connections for proper sealing. In particular, ensure the wiper
blades are in good condition. Any damaged or worn wiper blades must be replaced
immediately.
2. Wash water:
Check the wash water supply (see bottom right hand figure) and if required, top up. It is
advisable to add a corresponding anti-grease cleaning agent to the water. Cautionremember to add anti-freeze in the cold season!
3. Functional test:
Check the system for proper functioning.
Caution: - When the diesel engine is at a standstill, the screen wipers should only be
switched on momentarily as other the batteries will run flat and the charged status will not
be sufficient to start the diesel engine.
1997 DESIGN 140T GOTTWALD/JAMALPUR CRANE
ISSUE 1997
Railway Crane
Maintenance Manual
Screen Wiper/ Wash system
5.7.3
(P-2/2)
1997 DESIGN 140T GOTTWALD/JAMALPUR CRANE
ISSUE 1997
Railway Crane
Maintenance Manual
Fan
5.7.4
(P-1/2)
Description
The fans built into the cab rear wall at the top serve to suction off and intake the cab air.
Safety Instructions
Before maintenance work is performed, it must be ensured that the crane can not be switched
on and secured against rolling.
In addition, a “maintenance Work” warning sign must be visibly affixed to both in and out side
the cab.
Remove ignition key and battery main switch and secure against any unauthorised start.
The crane must not be in the way of other vehicles.
Ensure that no one is near hot or moving parts - danger getting burnt, crushed or drawn into the
equipment.
The crane must not be operated in enclosed areas without an exhaust fumes discharge.
When work is being performed on the crane, ensure that the switches levers can not be
operated by accident or unknowingly. Ensure that no one is in the danger zone.
Maintenance Instructions
1. Visual check:
Check the fans and their cover grates for external damage and firm seating.
2. To clean:
Screw off the vent grates when the fans are switched off and clean with a suitable aid.
3. Functional test:
Activate the respective switch on the control panel and test whether both fans run properly.
Caution! When the diesel engine is stationary, the fans should run only shortly as otherwise
the batteries will run flat and the charging rate will not be sufficient to start the diesel
engine!
1997 DESIGN 140T GOTTWALD/JAMALPUR CRANE
ISSUE 1997
Railway Crane
Maintenance Manual
Fan
5.7.4
(P2/2)
1997 DESIGN 140T GOTTWALD/JAMALPUR CRANE
ISSUE 1997
Railway Crane
Maintenance Manual
Seat
5.7.5
(P-1/2)
Description
The driver seat is a comfortable seat with a number of adjusting options.
Safety Instructions
Before maintenance work is performed, it must be ensured that the crane cannot be switched on
and is secured against rolling.
In addition, a “Maintenance work” warning sign must be visibly affixed to both in and outside
the cab.
Remove ignition key and battery main switch and secure against any unauthorised start.
The crane must not be in the way of other vehicles.
Ensure that no one is near hot or moving parts - danger of getting burnt, crushed or drawn into
the equipment!
When work is being performed on the crane, ensure that the switches and levers cannot be
operated by accident or unknowingly.
Ensure that no one is in the danger zone.
Maintenance instructions
1. Visual check:
Check the entire seat and its controls and mountings for external damage and firm seating.
2. Slide tracks:
Clean the slide tracks, on which the movable seat is fixed, with a suitable aid and grease
slightly.
1997 DESIGN 140T GOTTWALD/JAMALPUR CRANE
ISSUE 1997
Railway Crane
Maintenance Manual
Seat
5.7.5
(P-2/2)
1997 DESIGN 140T GOTTWALD/JAMALPUR CRANE
ISSUE 1997
Railway Crane
Maintenance Manual
Additional Equipment
5.7.6
(P-1/2)
Description
There are various pieces of additional equipment on the crane, in particular, in the cab.
Nevertheless, they do not serve to effect any crane functions directly, but are required
for smooth- running and proper operation.
Safety Instructions
When work is being performed on the crane, ensure that the switches and levers cannot
be operated by accident or unknowingly. Ensure that no one is in the danger zone!
Maintenance instructions
Check the entire cab equipment for proper functioning.
Any damaged parts must be repaired or replaced.
Caution - Remember that fire extinguishers and first aid kits, etc. have expiry dates.
Then they must be serviced or replaced accordingly!
1997 DESIGN 140T GOTTWALD/JAMALPUR CRANE
ISSUE 1997
Railway Crane
Maintenance Manual
Additional Equipment
5.7.6
(P-2/2)
1997 DESIGN 140T GOTTWALD/JAMALPUR CRANE
ISSUE 1997
Railway Crane
Maintenance Manual
Slewing Gear
5.8
(P-1/1)
5.8.1
5.8.2
5.8.3
Slew Reduction Gear Unit
Pinion and Gearwheel
Roller Bearing Slew Ring
1997 DESIGN 140T GOTTWALD/JAMALPUR CRANE
ISSUE 1997
Railway Crane
Maintenance Manual
Slew Reduction Gear Unit
5.8.1
(P-1/3)
Description
The slewing gear reduction unit (see figure at the top) is a three-stage planetary gearbox. The
equipment consists of an integrated, hydraulically lifted multi-disk holding brake with freewheeling option.
The wheels with external toothing have been hardened. The entire gearbox is seated on an antifriction bearing and is fitted with an oil bath lubrication system. The bearing of the drive pinion
in the stay pipe is lubricated continuously with grease.
Safety Instructions
Before maintenance work is performed, it must be ensured that the crane cannot be switched on
and is secured against rolling.
In addition, a “Maintenance work” warning sign must be visibly affixed to both in and outside
the cab.
Remove ignition key and battery main switch and secure against any unauthorised start.
The crane must not be in the way of other vehicles.
Ensure that no one is near hot or moving parts - danger of getting burnt, crushed or drawn into
the equipment!
Maintenance instructions
Carry out the maintenance work on the planetary gearbox according to documentation supplied
by Lohmann & Stolterfoht GmbH.
1. Visual check:
Check the planetary gearbox, its attachments and connections for damage and leakages.
Check for all connections, lines and connections for firm seating.
2. Carry out a running noises check.
3. To check the oil level:
Note: The crane must be in horizontal position to check the oil level.
• Screw out the oil dipstick and wipe off with a clean, lint-free cloth. Then screw in the
oil dipstick and then screw out again. The oil level must be between the upper and
lowering markings on the dipstick (see figure at the bottom); if required, top up the oil
using the brand as classified in the chart in section 6 of this manual via the oil dipstick
opening.
• Then screw in the oil dipstick.
4. To carry out an oil analysis:
Carry out an oil analysis according to the intervals laid down in the maintenance check list.
5. To change the oil:
Note: The crane must be in horizontal position to charge the oil level.
• The oil must be changed when the oil has reached operating temperature.
• Direct the hose for the oil drain (below the slew reduction gear unit) into an external
outlet.
1997 DESIGN 140T GOTTWALD/JAMALPUR CRANE
ISSUE 1997
Railway Crane
Maintenance Manual
Slew Reduction Gear Unit
5.8.1
(P-2/3)
•
•
•
•
•
•
Screw out the oil dipstick and the oil drain plug on the hose end (see figure at the
bottom).Drain the oil into a suitable and sufficiently large enough tray (oil quantity:
approx. 15.5 litters). Always check the drained oil for metal pollution and excessive
abrasion.
Screw out the oil drain plug on the hose end and direct the hose back into the opening.
Add oil using the brand as classified in the chart in section 6 of this manual. Monitor
the oil level via the oil dipstick.
Wait a few minutes.
If the oil level falls, top up the oil until the oil level maintains constant.
Then screw in the oil dipstick.
6. To check the screw connections:
Check the screw connections, taking into the account the torque moment in the installation
drawing and check for firm seating.
7. Breather filter:
Unscrew the breather filter adjacent to the pipe whenever oil is topped up and check for
pollution; if required, clean or replace the filter.
1997 DESIGN 140T GOTTWALD/JAMALPUR CRANE
ISSUE 1997
Railway Crane
Maintenance Manual
Slew Reduction Gear Unit
5.8.1
(P-3/3)
1997 DESIGN 140T GOTTWALD/JAMALPUR CRANE
ISSUE 1997
Railway Crane
Maintenance Manual
Pinion and Gearwheel
5.8.2
(P-1/2)
Description
The pinion and gear wheel forms the last stage of the slewing gear drive. The pinion
and gear wheel must be checked regularly for damage and lubricated according to the
maintenance check lilt for damage.
Safety Instructions
Before maintenance work is performed, it must be ensured that the crane cannot be
switched on and is secured against rolling.
In addition, a “Maintenance work” warning sign must be visibly affixed to both in and
outside the cab.
Remove ignition key and battery main switch and secure against any unauthorised
start.
The crane must not be in the way of other vehicles.
Ensure that no one is near hot or moving parts - danger of getting burnt, crushed or
drawn into the equipment!
To check and clean the pinion and gear wheel, the superstructure must be rotated
several times on the undercarriage.
Prior to commencing with the actual work, ensure, using the above measures that the
crane cannot be set into operation- danger of being crushed or drawn into the
equipment!
Maintenance instructions
1. Visual check:
Check the gear wheel and, in particular, the pinion for external damage such as
cracks, broken teeth, dimples and steel pits.
2. To clean and grease:
Clean the gear wheel and pinion of waste grease and dirt. Then grease with spray
grease brand as classified in the chart in section 6 of this manual.
1997 DESIGN 140T GOTTWALD/JAMALPUR CRANE
ISSUE 1997
Railway Crane
Maintenance Manual
Pinion and Gearwheel
5.8.2
(P-2/2)
1997 DESIGN 140T GOTTWALD/JAMALPUR CRANE
ISSUE 1997
Railway Crane
Maintenance Manual
Roller Bearing Slew Ring
5.8.3
(P-1/2)
Description
The roller bearing slew ring is the 3600 rotatable connection between the superstructure
and the undercarriage.
Safety Instructions
Before maintenance work is performed, it must be ensured that the crane cannot be
switched on and is secured against rolling.
In addition, a “Maintenance work” warning sign must be visibly affixed to both in and
outside the cab.
Remove ignition key and battery main switch and secure against any unauthorised
start.
The crane must not be in the way of other vehicles.
Ensure that no one is near hot or moving parts-danger of getting burnt, crushed or
drawn in to the equipment!
To carry out the running noises check, the superstructure must be rotated several times
on the undercarriage.
Prior to commencing with the actual work, ensure, using the above measures, that the
crane cannot be set into operation - danger of being crushed or drawn into the
equipment!
Maintenance instructions
1. To carry out the running noises check:
To carry out the running noises check, the superstructure must be rotated slowly on
the undercarriage; ensure that the bearing assembly runs smoothly and quaintly.
2. To lubricate:
Two lubrication nipples are located in the left machinery house near the slew
reduction gear unit. The entire slew ring must be lubricated via these nipples. The
grease is fed via a pipeline system to the 24 lubrication points. These points must
be lubricated until the slew ring is protected by means of a clean, surrounding bead
of grease.
3. Check the bolt-type connections:
To compensate for settling, the bolts must be tightening with the prescribed torque
moment.
1997 DESIGN 140T GOTTWALD/JAMALPUR CRANE
ISSUE 1997
Railway Crane
Maintenance Manual
Roller Bearing Slew Ring
5.8.3
(P-2/2)
1997 DESIGN 140T GOTTWALD/JAMALPUR CRANE
ISSUE 1997
Railway Crane
Maintenance Manual
Main Hoist
5.9
(P-1/1)
5.9.1
5.9.2
Main Hoist Reduction Gear Unit including Brake
Rope Drum
1997 DESIGN 140T GOTTWALD/JAMALPUR CRANE
ISSUE 1997
Railway Crane
Maintenance Manual
Main Hoist Reduction Gear Unit including Brake
5.9.1
(P-1/3)
Description
The main hoist is a three – stage planetary gearbox. The equipment includes an
integrated, hydraulically lifted multi-disk brake with free-wheeling option and a
counter bearing.
The wheels with external toothing have been hardened. The entire gearbox is seated on
anti-friction bearing and is fitted with an oil bath lubrication system. Power take-off
and drive motions have counter rotary directions.
Safety Instructions
Before maintenance work is performed, it must be ensured that the crane cannot be
switched on and is secured against rolling.
In addition, a “Maintenance work” warning sign must be visibly affixed to both in and
outside the cab.
Remove ignition key and battery main switch and secure against any unauthorised
start.
The crane must not be in the way of other vehicles.
Ensure that no one is near hot or moving parts - danger of getting burnt, crushed or
drawn into the equipment!
Maintenance Instructions
The maintenance work on the planetary gearbox must be carried out according to the
information in the Lohmann & Stolterfoht GmbH User’s Manual.
1. Visual check:
Check the planetary gearbox, its attachments and all connections for external
damage and leakages. Check all connections, lines and links for firm seating.
2. Carry out a running noise check.
3. To check the oil level:
Note: The crane must be in horizontal position to check the oil level.
• The oil is checked via the overflow meter. To do so, screw out the oil filter plug
(item 1) and the oil level inspection plug (item 2); if required, top up oil using
the brand as classified in the chart in section 6 of this manual.
• Then screw in both plugs.
4. To carry out an oil analysis:
Carry out an oil analysis according to the intervals in the maintenance check list.
5. Lubricate the lubrication nipple on the counter bearing.
6. To change the oil:
Note: The crane must be in horizontal position to change the oil.
• The oil must be changed when the oil has reached operating temperature.
• Screw out the oil filler plug, the oil level inspection plug and the oil drain plug
(item 3) and allow the oil to drain in a suitable and sufficiently large enough tray
(approx. 6.5 L) oil. Always check the drained oil for metallic pollution and
excessive abrasion.
1997 DESIGN 140T GOTTWALD/JAMALPUR CRANE
ISSUE 1997
Railway Crane
Maintenance Manual
Main Hoist Reduction Gear Unit including Brake
5.9.1
(P-2/3)
• Then screw in the oil drain plug and add oil through the opening using the brand
as classified in the chart in section 6 of this manual. Monitor the oil level on the
oil level inspection plug.
• Wait a few minutes.
• If the oil level falls, top up the oil until the oil level maintains constant.
• Then screw in the oil filler plug and the oil level inspection plug
7. To check the screw connection:
Check the screw connections taking into the account the torque moment in the
installation drawing and check for firm seating.
1997 DESIGN 140T GOTTWALD/JAMALPUR CRANE
ISSUE 1997
Railway Crane
Maintenance Manual
Main Hoist Reduction Gear Unit Including Brake
5.9.1
(P-3/3)
1997 DESIGN 140T GOTTWALD/JAMALPUR CRANE
ISSUE 1997
Railway Crane
Maintenance Manual
Rope Drum
5.9.2
(P-1/2)
Description
The rope drum forms a rigid unit with the main hoist reduction unit. The rope drum
coils the hoist rope in several layers.
Safety Instructions
Before maintenance work is performed, it must be ensured that the crane cannot be
switched on and is secured against rolling.
In addition, a “Maintenance work” warning sign must be visibly affixed to both in and
outside the cab.
Remove ignition key and battery main switch and secure against any unauthorised
start.
The crane must not be in the way of other vehicles.
Ensure that no one is near hot or moving parts - danger of getting burnt, crushed or
drawn into the equipment!
Maintenance instructions
1. Visual check:
Check the rope drum for external damage and firm seating
2. Rope clamp:
Check the rope clamp for firm seating and damage.
1997 DESIGN 140T GOTTWALD/JAMALPUR CRANE
ISSUE 1997
Railway Crane
Maintenance Manual
Rope Drum
5.9.2
(P-2/2)
1997 DESIGN 140T GOTTWALD/JAMALPUR CRANE
ISSUE 1997
Railway Crane
Maintenance Manual
Auxiliary Hoist
5.10
(P-1/1)
5.10.1 Auxiliary Hoist Reduction Gear Unit including Brake.
5.10.2 Rope Drum
1997 DESIGN 140T GOTTWALD/JAMALPUR CRANE
ISSUE 1997
Railway Crane
Maintenance Manual
Auxiliary Hoist Reduction Gear Unit including Brake
5.10.1
(P-1/3)
Description
The auxiliary hoist is a two-stage planetary gearbox. The equipment includes an
integrated, hydraulically lifted multi-disk brake with free - wheeling option and a
counter bearing.
The wheels with external toothing have been hardened. The entire gearbox is seated on
an anti-friction bearing and is fitted with an oil bath lubrication system.
Power take-off and drive motions have counter rotary directions.
Safety Instructions
Before maintenance work is performed, it must be ensured that the crane cannot be
switched on and is secured against rolling.
In addition, a “Maintenance work” warning sign must be visibly affixed to both in and
outside the cab.
Remove ignition key and battery main switch and secure against any unauthorised
start.
The crane must not be in the way of other vehicles.
Ensure that no one is near hot or moving parts-danger of getting burnt, crushed or
drawn into the equipment!
Maintenance instructions
The maintenance work in the planetary gearbox must be carried out according to the
information in the Lohmann & stolterfoht GmbH User’s Manual.
1. Visual check:
Check the planetary gearbox, its attachments and all connections for external
damage and leakages. Check all connections, lines and links for firm seating.
2. Carry out a running noise check
3. To check the oil level:
Note: The crane must be in horizontal position to heck the oil level.
• The oil is checked via the overflow meter. To do so, screw out the oil filter
plug (item 1) and the oil level inspection plug (item 2); if required, top up oil
using the brand as classified in the chart in section 6 of this manual.
• Then screw in both plugs.
4. To carry out an oil analysis:
Carry out an oil analysis according to the intervals in the maintenance check list.
5. Lubricate the lubrication nipple on the counter bearing.
6. To change the oil:
Note: The crane must be in horizontal position to change the oil.
• The oil must be changed when the oil has reached operating temperature.
• Screw out the oil filler plug, the oil level inspection plug and the oil drain plug
(item 3) and allow the oil to drain in a suitable and sufficiently large enough
tray (approx.3.5 L) oil. Always check the drained oil for metallic pollution and
excessive abrasion.
1997 DESIGN 140T GOTTWALD/JAMALPUR CRANE
ISSUE 1997
Railway Crane
Maintenance Manual
Auxiliary Hoist Reduction Gear Unit including Brake
5.10.1
(P-2/3)
•
•
•
•
Then screw in the oil drain plug and add oil through the opening using the
brand as classified in the chart in section 6 of this manual. Monitor the oil level
on the oil level inspection plug.
Wait a few minutes.
If the oil level falls, top up the oil until the oil level maintains constant.
Then screw in the oil filler plug and the oil level inspection plug.
7. To check the screw connections:
Check the screw connections taking into the account the torque moment in the
installation drawing and check for firm seating.
1997 DESIGN 140T GOTTWALD/JAMALPUR CRANE
ISSUE 1997
Railway Crane
Maintenance Manual
Auxiliary Hoist Reduction Gear Unit including Brake
5.10.1
(P-3/3)
1997 DESIGN 140T GOTTWALD/JAMALPUR CRANE
ISSUE 1997
Railway Crane
Maintenance Manual
Rope Drum
5.10.2
(P-1/2)
Description
The rope drum forms a rigid unit with the auxiliary hoist reduction unit. The rope drum
coils the hoist rope in several layers.
Safety Instructions
Before maintenance work is performed, it must be ensured that the crane cannot be
switched on and is secured against rolling.
In addition, a “Maintenance work” warning sign must be visibly affixed to both in and
outside the cab.
Remove ignition key and battery main switch and secure against any unauthorised
start.
The crane must not be in the way of other vehicles.
Ensure that no one is near hot or moving parts - danger of getting burnt, crushed or
drawn into the equipment!
Maintenance instructions
1. Visual check
Check the rope drum for external damage and firm seating.
2. Rope clamp:
Check the rope clamp for firm seating and damage.
1997 DESIGN 140T GOTTWALD/JAMALPUR CRANE
ISSUE 1997
Railway Crane
Maintenance Manual
Rope Drum
5.10.2
(P-2/2)
1997 DESIGN 140T GOTTWALD/JAMALPUR CRANE
ISSUE 1997
Railway Crane
Maintenance Manual
Derricking Gear
5.11
(P-1/1)
5.11.1 Derricking Reduction Gear Unit including Brake.
5.11.2 Rope Drum
5.11.3 Rope Pulleys and Rope Guide on the Superstructure
1997 DESIGN 140T GOTTWALD/JAMALPUR CRANE
ISSUE 1997
Railway Crane
Maintenance Manual
Derricking Reduction Gear Unit including Brake
5.11.1
(P-1/3)
Description
The derricking gear permits the boom to derricked in and out. The derricking gear is a
three- stage planetary gearbox. The equipment includes an integrated, hydraulically
lifted multi-disk brake with free- wheeling option and a counter bearing.
The wheels with external toothing have been hardened. The entire gearbox is seated on
an anti-friction bearing and is fitted with an oil bath lubrication system.
Power take-off and drive motions have counter rotary directions
Safety Instructions
Before maintenance work is performed, it must be ensured that the crane cannot be
switched on and is secured against rolling.
In addition, a “Maintenance work” warning sign must be visibly affixed to both in and
outside the cab.
Remove ignition key and battery main switch and secure against any unauthorised
start.
The crane must not be in the way of other vehicles.
Ensure that no one is near hot or moving parts - danger of getting burnt, crushed or
drawn into the equipment!
Maintenance instructions
The maintenance work on the planetary gearbox must be carried out according to the
information in the Lohmann& Stolterfoht GmbH User’s Manual.
1. Visual check:
Check the planetary gearbox, its attachments and all connections for external
damage and leakages. Check all connections, lines and links for firm seating.
2. Carry out a running noise check
3. To check the oil level:
Note: The crane must be in horizontal position to check the oil level.
• The oil is checked via the overflow meter. To do so, screw out the oil filler
plug (item 1) and the oil level inspection plug (item 2); if required top up oil
using the brand as classified in the chart in section 6 of this manual.
• Then screw in both plugs.
4. To carry out an oil analysis:
Carry out an oil analysis according to the intervals in the maintenance check list.
5. Lubricate the lubrication nipple on the counter bearing.
6. To change the oil:
Note: The crane must be in horizontal position to change the oil.
• The oil must be changed when the oil has reached operating temperature.
1997 DESIGN 140T GOTTWALD/JAMALPUR CRANE
ISSUE 1997
Railway Crane
Maintenance Manual
Derricking Gear Including Brake
5.11.1
(P-2/3)
• Screw out the oil filler plug and the oil level inspection plug. Insert the unattached pipe
supplied to the opening on the oil drain plug (item 3). Screw out the drain plug and
allow the oil to drain in a suitable and sufficiently large enough tray (approx. 9.5 L oil
quantity). Always check the oil for metal pollution and excessive abrasion.
• Then remove the pipe, screw in the oil plug and add oil using the brand as classified in
the chart in section 6 of this manual, Monitor the oil level on the level inspection plug.
• Wait a few minutes.
• If the oil level falls, top up the oil until the oil level maintains constant.
• Then screw in the oil filler plug and the oil level inspection plug.
7.
To check the screw connections:
Check the screw connections taking into the account the torque moment in the
installation drawing.
1997 DESIGN 140T GOTTWALD/JAMALPUR CRANE
ISSUE 1997
Railway Crane
Maintenance Manual
Derricking Gear Including Brake
5.11.1
(P-3/3)
1997 DESIGN 140T GOTTWALD/JAMALPUR CRANE
ISSUE 1997
Railway Crane
Maintenance Manual
Rope Drum
5.11.2
(P-1/2)
Description
The rope drum serves to coil the rope. The rope drum is rigidly connected with the
planetary gearboxes for the winch drive assembly.
Safety Instructions
Before maintenance work is performed, it must be ensured that the crane cannot be
switched on and is secured against rolling.
In addition, a “Maintenance Work” warning sign must be visibly affixed to both in and
outside the cab.
Remove ignition key and battery main switch and secure against any unauthorised
start.
The crane must not be in the way of other vehicles.
Ensure that no one is near hot or moving parts – danger of getting burnt, crushed or
drawn into the equipment!
Maintenance instructions
1. Visual check:
• Check the rope drum for external damage.
• Check the rope clamps for firm seating; if required, re-tighten.
• Check the rope grooves in the drum for damage and excessive wear when the
rope is coiled.
2. Rope clamp:
Check the rope clamp for firm seating and damage.
1997 DESIGN 140T GOTTWALD/JAMALPUR CRANE
ISSUE 1997
Railway Crane
Maintenance Manual
Rope Drum
5.11.2
(P-2/2)
1997 DESIGN 140T GOTTWALD/JAMALPUR CRANE
ISSUE 1997
Railway Crane
Maintenance Manual
Rope Pulley Set and Rope Guide on the Superstructure
5.11.3
(P-1/2)
Description
The pulley set at the rear of the superstructure and the rope guide on the front of the
crane superstructure ensure that the ropes are properly guided in every boom position
and thus contribute to safe operation and a long rope service life.
Safety Instructions
Before maintenance work is performed, it must be ensured that the crane cannot be
switched on and is secured against rolling.
In addition, a “Maintenance work” warning sign must be visibly affixed to both in and
outside the cab.
Remove ignition key and battery main switch and secure against any unauthorised
start.
The crane must not be in the way of other vehicles.
Ensure that no one is near hot or moving parts - danger of getting burnt, crushed or
drawn into the equipment!
Maintenance Instructions
Rope pulley set:
1. Visual check:
• Check the rope pulleys for external damage and wear. Any damaged or worn
pulleys must be replaced.
• Check also the rope pulleys for firm seating and whether they move easily; if
required, re-tighten.
2. Functional test:
• Carry out a functional test on the rope pulleys and checked as to whether they
move easily and run properly.
Rope guide:
1. Visual check:
• Check the rope guide for external damage, firm seating and wear, any damaged
or loose rope guides must be replaced.
• Check also the rope pulleys for firm seating and whether they move easily; if
required, re-tighten using the torque laid down in regulations.
2. Functional test:
• Carry out a functional test on the rope guide whether it moves easily and runs
properly.
1997 DESIGN 140T GOTTWALD/JAMALPUR CRANE
ISSUE 1997
Railway Crane
Maintenance Manual
Rope Pulley Set and Rope Guide on the Superstructure
5.11.3
(P-2/2)
1997 DESIGN 140T GOTTWALD/JAMALPUR CRANE
ISSUE 1997
Railway Crane
Maintenance Manual
Recovery Winch
5.12
(P-1/1)
5.12.1 Recovery Winch including Brake
5.12.2 Rope Drum
5.12.3 Deflection Rollers
1997 DESIGN 140T GOTTWALD/JAMALPUR CRANE
ISSUE 1997
Railway Crane
Maintenance Manual
Recovery Winch including Brake
5.12.1
(P-1/3)
Description
The recovery winch is a three–stage planetary gearbox. The equipment consists of an
integrated, hydraulically lifted multi-disk holding brake with free-wheeling option.
The wheels with external toothing have been hardened. The entire gearbox is seated on
an anti-friction bearing and is fitted with an oil bath lubrication system. The bearing of
the drive pinion in the stay pipe is lubricated continuously with grease. Power take-off
and drive motions have counter rotary directions.
Safety Instructions
Before maintenance work is performed, it must be ensured that the crane cannot be
switched on and is secured against rolling.
In addition, a “Maintenance Work” warning sign must be visibly affixed to both in and
outside the cab.
Remove ignition key and battery main switch and secure against any unauthorised
start.
The crane must not be in the way of other vehicles.
Ensure that no one is near hot or moving parts - danger of getting burnt, crushed or
drawn into the equipment!
Maintenance Instruction
The maintenance work on the planetary gearbox must be carried out according to the
information in the Lohmann & Stolterfoht GmbH User’s Manual.
1. Visual check:
Check the planetary gearbox, its attachments and all connections for external
damage and leakages. Check all connections, lines and links for firm seating.
2. Carry out a running noise check.
3. To check the oil level:
Note: The crane must be in horizontal position to check the oil level. The oil level
inspection, oil filler and oil drain plugs are located on the gearbox side (see bottom
figure). The counterweight support must be lowered to check the oil level or to
carry out an oil change.
• The oil is checked via the overflow meter. To do so, screw out the oil filler plug
and the oil level inspection plug (item 1); if required, top up oil using the brand
as classified in the chart in section 6 of this manual.
• Then screw in both plugs.
4. To carry out an oil analysis:
Carry out an oil analysis according to the intervals in the maintenance check list.
5. Lubricate the lubrication nipple on the counter bearing.
6. To change the oil:
Note: The crane must be in horizontal position to change the oil. The oil level
inspection, oil filler and oil drain plugs are located on the gearbox side.
1997 DESIGN 140T GOTTWALD/JAMALPUR CRANE
ISSUE 1997
Railway Crane
Maintenance Manual
Recovery Winch including Brake
5.12.1
(P-2/3)
• The oil must be changed when the oil has reached operating temperature.
• Screw out the oil filler plug, which is simultaneously the oil level inspection plug,
and the oil drain plug and allow the oil to drain in suitable and sufficiently large
enough tray (approx. 3.4 L) oil. Always check the drained oil for metallic pollution
and excessive abrasion.
• Then screw in the oil drain plug and add oil through the opening using the brand as
classified in the chart in section 6 of this manual. Monitor the oil level on the oil
level inspection plug.
• Wait a few minutes.
• If the oil level falls, top up the oil until the oil level maintains constant.
• Then screw in the oil filler plug and the oil level inspection plug.
6. To check the screw connections:
Check the screw connections taking into the account the torque moment in the
installation drawing and check for firm seating.
1997 DESIGN 140T GOTTWALD/JAMALPUR CRANE
ISSUE 1997
Railway Crane
Maintenance Manual
Recovery Winch including Brake
5.12.1
(P-3/3)
1997 DESIGN 140T GOTTWALD/JAMALPUR CRANE
ISSUE 1997
Railway Crane
Maintenance Manual
Rope Drum
5.12.2
(P-1/2)
Description
The rope drum serves to take up the rope. The rope drum is rigidly connected to the
planetary gearboxes for the winch drive assembly.
Safety Instructions
Before maintenance work is performed, it must be ensured that the crane cannot be
switched on and is secured against rolling.
In addition, a “Maintenance Work” warning sign must be visibly affixed to both in and
outside the cab.
Remove ignition key and battery main switch and secure against any unauthorised
start.
The crane must not be in the way of other vehicles.
Ensure that no one is near hot or moving parts – danger of getting burnt, crushed or
drawn into the equipment!
Maintenance Instructions
1. Visual check:
• Check the rope drum for external damage.
• Check the rope clamps for firm seating; if required, re-tighten.
• Check the rope grooves in the drum for damage and excessive wear when the
rope is uncoiled.
2. Rope clamp:
Check the rope clamp for firm seating and damage.
1997 DESIGN 140T GOTTWALD/JAMALPUR CRANE
ISSUE 1997
Railway Crane
Maintenance Manual
Rope Drum
5.12.2
(P-2/2)
1997 DESIGN 140T GOTTWALD/JAMALPUR CRANE
ISSUE 1997
Railway Crane
Maintenance Manual
Deflection Rolls
5.12.3
(P-1/2)
Description
The deflection rolls of the recovery winch ensure that the rope is guided properly and
contribute to the safe operation and long service life of the ropes.
Safety Instructions
Before maintenance work is performed, it must be ensured that the crane cannot be
switched on and is secured against rolling.
In addition, a “Maintenance Work” warning sign must be visibly affixed to both in and
outside the cab.
Remove ignition key and battery main switch and secure against any unauthorised
start.
The crane must not be in the way of other vehicles.
Ensure that no one is near hot or moving parts – danger of getting burnt, crushed or
drawn into the equipment!
Maintenance Instructions
1. Visual Check:
Check the deflection rolls for external damage, wear and firm seating. If required,
tighten the mounting elements. Replace any damage or worn deflection rolls.
2. Rope clamp:
Check the rope clamp for firm seating and damage.
3. To lubricate:
Lubricate the lubrication nipple on the deflection rolls.
1997 DESIGN 140T GOTTWALD/JAMALPUR CRANE
ISSUE 1997
Railway Crane
Maintenance Manual
Deflection Rolls
5.12.3
(P-2/2)
1997 DESIGN 140T GOTTWALD/JAMALPUR CRANE
ISSUE 1997
Railway Crane
Maintenance Manual
Basic Construction
5.13
(P-1/1)
5.13.1 Steel Construction
5.13.2 Paintwork
5.13.3 Protective Housing and Panelling
5.13.4 Stairways, Footboards and Supporting Straps
5.13.5 Counterweights
5.13.6 Outrigger Beams
5.13.7 Outrigger Pads
5.13.8 Signs and Labelling
5.13.9 Tool Kit
5.13.10 Superstructure Locking Device
5.13.11 Bogie
1997 DESIGN 140T GOTTWALD/JAMALPUR CRANE
ISSUE 1997
Railway Crane
Maintenance Manual
Steel Construction
5.13.1
(P-1/2)
Description
The steel construction supports all the components of the crane and provides it with the
required strength and rigidity to carry out its duties for which it is designed. The shape
and dimensions of the steel construction have been calculated exactly and thus ensure
that crane operation can be carried out safely. The undercarriage has mainly been
manufactured in material St 52-3, the superstructure and boom in STE 460 and STE
690.
Safety Instructions
Before maintenance work is performed, it must be ensured that the crane cannot be
switched on and is secured against rolling.
In addition, a “Maintenance Work” warning sign must be visibly affixed to both in and
outside the cab.
Remove ignition key and battery main switch and secure against any unauthorised
start.
The crane must not be in the way of other vehicles.
When working with paint and solvents, ensure to observe without fail the respective
safety instructions on the packages.
Please note that the manufacturer must be consulted before any burning, welding or
dressing work is carried out on the crane.
Maintenance Instructions
1. Visual Check:
Check the entire crane steel construction for external damage such as cracks or
deformations.
1997 DESIGN 140T GOTTWALD/JAMALPUR CRANE
ISSUE 1997
Railway Crane
Maintenance Manual
Steel Construction
5.13.1
(P-2/2)
1997 DESIGN 140T GOTTWALD/JAMALPUR CRANE
ISSUE 1997
Railway Crane
Maintenance Manual
Paintwork
5.13.2
(P-1/1)
Description
The supporting steel construction has been prepared for paintwork by means of a sandblasting de-rusting procedure as per SAE 2.5 and then primed with 2-component epoxy
resin. 2-component polyurethane high solid top coat has been used for the top coat.
The non-supporting steel construction has been prepared for paintwork by means of
manual de-resting and primed with 2-component epoxy resin. 2-component acrylic
polyurethane high solid top coat has been used for the top coat.
Safety Instructions
Before maintenance work is performed, it must be ensureD that the crane cannot be
switched on and is secured against rolling.
In addition, a “Maintenance Work” warning sign must be visibly affixed to both in and
outside the cab.
Remove ignition key and battery main switch and secure against any unauthorised
start.
The crane must not be in the way of other vehicles.
Rubber parts, seals and cylinder piston rods must not be painted!
When working with paint and solvents, ensure to observe without fail the respective
safety instructions on the packages.
Ensure that no one is near hot or moving parts – danger of getting burnt, crushed or
drawn into the equipment!
Maintenance Instructions
Note: Only paint and primer indicated above may be used.
1. Visual check:
Check all components for paintwork damage and corrosion. Touch-up work should
only be carried out when the weather is dry.
2. To eliminate paintwork damage:
The paintwork must be thoroughly de-rested and primed three times using a
paintbrush. Then a sufficiently thick top coat must be applied.
• Primer: Epoxy resin 2-component primer
• Top coat: 2-component polyurethane high-solid material.
1997 DESIGN 140T GOTTWALD/JAMALPUR CRANE
ISSUE 1997
Railway Crane
Maintenance Manual
Protective Housing and Panelling
5.13.3
(P-1/2)
Description
The protective housing and panelling screen off hot and moving components and
protect persons near the components. Simultaneously, the components are protected
against moisture and other external influences.
Safety Instructions
Before maintenance work is performed, it must be ensured that the crane cannot be
switched on and is secured against rolling.
In addition, a “Maintenance Work” warning sign must be visibly affixed to both in and
outside the cab.
Remove ignition key and battery main switch and secure against any unauthorised
start.
The crane must not be in the way of other vehicles.
When working with paint and solvents, ensure to observe without fail the respective
safety instructions on the packages.
When dressing with a flame - use caution - danger of explosion near fuel and oil
related components!
Ensure that no one is near hot or moving parts – danger of getting burnt, crushed or
drawn into the equipment!
When electrical welding work is being performed, the earthling terminal must be
connected directly to the part to be welded. In addition, the battery pole terminals on
the diesel engine system and the emergency diesel engine system must be
disconnected.
Ensure that no one is near hot or moving parts – danger of getting burnt, crushed or
drawn into the equipment!
Maintenance Instruction
1. To clean:
Prior to commencing with inspection and maintenance work, clean the protective
housing and panelling with a suitable aid. This applies, in particular, to the
stairway and walkway areas. Only and greasy components increase the danger of
slipping!
2. Visual check:
Check the protective housing and panelling for external damage.
3. To eliminate paintwork damage:
Clean the damaged areas. Eliminate the damage with suitable knifing filler, glass
fiber mats and polyester or corresponding primer and paintwork and then touch-up
with paint.
4. To straighten deformations and paint:
Damage on minor components must be straighten and touched up with paint.
5. To check the hinges, locks and storm hook:
Oil the hinges and locks on the doors and check for proper functioning. Check the
storm hooks on the doors for external damage and proper functioning.
1997 DESIGN 140T GOTTWALD/JAMALPUR CRANE
ISSUE 1997
Railway Crane
Maintenance Manual
Protective Housing and Panelling
5.13.3
(P-2/2)
1997 DESIGN 140T GOTTWALD/JAMALPUR CRANE
ISSUE 1997
Railway Crane
Maintenance Manual
Stairways, Footboards and Holding Straps
5.13.4
(P-1/2)
Description
The stairways, footboards and holding straps provide an easy and safe hold when
climbing into the cab and onto the crane. They have anti-slip, weather-proof treads.
Safety Instructions
Before maintenance work is performed, it must be ensured that the crane cannot be
switched on and is secured against rolling.
In addition, a “Maintenance Work” warning sign must be visibly affixed to both in and
outside the cab.
Remove ignition key and battery main switch and secure against any unauthorised
start.
The crane must not be in the way of other vehicles.
When working with paint and solvents, ensure to observe without fail the respective
safety instructions on the packages.
When dressing with a flame - use caution - danger of explosion near fuel and oil
related components!
When electrical welding work is being performed, the earthling terminal must be
connected directly to the part to be welded In addition, the battery pole terminals on
the diesel engine system and the emergency diesel engine system must be
disconnected.
Ensure that no one is near hot or moving parts – danger of getting burnt, crushed or
drawn into the equipment
Maintenance Instructions
1. To clean:
• Clean the stairways, footboards and the walking surfaces and their mountings
thoroughly with a corresponding cleaning agent. The oil and grease film on
stairways increase the danger of slipping!
2. Visual check :
• Check the stairways, footboards and holding straps and their mountings for
damage and firm seating.
• Missing screws must be replaced and loose connection must be replaced.
3. Paintwork damage
• Clean the paintwork damage immediately and protect against corrosion using
primer and the corresponding paint.
• Primer: Epoxy resin 2- component primer
• Top coat: 2- Component polyurethane high – solid material
4. To straighten deformations and paint:
• Damage on minor components must be straighten and touched up with paint.
1997 DESIGN 140T GOTTWALD/JAMALPUR CRANE
ISSUE 1997
Railway Crane
Maintenance Manual
Stairways, Footboards and Holding Straps
5.13.4
(P-2/2)
1997 DESIGN 140T GOTTWALD/JAMALPUR CRANE
ISSUE 1997
Railway Crane
Maintenance Manual
Counterweight
5.13.5
(P-1/2)
Description
The three-section steel counterweight, which can be detached for transport purposes, is
mounted on the counterweight support.
Safety Instructions
Before maintenance work is performed, it must be ensured that the crane cannot be
switched on and is secured against rolling.
In addition, a “Maintenance Work” warning sign must be visibly affixed to both in and
outside the cab.
Remove ignition key and battery main switch and secure against any unauthorised
start.
The crane must not be in the way of other vehicles.
When working with paint and solvents, ensure to observe without fail the respective
safety instructions on the packages.
When dressing with a flame - use caution - danger of explosion near fuel and oil
related components!
When electrical welding work is being performed, the earthling terminal must be
connected directly to the part to be welded In addition, the battery pole terminals on
the diesel engine system and the emergency diesel engine system must be
disconnected.
Ensure that no one is near hot or moving parts – danger of getting burnt, crushed or
drawn into the equipment!
Maintenance Instructions
1. Visual check:
Check the counterweight and the mountings for external damage and cracks.
2. Paintwork damage
• Clean the paintwork damage immediately and prime and protect against
corrosion with the corresponding paint.
• Primer: Epoxy resin 2- component primer
• Top coat: 2- Component polyurethane high – solid material
1997 DESIGN 140T GOTTWALD/JAMALPUR CRANE
ISSUE 1997
Railway Crane
Maintenance Manual
Counterweight
5.13.5
(P-2/2)
1997 DESIGN 140T GOTTWALD/JAMALPUR CRANE
ISSUE 1997
Railway Crane
Maintenance Manual
Outrigger Beams
5.13.6
(P-1/2)
Description
The outrigger beams are extended and retracted via a hydraulic cylinder. The outrigger
beams are latched in transport position by means of socket pins.
Safety Instructions
Before maintenance work is performed, it must be ensured that the crane cannot be
switched on and is secured against rolling.
In addition, a “Maintenance Work” warning sign must be visibly affixed to both in and
outside the cab.
Remove ignition key and battery main switch and secure against any unauthorised
start.
The crane must not be in the way of other vehicles.
When working with paint and solvents, ensure to observe without fail the respective
safety instructions on the packages.
Ensure that no one is near hot or moving parts – danger of getting burnt, crushed or
drawn into the equipment!
Maintenance Instructions
1. Visual check:
Check the outrigger beams for external damage, cracks, fractures and
deformations.
2. Paintwork damage
• Clean the paintwork damage immediately and prime and protect against
corrosion with the corresponding paint.
• Primer: Epoxy resin 2- component primer
• Top coat: 2- Component polyurethane high – solid material
3. To lubricate:
The bearings of the outrigger beams on the undercarriage are fitted with one
lubrications nipple each on the upper and lower sides. Remove the waste grease
and lubricate until the bearing points are protected by means of a surrounding bead
of grease.
4. Functional test:
Check the outrigger beams as to whether they extend and retract properly and
whether they lock properly.
1997 DESIGN 140T GOTTWALD/JAMALPUR CRANE
ISSUE 1997
Railway Crane
Maintenance Manual
Outrigger Beams
5.13.6
(P-2/2)
1997 DESIGN 140T GOTTWALD/JAMALPUR CRANE
ISSUE 1997
Railway Crane
Maintenance Manual
Outrigger Pads
5.13.7
(P-1/2)
Description
The outrigger pads are hinged to transfer the support forces for the crane evenly into
the ground.
Safety Instructions
Before maintenance work is performed, it must be ensured that the crane cannot be
switched on and is secured against rolling.
In addition, a “Maintenance Work” warning sign must be visibly affixed to both in and
outside the cab.
Remove ignition key and battery main switch and secure against any unauthorised
start.
The crane must not be in the way of other vehicles.
When working with paint and solvents, ensure to observe without fall the respective
safety instructions on the packages.
When dressing with a flame - use caution - danger of explosion near fuel and oil
related components!
When electrical welding work is being performed, the earthing terminal must be
connected directly to the to the part to be welded. In addition, the battery pole
terminals on the diesel engine system and the emergency diesel engine system must be
disconnected.
Ensure that no one is near hot or moving parts – danger of getting burnt, crushed or
drawn into the equipment!
Maintenance Instructions
1. Visual check:
Check the outrigger pads for external damage, cracks, fractures and deformations.
Likewise check the mounting bolts and the safety pins as to whether they are in
good condition.
2. To clean and to grease:
Clean the Knuckle joints and then protect against corrosion by greasing.
1997 DESIGN 140T GOTTWALD/JAMALPUR CRANE
ISSUE 1997
Railway Crane
Maintenance Manual
Outrigger Pads
5.13.7
(P-2/2)
1997 DESIGN 140T GOTTWALD/JAMALPUR CRANE
ISSUE 1997
Railway Crane
Maintenance Manual
Signs and Labelling
5.13.8
(P-1/2)
Description
The Crane has the usual, prescribed signs for the railway. In addition, the crane is
equipped with a number of labelling for various areas.
Safety Instructions
Before maintenance work is performed, it must be ensured that the crane cannot be
switched on and is secured against rolling.
In addition, a “Maintenance Work” warning sign must be visibly affixed to both in and
outside the cab.
Remove ignition key and battery main switch and secure against any unauthorised
start.
The crane must not be in the way of other vehicles.
When working with paint and solvents, ensure to observe without fall the respective
safety instructions on the packages.
Ensure that no one is near hot or moving parts – danger of getting burnt, crushed or
drawn into the equipment!
Maintenance Instructions
1. Visual check:
Check all signs and labelling in the crane as to whether they are easily read.
Clean any dirty signs. Repair or replace any damaged signs.
1997 DESIGN 140T GOTTWALD/JAMALPUR CRANE
ISSUE 1997
Railway Crane
Maintenance Manual
Signs and Labelling
5.13.8
(P-2/2)
1997 DESIGN 140T GOTTWALD/JAMALPUR CRANE
ISSUE 1997
Railway Crane
Maintenance Manual
Tool Kit
5.13.9
( P-1/1)
Description
The tools in the tool kit (not illustrated) provided represent an appropriate basic kit
which can be used for work in the event of malfunctions or for maintenance work.
Safety Instructions
Any faulty or improperly used tool can cause damage to the components and injuries
to personnel. This is why faulty tools must be replaced immediately.
Maintenance Instructions
The tool kit is located behind the seat in the cab. Check the kit as to whether it is
complete and the kit has a lock. Also check the condition of the tools.
1.
Take inventory
- Hammer, 800 g
- Flat chisel
- Oil spray can
- Hand lever-operated grease gun
- 17 Double–ended open-jawed spanners, 8x10 - 55x60
- 6 Single- ended open–jawed spanners, 8/41/65/70/75/80 mm
- 8 Hex. Socket head wrench, SW 6 /8/10/12/14/22/27/32
- 4 Tubular hex. box spanners, 13x7/19x22/24x30/30x36
- 4 Tommy bars s for spanners, A10/12/16/18
- Standard rachet,1/2”
- Extension piece,10”
- Articulated square-drive socket adapter, 70mm
- Socket for wrenches, SW 17/19
- 3 screw drivers
- Light tester
- Pressure gauge, 0-400bar
- Hose, DN /222bx5000
- Pressure gauge connection fitting
- Union nuts
- Cutting ring
- Seeger circlip ring pliers, A3/A4
- Flat-nosed and cutting nippers
- Pipe wrench
- Sickle spanner
- Hose, NW 18x 3 5000
1997 DESIGN 140T GOTTWALD/JAMALPUR CRANE
ISSUE 1997
Railway Crane
Maintenance Manual
Superstructure Locking Device
5.13.10
(P-1/2)
Description
The superstructure locking device serves to secure the superstructure against rotation
during transport. The superstructure is locked when the counterweight support is
lowered.
Safety Instructions
Before maintenance work is performed, it must be ensured that the crane cannot be
switched on and is secured against rolling.
In addition, a “Maintenance Work” warning sign must be visibly affixed to both in and
outside the cab.
Remove ignition key and battery main switch and secure against any unauthorised
start.
The crane must not be in the way of other vehicles.
When working with paint and solvents, ensure to observe without fail the respective
safety instructions on the packages.
Ensure that no one is near hot or moving parts – danger of getting burnt, crushed or
drawn into the equipment!
Please note that the manufacturer must be consulted before any burning, welding or
dressing work is carried out on the crane.
Maintenance Instructions
1. Visual check:
Check the entire locking device, cracks fracture and deformations.
2. To clean and to grease:
Clean the knuckle joints thoroughly with a suitable aid and then grease to protect
against corrosion.
3. Paintwork damage:
• Clean the paintwork damage immediately and prime and protect against
corrosion with the corresponding paint.
• Primer: Epoxyd resin 2-component primer.
• Top coat: 2-component polyurethane high-solid material.
1997 DESIGN 140T GOTTWALD/JAMALPUR CRANE
ISSUE 1997
Railway Crane
Maintenance Manual
Superstructure Locking Device
5.13.10
( P-2/2)
1997 DESIGN 140T GOTTWALD/JAMALPUR CRANE
ISSUE 1997
Railway Crane
Maintenance Manual
Bogies
5.13.11
( P-1/2)
Description
The crane has 2 bogies which support 3 wheel sets each. In addition, a travel gear
reduction unit including the disengaging device, a brake system and a suspension
assembly are located in each of the bogies. The undercarriage is seated on the bogies
above bogie pivots.
Safety Instructions
Before maintenance work is performed, it must be ensured that the crane cannot be
switched on and is secured against rolling.
In addition, a “Maintenance Work” warning sign must be visibly affixed to both in and
outside the cab.
Remove ignition key and battery main switch and secure against any unauthorised
start.
The crane must not be in the way of other vehicles.
When working with paint and solvents, ensure to observe without fail the respective
safety instructions on the packages.
Ensure that no one is near hot or moving parts – danger of getting burnt, crushed or
drawn into the equipment!
Please note that the manufacturer must be consulted before any burning, welding or
dressing work is carried out on the crane.
Maintenance Instructions
2. Visual check:
Check both bogies for external damage, cracks and deformations.
2. Paintwork damage:
Clean the paintwork damage immediately and prime and protect against corrosion
with the corresponding paint.
Primer:
Epoxyd resin 2- component primer
Top coat: 2- Component polyurethane high–solid material
3. To lubricate:
The pivot bearing assembly (item 1) between the undercarriage and the bogies is
maintenance-free.
The side bearings (item 3) between the undercarriage and the bogie must be
lubricated regularly.
4. The side bearing clearance:
The clearance between the side bearings (item 4) on the undercarriage and on the
bogies must be checked
1997 DESIGN 140T GOTTWALD/JAMALPUR CRANE
ISSUE 1997
Railway Crane
Maintenance Manual
Bogies
5.13.11
(P-2/2)
1997 DESIGN 140T GOTTWALD/JAMALPUR CRANE
ISSUE 1997
Railway Crane
Maintenance Manual
Boom
5.14
(P 1/1)
5.14.1
5.14.2
5.14.3
5.14.4
Boom and Root Point
Rope Pulleys
Rope Guides
Boom Support Block
1997 DESIGN 140T GOTTWALD/JAMALPUR CRANE
ISSUE 1997
Railway Crane
Maintenance Manual
Boom and Root Point
5.14.1
(P-1/2)
Description
The boom is seated on an open-type root point. In transport position, the boom is
lowered onto the match truck and lifted out of the boom root via hydraulic cylinders. In
this way, the superstructure and boom can move freely of one another in towing
operation.
Safety Instructions
Before maintenance work is performed, it must be ensured that the crane cannot be
switched on and is secured against rolling.
In addition, a “Maintenance Work” warning sign must be visibly affixed to both in and
outside the cab.
Remove ignition key and battery main switch and secure against any unauthorised
start.
The crane must not be in the way of other vehicles.
When working with paint and solvents, ensure to observe without fail the respective
safety instructions on the packages.
Ensure that no one is near hot or moving parts – danger of getting burnt, crushed or
drawn into the equipment!
Please note that the manufacturer must be consulted before any burning, welding or
dressing work carried out on the crane.
Maintenance Instructions
1. Visual check:
Check the boom for external damage and cracks.
2. Root Point:
Clean the bearing sleeves of the shafts on the boom root point when they are
disengaged and then protect against corrosion by greasing. If the crane is subject to
extreme external conditions, e.g. sea air, a high degree of dust and sand,
maintenance must be carried out on the boom root in-between the intervals
indicated.
3. Paintwork damage:
• Clean the paintwork damage immediately and prime and protect against
corrosion with the corresponding paint.
• Primer: Epoxyd resin 2—component primer
• Top coat; 2 – component polyurethane high-solid material
Caution! –The sliding tracks must be not be soiled by paint and should not be
painted.
1997 DESIGN 140T GOTTWALD/JAMALPUR CRANE
ISSUE 1997
Railway Crane
Maintenance Manual
Boom and Root Point
5.14.1
(P-2/2)
1997 DESIGN 140T GOTTWALD/JAMALPUR CRANE
ISSUE 1997
Railway Crane
Maintenance Manual
Rope Pulleys
5.14.2
(P-1/2)
Description
The rope pulleys serve to guide the ropes precisely to the boom head. They ensure that
the rope runs properly in every boom position.
Safety Instructions
Before maintenance work is performed, it must be ensured that the crane cannot be
switched on and is secured against rolling.
In addition, a “Maintenance Work” warning sign must be visibly affixed to both in and
outside the cab.
Remove ignition key and battery main switch and secure against any unauthorised
start.
The crane must not be in the way of other vehicles.
When working with paint and solvents, ensure to observe without fail the respective
safety instructions on the packages.
Ensure that no one is near hot or moving parts – danger of getting burnt, crushed or
drawn into the equipment!
Use caution near the overhead lines! Do not climb up onto the crane superstructure!
Mortal danger!
Maintenance Instructions
1. Visual check:
Check for the rope pulleys for external damage, firm seating and excessive wear.
Any damaged or worn pulleys must be replaced immediately.
2. Functional test:
Once the pulleys have been re-installed, carry out a functional test.
1997 DESIGN 140T GOTTWALD/JAMALPUR CRANE
ISSUE 1997
Railway Crane
Maintenance Manual
Rope Pulleys
5.14.2
(P-2/2)
1997 DESIGN 140T GOTTWALD/JAMALPUR CRANE
ISSUE 1997
Railway Crane
Maintenance Manual
Rope Guides
5.14.3
(P-1/2)
Description
The rope guides permit the ropes to be guided cleanly and prevent, in particular, the
ropes from being sheared by the boom.
Safety Instructions
Before maintenance work is performed, it must be ensured that the crane cannot be
switched on and is secured against rolling.
In addition, a “Maintenance Work” warning sign must be visibly affixed to both in and
outside the cab.
Remove ignition key and battery main switch and secure against any unauthorised
start.
The crane must not be in the way of other vehicles.
When working with paint and solvents, ensure to observe without fail the respective
safety instructions on the packages.
When dressing with a flame - use caution - danger of explosion near fuel and oil
related components!
When electrical welding work is being performed, the earhting terminal must be
connected directly to the part be welded. In addition, the battery pole terminals on the
diesel engine system and the emergency diesel engine system must be disconnected.
Ensure that no one is near hot or moving parts – danger of getting burnt, crushed or
drawn into the equipment!
Use caution near the overhead lines! Do not climb up onto the crane superstructure!
Mortal danger!
Maintenance Instructions
The good condition of the rope guide is important for a long hoist rope service life.
1. Visual check:
Check the rope guides for external damage and firm seating. Any damaged or
loose rope guides can damage the rope.
2. To clean:
Clean rope guides with a suitable aid.
1997 DESIGN 140T GOTTWALD/JAMALPUR CRANE
ISSUE 1997
Railway Crane
Maintenance Manual
Rope Guides
5.14.3
(P-2/2)
1997 DESIGN 140T GOTTWALD/JAMALPUR CRANE
ISSUE 1997
Railway Crane
Maintenance Manual
Boom Support
5.14.4
(P-1/1)
Description
The boom support (not illustrated) on the match truck supports the boom head when
the boom is lowered during towing operation.
Safety Instructions
Before maintenance work is performed, it must be ensured that the crane cannot be
switched on and is secured against rolling.
In addition, a “Maintenance work” warning sign must be visibly affixed to both in and
outside the cab.
Remove ignition key and battery main switch and secure against any unauthorised
start.
The Crane must not be in the way of other vehicles.
When working with paint and solvents, ensure to observe without fail the respective
safety instructions on the packages.
Ensure that no one is near hot or moving parts – danger of getting burnt, crushed or
drawn into the equipment!
Please note that the manufacturer must be consulted before any burning, welding or
dressing work is carried out on the crane.
Maintenance Instructions
1. Visual check:
Check the boom support for external damage and firm seating. Check the moving
latching unit for external damage and firm seating. Check whether it moves easily.
2. To clean and to grease:
Clean and grease the knuckle joints and sliding surfaces.
3. Paintwork damage:
• Clean the paintwork damage immediately and prime and protect against
corrosion with the corresponding paint.
• Primer: Epoxy resin 2-component primer
• Top coat: 2-component polyurethane high –solid material.
1997 DESIGN 140T GOTTWALD/JAMALPUR CRANE
ISSUE 1997
Railway Crane
Maintenance Manual
Ropes and Lifting Gear
5.15
(P-1/1)
5.15.1 Ropes
5.15.2 Hook Blocks
1997 DESIGN 140T GOTTWALD/JAMALPUR CRANE
ISSUE 1997
Railway Crane
Maintenance Manual
Ropes
5.15.1
(P-1/3)
Description
The ropes are of the following types:
Hoist ropes:
rotation, resistant, flexible hoist rope with a compacted steel
core (langs lay);
Derricking ropes:
8-strand rope made out of conventional strands (langs lay)
Safety Instructions
Before maintenance work is performed, it must be ensured that the crane cannot be
switched on and is secured against rolling.
In addition, a “Maintenance work” warning sign must be visibly affixed to both in and
outside the cab.
Remove ignition key and battery main switch and secure against any unauthorised start.
The crane must not be in the way of other vehicles.
Ensure that no one is near hot or moving parts – danger of getting burnt, crushed or
drawn into the equipment!
Use caution near the overhead lines! Do not climb up onto the crane superstructure.
Maintenance Instructions
Inspection:
Wire ropes are consumable items with a limited life. This is why the wire ropes and rope
fittings must be inspected daily. The complete length of the ropes must be inspected. In
addition, the wire ropes must be examined for operating safety by a competent person in
regular intervals. The intervals should be scheduled so that any damage will be detected
early. This is what during the first few weeks after the installation of a new rope and
after the first broken wire or other damage the intervals should be reduced accordingly.
If the rope has been overloaded or if non-visible damage is suspected, the intervals
between examinations should be reduced accordingly (if required, every few hours)
Moreover, an examination should be carried out when the rope is put back into service
after long periods of standstill.
A wire rope must be removed in time to maintain crane operating safety. The following
criteria based on DIN (German Industrial Standards) 15020 determine whether a rope
must be discarded:
1a) Type and number of wire breakagesMain hoist and derricking ropes (rope diameter: 26 mm):
If the rope shows more than 5 wire breakages on a length of 6 x diameter or 10
on a length of 30x diameter, the rope is unserviceable and must be discarded.
Auxiliary hoist ropes (rope diameter: 22mm):
If the rope shows more than 5 wire breakages on a length of 6 x diameter or 13
on a length of 30 x diameters, the rope is unserviceable and must be discarded.
1b) Position of the wire breakages
When wire basketing occurs or if a stand breaks, the rope is immediately
unserviceable.
1997 DESIGN 140T GOTTWALD/JAMALPUR CRANE
ISSUE 1997
Railway Crane
Maintenance Manual
Ropes
1c)
2.
3.
4
5
5.15.1
(P-2/3)
Inevitable wire breakages
As wire breakage occurs after a certain number of operating hours and then the
number increases more quickly, it is recommended to observe the times in which
breakages occur so as to be able to judge the overall condition of the rope.
Rope diameter contraction during operating time:
If the rope diameter over a greater length is reduced by 15% or more from the actual
measured rope diameter in new condition (nominal damage) the rope is no longer
serviceable.
Corrosion:
To what degree the ropes are subject to corrosion will depend very much on the
crane site (e.g. ocean atmosphere). Should the rope show a high degree of corrosion,
the rope is no longer serviceable.
Wear through friction:
If the rope diameter is reduced by 10% or more through wear by friction the rope is
no longer serviceable.
Rope deformations
Deformations in the rope such as waviness, birdcaging, loop formations, loose wires,
nodes, rope thinning, misplaced outer wires, kinks and flat areas are visible changes
in the rope structure. A rope with such deformation is no longer serviceable.
Rope change:
If a rope change is necessary, it must be ensured that a wire rope of the same type and breaking
strength as the original wire rope in new condition is fitted. When a new rope is being
mounted, ensure that it is not twisted. Prior to operating with a newly fitted rope, it must be
ensured that the rope is properly reeved and guided in the grooves of the rope drum, rope
pulleys and the compensation rollers. In particular, for the ropes on the derricking gear (2 ropes
on drum), it is advisable to always change both ropes at the same time to ensure the same rope
quality and to maintain the same inspection and maintenance intervals.
Functional test:
In particular, a functional test without load is to be conducted after a rope change. During the
test it should be ensured that the rope runs smoothly, the rope coils properly and the limit
switches function. After a wire rope has been mounted and before it begins its actual works,
load tests with very light loads should be carried out for at least an hour.
Cleaning, greasing:
Wire popes must undergo maintenance regularly. However the kind of maintenance will
depend on how much the rope is used. Regular maintenance may considerably increase the
service life of steel wire rope. During production, the rope receives intensive lubrication. This
in-process treatment will provide the rope with ample protection against corrosion and is meant
to reduce the friction between the elements which make up the rope as well as the friction
between rope and sheaves or drums. This lubrication, however, only lasts for a limited time and
should be re-applied periodically. When choosing the relubricant, it must be ensured that it is
in accordance with the recommendations of the rope manufacturer.
It is important that relubrication of steel wire ropes is carried out regularly right from
the beginning of the service life of the rope and not only after the first damage has been
ascertained !
Clean the ropes with a suitable aid and then lubricate. As dirt can reduce the service life of a
rope considerably, depending on crane site, it may be necessary to clean and grease the rope inbetween the indicated intervals.
1997 DESIGN 140T GOTTWALD/JAMALPUR CRANE
ISSUE 1997
Railway Crane
Maintenance Manual
Ropes
5.15.1
(P-3/3)
1997 DESIGN 140T GOTTWALD/JAMALPUR CRANE
ISSUE 1997
Railway Crane
Maintenance Manual
Hook Blocks
5.15.2
(P-1/2)
Description
The crane has two hook blocks each for the main hoist and the auxiliary hoist.
Safety Instructions
Before maintenance work is performed, it must be ensured that the crane cannot be
switched on and is secured against rolling.
In addition, a “Maintenance Work” warning sign must be visibly affixed to both in and
outside the cab.
Remove ignition key and battery main switch and secure against any unauthorised
start.
The crane must not be in the way of other vehicles.
Ensure that no one is near hot or moving parts – danger of getting burnt, crushed or
drawn into the equipment!
Use caution near the overhead lines! Do not climb up onto the crane Superstructure!
Mortal danger!
Maintenance instructions
1. Visual check:
Check the entire hook block for external damage and cracks. Any damaged parts
must be replaced immediately!
1997 DESIGN 140T GOTTWALD/JAMALPUR CRANE
ISSUE 1997
Railway Crane
Maintenance Manual
Hook Blocks
5.15.2
(P-2/2)
1997 DESIGN 140T GOTTWALD/JAMALPUR CRANE
ISSUE 1997
Railway Crane
Maintenance Manual
Fuel, Oil and lubricant Chart
6
(P-1/3)
Symbol/
Fluid/
Filling Capacity:
A Diesel engine oil
Filling capacity:
approx. 39 l
incl. filter- change
B
Diesel engine
Coolant
Filling capacity:
75 l mixture
incl. filter change
C
Emergency diesel
engine oil Filling
capacity approx. 5.5
litres
Classification
Ambient temperature range:
SAE Viscosity
API CE
Please note: Observe the Cummins
User’s Manual
50% anti-freeze with lower
silicate percentage as per GM
6038-M
50% soft water (Degree of
hardness < 300 ppm) with
Fleet guard DCA4-share of 1
to 2 units per 3.8 litres of
coolant
SAE viscosity
Temperature
range:
SAE viscosity
class:
-400 to +200C
-250 to +200C
-100 to +450C
SAE 5 W 30
SAE 10 W 30
SAE 15 W 30
Please note: Observe the Cummins
User’s Manual.
All zones outside arctic temperature
zones.
Please note: Observe the Kirloskar
User’s Manual
Temperature
SAE viscosity
range:
class:
-50 to + 450C
-100 to +400C
-200 to +200C
D
E
Diesel fuel for diesel
engine and
emergency diesel
engines
Lube oils for Pumpdistributor gearbox
Filling capacity
approx. 6 litres
SAE 20 W 40
SAE 15 W 40
SAE 10 W 30
IS-No. 1460
Please note: Observe the Cummins /
Kirloskar User’s Manuals
As per DIN 51517 T3: CLP
150 ISO viscosity as per DIN
51519: ISO-VG 150
Kinematic viscosity: min. 135
mm2/s (cSt) max. 165 mm2/s
(cSt) FZG test A/8.3/90 as per
DIN 51354 T2: min.
breakdown load stage 12
Oil brands: see Lohmann und
Stolterfoht- User’s Manual
1997 DESIGN 140T GOTTWALD/JAMALPUR CRANE
ISSUE 1997
Railway Crane
Maintenance Manual
Fuel, Oil and lubricant Chart
6
(P-2/3)
Symbol/
Fluid/
Filling Capacity:
F Molykote copper
Classification
Ambient temperature range:
Cu 7439 Plus
Please note: Observe the BSI-Verkehrs
technik User’s Manual.
G
Creep oil
Please note: Observe the BSI-Verkehrs
technik User’s Manual.
To carry out magnetic powder
test
To carry out magnetic powder
test
To clean dirty components
Please note: Observe the BSI-Verkehrs
technik User’s Manual.
Please not: Observe the BSI-Verkehrs
technik User’s Manual.
Please note: Observe the BSI-Verkehrs
technik User’s Manual.
Temperature
SAE viscosity
range:
class:
SAE viscosity API CC or CD
00 to +600C
-50 to +500C
-150 to +400C
-250 to +300C
As per DIN 51517 T3: CLP
150 LS 2
ISO viscosity as per DIN
51519: ISO-VG 100
Kinematic viscosity: min. 90.0
mm2/s (cSt) max. 110.0 mm2/s
(cSt) FZG test A/8,3/90 nach
DIN 51354 T2: min.
breakdown load stage 12
Oil brands: see Lohmann und
Stolterfoht User’s Manual
H
I
J
K
L
paste for lubrication
of bearings knuckle
joints + brake
cylinder expanders
To loosen brake
cylinder expander
unit fitting +
connections.
Brake test agent
Brake magnetic test
powder
Brake chemical
agents
Undercarriage air
pressure compressor
lube oil
Filling capacity: of
each: 0.5 l
Lube oil for:
• slew gear
reduction unit
Filling capacity:
approx. 15.5 l
• Main hoist
reduction gear
unit
Filling capacity
approx. 6.5 l
• Auxiliary hoist
reduction gear
unit.
1997 DESIGN 140T GOTTWALD/JAMALPUR CRANE
SAE 40
SAE 30
SAE 20
SAE 10
ISSUE 1997
Railway Crane
Maintenance Manual
Fuel, Oil and Lubricant Chart
6
(P-3/3)
Symbol/
Fluid/
Filling Capacity:
M
N
O
P
Q
Filling capacity:
approx. 6.5. l
• Derricking gear
reduction unit
Filling capacity:
approx. 9.5 l
• Recovery winch
reduction unit
Filling capacity:
approx, 3.4 l
• Travel gear
reduction unit.
Filling capacity
of each: 12 l
Lube grease for
counter bearing on
* Main hoist
reduction- gear unit
* Auxiliary hoist
reduction gear unit
* Derricking
reduction
gear unit
Hydraulic oil
Gearwheel /pinion
lube grease
Roller slew ring lube
greaseAxle gearbox pinion
lube grease
Classification
Ambient temperature range:
Lithium –MZ grease
NLGI 3 K2K DIN 51825
All zones
ATF ESSO SUFFIX A
all zone
ESSO EP Grease 350
-200 - +1200C
ESSO Beacon EP25
-250 - +1300C
Like O
1997 DESIGN 140T GOTTWALD/JAMALPUR CRANE
ISSUE 1997
Railway Crane
Maintenance Manual
Torque Moments
7
(P-1/1)
The bolt torque moments indicated here apply when no other values for the torque moments of the
individual bolts are provided in the Maintenance Manual. The bolt size is based on the metric system
in accordance with DIN (German Industrial Standards) and the bolt quality is based on ISO 898,
Section I.
Bolt Classification
Bolt Size
M4
M5
M6
M8
M 10
M 12
M 14
M 16
M 18
M 20
M 22
M 24
M 27
M 30
M8X1
M 10 X 1.25
M 12 X 1.25
M 12 X 1.5
M 14 X 1.5
M 16 X 1.5
M 18 X 1.5
M 20 X 1.5
M 22 X 1.5
M 24 X 2
M 27 X 2
M 30 X 2
8.8
2.8 Nm
5.5 Nm
9.6 Nm
23 Nm
46 Nm
79 Nm
125 Nm
195 Nm
280 Nm
395 Nm
540 Nm
680 Nm
1,000 Nm
1,350 Nm
25 Nm
49 Nm
87 Nm
83 Nm
135 Nm
210 Nm
315 Nm
440 Nm
590 Nm
740 Nm
1,100 Nm
1,500 Nm
10.9
4.1 Nm
8.1 Nm
14 Nm
34 Nm
67 Nm
115 Nm
185 Nm
290 Nm
400 Nm
560 Nm
760 Nm
970 Nm
1,450 Nm
1,950 Nm
37 Nm
71 Nm
130 Nm
120 Nm
200 Nm
310 Nm
450 Nm
630 Nm
840 Nm
1,050 Nm
1,550 Nm
2,150 Nm
1997 DESIGN 140T GOTTWALD/JAMALPUR CRANE
12.9
4.8 Nm
9.5 Nm
16 Nm
40 Nm
79 Nm
135 Nm
220 Nm
340 Nm
470 Nm
660 Nm
890 Nm
1,150 Nm
1,700 Nm
2,300 Nm
43 Nm
83 Nm
150 Nm
145 Nm
235 Nm
360 Nm
530 Nm
730 Nm
980 Nm
1,250 Nm
1,800 Nm
2, 500 Nm
ISSUE 1997
Railway Crane
Maintenance Manual
Maintenance Diagrams
8
(P-1/1)
8.1
8.2
8.3
Undercarriage Maintenance Diagram
Superstructure maintenance Diagram
Boom Maintenance Diagram
1997 DESIGN 140T GOTTWALD/JAMALPUR CRANE
ISSUE 1997
Railway Crane
Maintenance Manual
Undercarriage Maintenance Diagram
8.1
(P 1/1)
1997 DESIGN 140T GOTTWALD/JAMALPUR CRANE
ISSUE 1997
Railway Crane
Maintenance Manual
Superstructure maintenance Diagram
8.2
(P 1/1)
1997 DESIGN 140T GOTTWALD/JAMALPUR CRANE
ISSUE 1997
Railway Crane
Maintenance Manual
Boom Maintenance Diagram
8.3
(P-1/1)
1997 DESIGN 140T GOTTWALD/JAMALPUR CRANE
ISSUE 1997
Railway Crane
Maintenance Manual
Supplier Documentation
9
(P-1/1)
0
1
2
3
4
5
6
7
8
9
10
11
12
13
14
Recovery winch Type: GFT 36 W3 2021
Derricking gear: type: GFT W3 8228, German
Hoist 1: Type: GFT W3 8228, German
Hoist 2: Type: GFT 26 W2 8022, German
Slewing gear: Type: GFB 80 T3 1008, German
SAB brake unit, mode PBACF servicing regulations
SAB brake unit, model PBAC servicing regulations
Gutehoffnungshutte Radsatz GmbH / Drive and running wheel sets
BSI - wheel brake disk manual R780G
BSI - brake cylinder expander unit manual
PAT- safe load indicator / Operating Manual IK350/1327
Wabco, Instruction Recommendations and Maintenance Instructions for the
compressors
Kirloskar Oil Engines limited Type: HA 294
Cummins Diesel Engine
Pump distributor gearbox GFC 230 1048
1997 DESIGN 140T GOTTWALD/JAMALPUR CRANE
ISSUE 1997