1
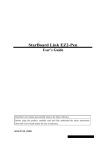
StarBoard FX-79E1 StarBoard FX-89WE1 User’s Guide Read this User's Guide and carefully retain it for future reference. Before using this product, carefully read and fully understand the safety instructions. Store this User's Guide nearby for ease of reference. FXE1-ML120901 StarBoard FX-79E1/89WE1 Notices Reproduction or reprinting, without permission, of this User's Guide or any part thereof is prohibited. The contents of this User's Guide are subject to change without prior notice. Every effort has been made to ensure that this User's Guide is complete and correct. However, should any questionable points, mistakes, etc., come to your attention, please inform the vendor. Hitachi Solutions, Ltd., assumes no responsibility for losses resulting from or related to the use of this product. Refer to "3. Appendix 3.4 Product Warranty Policy" at the end of this User's Guide for details on the warranty and liabilities. Precautions Regarding Disposal At time of disposal, handle this product as industrial waste according to all applicable laws and regulations. Disclaimers Hitachi Solutions, Ltd. assumes no liability and makes no warranty, either express or implicit, regarding the contents of this User's Guide. Also, the company makes no warranty as to the product's suitability, merchantability or fitness for a particular intended use. All products of Hitachi Solutions, Ltd., described in this User's Guide are presently for sale or are site-licensed. Users who purchased the aforesaid product(s) will bear the costs of all required services, repairs, and damages resulting from defects in this product, and will bear the costs of direct or indirect damages (including the loss of profits or required information) that resulted from the product defects. Moreover, Hitachi Solutions, Ltd., retains the right to revise this User's Guide and to modify the contents thereof, without any obligation to notify anyone. 1 English StarBoard FX-79E1/89WE1 Product Assurance Provisions This product is limited to use in the country where the user bought this product. For warranty details, refer to "3. Appendix 3.4 Product Warranty Policy" at the end of this User's Guide. This Fourth version of the User's Guide (FXE1-ML120901) is for the following products: AH00329: AH00332: StarBoard FX-79E1 StarBoard FX-89WE1 Windows is a trademark of Microsoft Corporation (U.S.) and in other countries. Mac and Mac OS are trademarks of Apple Inc., registered in the U.S. and other countries. Other trademarks and product names are trademarks and/or registered trademarks of their respective holders Manual Creation Dates September 2012, Fourth edition FXE1-ML120901 All Rights Reserved, Copyright(c) 2011, 2012 Hitachi Solutions, Ltd. 2 English StarBoard FX-79E1/89WE1 Introduction Thank you very much for purchasing Hitachi solutions’ StarBoard FX-79E1/89WE1 (henceforth referred to as “StarBoard”). This User’s Guide has been created for people who already have a working knowledge of personal computers (henceforth referred to as “PC”). Please make sure that you understand the contents of this User’s Guide and use the software correctly. We hope that you make the most of this product. 3 English StarBoard FX-79E1/89WE1 Safe Handling Safe Handling Markings and Symbols Various markings and symbols are used in this User’s Guide and on this product, to ensure the safe and correct use of this product and to prevent personal injury and property damage. These symbols and their meanings are as explained below. Understand the information well before reading the body of the User’s Guide. This is a Safety Warning symbol. This symbol will appear to raise the attention of the user to existing risks that may cause harm to people. To avoid any chances of injuries or possibly death, DO NOT IGNORE the safety instructions that follow this symbol. WARNINGS This warning will appear where there exists a risk of death or fatal injuries. CAUTIONS This warning will appear where there exists a risk of moderate or light injuries. NOTICE This warning will appear where there exists a risk of damage to property. This symbol draws attention to cautions (including warnings). This symbol indicates something prohibited. This symbol indicates something that must be done. 4 English StarBoard FX-79E1/89WE1 Safe Handling Safe Precautions Required Precautions (1) Precautions Regarding Operation WARNINGS Do not make modifications. Do not make any adjustments, repairs, or modifications not given in this User's’Guide as doing so may lead to personal injury or damage to the product. Do not open or remove cover of this product. Failure to comply may lead to personal injury or damage to the product. Refer internal inspections, adjustments, and repairs to your dealer or support center. Do not place objects on top of this product. If a foreign object falls on top of or inside this product, it may lead to personal injury or damage to the product. CAUTIONS In order to prevent damage by static electricity, touch a nearby metal object with your hand to discharge any static electricity before touching this product. Static electricity from your body may cause damage to this product. NOTICE Do not allow the LED cover surrounding the board to become dirty or scratched. If the LED cover becomes dirty or scratched, it may lead to improper coordinate detection. Do not use a USB cable extended. Use of a USB cable extended may result in malfunction. Do not use any cables other than those provided. Furthermore, do not use cables that are longer than 5m. Do not place heavy objects on, pull on, or subject the USB cable to excess heat. Failure to comply may result damage to the USB cable. Always grasp the plug of the USB cable when connecting or disconnecting. Pulling on the USB cable may result in scratching or damage to the cable. Always lock the casters with stoppers on the front side after installing this product. Failure to lock the casters may allow the product to move or slide. 5 English StarBoard FX-79E1/89WE1 Safe Handling (2) Dealing with Trouble CAUTIONS What to do in case of emission of smoke, strange odor, or strange noise If an abnormal condition such as emission of smoke, strange odor, or strange noise happens to occur for some reason, immediately disconnect the product's’USB cable from the PC. Confirm that the smoke or strange odor is no longer being emitted and contact a support center to request repairs. Continued operation without repair may result in fire. What to do if the product breaks or the USB cable is damaged If this product breaks or the USB cable becomes damaged for some reason, immediately disconnect the USB cable from the PC and contact a support center. Continued operation without repair may result in emission of a strange odor or smoke. (3) Precautions Regarding Handling WARNINGS Do not hang from or climb on this product. Failure to comply may result in personal injury if the product falls, collapses, or breaks into pieces. Be particularly careful in the case of small children. CAUTIONS Do not splash with water or chemical compounds. Do not place this product in a location subject to contact with water droplets or place any containers containing water or other chemical compounds on top of or nearby this product. Failure to comply may result in damage or fire if water or chemical compounds get inside this product. 6 English StarBoard FX-79E1/89WE1 Safe Handling NOTICE Disconnect the USB cable during extended periods of non-use. For safety reasons, disconnect the USB cable if the product is not going to be used for an extended period of time. Failure to comply may result in malfunction. Handle the connection cable properly. Improper handling of the connection cable such as jamming it against a wall, undue bending, pulling, or twisting may result in overheating or damage due to exposure of the conductive core, electrical short, or severing of the cable. (4) Precautions Regarding Moving the Product CAUTIONS Always use two or more people to move this product. This product is a very large and heavy precision instrument. Always use two or more people and take great care when moving this product. Result in the personal injury or breakdown if the product falls over. Always disconnect the USB cable from the PC when moving this product. Failure to comply may result in damage to the USB cable and/or the product itself. Do not subject to shock of impact. This product is a precision instrument. Excessive shock of impact may hinder further operation. Take extreme care when moving this product. 7 English StarBoard FX-79E1/89WE1 Safe Handling (5) Precautions Regarding Setup Environment WARNINGS Wall mounting work should be performed by a construction specialist. Improper work may result in death or personal injury due to the product falling during operation. Always use the specified mounting unit. Improper assembly may cause the product to fall over. There is risk of personal injury if the product falls over. Completely tighten the screws of all individual parts. Install this product on a flat wall. Installing this product on an uneven wall such as bumpy or curved surfaces may cause the product to operate improperly or fall over, resulting in personal injury or product malfunction. Do not place in a location with flammable or corrosive gas. Placing this product in a location where there is flammable or corrosive gas may result in fire or damage to this product. There is a particular danger of explosion in the case of flammable gas. Do not place in a location with flammable or corrosive gas. CAUTIONS Do not touch internally mounted parts. Directly toughing internally mounted parts inside this product may result in personal injury or damage to this product. Do not place in locations subject to excess moisture, dust, smoke, or steam. Placement in a location such as next to a kitchen or a humidifier may result in fire or damage to this product. Do not use this product near water. If water somehow gets inside this product, immediately disconnect the USB cable and contact a support center. Continued use may result in fire or damage to this product. 8 English StarBoard FX-79E1/89WE1 Safe Handling NOTICE Regarding the setup environment Set up this product on a level floor surface with a weight bearing capacity of 150 kg/m2 or more, and which is made of floor materials that will not deform or become depressed due to movement by casters. Do not use this product in locations subject to high temperature or high humidity. This product's’usage environment conditions: Temperature: 5°C – 35°C Humidity: 20%RH – 80%RH (no condensation) Do not set up in locations subject to vibration and/or shock of impact. Vibration and/or shock of impact may harm internal components of this product, resulting in damage to it. Do not set up this product in a location subject to vibration or shock of impact. Do not set up this product near a high-voltage line or power source. If this product is set up near high-voltage lines or power sources, it might receive interference. Do not set up in a location subject to direct sunlight or near a heater. Failure to comply may result in deformation of or damage to this product. (6) Precautions Regarding Disposal NOTICE At time of disposal, handle this product as industrial waste according to all applicable laws and regulations. When disposing of this product, the user should follow all laws and regulations of the locality in which it is being used. 9 English StarBoard FX-79E1/89WE1 Safe Handling Careful thought was given to the cautions on this device and in this User's’Guide. However, unanticipated circumstances might occur. When operating this product, users themselves must exercise caution as well as follow instructions. WARNINGS Warnings Contents Page(s) Install this product on a vertical and flat surface. Do not install this product on a slanting surface, ceiling or uneven wall. Otherwise, the equipment might fall, possibly resulting in injury, or the impact might cause product failure. P.1-6 Keep the wall material in mind when installing. Installation by means not suited to the wall material in question may result in the board falling. Furthermore, wall installation may not be possible depending on the wall. For details, consult P.1-6 with your dealer. Keep the wall strength in mind when installing. Only use this product after confirming that it is securely attached and will not fall. Furthermore, P.1-6 be sure to install using a wall-mounting bracket capable of supporting a weight of at least 50 kg. Wall mounting work should be performed by a construction specialist. Improper work may result in death or personal injury due to the product falling during operation. P.1-8 Always use the specified mounting unit. Tighten the screws securely. Failure to comply may cause the board to fall, resulting in personal injury, or may cause damage P.1-9 to this product due to shock of impact from the board falling. CAUTIONS Cautions Contents Be sure to use three or more people for this work. Failure to comply may cause the board to fall, resulting in personal injury, or may cause damage to this product due to shock of impact. Do not strike the board forcefully with the stylus pen, bend it, or apply an excessive load to it. Page(s) P.1-8 P.1-10 P.2-3 Failure to comply may result in damage to the stylus pen or personal injury. 10 English Contents Safe Handling StarBoard FX-79E1/89WE1 NOTICE Notice Contents - Select a level and stable position. - Do not set it up near equipment that might generate electromagnetic waves or radio frequencies, such as radio transmitters, televisions, copying machines or air conditioners. - Avoid locations that are dusty, that are subject to extremely high or low temperatures or humidity, or that are exposed to direct sunlight. Do not touch board at the time of plugging USB cable. It may cause of malfunction. Do not scrape or strike the board surface by stylus pen. Failure to comply may result in damage on the board surface. Page(s) P.1-6 P.1-11 P.2-1 Use an input tool with a thickness of least 7 mm. When inputting to this product, use a tool that is at least 7 mm. If a pen or similar tool with a thickness of less than 7 mm is used, the input will be unstable. Also, do not use tools with a sharp tip, such as a ballpoint pen. If such a tool is used incorrectly, it could damage the surface of the board. Sleep mode is unavailable on Windows XP. Unplug USB cable from StarBoard if you use sleep mode. 11 P.2-1 P.2-1 English Contents StarBoard FX-79E1/89WE1 Contents 1. INTRODUCTION ..................................................................................................................... 1-1 1.1 PREPARATIONS ........................................................................................................................ 1-1 1.1.1 Product Outline ............................................................................................................... 1-1 1.1.2 Features........................................................................................................................... 1-1 1.2 PARTS CHECK ......................................................................................................................... 1-2 1.2.1 StarBoard ........................................................................................................................ 1-2 1.2.2 Stand (option) ................................................................................................................. 1-3 1.2.3 StarBoard FX-79E1/89WE1 Stand Stay (option) ........................................................... 1-3 1.3 ROLE OF EACH PART ............................................................................................................... 1-5 1.3.1 StarBoard ........................................................................................................................ 1-5 1.3.2 Function Area ................................................................................................................. 1-6 1.4 ASSEMBLY AND SETUP ............................................................................................................ 1-7 1.4.1 Wall-Mounting Setup Method ........................................................................................ 1-7 1.4.2 Stand Setup Method ...................................................................................................... 1-10 1.4.3 Equipment Connection Method .................................................................................... 1-14 2. HOW TO USE ............................................................................................................................ 2-1 2.1 BASIC OPERATIONS ................................................................................................................. 2-1 2.1.1 Character Input ............................................................................................................... 2-1 2.1.2 PC Operations ................................................................................................................. 2-2 2.2 START METHOD ...................................................................................................................... 2-4 2.2.1 Start Method (Windows virsion)..................................................................................... 2-4 2.2.2 Start Method (Mac version) .......................................................................................... 2-5 3. APPENDIX ................................................................................................................................. 3-1 3.1 TROUBLESHOOTING ................................................................................................................ 3-1 3.2 SYSTEM SPECIFICATIONS ........................................................................................................ 3-3 3.3 PROPER CARE AND CLEANING .............................................................................................. 3-4 3.4 PRODUCT WARRANTY POLICY ................................................................................................ 3-5 12 English StarBoard FX-79E1/89WE1 Introduction 1. Introduction 1.1 Preparations This chapter describes the preparations to be made before using StarBoard. First-time users of StarBoard should read through this chapter. 1.1.1 Product Outline The StarBoard is an extremely convenient and easy-to-use electronic whiteboard. After setting up the provided software on a PC that is connected to a projector, you can use your finger or the stylus pen (option) that is included with the product to operate the PC or import to the PC in real time characters or images that are drawn on the whiteboard. 1.1.2 Features - You can use your finger or the pen to operate the PC You can use your finger or the pen to operate a PC screen that is projected onto the board with a projector. Two pen types are available: the stylus pen that is included with the product. - You can write two people at the same time Two people can input simultaneously with dedicated purpose tools or contents. It is effective for class and presentation. - You can write directly onto the PC screen After installing the provided StarBoard Software onto a PC, you can use your finger or the pen to write characters or images directly onto the PC screen. The input characters or drawn images are imported as digital data in real time into the PC, where they can be saved or printed. - Compatible with PowerPoint presentations Characters or images can be written into presentations created with Microsoft PowerPoint, which significantly improves the expressive power of the presentations. - You can also write on video images (For Windows) Characters or images can be written onto captured video image displays. This makes it easy to use video materials in lessons or presentations. 1-1 English StarBoard FX-79E1/89WE1 Introduction 1.2 Parts Check After unpacking, make sure that all the following parts are present. 1.2.1 StarBoard [1] Parts No. Name Qty (1) StarBoard 1 (2) USB Cable (5m) 1 (3) Wall-mounting bracket 4 (4) Nut & bolt set 4 (5) Stylus pen 1 (6) StarBoard Software DVD-ROM 1 (7) StarBoard Software Startup Guide 1 (8) StarBoard FX-79E1/89WE1 Startup Guide 1 (9) Warranty Sheet 1 (2) (1) (3) (4) (8) (6) (5) (7) (9) 1-2 English StarBoard FX-79E1/89WE1 Introduction 1.2.2 Stand (option) [1] Parts No. Name Qty. (1) Stand vertical support 2 (2) Stand crossbar 2 (3) Stand foot with casters 2 (4) Board receiving bracket (left-hand version) 1 (5) Board receiving bracket (right-hand version) 1 (6) Board fixing bracket 2 (7) Hex socket head cap screw, with collar 8 (8) Hex socket head cap screw 4 (9) Panhead screw 8 (10) Triangular knob screw 2 (1) (2) (3) (4) (5) (6) (7) (8) (9) (10) [2] Accessories No. Name Qty. (1) Allen wrench 1 (2) Allen wrench holder 1 (2) is used to prevent the loss of the Allen wrench. Hang it in the appropriate place on the stand. (1) (2) 1-3 English StarBoard FX-79E1/89WE1 Introduction 1.2.3 StarBoard FX-79E1/89WE1 Stand Stay (option) [1] Parts No. Name Qty. (1) stay 2 (2) Nut & bolt set 4 (1) (2) 1-4 English StarBoard FX-79E1/89WE1 Introduction 1.3 Role of Each Part 1.3.1 StarBoard (1) (1) (2) (3) (4) (1) Function Area (Left and Right) (4) Casters (Parts of stand) Shortcut buttons for functions that are frequently used in applications are located here. (Refer to the next page for details.) These are the casters for moving the board. After setting up the StarBoard, be sure to lock the casters. Lift up the tab to unlock a caster and press down the tab to lock it. (2) Input Area Characters or images drawn in this area are imported into the PC. When using the StarBoard in Projection Mode, make sure that the image projected from the projector is kept within this area. Locked (3) USB Cable Unlocked Used to connect the StarBoard with the PC. 1-5 English StarBoard FX-79E1/89WE1 Introduction 1.3.2 Function Area The function area is provided with shortcut keys for the functions that are frequently used in the StarBoard Software. Use by clicking the middle of the symbol with your pen or finger. When using Windows, all buttons except for the one-time right click switching button can be customized. You cannot customize the shortcuts with the software for Mac. Refer to the online help for details. The default settings are as follows. Symbol Description Select one-time right click. (*1) Hides/displays the Software Toolbar. Symbol StarBoard Description Select Solid Pen (black). Select Solid Pen (red). Adds a new blank page. Select Solid Pen (blue). Show previous page. Select Solid Pen (green). Show next page. Select Fluorescent Marker Pen. Hides/displays the Topic List. Select Eraser. Switch to PC Operation. Customizable button 1 (Calibration is set as the default) Customizable button 2 (Unassigned) (*1) About one-time right click: - When the one-time right click function button is pressed, the next finger input becomes right-click operational one time only. - If the function button is pressed, the one-time right click operation is not cancelled until a finger input is made. 1-6 English StarBoard FX-79E1/89WE1 Introduction 1.4 Assembly and Setup When setting up the board, keep the following in mind. WARNINGS Install this product on a vertical and flat surface. Do not install this product on a slanting surface, ceiling or uneven wall. Otherwise, the equipment might fall, possibly resulting in injury, or the impact might cause product failure. NOTICE - Select a level and stable position. - Do not set it up near equipment that might generate electromagnetic waves or radio frequencies, such as radio transmitters, televisions, copying machines or air conditioners. - Avoid locations that are dusty, that are subject to extremely high or low temperatures or humidity, or that are exposed to direct sunlight. 1.4.1 Wall-Mounting Setup Method WARNINGS Keep the wall material in mind when installing. Installing the board on to the wall in a way that does not suite the wall material, may result in the board falling off the wall causing injuries or damage to the board. Furthermore, wall installation may not be possible depending on the wall. For details, consult with your dealer. Keep the wall strength in mind when installing. Only use this product after confirming that it is securely attached and will not fall. Furthermore, be sure to install using a wall-mounting bracket capable of supporting a weight of at least 50 kg. 1-7 English StarBoard FX-79E1/89WE1 Introduction [1] Install the wall-mounting brackets Determine the height at which the board will be installed, and install the wall-mounting brackets onto the StarBoard at the positions shown in the diagram below. The wall-mounting brackets are provided with the StarBoard. ((3) on page 1-2) More than 1300mm Tighten with the spanner Back of the board More than 1300mm 1-8 English StarBoard FX-79E1/89WE1 Introduction [2] Install the board Prepare the following tools. -Spanner (10mm diameter) -Hexagon wrench (large, small) *Provided as an accessory -Screwdriver WARNINGS Wall mounting work should be performed by a construction specialist. Improper work may result in death or personal injury due to the product falling during operation. Always use the specified mounting unit. CAUTION Be sure to use three or more people for this work. Failure to comply may cause the board to fall, resulting in personal injury, or may cause damage to this product due to shock of impact. Use the screws to install the wall-mounting bracket on the wall. Use 4-6 mm diameter screws 1-9 English StarBoard FX-79E1/89WE1 Introduction 1.4.2 Stand Setup Method Reconfirm that all the parts are present before assembling and setting up the stand (option). WARNINGS Tighten the screws securely. Failure to comply may cause the stand to collapse, resulting in personal injury, or may cause damage to this product due to shock of impact from the board falling. CAUTION This work should be performed by at least two people. The board might fall and cause injury or its impact might cause damage. [1] Assemble the stand FX-79E1/89WE1 is available with the stand. Follow the diagram below to install the board on the stand. The numbers in the diagram correspond to the numbers in the parts tables on pages and 1-3 of this User's Guide. (1) (4) (9) (7) (5) (6) (9) (2) (7) Long Short Align both feet with the Fasten with a Phillips screwdriver. longer side facing forward (3) Fasten with an Allen wrench. (8) 1-10 English StarBoard FX-79E1/89WE1 Introduction [2] Adjust the height Follow the diagram below to install the stay. The numbers in the diagram correspond to the numbers in the parts tables on pages and 1-4 of this User's Guide. 372mm 1108mm 372mm Tighten with the spanner Back of the board (2) (1) 372mm 1108mm 372mm (2) <FX-79E1> 1-11 English StarBoard FX-79E1/89WE1 535mm Introduction 1108mm 535mm Tighten with the spanner Back of the board (2) (1) 535mm 1108mm 535mm (2) <FX-89WE1> 1-12 English StarBoard FX-79E1/89WE1 Introduction [3] Adjust the height Install the board on the stand assembled in step (1). Install the board according to the following procedure. Furthermore, this step should be performed by at least two people. Numbers in the diagram correspond to numbers in the parts list on page 1-3. Board (a) Decide the level (out of six) at which the board will be installed, and use the square holes on the back of the board to hang it on the Height Adjustment Stay. (4)(5) (b) Verify that one of the board’s square holes is attached securely to the Height Adjustment Stay on each side. (6) (10) (c) Tighten triangular knob screw to fasten the board to the board fixing bracket on each side. [4] Adjust the height The StarBoard can be positioned at six height levels. Adjust the height according to the following procedure. Furthermore, this work should be done by at least two people. (a) Loosen the screws shown in (5) in the figure on page 1-9. (b) Lift the board to the installation height. (b) (c) Tighten the screws shown in (5) with a spanner. (a)(c) 1-13 English StarBoard FX-79E1/89WE1 Introduction 1.4.3 Equipment Connection Method Before Starting to Connect Equipment Install the StarBoard Software on your PC before starting to connect equipment. The equipment might not operate correctly if it is connected without the software being installed. Connect the PC, projector and StarBoard according to the following procedure. StarBoard (1) (3) (2) (3) Projector (4) PC (4) Power Supply (1) Connect the RGB cable to the projector's RGB connector, and fasten with screws. (2) Connect the opposite side of the RGB cable to the PC's RGB connector, and fasten with screws. (3) Connect the USB connector at the bottom left of the StarBoard to the USB port on the PC using the provided USB cable. (4) Connect the power supply cables of the PC and projector to the power supply. NOTICE Do not touch board at the time of plugging USB cable. It may cause of malfunction. 1-14 English StarBoard FX-79E1/89WE1 Introduction About PC Earth Depending on your PC, an incorrect operation might be caused by PC noise via the USB cable. If this happens, verify that the earth of your PC's power supply cable is connected. If the earth is not connected, it might cause an incorrect operation. For Windows XP When you connect the PC and StarBoard, "Found New Hardware Wizard" window starts up. Select "No, not this time" and click "Next". Select "Install the software automatically (Recommended)" and click "Next". 1-15 English StarBoard FX-79E1/89WE1 How to use 2. How to Use 2.1 Basic Operations This chapter gives a description of the basic operations of the board. 2.1.1 Character Input To input characters, use your finger or the stylus that was provided with the product. NOTICE Do not scrape or strike the board surface by stylus pen. Failure to comply may result in damage on the board surface. Use an input tool with a thickness of least 7 mm. When inputting to this product, use a tool that is at least 7 mm. If a pen or similar tool with a thickness of less than 7 mm is used, the input will be unstable. Also, do not use tools with a sharp tip, such as a ballpoint pen. If such a tool is used incorrectly, it could damage the surface of the board. Sleep mode is unavailable on Windows XP. Unplug USB cable from StarBoard if you use sleep mode. - Using the stylus pen Use the pen on the board with your body kept sufficiently away, so that your palm and elbow do not touch the board. If your hand or elbow touches the board, or you are within 1 cm of the board, it might cause an incorrect operation. 2-1 English StarBoard FX-79E1/89WE1 How to use - Using your finger Extend your finger and touch the board. In the same way as the stylus pen, if you touch the board with anything other than your finger or you are too close to the board, it might cause an incorrect operation. 2.1.2 PC Operations When performing PC operations by pointing or giving presentations without inputting characters, it is convenient to extend the stylus pen and use it as a pointer. 2-2 English StarBoard FX-79E1/89WE1 How to use CAUTION Do not strike the board forcefully with the stylus pen, bend it, or apply an excessive load to it. Failure to comply may result in damage to the stylus pen or personal injury. 2-3 English StarBoard FX-79E1/89WE1 How to use 2.2 Start Method 2.2.1 Start Method (Windows virsion) (1) Connect the devices with reference to the connection method on page 1-11. (2) Turn on the power switch of the projector. (3) Turn on the power switch of the PC to start Windows. (4) Adjust the position of the projector so that the Windows screen projected by the projector is within the input area (refer to page 1-4 of this User's Guide). (5) Select "Start" → "All Programs" → "StarBoard Software," or double-click the StarBoard icon on the desktop. If the "No connection" icon in below appears on the Tasktray, it means that the StarBoard is not connected. Make sure that the StarBoard and the PC are properly connected. Connected No Connection If the StarBoard is properly connected, the icon changes to "Connected" as above. If the icon does not change despite correcting the connection, there may be some other problem. For details, refer to "3. Appendix 3.1 Troubleshooting" on page 3-1 of this User's Guide. If the positions of the pen tip and cursor are out of alignment, select "MENU" on the StarBoard Software toolbar → "Settings" →"StarBoard" → "Calibrate" → "OK". and then perform position alignment. 2-4 English StarBoard FX-79E1/89WE1 How to use 2.2.2 Start Method (Mac version) (1) Connect the devices with reference to the connection method on page 1-11. (2) Turn on the power switch of the projector. (3) Turn on the power switch of the PC to start Mac (4) Adjust the position of the projector so that the Mac screen projected by the projector is within the input area (refer to page 1-4 of this User's Guide). (5) Select "Go" → "Applications" → "StarBoard Software" to start StarBoard Software. (6) Select "MENU" on the StarBoard Software toolbar → "Settings" → "StarBoard" → "Check Connection," and then check the connection. If the "StarBoard is not connected" message appears, StarBoard Software has not detected the StarBoard. Check whether the StarBoard and PC are connected properly. Connected No Connection If they are connected properly, the "StarBoard is connected" message appears. If the indication does not change even though you have checked the connection, there is likely to be some problem. For details, see "3. Appendix Troubleshooting " on page 3-1 in this user's guide. If the positions of the pen tip and cursor are out of alignment, select "MENU" on the StarBoard Software toolbar → "Settings" →"StarBoard" → "Calibrate" → "OK". and then perform position alignment. 2-5 English StarBoard FX-79E1/89WE1 Appendix 3. Appendix 3.1 Troubleshooting Before assuming the product is broken, be sure to check adjustments, proper handling procedures, the possibility of faulty cable connections, etc. Recognition-Related Problems Problem The StarBoard does recognise input. What to check What to do not Is the USB cable connected to Connect the USB cable to the PC. the PC? Is the USB cable connected to the StarBoard? Did you start the system in the correct sequence? Connect the USB cable to the StarBoard. Start the system in the correct sequence. (For details on starting the system, see page 2-4 of this User's Guide.) StarBoard Software files may be Uninstall the StarBoard Software and broken or installation may not be then re-install it. complete correctly. (For details on installing StarBoard Software, see the StarBoard Software Installation Guide.) Other than the above Contact a support center. StarBoard unstable operations are Is something blocking light from Remove the blockage. reaching the board surface or LED cover? Is the LED cover dirty? Wipe away any dirt from the LED cover. The controller must be reset and Disconnect the USB cable and the system restarted. reconnect it. If this does not solve the problem, restart the PC. In case that USB cable extended as bellow, it may result in unstable of product working. ・USB extension cable ・Bus-powered USB hub ・USB extender Quit the USB cable extend, plug USB cable to PC directly. If you need to extend USB cable, use self-powered USB hub. Is a high-speed USB device Be sure to connect the StarBoard and connected to the USB host any high-speed USB devices to controller used to connect the separate USB host controllers. StarBoard? Be sure to use a USB hub in the case of PCs with only one USB host controller. 3-1 English StarBoard FX-79E1/89WE1 Appendix Input-Related Problems Problem What to check What to do The input position does not Has position alignment Perform proper position alignment. match. been performed properly? Other than the above Contact a support center. The position cannot aligned properly. be Have the StarBoard and Adjust the position of the StarBoard projector been placed in the and the projector. If undue correction proper orientation? is performed, it may not be possible to align the position properly. Is the PC screen being Make sure the PC screen projection is projected inside the contained within the StarBoard's input StarBoard's input area? area. (For details on the input area, see page 1-4 of this User's Guide.) StarBoard Software files Uninstall the StarBoard Software and may be broken or then re-install it. installation may not be (For details on installing StarBoard complete correctly. Software, see the StarBoard Software Installation Guide.) Other than the above Contact a support center. 3-2 English StarBoard FX-79E1/89WE1 Appendix 3.2 System Specifications Item Model name Detection method LED pitch Sampling rate Interface Specification StarBoard FX-79E1 StarBoard FX-89WE1 Infra-red interception system*1 6mm Approx. 66 points/second USB 1.1 (cable length:5m) (Aspect ratio 16:10) Effective screen Approx.79inches (Aspect ratio 4:3) 、 Approx.89inches size (mm) 1,633(W)×1,225H) 1,960(W)×1,225H) Board 1,852(W)×1,282(H)×35(D) 2,179(W)×1,282(H)×35(D) dimensions (mm) Overall 1,852(W)×1,695∼2,045(H)×620(D) 2,179(W)×1,695∼2,045(H)×620(D) dimensions (including stand) (mm) Power 5V 500mA consumption Weight of main Approx. 21kg /39kg Approx. 24kg /42kg unit/ weight including stand Operating +5C – 35C (Humidity: 20 – 80% RH, without condensation) requirements Storage -10C – +45C (Humidity: 20 – 80% RH, without condensation) requirements Standards, etc. FCC Class B, CE, VCCI class A 、 *1 This product uses infra-red light to detect the coordinate position of the stylus pen or finger. Do not operate near lighting that will obstruct the capture of the image. This includes: ・ Locations where direct sunlight strikes the board surface or comes from the side. ・ Locations with white incandescent lighting or strong infrared source directly overhead. 3-3 English StarBoard FX-79E1/89WE1 Appendix 3.3 Proper Care and Cleaning Clean the StarBoard periodically so that you may use it for a long time to come. (1) Cleaning the StarBoard ・ To clean the StarBoard, use a soft cloth dampened with whiteboard cleaner or a diluted neutral cleansing agent that does not contain a polishing compound. ・ Never use a solvent such as thinner. ・ Note that rubbing or striking the StarBoard surface with a finger nail or other hard object may result in scratching. (2) Cleaning the LED cover Dirt on the LED cover affects the operations performed using the stylus pen or finger. Clean the reflective tape periodically or whenever it becomes dirty or soiled. ・ To clean the reflective tape, apply a minimal amount of diluted neutral cleansing agent that does not contain a polishing compound to a soft cloth and wipe. ・Never use a solvent such as thinner. ・Use a soft cloth to prevent scratching of the LED cover surface 3-4 English StarBoard FX-79E1/89WE1 Appendix 3.4 Product Warranty Policy 1. During the free warranty service period, if a malfunction occurs during normal use, the malfunction will be corrected without charge, according to the provisions of the warranty. Furthermore, if the customer registration card accompanying the warranty is not returned to our company, the customer information will not be registered; so free repairs might be unavailable. After receiving this product, please immediately fill out and return this customer registration card. 2. The warranty coverage is listed in the following table: Product Name StarBoard Part Name Warranty Coverage Digitiser (Light transmitting board, light receiving board) + Function Area Sticker – – – Wall-Mounting Bracket Stand (Explanatory note): + → Covered by warranty (excluding wear or physical damage) – → Not covered by warranty 3. Please refer to the warranty sheet for this product’s warranty service period. 4. Even during the warranty period, there will be a repair charge in the following cases: (1) If the registration card accompanying the warranty is not returned to our company. (2) If the warranty is not presented. (3) If specified fields on the registration card accompanying the warranty are not completed, or if the wording has been changed without authorisation. (4) The warranty applies only to the original purchasers. (It does not apply to a third party to whom the customer resold this product.) (5) In the event of a malfunction or damage resulting from the customer’s improper handling (e.g., a fall, impact, etc., caused by the customer during transportation or movement). (6) In the event of problems resulting from handling contrary to the handling and precautions mentioned in this user’s guide. (7) In the event of failure or damage resulting from abnormal voltages, pollution or other natural disasters (e.g., fire, earthquake, and lightning). (8) In the event of a malfunction in this product caused by the connection to this product of equipment other than the equipment specified by our company. (9) In the event that there is no abnormality in this product, but a defect in a part other than this product was detected or remedied. (10) In the event of ordinary wear and tear, wear, deterioration, etc., of consumables, even during normal use. 3-5 English StarBoard FX-79E1/89WE1 Appendix 5. If this product malfunctions, review the contents of this user’s guide. If the problems remain irreparable, contact the dealer. The dealer will determine whether or not the product must be repaired, so please contact them. If the customer sends the product to our company without RMA (Return Merchandise Authorisation) number, it might not be covered by warranty. 6. As a rule, the customer is responsible for shipping charges required to send all or part of the product for repair, etc. Our company will assume responsibility for the return shipping to the customer. 7. This warranty does not cover labour fees for repair-associated equipment assembly or disassembly. 8. Incidental damage caused by the failure of this product (e.g., loss of profit that should have resulted from the use of this product) is outside the scope of this warranty. 9. The aforementioned provisions define this warranty, and they supersede those of all express or implied warranties that include legal defect liability. 10. No warranty if customer fixed the product in a method other than our company specified. Our company has no responsibility for compensation of board falling accident. 11. This warranty is limited to use of this product within the country where the user bought this product. 3-6 English