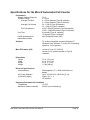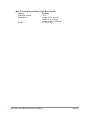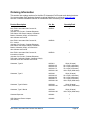
1
The information in this document is subject to change without notice and should not be construed as a
commitment by ORFLO Technologies, a DBA of E.I. Spectra, LLC. Neither Orflo Technologies nor any of
its affiliated corporations assumes responsibility for any errors that may appear in this document. This
manual is believed to be complete and accurate at the time of publication. In no event shall Orflo
Technologies or any of its affiliated corporations be liable for incidental or consequential damages in
connection with or arising from the use of this manual.
© 2012 ORFLO Technologies, a DBA of E.I. Spectra, LLC. All rights reserved.
Rev. 5.0.1, 03/2012
The ORFLO symbol and Moxi are trademarks of E.I Spectra, LLC, registered in the U.S. and other countries.
Windows, Windows XP, Windows Vista, and Windows 7 are trademarks of Microsoft Corporation, registered in the
U.S. and other countries.
Mac and Mac OS are trademarks of Apple Corporation, registered in the U.S. and other countries.
Bluetooth and the Bluetooth logos are registered trademarks of Bluetooth SIG, Inc., registered in the U.S. and other
countries.
Accutase is a registered trademark of Innovative Cell Technologies.
TÜV SÜD and the TÜV SÜD symbol are registered trademarks of TÜV SÜD Aktiengesellschaft.
Contents
Introduction ................................................................................................................................... 1 Symbols Used in This User Guide ................................................................................................ 1 Safety Precautions ........................................................................................................................ 2 Consignes de sécurité .................................................................................................................. 3 Moxi Z Mini Automated Cell Counter Kit ....................................................................................... 4 Moxi Z Mini Automated Cell Counter Accessories ........................................................................ 5 Installation ..................................................................................................................................... 6 General Guidelines ....................................................................................................................... 6 Materials Required ........................................................................................................................ 7 Using the Moxi Z Automated Cell Counter ................................................................................... 7 Settings ..................................................................................................................................... 7 Cell Counting ............................................................................................................................. 7 Managing the Data .................................................................................................................... 8 Retrieving and Deleting Data .................................................................................................. 11 Moxi Z Performance Test Using Calibration Check Beads ..................................................... 13 Moxi Z Performance Test Using Electronic Calibration Cassette ........................................... 14 Moxi Z Help ............................................................................................................................. 14 Installing MoxiChart Software on a PC ................................................................................... 15 Connecting to Moxi Z via Bluetooth with a PC ........................................................................ 15 Connecting to Moxi Z via USB (requires Moxi Z OS v4.0 or greater) ..................................... 17 Installing MoxiChart Software on a Mac .................................................................................. 18 Connecting to Moxi Z via Bluetooth with a Mac ...................................................................... 18 Instrument Firmware and Software Upgrades ........................................................................ 18 Updating Moxi Z Firmware via Bluetooth (Moxichart) ............................................................. 19 Updating Moxi Z Firmware via USB (requires Moxi Z OS v4.0 or greater) ............................. 20 Moxi Apps ............................................................................................................................... 21 Troubleshooting .......................................................................................................................... 22 Maintenance and Storage ........................................................................................................... 24 Specifications for the Moxi Z Automated Cell Counter ............................................................... 26 Ordering Information ................................................................................................................... 28 Technical Service ....................................................................................................................... 29 Warranty ..................................................................................................................................... 29 Introduction
The ORFLO Moxi Z Mini Automated Cell Counter performs cell count and size measurements
for particle sizes of 4 – 25 microns (Type M cassette) and 3 – 20 microns (Type S cassette). It
also provides an assessment of mammalian culture viability using a proprietary software
algorithm to report the standardized Moxi Population Index (MPI). It combines the gold standard
Coulter Principle with a patented thin-film sensor technology to deliver highly accurate and
repeatable results in just 8 seconds (Type M cassette) or 15 seconds (Type S cassette).
The instrument is ultra-small and runs on a rechargeable battery, making it ideal for use in a
hood. Cell concentration, average cell volume, average cell diameter, and the Moxi Population
Index (MPI) are displayed for each sample. Test results are also displayed in the form of a
histogram. The Moxi Z unit can store approximately 500 histograms, and if desired, the data
may be downloaded to a PC or Mac via a Bluetooth wireless connection or via USB connectivity
(v 4.0).
The system is intended for research use only and has been tested with cell types that are
representative of those commonly used.
The Moxi Z Mini Automated Cell Counting system is designed and manufactured by:
Orflo Technologies, a DBA of E.I. Spectra, LLC
130 Airport Circle
Hailey, ID 83333
www.orflo.com
Symbols Used in This User Guide
The following symbols are used throughout this user guide and/or on product labels. The user
is responsible for operating the product in accordance with the indicated requirements:
Symbol / Symbole
Definition / Définition
Warning alerts you to actions that may cause personal injury or pose a
physical threat.
La mise en garde vous alerte des actions qui risquent de causer des
blessures corporelles ou de constituer une menace physique.
Do not discard with common solid waste at end of life. Segregate with
other waste electrical and electronic equipment (WEEE) and send to an
appropriate facility for recycling.
Affixed in accordance with European Council Directives 2004/108/EC,
(electromagnetic compatibility) and 2006/95/EC (safety requirements)
Moxi Z Mini Automated Cell Counter User Manual
Page 1
Safety tested and certified by TÜV SÜD® Product Service Division.
Safety Precautions
Please review and understand the safety instructions below before operating the Moxi Z Cell
Counter.
WARNINGS:
•
•
•
•
•
•
To avoid danger of electric shock, do not install the instrument in an area with a high
humidity level, such as a greenhouse or an incubator. Refer to Operating Environmental
Conditions in Specifications section.
Do not touch the USB cable or USB charging adapter with wet hands.
To avoid a potential shock hazard, choose the correct plug configuration and make sure
that the USB cable and USB charging adapter are plugged securely into a properly
grounded AC power outlet. Make sure that the connection between the USB cable and
the instrument is secure.
Always ensure that the power supply input voltage matches the voltage available in your
location.
Do not use with flammable or explosive liquids.
Do not immerse instrument body in liquid, or allow liquid to enter any part of the
instrument.
CAUTION:
•
•
•
•
Do not expose instrument to vibrations. Vibrations may cause instrument malfunction or
damage.
Do not autoclave or expose to high temperature.
Use only authorized accessories (universal power adapters, USB cable).
If the instrument is dropped and broken, disconnect the USB cable and contact Orflo
Technologies. Do not attempt to disassemble the instrument.
Moxi Z Mini Automated Cell Counter User Manual
Page 2
Consignes de sécurité
Veuillez lire et vous assurer de comprendre les consignes de sécurité ci-dessous avant d’utiliser
le compteur Moxi Z Cell.
AVERTISSEMENTS :
•
•
•
•
•
•
Afin d’éviter tout danger de choc électrique, ne pas installer l’instrument dans un
endroit où le taux d’humidité est élevé, comme dans une serre ou un incubateur. Se
reporter à la section sur les spécifications en matière de conditions
environnementales d’exploitation.
Ne pas toucher au câble USB ou à l’adaptateur de charge USB les mains mouillées.
Afin d’éviter tout risque de choc électrique, choisir la configuration de prise
appropriée et s’assurer que le câble USB et l’adaptateur de charge USB sont bien
branchés dans une prise de courant CA mise à la terre. S’assurer que la connexion
entre le câble USB et l’instrument est bien établie.
Toujours s’assurer que la tension d’entrée du bloc d’alimentation correspond à la
tension disponible dans votre lieu.
Ne pas utiliser avec des liquides inflammables ou explosifs.
Ne pas immerger le corps de l’instrument dans du liquide ou permettre à du liquide
de pénétrer dans l’instrument.
ATTENTION :
•
•
•
Ne pas exposer l’instrument à des vibrations. Les vibrations peuvent causer le
dysfonctionnement de l’instrument ou des dommages à celui-ci.
Ne pas autoclaver ou exposer à des températures élevées.
Utiliser uniquement les accessoires autorisés (adaptateurs de courant universels,
câble USB).Si l’instrument est échappé et brisé, débrancher le câble USB et
communiquer avec Orflo Technologies. Ne pas tenter de désassembler l’instrument.
Moxi Z Mini Automated Cell Counter User Manual
Page 3
Moxi Z Mini Automated Cell Counter Kit
The Moxi Z Mini Automated Cell Counter kit includes the Moxi Z instrument, USB Cable, Power
Adapter (US and EU versions only), Cassette Dispenser, Calibration Check Beads, USB Flash
Drive with software/user guide and 25 Cassettes (2 tests per cassette).
Touch Screen Display
Cassette Tray
Power/Reset Button
USB Cable Port
Cassette
Test 2 Fill Port
Test 1 Fill Port
Cassette
Moxi Z Mini Automated Cell Counter User Manual
Page 4
Part
Function
Touch Screen Display
Allows user to interface with instrument. Displays all
information needed for operation. Displays test results and
histograms with curve fitting, gating, cell volume,
concentration, diameter, and Moxi Population Index (MPI).
Power/Reset Button
Turns Moxi Z on and off.
Resets the unit when pressed and held for >5 seconds.
Cassette Tray
Tray that needs to be pressed down for inserting cassette
USB Cable Port
Connects instrument to USB cable.
Cassette
Disposable used for loading samples. Each cassette
contains two ports thereby allowing for two samples to be
run per cassette.
Moxi Z Mini Automated Cell Counter Accessories
Cassette Dispenser
USB Cable & Power Adapter
Calibration Check Beads
USB Flash Drive with software
Electronic Calibration Cassette (sold separately)
Moxi Z Mini Automated Cell Counter User Manual
Page 5
Part
Function
Cassette Dispenser
Stores up to 25 cassettes for convenient
dispensing
USB Cable
Connects instrument to PC/Mac or power adapter
Power Adapter
(US and EU models only)
Connects USB cable to an AC outlet
USB Flash Drive
Stores Moxi Z software and user manual
Calibration Check Beads
Polystyrene beads for confirming proper system
operation and calibration
Electronic Calibration Cassette
(sold separately)
Electronic cassette for verifying proper system
operation and calibration
Installation
The Moxi Z is shipped in a condition ready for initial use with the battery partially charged. If
necessary, the battery can be charged by inserting the USB cable into the USB Cable Port and
connecting the cable to a computer or power adapter. If using a power adapter, insert the plug
into an AC outlet (110/220 V). The battery will be fully charged in approximately four hours.
Note: For optimal cell counting results, perform cell counts with the USB cable disconnected.
Although the unit may be operated using AC power, this mode may cause undesirable electrical
noise which could result in less accurate small particle counting results and may affect the MPI.
When not in use, the Moxi Z should be connected to a charging source so that the battery will
maintain a continuous charge and be ready for immediate use. If a low battery warning appears
on the display, stop using the instrument and charge the battery or operate the Moxi Z using an
AC power source.
General Guidelines
The Moxi Z Mini Automated Cell Counter is used with Moxi Z Cassettes. Refer to the
Specifications section for information on the operating ranges for the system.
The sample volume for a test should be 75 µL.
If necessary, prepare dilutions of the sample using ORFLO Diluent (Cat. No. MXA006) or a
diluent compatible with the characteristics of the cells. The diluent used should not cause
changes in the cell size and should have sufficient conductivity to enable operation of the
instrument. Water, hypotonic, or hypertonic solutions are not acceptable diluents.
Moxi Z Mini Automated Cell Counter User Manual
Page 6
Notes: Detergents may interfere with cell counting.
Additives such as DMSO or serum, will alter solution conductivity and will result in
corresponding changes of measured particle size.
Unfiltered media can contribute real particle counts that, depending on size, can overlap
and alter cell counts.
Materials Required
Cell sample (diluted and dissociated, if necessary); 75 µL minimum.
Pipette and appropriately sized pipette tips
Using the Moxi Z Automated Cell Counter
Settings
Set the date and time by pressing the Settings icon on the main menu of the Moxi Z. Then use
the arrow keys and follow the instructions displayed on the screen.
Cell Counting
1. If necessary, dilute a cell suspension with
ORFLO Diluent or an appropriate diluent so that
the cell concentration is within the operating
range of the cassette being used (Type M:
3,000 to 500,000 cells/mL, Type S: 3,000 to
2,500,000 cells/ml).
For Type M cassettes, a dilution of 1:5 to 1:20
is recommended for most mammalian cell lines,
but the appropriate dilution will depend on cell type and seeding density. Type S
cassettes will typically require no to 1:2 dilution depending on cell type and seeding
density. The volume required for an accurate count is approximately 75 µL.
2. Turn the Cell Counter on by pressing the power button and the Home screen will be
displayed.
3. Press the tray down and insert a Cassette into the Moxi Z. The
Pipette 75µL Sample… screen will be displayed.
Moxi Z Mini Automated Cell Counter User Manual
Page 7
4. Pipette a 75 µL sample into the fill port of the cassette (either test 1
or test 2, depending on which end of the cassette was inserted into
the instrument).
5. For counting most mammalian cells, touch the screen anywhere
to start. For counting very small particles (< 8 µm in diameter),
the Moxi Z can be run in Small Particle Mode (SPM). In this
mode, Moxi Z sets the diameter scale to 2 to 10 µm as the
default and performs the count using optimized parameters for
the detection of small cells. Press the Small Particle Mode < 8
µm button to initiate the test and run in this mode.
6. The Moxi Z will begin the test and the histogram count results will be
complete in approximately 8 seconds (Type M cassette) or 15
seconds (Type S cassette). The Curve Fitting and MPI calculations
begin automatically and require only a few additional seconds. The
results will then automatically be displayed on the screen. To make
Gating the default acquisition mode, press the Curve Fit Count
button to toggle into Gating mode.
Managing the Data
Background
We have found, based on a considerable amount of particle counting research, that using a
curve-fitting approach to determine cell counts provides better count results than does a
simple gating method. Using a simple gating mode will often result in counts that deviate
from “true” counts, particularly at higher concentrations. This is due to the occurrence of
“coincidence” events or the simultaneous arrival of two or more particles/cells in the sensing
chamber. A coincidence event, despite the presence of multiple particles/cells, is electrically
registered as a single spike or count event. Moxi Z has a proprietary software algorithm
based on curve-fitting that adjusts for these coincidence events to determine the “true” count
in the sample. Data has shown that the Moxi Z coincidence correction algorithm generates
Moxi Z Mini Automated Cell Counter User Manual
Page 8
counts that closely correlate to that of the Coulter Z2 which has been widely-regarded as the
gold standard in counting technologies. Moxi Z gating-mode does implement elements of
the Moxi Z coincidence correction algorithm, but without the full curve-fitting technique, it
does not achieve quite the same level of accuracy. As a result, Orflo recommends the use
of the curve-fitting count mode over gating mode whenever possible in order to generate the
“true” cell count.
1. Except when running in Small Particle Mode, the results of a test are initially displayed
on a diameter scale of 4-34 µm (Type M cassette) or 3-26 µm (Type S cassette). To
Change the x-axis resolution, touch the scaling button (red arrow below). The text below
the button indicates the next scale range. Successively pressing the scaling icon will
cycle the diameter scale through the following ranges:
a. 4-34, 4-26, 4-20, and 4-10 µm for Type M cassettes
b. 3-26, 3-18, and 3-10 for Type S
cassettes
Note: This feature is only available immediately
following a cell count. Touching the Done icon
will save the current histogram with the current
scale settings.
2. The histogram can also be gated manually by touching the Gating icon. Gating markers
can then be positioned as desired by touching and dragging each blue gating marker
independently or by tapping the blue gating markers and using the arrows to adjust the
gating ranges. Switching between left and right gates can be accomplished by touching
the middle black box (with text “Right (or left) gate location”) between the gating arrows.
Only the cells between the markers are counted. Auto Gating to a particular peak can
be accomplished by toughing the display in the proximity of the desired histogram peak.
Touching the CurveFit icon will return the display to curve fit mode.
Moxi Z Mini Automated Cell Counter User Manual
Page 9
3. Use the arrows to the right of the histogram to
change the vertical scale of the histogram. The
vertical scale can also be changed by vertically
swiping a finger on the display up (to increase)
or down (to decrease).
4. Tap the “Average Size” black box to toggle
between diameter (µm) and volume (fL) scales.
5. Press the Delete icon at any time to permanently delete the results of the test.
6. Press the Done icon to save the results and return to the Home screen.
Note: If the total particle count of the test exceeds
the concentration range of the cassette being used
(Type M: 500,000 cells/ml, Type S: 2,500,000
cells/ml) then a warning will be provided in the
form of yellow background and red “High
Concentration” text in the counts box (see arrows).
Moxi Z Mini Automated Cell Counter User Manual
Page 10
Retrieving and Deleting Data
1. To open a saved test, press the Histogram
icon on the Home screen.
2. Icons for up to nine saved histograms will be
displayed on the screen. Press the appropriate
icon for the test of interest or press the Page
Up or Page Down icon to view more test
results.
3. Each histogram will be opened in either the
Curve Fit Count mode or Gated Count mode,
depending on how it was saved. In Gated
Count mode, gating markers can be positioned
as desired by sliding each blue gating marker
independently. Auto Gate by touching on the
desired peak. Toggle between the Gated
Count and Curve Fit Count modes by
pressing the button indicated by the red arrow.
4. Use the arrows to the right of the histogram to
change the vertical scale of the histogram. The
vertical scale can also be changed by vertically
swiping a finger on the display up (to increase)
or down (to decrease).
Moxi Z Mini Automated Cell Counter User Manual
Page 11
5. Tap the “Average Size” black box to toggle
between diameter (µm) and volume (fL) scales.
6. Press the Delete icon to permanently delete the results of the test.
7. Press the Back icon to close the test results
and return to the Histogram viewer screen.
Press the Close icon to return to the Home
screen. (note: changes to histogram view will
not be saved)
Moxi Z Mini Automated Cell Counter User Manual
Page 12
Moxi Z Performance Test Using Calibration Check Beads
A 5 mL sample of Calibration Check Beads (Cat. No. MXA005) is included with each MOXI Z
Automated Cell Counter. The calibration check beads consist of polymer microspheres of a
known size in solution at a known concentration. The beads can be used to test the system as
well as for practice and troubleshooting.
For best results, invert the bottle containing the calibration check beads several times
immediately before use. Load a 75 µL sample using the standard procedure described in the
section entitled Cell Counting (page 7). The particle diameter and concentration results
recorded by the Moxi Z should be approximately equivalent to that specified on the label of the
calibration check bead bottle. If the results differ significantly, repeat the test. If repeated tests
continue to generate discrepant results, contact your distributor or ORFLO Technologies for
assistance. Alternatively, Moxi Z performance can be evaluated using the Electronic Calibration
Cassette (sold separately) which may be helpful in cases where you suspect the calibration
check beads have become contaminated. Use of the Electronic Calibration Cassette is
described in the next section (see page 14).
It is recommended that calibration tests are run at 25ºC. For long-term storage, the Calibration
Check Beads should be stored at 2-8ºC. Avoid freezing.
Moxi Z Mini Automated Cell Counter User Manual
Page 13
Moxi Z Performance Test Using Electronic Calibration Cassette
The Electronic Calibration Cassette (Cat. No. MXA004) is an optional
accessory that can be used to verify proper operation of the MOXI Z.
Simply insert the Electronic Calibration Cassette (ECC) into the MOXI Z
and the test will begin automatically. The ECC will generate data that
simulates various cell sizes and concentrations. Upon completion of the
test, a pass or fail result will be displayed as shown. If repeated tests
continue to generate a failed result, contact your distributor or ORFLO
Technologies for assistance.
Moxi Z Help
1. For help with operation of the Moxi Z, press the Help icon on the Home screen. Visual
instructions for inserting a cassette will be presented.
2. Press the Next icon to view the next visual instruction that demonstrates how to pipette
a sample into the cassette.
3. Press the Next icon to proceed to the next instruction screen or press the Previous icon
to return to the previous screen.
4. Press the Done icon to exit the help screens and return to the Home screen.
For additional help, see the Troubleshooting table (page 20).
Moxi Z Mini Automated Cell Counter User Manual
Page 14
Installing MoxiChart Software on a PC
1. Insert Moxi Z flash drive into a USB port on your
computer.
2. If prompted to run MoxiChart Install, click
YES and follow the on screen instructions.
Otherwise, open ORFLO DISK folder and
double click on the file
MoxiChart_Win_Install.exe.
Complete the setup by following the
instructions of the MoxiChart Setup
Wizard.
Connecting to Moxi Z via Bluetooth with a PC
1. Press the Bluetooth icon to display the unit’s Bluetooth I.D.
Moxi Z Mini Automated Cell Counter User Manual
Page 15
2. Run MoxiChart application and click on
Bluetooth icon in upper right corner.
3. If the screen to the right is displayed,
simply choose the device that
corresponds to the Moxi Z.
4. If a Moxi Z unit is not detected (above screen is not displayed), your Bluetooth radio
most likely requires Bluetooth device pairing (Windows) and, on Windows XP systems, a
Bluetooth serial port connection to be established. As this process is specific to each
Bluetooth manufacturer, please follow their instructions to set this connection up. Once
established, MoxiChart will automatically connect to that device on clicking the Bluetooth
icon (no device selection required).
5. Select a folder to upload data files to.
Moxi Z Mini Automated Cell Counter User Manual
Page 16
Connecting to Moxi Z via USB (requires Moxi Z OS v4.0 or greater)
1. Unplug the USB cable from the Moxi Z power adaptor.
2. Plug the wide end of the cable into your computer’s USB port.
3. Plug the small end of the cable into the back of the Moxi Z
4. Make sure the Moxi Z is powered on and wait for the Moxi Z to
appear as a disk (or flash) drive in your computer’s file system
(Windows Explorer for PC’s or Finder for Mac). Note: Upon powerup, the Moxi Z will display a notification on the home screen that it is
“Exporting files to disk” (see image). The Moxi Z disk will be
mounted to (appear as a drive on) the computer following completion
of this file export process.
5. Open the Moxi Z drive folder and copy the files to your computer (drag and drop or copy
and paste)
Moxi Z Mini Automated Cell Counter User Manual
Page 17
Installing MoxiChart Software on a Mac
1. Insert Moxi Z flash drive into a USB port on your
computer.
2. Open the folder for the USB drive.
3. Double click on the on the file MoxiChartInstaller.dmg
4. Drag and drop MoxiChart into your applications
folder.
5. From the applications folder, select MoxiChart to launch the application.
Connecting to Moxi Z via Bluetooth with a Mac
The procedure for connecting Moxi Z via Bluetooth with a Mac is the same as that for a PC.
See the section entitled “Connecting to Moxi Z via Bluetooth with a PC” on pages 15-16.
Instrument Firmware and Software Upgrades
This User Manual describes OS version 4.0 of the Moxi Z Automated Cell Counter firmware.
The Moxi Z firmware and software may be updated periodically. For information on the most
up-to-date firmware and software, contact ORFLO Technologies at www.orflo.com. Register
your instrument in order to receive notification about relevant firmware and software upgrades.
Moxi Z Mini Automated Cell Counter User Manual
Page 18
Updating Moxi Z Firmware via Bluetooth (Moxichart)
The Moxi Z firmware can be updated through a Bluetooth connection. The user first needs to
put the Moxi Z into a firmware update mode. This can be done in either of the following two
ways:
With the unit powered off, quickly press the
power/reset button four times. When successful, the
white Moxi Z screen will display with text under the
Moxi Z logo that indicates the system is in firmware
update mode. If unsuccessful, turn the power off and
retry.
OR:
Alternatively in v4.0 (or greater), the firmware update
mode can be entered from the Applications screen.
From the home screen touch the Apps icon and then
touch the Loader icon. If successful a white, “System
is loading…” screen and the system is ready for
updating.
From here, open MoxiChart and select Update Firmware from the Tools menu. Follow the
instructions in the installation wizard to complete the firmware update.
Moxi Z Mini Automated Cell Counter User Manual
Page 19
Updating Moxi Z Firmware via USB (requires Moxi Z OS v4.0 or greater)
The Moxi Z firmware can be updated through a USB connection. For this method of update, the
user must connect the Moxi Z to the computer’s USB port via the provided cable. (Note: The
cable is part of the AC power adaptor). Unplug the power adapter to expose the USB connector
for the computer. Next, the user needs to put the Moxi Z into a firmware update mode. This
can be done in either of the following two ways:
With the unit powered off, quickly press the power/reset
button four times. When successful, the white Moxi Z
screen will display with text under the Moxi Z logo that
indicates the system is in firmware update mode. If
unsuccessful, turn the power off and retry.
OR:
Alternatively in v4.0 (or greater), the firmware update
mode can be entered from the Applications screen.
From the home screen touch the Apps icon and then
touch the Loader icon. If successful a white, “System
is loading…” screen and the system is ready for
updating.
From here, open MoxiChart and select Update Firmware from the Tools menu. Follow the
instructions in the installation wizard to complete the firmware update.
Moxi Z Mini Automated Cell Counter User Manual
Page 20
Moxi Apps
Moxi Z applications can be entered from touching the
Apps icon on the home screen. Included applications
in verson 4.0 are:
•
Clock
•
Programmable timer (with sound notification)
•
Restore – restores unit to factory settings
•
Loader – Puts unit is Firmware/OS loader mode
•
Off – powers the unit off.
Moxi Z Mini Automated Cell Counter User Manual
Page 21
Troubleshooting
Symptom
Cause
Corrective Action
Questionable
concentration
Concentration of cell
sample is too high or too
low
Make sure concentration of cell sample is within
recommended guidelines. Refer to General
Guidelines section.
Wrong diluent
Use a diluent that is compatible with cells being
counted. ORFLO Diluent (Cat No. MXA006) or
equivalent.
Cell clumping
Ensure the cells are in a single-cell suspension. Break
clumps by pipetting up and down with a standard
pipette. ORFLO recommends Accutase or equivalent.
Wrong diluent
Use a diluent that is compatible with cells being
counted. ORFLO Diluent (Cat No. MXA006) or
equivalent.
Questionable cell diameter
Cell clumping
Peak of interest indistinct
Cell concentration too low
Ensure the cells are in a single-cell suspension. Break
clumps by pipetting up and down with a standard
pipette. ORFLO recommends Accutase or equivalent.
Try running the cell sample at a higher concentration.
Refer to Managing the Data section for instructions on
adjusting the Y-axis.
Cells not viable
Instrument stops responding
Internal firmware issue
due to instrument
malfunction or high level
of external interference
Reset instrument by pressing and holding the power
button for at least 5 seconds. If problem persists,
return instrument for service.
Battery will not fully charge
Battery is faulty or has
surpassed its service life
Return instrument for battery replacement
Insufficient fluid (<75 µL)
Adjust pipette to ensure sufficient volume for the test.
For improperly calibrated pipettes, this might require a
setting > 75 µL
Cells too large
Make certain that the cell type is within the specified
size range of the cassettes being used
Highly/strongly
aggregated cells clogging
filter and blocking flow
Try breaking apart cells using pipette trituration and/or
protease treatment.
Incomplete Test
Moxi Z Mini Automated Cell Counter User Manual
Page 22
Error/Warning
Messages
---------------------------------Messages d’erreur/de
mise en garde
Cause
-----------------------Cause
Corrective Action
----------------------------------------------------Mesure corrective
Lost start
Sample volume too
small or air bubble in
test cassette
Make sure sample volume is 75 µL.
Lost sensor - detect
Sensor not properly
inserted into cell
counter
Do not remove cassette from Cell Counter before
completion of counting cycle. Ensure cassette is
properly inserted.
Warning High Concentration
---------------------------------------Mise en garde - concentration
élevée
Concentration of cell
sample is too high
-----------------------------La concentration de
l’échantillon de cellules
est trop élevée
Make sure concentration of cell sample is within
recommended guidelines. Refer to General
Guidelines section.
-------------------------------------------------------------------S’assurer que la concentration de l’échantillon de
cellules se situe dans la fourchette recommandée. Se
reporter à la section « Recommandations
générales ».
Start open
Stop open
Start/stop short
Electrode short
Issue detected upon
test cassette insertion
Reinsert sensor. If problem persists, return
instrument for service.
Used cassette
Previously used sensor
detected
Do not reuse sensors.
Low battery
Battery needs to be
recharged
Recharge instrument for a minimum of 4 hours or use
instrument with AC power.
Disk full
Instrument has
exceeded maximum
storage capacity of
~500 histograms
Delete histograms or download to computer.
Disk now full
After histogram is
recorded and saved,
there is no more space
on the disk drive
Delete files.
Unhandled exception
Internal firmware issue
due to instrument
malfunction or high level
of external interference
Clear error by turning instrument off and then on
again. Remove cell counter from sources of external
interference. If problem persists, return instrument for
service.
SPI timeout
Instrument malfunction
If problem persists, return instrument for service.
Corrupt filesys
Instrument malfunction
If problem persists, return instrument for service.
Defaults loaded
Instrument has detected
corruption or new
version of firmware and
reset all settings to
factory defaults
If problem persists, return instrument for service.
Sensor malfunction
Use new sensor.
False start
False stop
Moxi Z Mini Automated Cell Counter User Manual
Page 23
Error/Warning
Messages
---------------------------------Messages d’erreur/de
mise en garde
Incorrect x-axis scale range
Cause
-----------------------Cause
Corrective Action
----------------------------------------------------Mesure corrective
Small Particle Mode
selected
User touched the black “Small Particle Mode <8 µm”
box to start the test. Re-run test touching the main
part of the start screen.
User rescaled test
Tests can only be rescaled immediately after the run.
If it is immediately after a run, the user can cycle
through the scale ranges by pressing the scale range
icon (see “Managing your data” section)
Type S cassette run on
Moxi Z Firmware 3.5 or
earlier
Upgrade Moxi Z system firmware to v3.6 or later
Maintenance and Storage
Storage
Store the Moxi Z Cell Counter and Moxi Z Test Cassettes at room temperature in a dry
environment.
Avoid exposure to ultraviolet light as it may discolor and/or damage the instrument.
Charging the Battery
The Moxi Z Automated Cell Counter contains a 3.7 V lithium ion battery which can be charged
for approximately 500 cycles. The battery may be charged at any time in the discharge cycle
and can be charged continuously without damage, using a PC/Mac or the power adapter. Refer
to the Installation section for information on how to charge the battery.
CAUTION:
To prevent battery damage, use ONLY the specified power adapter
(Cat. No. MXA002 or MXA003) or the USB port of a computer.
MISE EN GARDE :
Pour éviter d’endommager la pile, utiliser UNIQUEMENT l’adaptateur
spécifié (Réf. no MXA002 ou MXA003) ou le port USB d’un ordinateur.
The battery life is about 2 to 5 years depending on use. Lithium ion batteries discharge even if
they are not in use. To prevent battery damage from self-discharge, charge the battery at least
once every two months.
Cleaning/Sanitizing
The Moxi Z Cell Counter is NOT autoclavable. Extreme heat will damage the battery, touch
screen display, and other electronic components.
Moxi Z Mini Automated Cell Counter User Manual
Page 24
The external surfaces of the Moxi Z Cell Counter body and touch screen display can be
sanitized by wiping with a soft, nonabrasive cloth moistened with 70% isopropyl alcohol (IPA) or
70% ethanol. Do not clean the instrument with any more aggressive solutions.
CAUTION:
When sanitizing, make certain that no liquid enters any internal cavities of the
instrument.
MISE EN GARDE :
Lors de la décontamination, s’assurer qu’aucun liquide ne pénètre dans
les cavités internes de l’instrument.
Maintenance
There is no routine maintenance required for the Moxi Z Automated Cell Counter. In addition,
there are no user serviceable parts. Instrument repairs must be carried out by authorized
personnel only.
Moxi Z Mini Automated Cell Counter User Manual
Page 25
Specifications for the Moxi Z Automated Cell Counter
Performance
Sample Volume Required
Dynamic Range
Average Cell Size
Average Cell Volume
Cell Concentration
Test Time
Health assessment for
mammalian cultures
75 µL
2 - 34 µm
4 - 25 µm diameter (Type M cassette)
3 - 20 µm diameter (Type S cassette)
34 - 8,180 fL(Type M cassette)
14 - 4,200 fL (Type S cassette)
3,000 - 500,000 cells/mL (Type M cassette)
3,000 - 2,500,000 cells/ml (Type S cassette)
8 seconds (Type M cassette)
15 seconds (Type S cassette)
Moxi Population Index (MPI)
Software
PC or Mac compatible; requires Windows XP,
Windows Vista, Windows 7, or Mac OS X operating
system (v 10.6 or greater)
Moxi Z Firmware (OS)
Version 4.0 (as of 3/15/2012)
Version 3.6 or greater required for Type S
cassettes
Dimensions
Length
Width
Height
Weight
Electrical Specifications
Internal Battery
AC Power Adapters
(US and EU types)
7.6 in. (19.3 cm)
4.3 in. (13.5 cm)
2.8 in. (7.1 cm)
1.5 lbs (680 g)
Rechargeable 3.7 V, 4400 mAh lithium ion
battery
Input: 100-240 VAC (50/60 Hz), 0.2 A
Output: 5 V, 1 A
CE certified
Operating Environmental Conditions
Temperature
15-30°C
Maximum Relative Humidity
20-80% (non-condensing)
Moxi Z Mini Automated Cell Counter User Manual
Page 26
Moxi Z Cassette Specifications (Type M and Type S)
Material
Polyester
Aspiration Volume
75 µL
Dimensions
Length: 3.3 in. (8.4 cm)
Width: 1.2 in. (3.0 cm)
Height: 0.035 in. (0.90 mm)
Weight
0.1 oz. (2.3 g)
Moxi Z Mini Automated Cell Counter User Manual
Page 27
Ordering Information
This section lists catalog numbers for the Moxi Z Automated Cell Counter and related products.
You can purchase Orflo products through a regional distributor or on-line at www.orflo.com.
See the Technical Assistance section for information about contacting Orflo.
Product Description
Cat. No.
Moxi Z Mini Automated Cell Counter Kit,
U.S. Version.
(includes Cell Counter, Cassette Dispenser,
USB Cable, USB Power Adapter, Calibration
Beads, Cassettes (25/pk), and flash drive
with software and manual.
MXZ001
1
Moxi Z Mini Automated Cell Counter Kit,
E.U. Version.
(includes Cell Counter, Cassette Dispenser,
USB Cable, USB Power Adapter, Calibration
Beads, Cassettes (25/pk), and flash drive
with software and manual.
MXZ002
1
Moxi Z Mini Automated Cell Counter Kit,
International Version.
(includes Cell Counter, Cassette Dispenser,
USB cable, Calibration Beads, Cassettes (25/pk),
and flash drive with software and manual.
MXZ003
1
Cassettes, Type M
MXC001
MXC001-25
MXC001-50
MXC001-75
MXC001-100
25/pk (50 tests)
25 x 25/pk (1250 tests)
50 x 25/pk (2500 tests)
75 x 25/pk (3750 tests)
100 x 25/pk (5000 tests)
Cassettes, Type S
MXC002
MXC002-25
MXC002-50
MXC002-75
MXC002-100
25/pk (50 tests)
25 x 25/pk (1250 tests)
50 x 25/pk (2500 tests)
75 x 25/pk (3750 tests)
100 x 25/pk (5000 tests)
Cassettes, Type M Sterile
MXC003
MXC003-100
25/pk (50 tests)
100 x 25/pk (5000 tests)
Cassettes, Type S Sterile
MXC004
MXC004-100
25/pk (50 tests)
100 x 25/pk (5000 tests)
Cassette Dispenser
MXA001
1
USB Cable and Power Adapter
(US version)
MXA002
1
Moxi Z Mini Automated Cell Counter User Manual
Quantity/Pack
Page 28
USB Cable and Power Adapter
(EU version)
MXA003
1
Electronic Calibration Cassette
MXA004
1
Calibration Check Bead Kit (5 mL)
MXA005
1
ORFLO Diluent (100 ml)
MXA006
1
USB Power Cable
MXA007
1
Technical Service
For technical service, contact ORFLO Technologies at 855-TRY-MOXI (855-879-6694) or email
us at [email protected].
Warranty
ORFLO Technologies (“Orflo”) warrants that its products will meet their applicable published
specifications when used in accordance with their applicable instructions for a period of one
year. ORFLO MAKES NO OTHER WARRANTY, EXPRESS OR IMPLIED. THERE IS NO
WARRANTY OR MERCHANTABILITY OR FITNESS FOR A PARTICULAR PURPOSE. The
warranty provided herein and the data, specifications, and descriptions of Orflo products
appearing in Orflo’s product literature may not be altered except by expressed written
agreement signed by an officer of Orflo. Representations, oral or written, which are inconsistent
with this warranty or such publications are not authorized and if given, should not be relied
upon.
In the event of a breach of the foregoing warranty, Orflo’s sole obligation shall be to repair or
replace, at its option, the applicable product or part thereof, provided the customer notifies Orflo
promptly of any such breach. If after exercising reasonable efforts, Orflo is unable to repair or
replace the product or part, then Orflo shall refund to the customer all monies paid for such
applicable product or part. ORFLO SHALL NOT BE LIABLE FOR CONSEQUENTIAL,
INCIDENTAL, SPECIAL, OR ANY OTHER DAMAGES RESULTING FROM ECONOMIC
LOSS OR PROPERTY DAMAGE SUSTAINED BY ANY CUSTOMER FROM THE USE OF ITS
PRODUCTS.
Moxi Z Mini Automated Cell Counter User Manual
Page 29
Moxi Z Mini Automated Cell Counter User Manual
Page 30